
一、权限管理简介
1、什么是权限管理
基本上涉及到用户参与的系统都要进行权限管理,权限管理属于系统安全的范畴,权限管理实现对用户访问系统的控制,按照安全规则或者安全策略控制用户可以访问而且只能访问自己被授权的资源。
权限管理包括用户身份认证鉴权(授权)两部分,简称认证授权。对于需要访问控制的资源用户首先经过身份认证,认证通过后用户具有该资源的访问权限方可访问
2、认证
身份认证,就是判断一个用户是否为合法用户的处理过程。最常用的简单身份认证方式是系统通过核对用户输入的用户名和口令,看其是否与系统中存储的该用户的用户名和口令一致,来判断用户身份是否正确。对于采用指纹等系统,则出示指纹;对于硬件Key等刷卡系统,则需要刷卡。
- Subject :主体访问系统的用户,主体可以是用户、程序等,进行认证的都称为主体;
- Principal :身份信息
是主体(subject)进行身份认证的标识,标识必须具有唯一性,如用户名、手机号、邮箱地址等,一个主体可以有多个身份,但是必须有一个主身份(Primary Principal)。
- credential :凭证信息
是只有主体自己知道的安全信息,如密码、证书等。
3、授权
授权,即访问控制,控制谁能访问哪些资源。主体进行身份认证后需要分配权限方可访问系统的资源,对于某些资源没有权限是无法访问的。
下图中橙色为授权流程。
授权可简单理解为who对what(which)进行How操作:
- Who,即主体(Subject),主体需要访问系统中的资源。
- What,即资源(Resource),如系统菜单、页面、按钮、类方法、系统商品信息等。资源包括资源类型和资源实例,比如商品信息为资源类型,类型为t01的商品为资源实例,编号为001的商品信息也属于资源实例。
- How,权限/许可(Permission),规定了主体对资源的操作许可,权限离开资源没有意义,如用户查询权限、用户添加权限、某个类方法的调用权限、编号为001用户的修改权限等,通过权限可知主体对哪些资源都有哪些操作许可。权限分为粗颗粒和细颗粒,粗颗粒权限是指对资源类型的权限,细颗粒权限是对资源实例的权限
二、权限管理解决方案
1、基于角色的访问控制
RBAC基于角色的访问控制(Role-Based Access Control)是以角色为中心进行访问控制,比如:主体的角色为总经理可以查询企业运营报表,查询员工工资信息等,访问控制流程如下:
if(主体.hasRole("总经理角色id")){
     查询工资
}
缺点:以角色进行访问控制粒度较粗,如果上图中查询工资所需要的角色变化为总经理和部门经理,此时就需要修改判断逻辑为“判断主体的角色是否是总经理或部门经理”,系统可扩展性差。
修改代码如下:
if(主体.hasRole(“总经理角色id”) || 主体.hasRole(“部门经理角色id”)){
查询工资
}
2、基于资源的访问控制
RBAC基于资源的访问控制(Resource-Based Access Control)是以资源为中心进行访问控制,比如:主体必须具有查询工资权限才可以查询员工工资信息等,访问控制流程如下:
上图中的判断逻辑代码可以理解为:
if(主体.hasPermission(“查询工资权限标识”)){
查询工资
}
优点:系统设计时定义好查询工资的权限标识,即使查询工资所需要的角色变化为总经理和部门经理也只需要将“查询工资信息权限”添加到“部门经理角色”的权限列表中,判断逻辑不用修改,系统可扩展性强。
三、Spring Security概述
1,Spring Security简介
Spring Security 是一个能够为基于 Spring 的企业应用系统提供声明式的安全访问控制解决方案的安全框架。它提供了一组可以在 Spring 应用上下文中配置的 Bean,充分利用了 Spring IoC(Inversion of Control 控制反转),DI(Dependency Injection 依赖注入)和 AOP(面向切面编程)功能,为应用系统提供声明式的安全访问控制功能,减少了为企业系统安全控制编写大量重复代码的工作。
Spring Security 拥有以下特性:
- 对身份验证和授权的全面且可扩展的支持
- 防御会话固定、点击劫持,跨站请求伪造等攻击
- 支持 Servlet API 集成
- 支持与 Spring Web MVC 集成-
2、Spring Security快速入门
2.1、引入依赖
<!--springboot整合security坐标--><dependency><groupId>org.springframework.boot</groupId><artifactId>spring-boot-starter-security</artifactId></dependency>
2.2、创建一个控制器
@RestControllerpublicclassHelloController{@GetMapping("hello")publicStringhello(){return"Hello Spring security";}}
2.3、启动项目
访问:http://localhost:8080/hello 结果打开的是一个登录页面,其实这时候我们的请求已经被保护起来了,要想访问,需要先登录。
Spring Security 默认提供了一个用户名为 user 的用户,其密码在控制台可以找到
四、Spring Security 认证配置
1、WebSecurityConfigurerAdapter
当然还可以通过配置类的方式进行配置,创建一个配置类去继承,实现自定义用户名密码登录
/**
 * Spring Security配置类
 * 在springboot2.7 后WebSecurityConfigurerAdapter弃用了,用2.5.4
 */@EnableWebSecuritypublicclassSecurityConfigextendsWebSecurityConfigurerAdapter{@Overrideprotectedvoidconfigure(AuthenticationManagerBuilder auth)throwsException{// 对密码进行加密。123 是密码明文,现在 Spring Security 强制性要求『不允许明文存储密码』。BCryptPasswordEncoder passwordEncoder =newBCryptPasswordEncoder();String password = passwordEncoder.encode("123");
        auth.inMemoryAuthentication().withUser("tom").password(password).roles("admin");}}
从 5.x 开始,强制性要求必须使用密码加密器(PasswordEncoder)对原始密码(注册密码)进行加密。因此,如果忘记指定 PasswordEncoder 会导致执行时会出现
There is no PasswordEncoder mapped for the id "null"
异常。
这是因为我们在对密码加密的时候使用到了 BCryptPasswordEncoder 对象,而 Spring Security 在对密码比对的过程中不会『自己创建』加密器,因此,需要我们在 Spring IoC 容器中配置、创建好加密器的单例对象,以供它直接使用。
所以,我们还需要在容器中配置、创建加密器的单例对象(上面那个 new 理论上可以改造成注入),修改Spring securitry配置类
/**
 * Spring Security配置类
 * 在springboot2.7后WebSecurityConfigurerAdapter弃用了,用2.5.4
 */@EnableWebSecuritypublicclassSecurityConfigextendsWebSecurityConfigurerAdapter{@Overrideprotectedvoidconfigure(AuthenticationManagerBuilder auth)throwsException{// 对密码进行加密。123 是密码明文,现在 Spring Security 强制性要求『不允许明文存储密码』。BCryptPasswordEncoder passwordEncoder =newBCryptPasswordEncoder();String password = passwordEncoder.encode("123");
        auth.inMemoryAuthentication().withUser("tom").password(password).roles("admin");}/**
     * 将PasswordEncoder注入到ioc容器
     * @return
     */@BeanpublicPasswordEncoderpasswordEncoder(){returnnewBCryptPasswordEncoder();}}
我们获取用户名和密码都是从数据库中获取,所以用以上方式不合理,引出auth.userDetailsService() ,使用UserDetailsService来实现从数据库中查用户名和密码
Spring Security 内置的 Password Encoder 有: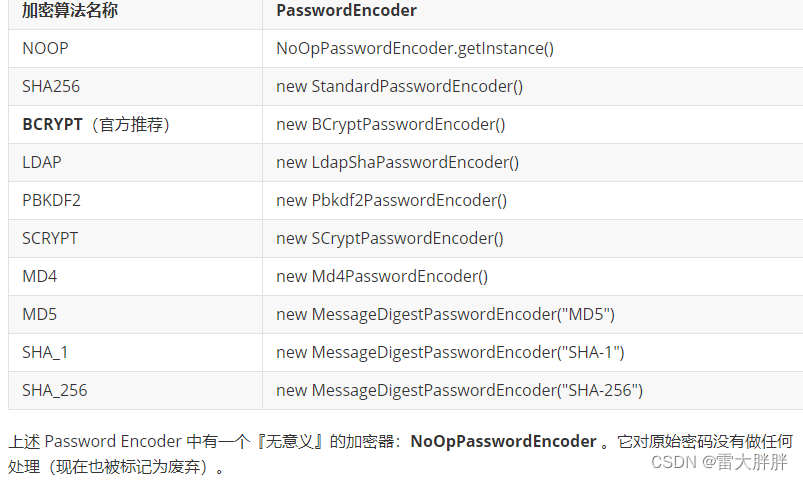
上述 Password Encoder 中有一个『无意义』的加密器:NoOpPasswordEncoder 。它对原始密码没有做任何处理(现在也被标记为废弃)。
记得使用 @SuppressWarnings(“deprecation”) 去掉 IDE 的警告信息。
1、基本概念
- AuthenticationManager它是 “表面上” 的做认证和鉴权比对工作的那个人,它是认证和鉴权比对工作的起点。ProvierderManager 是 AuthenticationManager 接口的具体实现。
- AuthenticationProvider它是 “实际上” 的做认证和鉴权比对工作的那个人。从命名上很容易看出,Provider 受 ProviderManager 的管理,ProviderManager 调用 Provider 进行认证和鉴权的比对工作。我们最常用到 DaoAuthenticationProvider 是 AuthenticationProvider 接口的具体实现。
- UserDetailsService虽然 AuthenticationProvider 负责进行用户名和密码的比对工作,但是它并不清楚用户名和密码的『标准答案』,而标准答案则是由 UserDetailsService 来提供。简单来说,UserDetailsService 负责提供标准答案 ,以供 AuthenticationProvider 使用。
- UserDetailsUserDetails 它是存放用户认证信息和权限信息的标准答案的 “容器” ,它也是 UserDetailService “应该” 返回的内容。
- PasswordEncoderSpring Security 要求密码不能是明文,必须经过加密器加密。这样,AuthenticationProvider 在做比对时,就必须知道『当初』密码时使用哪种加密器加密的。所以,AuthenticationProvider 除了要向 UserDetailsService 『要』用户名密码的标准答案之外,它还需要知道配套的加密算法(加密器)是什么### 2、用户名和密码从数据库取
Spring Security 要求 UserDetailsService 将用户信息的 “标准答案” 必须封装到一个 UserDetails 对象中,返回给 AuthenticationProvider 使用(做比对工作)。
我们可以直接使用 Spring Security 内置的 UserDetails 的实现类:User 。
- 在service包下创建一个UserDetailsService类
/**
 * spring security认证业务类
 */@ServicepublicclassMyUserDetailsServiceimplementsUserDetailsService{//为passwordEncoder注入值@AutowiredprivateUserDao userDao;@AutowiredprivatePasswordEncoder passwordEncoder;@OverridepublicUserDetailsloadUserByUsername(String username)throwsUsernameNotFoundException{//调用dao到数据库中根据username查找用户信息Users users = userDao.getByUserName(username);try{//将查找到的用户帐号与密码保存到Security的User对象中由Security进行比对returnnewUser(users.getUsername(), passwordEncoder.encode(users.getPassword()),AuthorityUtils.commaSeparatedStringToAuthorityList("ROLE_ADMIN"));//配置登录用户有哪些角色和权限,此处模拟直接写死}catch(Exception e){thrownewUsernameNotFoundException("用户"+username+"不存在");}}}
修改spring security配置类
/**
 * Spring Security配置类
 *
 *
 */@EnableWebSecuritypublicclassSecurityConfigextendsWebSecurityConfigurerAdapter{/**
     * 属性注入和构造注入区别
     * 1、属性注入时,Spring IOC容器“创建对象”和为对象属性赋值两件事情是分开做的。
     *    构造注入时,Spring IOC容器直接调用类的有参构造,这样“创建对象”和为对象
     *    属性赋值两件事情是一起做的
     * 2、属性注入没法表达对象创建的“先后/依赖关系”,但是构造注入可以
     *    属性注入天然能解决循环依赖问题,但是构造注入要使用@Lazy注解
     * 所以建议单例对象的必要属性用构造注入,可选属性使用属性注入
     */@ResourceprivateMyUserDetailsService userDetailsService;publicSecurityConfig(@LazyMyUserDetailsService myUserDetailsService){this.userDetailsService = myUserDetailsService;}/**
     * 将PasswordEncoder注入到ioc容器
     * @return
     */@BeanpublicPasswordEncoderpasswordEncoder(){returnnewBCryptPasswordEncoder();}@Overrideprotectedvoidconfigure(AuthenticationManagerBuilder auth)throwsException{
       auth.userDetailsService(userDetailsService).passwordEncoder(passwordEncoder());}}
ProviderManager/AuthenticationProvider 在做密码密码的比对工作时,会调用 UserDetailsService 的
.loadUserByUsername()
方法,并传入『用户名』,用以查询该用户的密码和权限信息。
3、Spring Security 自带的表单认证
3.1、SpringSecurityConfig 类中的配置代码
@Overrideprotectedvoidconfigure(HttpSecurity http)throwsException{
        http.formLogin();//1
        http.authorizeRequests().anyRequest().authenticated();// 2
        http.csrf().disable();// 3}

代码配置的链式调用连写:
    http.formLogin().and().authorizeRequests().anyRequest().authenticated().and().csrf().disable();
以上配置的意思是:
#说明1要求用户登陆时,是使用表单页面进行登陆。但是,由于我们有意/无意中没有指明登陆页面,因此,Spring Security 会使用它自己自带的一个登陆页面。2同上,让 Spring Security 拦截所有请求。要求所有请求都必须通过认证才能放行,否则要求用户登陆。3同上,暂且认为是固定写法。后续专项讲解。
|
3.2、使用自定义表单实现认证
- 准备自定义登录页面(可以是一个纯 html 页面)
<!DOCTYPEhtml><htmllang="en"xmlns:th="http://www.thymeleaf.org"><head><metacharset="UTF-8"><title>登录</title></head><body><formaction="dologin"method="post"><!--注意:帐号和密码的名称必须是username和password否则spring security无法识别--><p>帐号:<inputtype="text"name="username"></p><p>密码:<inputtype="text"name="password"></p><p><buttontype="submit">登录</button></p></form></body></html>
SpringSecurityConfig 类中的配置代码
@Overrideprotectedvoidconfigure(HttpSecurity http)throwsException{

        http.formLogin().loginPage("/login.html")//配置需要显示的登录页面.loginProcessingUrl("/dologin")//配置登录请求路径,很from表单的 action 要对应上.defaultSuccessUrl("/index")//默认登录成功后跳转地址.permitAll()//这句配置很重要,新手容易忘记。放开 login.html和dologin 的访问权.and().authorizeRequests().anyRequest().authenticated();// 除了antMatchers() 配的页面,其他都需要认证

        http.csrf().disable();}
五、鉴权配置
1、鉴权配置
当前用户是否有权限访问某个 URI 的相关配置也是写在
configure(HttpSecurity http)
方法中。
.antMatchers() 方法是一个采用 ANT 风格的 URL 匹配器。
权限表达式说明permitAll()永远返回 truedenyAll()永远返回 falseanonymous()当前用户是匿名用户(anonymous)时返回 truerememberMe()当前用户是 rememberMe 用户时返回 trueauthentication当前用户不是匿名用户时,返回 truefullyAuthenticated当前用户既不是匿名用户,也不是 rememberMe 用户时,返回 true**hasRole(“role”)当用户拥有指定身份时,返回 truehasAnyRole(“role1”, “role2”, …)当用户返回指定身份中的任意一个时,返回 truehasAuthority(“authority1”)当用于拥有指定权限时,返回 truehasAnyAuthority(“authority1”, “authority2”)**当用户拥有指定权限中的任意一个时,返回 truehasIpAddress(“xxx.xxx.x.xxx”)发送请求的 ip 符合指定时,返回 trueprincipal允许直接访问主体对象,表示当前用户
hasRole():数据库用户角色必须加 ROLE_ 前缀,而用hasRole() security会自动加上ROLE_ 前缀,自己不能加上ROLE_ 前缀,例如
AuthorityUtils.commaSeparatedStringToAuthorityList("ROLE_admin")
对上
hasRole("admin")
hasAuthority() 数据库角色名称和方法内容一致 例如:
AuthorityUtils.commaSeparatedStringToAuthorityList("admin")
对上
hasRole("admin")
语法:
  http.authorizeRequests().antMatchers("/user/insert").hasAuthority("user:insert").antMatchers("/user/modify").hasAuthority("user:modify").antMatchers("/user/delete").hasAuthority("user:delete").antMatchers("/user/query").hasAuthority("user:query").antMatchers("/user/**").hasAnyRole("USER","ADMIN").antMatchers("/user-can-do").hasRole("USER")//.antMatchers("/admin-can-do").hasRole("ADMIN")// 同上.antMatchers("/all-can-do").permitAll().anyRequest().authenticated();// 除了上面的权限以外的,都必须登录才能访问
提示:本质上
.hasRole("xxx")
和
.hasAuthority("xxx")
并没有太大区别,但是,
.hashRole()
在做比对时,会在里面内容前面拼上 ROLE_ 。所以,确保你的 Role 的『标准答案』是以 Role_ 开头
在使用hasRole() 和 hasAnyRole() 时候,设置角色时候要加ROLE_ 前缀
returnnewUser(users.getUsername(), passwordEncoder.encode(users.getPassword()),AuthorityUtils.commaSeparatedStringToAuthorityList("ROLE_admin"));
没有权限跳转到自定义页面
   http.exceptionHandling().accessDeniedPage("/error");//没有权限跳转到自定义页面
        http.formLogin().loginPage("/hello")//配置需要显示的登录页面.loginProcessingUrl("/dologin")//配置登录请求路径.defaultSuccessUrl("/index").permitAll()//这句配置很重要,新手容易忘记。放开 login.html和dologin 的访问权.and().authorizeRequests().antMatchers("/","/hello").permitAll()// 设置哪些路劲不需要登录,能直接当问.antMatchers("/toupdate").hasAuthority("asd").anyRequest().authenticated();// 除了antMatchers() 配的页面,其他都需要认证

        http.csrf().disable();
2、使用注解实
在实际的使用过程中用户的鉴权并不是通过置来写的而是通过注解来进行,Spring Security 默认是禁用注解的。
要想开启注解功能需要在配置类上加入 @EnableGlobalMethodSecurity注解来判断用户对某个控制层的方法是否具有访问权限。
注解就是用来替换springSecurity配置类中的http.authorizeRequests()配置
Spring Security 支持三套注解:
注解类型注解jsr250 注解@DenyAll、@PermitAll、@RolesAllowedsecured 注解@SecuredprePost 注解@PreAuthorize、@PostAuthorize
使用什么注解在@EnableGlobalMethodSecurity开启,默认是关闭的,例如
@EnableWebSecurity@EnableGlobalMethodSecurity(jsr250Enabled =true,securedEnabled=true)//开启jsr250和secured注解publicclassSecurityConfigextendsWebSecurityConfigurerAdapter{}
secured 注解
@Secured 注解是 jsr250 标准出现之前,Spring Security 框架自己定义的注解。
@Secured 标注于方法上,表示只有具有它所指定的角色的用户才可以调用该方法。如果当前用户不具备所要求的角色,那么,将会抛出 AccessDenied 异常,注解和配置类都要加上ROLE_ 前缀
@RestControllerpublicclassUserController{@Secured({"ROLE_USER","ROLE_ADMIN"})// 这里加前缀 ROLE_,@RequestMapping("/all-can-do")publicStringshow7(){return"all-can-do";}@Secured("ROLE_USER")@RequestMapping("/admin-can-do")publicStringshow6(){return"admin-can-do";}}
配置类
returnnewUser(users.getUsername(), passwordEncoder.encode(users.getPassword()),AuthorityUtils.commaSeparatedStringToAuthorityList("ROLE_USER"));//配置登录用户有哪些角色和权限
- JSR-250 注解@DenyAll: 所有用户都不可以访问@PermitAll:所有用户都可以访问
@RolesAllowed:用法同@Secured差不多,区别是注解上ROLE_ 可加可不加,但是配置类上必须加ROLE_ 前缀
- prePost 注解@PreAuthorize可以用来控制一个方法是否能够被调用。
@PreAuthorize(“hasRole(‘ROLE_ADMIN’)”)publicvoid addUser(User user){System.out.println(“addUser…” + user);}@PreAuthorize(“hasRole(‘ROLE_USER’) or hasRole(‘ROLE_ADMIN’)”)publicUserfind(int id){System.out.println(“find user by id…” + id);returnnull;}- JSR-250 注解@DenyAll: 所有用户都不可以访问@PermitAll:所有用户都可以访问
@RolesAllowed:用法同@Secured差不多,区别是注解上ROLE_ 可加可不加,但是配置类上必须加ROLE_ 前缀
- prePost 注解@PreAuthorize可以用来控制一个方法是否能够被调用。
@PreAuthorize(“hasRole(‘ROLE_ADMIN’)”)
publicvoid addUser(User user){System.out.println(“addUser…” + user);}@PreAuthorize(“hasRole(‘ROLE_USER’) or hasRole(‘ROLE_ADMIN’)”)publicUserfind(int id){System.out.println(“find user by id…” + id);
returnnull;}
@PostAuthorize在方法调用完之后进行权限检查。
@PostAuthorize(“returnObject.id%2==0”)publicUserfind(int id){User user =newUser();
    user.setId(id);return user;}
如果返回值的id是偶数则表示校验通过,否则表示校验失败,将抛出AccessDeniedException
实际开发中最常用的写法 使用 @PreAuthorize(“hasRole(‘admin’)”)
@RequestMapping("insert")@PreAuthorize("hasAnyAuthority('admin')")publicStringinsert(){return"insert";}
3、 登录返回处理
在某些前后端完全分离,仅靠 JSON 完成所有交互的系统中,一般会在登陆成功时返回一段 JSON 数据,告知前端,登陆成功与否。在这里,可以通过 .successHandler 方法和 .failureHandler 方法指定『认证通过』之后和『认证未通过』之后的处理逻辑。
- 创建SimpleAuthenticationSuccessHandler和SimpleAuthenticationFailureHandler类来处理登录成功和失败的业务
/**
 * 认证成功的处理器类
 */@ComponentpublicclassSimpleAuthenticationSuccessHandlerimplementsAuthenticationSuccessHandler{@OverridepublicvoidonAuthenticationSuccess(HttpServletRequest httpServletRequest,HttpServletResponse httpServletResponse,Authentication authentication)throwsIOException,ServletException{// authentication 对象携带了当前登陆用户名等相关信息//User user = (User) authentication.getPrincipal();
        httpServletResponse.setContentType("application/json;charset=UTF-8");ResponseResult<Void> ok =newResponseResult<>(200,"登录成功");//使用jacksong将对象序列化为josn字符串ObjectMapper mapper=newObjectMapper();String json=mapper.writeValueAsString(ok);//输出json字符串到客户端PrintWriter printWriter = httpServletResponse.getWriter();
        printWriter.print(json);
        printWriter.flush();
        printWriter.close();}}/**
 * 登录失败处理器
 */publicclassSimpleAuthenticationFailureHandlerimplementsAuthenticationFailureHandler{@OverridepublicvoidonAuthenticationFailure(HttpServletRequest request,HttpServletResponse response,AuthenticationException exception)throwsIOException,ServletException{//响应请求转码
        response.setContentType("application/json;charset=UTF-8");System.out.println(exception);//exception就是登录失败时的异常对象ResponseResult<Void> responseResult=null;if(exception instanceofInternalAuthenticationServiceException){
            responseResult=newResponseResult<>(2001,"用户名错误!");}if(exception instanceofBadCredentialsException){
            responseResult=newResponseResult<>(2002,"密码错误!");}//使用jacksong将对象序列化为josn字符串ObjectMapper mapper=newObjectMapper();String json=mapper.writeValueAsString(responseResult);//输出json字符串到客户端PrintWriter printWriter =response.getWriter();
        printWriter.print(json);
        printWriter.flush();
        printWriter.close();}}
修改spring security配置类
@ResourceprivateSimpleAuthenticationSuccessHandler simpleAuthenticationSuccessHandler;@Overrideprotectedvoidconfigure(HttpSecurity http)throwsException{/**
         * 资源权限相关配置
         * 配置哪些路径需要什么权限才能访问
         */
        http.authorizeRequests().antMatchers("/user/insert").hasAuthority("user:insert").antMatchers("/user/modify").hasAuthority("user:modify").antMatchers("/user/delete").hasAuthority("user:delete").antMatchers("/user/query").hasAuthority("user:query").antMatchers("/user/**").hasAnyRole("USER","ADMIN").antMatchers("/user-can-do").hasRole("USER")// 这里本质上应该是 ROLE_USER,但是 ROLE_ 要移除。不过你所提供的标准答案中,又必须要有 ROLE_ !.antMatchers("/admin-can-do").hasRole("ADMIN")// 同上.antMatchers("/all-can-do").permitAll().anyRequest().authenticated();// 除了上面的权限以外的,都必须登录才能访问//登录相关配置
        http.formLogin().loginPage("/login.html")//配置需要显示的登录页面.loginProcessingUrl("/dologin")//告诉spring security登录页面发送这个请求时spring secruity就做登录认证.successHandler(newsimpleAuthenticationSuccessHandle())//配置登录成功后的处理器.failureHandler(newSimpleAuthenticationFailureHandler())//配置登录失败后的处理器.permitAll();//这句配置很重要,新手容易忘记。放开 login.html和dologin 的访问权

        http.csrf().disable();}
版权归原作者 雷大胖胖 所有, 如有侵权,请联系我们删除。