
Python Request get post 代理 常用示例
文章目录
以下是本篇文章正文内容,下面案例可供参考
一、Pip install requests
pip install requests -i https://pypi.tuna.tsinghua.edu.cn/simple
二、Requests 请求时携带的常用参数
1、参数说明
参数说明url需要请求的目标网站链接headers字典,HTTP定制头,最基本的身份伪装正常情况都会用params字典或字节序列,作为参数增加到url中data字典,字节序列或文件对象,作为request的内容jsonJSON格式的数据,作为request的内容cookies字典或CookieJar, request中的cookie,常被网站用于身份校验auth元组,支持HTTp认证功能files字典类型,传输文件timeoutint类型 设定超时时间,秒为单位proxies字典类型,设定访问代理服务器,可以增加登录认证allow_redirects重定向开关,默认为Truestream获取内容立即下载开关,默认为Trueverify认证SSL证书开关,默认为True,使用代理时设置为Flase
2、headers
    def get_headers():
        user_gent =[
            'Mozilla/5.0(Windows NT 10.0; Win64; x64) AppleWebKit/537.36(KHTML, like Gecko) Chrome/105.0.0.0 Safari/'
            '537.36',"MQQBrowser/25 (Linux; U; 2.3.3; zh-cn; HTC Desire S Build/GRI40;480*800)","Mozilla/5.0 (Windows NT 5.2) AppleWebKit/534.30 (KHTML, like Gecko) Chrome/12.0.742.122 Safari/534.30","Mozilla/5.0 (Windows NT 6.1) AppleWebKit/535.1 (KHTML, like Gecko) Chrome/14.0.835.202 Safari/535.1","Mozilla/5.0 (compatible; MSIE 9.0; Windows Phone OS 7.5; Trident/5.0; IEMobile/9.0; SAMSUNG; OMNIA7)","Mozilla/5.0 (compatible; MSIE 9.0; Windows NT 6.1; Trident/5.0; XBLWP7; ZuneWP7)","Mozilla/5.0 (Windows NT 5.2) AppleWebKit/534.30 (KHTML, like Gecko) Chrome/12.0.742.122 Safari/534.30","Mozilla/5.0 (Windows NT 5.1; rv:5.0) Gecko/20100101 Firefox/5.0","Mozilla/4.0 (compatible; MSIE 60; Windows NT 5.1; SV1; .NET CLR 2.0.50727)","Opera/9.80 (Windows NT 5.1; U; zh-cn) Presto/2.9.168 Version/11.50","Mozilla/4.0 (compatible; MSIE 6.0; Windows NT 5.1; SV1)","Mozilla/4.0 (compatible; MSIE 6.0; Windows NT 5.1; SV1; .NET CLR 2.0.50727; TheWorld)"]
        headers ={'User-Agent': user_gent[random.randint(0,len(user_gent)-1)],}return headers
3、requests 常用参数:url、headers、proxies、verify、timeout
url ="https://www.baidu.com/"  # 需要请求的链接
headers ={"user-agent":"Mozilla/5.0 (Windows NT 10.0; Win64; x64) AppleWebKit/537.36 (KHTML, like Gecko) Chrome/105.0.0.0 Safari/537.36"}  # headers =get_headers()
proxies ={'http': f'http://{ip}:{port}','https': f'http://{ip}:{port}'}  # IP代理 注意http和https都要写
proxies ={'http':'http://127.0.0.1:10809','https':'http://127.0.0.1:10809'}  # 添加系统代理VPN
verify = Flase  # 使用IP代理或VPN时设置为False
timeout =5  # 每次请求连接超过5秒未响应抛出异常
三、Requests Get Post
1、Get
params={"key":"value"}  # url中传递的参数,效果如:http://www.baidu.com?key=value
response = requests.get(url=url, headers=headers, params=params, proxies=proxies, verify = Flase, timeout=5)
2、Post
parameter ={"key1":"value1","key2":"value2"}#requests.post() 方法 json与data说明
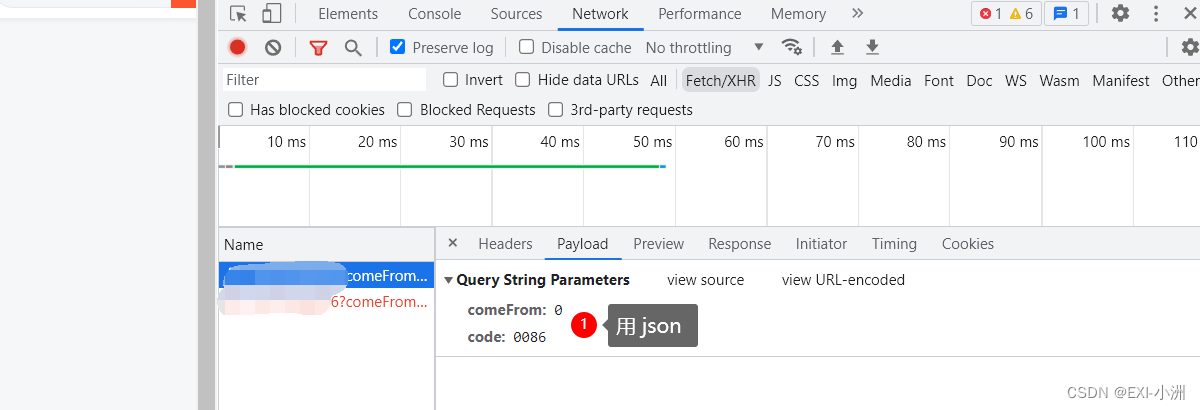
# 在chrom浏览器中,数据格式为Form Data,则用data来发送数据,也可根据{}(花括号来区分)
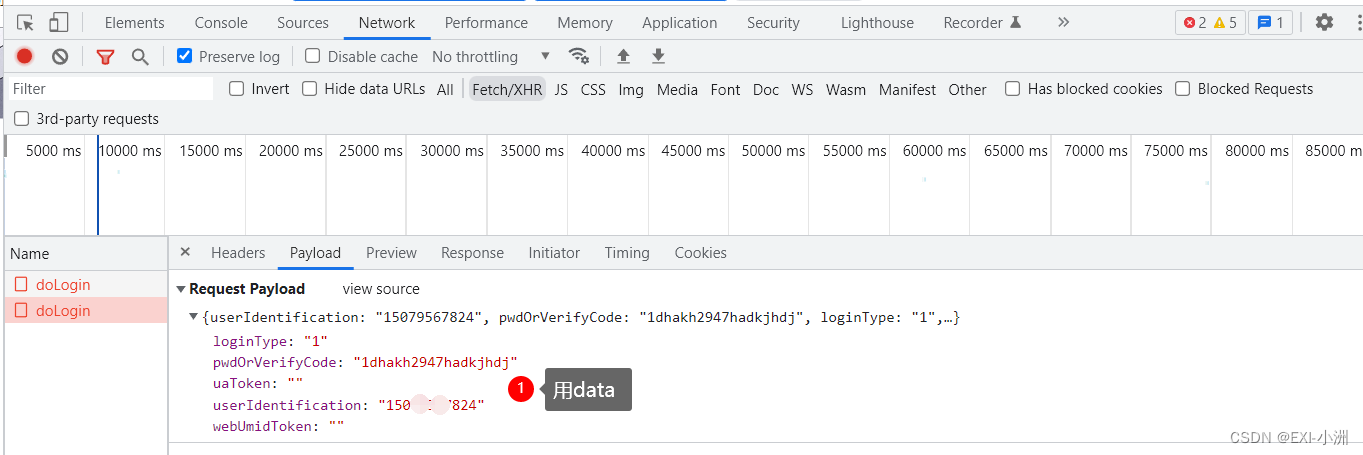
# 在chrom浏览器中,数据格式为Request Payload,则用json来发送数据,也可根据{}(花括号来区分)
response = requests.post(url=url, headers=headers, data=parameter, proxies=proxies, verify = Flase, timeout=5)
files ={"file":open("xxx.txt","rb")} # 提交文件
response = requests.post(url=url, headers=headers, files=files , proxies=proxies, verify = Flase, timeout=5)
Request Form Data 用 data,
Request Payload 用json
关于文件上传可参考我的这篇博客:requests post 文件上传https://blog.csdn.net/EXIxiaozhou/article/details/126975807
四、Requests 常用代码
1、常用的请求代码
import requests
from requests import exceptions
request_count =0while request_count <3:
    try:
        response = requests.get(url=url, headers=get_headers(), proxies=proxy,  verify = Flase, timeout=5)print(f"{xxxx} - 请求成功 {url} IP:{self.proxy}\n", end='')break
    except request_exceptions.ConnectTimeout:print(f'{xxxx}- 请求失败 ConnectTimeout! IP:{self.proxy}\n', end='')
    except request_exceptions.RequestException:print(f'{xxxx}- 请求失败 RequestException! IP:{self.proxy}\n', end='')
    proxy = proxy_obj.get_proxy()  # 关于IP代理的详细内容请关注我的更多博客
    request_count +=1
2、requests 文件下载
import requests
url ="https://xxxx.pdf"
file_path ='xxxx.pdf'
response = requests.get(url=url, headers=get_headers(), proxies=proxy,  verify = Flase, timeout=5)
with open(file_path ,'wb') as fis:for chunk in response.iter_content(chunk_size=1000):
        fis.write(chunk)
        fis.flush()
3、response 常用属性介绍
response.statis_code  # 返回状态,200表示连接成功
response.text  # 响应内容的字符串形式,url链接的内容
response.encoding  # 响应内容的编码方式,header中不存在charset,则认为编码为ISO‐8859‐1
response.apparent_encoding  # 内容中分析出响应内容的编码方式
response.encoding = response.apparent_encoding  # 或=UTF-8
response.content  # 响应内容的二进制形式
response.raise_for_status()  # 不是200则抛出异常
response.cookies()  # 返回一个字典类型的属性
response.json()  # 如果返回的是json则可以根据解析字典的方式提取内容
五、Requests 异常处理
1.常用的异常处理
from requests import exceptions
try:
    # 需要执行的代码
except exceptions.ConnectTimeout:print(f'{xxxx}- 请求失败 连接超时! IP:{self.proxy}\n', end='')
except exceptions.RequestException:print(f'{xxxx}- 请求失败 请求异常! IP:{self.proxy}\n', end='')
except exceptions.ReadTimeout:print(f'{xxxx}- 请求失败 代理读取超时! IP:{self.proxy}\n', end='')
except exceptions.ProxyError:print(f'{xxxx}- 请求失败 代理连接不上! IP:{self.proxy}\n', end='')
except exceptions.ConnectionError:print(f'{xxxx}- 请求失败 未知的服务器 or 网络环境异常! IP:{self.proxy}\n', end='')
except Exception:print(f'{xxxx} - 请求失败 以上未捕捉到的异常!}\n', end='')
总结
以上就是今天要讲的内容,本文仅仅简单介绍了requests的使用,而requests提供了大量能使我们快速便捷请求网络资源的函数和方法,后续有关于requests的常用代码会在这篇博客中持续更新;
Requests 中文文档:https://www.w3cschool.cn/requests2
本文转载自: https://blog.csdn.net/EXIxiaozhou/article/details/127015235
版权归原作者 EXI-小洲 所有, 如有侵权,请联系我们删除。
版权归原作者 EXI-小洲 所有, 如有侵权,请联系我们删除。