
Canvas鼠标滚轮缩放以及画布拖动
本文会带大家认识Canvas中常用的坐标变换方法 translate 和 scale,并结合这两个方法,实现鼠标滚轮缩放以及画布拖动功能。
Canvas的坐标变换
Canvas
绘图的缩放以及画布拖动主要通过 CanvasRenderingContext2D 提供的
translate
和
scale
两个方法实现的,先来认识下这两个方法。
translate 方法
语法:
translate(x, y)
translate
的用法记住一句话:
translate 方法重新映射画布上的(0, 0)位置。
说白了就是把画布的原点移动到了
translate
方法指定的坐标,之后所有图形的绘制都会以该坐标进行参照。
举个例子:
const canvas = document.getElementById('canvas');const ctx = canvas.getContext('2d');
canvas.width =600;
canvas.height =400;

ctx.fillStyle ='red';
ctx.fillRect(50,50,50,50);

ctx.translate(50,50);

ctx.fillStyle ='green';
ctx.fillRect(50,50,50,50);
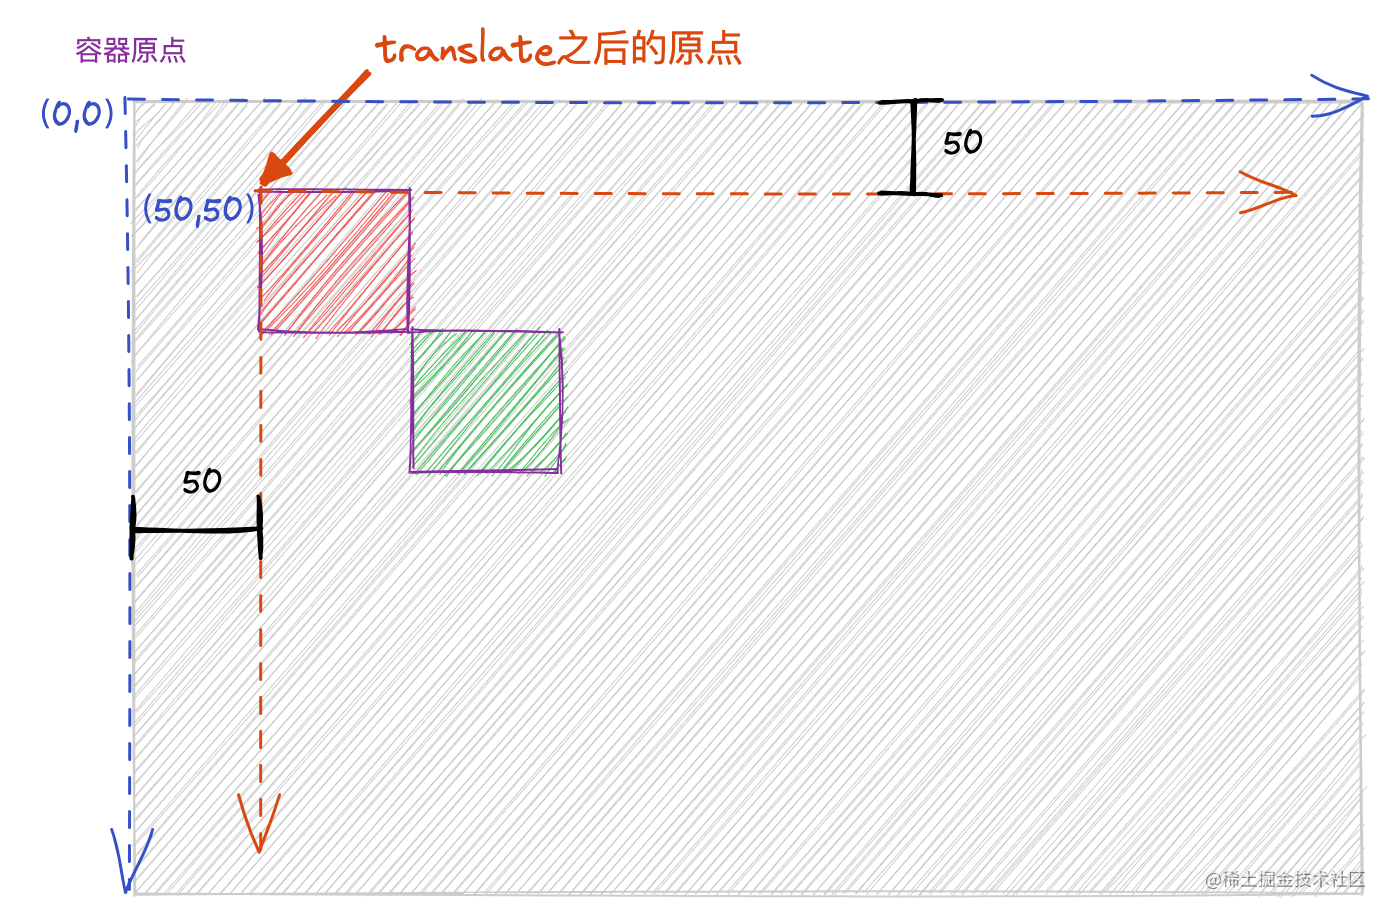
开始的时候,
Canvas
容器原点和绘图原点重合,绘制一个背景色为红色,原点坐标(50, 50),长宽各为 50 的矩形,接着调用
translate
方法将绘图原点沿水平和纵向各偏移50,再绘制一个背景色是绿色,原点坐标(50, 50),长宽各为 50 的矩形,示意图如下,其中灰色的背景为
Canvas
区域。
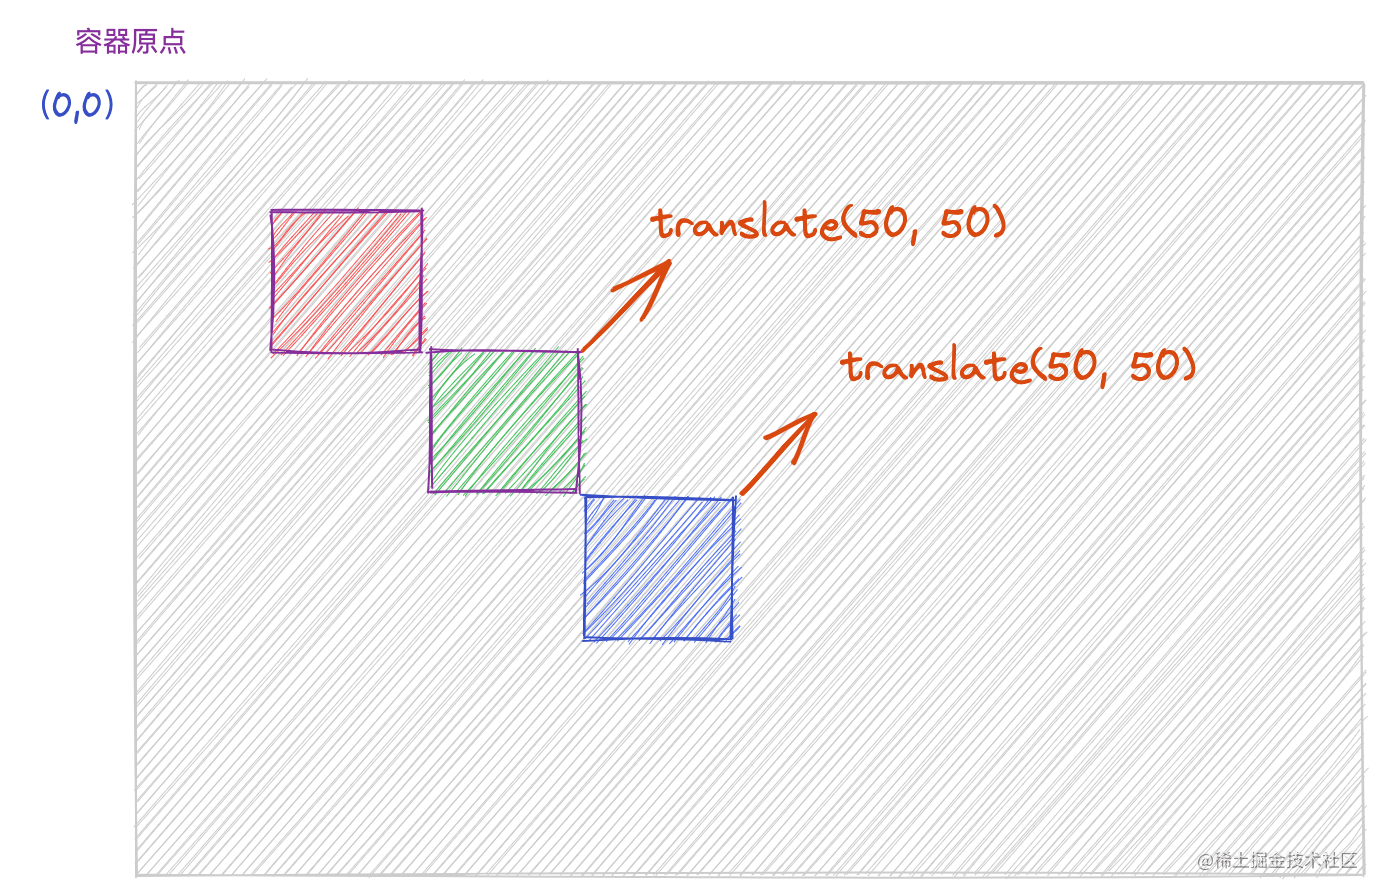
需要注意的是,如果此时继续调用
translate
方法进行偏移操作,后续的偏移会基于原来偏移的基础上进行的。
ctx.fillStyle ='red';
ctx.fillRect(50,50,50,50);// 第一次坐标系偏移
ctx.translate(50,50);

ctx.fillStyle ='green';
ctx.fillRect(50,50,50,50);// 第二次坐标系偏移
ctx.translate(50,50);

ctx.fillStyle ='blue';
ctx.fillRect(50,50,50,50);
因此,如果涉及到多次调用
translate
方法进行坐标变换,很容易将坐标系搞混乱,所以,一般在
translate
之前会调用
save
方法先保存下绘图的状态,再调用
translate
后,绘制完图形后,调用
restore
方法恢复之前的上下文,对坐标系进行还原,这样不容易搞乱坐标系。
save方法通过将当前状态压入堆栈来保存画布的整个状态。
保存到堆栈上的图形状态包括:
- 当前转换矩阵。
- 当前裁剪区域。
- 当前的破折号列表。
- 包含的属性:strokeStyle、ill Style、lobalAlpha、linewidth、lineCap、lineJoin、miterLimit、lineDashOffset、shadowOffsetX、shadowOffsetY、shadowBlur、shadowColor、global alCompositeOperation、Font、extAlign、extBaseline、Direction、ImageSmoothingEnabled。
restore 方法通过弹出绘制状态堆栈中的顶部条目来恢复最近保存的画布状态。
ctx.fillStyle ='red';
ctx.fillRect(50,50,50,50);// 保存绘图上下文
ctx.save()

ctx.translate(50,50);
ctx.fillStyle ='green';
ctx.fillRect(50,50,50,50);// 绘制完成后恢复上下文
ctx.restore()

ctx.fillStyle ='blue';
ctx.fillRect(0,0,50,50);

scale 方法
语法:
scale(x, y)
缩放 (scale) 就是将一个图形围绕中心点,然后将宽和高分别乘以一定的因子(sx,sy)
默认情况下,画布上的一个单位正好是一个像素。缩放变换会修改此行为。例如,如果比例因子为0.5,则单位大小为0.5像素;因此,形状的绘制大小为正常大小的一半。类似地,比例因子为2会增加单位大小,使一个单位变为两个像素;从而以正常大小的两倍绘制形状。
举个例子:
const canvas = document.getElementById('canvas');const ctx = canvas.getContext('2d');

ctx.scale(0.5,2);
ctx.fillStyle="blue";
ctx.fillRect(50,50,100,50);
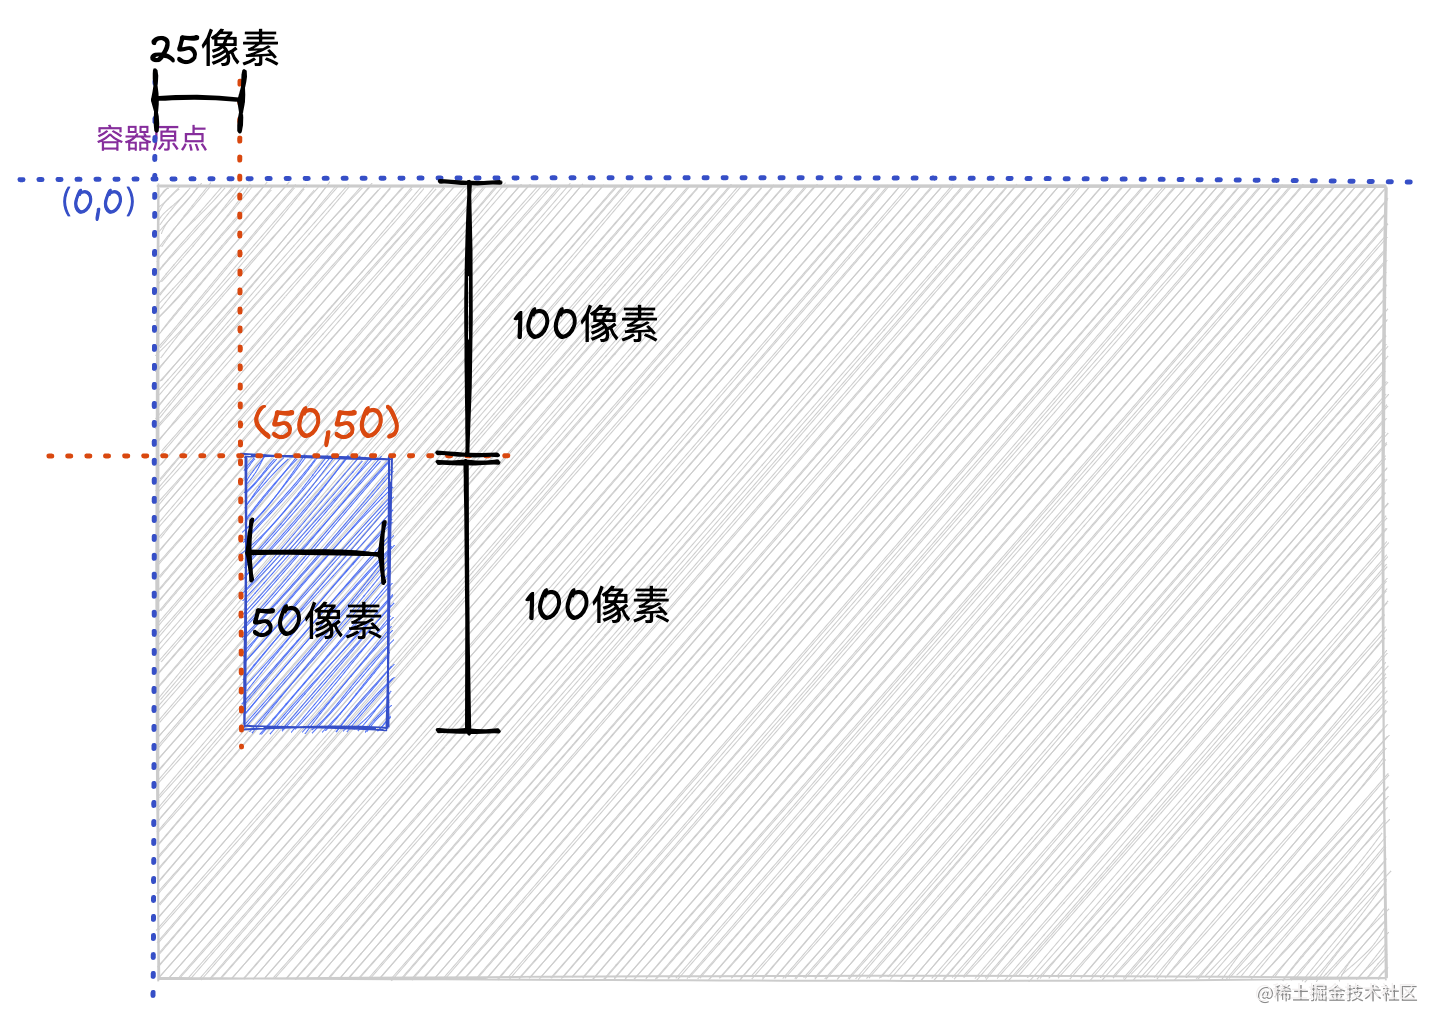
调用
scale(0.5,2)
将画布水平方向缩小一倍,垂直方向放大一倍,绘制一个坐标原点 (50, 50),宽度 100,高度 50 的矩形。经过缩放变换后,距离原点的实际像素是横轴 25像素,纵轴 100 像素,宽度 50 像素,高度 100 像素。
实现鼠标拖动画布
效果
创建Sence类
Sence类:
classScene{constructor(id, options ={width:600,height:400}){this.canvas = document.querySelector('#'+ id)this.width = options.width;this.height = options.height;this.canvas.width = options.width;this.canvas.height = options.height;this.ctx =this.canvas.getContext('2d');}draw(){this.ctx.fillStyle ='red';this.ctx.fillRect(50,50,50,50);this.ctx.fillStyle ='green';this.ctx.fillRect(150,150,50,50);}clear(){this.canvas.width =this.width;}paint(){this.clear();this.draw();}}let scene =newScene('canvas');

scene.draw();
在
Sence
类的构造函数中初始化
Canvas
,得到
CanvasRenderingContext2D
对象,并设置
Canvas
的宽高属性,
draw
方法里面绘制了两个矩形。
在进行下面的工作之前,我们先来了解下
Canvas
的事件机制。
通过
addEventListener
方法可以给
Canvas
绑定一个事件。
this.canvas.addEventListener('mousedown',(event)=>{
  console.log(event.x)});
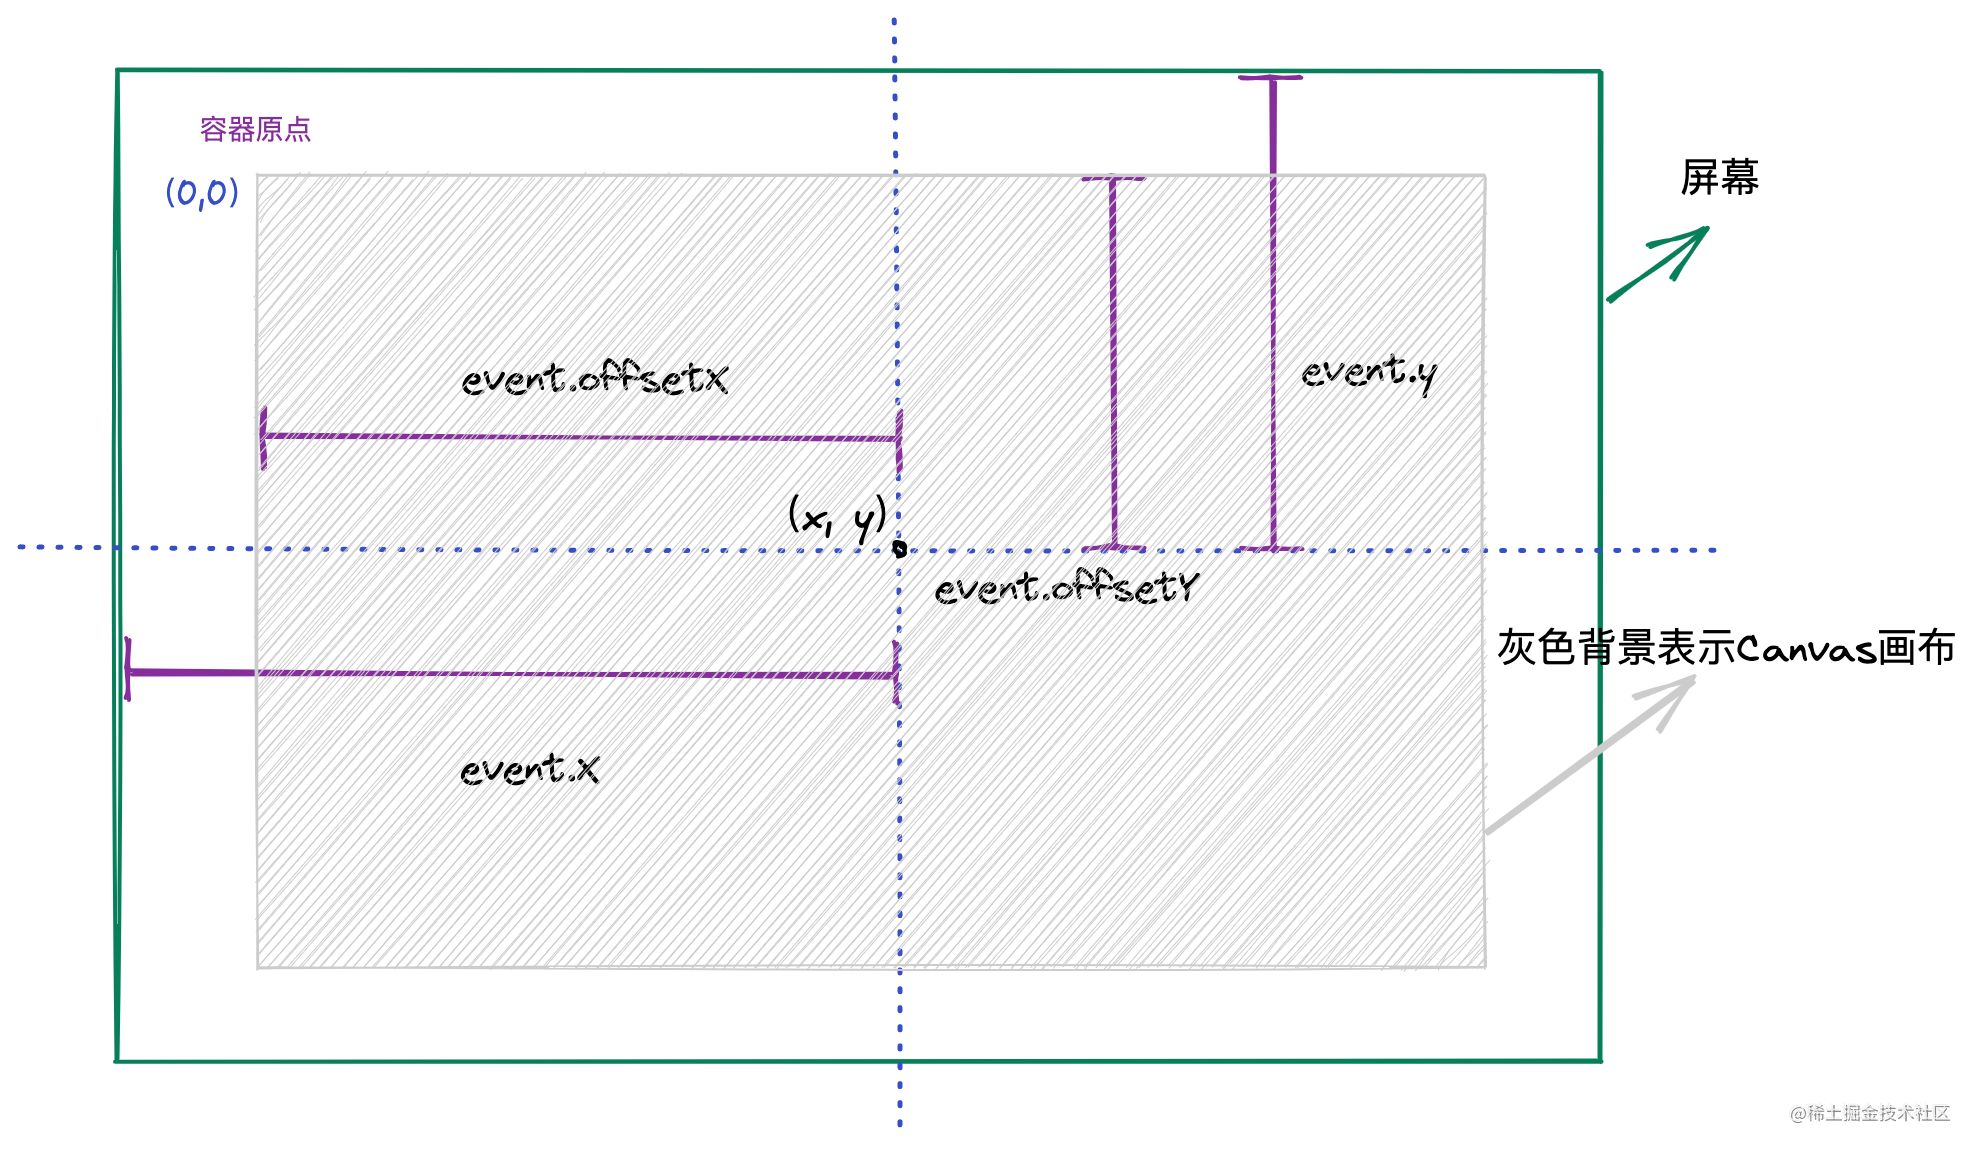
事件的回调函数参数的
event
对象中可以获取鼠标点击
Canvas
时的坐标信息,
event
对象中经常会用到的坐标有两个,一个是
event.x
和
event.y
,另一个是
event.offsetX
和
event.offsetY
,其中,
event.x
和
event.y
获取的是鼠标点击时相对于屏幕的坐标,而
event.offsetX
和
event.offsetY
是相对于
Canvas
容器的坐标。
通过下面这张图可以清晰的看出两个坐标的区别,明白这一点对于我们后续的坐标变换非常重要。
在构造函数中添加对
Canvas
的
mousedown
事件监听,记录点击鼠标时相对屏幕的位置
x
和
y
。
classScene{
  x =0;// 记录鼠标点击Canvas时的横坐标
  y =0;// 记录鼠标点击Canvas时的纵坐标constructor(id, options ={width:600,height:400}){this.canvas.addEventListener('mousedown',this.onMousedown);}onMousedown(e){if(e.button ===0){// 点击了鼠标左键this.x = x;this.y = y;}}}
画布拖动的整体思路就是利用前面介绍的
Canvas
的
translate
方法。画布的整体偏移量记录在
offset.x
和
offset.y
,鼠标触发
mousedown
事件时,记录当前鼠标点击的位置相对于屏幕的坐标
x
, 和
y
,并且开始监听鼠标的
mousemove
和
mouseup
事件。鼠标触发
mousemove
事件时计算每次移动时整体累加的偏移量:
onMousemove(e){this.offset.x =this.curOffset.x +(e.x -this.x);this.offset.y =this.curOffset.y +(e.y -this.y);this.paint();}
其中
curOffset.x
和
curOffset.y
记录的是鼠标触发
mouseup
时保存的当前的偏移量,便于计算累加的偏移量。每次触发完鼠标
mousemove
事件后,重新进行图形绘制。
onMouseup() {
  this.curOffset.x = this.offset.x;
  this.curOffset.y = this.offset.y;
  window.removeEventListener('mousemove', this.onMousemove);
  window.removeEventListener('mouseup', this.onMouseup);
}
Sence 类完整代码如下:
classScene{
  offset ={x:0,y:0};// 拖动偏移
  curOffset ={x:0,y:0};// 记录上一次的偏移量
  x =0;// 记录鼠标点击Canvas时的横坐标
  y =0;// 记录鼠标点击Canvas时的纵坐标constructor(id, options ={width:600,height:400}){this.canvas = document.querySelector('#'+ id);this.width = options.width;this.height = options.height;this.canvas.width = options.width;this.canvas.height = options.height;this.ctx =this.canvas.getContext('2d');this.onMousedown =this.onMousedown.bind(this);this.onMousemove =this.onMousemove.bind(this);this.onMouseup =this.onMouseup.bind(this);this.canvas.addEventListener('mousedown',this.onMousedown);}onMousedown(e){if(e.button ===0){// 鼠标左键this.x = e.x;this.y = e.y
      window.addEventListener('mousemove',this.onMousemove);
      window.addEventListener('mouseup',this.onMouseup);}}onMousemove(e){this.offset.x =this.curOffset.x +(e.x -this.x);this.offset.y =this.curOffset.y +(e.y -this.y);this.paint();}onMouseup(){this.curOffset.x =this.offset.x;this.curOffset.y =this.offset.y;
    window.removeEventListener('mousemove',this.onMousemove);
    window.removeEventListener('mouseup',this.onMouseup);}draw(){this.ctx.fillStyle ='red';this.ctx.fillRect(50,50,50,50);this.ctx.fillStyle ='green';this.ctx.fillRect(150,150,50,50);}clear(){this.canvas.width =this.width;}paint(){this.clear();this.ctx.translate(this.offset.x,this.offset.y);this.draw();}}
上述代码中有几点需要注意:
- 事件函数中的this指向问题
细心的同学可能注意到,在 Sence 类的构造函数里有这样几行代码:
constructor(id, options ={width:600,height:400}){this.onMousedown =this.onMousedown.bind(this);this.onMousemove =this.onMousemove.bind(this);this.onMouseup =this.onMouseup.bind(this);}
为什么要使用
bind
函数给事件函数重新绑定this对象呢?
主要的原因在于一个事件有监听就会有移除。假设我们想要销毁
mousemove
事件怎么办呢?
可以调用
removeEventListener
方法进行事件监听的移除,比如上述代码会在
onMouseup
中移除对
mousemove
事件的监听:
onMouseup(){this.curOffset.x =this.offset.x;this.curOffset.y =this.offset.y;
  window.removeEventListener('mousemove',this.onMousemove);}
如果不在构造函数中使用
bind
方法重新绑定
this
指向,此时的
this
指向的就是
window
,因为
this
指向的是调用
onMouseup
的对象,而
onMouseup
方法是被
window
上的
mouseup
事件调用的,但是实际上我们想要的this指向应该
Sence 实例
。为了避免上述问题的出现,最好的解决办法就是在
Sence
类的构造函数中重新绑定
this
指向。
- 画布的清空问题
每次鼠标移动的时候会改变
Canvas
的
CanvasRenderingContext2D
偏移量,并重新进行图形的绘制,重新绘制的过程就是先将画布清空,然后设置画布的偏移量(调用 translate 方法),接着绘制图形。其中清空画布这里选择了重新设置Canvas的宽度,而不是调用
clearRect
方法,主要是因为
clearRect
方法只在
Canvas
的渲染上下文没有进行过平移、缩放、旋转等变换时有效,如果
Canvas
的渲染上下文已经经过了变换,那么在使用
clearRect
清空画布前,需要先重置变换,否则
clearRect
将无法有效地清除整块画布。
实现鼠标滚轮缩放
效果
实现原理
鼠标滚轮的放大需要结合上面介绍的
Canvas
的
translate
和
scale
两个方法进行组合变换。
计算放大系数
监听鼠标滚轮的
mousewheel
事件,在事件的回调函数中通过
event.wheelDelta
值的变化来实时计算当前的缩放值,其中
event.wheelDelta > 0
表示放大,反之表示缩小,放大和缩小都有对应的阈值,超过阈值就禁止继续放大和缩小。
改造
Sence
类,添加
onMousewheel
事件:
onMousewheel(e){if(e.wheelDelta >0){// 放大this.scale =parseFloat((this.scaleStep +this.scale).toFixed(2));// 解决小数点运算丢失精度的问题if(this.scale >this.maxScale){this.scale =this.maxScale;return;}}else{// 缩小this.scale =parseFloat((this.scale -this.scaleStep).toFixed(2));// 解决小数点运算丢失精度的问题if(this.scale <this.minScale){this.scale =this.minScale;return;}}this.preScale =this.scale;}
其中,
this.scale / this.preScale
计算出来的值就是放大系数,暂且记做
n
。
在计算放大系数的时候,需要注意两个浮点型数值在计算不能直接相加,否则会出现丢失精度的问题。
缩放原理
在缩放的时候,会调用
scale(n, n)
方法,将坐标系放大
n
倍。假设鼠标滚轮停在 A 点进行放大操作,放大之后得到坐标 A’ 点。
可以看到,放大之后,
A(x1, y1)
坐标变换到了
A'(x1, y1)
,
A => A'
放大了
n
倍,因此得到
x1 = x * n
,
y1 = y1 * n
。
这个时候就会存在一个问题,我们在
A
点进行放大,放大后得到的
A'
的位置应该是不变的,所以需要在放大之后需要调整
A’
点的位置到
A
点。
这里我们采用的策略是在放大前先偏移一段距离,然后进行放大之后就可以保持
A
点和
A‘
点的重合。
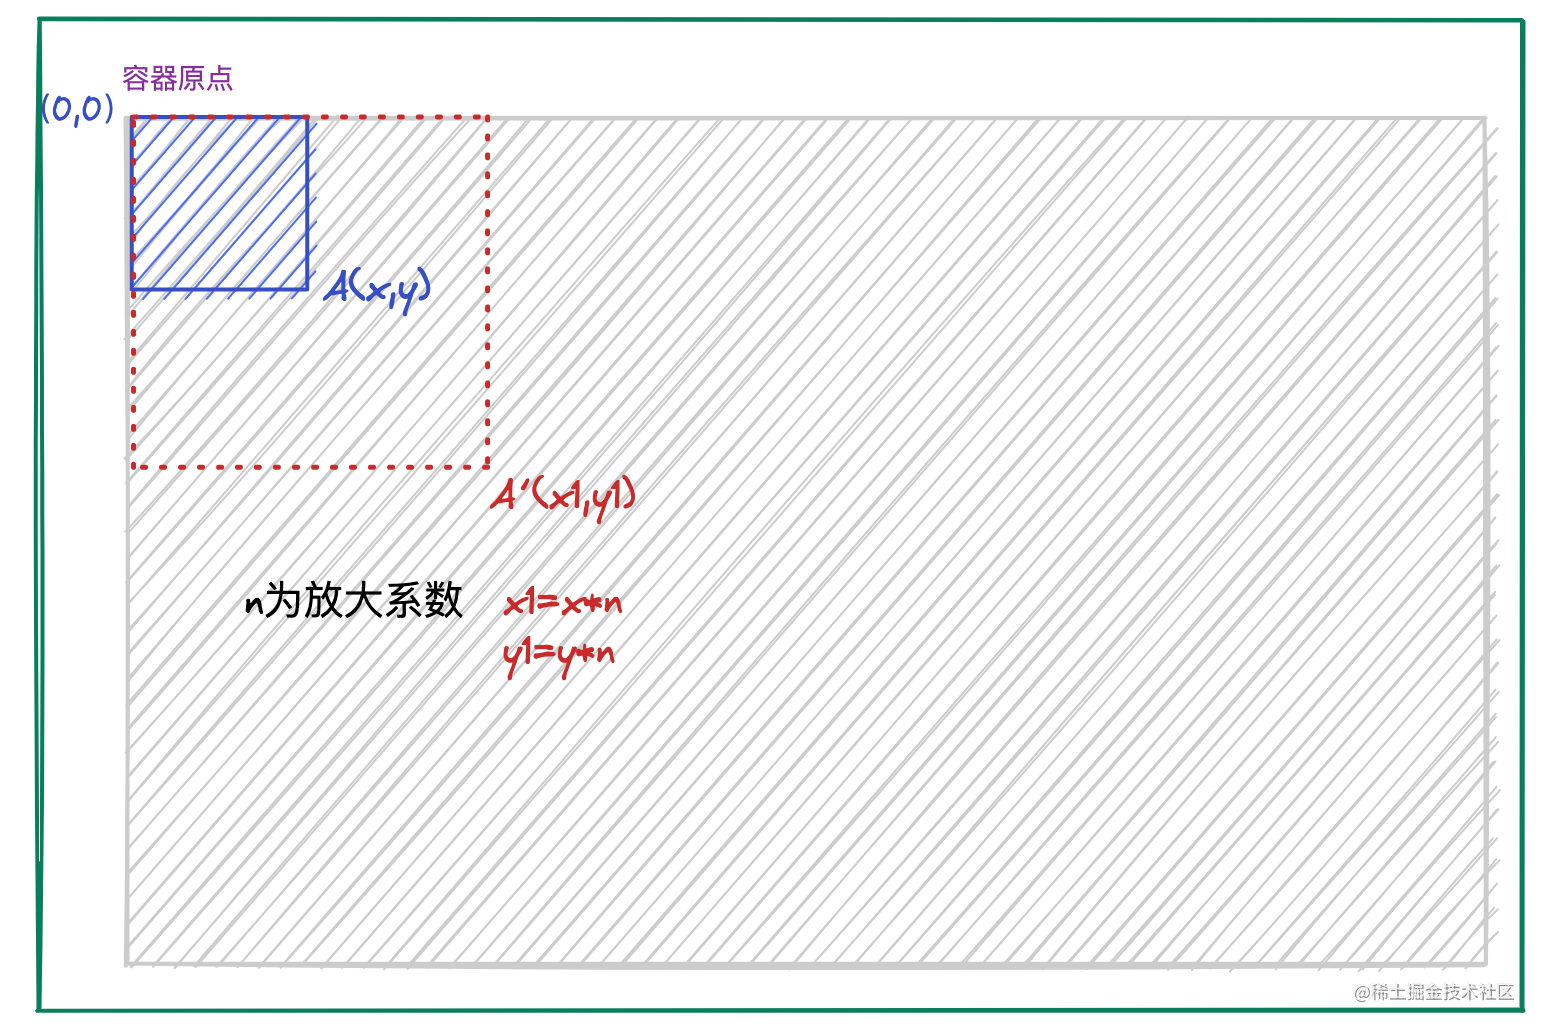
鼠标停留在
A
点对蓝色矩形进行放大,放大系数为
n
,蓝色矩形的起点左上角和坐标原点重合,宽度和高度分别是
x
和
y
,因此,A点的坐标为
(x, y)
。
前面我们说过,对
A
点进行放大后得到的
A’
点应该和A点重合,这样就需要先把整个坐标系沿着x轴和y轴分别向左和向上偏移
offsetX
和
offsetY
,偏移后得到的
A'
点坐标记作
(x1, x2)
,因为
A
点是经过放大
n
倍后得到的
A'
点,所以得到以下距离关系:
x1 = x * n;
y1 = y * n
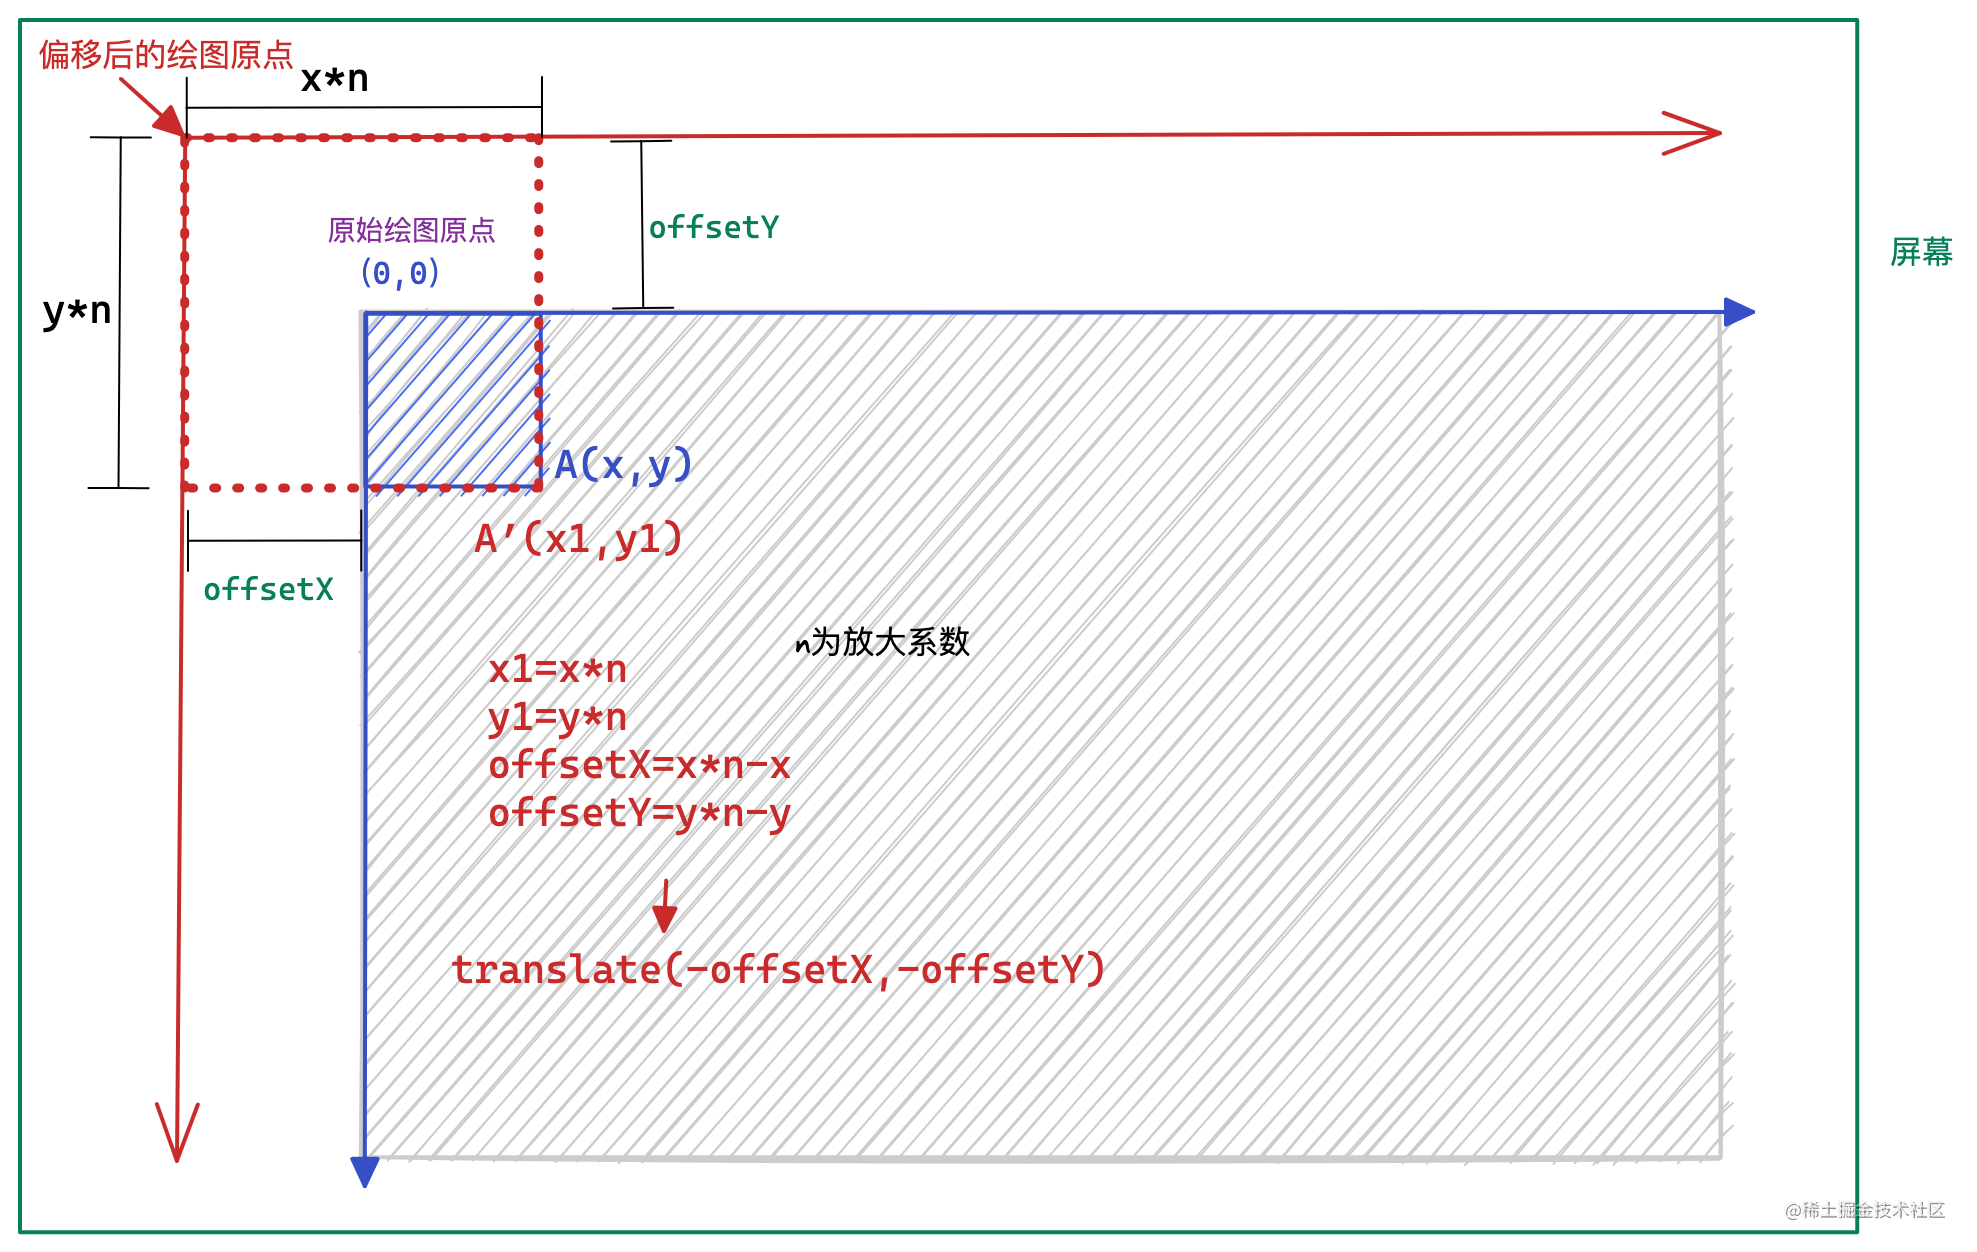
进一步就可以得到横纵坐标的偏移量
offsetX
和
offsetY
的绝对值:
offsetX = x*n-x;
offsetY =x*n - y;
因此,这需要将坐标系经过
translate(-offsetX, -offsetY)
之后,再
scale(n, n)
,就能确保
A
点 和
A‘
点重合了。
明白了缩放的基本原理,下面就继续码代码吧😜。
onMousewheel(e){
  e.preventDefault();this.mousePosition.x = e.offsetX;// 记录当前鼠标点击的横坐标this.mousePosition.y = e.offsetY;// 记录当前鼠标点击的纵坐标if(e.wheelDelta >0){// 放大this.scale =parseFloat((this.scaleStep +this.scale).toFixed(2));// 解决小数点运算丢失精度的问题if(this.scale >this.maxScale){this.scale =this.maxScale;return;}}else{// 缩小this.scale =parseFloat((this.scale -this.scaleStep).toFixed(2));// 解决小数点运算丢失精度的问题if(this.scale <this.minScale){this.scale =this.minScale;return;}}this.offset.x =this.mousePosition.x -((this.mousePosition.x -this.offset.x)*this.scale)/this.preScale;this.offset.y =this.mousePosition.y -((this.mousePosition.y -this.offset.y)*this.scale)/this.preScale;this.paint(this.ctx);this.preScale =this.scale;this.curOffset.x =this.offset.x;this.curOffset.y =this.offset.y;}paint(){this.clear();this.ctx.translate(this.offset.x,this.offset.y);this.ctx.scale(this.scale,this.scale);this.draw();}
总结
本文从基础原理到代码实现,完整给大家讲解了
Canvas
画布绘制中经常会遇到的画布拖动和鼠标滚轮缩放功能,希望对大家有帮助,更多精彩文章欢迎大家关注我的vx公众号:前端架构师笔记。本文完整代码地址:https://github.com/astonishqft/scanvas-translate-and-scale
版权归原作者 astonishqft 所有, 如有侵权,请联系我们删除。