文章目录
在前一篇博客中(
Spring项目创建与Bean的存储与读取(DL))介绍的是通过配置文件注册对象从而存储到 Spring 中,这种方式其实还是挺繁琐的。
实际上,在使用学习使用 Spring过程中,当我们要实现一个功能的时候,先应该考虑的是有没有相应的注解是实现对应功能的,Spring 中很多功能的配置都是可以依靠注解实现的,而本篇中介绍的是使用注解来存储 Bean 对象。
一. 配置扫描路径
首先还是要创建 Spring 项目,这里有问题还是去看我上一篇博客。当创建好项目后,我们的第一步就是配置扫描路径,这一步骤非常关键的,这里错了,之后的的操作就都不会生效了。
我们在
resources
目录下创建一个
spring-config.xml
配置文件,用来设置扫描的路径,在配置文件中添加如下内容:
<?xml version="1.0" encoding="UTF-8"?><beans xmlns="http://www.springframework.org/schema/beans"
       xmlns:xsi="http://www.w3.org/2001/XMLSchema-instance"
       xmlns:content="http://www.springframework.org/schema/context"
       xsi:schemaLocation="http://www.springframework.org/schema/beans http://www.springframework.org/schema/beans/spring-beans.xsd http://www.springframework.org/schema/context https://www.springframework.org/schema/context/spring-context.xsd"><content:component-scan base-package=""></content:component-scan></beans>
其中
<content:component-scan base-package=""></content:component-scan>
里面
base-package
的值设置为你需要扫描对象的根路径,这个路径从
java
目录开始,比如我在如图中的
com.tr.demo
目录下创建类: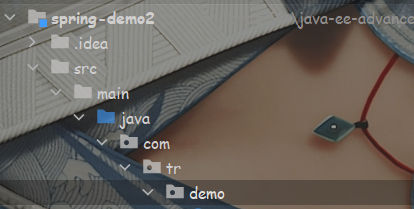
那么这个配置文件中根路径就为
com.tr.demo
,所以我们将
base-package
的值设置为
com.tr.demo
。
<content:component-scan base-package="com.tr.demo"></content:component-scan>
二. 使用注解储存Bean对象
想要使用注解,那得先知道能使用哪些注解,在 Spring 中有五大类注解和方法注解,分别为:
- 五大类注解:@Controller(控制器)、@Service(服务)、@Repository(仓库)、@Component(组件)、@Configuration(配置)。
- 方法注解:@Bean。
1. 使用五大类注解储存Bean
首先,我们来了解如何使用五大类注解来储存对象,先以
@Controller
注解为例,我们有如下的代码:
package com.tr.demo;import org.springframework.stereotype.Controller;@ControllerpublicclassUserController{publicvoidsayHi(){
        System.out.println("Hi, UserController~");}}
像这样在扫描路径下创建类,并在类上加上
@Controller
注解就将
Bean
存储到容器当中了。
接下来就要从 Spring 中读取出我们的对象,这里还是先使用依赖查找的方式来获取 Bean,使用五大类注解,默认情况下,Bean 的名字就是原类名首字母小写(小驼峰)。
import com.tr.demo.UserController;import org.springframework.context.ApplicationContext;import org.springframework.context.support.ClassPathXmlApplicationContext;publicclassAPP{publicstaticvoidmain(String[] args){
        ApplicationContext context =newClassPathXmlApplicationContext("spring-config.xml");//获取对象时使用类名的小驼峰形式作为 name 参数
        UserController userController =  context.getBean("userController", UserController.class);
        userController.sayHi();}}
运行结果:
要注意,是使用了五大类注解创建的类且类必须要在前面我们配置的扫描路径下(包括子包)才能将 Bean 存储到 Spring 当中,否则是无效的,所以这个扫描路径也叫做根路径。
设置根路径其实也是为了提高程序的性能,因为如果不设置根路径,Spring 就会扫描项目文件中所有的目录,但并不是所有类都需要储存到 Spring当中,这样性能就会比较低,设置了根路径,Spring 就只扫描该根路径下所有的目录就可以了,提高了程序的性能。
上面只使用了 @Controller,那么我们再来验证一下其他四个注解可不可以达到同样的目的,同时为了验证上面的结论,我们在
com.tr.demo
目录下再创建一个
inner
目录,在根路径外在创建一个类
Student
使用类注解。

package com.tr.demo.inner;import org.springframework.stereotype.Component;@ComponentpublicclassUserComponent{publicvoidsayHi(){
        System.out.println("Hi, UserComponent~");}}package com.tr.demo.inner;import org.springframework.context.annotation.Configuration;@ConfigurationpublicclassUserConfiguration{publicvoidsayHi(){
        System.out.println("Hi, UserConfiguration~");}}package com.tr.demo.inner;import org.springframework.stereotype.Repository;@RepositorypublicclassUserRepository{publicvoidsayHi(){
        System.out.println("Hi, UserRepository~");}}package com.tr.demo.inner;import org.springframework.stereotype.Service;@ServicepublicclassUserService{publicvoidsayHi(){
        System.out.println("Hi, UserService~");}}import com.tr.demo.UserController;import com.tr.demo.inner.UserComponent;import com.tr.demo.inner.UserConfiguration;import com.tr.demo.inner.UserRepository;import com.tr.demo.inner.UserService;import org.springframework.context.ApplicationContext;import org.springframework.context.support.ClassPathXmlApplicationContext;publicclassAPP{publicstaticvoidmain(String[] args){
        ApplicationContext context =newClassPathXmlApplicationContext("spring-config.xml");//获取对象时使用类名的小驼峰形式作为 name 参数
        UserController userController =  context.getBean("userController", UserController.class);
        userController.sayHi();
        UserService service =  context.getBean("userService", UserService.class);
        service.sayHi();
        UserConfiguration configuration =  context.getBean("userConfiguration", UserConfiguration.class);
        configuration.sayHi();
        UserComponent component =  context.getBean("userComponent", UserComponent.class);
        component.sayHi();
        UserRepository repository =  context.getBean("userRepository", UserRepository.class);
        repository.sayHi();}}
运行结果:
五大类注解效果都是一样的,而不在根路径下的
Student
是无效的。
还需要知道的是使用注解存储的 Bean 和使用
XML
存储的的 Bean 是可以一同使用的,比如我们将将刚刚有问题的
Student
重新通过
XML
的方式进行存储。
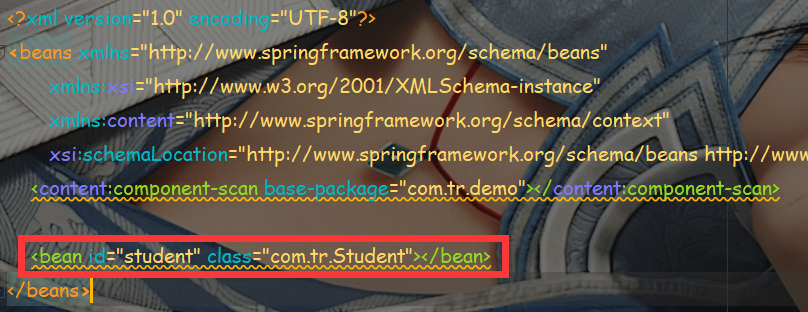
运行结果:
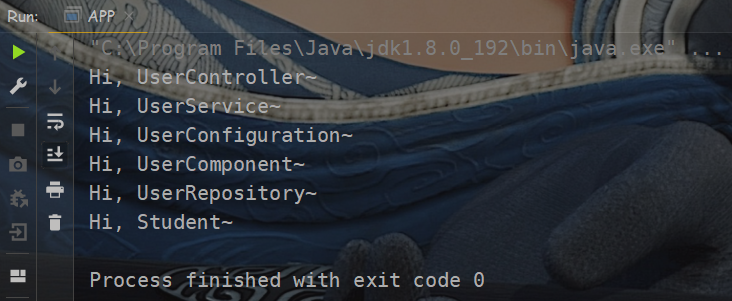
2. 为什么要有五大类注解?
既然都五大类完成的是同样的工作,那为什么要有五大类注解呢?
其实五大类注解主要是为了规范 Java 项目的代码,Java 项目的标准分层如下:
- 控制层(Controller)
- 服务层(Service)
- 数据持久层(Dao)
而五大类注解便是对应着不同的层级别使用的,让程序猿看到某一个注解就可以明确这个了类是做什么的。
- @Controller:控制器,校验用户请求数据的正确性(安保系统);直接和前端打交道,校验前端发来请求是参数和合法性。
- @Service:服务,编排和调度具体执行方法的(客服中心);不会直接操作数据库,根据请求判断具体调用哪个方法。
- @Repository:数据持久层,直接和数据库交互(实际业务的执行),也叫DAO层(data access object)。
- @Component:组件(工具类层),为整个项目存放一些需要使用的组件,但又和其他层没有什么实际交互。
- @Configuration 配置项(项目中的一些配置)。
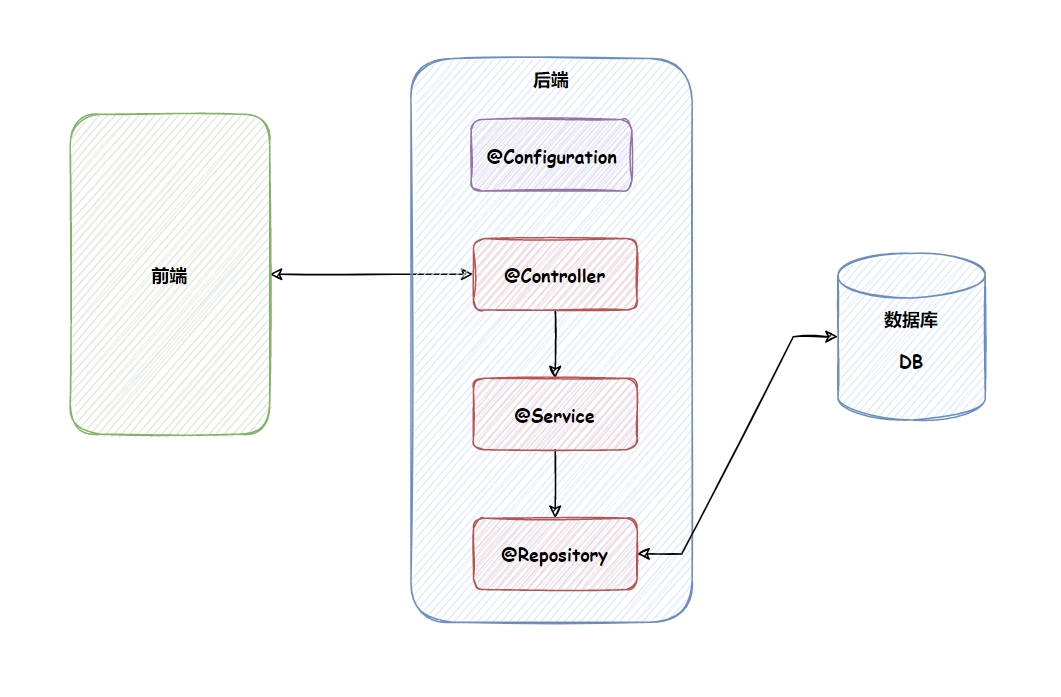
包括企业中也是按照这样的结构来将项目分层的,典型的比如阿里,它只是在标准分层在服务层(Service)做了一个扩展,划分的更加细致详细了。
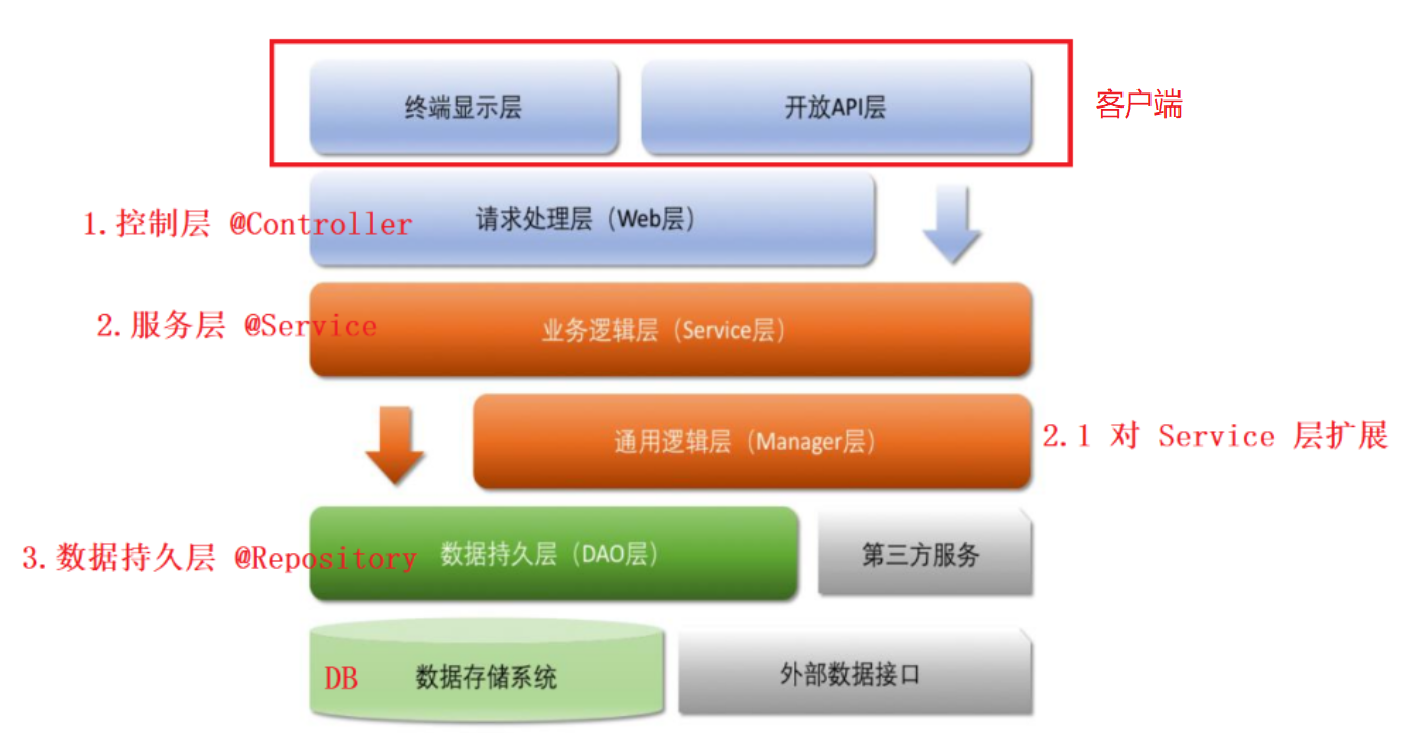
五大类注解主要起到的是“见名知意”的作用,代码层面上来看,作用是类似的,我们去查看五大类类注解的源码看一看。


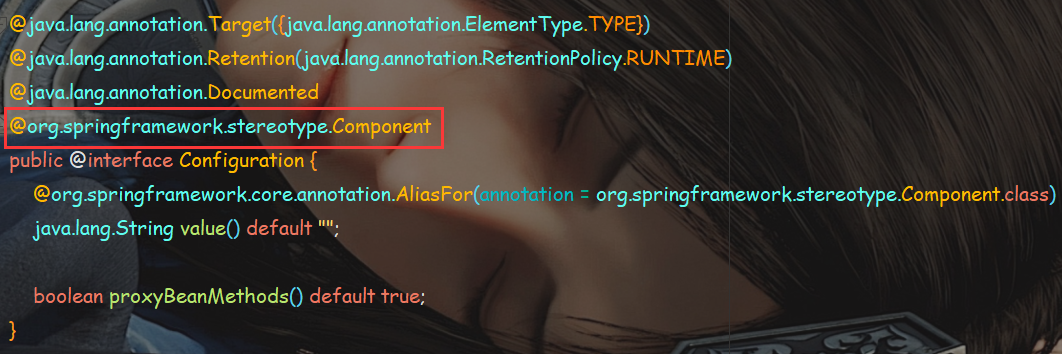
可以看到五大类的源码中除了 @Component 以外,其他四大类注解中都包含了 @Component 注解的功能,这四大类注解都是基于 @Component 实现的,是 @Component 拓展。
3.4有关获取Bean参数的命名规则
上文中在使用依赖查找的方式获取
Bean
时,
getBean
方法的
BeanName
是使用类名的小驼峰形式(即类名的首字母小写),这是因为使用注解储存对象时,默认会将类名的小驼峰形式设置为 Bean 的名字,但并不是完全依照这个规则的,是有特殊情况的。
比如,我们创建一个类,将它的前两个字母大写,如
UConfig
,此时来看使用类名的小驼峰形式还能不能获取到 Bean。
package com.tr.demo;import org.springframework.stereotype.Repository;@RepositorypublicclassUConfig{publicvoidsayHi(){
        System.out.println("Hi, UConfig~");}}
启动类
import com.tr.demo.UConfig;import org.springframework.context.ApplicationContext;import org.springframework.context.support.ClassPathXmlApplicationContext;publicclassAPP2{publicstaticvoidmain(String[] args){
        ApplicationContext context =newClassPathXmlApplicationContext("spring-config.xml");

        UConfig uConfig=  context.getBean("uConfig", UConfig.class);
        uConfig.sayHi();}}
运行结果:
可以看到程序报错了,说没有找到
beanName
为
uConfig
的对象,那此时的
beanName
是什么呢?
此时再来试一下原本的类名(大驼峰),看能不能获取:
UConfig uConfig= context.getBean("UConfig", UConfig.class);
运行结果:
此时就获取到了,好像多少有点玄学在里面,我们来翻一翻源码,看一看这是什么原因。
双击
Shift
进行全局搜索,上面是根于对象名称来找到对象的,所以我们输入
beanName
,试着搜索一下:
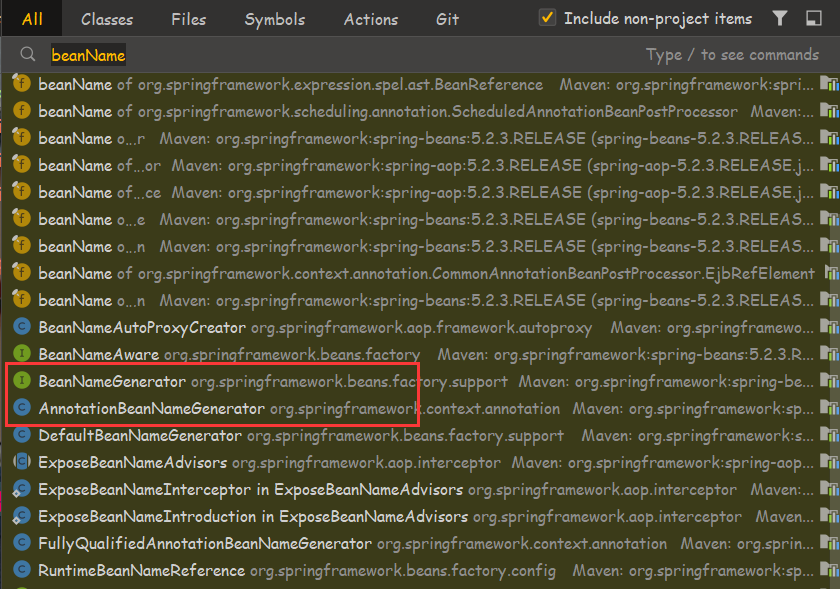
我们会发现有
AnnotationBeanNameGenerator
类与
BeanNameGenerator
接口,那我们就试着点到
AnnotationBeanNameGenerator
类源码看一看。
正常点开后看到的应该是 IDEA 将
.class
文件反编译出来的代码,缺少注释和明确的变量命名。

我们点击
Download Sources
将 Spring 源码下载下来即可,此时我们在在源码中就能看到下面的方法,看名字也知道,用来建立默认的
BeanName
的。

返回值是
Introspector.decapitalize
方法的返回值,再点进去看看这个方法。
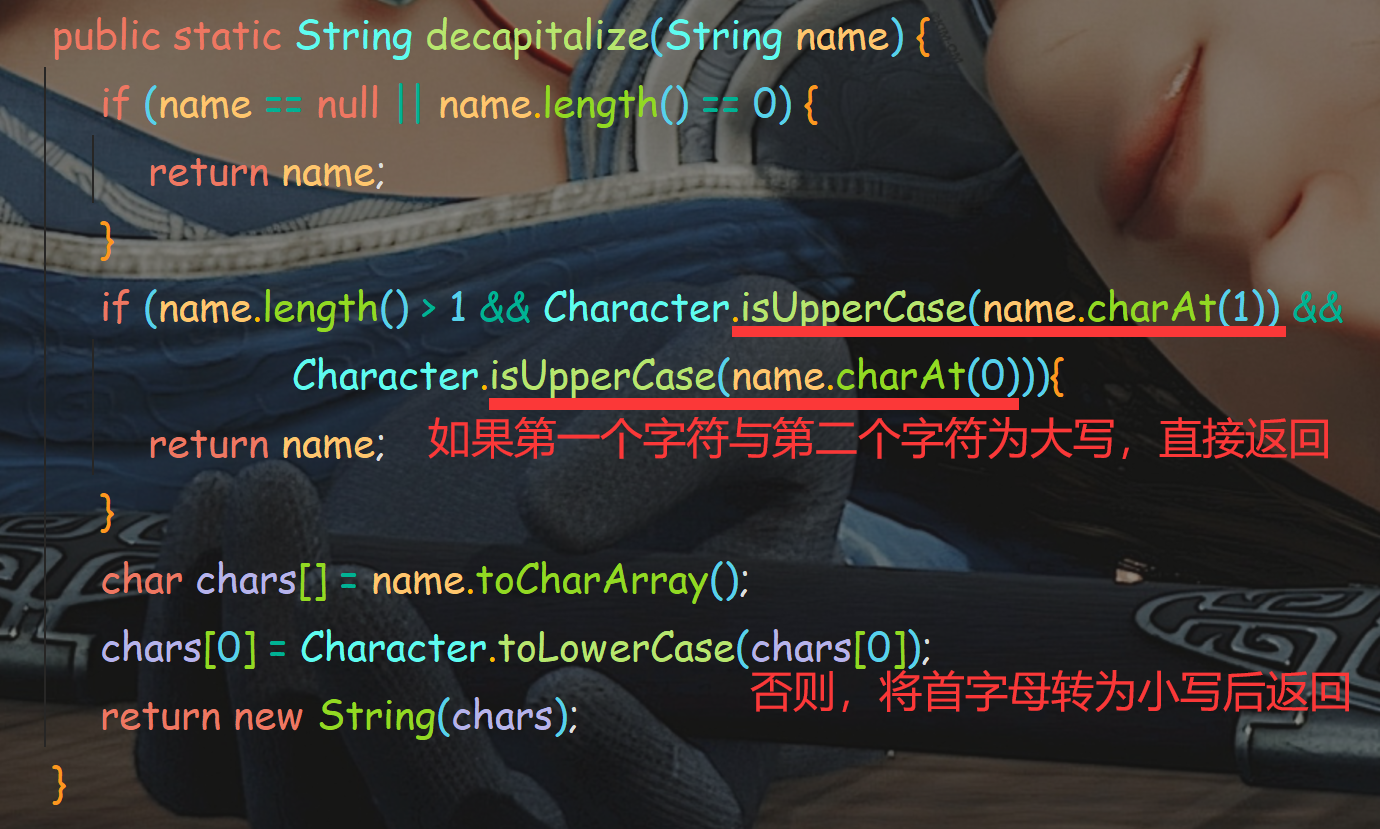
此时我们就能分析得出结论,如果类名长度大于
1
并且满足第一个与第二个字母为大写,则构造的
BeanName
就为原类名,其他正常情况为类名的小驼峰形式,这就解释了
UConfig
类的
BeanName
为什么是原类名了。
而且我们会发现这个方法所在类是来自于
jdk
的。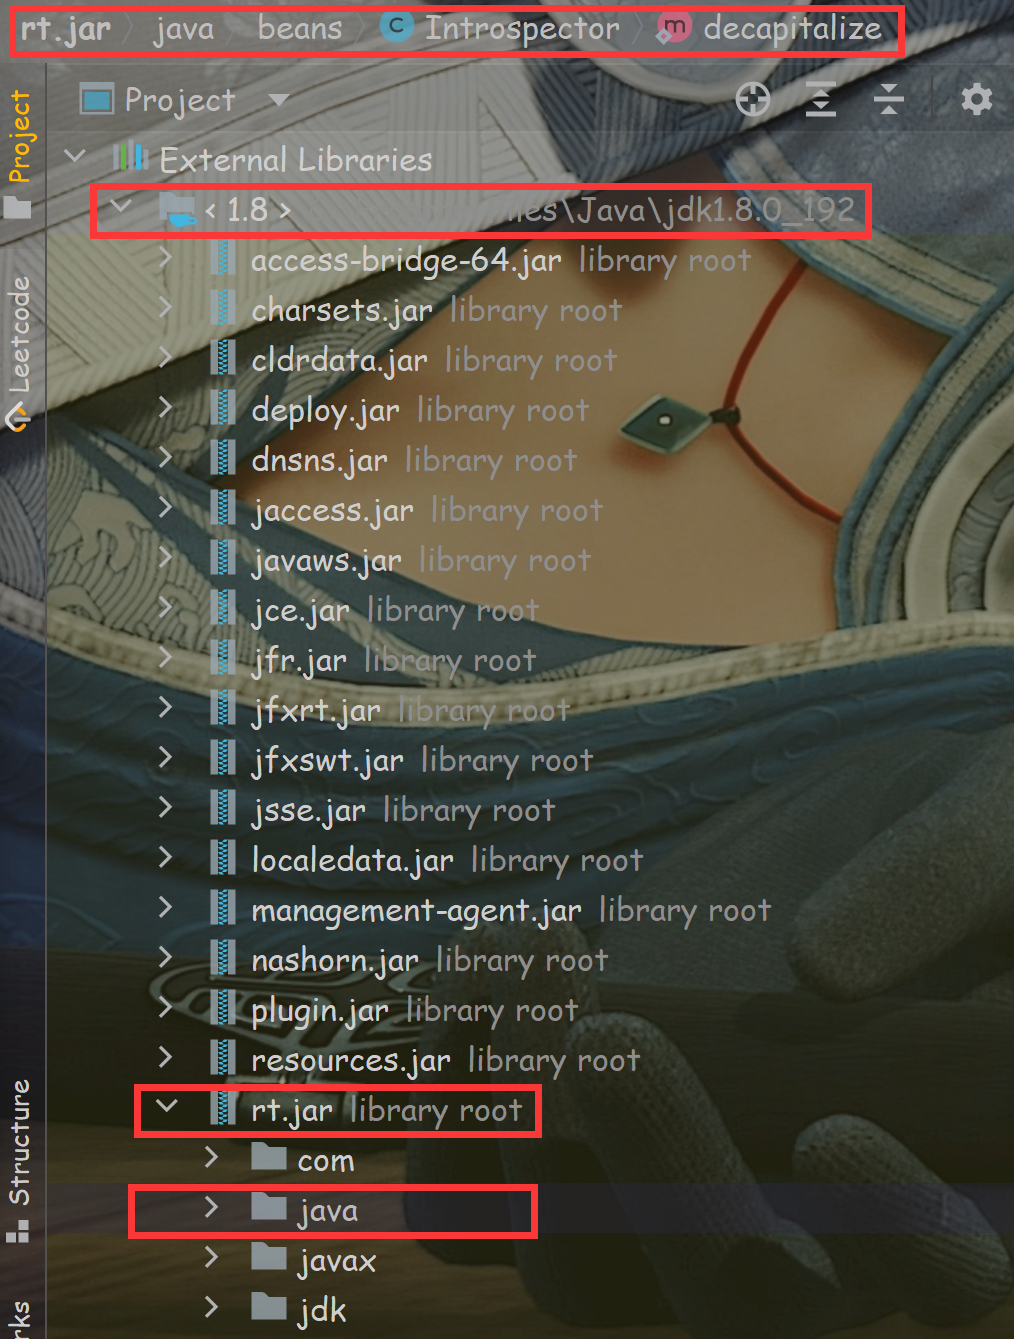
所以,
BeanName
的规范命名规则并不是 Spring 独创的,而依照 Java 标准库的规则进行的。
- 如果类名不存在或类名为空字符串,
BeanName为原类名。 - 如果类名字长度大于1,且第一个与第二个字符为大写,
BeanName为原类名。 - 其他情况,
BeanName为原类名的小驼峰形式。
三. 使用方法注解储存Bean对象
1. 方法注解储存对象的用法
五大类注解是添加到某个类上的,而方法注解是放到方法上的,当一个方法返回的是一个具体的实例对象时,我们就可以使用方法注解
@Bean
来将对象储存到 Spring,但是单单使用一个
@Bean
是不能够成功储存对象的,还需要在方法所在类上使用五大类注解才行,比如搭配一 个@Component 注解,方法注解是不能够单独使用的,
@Bean
注解必须要搭配五大类注解一起使用(Spring为了提升性能所做的规定,毕竟造方法的成本太低了,不能去扫描整个项目的方法吧)。
还是要注意使用必须是在根路径下。
比如我们有一个普通文章的实体类
ArticleInfo
package com.tr.demo.model;import java.time.LocalDateTime;/**
 * 普通的文章实体类
 */publicclassArticleInfo{privateint aid;private LocalDateTime createtime;private String title;private String author;private String content;publicvoidsetAid(int aid){this.aid = aid;}publicvoidsetCreatetime(LocalDateTime createtime){this.createtime = createtime;}publicvoidsetTitle(String title){this.title = title;}publicvoidsetAuthor(String author){this.author = author;}publicvoidsetContent(String content){this.content = content;}@Overridepublic String toString(){return"ArticleInfo{"+"aid="+ aid +", createtime="+ createtime +"\n"+", title='"+ title +'\''+", author='"+ author +'\''+"\n"+", content='"+ content +'\''+'}';}}
下面演示使用
@Bean
方法注解储存对象
package com.tr.demo;import com.tr.demo.model.ArticleInfo;import org.springframework.context.annotation.Bean;import org.springframework.stereotype.Controller;import java.time.LocalDateTime;@ControllerpublicclassArticles{@Bean// 将当前方法返回的对象存储到 IoC 容器public ArticleInfo getArt(){// 伪代码(实际上这里的 Bean 不是 new 出来的)
        ArticleInfo articleInfo =newArticleInfo();
        articleInfo.setAid(1);
        articleInfo.setCreatetime(LocalDateTime.now());
        articleInfo.setTitle("夏日绝句");
        articleInfo.setAuthor("李清照");
        articleInfo.setContent("生当做人杰,死亦为鬼雄。至今思项羽,不肯过江东。");return articleInfo;}publicvoidsayHi(){
        System.out.println("Hi, Articles~");}}
获取方法注解储存的对象时,传入的
BeanName
参数值默认值就是方法名,我上面的代码中方法名为
getArt
,所以获取时,就使用
getArt
作为参数来进行获取。
import com.tr.demo.model.ArticleInfo;import org.springframework.context.ApplicationContext;import org.springframework.context.support.ClassPathXmlApplicationContext;publicclassAPP3{publicstaticvoidmain(String[] args){
        ApplicationContext context =newClassPathXmlApplicationContext("spring-config.xml");
        ArticleInfo article =  context.getBean("getArt", ArticleInfo.class);

        System.out.println(article);}}
运行结果:
2. @Bean的重命名
获取方法注解储存的对象时,传入的
BeanName
参数值默值为方法名,但像上面那样返回对象的方法名称往往是
getXXX
这样式取名的,虽然在语法与实现上是没有问题的,但实际开发写出这样的代码,看起来还是比较别扭的。
实际上注解 @Bean 是可以加参数的,给储存的对象起别名,像下面这个样子。
@ControllerpublicclassArticles{@Bean("article")// 将当前方法返回的对象存储到 IoC 容器public ArticleInfo getArt(){// 伪代码(实际上这里的 Bean 不是 new 出来的)
        ArticleInfo articleInfo =newArticleInfo();
        articleInfo.setAid(1);
        articleInfo.setCreatetime(LocalDateTime.now());
        articleInfo.setTitle("夏日绝句");
        articleInfo.setAuthor("李清照");
        articleInfo.setContent("生当做人杰,死亦为鬼雄。至今思项羽,不肯过江东。");return articleInfo;}publicvoidsayHi(){
        System.out.println("Hi, Articles~");}}
也可以给 Bean 设置多个别名,总结起来有如下几种方式:
//方式一(省略参数名的情况下默认是name)@Bean("article1")//方式二@Bean(name ="article2")//方式三@Bean(value ="article3")//起多个别名@Bean(name ={"article4","article5"})@Bean(value ={"article6","article7"})@Bean({"article8","article9","article10"})
我们按照第 9 行的方式设置,此时获取方法注解储存的对象就能够使用别名来进行获取。

import com.tr.demo.model.ArticleInfo;import org.springframework.context.ApplicationContext;import org.springframework.context.support.ClassPathXmlApplicationContext;publicclassAPP4{publicstaticvoidmain(String[] args){
        ApplicationContext context =newClassPathXmlApplicationContext("spring-config.xml");

        ArticleInfo article1 =  context.getBean("article6", ArticleInfo.class);
        System.out.println(article1);
        System.out.println("-----------------------------------------------------");
        ArticleInfo article2 =  context.getBean("article7", ArticleInfo.class);
        System.out.println(article2);
        System.out.println("-----------------------------------------------------");}}
运行结果: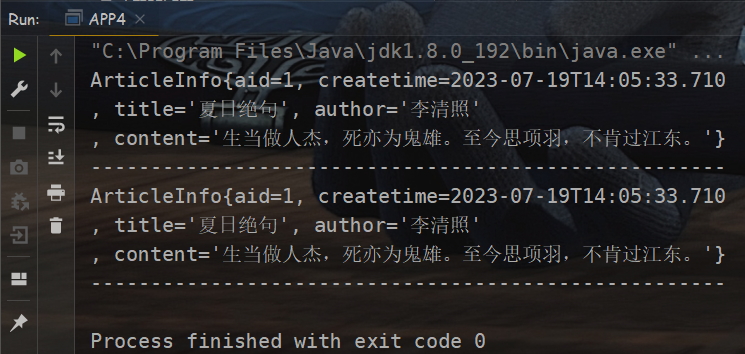
再想一下,当一个 Bean 有别名了,那使用之前那个方法名还能够获取到对象吗?尝试一下:
import com.tr.demo.model.ArticleInfo;import org.springframework.context.ApplicationContext;import org.springframework.context.support.ClassPathXmlApplicationContext;publicclassAPP5{publicstaticvoidmain(String[] args){
        ApplicationContext context =newClassPathXmlApplicationContext("spring-config.xml");

        ArticleInfo article =  context.getBean("getArt", ArticleInfo.class);
        System.out.println(article);}}
运行结果:
此时就能发现是获取不到的
所以使用 @Bean 存储对象的
beanName
命名规则是,当没有设置
name/value
属性时,此时 Bean 的默认名字就是方法名,一旦添加了别名
name/value
属性后,就只能通过重命名的别名来获取 Bean 了,默认的使用方法名获取 Bean 对象就不能使用了。
还要简单注意一下,@Bean 使用时,同一类如果多个 Bean 使用相同的名称,此时程序执行是不会报错的,他会根据类加载顺序和类中代码从上至下的的顺序,将第一个 Bean 存放到 Spring 中,但第一个之后的对象就不会被存放到容器中了,也就是只有在第一次创建 Bean 的时候会将对象和 Bean 名称关联起来,后续再有相同名称的Bean存储时候,容器会自动忽略。
还可以通过类注解
@Order
注解控制类加载顺序(值越小,优先级越高),进而影响 Bean 的存放的先后顺序,这些也比较简单,就不做演示了。
版权归原作者 韵秋梧桐 所有, 如有侵权,请联系我们删除。