
介绍
大多数图像去噪器技术专注于去除AWGN(高斯白噪声)。通常,噪声是综合添加的并且涉及各种技术来去除这些图像。但是随着深度学习的进步,重点已转向为现实世界中的嘈杂彩色图像设计降噪架构。实际的嘈杂图像是通过具有不同设置或在弱光条件下的不同摄像机获得的。在较低的相机ISO设置下或在强光条件下,也可以获得相应的清晰图像。具有干净且嘈杂的图像对,我们可以训练深度学习卷积体系结构以对图像进行降噪。图像去噪效果可能是肉眼可见的。我使用PSNR和SSIM指标来衡量图像去噪器性能。
要解决的问题
不能完全保证在摄影中提供高质量的图像。有时由于光线不足或相机快门速度慢而导致图像损坏。图像在传输过程中以及压缩时都会被破坏。对这些低质量图像进行降噪以使其与理想条件下的图像相匹配是一个非常苛刻的问题。
将归纳到DL的问题
我们有两个图像对,一个是嘈杂的,另一个是干净或真实的图像。我们训练卷积架构以消除噪声。这不是分类问题。在分类中,将“ X”视为特征,将“ Y”视为二进制值或分类值。在图像降噪器中,我们将“ X”作为噪点图像,将“ Y”作为真实图像或干净图像。当我们在图像像素级别上进行操作时,我们将平方损耗用作损耗函数。我们试图使总像素级别损失最小化。诸如adadelta,adam之类的任何现代优化器都可以用作优化器。
测量指标:
PSNR:PSNR块计算两个图像之间的峰值信噪比,以分贝为单位。该比率用作原始图像和压缩图像之间的质量度量。PSNR越高,压缩或重构图像的质量越好。
均方误差(MSE)和峰值信噪比(PSNR)用于比较图像压缩质量。MSE代表压缩图像和原始图像之间的累积平方误差,而PSNR代表峰值误差的量度。MSE的值越小,误差越小。
PSNR = 10log10(R * R / MSE)
R =像素的最大值
MSE =干净像素和噪声像素的均方误差
SSIM:这是一种预测数字电视和电影图像以及其他类型的数字图像和视频的感知质量的方法。SSIM用于测量两个图像之间的相似度。SSIM索引是完整的参考指标;换句话说,图像质量的测量或预测基于初始未压缩或无失真的图像作为参考。
数据来源
我从下面的链接中收集了“Renoir”和“ NIND”数据集。归功于准备这些数据集的人员。从下面的链接中找到有关项目和数据集相关人员的信息。
arxiv:1906.00270
我最初从这些来源收集了约600张图像。图像平均大小为30 MB,并且大小超过2500 * 2500。由于在训练时很难将这些图像适配到内存中,因此我将它们的大小调整为256 * 256并训练了模型。但是后来我发现调整大小并不是一个好主意,因为它会在压缩时增加自身的噪音或信息丢失。然后,我将原始图像切成小块,这很好,没有任何信息丢失。例如,如果图像尺寸为2560 * 2560,我将其切成100块256 * 256。仅用一张图像,我就生成了100多幅图像用于训练。这样,我准备了3791张图像进行训练而577张图像进行测试的数据集。
数据扩充应用于翻转和旋转数据集。
嘈杂和干净的图像的例子

不同的架构/模型
三星MRDNet
三星团队在NTIRE 2020挑战中使用了此体系结构。
相关论文arxiv.org:2005.04117。本文提出了10多种用于现实世界图像降噪的架构,作为2020年CVPRW竞赛的一部分。我使用的是获得第三名的架构。
基于多尺度残差密集块的实像去噪。三星SLSI MSL团队在“NTIRE 2020真实图像降噪挑战”竞赛中提出了MRDN体系结构。
多尺度残差密集网络(Multi-scale Residual Dense Network, MRDN)是基于一种新的基本模块——多尺度残差密集块(Multi-scale Residual Dense Block, MRDB),如图2 (a)所示。MRDB结合了来自ASPP的多尺度特征和传统残差密集块(Residual Dense Block, RDB)的其他特征。如图2 (b)所示,ASPP包含四个并行网络块,分别是Conv 1×1、Conv Rate 6、Conv Rate 12和pooling。Conv Rate 6和Conv Rate 12分别表示3×3膨胀卷积,膨胀率为6和12。Conv Rate 6、Conv Rate 12和图像池化可以很好地捕获块输入的多尺度特征。从ASPP输出的特性被连接和压缩以与RDB的其他特性相结合。为了有一个无缝的本地剩余连接,这个连接特性被另一个Conv 1×1压缩在一个元素级加器之前。MRDB的输出保持了输入的通道数不变,从而避免了复杂度的指数级增长。MRDB作为构建模块,MRDN采用与RDN类似的方式构建网络,MRDB之间通过密集连接进行级联。采用Conv 1×1对mrdb的输出进行级联压缩,并采用全局残差连接获取干净特征。
Keras 代码实现
 def denseBlock(previous_output,ks,depth):
   op_x1=Conv2D(depth,(ks,ks),padding='same',kernel_initializer='he_normal',kernel_regularizer=l2(0.03),\
                bias_regularizer=l2(0.03))(previous_output)
   op_x2=Activation('relu')(op_x1)
   conc1=concatenate([previous_output,op_x2],axis=-1)

   op_x3=Conv2D(depth,(ks,ks),padding='same',kernel_initializer='he_normal',kernel_regularizer=l2(0.03), \
                bias_regularizer=l2(0.03))(conc1)
   op_x4=Activation('relu')(op_x3)
   conc2=concatenate([previous_output,conc1,op_x4],axis=-1)

   op_x5=Conv2D(depth,(ks,ks),padding='same',kernel_initializer='he_normal',kernel_regularizer=l2(0.03), \
                bias_regularizer=l2(0.03))(conc2)
   op_x6=Activation('relu')(op_x5)
   conc3=concatenate([previous_output,conc1,conc2,op_x6],axis=-1)

   op_x7=Conv2D(depth,(ks,ks),padding='same',kernel_initializer='he_normal',kernel_regularizer=l2(0.03), \
                bias_regularizer=l2(0.03))(conc3)
   op_x8=Activation('relu')(op_x7)
   out_aspp=ASPP(previous_output,depth)
   conc3=concatenate([previous_output,conc1,conc2,conc3,op_x8,out_aspp],axis=-1)

   mdr_out=Conv2D(128, (1,1), padding='same',kernel_regularizer=l2(0.03), bias_regularizer=l2(0.03))(conc3)

   final_mdr_out=Add()([mdr_out,previous_output])

   return final_mdr_out

 #ASPP block
 def ASPP(previous_output,depth):
   op_x1=Conv2D(depth,(3,3),padding='same',kernel_initializer='he_normal',kernel_regularizer=l2(0.03), \
                bias_regularizer=l2(0.03))(previous_output)
   op_x2=Activation('relu')(op_x1)


   op_x3 = Conv2D(depth, (1,1), padding='same',kernel_regularizer=l2(0.03), bias_regularizer=l2(0.03))(op_x2)
   op_x3    =  Dropout(0.3)(op_x3)
   op_x4 = Conv2D(depth, (3,3), padding='same',dilation_rate=6,kernel_regularizer=l2(0.03), \
                  bias_regularizer=l2(0.03))(op_x2)
   op_x4    =  Dropout(0.3)(op_x4)
   op_x5 = Conv2D(depth, (3,3), padding='same',dilation_rate=12,kernel_regularizer=l2(0.03), \
                  bias_regularizer=l2(0.03))(op_x2)
   op_x5    =  Dropout(0.3)(op_x5)
   op_x6 = MaxPooling2D((3,3), strides=(1,1), padding='same')(op_x2)

   conc4    = concatenate([op_x3,op_x4,op_x5,op_x6],axis=-1)
   op_x7    = Conv2D(depth, (1,1), padding='same',kernel_regularizer=l2(0.03), bias_regularizer=l2(0.03))(conc4)
   return op_x7

 #Sequential model starts from here.
 depth=128
 first_input=Input(shape=(256,256,3))
 inp1 = Conv2D(depth, (3,3), padding='same',kernel_regularizer=l2(0.03), bias_regularizer=l2(0.03))(first_input)
 inp2 = Conv2D(depth, (3,3), padding='same',kernel_regularizer=l2(0.03), bias_regularizer=l2(0.03))(inp1)

 inp3 = denseBlock(inp2,3,128)
 inp3 =  Dropout(0.3)(inp3)
 inp4 = denseBlock(inp3,3,128)
 inp4 =  Dropout(0.3)(inp4)


 conc = concatenate([inp2,inp3,inp4],axis=-1)

 conv3    = Conv2D(depth, (1,1), padding='same',kernel_regularizer=l2(0.03), bias_regularizer=l2(0.03))(conc)
 conv4    = Conv2D(depth, (3,3), padding='same',kernel_regularizer=l2(0.03), bias_regularizer=l2(0.03))(conv3)
 add      = Add()([inp1,conv4])
 conv5    = Conv2D(depth, (3,3), padding='same',kernel_regularizer=l2(0.03), bias_regularizer=l2(0.03))(add)
 outfinal    = Conv2D(3, (3,3), padding='same',kernel_regularizer=l2(0.03), bias_regularizer=l2(0.03))(conv5)
 #create model
 model=Model(inputs=first_input,outputs = outfinal)
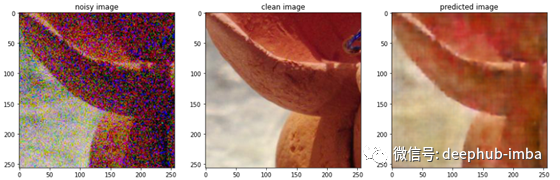
在下面的图中可以看到使用上述模型的预测图像的去噪效果。
MWRCAnet
上述去噪架构由百度Research Vision和HITVPC&HUAWEI团队提出。
arxiv:2005.04117。作为NTIRE 2020年竞赛的一部分,本文介绍了10多个用于真实世界图像去噪的架构。我使用的是一个赢得了第二排名的架构,如上所示。该体系结构包括一个称为Residual Channel attention block的特殊块。
 class dwt(Layer):
     def __init__(self, **kwargs):
         super().__init__(**kwargs)

     def get_config(self):
       config = super().get_config().copy()

       return config

     def call(self, x):

         x1 = x[:, 0::2, 0::2, :] #x(2i−1, 2j−1)
         x2 = x[:, 1::2, 0::2, :] #x(2i, 2j-1)
         x3 = x[:, 0::2, 1::2, :] #x(2i−1, 2j)
         x4 = x[:, 1::2, 1::2, :] #x(2i, 2j)
         print(x1)

         x_LL = x1 + x2 + x3 + x4
         x_LH = -x1 - x3 + x2 + x4
         x_HL = -x1 + x3 - x2 + x4
         x_HH = x1 - x3 - x2 + x4

         return Concatenate(axis=-1)([x_LL, x_LH, x_HL, x_HH])


 class iwt(Layer):
     def __init__(self, **kwargs):
         super().__init__(**kwargs)

     def get_config(self):
       config = super().get_config().copy()

       return config

     def call(self, x):
         x_LL = x[:, :, :, 0:x.shape[3]//4]
         x_LH = x[:, :, :, x.shape[3]//4:x.shape[3]//4*2]
         x_HL = x[:, :, :, x.shape[3]//4*2:x.shape[3]//4*3]
         x_HH = x[:, :, :, x.shape[3]//4*3:]

         x1 = (x_LL - x_LH - x_HL + x_HH)/4
         x2 = (x_LL - x_LH + x_HL - x_HH)/4
         x3 = (x_LL + x_LH - x_HL - x_HH)/4
         x4 = (x_LL + x_LH + x_HL + x_HH)/4

         y1 = K.stack([x1,x3], axis=2)
         y2 = K.stack([x2,x4], axis=2)
         shape = K.shape(x)
         return K.reshape(K.concatenate([y1,y2], axis=-1), K.stack([shape[0],\
                shape[1]*2, shape[2]*2, shape[3]//4]))


 def channel_attention(input_feature,channel,ratio):
   x=GlobalAveragePooling2D()(input_feature)
   x=Reshape((1,1,channel))(x)
   assert x.shape[1:] == (1,1,channel)
   x=Conv2D(channel // ratio,1,activation='relu',kernel_initializer='he_normal',\
            use_bias=True,bias_initializer='zeros')(x)
   assert x.shape[1:] == (1,1,channel//ratio)
   x = Conv2D(channel,1,activation='sigmoid',kernel_initializer='he_normal',\
              use_bias=True,bias_initializer='zeros')(x)
   x = multiply([input_feature, x])
   return x
 #channel_attention(first_input,64,4)


 def RCAB(prev_input,filters,kernal_size,blocks):
   for i in range(blocks):
     if (i==0):
       x=Conv2D(filters,kernal_size,padding='same')(prev_input)
     else:
       x=Conv2D(filters,kernal_size,padding='same')(lip)
     x= PReLU(alpha_initializer='he_normal')(x)
     x=Conv2D(filters,1,padding='same')(x)
     x=channel_attention(x,filters,4)
     if (i==0):
       lip=Add()([prev_input,x])
     else:
       lip=Add()([lip,x])
   x=Conv2D(filters,kernal_size,padding='same')(x)
   x=Add()([prev_input,x])
   return x
   #return Model(inputs=prev_input,outputs=x)

 def Model_Creation():
   first_input=Input(shape=(256,256,3))

   #encoder3
   first=dwt()(first_input)
   inp=Conv2D(64,3,padding='same')(first)
   inp=PReLU(alpha_initializer='he_normal')(inp)
   second=RCAB(inp,64,3,3)


   #encoder2
   out_dwt_second = dwt()(second)
   inp=Conv2D(256,3,padding='same')(out_dwt_second)
   inp=PReLU(alpha_initializer='he_normal')(inp)
   third=RCAB(inp,256,3,3)

   #encoder1
   out_dwt_third=dwt()(third)
   inp=Conv2D(512,3,padding='same')(out_dwt_third)
   inp=PReLU(alpha_initializer='he_normal')(inp)
   inp=RCAB(inp,512,3,3)


   #decoder1
   inp=RCAB(inp,512,3,3)
   inp=Conv2D(1024,3,padding='same')(inp)
   inp=PReLU(alpha_initializer='he_normal')(inp)
   inp=iwt()(inp)
   inp=Add()([third,inp])

   #decoder2
   inp=RCAB(inp,256,3,3)
   inp=Conv2D(256,3,padding='same')(inp)
   inp=PReLU(alpha_initializer='he_normal')(inp)
   inp=iwt()(inp)
   inp=Add()([second,inp])


   #decoder3
   inp=RCAB(inp,64,3,3)
   inp=Conv2D(12,3,padding='same')(inp)
   inp=PReLU(alpha_initializer='he_normal')(inp)
   inp=iwt()(inp)

   out=Add()([first_input,inp])

   return Model(inputs=first_input,outputs=out)


 model=Model_Creation()
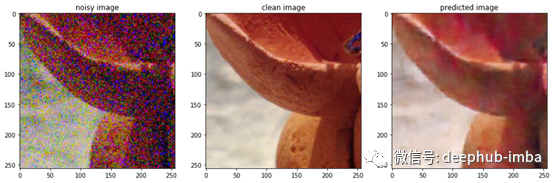
在下图中,使用上述模型可以在预测图像中看到去噪效果。
EDSR模型(Enhanced Deep Residual Network):
arxiv:1707.02921概念:实际上,这个网络模型是为了提高调整后的图像的质量,当它们再次转换到一个更高的维度。我对上述架构进行了修改,用于对摄影图像进行图像去噪
 ########################################## EDSR MODEL #####################################
 def EDSR(scale, num_filters=256, res_blocks=8, res_block_scaling=None):
     x_input = Input(shape=(256, 256, 3))

     # assign value of x to x_res block for further operations
     x = x_res_block = Conv2D(num_filters, 3, padding='same')(x_input)

     # Goes in number of res block
     for i in range(res_blocks):
         x_res_block = ResBlock(x_res_block, num_filters, res_block_scaling)
     # convolution
     x_res_block = Conv2D(num_filters, 3, padding='same',kernel_initializer='he_normal')(x_res_block)
     x_res_block=LeakyReLU(alpha=0.1)(x_res_block)

     # add res_block output and original normalizwd input
     x = Add()([x, x_res_block])

     # upsampling
     x = Upsampling(x, scale, num_filters)
     x = Conv2D(3, 3, padding='same')(x)
     x=AveragePooling2D(pool_size=(2,2),strides=(2,2),padding='same')(x)

     x = Conv2D(3, 3, padding='same')(x)
     return Model(x_input, x, name="EDSR")

 ################################## ResBlock Architecture ################################
 def ResBlock(x_input, num_filters):
     '''This function Implementes Proposed ResBlock Architecture as per EDSR paper'''
     # proposed ResBlock ==> Conv --> Relu --> Conv --> Scaling(mul) --> Add
     x = Conv2D(num_filters, 3, padding='same', kernel_initializer='he_normal')(x_input)
     x=LeakyReLU(alpha=0.1)(x)
     x = Conv2D(num_filters, 3, padding='same',kernel_initializer='he_normal')(x)
     x=LeakyReLU(alpha=0.1)(x)
     x=AveragePooling2D(pool_size=(2,2),strides=(1,1),padding='same')(x)

     return x
 ######################################### Upsampling #######################################
 def Upsampling(x, scale, num_filters):
     '''This function upsampling as mentioned in EDSR paper'''
     def upsample(x, factor, **kwargs):
         x = Conv2D(num_filters * (factor ** 2), 3, padding='same', **kwargs)(x)
         return Lambda(shuffle_pixels(scale=factor))(x)

     if scale == 2:
         x = upsample(x, 2, name='conv2d_1_scale_2')
     elif scale == 3:
         x = upsample(x, 3, name='conv2d_1_scale_3')
     elif scale == 4:
         x = upsample(x, 2, name='conv2d_1_scale_2')
         x = upsample(x, 2, name='conv2d_2_scale_2')

     return x

 model=EDSR(2, num_filters=128, res_blocks=8, res_block_scaling=None)
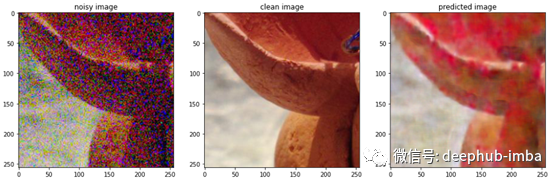
在下面的图中可以看到使用上述模型的预测图像的去噪效果。
效果总结
PSNR
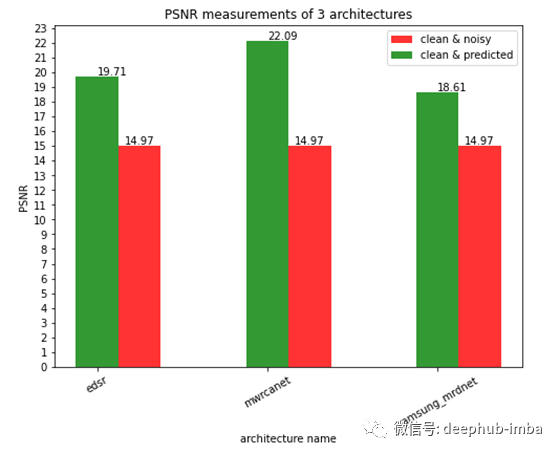
如上图所示,mwrcanet体系结构显示了PSNR值的最高。
SSIM
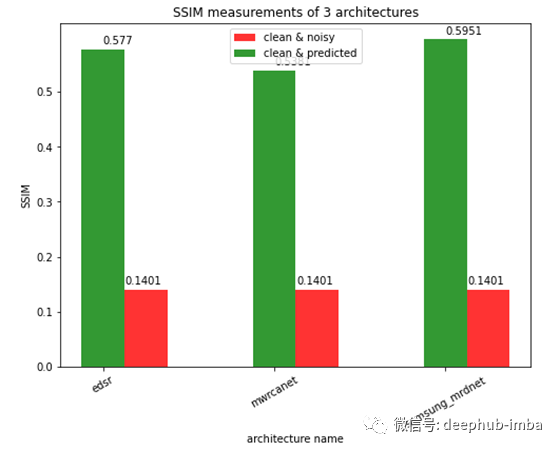
如上图所示,samsung_mrdnet显示了SSIM方面的最高改进。
我还做过的其他尝试:
我用adam optimizer尝试了各种初始学习率,0.0001效果最好
尝试了3种不同的架构,涉及不同的研究
最初,我使用了图像后,调整他们,但调整使信息损失。所以我把原始图像切成小块,用它来训练。这对提高结果有很好的效果。
例如,如果图像大小是30003000,我从一个完整的图像中获得了300300总共100张图像,以避免在调整大小后丢失信息
由于mrdn模型是过拟合的,采用了正则化和dropout
使用新的概念,如PRelu激活,iwt和dwt(小波变换)与mwrcanet模型
结论
三种模型均获得了较好的结果。在PSNR值方面,mwrcanet优于其他所有架构。在SSIM方面,三星- mrdn优于其他任何架构。但是mwrcanet架构产生的结果非常接近于人眼的干净图像。从EDSR架构修改中获得的结果也非常好,接近顶层架构,我认为这是一个基线模型
进一步的讨论
在此,将所有三个颜色通道同时输入到模型中,得到去噪图像。我们可以尝试将单独的通道分别输入,得到每个部分对应的去噪图像,然后将它们组合。所以对于每个通道,我们可以获得单独的权值或者给每个通道,使用单一的架构得到去噪后的通道图像,使用于训练的数据点数量增加3倍。我已经把原始图像切成碎片,但我没有重新组合它们。我们可以对图像的去噪部分进行估计,并将其组合生成一幅大图像。
最后本文的代码:https://github.com/Anand310892/Real-world-photographic-image-denoiser
作者:
deephub翻译组