前言
iOS越狱为用户打开了无限的可能性,其中之一是便是开发系统级插件,为了确保应用程序一直保持在前台,即使在意外情况下也是如此。
本文将向您展示如何轻松编写这样的插件,让我们开始探索iOS系统插件的世界吧!
一、目标
学会创建功能强大的iOS系统插件。
二、开发环境和工具清单
- mac系统
- frida:动态调试
- 已越狱iOS设备(iOS12.5.5):动态调试及插件测试
三、步骤
1、定位关键函数
SpringBoard是iOS系统非常重要的一个系统应用程序,它为用户提供了访问和管理应用程序的主要方式,同时也是用户与设备交互的一个重要界面。咱们今天的调试目标就是它。
使用frida-trace动态调试地,如何给定关键词来缩小函数范围,我在这有几点经验:
- 根据类的前缀来减少不相关的类:如果你要跟踪的库为CoreFoundation.framework。那对应的trace为
frida-trace -UF -m "*[CF* *]"同样,如果你要跟踪的库为AVFoundation.framework。那对应的trace为frida-trace -UF -m "*[AV* *]"这种命名约定的背后是,iOS系统库中的类名通常采用库名的首字母缩写加上具体类名的形式,以确保类名的唯一性和可读性。例如,MapKit.framework中的类MKMapView.h、CoreLocation.framework中的类CLLocationManager.h、以及AVFoundation.framework中的类AVCaptureSession.h都遵循了这一约定。为什么UIKit.framework里的是UILabel.h,而不是UIKLabel.h呢?因为这货出现得太早了,当时的命名规范还未形成。为什么Foundation.framework里的是NSString.h,而不是FString.h呢?这货也一样,太早了,命名不规范。NS的全称是NeXTStep框架,也就是Objective-c语言早期的实现之一,更多信息请google。- 根据你的目标来限定关键词,如你想要跟踪的功能和定位有关系。那你可以尝试trace
"*[*Location* *]"或"*[* *Location*]"。或者你要跟踪的和发送消息有关系。那你可以尝试trace"*[* *sendMsg*]"或"*[* *sendMsg]"。注:在这需要注意字母的大小写。比如Location,这个L有可能是写,这种情况你可以这样trace"*[* ocation*]",不写这个L就好了嘛。
那试想一下。我们今天的插件是不是和应用有关系,那它的关键词是不是就应该是Application或App。还有状态有关系。应用的切换,就在在各种状态之前变化,那这关键词是不是就是State或state。根据经验的第一条。咱们目标应用SpringBoard,那类名的前缀是不是应该是SB。
连上你的手机,并启动任意程序。在终端执行
frida-trace -U -m "*[SB* *]" -o a.log SpringBoard
,然而,以SB开头的类太多了,这命令trace了3万多个函数,范围太广,手机直接卡死了…

重新越狱调整命令为
frida-trace -U -m "*[SB*pp* *]" -o a.log SpringBoard
,将应用切换到后台,获取到关键日志如下:
....................................
  仍然太多了,你也可以一点点分析,看看哪些函数可疑,然后再跟踪。
再调试trace命令,加上state
frida-trace -U -m "*[SB*pp* *tate*]" -o a.log SpringBoard
,将应用切换到后台,获取到的部分关键日志如下:
-[SBMainDisplayWorkspaceAppInteractionEventSource layoutStateTransitionCoordinator:0x283547690 transitionDidEndWithTransitionContext:0x28275c900]
-[SBAppToAppWorkspaceTransaction shouldPerformToAppStateCleanupOnCompletion]
-[SBToAppsWorkspaceTransaction performToAppStateCleanup]
-[SBWorkspaceApplicationSceneTransitionContext layoutState]
-[SBWorkspaceApplicationSceneTransitionContext previousLayoutState]
-[SBApplication _noteProcess:0x109b51300 didChangeToState:0x283be0880]
-[SBApplication _updateProcess:<FBApplicationProcess: 0x109b51300; Cydia (com.saurik.Cydia); pid: 20212> withState:<FBProcessState: 0x283be0880; pid: 20212; taskState: Running; visibility: Background>]
-[SBApplication _internalProcessState]
-[SBApplicationProcessState taskState]
-[SBApplication _internalProcessState]
-[SBApplicationProcessState _initWithProcess:0x109b51300 stateSnapshot:0x283be0880]
-[SBApplication _setInternalProcessState:0x283bf8f40]
-[SBApplicationProcessState taskState]
-[SBApplicationProcessState taskState]
-[SBApplicationAutoLaunchService _applicationProcessStateDidChange:0x2835676f0]
-[SBApplication processState]
-[SBApplicationProcessState taskState]
-[SBApplication _noteProcess:0x109b51300 didChangeToState:0x283b07b20]
-[SBApplication _updateProcess:<FBApplicationProcess: 0x109b51300; Cydia (com.saurik.Cydia); pid: 20212> withState:<FBProcessState: 0x283b07b20; pid: 20212; taskState: Suspended; visibility: Background>]
-[SBApplication _internalProcessState]
-[SBApplicationProcessState taskState]
-[SBApplication _internalProcessState]
-[SBApplicationProcessState _initWithProcess:0x109b51300 stateSnapshot:0x283b07b20]
-[SBApplication _setInternalProcessState:0x283b98ea0]
-[SBApplicationProcessState taskState]
-[SBApplicationProcessState taskState]
-[SBApplicationAutoLaunchService _applicationProcessStateDidChange:0x283544690]
-[SBApplication processState]
-[SBApplication _internalProcessState]
从以上信息我们提取出关键类为
SBApplication
,可疑函数
-[SBApplication _noteProcess:0x109b51300 didChangeToState:0x283b07b20]
,跟踪该类
frida-trace -U -m "-[SBApplication _noteProcess:didChangeToState:]" -o a.log SpringBoard
,js代码如下:
{onEnter(log, args, state){log(`-[SBApplication _noteProcess:${ObjC.Object(args[2])} didChangeToState:${ObjC.Object(args[3])}]`);},onLeave(log, retval, state){}}
应用切到后台,获取到日志如下:
-[SBApplication _noteProcess:<FBApplicationProcess: 0x113b1e540; Cydia (com.saurik.Cydia); pid: 20869> didChangeToState:<FBProcessState: 0x283bd71e0; pid: 20869; taskState: Running; visibility: Background>]
-[SBApplication _noteProcess:<FBApplicationProcess: 0x113b1e540; Cydia (com.saurik.Cydia); pid: 20869> didChangeToState:<FBProcessState: 0x283b82660; pid: 20869; taskState: Suspended; visibility: Background>]
根据日志信息,可以看出。第一个参数里包含了我们当前的应用信息。第二个参数则是应用的状态。Running、Suspended、Not Running。
至此,目标函数已找到。
注:目标函数不止这一个,只要你通过你自己的关键词定位,尝试,也许是找到的其他函数。只要应用的状态正确且唯一,都可以使用。比如我之前调试过程中找到的函数是
[SBMainWorkspace process:stateDidChangeFromState:toState:]
,也是可以用的。
2、编写插件代码
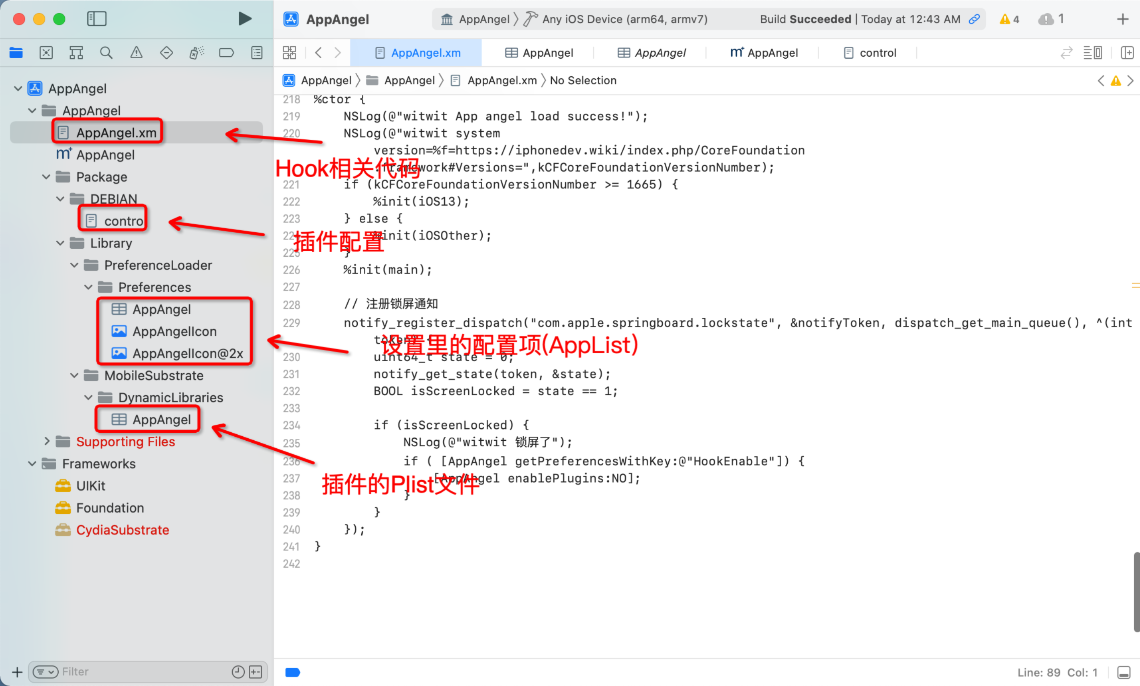
使用Xcode的MonkeyDev插件的Logos Tweak来创建插件工程:

应用状态hook代码如下:
%hook SBMainWorkspace

-(void)process:(id)arg1 stateDidChangeFromState:(id)arg2 toState:(id)arg3{%orig;// arg1的类型为:FBApplicationProcess,获取包名的方法名为bundleIdentifier// arg3的类型为:FBProcessState,获取到状态的方法名为taskState// 在这查找类对应的头文件:https://developer.limneos.net/index.php

    NSString *bundleID =[arg1 valueForKey:@"bundleIdentifier"];
    BOOL isValid =[AppAngel validBundleID:bundleID];int toState =[[arg3 valueForKey:@"taskState"] intValue];// 调试可得:2运行,3后台,1杀死NSLog(@"witwit =%@=%@=", bundleID, arg3);NSLog(@"witwit hook=%d=%d=", isValid, toState);if(isValid {if(toState ==3){[AppAngel launchApp:bundleID];}elseif(toState ==1){[AppAngel performSelector:@selector(launchApp:) withObject:bundleID afterDelay:1];}}}%end
由于插件开启后,目标应用无法切换到后台,这时你想关闭插件咋办?于是有了关闭快捷键音量-或电源键,相关hook代码如下:
%hook VolumeControl
-(void)increaseVolume {
    NSTimeInterval nowtime = [[NSDate date] timeIntervalSince1970];
    NSLog(@"witwit iosother increaseVolume");

    if (nowtime - g_volume_up_time < 1) {
       g_volume_up_count += 1;
       if (g_volume_up_count >= 2) {
            g_volume_up_count = 0;
            [AppAngel enablePlugins:YES];
        }
    } else {
        g_volume_up_count = 0;
    }
    %orig;
    g_volume_up_time = nowtime;
}

-(void)decreaseVolume {
    NSTimeInterval nowtime = [[NSDate date] timeIntervalSince1970];
    NSLog(@"witwit iosother decreaseVolume");

    if (nowtime - g_volume_down_time < 1) {
       g_volume_down_count += 1;
       if (g_volume_down_count >= 2) {
            g_volume_down_count = 0;
            [AppAngel enablePlugins:NO];
        }
    } else {
        g_volume_down_count = 0;
    }
    %orig;
    g_volume_down_time = nowtime;
}

// 在使用音量键开启或关闭插件的toast在iOS12系统中会和音量弹窗重叠,hook音量弹窗
- (BOOL)_HUDIsDisplayableForCategory:(NSString *)category {
    if ([category isEqualToString:@"Audio/Video"]) {
        return NO;
    }
    return %orig;
}

%end
电源键监听相关代码如下:
// 注册锁屏通知
notify_register_dispatch("com.apple.springboard.lockstate", ¬ifyToken, dispatch_get_main_queue(), ^(int token) {
uint64_t state = 0;
notify_get_state(token, &state);
BOOL isScreenLocked = state == 1;
if (isScreenLocked) {
NSLog(@"witwit 锁屏了");
if ( [AppAngel getPreferencesWithKey:@"HookEnable"]) {
[AppAngel enablePlugins:NO];
}
}
});
由于我们可以会对特定的App进行配置。于是使用AppList插件来实现该界面:
相关源码如下:
<?xml version="1.0" encoding="UTF-8"?>
<!DOCTYPE plist PUBLIC "-//Apple//DTD PLIST 1.0//EN" "http://www.apple.com/DTDs/PropertyList-1.0.dtd">
<plist version="1.0">
<dict>
    <key>entry</key>
    <dict>
        <key>bundle</key>
        <string>AppList</string>
        <key>cell</key>
        <string>PSLinkCell</string>
        <key>icon</key>
        <string>/Library/PreferenceLoader/Preferences/AppAngelIcon.png</string>
        <key>isController</key>
        <string>1</string>
        <key>label</key>
        <string>应用天使</string>
        <key>ALSettingsPath</key>
        <string>/var/mobile/Library/Preferences/com.witchan.AppAngel.plist</string>
        <key>ALSettingsKeyPrefix</key>
        <string>witwit-</string>
        <key>ALChangeNotification</key>
        <string>com.rpetrich.applist.sample.notification</string>
        <key>ALAllowsSelection</key>
        <string>1</string>
        <key>ALSectionDescriptors</key>
        <array>
            <dict>
                <key>items</key>
                <array>
                    <dict>
                        <key>text</key>
                        <string>关于我</string>
                        <key>action</key>
                        <string>launchURL</string>
                        <key>url</key>
                        <string>https://mp.weixin.qq.com/s/WERMNPzW6WV5YGFthVqCRg</string>
                    </dict>
                </array>
            </dict>
            <dict>
                <key>footer-title</key>
                <string>连按音量+键开启插件,连按音量-或电源键停止插件                                                         </string>
                <key>items</key>
                <array>
                    <dict>
                        <key>cell-class-name</key>
                        <string>ALSwitchCell</string>
                        <key>default</key>
                        <string>NO</string>
                        <key>ALSettingsKey</key>
                        <string>witwit-HookEnable</string>
                        <key>text</key>
                        <string>插件开关</string>
                    </dict>
                </array>
            </dict>
            <dict>
                <key>title</key>
                <string>用户应用</string>
                <key>predicate</key>
                <string>isSystemApplication = FALSE</string>
                <key>cell-class-name</key>
                <string>ALSwitchCell</string>
                <key>icon-size</key>
                <string>29</string>
                <key>suppress-hidden-apps</key>
                <string>1</string>
            </dict>
            <dict>
                <key>title</key>
                <string>系统应用</string>
                <key>predicate</key>
                <string>isSystemApplication = TRUE</string>
                <key>cell-class-name</key>
                <string>ALSwitchCell</string>
                <key>icon-size</key>
                <string>29</string>
                <key>suppress-hidden-apps</key>
                <string>1</string>
            </dict>
        </array>
    </dict>
</dict>
</plist>
总结
本文主要系统插件的实现过程进行了分析及试验,插件名叫【应用天使】已在iOS12和15系统上测试并通过,已上传到bigboss源。需要的同学请可下载使用,当你在使用中遇到任何问题也可向我反馈。如需要插件完整源码,请公众号回复【应用天使】即可获取完整代码。
注:在iOS15系统中,bigboss源的AppList插件不支持,请从https://repo.palera.in/源里下载并安装AppList,或者自行下载支持iOS15的AppList。
提示:阅读此文档的过程中遇到任何问题,请关住工众好【*
移动端Android和iOS开发技术分享】或+99 君羊【
812546729*】
版权归原作者 移动端小陈 所有, 如有侵权,请联系我们删除。
