1、消息队列概念
1.1 消息队列是什么
消息队列(Message Queue MQ)是实现应用之间数据通信的一种机制,采用先进先出的数据结构和生产者消费者设计模式实现通信。
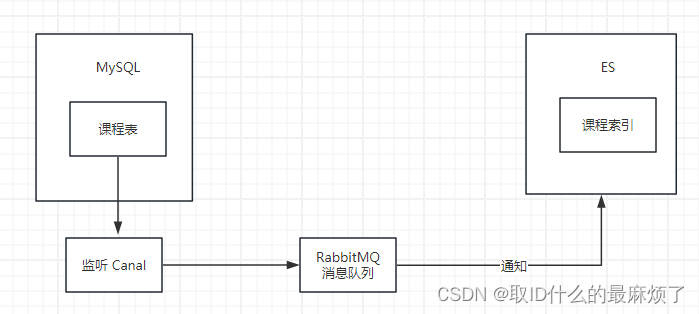

1.2 消息队列有什么作用
消息队列的优势:
- 解耦
- 异步
- 削峰
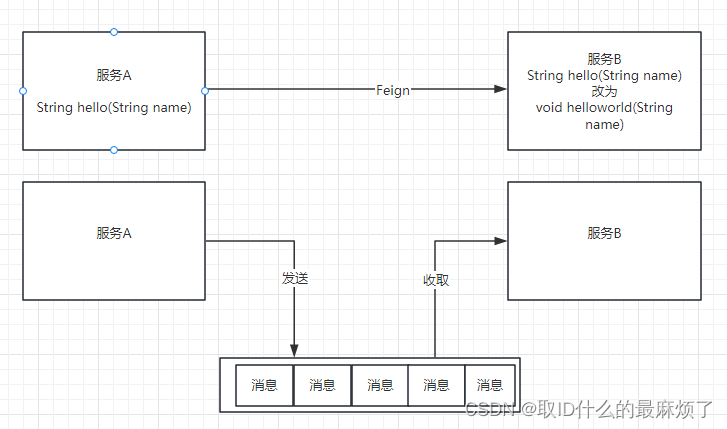
1.2.1 解耦
实现生产者和消费者的解耦,生产者和消费者不直接调用,也不用关心对方如何处理,代码的维护性提高
例如:使用openfeign实现服务调用,如果被调用服务的接口发生修改,服务调用方也需要进行修改,服务之间的耦合性较高,不利于开发和维护
1.2.2 异步
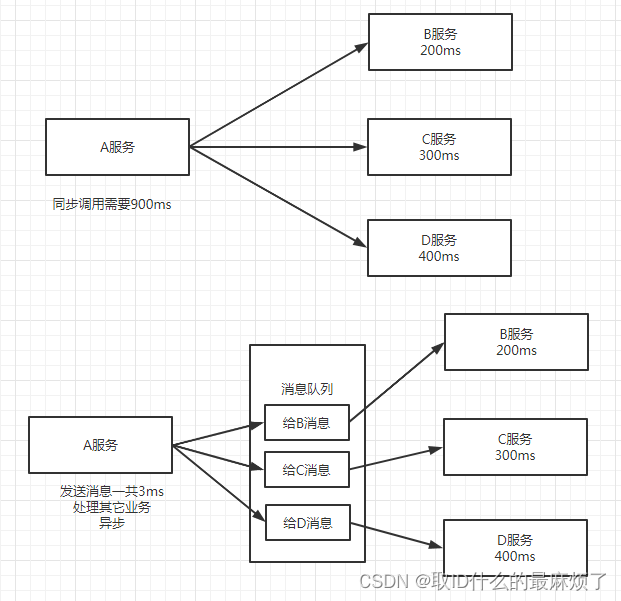
同步调用,服务A调用服务B,必须等待服务B执行完业务,服务A才能执行其它业务
异步调用,服务A发送消息给消息队列,马上返回完成其它业务,不用等待服务B执行完
1.2.3 削峰
可以通过控制消息队列的长度来限制请求流量,从而达到限流保护服务器的作用
消息队列的缺点:
- 提高系统的复杂性
- 降低系统的可用性
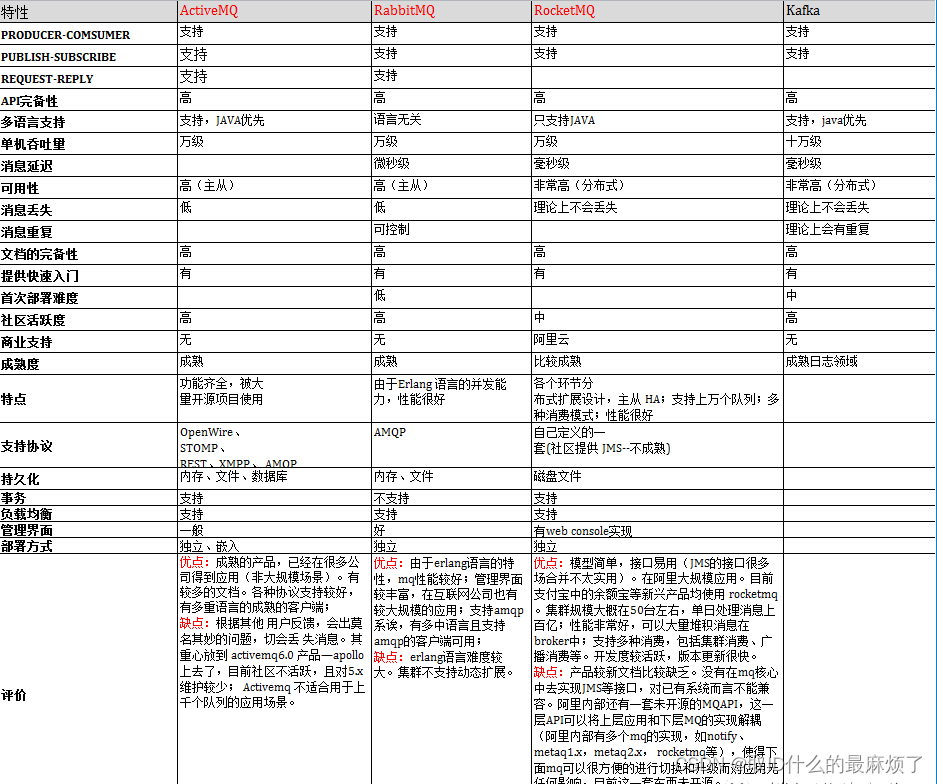
1.3 主流的消息队列
主流的MQ:
- ActiveMQ
- RabbitMQ
- RocketMQ
- Kafka
1.4 消息队列的基本概念
- 生产者向消息队列发送消息的服务
- 消费者从消息队列取消息的服务
- 队列 queue存放消息的容器,采用FIFO数据结构
- 交换机 exchange实现消息路由,将消息分发到对应的队列中
- 消息服务器 Broker进行消息通信的软件平台服务器
- 虚拟主机 virtual host类似于namespace,将不同用户的交换机和队列区分开来
- 连接 connection网络连接
- 通道 channel数据通信的通道

2、安装RabbitMQ
2.1 Linux安装
1)安装erlang
wget https://packages.erlang-solutions.com/erlang-solutions-1.0-1.noarch.rpm
rpm -Uvh erlang-solutions-1.0-1.noarch.rpm
yum install epel-release
yum install erlang
2) 安装rabbitmq 目前的最新版本 支持erlang24
wget https://github.com/rabbitmq/rabbitmq-server/releases/download/v3.9.7/rabbitmq-server-3.9.7-1.el7.noarch.rpm
yum install rabbitmq-server-3.9.7-1.el7.noarch.rpm
3) 启动rabbitmq
service rabbitmq-server start
4) 启用管理工具
rabbitmq-plugins enable rabbitmq_management
5) 防火墙允许端口
firewall-cmd --permanent --add-port=15672/tcp
firewall-cmd --permanent --add-port=5672/tcp
6) 提示不能使用localhost登录,添加远程登录的用户
rabbitmqctl add_user admin admin
rabbitmqctl set_user_tags admin administrator
7) 设置开机启动输入下面命令
chkconfig rabbitmq-server on
2.2 Windows安装
1)下载erlang和RabbitMQ安装包
2)安装erlang
3)安装rabbitmq
4)打开菜单输入命令,启动管理工具
rabbitmq-plugins enable rabbitmq_management
5)启动rabbitMQ
net start rabbitmq
net stop rabbitmq
6)浏览器输入: http://localhost:15672 账号密码都是guest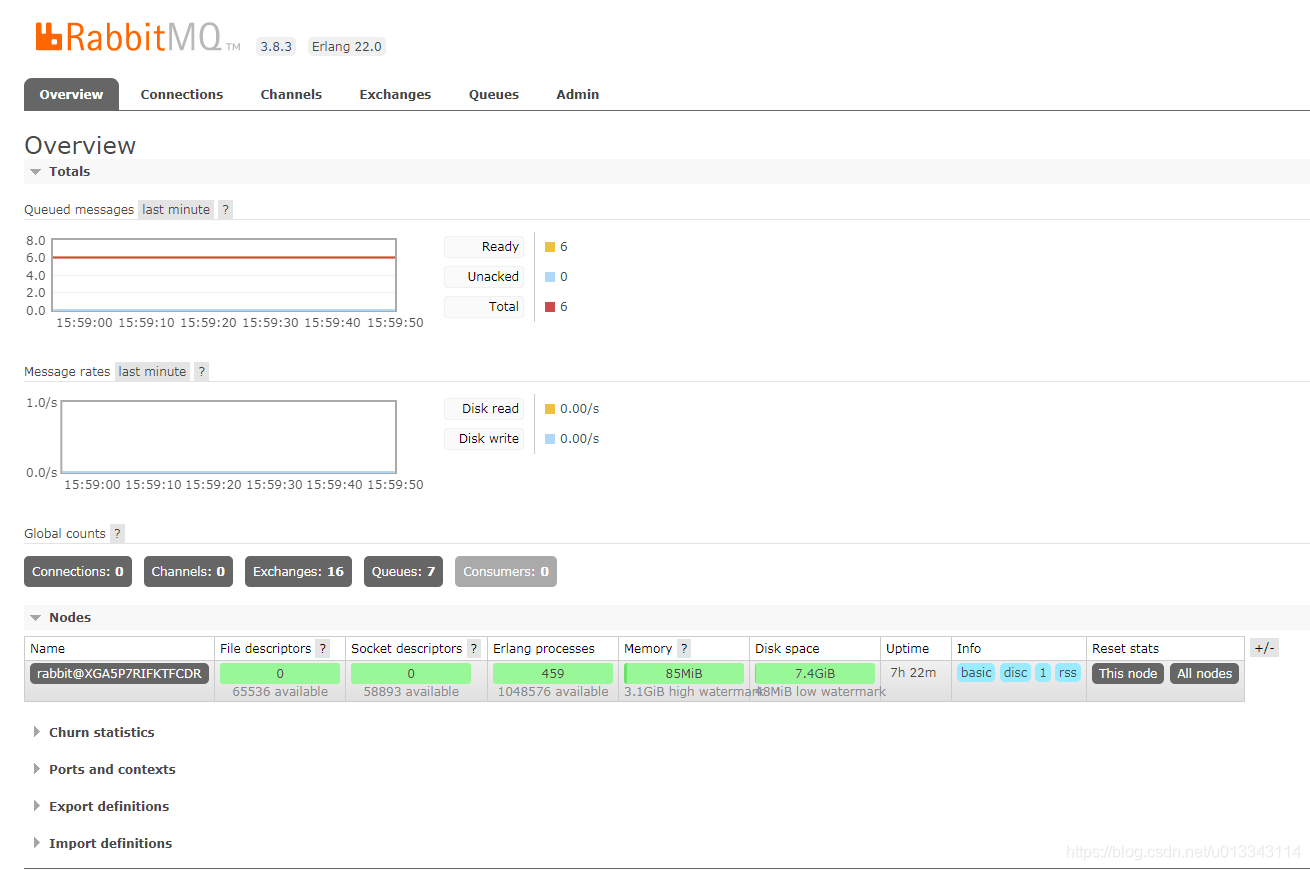
3、RabbitMQ的基本使用
3.1 添加用户
不同的系统可以使用各自的用户登录RabbitMQ,可以在Admin的User页面添加新用户
3.2 添加虚拟主机
虚拟主机相当于一个独立的MQ服务,有自身的队列、交换机、绑定策略等。
添加虚拟主机
3.2 添加队列
不同的消息队列保存不同类型的消息,如支付消息、秒杀消息、数据同步消息等。
添加队列,需要填写虚拟主机、类型、名称、持久化、自动删除和参数等。
3.3 添加交换机
生产者将消息发送到交换机Exchange,再由交换机路由到一个或多个队列中;
交换器的类型有fanout、direct、topic、headers这四种,下篇文章将详细介绍。
添加交换机
4、RabbitMQ的五种消息模型

RabbitMQ提供了多种消息模型,官网上第6种是RPC不属于常规的消息队列。
属于消息模型的是前5种:
- 简单的一对一模型
- 工作队列模型 ,一个生产者将消息分发给多个消费者
- 发布/订阅模型 ,生产者发布消息,多个消费者同时收取
- 路由模型 ,生产者通过关键字发送消息给特定消费者
- 主题模型 ,路由模式基础上,在关键字里加入了通配符
4.1 一对一模型

最基本的队列模型:
一个生产者发送消息到一个队列,一个消费者从队列中取消息。
4.1.1 操作步骤
1)启动Rabbitmq,在管理页面中创建用户admin
2)使用admin登录,然后创建虚拟主机myhost
创建队列,配置如下
4.1.2 案例代码
导入依赖
<dependency><groupId>com.rabbitmq</groupId><artifactId>amqp-client</artifactId><version>3.4.1</version></dependency>
开发工具类
publicclassMQUtils{publicstaticfinalStringQUEUE_NAME="myqueue01";publicstaticfinalStringQUEUE_NAME2="myqueue02";publicstaticfinalStringEXCHANGE_NAME="myexchange01";publicstaticfinalStringEXCHANGE_NAME2="myexchange02";publicstaticfinalStringEXCHANGE_NAME3="myexchange03";/**
     * 获得MQ的连接
     * @return
     * @throws IOException
     */publicstaticConnectiongetConnection()throwsIOException{ConnectionFactory connectionFactory =newConnectionFactory();//配置服务器名、端口、虚拟主机名、登录账号和密码
        connectionFactory.setHost("localhost");
        connectionFactory.setPort(5672);
        connectionFactory.setVirtualHost("myhost");
        connectionFactory.setUsername("admin");
        connectionFactory.setPassword("123456");return connectionFactory.newConnection();}}
开发生产者
/**
 * 生产者,发送简单的消息到队列中
 */publicclassSimpleProducer{publicstaticvoidmain(String[] args)throwsIOException{Connection connection =MQUtils.getConnection();//创建通道Channel channel = connection.createChannel();//定义队列
        channel.queueDeclare(MQUtils.QUEUE_NAME,false,false,false,null);String msg ="Hello World!";//发布消息到队列
        channel.basicPublish("",MQUtils.QUEUE_NAME,null,msg.getBytes());
        channel.close();
        connection.close();}}
运行生产者代码,管理页面点进myqueue01,在GetMessages中可以看到消息
开发消费者
/**
 * 消费者,从队列中读取简单的消息
 */publicclassSimpleConsumer{publicstaticvoidmain(String[] args)throwsIOException,InterruptedException{Connection connection =MQUtils.getConnection();Channel channel = connection.createChannel();//定义队列
        channel.queueDeclare(MQUtils.QUEUE_NAME,false,false,false,null);//创建消费者QueueingConsumer queueingConsumer =newQueueingConsumer(channel);//消费者消费通道中的消息
        channel.basicConsume(MQUtils.QUEUE_NAME,true,queueingConsumer);//读取消息while(true){QueueingConsumer.Delivery delivery = queueingConsumer.nextDelivery();System.out.println(newString(delivery.getBody()));}}}
4.2 工作队列模型

工作队列,生产者将消息分发给多个消费者,如果生产者生产了100条消息,消费者1消费50条,消费者2消费50条。
4.2.1 案例代码
开发生产者
/**
  多对多模式的生产者,会发送多条消息到队列中
 */publicclassWorkProductor{publicstaticvoidmain(String[] args)throwsIOException,InterruptedException{Connection connection =MQUtils.getConnection();Channel channel = connection.createChannel();
        channel.queueDeclare(MQUtils.QUEUE_NAME,false,false,false,null);for(int i =0;i <100;i++){String msg ="Hello-->"+ i;
            channel.basicPublish("",MQUtils.QUEUE_NAME,null, msg.getBytes());System.out.println("send:"+ msg);Thread.sleep(10);}
        channel.close();
        connection.close();}}
开发消费者1
/**
 * 多对多模式的消费者1
 */publicclassWorkConsumer01{publicstaticvoidmain(String[] args)throwsIOException,InterruptedException{Connection connection =MQUtils.getConnection();Channel channel = connection.createChannel();
        channel.queueDeclare(MQUtils.QUEUE_NAME,false,false,false,null);QueueingConsumer queueingConsumer =newQueueingConsumer(channel);//消费者消费通道中的消息
        channel.basicConsume(MQUtils.QUEUE_NAME,true,queueingConsumer);while(true){QueueingConsumer.Delivery delivery = queueingConsumer.nextDelivery();System.out.println("WorkConsumer1 receive :"+newString(delivery.getBody()));Thread.sleep(10);}}}
开发消费者2
/**
 * 多对多模式的消费者2
 */publicclassWorkConsumer02{publicstaticvoidmain(String[] args)throwsIOException,InterruptedException{Connection connection =MQUtils.getConnection();Channel channel = connection.createChannel();
        channel.queueDeclare(MQUtils.QUEUE_NAME,false,false,false,null);QueueingConsumer queueingConsumer =newQueueingConsumer(channel);//消费者消费通道中的消息
        channel.basicConsume(MQUtils.QUEUE_NAME,true,queueingConsumer);while(true){QueueingConsumer.Delivery delivery = queueingConsumer.nextDelivery();System.out.println("WorkConsumer2 receive :"+newString(delivery.getBody()));Thread.sleep(1000);}}}
生产者发送100个消息,两个消费者分别读取了50条。
看消息内容,发现队列发送消息采用的是轮询方式,也就是先发给消费者1,再发给消费者2,依次往复。
4.2.2 能者多劳
上面案例中有一个问题:消费者处理消息的速度是不一样的,消费者1处理后睡眠10毫秒(Thread.sleep(10)),消费者2是1000毫秒,速度相差100倍,但是最后处理的消息数还是一样的。这样就存在效率问题:处理能力强的消费者得不到更多的消息。
因为队列默认采用是自动确认机制,消息发过去后就自动确认,队列不清楚每个消息具体什么时间处理完,所以平均分配消息数量。
实现能者多劳:
- channel.basicQos(1);限制队列一次发一个消息给消费者,等消费者有了反馈,再发下一条
- channel.basicAck 消费完消息后手动反馈,处理快的消费者就能处理更多消息
- basicConsume 中的参数改为false
/**
多对多模式的消费者1
*/publicclassWorkConsumer1{publicstaticvoidmain(String[] args)throwsIOException,InterruptedException{Connection connection =MQUtils.getConnection();Channel channel = connection.createChannel();
       channel.queueDeclare(MQUtils.QUEUE_NAME,false,false,false,null);//同一时刻服务器只发送一条消息给消费者
       channel.basicQos(1);QueueingConsumer queueingConsumer =newQueueingConsumer(channel);//true是自动返回完成状态,false表示手动
       channel.basicConsume(MQUtils.QUEUE_NAME,false,queueingConsumer);while(true){QueueingConsumer.Delivery delivery = queueingConsumer.nextDelivery();System.out.println("WorkConsumer1 receive :"+newString(delivery.getBody()));Thread.sleep(10);//手动确定返回状态,不写就是自动确认
           channel.basicAck(delivery.getEnvelope().getDeliveryTag(),false);}}}/**
 * 多对多模式的消费者2
*/publicclassWorkConsumer2{publicstaticvoidmain(String[] args)throwsIOException,InterruptedException{Connection connection =MQUtils.getConnection();Channel channel = connection.createChannel();
       channel.queueDeclare(MQUtils.QUEUE_NAME,false,false,false,null);//同一时刻服务器只发送一条消息给消费者
       channel.basicQos(1);QueueingConsumer queueingConsumer =newQueueingConsumer(channel);//true是自动返回完成状态,false表示手动
       channel.basicConsume(MQUtils.QUEUE_NAME,false,queueingConsumer);while(true){QueueingConsumer.Delivery delivery = queueingConsumer.nextDelivery();System.out.println("WorkConsumer2 receive :"+newString(delivery.getBody()));Thread.sleep(1000);//手动确定返回状态,不写就是自动确认
           channel.basicAck(delivery.getEnvelope().getDeliveryTag(),false);}}}
4.3 发布/订阅模型

发布/订阅模式和Work模式的区别是:Work模式只存在一个队列,多个消费者共同消费一个队列中的消息;而发布订阅模式存在多个队列,不同的消费者可以从各自的队列中处理完全相同的消息。
4.3.1 操作步骤
实现步骤:
- 创建交换机(Exchange)类型是fanout(扇出)
- 交换机需要绑定不同的队列
- 不同的消费者从不同的队列中获得消息
- 生产者发送消息到交换机
- 再由交换机将消息分发到多个队列
新建队列
新建交换机
点击交换机,在bindings里面绑定两个队列
4.3.2 案例代码
生产者
/**
 * 发布和订阅模式的生产者,消息会通过交换机发到队列
 */publicclassPublishProductor{publicstaticvoidmain(String[] args)throwsIOException{Connection connection =MQUtils.getConnection();Channel channel = connection.createChannel();//声明fanout exchange
        channel.exchangeDeclare(MQUtils.EXCHANGE_NAME,"fanout");String msg ="Hello Fanout";//发布消息到交换机
        channel.basicPublish(MQUtils.EXCHANGE_NAME,"",null,msg.getBytes());System.out.println("send:"+ msg);
        channel.close();
        connection.close();}}
消费者1
/**
 * 发布订阅模式的消费者1
 * 两个消费者绑定的消息队列不同
 * 通过交换机一个消息能被不同队列的两个消费者同时获取
 * 一个队列可以有多个消费者,队列中的消息只能被一个消费者获取
 */publicclassSubscribeConsumer1{publicstaticvoidmain(String[] args)throwsIOException,InterruptedException{Connection connection =MQUtils.getConnection();Channel channel = connection.createChannel();
        channel.queueDeclare(MQUtils.QUEUE_NAME,false,false,false,null);//绑定队列1到交换机
        channel.queueBind(MQUtils.QUEUE_NAME,MQUtils.EXCHANGE_NAME,"");QueueingConsumer queueingConsumer =newQueueingConsumer(channel);
        channel.basicConsume(MQUtils.QUEUE_NAME,true,queueingConsumer);while(true){QueueingConsumer.Delivery delivery = queueingConsumer.nextDelivery();System.out.println("Consumer1 receive :"+newString(delivery.getBody()));}}}
消费者2
publicclassSubscribeConsumer2{publicstaticvoidmain(String[] args)throwsIOException,InterruptedException{Connection connection =MQUtils.getConnection();Channel channel = connection.createChannel();
        channel.queueDeclare(MQUtils.QUEUE_NAME2,false,false,false,null);//绑定队列2到交换机
        channel.queueBind(MQUtils.QUEUE_NAME2,MQUtils.EXCHANGE_NAME,"");QueueingConsumer queueingConsumer =newQueueingConsumer(channel);
        channel.basicConsume(MQUtils.QUEUE_NAME2,true,queueingConsumer);while(true){QueueingConsumer.Delivery delivery = queueingConsumer.nextDelivery();System.out.println("Consumer2 receive :"+newString(delivery.getBody()));}}}
4.4 路由模型

路由模式的消息队列可以给队列绑定不同的key,生产者发送消息时,给消息设置不同的key,这样交换机在分发消息时,可以让消息路由到key匹配的队列中。
可以想象上图是一个日志处理系统,C1可以处理error日志消息,C2可以处理info\error\warining类型的日志消息,使用路由模式就很容易实现了。
4.3.1 操作步骤
新建direct类型的交换机
4.3.2 案例代码
生产者,给myqueue01绑定了key:error,myqueue02绑定了key:debug,然后发送了key:error的消息
/**
  路由模式的生产者,发布消息会有特定的Key,消息会被绑定特定Key的消费者获取
 */publicclassRouteProductor{publicstaticvoidmain(String[] args)throwsIOException,InterruptedException{Connection connection =MQUtils.getConnection();Channel channel = connection.createChannel();//声明交换机类型为direct
        channel.exchangeDeclare(MQUtils.EXCHANGE_NAME2,"direct");String msg ="Hello-->Route";//绑定队列1到交换机,指定了Key为error
        channel.queueBind(MQUtils.QUEUE_NAME,MQUtils.EXCHANGE_NAME2,"error");//绑定队列2到交换机,指定了Key为debug
        channel.queueBind(MQUtils.QUEUE_NAME2,MQUtils.EXCHANGE_NAME2,"debug");//error是一个指定的Key
        channel.basicPublish(MQUtils.EXCHANGE_NAME2,"error",null,msg.getBytes());System.out.println("send:"+ msg);
        channel.close();
        connection.close();}}
消费者1
/**
 * 路由模式的消费者1
 * 可以指定Key,消费特定的消息
 */publicclassRouteConsumer1{publicstaticvoidmain(String[] args)throwsIOException,InterruptedException{Connection connection =MQUtils.getConnection();Channel channel = connection.createChannel();
        channel.queueDeclare(MQUtils.QUEUE_NAME,false,false,false,null);QueueingConsumer queueingConsumer =newQueueingConsumer(channel);
        channel.basicConsume(MQUtils.QUEUE_NAME,true,queueingConsumer);while(true){QueueingConsumer.Delivery delivery = queueingConsumer.nextDelivery();System.out.println("RouteConsumer1 receive :"+newString(delivery.getBody()));}}}
消费者2
/**
 * 路由模式的消费者2
 * 可以指定Key,消费特定的消息
 */publicclassRouteConsumer2{publicstaticvoidmain(String[] args)throwsIOException,InterruptedException{Connection connection =MQUtils.getConnection();Channel channel = connection.createChannel();
        channel.queueDeclare(MQUtils.QUEUE_NAME2,false,false,false,null);QueueingConsumer queueingConsumer =newQueueingConsumer(channel);
        channel.basicConsume(MQUtils.QUEUE_NAME2,true,queueingConsumer);while(true){QueueingConsumer.Delivery delivery = queueingConsumer.nextDelivery();System.out.println("RouteConsumer2 receive :"+newString(delivery.getBody()));}}}
4.5 主题模型
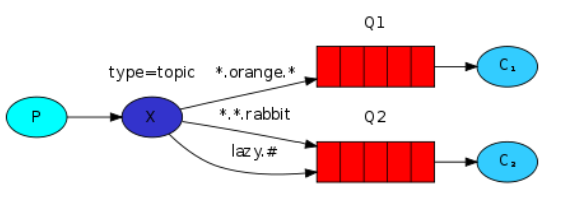
主题模式和路由模式差不多,在key中可以加入通配符:
- 匹配任意一个单词 com.* ----> com.hopu com.blb com.baidu
匹配.号隔开的0个或多个单词 com.# —> com.hopu.net com.hopu com.163.xxx.xxx.xxx
4.3.1 案例代码
生产者代码
/**
  主题模式的生产者
 */publicclassTopicProductor{publicstaticvoidmain(String[] args)throwsIOException,InterruptedException{Connection connection =MQUtils.getConnection();Channel channel = connection.createChannel();//声明交换机类型为topic
        channel.exchangeDeclare(MQUtils.EXCHANGE_NAME3,"topic");//绑定队列到交换机,最后指定了Key
        channel.queueBind(MQUtils.QUEUE_NAME,MQUtils.EXCHANGE_NAME3,"xray.#");//绑定队列到交换机,最后指定了Key
        channel.queueBind(MQUtils.QUEUE_NAME2,MQUtils.EXCHANGE_NAME3,"*.*.cn");String msg ="Hello-->Topic";
        channel.basicPublish(MQUtils.EXCHANGE_NAME3,"rabbit.com.cn",null,msg.getBytes());System.out.println("send:"+ msg);
        channel.close();
        connection.close();}}
消费者1
/**
 * 主题模式的消费者1 ,类似路由模式,可以使用通配符对Key进行筛选
 *   #匹配1个或多个单词,*匹配一个单词
 */publicclassTopicConsumer1{publicstaticvoidmain(String[] args)throwsIOException,InterruptedException{Connection connection =MQUtils.getConnection();Channel channel = connection.createChannel();
        channel.queueDeclare(MQUtils.QUEUE_NAME,false,false,false,null);QueueingConsumer queueingConsumer =newQueueingConsumer(channel);
        channel.basicConsume(MQUtils.QUEUE_NAME,true,queueingConsumer);while(true){QueueingConsumer.Delivery delivery = queueingConsumer.nextDelivery();System.out.println("TopicConsumer1 receive :"+newString(delivery.getBody()));}}}
消费者2
/**
 * 主题模式的消费者2
 */publicclassTopicConsumer2{publicstaticvoidmain(String[] args)throwsIOException,InterruptedException{Connection connection =MQUtils.getConnection();Channel channel = connection.createChannel();
        channel.queueDeclare(MQUtils.QUEUE_NAME2,false,false,false,null);QueueingConsumer queueingConsumer =newQueueingConsumer(channel);
        channel.basicConsume(MQUtils.QUEUE_NAME2,true,queueingConsumer);while(true){QueueingConsumer.Delivery delivery = queueingConsumer.nextDelivery();System.out.println("TopicConsumer2 receive :"+newString(delivery.getBody()));}}}
5、SpringBoot整合RabbitMQ
1)创建两个SpringBoot项目,一个作为生产者,一个作为消费者
生产者会发送两种消息:保存课程(更新和添加),删除课程
消费者监听两个队列:保存课程队列和删除课程队列
2)给生产者和消费者服务添加依赖
<dependency><groupId>org.springframework.boot</groupId><artifactId>spring-boot-starter-amqp</artifactId></dependency>
3) 给生产者和消费者服务添加配置
spring:
    rabbitmq:
      host: localhost
      port:5672
      username: root
      password:123456
      virtual-host: test
4)生产者的配置,用于生成消息队列和交换机
/**
 * RabbitMQ的配置
 */@ConfigurationpublicclassRabbitMQConfig{publicstaticfinalStringQUEUE_COURSE_SAVE="queue.course.save";publicstaticfinalStringQUEUE_COURSE_REMOVE="queue.course.remove";publicstaticfinalStringKEY_COURSE_SAVE="key.course.save";publicstaticfinalStringKEY_COURSE_REMOVE="key.course.remove";publicstaticfinalStringCOURSE_EXCHANGE="edu.course.exchange";@BeanpublicQueuequeueCourseSave(){returnnewQueue(QUEUE_COURSE_SAVE);}@BeanpublicQueuequeueCourseRemove(){returnnewQueue(QUEUE_COURSE_REMOVE);}@BeanpublicTopicExchangetopicExchange(){returnnewTopicExchange(COURSE_EXCHANGE);}@BeanpublicBindingbindCourseSave(){returnBindingBuilder.bind(queueCourseSave()).to(topicExchange()).with(KEY_COURSE_SAVE);}@BeanpublicBindingbindCourseRemove(){returnBindingBuilder.bind(queueCourseRemove()).to(topicExchange()).with(KEY_COURSE_REMOVE);}}
5) 生产者发送消息的核心代码
@ResourceprivateRabbitTemplate rabbitTemplate;@GetMapping("/course/sendSaveMessage")publicResponseResult<String>sendSaveMessage(){//发送消息给队列 1 交换机 2 路由器 3 数据
        rabbitTemplate.convertAndSend(RabbitMQConfig.COURSE_EXCHANGE,RabbitMQConfig.COURSE_SAVE_KEY,"添加课程");returnResponseResult.ok("ok");}@GetMapping("/course/sendRemoveMessage")publicResponseResult<String>sendRemoveMessage(){//发送消息给队列 1 交换机 2 路由器 3 数据
        rabbitTemplate.convertAndSend(RabbitMQConfig.COURSE_EXCHANGE,RabbitMQConfig.COURSE_REMOVE_KEY,99L);returnResponseResult.ok("ok");}
6)消费者添加监听器
importcom.blb.common.config.RabbitMQConfig;importlombok.extern.slf4j.Slf4j;importorg.springframework.amqp.rabbit.annotation.RabbitListener;importorg.springframework.stereotype.Component;/**
 * 课程消息队列监听器
 */@Slf4j@ComponentpublicclassCourseMQListener{@RabbitListener(queues ={RabbitMQConfig.COURSE_SAVE_QUEUE})publicvoidhandleSaveCourseMessage(String message){
        log.info("接收到保存课程消息:{}", message);}@RabbitListener(queues ={RabbitMQConfig.COURSE_REMOVE_QUEUE})publicvoidhandleRemoveCourseMessage(Long id){
        log.info("接收到删除课程消息:{}", id);}
注意
- 如果RabbitMQ的服务管理后台未发现我们用代码配置的队列和交换机,可能是未被Spring扫描到,请在消费者和生产者的启动类上添加扫描包的配置(com.blb.common.config包下就是RabbitMQ配置类,放在该包下是为了方便其它服务公用这一配置类)
生产者
@EnableDiscoveryClient@SpringBootApplication(scanBasePackages ={"com.blb.common.config","com.blb.educourseservice"})publicclassEduCourseServiceApplication{publicstaticvoidmain(String[] args){SpringApplication.run(EduCourseServiceApplication.class, args);}}
消费者
@EnableFeignClients(basePackages ="com.blb.edusearchservice.client")@EnableDiscoveryClient@SpringBootApplication(scanBasePackages ={"com.blb.common.config","com.blb.edusearchservice"})publicclassEduSearchSearchApplication{publicstaticvoidmain(String[] args){SpringApplication.run(EduSearchSearchApplication.class, args);}}
6 总结
一、消息队列是分布式系统的重要组件,起到的作用有:
- 解耦,生产者和消费者不需要知道对方的具体接口
- 异步,生产者发送完消息直接结束,不需要等待消费者执行完,效率高
- 削峰,控制高峰期消息的数量,降低服务器压力
二、RabbitMQ的消息模型有:
- 一对一,一个生产者一个队列一个消费者,一个发一个收
- 一对多,一个生产者一个队列多个消费者,多个消费者共享一个队列中的消息
- 发布订阅模式由交换机绑定多个队列,消息分发到多个队列,每个消费者消费自己的队列中的消息
- 路由模式在发布订阅模式的基础上,加入路由键,消息通过键路由到不同的队列
- 主题模式在路由模式基础上,键中加入通配符,实现更加灵活的匹配
版权归原作者 取ID什么的最麻烦了 所有, 如有侵权,请联系我们删除。