
本文主要将如何利用搭建一个初始化的商城H5项目框架。初始化阶段使用的技术栈有:vue3.2、vue-router、 TS 、 Pinia 、 Vant4、Less、vite
1. 环境检测:
node -v 检测是否有安装node.js,未安装请先去官网安装node.js
2. 创建初始化项目:
终端输入: npm init vite
自定义项目名称project name:demodemo
依次选择Vue + TypeScript创建项目
启动项目: cd demodemo
npm install
npm run dev
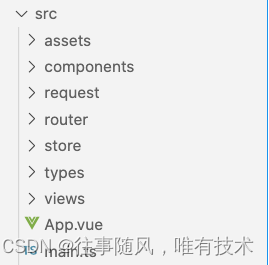
3. 初始化项目文件
删除style.css文件,清空assets文件和components文件
新增request文件(配置网络请求和集中存储请求API),文件下新建index.ts和api.ts两个空文件
新增store文件(数据共享仓库),文件下新建index.ts和order.ts和address.ts三个空文件
新增views文件(集中存放各页面),文件下新建Home.vue和Login.vue和404.vue等空文件
新增types文件(声明TS类型),文件下新建api.d.ts一个空文件
处理App.vue文件
//App.vue

<script setup lang="ts">

</script>

<template>
  //路由占位符
  <router-view />
</template>

<style scoped lang="less">

</style>
处理main.ts文件
import { createApp } from 'vue'
import App from './App.vue'

const app = createApp(App)

app.mount('#app')
4. 样式初始化,引入vant组件库,浏览器适配
1)样式初始化
npm i reset-css
//在main.ts中引入

import "reset-css"       //样式初始化
2)引入vant组件库
npm i vant
//在main.ts中引入vant
import vant from "vant"
import "../node_modules/vant/lib/index.css"
3)浏览器适配
npm i postcss-px-to-viewport --save -dev
新建文件postcss.config.cjs,配置设计稿的视口宽度:viewportWidth: 375,其余可选配置
//postcss.config.cjs文件
module.exports = {
    plugins: {
      'postcss-px-to-viewport': {
        viewportWidth: 375, // 设计稿的视口宽度
        unitPrecision: 5, // 单位转换后保留的精度
        propList: ["*"], // 能转化为vw的属性列表
        viewportUnit: "vw", // 希望使用的视口单位
        fontViewportUnit: "vw", // 字体使用的视口单位
        selectorBlackList: [], // 需要忽略的CSS选择器,不会转为视口单位,使用原有的px等单位。
        minPixelValue: 1, // 设置最小的转换数值,如果为1的话,只有大于1的值会被转换
        mediaQuery: false, // 媒体查询里的单位是否需要转换单位
        replace: true, //  是否直接更换属性值,而不添加备用属性
        exclude: undefined, // 忽略某些文件夹下的文件或特定文件,例如 'node_modules' 下的文件
        include: undefined, // 如果设置了include,那将只有匹配到的文件才会被转换
        landscape: false, // 是否添加根据 landscapeWidth 生成的媒体查询条件 @media (orientation: landscape)
        landscapeUnit: "vw", // 横屏时使用的单位
        landscapeWidth: 568, // 横屏时使用的视口宽度
      },
    },
  };
5. 自动导入常用的使用的第三方库的 API
npm i -D unplugin-auto-import
//在vite.config.ts中配置
import AutoImport from "unplugin-auto-import/vite"

export default defineConfig({
  plugins: [
    vue(),
    AutoImport({
      imports: [ 'vue', 'vue-router'] //自动导入相关函数
    })
  ],
})
6. 配置网络请求,全局配置请求的参数和返回值TS类型
npm i axios
//在request文件下的index.ts配置

import axios from "axios"

const instance = axios.create({
    baseURL: "https://XXXXXX.com",
    timeout: 20000
})

//请求拦截器
instance.interceptors.request.use(
    config => {
        if(localStorage.getItem('token')){
            config.headers.Authorization = localStorage.getItem('token')
        }
        return config
    },
    err => {
        return Promise.reject(err)
    }
)

// 响应拦截器
instance.interceptors.response.use(
    res => {
        return res.data
    },
    err => {
        return Promise.reject(err)
    }
)

export default instance
//在request文件下的api.ts配置

import request from "./index"

export const helpCenterRes = () => request.get('/helpcenter')

export const bannerAPIRes = ( params: BannerAPIReq ):Promise<BannerAPIRes> => request.get('/banner', {params})
在types文件下api.d.ts,配置各个请求接口的参数类型和返回值类型,并在api.ts中应用
interface BannerAPIReq {
    title: string;
}

interface BannerListType {
    detail_url: string;
    picture: string;
    url: string;
}

interface BannerAPIRes {
    code: number;
    message: string;
    banner: BannerListType[];
}
//在Index.vue中使用封装的接口

<script setup lang="ts">
import { ref,onMounted } from "vue"
import { bannerAPIRes } from '../request/api'
onMounted( () => {
    getBannerRes()
})
interface BannerListType {
    detail_url: string;
    picture: string;
    url: string;
}
const bannerList = ref<BannerListType[]>([])

const getBannerRes = async() => {
    const res:any = await bannerAPIRes({
        title: 'newapp'
    })
    console.log(res)
    if(res.code == 200){
        bannerList.value = res.banner
    }
}
</script>

<template>
  <van-swipe :autoplay="3000" :height="420" lazy-render>
    <van-swipe-item v-for="item in bannerList">
      <img style="width: 100%;height: 419.4px;" :src="item.picture" />
    </van-swipe-item>
  </van-swipe>
</template>

<style scoped lang="less">

</style>
7. 配置路由
npm i vue-router //下载vue-router插件第四版本
//main.ts中引入和挂载路由

import router from './router'

app.use(router)
//router/index.ts

import { createRouter, createWebHistory, RouteRecordRaw } from "vue-router";
import Home from "../views/Home.vue"
import Index from "../views/Index.vue"

const routes: Array<RouteRecordRaw> = [
    {
        path: '/',
        component:  Home,
        redirect: '/index',   //路由重定向
        children: [           //路由嵌套
            {
                path: 'index',
                name: 'Index',
                component: Index
            },
            {
                name: 'Wash',
                path: 'wash',
                component: () => import('../views/Wash.vue')
            },
            {
                name: 'Order',
                path: 'order',
                component: () => import('../views/Order.vue')
            },
            {
                name: 'My',
                path: 'my',
                component: () => import('../views/My.vue')
            }
        ]
    },
    {
        name: 'Login',
        path: '/login',
        component: () => import('../views/Login.vue')
    },
    {
        name: "404",
        path: "/:pathMatch(.*)*",
        component: () => import('../views/404.vue')
    }
]

const router = createRouter({
    history: createWebHistory(),
    routes
})

router.beforeEach( ( news,old,next ) => {
    next()
})

export default router
8. 配置pinia,并做持久化存储
npm i pinia
npm i pinia-plugin-persist
//在store/index.ts配置pinia和共享数据持久化处理

import { createPinia } from "pinia";
import piniaPluginPersist from "pinia-plugin-persist"

const store = createPinia()
store.use(piniaPluginPersist)

export default store
//在mian.ts中引入并挂载pinia

import store from "../src/store/index"

app.use(store)
为了避免共享的数据混乱放在一个文件下,因此需模块化处理不同页面的共享数据
order.ts表示订单页面涉及到的共享数据及数据的处理方法
address.ts表示地址页面涉及到的共享数据及数据的处理方法
以order.ts为示例
import { defineStore } from "pinia";

export const orderStore = defineStore( "order", {
    //存放需要共享的数据
    state: () => {
        return {
            orderType: "takein",
            count: 1
        }
    },
    //Store 状态的计算值
    getters: {
        doubleCount: (state) => state.count  * 2
    },
    //存放同步和异步方法
    actions: {
        countAdd(num: number){
            this.count = this.count + num
        }
    },
    //开启数据持久化存储
    persist: {
        enabled: true
    }
})
//在页面使用store中的数据
<script setup lang="ts">
  import { storeToRefs } from 'pinia';
  import { orderStore } from '../store/order'; //引入order模块数据

  const orderstore = orderStore()
  const {count, doubleCount} = storeToRefs(orderstore) //解构成响应式数据
  const addNum = (num: number) => {
    orderstore.countAdd(num)  //用actions中的方法
  }
</script>

<template>
  <div>state中的数据响应式展示: {{ count }} </div>
  <div>getters中的数据响应式展示: {{ doubleCount }} </div>
  <button @click="addNum(10)">点击操作state中的数据</button>
</template>

<style scoped lang="less">

</style>
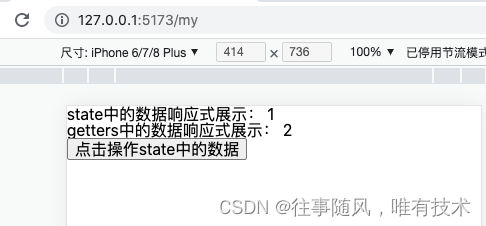
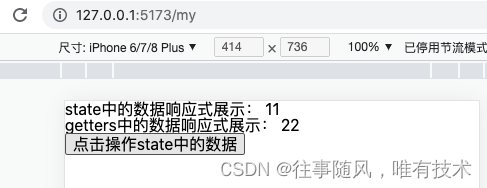
开启数据持久化存储后,刷新页面,数据不会变成原始数据
9. 设置网站logo和网站名称
在index.html文件配置网站logo和网站名称
网站logo的是.ico格式,其他格式图片需要转成.ico文件
<head>
    <meta charset="UTF-8" />
    <link rel="icon" href="/tidylogo.ico" />    //配置logo
    <title>XXXXX有限公司官方网站</title>          //配置网站名称
    <meta name="viewport" content="width=device-width, initial-scale=1.0" />
</head>
10. 配置less
npm i less -D
<style scoped lang="less">
@color: pink;   //定义一个颜色变量

//类名嵌套
.title{
  div{
    color: @color;   //使用变量
  }
}
</style>
11. 首页配置自定义tabbar底部栏
//Home.vue中配置tabbar栏数据和跳转路由等,同时在router/index.ts中配置相应的路由

<script setup lang="ts">
  import { ref,reactive,onMounted } from "vue"
  onMounted( () => {

  })

  const active = ref(0)

  const tabbarList = reactive([
    {
      title: '首页',
      path: '/index',
      inactive: 'https://tidyimages.oss-cn-hangzhou.aliyuncs.com/newh5/home.png',
      active: 'https://tidyimages.oss-cn-hangzhou.aliyuncs.com/newh5/home_active.png'
    },
    {
      title: '洗衣',
      path: '/wash',
      inactive: 'https://tidyimages.oss-cn-hangzhou.aliyuncs.com/newh5/wash.png',
      active: 'https://tidyimages.oss-cn-hangzhou.aliyuncs.com/newh5/wash_active.png'
    },
    {
      title: '订单',
      path: '/order',
      inactive: 'https://tidyimages.oss-cn-hangzhou.aliyuncs.com/newh5/order.png',
      active: 'https://tidyimages.oss-cn-hangzhou.aliyuncs.com/newh5/order_active.png'
    },
    {
      title: '我的',
      path: '/my',
      inactive: 'https://tidyimages.oss-cn-hangzhou.aliyuncs.com/newh5/my.png',
      active: 'https://tidyimages.oss-cn-hangzhou.aliyuncs.com/newh5/my_active.png'
    }
  ])
  const onChangeTab = (index: number | string) => {
    console.log(index)
  }
</script>

<template>
  <router-view></router-view>
  <van-tabbar v-model="active" active-color="#26D7CC" route @change="onChangeTab">
    <van-tabbar-item replace :to="item.path" v-for="(item,index) in tabbarList" :key="index">
      <span :class="active === index ? active : ''">{{ item.title }}</span>
      <template #icon="props">
        <img :src="props.active ? item.active : item.inactive" />
      </template>
    </van-tabbar-item>
  </van-tabbar>
</template>

<style scoped lang="less">

</style>
效果图如下:

本文转载自: https://blog.csdn.net/m0_55337573/article/details/129934771
版权归原作者 往事随风,唯有技术 所有, 如有侵权,请联系我们删除。
版权归原作者 往事随风,唯有技术 所有, 如有侵权,请联系我们删除。