
在我之前的文章 “Elasticsearch:使用 Elasticsearch Java client 8.0 来连接带有 HTTPS 的集群” 里,我使用了两种方法,一直是使用 token 的方式,另外一种是使用 PEM 证书来进行连接的。在实际的使用中,有时我们的证书是以 PCKS12 格式的 truststore 格式的,那么我们该如何建立这种 HTTPS 的连接呢?
如果你还没有安装好自己的 Elasticsearch 集群,你可以参考我之前的文章 “如何在 Linux,MacOS 及 Windows 上进行安装 Elasticsearch” 来进行安装。
在接下来的示例中,我将使用 Elasticsearch 8.4.1 来进行展示。为了大家更好地理解我下面的代码,我把代码放到 github 上。你可以通过如下的命令来进行下载:
git clone https://github.com/liu-xiao-guo/elasticsearchjava-search8-https
例子
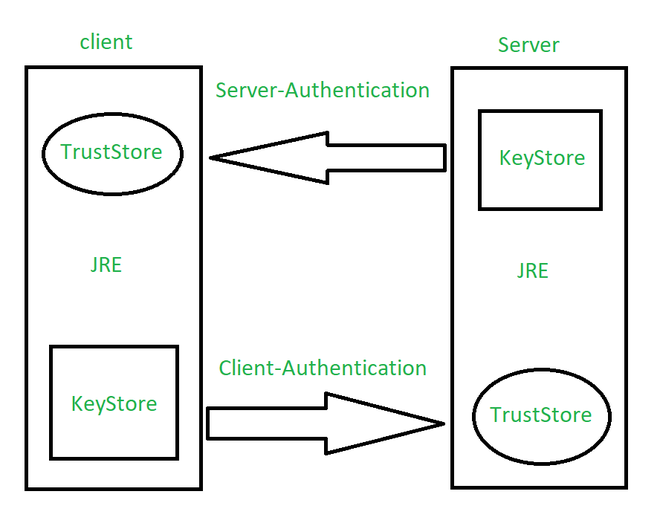
如上所示,Java 客户端和 Server 直接的验证图。针对我们的 Java 应用,我们需要在客户端创建一个 truststore 来建立联系。我们可以在 Elasticsearch 的安装目录下使用如下的命令来创建一个 truststore:
keytool -import -file http_ca.crt -keystore truststore.p12 -storepass password -noprompt -storetype pkcs12
$ pwd
/Users/liuxg/elastic/elasticsearch-8.4.1/config/certs
$ keytool -import -file http_ca.crt -keystore truststore.p12 -storepass password -noprompt -storetype pkcs12
Certificate was added to keystore
$ ls
http.p12       http_ca.crt    transport.p12  truststore.p12
如上所示,它在当前的目录下创建一个叫做 truststore.p12 的文件。它的密码是 password。我们可以使用如下的命令来查看这个 truststore 的内容:
keytool -keystore truststore.p12 -list
$ keytool -keystore truststore.p12 -list
Enter keystore password:
Keystore type: PKCS12
Keystore provider: SUN

Your keystore contains 1 entry

mykey, Sep 26, 2022, trustedCertEntry,
Certificate fingerprint (SHA-256): F7:7C:44:13:CC:C6:A0:34:AC:97:67:F1:2B:9F:82:40:BF:30:1C:E9:56:CE:0D:96:10:9A:78:63:C4:A3:34:63
接下来,我们在 ElasticsearchJava.java 文件中添加如下的一个方法:
ElasticsearchJava.java
   private static synchronized void makeConnection_truststore() throws CertificateException, IOException, NoSuchAlgorithmException,
            KeyStoreException, KeyManagementException {
        final CredentialsProvider credentialsProvider =
                new BasicCredentialsProvider();
        credentialsProvider.setCredentials(AuthScope.ANY,
                new UsernamePasswordCredentials("elastic", "Qu9UByppvqRRyI0LkoI+"));

        String storePath = "/Users/liuxg/elastic/elasticsearch-8.4.1/config/certs/truststore.p12";
//        String keyStorePass = "dI8wbt8VTkigRjxvOrvP9w";
        String keyStorePass = "password";
        Path trustStorePath = Paths.get(storePath);
        KeyStore truststore = KeyStore.getInstance("pkcs12");
        try (InputStream is = Files.newInputStream(trustStorePath)) {
            truststore.load(is, keyStorePass.toCharArray());
        }
        SSLContextBuilder sslBuilder = SSLContexts.custom()
                .loadTrustMaterial(truststore, null);
        final SSLContext sslContext = sslBuilder.build();
        RestClientBuilder builder = RestClient.builder(
                        new HttpHost("localhost", 9200, "https"))
                .setHttpClientConfigCallback(new RestClientBuilder.HttpClientConfigCallback() {
                    @Override
                    public HttpAsyncClientBuilder customizeHttpClient(
                            HttpAsyncClientBuilder httpClientBuilder) {
                        return httpClientBuilder.setSSLContext(sslContext)
                                .setDefaultCredentialsProvider(credentialsProvider);
                    }
                });
        RestClient restClient = builder.build();

        // Create the transport with a Jackson mapper
        ElasticsearchTransport transport = new RestClientTransport(
                restClient, new JacksonJsonpMapper());

        client = new ElasticsearchClient(transport);
        asyncClient = new ElasticsearchAsyncClient(transport);
    }
在上面,我们需要注意的是:
- 你可以使用除 elastic 之外的其它用户账号及其密码来进行连接
- 你需要修改 storePath 的路径,根据自己的安装及生成的 truststore 的文件路径
- 你需要修改相应的 keyStorePass,根据自己的配置
我们使用如下的代码进行相应的连接并创建一个叫做 products 的索引:
        try {
            makeConnection_truststore();
        } catch (CertificateException e) {
            e.printStackTrace();
        } catch (NoSuchAlgorithmException e) {
            e.printStackTrace();
        } catch (KeyStoreException e) {
            e.printStackTrace();
        } catch (KeyManagementException e) {
            e.printStackTrace();
        }

        // Index data to an index products
        Product product = new Product("abc", "Bag", 42);

        IndexRequest<Object> indexRequest = new IndexRequest.Builder<>()
                .index("products")
                .id("abc")
                .document(product)
                .build();

        client.index(indexRequest);
我们运行上面的代码,并在 Kibana 中进行查看:
GET products/_search
{
  "took": 0,
  "timed_out": false,
  "_shards": {
    "total": 1,
    "successful": 1,
    "skipped": 0,
    "failed": 0
  },
  "hits": {
    "total": {
      "value": 1,
      "relation": "eq"
    },
    "max_score": 1,
    "hits": [
      {
        "_index": "products",
        "_id": "abc",
        "_score": 1,
        "_source": {
          "id": "abc",
          "name": "Bag",
          "price": 42
        }
      }
    ]
  }
}
它表明,我们已经成功地创建了 products 索引。它说明了我们的连接是成功的。
我们也可以使用另外一种方法来生成相应的 truststore 证书。首先我们复制现有的 http.p12 文件到 trust.p12 文件:
$ pwd
/Users/liuxg/elastic/elasticsearch-8.4.1/config/certs
$ ls
http.p12       http_ca.crt    transport.p12  truststore.p12
$ cp http.p12 trust.p12
$ ls
http.p12       http_ca.crt    transport.p12  trust.p12      truststore.p12
我们可以使用如下的命令来展示 trust.p12 里的内容:
$ ./bin/elasticsearch-keystore list
keystore.seed
xpack.security.http.ssl.keystore.secure_password
xpack.security.transport.ssl.keystore.secure_password
xpack.security.transport.ssl.truststore.secure_password
$ ./bin/elasticsearch-keystore show xpack.security.http.ssl.keystore.secure_password
Jn1YI7FMSNaiAXjUsdp4Mw
$ cd config/certs/
$ ls
http.p12       http_ca.crt    transport.p12  truststore.p12
$ cp http.p12 trust.p12
$ keytool -keystore trust.p12 -list
Enter keystore password:
Keystore type: PKCS12
Keystore provider: SUN

Your keystore contains 2 entries

http, Sep 26, 2022, PrivateKeyEntry,
Certificate fingerprint (SHA-256): 97:D0:50:B0:31:73:42:67:D1:00:7C:71:F2:4D:D4:9E:AC:73:99:39:AC:E8:34:EB:DA:2F:0B:5E:F6:65:D3:CD
http_ca, Sep 26, 2022, PrivateKeyEntry,
Certificate fingerprint (SHA-256): B4:8C:3E:33:FE:E5:AA:42:CF:1F:36:AC:94:D2:47:B2:3E:A3:B1:27:52:67:C5:6F:7B:CB:FF:9F:30:47:56:99
在上面的最后命令中,我们使用 Jn1YI7FMSNaiAXjUsdp4Mw 作为密码。从上面我们可以看出来,它含有两个条目。我们可以通过如下的方式来删除上面的 http 条目,而只留下 http_ca:
keytool -delete -noprompt -alias http -keystore trust.p12 -storepass Jn1YI7FMSNaiAXjUsdp4Mw
$ pwd
/Users/liuxg/elastic/elasticsearch-8.4.1/config/certs
$ keytool -delete -noprompt -alias http -keystore trust.p12 -storepass Jn1YI7FMSNaiAXjUsdp4Mw
$ ls
http.p12       http_ca.crt    transport.p12  trust.p12      truststore.p12
$ keytool -keystore trust.p12 -list
Enter keystore password:
Keystore type: PKCS12
Keystore provider: SUN

Your keystore contains 1 entry

http_ca, Sep 26, 2022, PrivateKeyEntry,
Certificate fingerprint (SHA-256): B4:8C:3E:33:FE:E5:AA:42:CF:1F:36:AC:94:D2:47:B2:3E:A3:B1:27:52:67:C5:6F:7B:CB:FF:9F:30:47:56:99
从上面,我们可以看出来,这个 trust.p12 只含有一个 http_ca 的项。我们让它和之前生成的 truststore.p12 相比较:
$ keytool -keystore truststore.p12 -list
Enter keystore password:
Keystore type: PKCS12
Keystore provider: SUN

Your keystore contains 1 entry

mykey, Sep 26, 2022, trustedCertEntry,
Certificate fingerprint (SHA-256): B4:8C:3E:33:FE:E5:AA:42:CF:1F:36:AC:94:D2:47:B2:3E:A3:B1:27:52:67:C5:6F:7B:CB:FF:9F:30:47:56:99
从上面的输出中,我们可以看出来 Certificate fingerprint 是一模一样的。
我们接下来修改代码为:
   private static synchronized void makeConnection_truststore() throws CertificateException, IOException, NoSuchAlgorithmException,
            KeyStoreException, KeyManagementException {
        final CredentialsProvider credentialsProvider =
                new BasicCredentialsProvider();
        credentialsProvider.setCredentials(AuthScope.ANY,
                new UsernamePasswordCredentials("elastic", "Xs5YVobQtp2Nul71YdBI"));

        String storePath = "/Users/liuxg/elastic/elasticsearch-8.4.1/config/certs/trust.p12";
        String keyStorePass = "Jn1YI7FMSNaiAXjUsdp4Mw";
//        String keyStorePass = "password";
        Path trustStorePath = Paths.get(storePath);
        KeyStore truststore = KeyStore.getInstance("pkcs12");
        try (InputStream is = Files.newInputStream(trustStorePath)) {
            truststore.load(is, keyStorePass.toCharArray());
        }
        SSLContextBuilder sslBuilder = SSLContexts.custom()
                .loadTrustMaterial(truststore, null);
        final SSLContext sslContext = sslBuilder.build();
        RestClientBuilder builder = RestClient.builder(
                        new HttpHost("localhost", 9200, "https"))
                .setHttpClientConfigCallback(new RestClientBuilder.HttpClientConfigCallback() {
                    @Override
                    public HttpAsyncClientBuilder customizeHttpClient(
                            HttpAsyncClientBuilder httpClientBuilder) {
                        return httpClientBuilder.setSSLContext(sslContext)
                                .setDefaultCredentialsProvider(credentialsProvider);
                    }
                });
        RestClient restClient = builder.build();

        // Create the transport with a Jackson mapper
        ElasticsearchTransport transport = new RestClientTransport(
                restClient, new JacksonJsonpMapper());

        client = new ElasticsearchClient(transport);
        asyncClient = new ElasticsearchAsyncClient(transport);
    }
在这里,我们修改 storePath 及 keyStorePass 的值。重新编译并运行代码,它将生成和上面一样的结果。这里就不再累述了。
参考:
【1】 Encrypted communication | Elasticsearch Java API Client [8.4] | Elastic
版权归原作者 Elastic 中国社区官方博客 所有, 如有侵权,请联系我们删除。