前言:
👏作者简介:我是笑霸final,一名热爱技术的在校学生。
📝个人主页:个人主页1 || 笑霸final的主页2
📕系列专栏:后端专栏
📧如果文章知识点有错误的地方,请指正!和大家一起学习,一起进步👀
🔥如果感觉博主的文章还不错的话,👍点赞👍 + 👀关注👀 + 🤏收藏🤏
话不多说 直接开干
目录
一 导入maven坐标与配置
<!--rabbitmq--><dependency><groupId>org.springframework.boot</groupId><artifactId>spring-boot-starter-amqp</artifactId></dependency>
基础配置文件
spring:rabbitmq:username: 你的用户名
    password: 你的密码
    host: rabbitmq安装的主机的 ip地址
    port:5672#端口号
二、直连交换机direct exchange
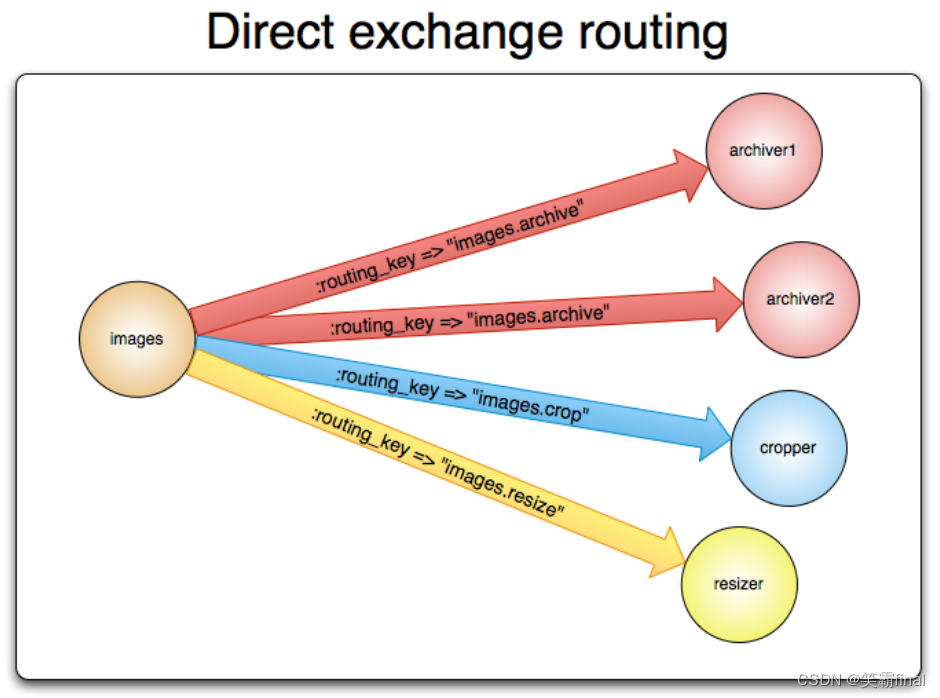
直连型交换机(direct exchange)是根据消息携带的路由键(routing key)将消息投递给对应队列的。
- 将一个队列绑定到某个交换机上,同时赋予该绑定一个路由键(routing key)
- 当一个携带着路由键为
routingKey01的消息被发送给直连交换机时,交换机会把它路由给绑定值同样为routingKey01的队列。
直连交换机经常用来循环分发任务给多个工作者(workers)。当这样做的时候,我们需要明白一点,在AMQP 0-9-1中,消息的负载均衡是发生在消费者(consumer)之间的,而不是队列(queue)之间。
2.1配置类QueueConfig
@ConfigurationpublicclassQueueConfig{/**
     * 创建一个队列  队列名为direct1
     * */@BeanpublicQueuequeue01(){returnnewQueue("direct1",true);//true表示持久化}/**
     * 创建一个直连交换机 名为directExchange
     * */@BeanpublicDirectExchangedirectExchange(){returnnewDirectExchange("directExchange");}/**
     * 在让队列和直连交换机绑定在一起
     * */@BeanpublicBindingbinding(){Binding binding=BindingBuilder.bind(queue01()).to(directExchange()).with("routingKey01");return binding;}}
2.2消息提供者
@ComponentpublicclassMqProducer{@ResourceprivateRabbitTemplate rabbitTemplate;publicvoidsent_test(Object o){//convertAndSend(交换机的名字,交换机中路由键名称,参数)
        rabbitTemplate.convertAndSend("directExchange",//交换机名字"routingKey01",//路由key
                o);}}
2.2消息消费者
@Component@Slf4jpublicclassMqConsumer{/**
     * 接收消息
     */@RabbitListener(queues ={"direct1"})publicvoidreceivedD(Message message,Channel channel)throwsException{String msg=newString(message.getBody());
        log.info("当前时间:{},消费者1收到消息:{}",newDate().toString(),msg);}}
我写了两个消费者内容一致
2.3测试类
@RunWith(SpringRunner.class)@SpringBootTest@Slf4jpublicclassSpringRunnerTest{@ResourceprivateMqProducer mqProducer;//注入消息提供者@Testpublicvoidtest_send()throwsInterruptedException{// 循环发送消息while(true){
            mqProducer.sent_test("你好,我是Lottery 001");Thread.sleep(3500);}}}
测试结果
三、默认交换机default exchange
默认交换机(default exchange)实际上
是一个由消息代理预先声明好的
没有名字(名字为空字符串)的直连交换机(direct exchange)。它有一个特殊的属性使得它对于简单应用特别有用处:那就是每个
新建队列(queue)都会
自动绑定到
默认交换机上,绑定的
路由键(routing key)名称与
队列名称相同。
3.1配置类和消息提供者
/**
*配置类
*/@ConfigurationpublicclassQueueConfig{//只需要创建一个队列//每个`新建队列`(queue)都会`自动`绑定到`默认交换机`上,//绑定的`路由键(routing //key)名称`与`队列名称` 相同@BeanpublicQueuequeue02(){returnnewQueue("def");}}
/**
*消息提供者
*/@ComponentpublicclassMqProducer{@ResourceprivateRabbitTemplate rabbitTemplate;publicvoiddef_sent_test(Object obj){//convertAndSend(交换机的名字,交换机中路由键名称,参数)
        rabbitTemplate.convertAndSend(//没有名字(名字为空字符串)"","def",
                obj);//消息内容}}
默认交换机名字是
空字符串。每个
新建队列(queue)都会
自动绑定到
默认交换机上,绑定的
路由键(routing key)名称与
队列名称相同。
3.2消息消费者
@Component@Slf4jpublicclassMqConsumer{/**
     * 接收消息
     */@RabbitListener(queues ={"def"})publicvoidreceivedD02(Message message,Channel channel)throwsException{String msg=newString(message.getBody());
        log.info("当前时间:{},消费者收到消息:{}",newDate().toString(),msg);}}
3.3测试结果
@RunWith(SpringRunner.class)@SpringBootTest@Slf4jpublicclassSpringRunnerTest{@ResourceprivateMqProducer mqProducer;//注入消息提供者@Testpublicvoidtest_send02()throwsInterruptedException{// 循环发送消息while(true){
            mqProducer.def_sent_test("测试默认交换机");Thread.sleep(3500);}}}

四、扇型交换机fanout exchange
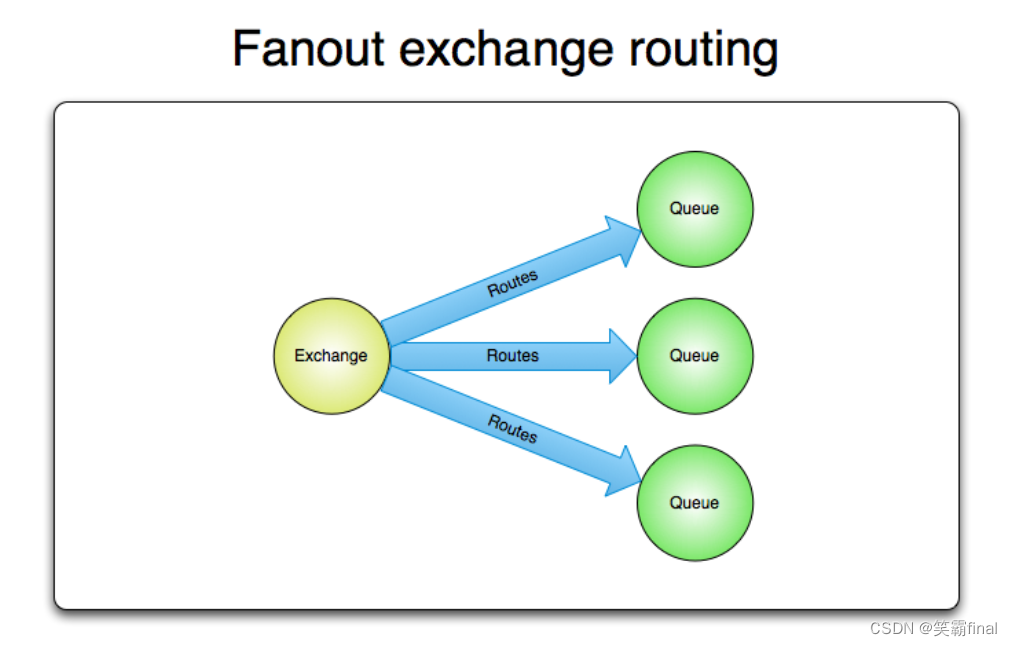
扇型交换机(fanout exchange)将消息路由给绑定到它身上的所有队列,而不理会绑定的路由键。如果N个队列绑定到某个扇型交换机上,当有消息发送给此扇型交换机时,交换机会将消息的拷贝分别发送给这所有的N个队列。扇型用来交换机处理消息的广播路由(broadcast routing)
这个交换机上的路由键将失效
4.1配置类
@ConfigurationpublicclassQueueConfig{/**
     * 创建多个队列
     * @return
     */@BeanpublicQueuequeue03_1(){returnnewQueue("fanout03_1");}@BeanpublicQueuequeue03_2(){returnnewQueue("fanout03_2");}@BeanpublicQueuequeue03_3(){returnnewQueue("fanout03_3");}/**
     * 创建一个扇形交换机
     */@BeanpublicFanoutExchangefanoutExchange(){returnnewFanoutExchange("fanoutExchange");}/**
     * 队列和扇形交换机绑定
     */@BeanpublicBindingbinding_3_1(){Binding binding=BindingBuilder.bind(queue03_1()).to(fanoutExchange());return binding;}@BeanpublicBindingbinding_3_2(){Binding binding=BindingBuilder.bind(queue03_2()).to(fanoutExchange());return binding;}@BeanpublicBindingbinding_3_3(){Binding binding=BindingBuilder.bind(queue03_3()).to(fanoutExchange());return binding;}}
4.2消息提供者
@ComponentpublicclassMqProducer{@ResourceprivateRabbitTemplate rabbitTemplate;/**
     * 扇形交换机
     */publicvoidfanout_sent_test(Object o){//convertAndSend(交换机的名字,交换机中路由键名称,参数)
        rabbitTemplate.convertAndSend("fanoutExchange","",//扇形交换机也没有路由建
                o);}}
注意:扇形交换机也
没有路由key也用空字符串
4.3消息消费者
@Component@Slf4jpublicclassMqConsumer{@RabbitListener(queues ={"fanout03_1"})publicvoidreceivedD03_1(Message message,Channel channel)throwsException{String msg=newString(message.getBody());
        log.info("绑定队列一 当前时间:{},消费者收到消息:{}",newDate().toString(),msg);}@RabbitListener(queues ={"fanout03_2"})publicvoidreceivedD03_2(Message message,Channel channel)throwsException{String msg=newString(message.getBody());
        log.info("绑定队列二 当前时间:{},消费者收到消息:{}",newDate().toString(),msg);}@RabbitListener(queues ={"fanout03_3"})publicvoidreceivedD03_3(Message message,Channel channel)throwsException{String msg=newString(message.getBody());
        log.info("绑定队列三 当前时间:{},消费者收到消息:{}",newDate().toString(),msg);}}
4.4测试类
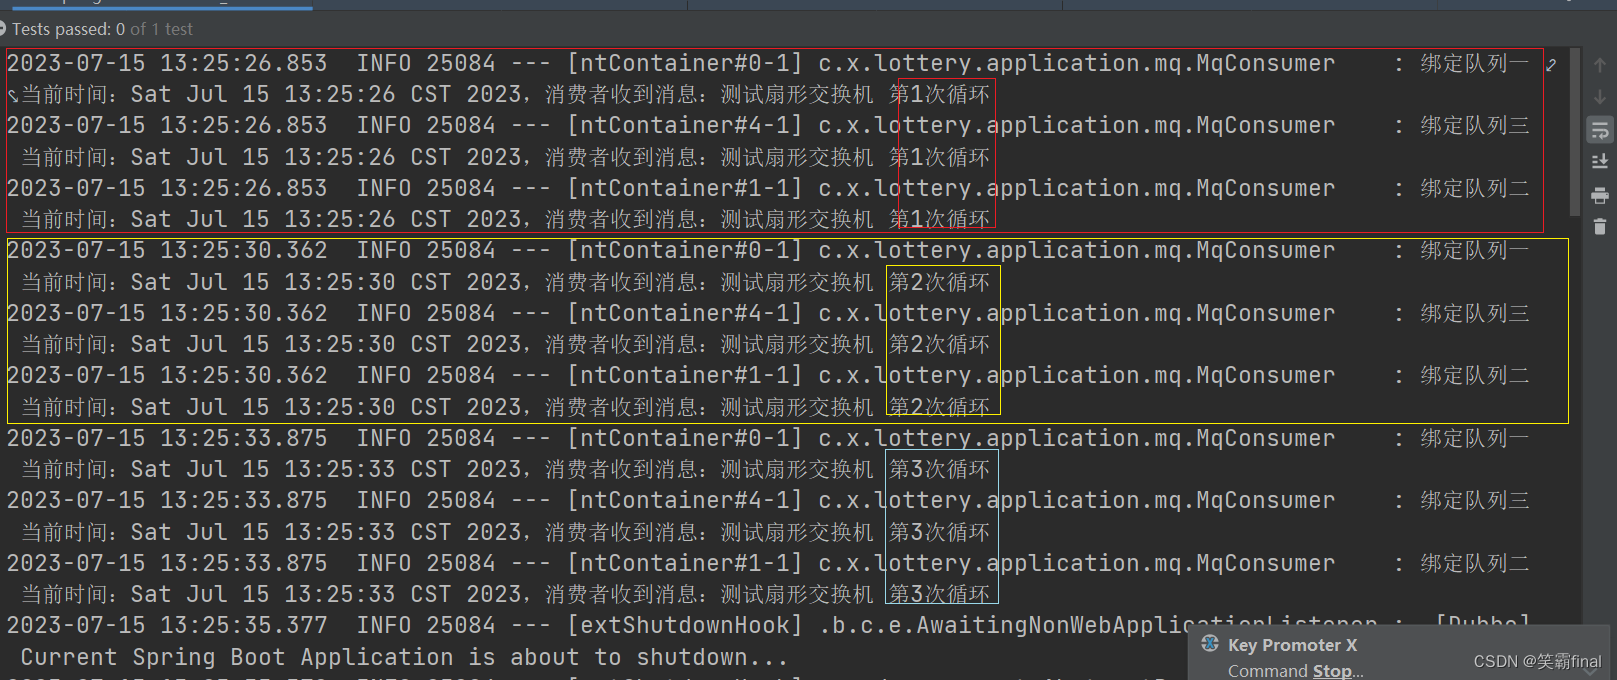
@RunWith(SpringRunner.class)@SpringBootTest@Slf4jpublicclassSpringRunnerTest{@ResourceprivateMqProducer mqProducer;//注入消息提供者@Testpublicvoidtest_send03()throwsInterruptedException{int a=1;// 循环发送消息while(true){
            mqProducer.fanout_sent_test("测试扇形交换机 第"+ a+++"次循环");Thread.sleep(3500);}}}
五、主题交换机topic exchanges
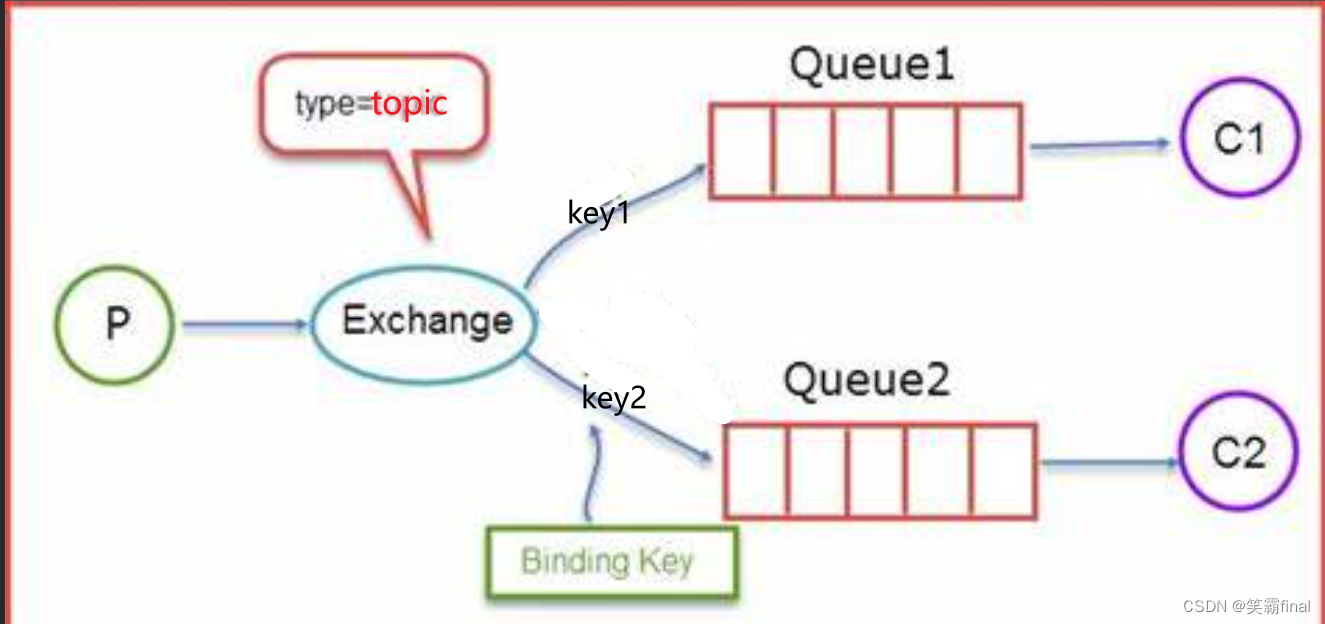
主题交换机(topic exchanges)通过对消息的
路由键和
队列到交换机的绑定模式之间的匹配,将
消息路由
给一个或多个队列。主题交换机经常用来实现各种分发/订阅模式及其变种。主题交换机通常用来实现消息的多播路由(multicast routing)。
5.1配置类
@ConfigurationpublicclassQueueConfig{/**
     * 创建;两个队列
     */@BeanpublicQueuetopicQueue_1(){returnnewQueue("topicQueue_1");}@BeanpublicQueuetopicQueue_2(){returnnewQueue("topicQueue_2");}/**
     * 创建主题交换机
     */@BeanpublicTopicExchangeTopicExchange(){returnnewTopicExchange("TopicExchange");}/**
     * 根据不同的key绑定不同的队列
     */@BeanpublicBindingbindingTopicExchange_1(){Binding binding=BindingBuilder.bind(topicQueue_1()).to(TopicExchange()).with("key1");return binding;}@BeanpublicBindingbindingTopicExchange_2(){Binding binding=BindingBuilder.bind(topicQueue_2()).to(TopicExchange()).with("key2");return binding;}}
5.2消息提供者
@ComponentpublicclassMqProducer{@ResourceprivateRabbitTemplate rabbitTemplate;/**
     * 主题交换机
     */publicvoidtopic_sent_test(Object o,String key){
        rabbitTemplate.convertAndSend("TopicExchange",
                key,//后面动态的传递key
                o);}}
5.3消息消费者
@Component@Slf4jpublicclassMqConsumer1{/**
     * 接收消息
     */@RabbitListener(queues ={"topicQueue_1"})publicvoidtopicQueue_1(Message message,Channel channel)throwsException{String msg=newString(message.getBody());
        log.info("队列一 当前时间:{},消费者收到消息:{}",newDate().toString(),msg);}@RabbitListener(queues ={"topicQueue_2"})publicvoidtopicQueue_2(Message message,Channel channel)throwsException{String msg=newString(message.getBody());
        log.info("队列二 当前时间:{},消费者收到消息:{}",newDate().toString(),msg);}}
5.4测试
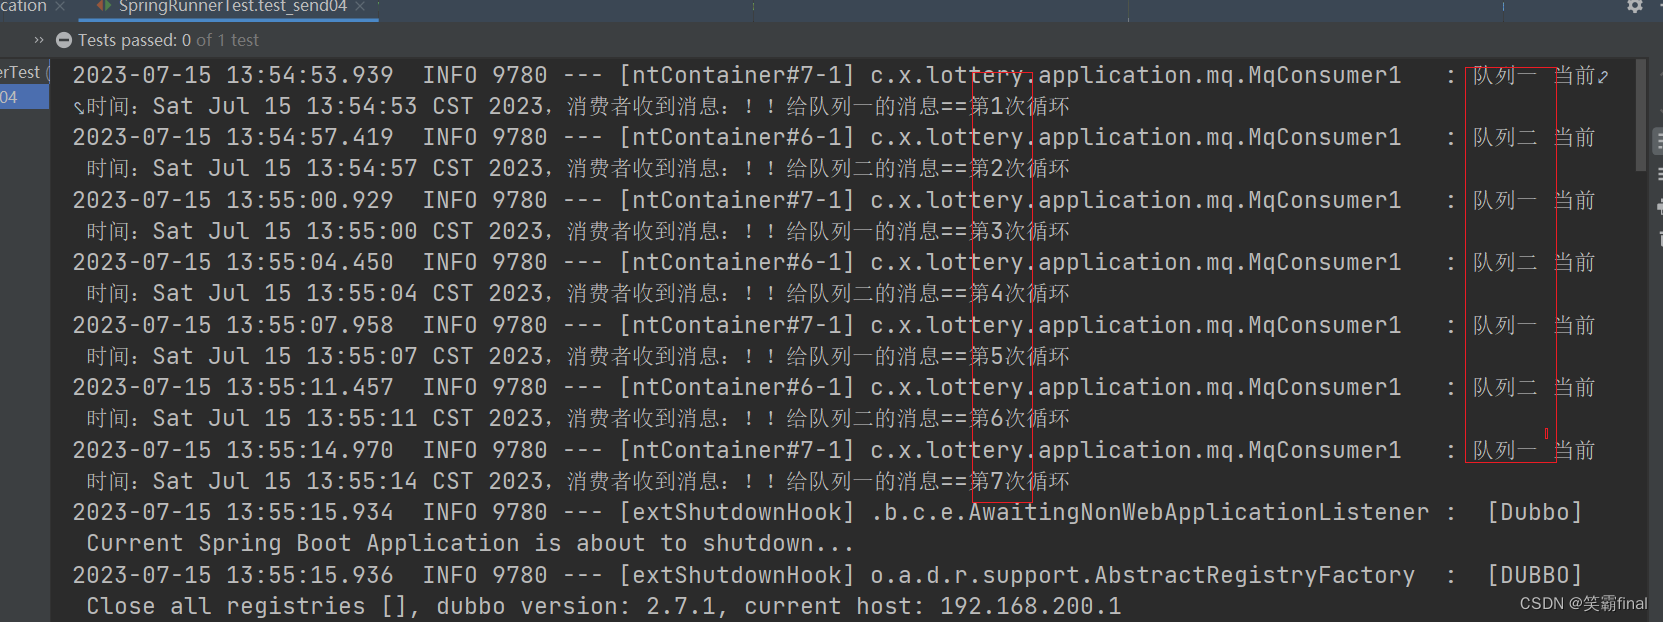
@RunWith(SpringRunner.class)@SpringBootTest@Slf4jpublicclassSpringRunnerTest{@ResourceprivateMqProducer mqProducer;//注入消息提供者@Testpublicvoidtest_send04()throwsInterruptedException{// 循环发送消息int a=1;while(true){if(a%2==0){
                mqProducer.topic_sent_test("!!给队列二的消息==第"+ a+++"次循环","key2");}else{
                mqProducer.topic_sent_test("!!给队列一的消息==第"+ a+++"次循环","key1");}Thread.sleep(3500);}}}
使用案例:
- 分发有关于特定地理位置的数据,例如销售点
- 由多个工作者(workers)完成的后台任务,每个工作者负责处理某些特定的任务
- 股票价格更新(以及其他类型的金融数据更新)
- 涉及到分类或者标签的新闻更新(例如,针对特定的运动项目或者队伍)
- 云端的不同种类服务的协调
- 分布式架构/基于系统的软件封装,其中每个构建者仅能处理一个特定的架构或者系统。
六、头交换机 headers exchange
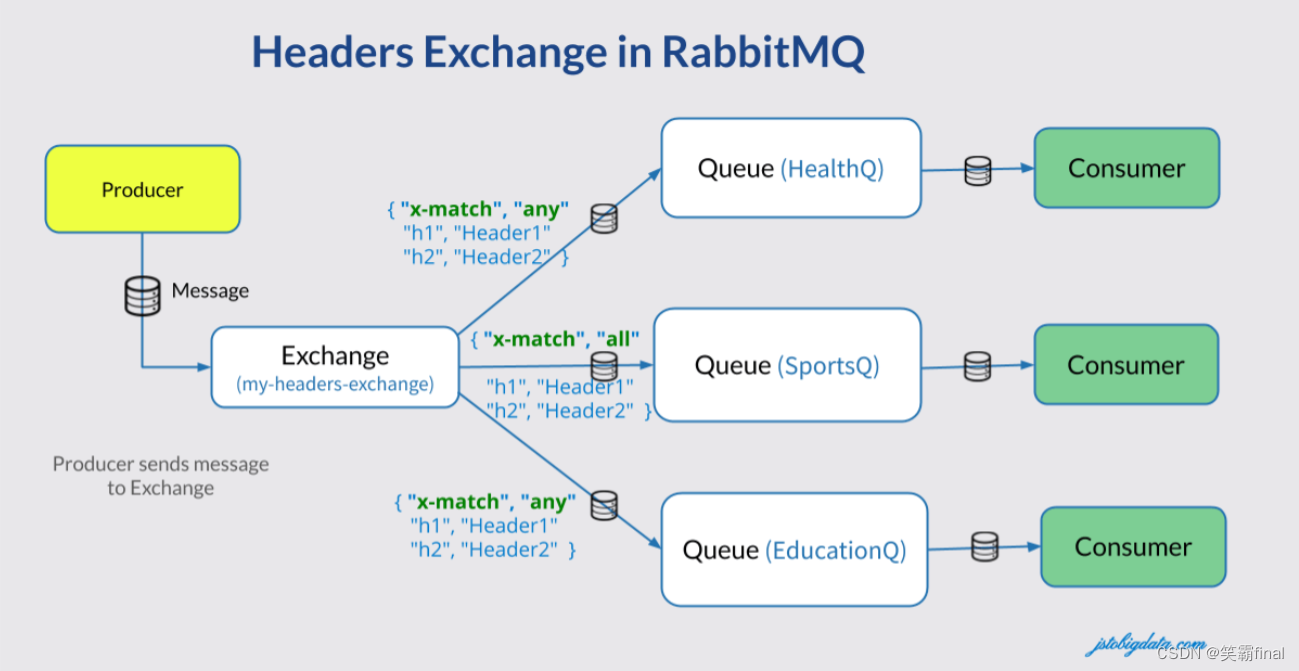
有时消息的路由操作会涉及到多个属性,此时使用消息头就比用路由键更容易表达,头交换机(headers exchange)就是为此而生的。头交换机使用多个
消息属性来
代替路由键建立路由规则。通过判断消息头的值能否与指定的绑定相匹配来确立路由规则。
6.1配置类
@ConfigurationpublicclassQueueConfig{/**
     * 创建2个队列
     */@Bean(name ="headersQ1")publicQueuequeue1(){returnnewQueue("headersQ1");}@Bean(name ="headersQ2")publicQueuequeue2(){returnnewQueue("headersQ2");}/**
     * 创建交换机
     * @return
     */@BeanpublicHeadersExchangeheadersExchange(){returnnewHeadersExchange("headersExchange");}/**
     * 绑定交换机和队列
     */@BeanpublicBindingbinding1(){HashMap<String,Object> header =newHashMap<>();
        header.put("queue","queue1");
        header.put("bindType","whereAll");returnBindingBuilder.bind(queue1()).to(headersExchange()).whereAll(header).match();}@BeanpublicBindingbinding2(){HashMap<String,Object> header =newHashMap<>();
        header.put("queue","queue2");
        header.put("bindType","whereAny");returnBindingBuilder.bind(queue2()).to(headersExchange()).whereAny(header).match();}}
6.2创建消息提供者
@ComponentpublicclassMqProducer{@ResourceprivateRabbitTemplate rabbitTemplate;/**
     * 头交换机
     * @param msg
     */publicvoidheaders_send(String msg,int a){//a用来控制头信息 达到传递给不同的队列效果MessageProperties messageProperties =newMessageProperties();if(  a %3==0){
            messageProperties.setHeader("queue","queue2");
            messageProperties.setHeader("bindType","whereAny");}else{
            messageProperties.setHeader("queue","queue1");
            messageProperties.setHeader("bindType","whereAll");}Message message =newMessage(msg.getBytes(), messageProperties);
        rabbitTemplate.convertAndSend("headersExchange",null, message);}}
6.3消息消费者
@Component@Slf4jpublicclassMqConsumer1{/**
     * 接收消息
     */@RabbitListener(queues ="headersQ1")publicvoidreceive1(String msg){
        log.info("接收到 headersQ1 发送的消息:"+ msg);}@RabbitListener(queues ="headersQ2")publicvoidreceive2(String msg){
        log.info("接收到 headersQ2 发送的消息:"+ msg);}}
6、4测试结果
@RunWith(SpringRunner.class)@SpringBootTest@Slf4jpublicclassSpringRunnerTest{@ResourceprivateMqProducer mqProducer;//注入消息提供者@Testpublicvoidtest_headers_send()throwsInterruptedException{// 循环发送消息int a=1;while(true){
            mqProducer.headers_send("消息"+a,a++);Thread.sleep(3500);}}}

版权归原作者 笑霸final 所有, 如有侵权,请联系我们删除。
