哈喽~大家好,这篇来看看springboot 拦截器与文件上传。
🥇个人主页:个人主页
🥈 系列专栏:【Java框架】
🥉与这篇相关的文章:
Springboot 整合与文件配置Springboot 整合与文件配置_程序猿追的博客-CSDN博客springboot 项目起步讲解及自动装配原理springboot 项目起步讲解及自动装配原理_程序猿追的博客-CSDN博客Java 框架的一些文件配置Java 框架的一些文件配置_程序猿追的博客-CSDN博客
一、前言
1、静态资源访问
使用IDEA创建Spring Boot项目,会默认创建出classpath:/static/目录,静态资源一般放在这个目录下即可。
如果默认的静态资源过滤策略不能满足开发需求,也可以自定义静态资源过滤策略。
在application.properties中直接定义过滤规则和静态资源位置
spring.web.resources.static-locations=/upload/
spring.mvc.static-path-pattern=/static/**
过滤规则为/static/**,静态资源位置为/upload/
SpringBootWeb项目中,默认的静态资源路径有下列4种
- classpath:/META-INF/resources
- classpath:/resources
- classpath:/static
- classpath:/public**
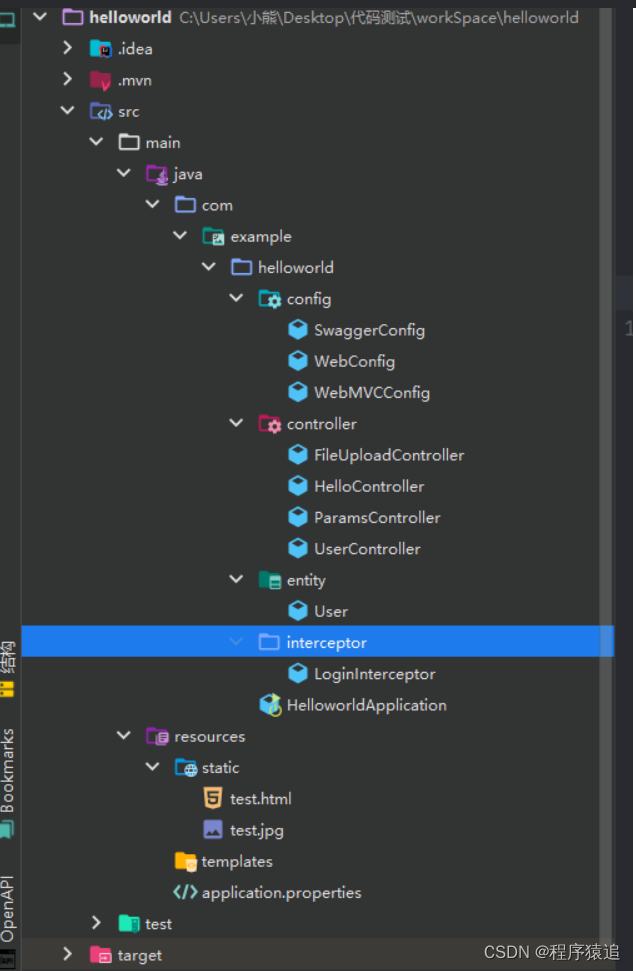
2、目录结构

但直接访问static目录下的直接404,原因是impleUrlHandlerMapping 的UrlMap存放的映射无法支持找到static/index.html,允许访问的资源路径仅仅只有classpath:/META-INF/resources/ 和classpath:/META-INF/resources/webjars/,这时我们改重写 addResourceHandlers 方法了
package com.example.helloworld.config;
import org.springframework.context.annotation.Configuration;
import org.springframework.web.servlet.config.annotation.ResourceHandlerRegistry;
import org.springframework.web.servlet.config.annotation.WebMvcConfigurationSupport;
@Configuration
public class WebMVCConfig extends WebMvcConfigurationSupport {
@Override
protected void addResourceHandlers(ResourceHandlerRegistry registry) {
registry.addResourceHandler("/**").addResourceLocations("classpath:/static/");
registry.addResourceHandler("/webjars/**") .addResourceLocations("classpath:/META-INF/resources/webjars/");
}
}
test.html 文件
<!DOCTYPE html>
<html lang="en" xmlns:th="http://www.thymeleaf.org">
<head>
    <meta charset="UTF-8">
    <title>Title</title>
</head>
<body>
<span>hello 过滤器</span>
</body>
</html>
访问测试下

图片也是一样

3、静态资源与动态资源的区别
静态资源:服务器端的文件从服务器端传给浏览器之后,如果在浏览器上看到的页面内容和服务器端一模一样,就是属于静态资源
动态资源:服务器端会把程序动态运行起来,运行完以后会把程序的执行结果 发还给客户端 ,客户端看到的只是一个结果,看不到源程序
简单来说:****静态资源:一般客户端发送请求到web服务器,web服务器从内存在取到相应的文件,返回给客户端,客户端解析并渲染显示出来。
动态资源:一般客户端请求的动态资源,先将请求交于web容器,web容器连接数据库,数据库处理数据之后,将内容交给web服务器,web服务器返回给客户端解析渲染处理。
二、文件上传
1、文件上传原理
表单的enctype 属性规定在发送到服务器之前应该如何对表单数据进行编码。
当表单的enctype="application/x-www-form-urlencoded"(默认)时,form表单中的数据格式为:key=value&key=value
当表单的enctype="multipart/form-data"时,其传输数据形式如下

2、SpirngBoot实现文件上传功能
Spring Boot工程嵌入的tomcat限制了请求的文件大小,每个文件的配置最大为1Mb,单次请求的文件的总数不能大于10Mb。
要更改这个默认值需要在配置文件(如application.properties)中加入两个配置
spring.servlet.multipart.max-file-size=10MB
spring.servlet.multipart.max-request-size=10MB
当表单的enctype="multipart/form-data"时,可以使用MultipartFile 获取上传的文件数据,再通过transferTo方法将其写入到磁盘中
代码
@RestController
public class FileUploadController {
@PostMapping("/upload")
public String up(String nickname, MultipartFile photo, HttpServletRequest request) throws IOException {
System.out.println(nickname);
// 获取图片的原始名称
System.out.println(photo.getOriginalFilename());
// 取文件类型
System.out.println(photo.getContentType());
String path = request.getServletContext().getRealPath("/upload/");
System.out.println(path);
saveFile(photo,path);
return "上传成功";
}
//
public void saveFile(MultipartFile photo,String path) throws IOException {
// 判断存储的目录是否存在,如果不存在则创建
File dir = new File(path);
if(!dir.exists()){
// 创建目录
dir.mkdir();
}
File file = new File(path+photo.getOriginalFilename());
photo.transferTo(file);
}
}
打开postman,编写请求

查看idea控制台

我们打开路径来查看下图片是否存在

三、拦截器
拦截器在Web系统中非常常见,对于某些全局统一的操作,我们可以把它提取到拦截器中实现。总结起来,拦截器大致有以下几种使用场景:
权限检查:如登录检测,进入处理程序检测是否登录,如果没有,则直接返回登录页面。
性能监控:有时系统在某段时间莫名其妙很慢,可以通过拦截器在进入处理程序之前记录开始时间,在处理完后记录结束时间,从而得到该请求的处理时间
通用行为:读取cookie得到用户信息并将用户对象放入请求,从而方便后续流程使用,还有提取Locale、Theme信息等,只要是多个处理程序都需要的,即可使用拦截器实现。
Spring Boot定义了HandlerInterceptor接口来实现自定义拦截器的功能
HandlerInterceptor接口定义了preHandle、postHandle、afterCompletion三种方法,通过重写这三种方法实现请求前、请求后等操作

创建interceptor包,新建LoginInterceptor类实现HandlerInterceptor接口重写preHandle方法
public class LoginInterceptor implements HandlerInterceptor {
    @Override
    public boolean preHandle(HttpServletRequest request, HttpServletResponse response, Object handler) throws Exception {
        System.out.println("LoginInterceptor");
        return true;
    }
}
创建config包新建WebConfig类实现WebMvcConfigurer接口重写addInterceptors方法,将LoginInterceptor添加进去
package com.example.helloworld.config;
import com.example.helloworld.interceptor.LoginInterceptor;
import org.springframework.context.annotation.Configuration;
import org.springframework.web.servlet.config.annotation.InterceptorRegistry;
import org.springframework.web.servlet.config.annotation.ResourceHandlerRegistry;
import org.springframework.web.servlet.config.annotation.WebMvcConfigurer;
@Configuration
public class WebConfig implements WebMvcConfigurer {
@Override
public void addInterceptors(InterceptorRegistry registry) {
// registry.addInterceptor( new LoginInterceptor()).addPathPatterns("/user/**");
registry.addInterceptor( new LoginInterceptor());
}
}
来个请求查看控制台

四、Swagger
1、什么是Swagger?
Swagger是一个规范和完整的框架,用于生成、描述、调用和可视化RESTful风格的Web服务,是非常流行的API表达工具。
Swagger能够自动生成完善的RESTful API文档,,同时并根据后台代码的修改同步更新,同时提供完整的测试页面来调试API。
2、使用Swagger生成Web API文档
在Spring Boot项目中集成Swagger同样非常简单,只需在项目中引入springfox-swagger2和springfox-swagger-ui依赖即可。
<!-- 添加swagger2相关功能 -->
<dependency>
    <groupId>io.springfox</groupId>
    <artifactId>springfox-swagger2</artifactId>
    <version>2.9.2</version>
</dependency>
<!-- 添加swagger-ui相关功能 -->
<dependency>
    <groupId>io.springfox</groupId>
    <artifactId>springfox-swagger-ui</artifactId>
    <version>2.9.2</version>
</dependency>
3、配置Swagger
@Configuration // 告诉Spring容器,这个类是一个配置类
@EnableSwagger2 // 启用Swagger2功能
public class SwaggerConfig {
    /**
     * 配置Swagger2相关的bean
     */
    @Bean
    public Docket createRestApi() {
        return new Docket(DocumentationType.SWAGGER_2)
                .apiInfo(apiInfo())
                .select()
                .apis(RequestHandlerSelectors.basePackage("com"))// com包下所有API都交给Swagger2管理
                .paths(PathSelectors.any()).build();
    }

    /**
     * 此处主要是API文档页面显示信息
     */
    private ApiInfo apiInfo() {
        return new ApiInfoBuilder()
                .title("演示项目API") // 标题
                .description("演示项目") // 描述
                .version("1.0") // 版本
                .build();
    }
}
application.properties中加入以下配置
spring.mvc.pathmatch.matching-strategy=ant_path_matcher
启动项目访问 http://127.0.0.1:8080/swagger-ui.html ,即可打开自动生成的可视化测试页面

在这个页面可以对我们所有的控制层的方法进行测试
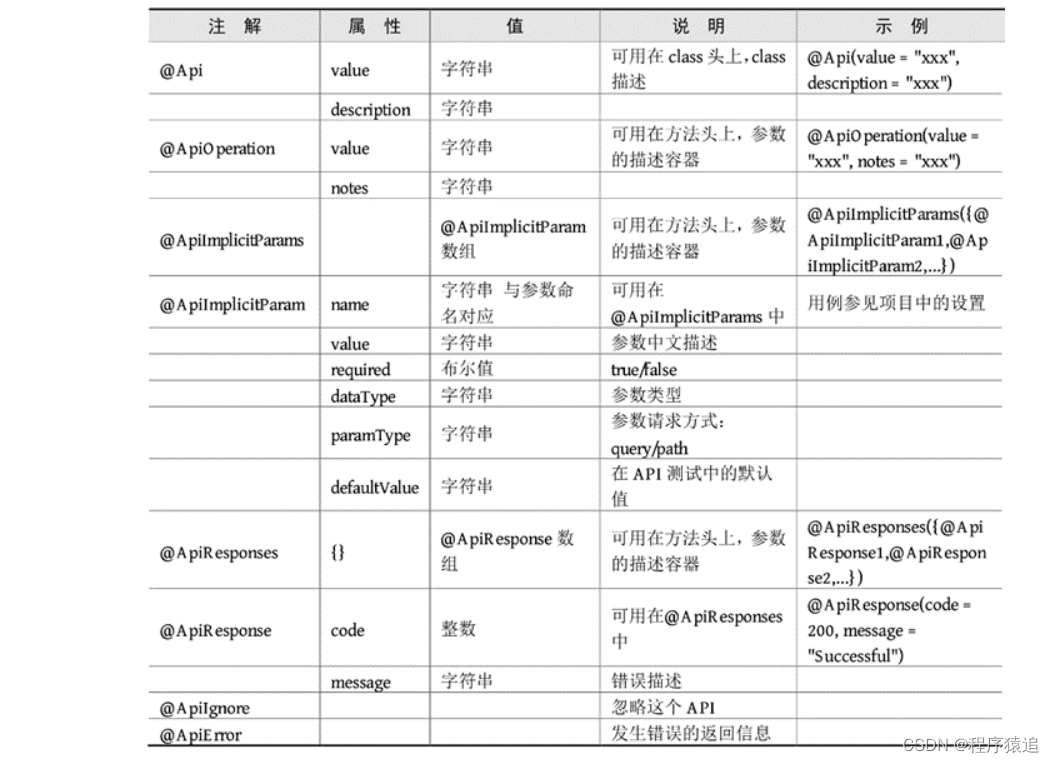
4、Swagger常用注解

很喜欢一句话,舞台再大,你不上台,永远是个观众。平台再好,你不参与,永远是局外人。能力再大,你不行动,只能看别人成功!
版权归原作者 程序猿追 所有, 如有侵权,请联系我们删除。
