
(一)kubernetes1.29.4离线部署之-安装文件准备
(二)kubernetes1.29.4离线部署之-镜像文件准备
(三)kubernetes1.29.4离线部署之-环境初始化
(四)kubernetes1.29.4离线部署之-组件安装
(五)kubernetes1.29.4离线部署之-初始化第一个控制平面
(六)kubernetes1.29.4离线部署之-加入Node节点
(七)kubernetes1.29.4离线部署之-网络插件
(八)kubernetes1.29.4离线部署之-测试验证
友情提示: 由于本文过长,不便于阅读,已经拆分为多个章节,可以点击上面的地址单独阅读
本文容器运行时采用的时Containerd
本文网络插件采用的时calico tigera-operator
本文涉及的所有脚本文件可以从如下地址获取:
https://gitee.com/qingplus/qingcloud-platform/tree/develop/qingcloud-deploy/service
前情提要:
本文不介绍K8S架构及细节,仅仅分享Kubernetes部署实施完整过程。
本文主要采用kubeadm方式安装部署。另外本文直接采用单控制平面方式快速完成版本部署,etcd的部署方式为堆叠方式,独立方式的切换后续完成文档说明。
高可用集群拓扑的两个选项介绍:
高可用集群拓扑的两个选项:
- 使用堆叠(stacked)控制平面节点,其中 etcd 节点与控制平面节点共存
- 使用外部 etcd 节点,其中 etcd 在与控制平面不同的节点上运行
本文主要采用第一种堆叠方式:

环境准备
硬件环境
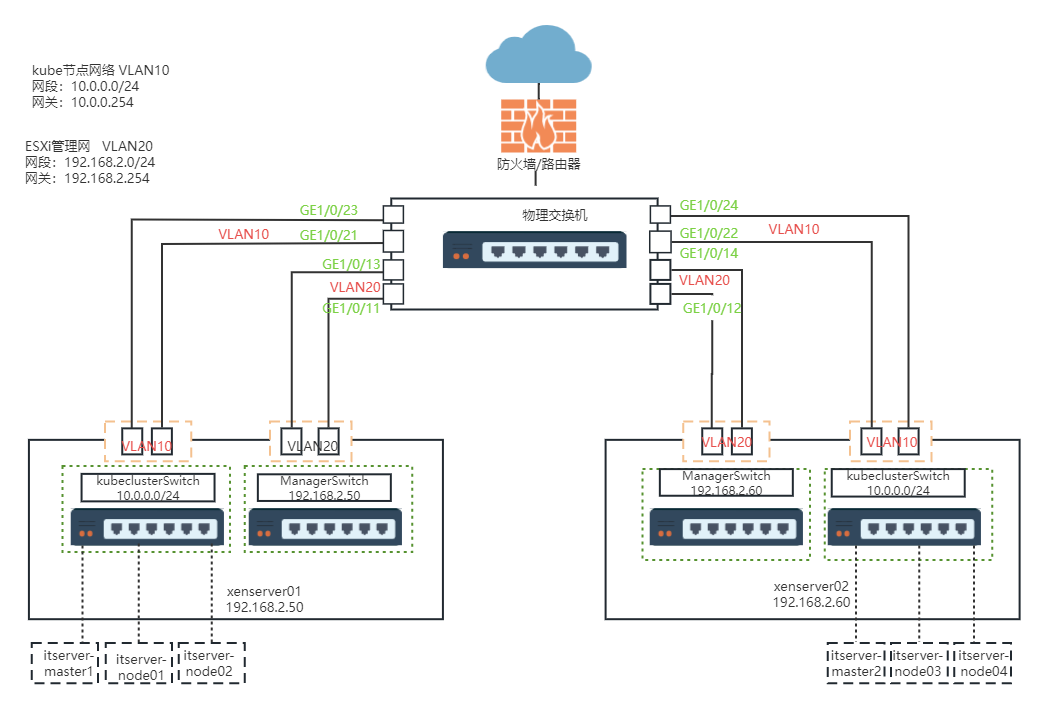
服务器由6台ESXi虚拟化服务器组成,详情参考《ESXi网络配置与物理交换机VLAN ID规划》
本文为单控制平面部署,非高可用集群部署,并未用到规划中的所有节点。后续集群部署会继续使用。
主机名称ESXi 节点名角色IP地址资源配置安装组件itserver-master1xenserver01master10.0.0.108C/16G/200Gitserver-master2xenserver02master10.0.0.138C/16G/200Gitserver-node01xenserver01node10.0.0.1116C/64G/500Gitserver-node02xenserver01node10.0.0.1216C/64G/500Gitserver-node03xenserver02node10.0.0.1416C/64G/500Gitserver-node04xenserver02node10.0.0.1516C/64G/500G
物理服务器节点(安装ESXi)
三台物理服务器ESXi 节点名ip地址用户名备注xenserver01192.168.3.50rootxenserver02192.168.3.60rootxenserver03192.168.3.100root
网络分配
角色IP地址备注node网络10.0.0.0/24Service 网络10.96.0.0/16Pod网络172.16.0.0/16
网络部署图
离线安装文件准备
需要准备如下几个必须的安装文件,可以离线下载后通过本地nginx代理供其他节点下载使用
- kubernetes_server
直接下载最新版二进制文件
- containerd
本文容器运行时采用containerd而非docker,如果容器运行时采用docker,需要另外的部署版本。本文直接下载三合一版本cri_containerd_cni
- cni_plugins
- crictl
命令行执行工具 。类似docker命令行
- runc
需要单独下载完整版,只是需要检查本地环境是否存在libcommp.so
- etcd
采用外部 etcd 节点部署时需要用到,如果使用的是堆叠的方式,直接用默认的etcd容器即可,可以不用下载。
完整的离线文件下载脚本:
#!/bin/bashENV_CFG=./env.cfg
if[-f${ENV_CFG}];thenchmod777${ENV_CFG}source${ENV_CFG}fi# Internet URLskernel_url="http://mirrors.tuna.tsinghua.edu.cn/elrepo/kernel/el7/x86_64/RPMS/${kernel_name}"cni_plugins_url="https://github.com/containernetworking/plugins/releases/download/${cni_plugins_version}/${cni_plugins_name}"cri_containerd_cni_url="https://github.com/containerd/containerd/releases/download/v${cri_containerd_cni_version}/${cri_containerd_cni_name}"crictl_url="https://github.com/kubernetes-sigs/cri-tools/releases/download/${crictl_version}/${crictl_name}"runc_url="https://github.com/opencontainers/runc/releases/download/v${runc_version}/${runc_name}"etcd_url="https://github.com/etcd-io/etcd/releases/download/${etcd_version}/${etcd_name}"kubernetes_server_url="https://storage.googleapis.com/kubernetes-release/release/${KUBERNETES_VERSION}/${kubernetes_server_name}"nginx_url="http://nginx.org/download/${nginx_name}"# Download packagespackages=($kernel_url$runc_url$cni_plugins_url$cri_containerd_cni_url$crictl_url$cri_dockerd_url$etcd_url$kubernetes_server_url)forpackage_urlin"${packages[@]}";dofilename=$(basename"$package_url")ifcurl-k-L-C - -o"$filename""$package_url";thenecho"Downloaded $filename"elseecho"Failed to download $filename"exit1fidone
离线镜像文件准备
注意:离线安装需要准备大量的镜像,这一步千万要仔细否则会出现各种意想不到的问题
需要准备的镜像文件
- kube-apiserver
- kube-controller-manager
- kube-scheduler
- kube-proxy
- kube-proxy
- coredns
- pause
- etcd
以上镜像文件可以从: registry.cn-hangzhou.aliyuncs.com/google_containers下载
- calico/node
- calico/kube-controllers
- calico/node
- calico/typha
- calico/node-driver-registrar
- calico/csi
- calico/cni
- calico/ctl
- calico/pod2daemon-flexvol
- calico/apiserver
以上可以直接从docker.io下载即可
注意: 以上所有的镜像文件务必准备到位。本文脚本中的几个版本便令注意修改到位:
KUBERNETES_VERSION=${KUBERNETES_VERSION:-“v1.29.4”}
COREDNS_VERSION=${COREDNS_VERSION:-‘v1.11.1’}
PAUSE_VERSION=${PAUSE_VERSION:-‘3.9’}
ETCD_VERSION=${ETCD_VERSION:-‘3.5.12-0’}
REGISTRY_VERSION=${REGISTRY_VERSION:-‘2.8.3’}
CALICO_VERSION=${CALICO_VERSION:-‘v3.27.3’}
完整的镜像下载脚本
#!/bin/bashENV_CFG=./env.cfg
if[-f${ENV_CFG}];thenchmod777${ENV_CFG}source${ENV_CFG}fiimage_list="${IMAGE_DOMAIN}/${IMAGE_NAMESPACE}/kube-apiserver:${KUBERNETES_VERSION}${IMAGE_DOMAIN}/${IMAGE_NAMESPACE}/kube-controller-manager:${KUBERNETES_VERSION}${IMAGE_DOMAIN}/${IMAGE_NAMESPACE}/kube-scheduler:${KUBERNETES_VERSION}${IMAGE_DOMAIN}/${IMAGE_NAMESPACE}/kube-proxy:${KUBERNETES_VERSION}${IMAGE_DOMAIN}/${IMAGE_NAMESPACE}/coredns:${COREDNS_VERSION}${IMAGE_DOMAIN}/${IMAGE_NAMESPACE}/pause:${PAUSE_VERSION}${IMAGE_DOMAIN}/${IMAGE_NAMESPACE}/etcd:${ETCD_VERSION}
calico/node:${CALICO_VERSION}
calico/kube-controllers:${CALICO_VERSION}
calico/node:${CALICO_VERSION}
calico/typha:${CALICO_VERSION}
calico/node-driver-registrar:${CALICO_VERSION}
calico/csi:${CALICO_VERSION}
calico/cni:${CALICO_VERSION}
calico/ctl:${CALICO_VERSION}
calico/pod2daemon-flexvol:${CALICO_VERSION}
calico/apiserver:${CALICO_VERSION}
"#${IMAGE_DOMAIN}/${IMAGE_NAMESPACE}/registry:${REGISTRY_VERSION}newimage_list=()forimagein${image_list};dodocker pull "${image}"newimage=$(echo $image |sed-e"s/calico/${LOCAL_IMAGE_DOMAIN}\/calico/")newimage=$(echo $newimage |sed-e"s/${IMAGE_DOMAIN}\/${IMAGE_NAMESPACE}/${LOCAL_IMAGE_DOMAIN}\/${LOCAL_IMAGE_NAMESPACE}/")newimage_list+="${newimage} "docker tag $image$newimagedocker push $newimagedonedocker save -o qinghub-kube-"${VERSION}".tar ${newimage_list}
轻云官方下载
https:/qingplus.cn/pkg/kubernetes/v1.29.4/qinghub-kube-v1.29.4.tar
下载完成后再手动导入所有的镜像即可。详细过程不在细说。
环境初始化
检查步骤
- 关闭防火墙
- 关闭 swap partition permanently
- 配置检查时间同步
- 配置安装时间同步组件
- 配置检查 nfs-utils kubeadmin方式安装不需要检查
- 配置检查内核版本
- 配置检查资源情况
- 配置检查SSH
- 配置检查系统配置
- 配置检查转发 IPv4
- 配置检查Docker用户并添加ssh免密认证<authoirzed_keys> (建议手动执行)
- 配置检查Docker (容器运行时为Containerd时,不需要检查)
- 配置检查Docker用户权限 (容器运行时为Containerd时,不需要检查)
- 配置检查网络
完整的初始化脚本
#!/bin/bash################################################ QingHub K8S Install 版本: $VERSION# 架构: $ARCH_TYPE 目前版本主要支持amd64,其他待敬请期待# 操作系统: $os_type# QingHub Studio官网: https://qinghub.net# 如过您安装遇到问题,请到官网查找官方联系方式或加支持群:#                                https://qinghub.net###############################################ENV_CFG=./env.cfg
if[-f${ENV_CFG}];thenchmod777${ENV_CFG}source${ENV_CFG}fiexportCONSOLE=${CONSOLE:-false}os_type=$(cat /etc/os-release |grep"^ID="|awk-F='{print $2}'|tr-d[:punct:])os_version_id=$(cat /etc/os-release |grep"VERSION_ID="|awk-F='{print $2}'|tr-d[:punct:])if["$EUID"-ne0];thenif["$LANG"=="zh_CN.UTF-8"];thenecho-e"${RED}[ERROR] 当前用户不是 root 用户,请切换到 root 用户执行该脚本.${NC}"exit1elseecho-e"${RED}[ERROR] Current user is not root user, please switch to root user to execute the script.${NC}"exit1fifiif[-z"$SSH_RSA"];thenif["$LANG"=="zh_CN.UTF-8"];thenecho-e"${RED}[ERROR] 请设置环境变量 SSH_RSA, 该变量为 SSH 公钥.${NC}"exit1elseecho-e"${RED}[ERROR] Please set the environment variable SSH_RSA, the variable is SSH public key.${NC}"exit1fifi################################################ 新增ubuntu 用户# QingHub Studio官网: https://qinghub.net# 如过您安装遇到问题,请到官网查找官方联系方式或加支持群:#                                https://qinghub.net###############################################functionadd_user_in_ubuntu(){useradd --create-home -s /bin/bash -g root "$1"echo"$1":"$2"| chpasswd
    if["$LANG"=="zh_CN.UTF-8"];thenecho-e"${GREEN}[INFO] 用户 $1 已经创建.${NC}"elseecho-e"${GREEN}[INFO] User $1 has been created.${NC}"fi}################################################ 新增redhat 用户# QingHub Studio官网: https://qinghub.net# 如过您安装遇到问题,请到官网查找官方联系方式或加支持群:#                                https://qinghub.net###############################################functionadd_user_in_redhat(){
    adduser -g root "$1"echo"$1":"$2"| chpasswd
    if["$LANG"=="zh_CN.UTF-8"];thenecho-e"${GREEN}[INFO] 用户 $1 已经创建.${NC}"elseecho-e"${GREEN}[INFO] User $1 has been created.${NC}"fi}################################################ 描述: 检查并新增用户, 有些版本可以不用检查,请使用时根据# 情况自行注释掉# QingHub Studio官网: https://qinghub.net# 如过您安装遇到问题,请到官网查找官方联系方式或加支持群:#                                https://qinghub.net###############################################functioncheck_user(){if!grep-qdocker /etc/group;thengroupadd--forcedockerfiifid-u"${DOCKER_USER}">/dev/null 2>&1;thenif!id-nG"${DOCKER_USER}"|grep-qw"docker";then
            gpasswd -a"${DOCKER_USER}"dockerfiif["$LANG"=="zh_CN.UTF-8"];thenecho-e"${GREEN}[INFO] 用户 ${DOCKER_USER} 已经存在.${NC}"elseecho-e"${GREEN}[INFO] User ${DOCKER_USER} already exists.${NC}"fielsecase$os_typein
        centos|redhat|euleros|fusionos|anolis|kylin|rhel|rocky|fedora|openEuler)
            add_user_in_redhat "${DOCKER_USER}""${DOCKER_PASS}";;
        ubuntu|debian)
            add_user_in_ubuntu "${DOCKER_USER}""${DOCKER_PASS}";;
        *)if["$LANG"=="zh_CN.UTF-8"];thenecho-e"${RED}[ERROR] 暂不支持 $os_type 操作系统.${NC}"exit1elseecho-e"${RED}[ERROR] The $os_type operating system is temporarily not supported.${NC}"exit1fi;;esacfi$CONSOLE$CONSOLE|| add_ssh_rsa "${DOCKER_USER}"}functionadd_ssh_rsa(){ifid-u"$user">/dev/null 2>&1;thenif[!-d"/home/$1/.ssh"];thenif["$LANG"=="zh_CN.UTF-8"];thenecho-e"${GREEN}[INFO] 创建 /home/$1/.ssh 目录.${NC}"elseecho-e"${GREEN}[INFO] Create /home/$1/.ssh directory.${NC}"fimkdir-p /home/"$1"/.ssh
        fiif[-f"/home/$1/.ssh/authorized_keys"];thenif["$LANG"=="zh_CN.UTF-8"];thenecho-e"${GREEN}[INFO] /home/$1/.ssh/authorized_keys 已经存在.${NC}"elseecho-e"${GREEN}[INFO] /home/$1/.ssh/authorized_keys already exists.${NC}"fichmod777 /home/"$1"/.ssh/authorized_keys
            if!< /home/"$1"/.ssh/authorized_keys grep-q"$SSH_RSA";thenecho"$SSH_RSA">> /home/"$1"/.ssh/authorized_keys
            fielseif["$LANG"=="zh_CN.UTF-8"];thenecho-e"${GREEN}[INFO] 创建 /home/$1/.ssh/authorized_keys.${NC}"elseecho-e"${GREEN}[INFO] Create /home/$1/.ssh/authorized_keys.${NC}"fitouch /home/"$1"/.ssh/authorized_keys
            chmod777 /home/"$1"/.ssh/authorized_keys
            echo"$SSH_RSA"> /home/"$1"/.ssh/authorized_keys
        fiif< /home/"$1"/.ssh/authorized_keys grep-q"$SSH_RSA";thenif["$LANG"=="zh_CN.UTF-8"];thenecho-e"${GREEN}[INFO] 成功将 SSH 公钥添加到 /home/$1/.ssh/authorized_keys.${NC}"elseecho-e"${GREEN}[INFO] Successfully added ssh public key to /home/$1/.ssh/authorized_keys.${NC}"fielseif["$LANG"=="zh_CN.UTF-8"];thenecho-e"${RED}[ERROR] 将 SSH 公钥添加到 /home/$1/.ssh/authorized_keys 失败.${NC}"exit1elseecho-e"${RED}[ERROR] Add ssh public key to /home/$1/.ssh/authorized_keys failed.${NC}"exit1fifichmod600 /home/"$1"/.ssh/authorized_keys
        chown-R"$1":"$1"  /home/"$1"/.ssh
    fi}functioncheck_user_permission(){ifsu${DOCKER_USER}-c"docker ps">/dev/null 2>&1;thenif["$LANG"=="zh_CN.UTF-8"];thenecho-e"${GREEN}[INFO] Docker 用户有权限执行 docker 命令.${NC}"elseecho-e"${GREEN}[INFO] Docker users have the permission to execute docker commands.${NC}"fielseif["$LANG"=="zh_CN.UTF-8"];thenecho-e"${RED}[ERROR] Docker 用户无权限执行 docker 命令, 请尝试重启docker 'systemctl restart docker'. 重启 docker 后, 再次执行该脚本.${NC}"exit1elseecho-e"${RED}[ERROR] Docker users have no permission to execute docker commands, Please try to restart docker 'systemctl restart docker'. After restarting docker, execute the script again.${NC}"exit1fifi}################################################ 描述: 关闭防火墙# QingHub Studio官网: https://qinghub.net# 如过您安装遇到问题,请到官网查找官方联系方式或加支持群:#                                https://qinghub.net###############################################functiondisable_firewalld(){if systemctl status firewalld |grep Active |grep-q running >/dev/null 2>&1;then
        systemctl stop firewalld >/dev/null 2>&1
        systemctl disable firewalld >/dev/null 2>&1if["$LANG"=="zh_CN.UTF-8"];thenecho-e"${GREEN}[INFO] 检测到 Firewalld 服务已启动,正在将 Firewalld 服务关闭并禁用.${NC}"elseecho-e"${GREEN}[INFO] The Firewalld service has been started, Firewalld service is being turned off and disabled.${NC}"fielseif["$LANG"=="zh_CN.UTF-8"];thenecho-e"${GREEN}[INFO] Firewalld 服务已经停止或未安装.${NC}"elseecho-e"${GREEN}[INFO] Firewalld service is not installed.${NC}"fifi}################################################ 描述: 关闭swap# QingHub Studio官网: https://qinghub.net# 如过您安装遇到问题,请到官网查找官方联系方式或加支持群:#                                https://qinghub.net###############################################functiondisable_swap(){if swapoff -a;thensed-i'/swap/s/^/#/' /etc/fstab
        if["$LANG"=="zh_CN.UTF-8"];thenecho-e"${GREEN}[INFO] swap 已经禁用.${NC}"elseecho-e"${GREEN}[INFO] swap has been disabled.${NC}"fifi}functioncheck_time_sync(){if timedatectl status |grep"NTP synchronized"|grep-q"yes">/dev/null 2>&1|| timedatectl show |grep"NTPSynchronized=yes">/dev/null 2>&1;thenif["$LANG"=="zh_CN.UTF-8"];thenecho-e"${GREEN}[INFO] NTP 时间同步已经启用.${NC}"elseecho-e"${GREEN}[INFO] NTP time synchronization has been enabled.${NC}"fielseif["$LANG"=="zh_CN.UTF-8"];thenecho-e"${YELLOW}[WARN] NTP 时间同步未启用.${NC}"elseecho-e"${YELLOW}[WARN] NTP time synchronization is not enabled.${NC}"fifi}################################################ 描述: 安装时钟同步,请酌情修改并安装# QingHub Studio官网: https://qinghub.net# 如过您安装遇到问题,请到官网查找官方联系方式或加支持群:#                                https://qinghub.net###############################################install_chrony(){case$os_typein
    ubuntu|debian)if dpkg -l|grep-q chrony >/dev/null 2>&1;thenecho-e"${GREEN}[INFO] chrony 已经安装在主机上.${NC}"elseecho-e"${YELLOW}[WARN] chrony 未安装在主机上, 请执行命令安装 'apt -y install chrony'.${NC}"apt-yinstall chrony &> /dev/null;
        systemctl restart chronyd && systemctl enable--now chronyd &> /dev/null
        systemctl is-active chronyd &> /dev/null
      fi;;
    *)ifrpm-qa|grep-q chrony >/dev/null 2>&1;thenif["$LANG"=="zh_CN.UTF-8"];thenecho-e"${GREEN}[INFO] chrony 已经安装在主机上.${NC}"elseecho-e"${GREEN}[INFO] chrony has been installed on the host.${NC}"fielseif["$LANG"=="zh_CN.UTF-8"];thenecho-e"${YELLOW}[WARN] chrony 未安装在主机上, 请执行命令安装 'yum -y install chrony'.${NC}"elseecho-e"${YELLOW}[WARN] chrony is not installed on the host, please execute the command install 'yum -y install chrony'.${NC}"fi
          yum -yinstall chrony
      fi;;esacif["${CHRONY_TYPE}"=='server'];thensudobash-c'cat > /etc/chrony.conf << EOF
pool ntp.aliyun.com iburst
driftfile /var/lib/chrony/drift
makestep 1.0 3
rtcsync
allow 10.0.0.0/24
local stratum 10
keyfile /etc/chrony.keys
leapsectz right/UTC
logdir /var/log/chrony
EOF'elsesudobash-c'cat > /etc/chrony.conf << EOF
pool ${CHRONY_SERVER} iburst
driftfile /var/lib/chrony/drift
makestep 1.0 3
rtcsync
keyfile /etc/chrony.keys
leapsectz right/UTC
logdir /var/log/chrony
EOF'fi
    systemctl restart chronyd && systemctl enable--now chronyd &> /dev/null
    systemctl is-active chronyd &> /dev/null
    if["$LANG"=="zh_CN.UTF-8"];thenecho-e"${GREEN}[INFO] chrony 完成配置在主机上.${NC}"elseecho-e"${GREEN}[INFO] chrony has been configured on the host.${NC}"fi}################################################ 描述: 优化配置forwarding_ipv4# QingHub Studio官网: https://qinghub.net# 如过您安装遇到问题,请到官网查找官方联系方式或加支持群:#                                https://qinghub.net###############################################functioncheck_forwarding_ipv4(){sudobash-c'cat <<EOF | sudo tee /etc/modules-load.d/k8s.conf
overlay
br_netfilter
EOF'sudo modprobe overlay
  sudo modprobe br_netfilter
  sudobash-c'cat <<EOF | sudo tee /etc/sysctl.d/k8s.conf
net.bridge.bridge-nf-call-iptables  = 1
net.bridge.bridge-nf-call-ip6tables = 1
net.ipv4.ip_forward                 = 1
EOF'sudosysctl--system#加载ipvs模块sudobash-c'cat <<EOF | sudo tee /etc/modules-load.d/ipvs.conf <<EOF
ip_vs
ip_vs_rr
ip_vs_wrr
ip_vs_sh
nf_conntrack
ip_tables
ip_set
xt_set
ipt_set
ipt_rpfilter
ipt_REJECT
ipip
EOF'
  systemctl restart systemd-modules-load.service
}################################################ 描述: 检查服务器资源状况# QingHub Studio官网: https://qinghub.net# 如过您安装遇到问题,请到官网查找官方联系方式或加支持群:#                                https://qinghub.net###############################################functioncheck_resource(){cpu=$(grep-c'processor' /proc/cpuinfo)mem=$(free-g|awk'/^Mem/{print $2}')DISK_SPACE=$(df /|sed-n'2p'|awk'{print $2}')# check cpuif["${cpu}"-lt2];thenif["$LANG"=="zh_CN.UTF-8"];thenecho-e"${YELLOW}[WARN] CPU核数建议至少为2核.${NC}"elseecho-e"${YELLOW}[WARN] The cpu is recommended to be at least 2C.${NC}"fifi# check memoryif["${mem}"-lt3];thenif["$LANG"=="zh_CN.UTF-8"];thenecho-e"${YELLOW}[WARN] 内存建议至少为8G.${NC}"elseecho-e"${YELLOW}[WARN] The Memory is recommended to be at least 8G.${NC}"fifi# check disk spaceif["${DISK_SPACE}"-lt47185920];thenif["$LANG"=="zh_CN.UTF-8"];thenecho-e"${YELLOW}[WARN] 根分区空间需大于 50G.${NC}"elseecho-e"${YELLOW}[WARN] The root partition space must be greater than 50G.${NC}"fifi}################################################ 描述: 检查内核版本# QingHub Studio官网: https://qinghub.net# 如过您安装遇到问题,请到官网查找官方联系方式或加支持群:#                                https://qinghub.net###############################################functioncheck_kernel(){kernel_version=$(uname-r|awk -F. '{print $1}')if["$kernel_version"-lt"4"];thenif["$LANG"=="zh_CN.UTF-8"];thenecho-e"${YELLOW}[WARN] 内核版本必须高于4.0, 请尽快升级内核到4.0+.${NC}"elseecho-e"${YELLOW}[WARN] Kernel version must be higher than 4.0, Please upgrade the kernel to 4.0+ as soon as possible.${NC}"fifi}################################################ 描述: 检查 nfs是否安装,这里并未自动安装# QingHub Studio官网: https://qinghub.net# 如过您安装遇到问题,请到官网查找官方联系方式或加支持群:#                                https://qinghub.net###############################################functioncheck_nfscli(){case$os_typein
        ubuntu|debian)if dpkg -l|grep-q nfs-common >/dev/null 2>&1;thenif["$LANG"=="zh_CN.UTF-8"];thenecho-e"${GREEN}[INFO] nfs-common 已经安装在主机上.${NC}"elseecho-e"${GREEN}[INFO] nfs-common has been installed on the host.${NC}"fielseif["$LANG"=="zh_CN.UTF-8"];thenecho-e"${YELLOW}[WARN] nfs-common 未安装在主机上, 请执行命令安装 'apt -y install nfs-common'.${NC}"elseecho-e"${YELLOW}[WARN] nfs-common is not installed on the host, please execute the command install 'apt-get update && apt -y install nfs-common'.${NC}"fifi;;
        *)ifrpm-qa|grep-q nfs-utils >/dev/null 2>&1;thenif["$LANG"=="zh_CN.UTF-8"];thenecho-e"${GREEN}[INFO] nfs-utils 已经安装在主机上.${NC}"elseecho-e"${GREEN}[INFO] nfs-utils has been installed on the host.${NC}"fielseif["$LANG"=="zh_CN.UTF-8"];thenecho-e"${YELLOW}[WARN] nfs-utils 未安装在主机上, 请执行命令安装 'yum -y install nfs-utils'.${NC}"elseecho-e"${YELLOW}[WARN] nfs-utils is not installed on the host, please execute the command install 'yum -y install nfs-utils'.${NC}"fifi;;esac}functioncheck_openssh(){ifssh-V>/dev/null 2>&1;thenOPENSSH_VERSION=$(ssh-V|&awk -F[_.]'{print $2}')if["${OPENSSH_VERSION}"-lt"7"];thenif["$LANG"=="zh_CN.UTF-8"];thenecho-e"${YELLOW}[WARN] Openssh 版本必须高于 7.0.${NC}"elseecho-e"${YELLOW}[WARN] Openssh version must be higher than 7.0 ${NC}"fifielseif["$LANG"=="zh_CN.UTF-8"];thenecho-e"${RED}[ERROR] 需要安装 7.0+ 版本的openssh.${NC}"exit1elseecho-e"${RED}[ERROR] Need to install 7.0+ version of openssh.${NC}"exit1fifiifgrep-v"^\s*#" /etc/ssh/sshd_config |grep"AllowTcpForwarding yes">/dev/null 2>&1;thenif["$LANG"=="zh_CN.UTF-8"];thenecho-e"${GREEN}[INFO] /etc/ssh/sshd_config 已经配置 AllowTcpForwarding yes.${NC}"elseecho-e"${GREEN}[INFO] /etc/ssh/sshd_config has been configured AllowTcpForwarding yes.${NC}"fielseifgrep"AllowTcpForwarding no" /etc/ssh/sshd_config >/dev/null 2>&1;thensed-i'/AllowTcpForwarding/s/^/#/' /etc/ssh/sshd_config
            sed-i'$a\AllowTcpForwarding yes' /etc/ssh/sshd_config
        elsesed-i'$a\AllowTcpForwarding yes' /etc/ssh/sshd_config
        fiif["$LANG"=="zh_CN.UTF-8"];thenecho-e"${YELLOW}[WARN] /etc/ssh/sshd_config 配置 AllowTcpForwarding yes 成功, 请执行命令重启 sshd 服务生效, 'systemctl restart sshd'.${NC}"elseecho-e"${YELLOW}[WARN] /etc/ssh/sshd_config AllowTcpForwarding yes is successfully configured, Run the following command to restart the sshd service to take effect, 'systemctl restart sshd'.${NC}"fifi}################################################ 描述: 优化参数# QingHub Studio官网: https://qinghub.net# 如过您安装遇到问题,请到官网查找官方联系方式或加支持群:#                                https://qinghub.net###############################################functionoptimize_linux(){sudobash-c'cat > /etc/sysctl.conf << EOF
net.bridge.bridge-nf-call-ip6tables=1
net.bridge.bridge-nf-call-iptables=1
net.ipv4.ip_forward=1
net.ipv4.conf.all.forwarding=1
net.ipv4.neigh.default.gc_thresh1=4096
net.ipv4.neigh.default.gc_thresh2=6144
net.ipv4.neigh.default.gc_thresh3=8192
net.ipv4.neigh.default.gc_interval=60
net.ipv4.neigh.default.gc_stale_time=120
kernel.perf_event_paranoid=-1
#sysctls for k8s node config
net.ipv4.tcp_slow_start_after_idle=0
net.core.rmem_max=16777216
fs.inotify.max_user_watches=524288
kernel.softlockup_all_cpu_backtrace=1
kernel.softlockup_panic=0
kernel.watchdog_thresh=30
fs.file-max=2097152
fs.inotify.max_user_instances=8192
fs.inotify.max_queued_events=16384
vm.max_map_count=262144
fs.may_detach_mounts=1
net.core.netdev_max_backlog=16384
net.ipv4.tcp_wmem=4096 12582912 16777216
net.core.wmem_max=16777216
net.core.somaxconn=32768
net.ipv4.ip_forward=1
net.ipv4.tcp_max_syn_backlog=8096
net.ipv4.tcp_rmem=4096 12582912 16777216

net.ipv6.conf.all.disable_ipv6=1
net.ipv6.conf.default.disable_ipv6=1
net.ipv6.conf.lo.disable_ipv6=1

kernel.yama.ptrace_scope=0
vm.swappiness=0
kernel.core_uses_pid=1
# Do not accept source routing
net.ipv4.conf.default.accept_source_route=0
net.ipv4.conf.all.accept_source_route=0

# Promote secondary addresses when the primary address is removed
net.ipv4.conf.default.promote_secondaries=1
net.ipv4.conf.all.promote_secondaries=1

# Enable hard and soft link protection
fs.protected_hardlinks=1
fs.protected_symlinks=1

net.ipv4.conf.all.rp_filter=0
net.ipv4.conf.default.rp_filter=0
net.ipv4.conf.default.arp_announce = 2
net.ipv4.conf.lo.arp_announce=2
net.ipv4.conf.all.arp_announce=2

net.ipv4.tcp_max_tw_buckets=5000
net.ipv4.tcp_syncookies=1
net.ipv4.tcp_fin_timeout=30
net.ipv4.tcp_synack_retries=2
kernel.sysrq=1
EOF'sudosysctl-p>/dev/null 2>&1echo-e"${GREEN}[INFO] 优化kernel参数成功${NC}"}functionoptimize_limits(){sudobash-c'cat >> /etc/security/limits.conf <<EOF
* soft nofile 1024000
* hard nofile 1024000
EOF'echo-e"${GREEN}[INFO] 优化limits参数成功${NC}"}functioncheck_syscfg(){sudochmod777 /etc/sysctl.conf
    sudochmod777 /sbin/sysctl
    sudochmod777 /etc/security/limits.conf
    optimize_linux
    optimize_limits
    sudochmod644 /etc/sysctl.conf
    sudochmod755 /sbin/sysctl
    sudochmod644 /etc/security/limits.conf
}################################################ 描述: calico 网络配置初始化# QingHub Studio官网: https://qinghub.net# 如过您安装遇到问题,请到官网查找官方联系方式或加支持群:#                                https://qinghub.net###############################################functioncheck_network(){sudobash-c'cat >> /etc/NetworkManager/conf.d/calico.conf << EOF
[keyfile]
unmanaged-devices=interface-name:cali*;interface-name:tunl*
unmanaged-devices=interface-name:cali*;interface-name:tunl*;interface-name:vxlan.calico;interface-name:wireguard.cali
EOF'
    systemctl restart NetworkManager
}################################################ 描述: 主入口函数# QingHub Studio官网: https://qinghub.net# 如过您安装遇到问题,请到官网查找官方联系方式或加支持群:#                                https://qinghub.net###############################################functionmain{echo-e"${GREEN}[INFO] ==========开始检查并配置初始化========= ${NC}"# 停止 friewalld
    disable_firewalld
    # 关闭 swap partition permanently
    disable_swap
    # 配置检查时间同步
    check_time_sync
    # 配置安装时间同步组件
    install_chrony
    # 配置检查 nfs-utils kubeadmin方式安装不需要检查#check_nfscli# 配置检查内核版本
    check_kernel
    # 配置检查资源情况
    check_resource
    # 配置检查SSH
    check_openssh
    # 配置检查系统配置
    check_syscfg
    # 转发 IPv4
    check_forwarding_ipv4
    # 配置检查Docker用户并添加ssh免密认证<authoirzed_keys>
    check_user
    # 配置检查Docker  容器运行时为Containerd时,不需要检查#check_docker# 配置检查Docker用户权限 容器运行时为Containerd时,不需要检查#check_user_permission# 配置检查网络
    check_network
    echo-e"${GREEN}[INFO] ==========成功完成检查并配置初始化========= ${NC}"}

main
组件安装
需要安装的组件列表
- 安装containerd
- 部署containerd 配置文件
- 安装cni plugin
- 安装crictl
- 安装runc
- 安装部署kubeadm、kubelet、kubectl
特别关注:
再拷贝kubeadm、kubelet、kubectl文件后,务必记得要创建必须要的几个目录,否则会导致后面初始化控制平面时会出错,详情见完整的安装脚本
sudo mkdir -p /var/lib/kubelet
sudo mkdir -p /etc/kubernetes/manifests
yum 自动从网络安装不会出现该问题,会自动创建。
- 初始化集群第一控制平面节点
安装完整的脚本
#!/bin/bash################################################ QingHub K8S Install 版本: $VERSION# 架构: $ARCH_TYPE 目前版本主要支持amd64,其他待敬请期待# 操作系统: $os_type# QingHub Studio官网: https://qinghub.net# 如过您安装遇到问题,请到官网查找官方联系方式或加支持群:#                           https://qinghub.net###############################################ENV_CFG=./env.cfg
if[-f${ENV_CFG}];thenchmod777${ENV_CFG}source${ENV_CFG}fios_type=$(uname-s)if[$(arch)="x86_64"]||[$(arch)="amd64"];thenarch_type=amd64
elif[$(arch)="aarch64"]||[$(arch)="arm64"];thenarch_type=arm64
elif[$(arch)="i386"];thenarch_type=amd64
    echo-e"${YELLOW}[WAIN] 检测到 i386, 我们暂时把它当做 x86_64(amd64) ${NC}"elseecho-e"${RED}[ERROR] QingHub Studio 目前还不支持 $(arch) 架构 ${NC}"exit1fi################################################ 复制并安装cri_containerd_cni 包括:cri, containerd,cni三合一,后续会覆盖安装# QingHub Studio官网: https://qinghub.net# 如过您安装遇到问题,请到官网查找官方联系方式或加支持群:#                                https://qinghub.net###############################################functioninstall_cri_containerd_cni(){echo-e"${GREEN}[INFO] 下载并安装cri_containerd_cni二级制文件 ${cri_containerd_cni_name}${NC}"if[[-e /usr/bin/curl ]];then# 离线下载文件请修改TODOcurl-L${cri_containerd_cni_url}|sudotar-C / -xz||{echo-e"${RED}[ERROR] 下载并安装cri_containerd_cni二进制文件失败 ${NC}"exit1}elsewget-c"$cri_containerd_cni_url"|sudotar-C / -xz||{echo-e"${RED}[ERROR] 下载cri_containerd_cni二进制文件失败 ${NC}"exit1}fiecho-e"${GREEN}[INFO] 创建containerd.service 文件 ${NC}"sudo systemctl enable--now containerd
  echo-e"${GREEN}[INFO] 安装containerd成功${NC}"}################################################ 描述: 初始化containerd 配置文件,添加修改仓库信息,请酌情修改# QingHub Studio官网: https://qinghub.net# 如过您安装遇到问题,请到官网查找官方联系方式或加支持群:#                                https://qinghub.net###############################################functioninstall_containerd_config(){mkdir-p /etc/containerd
  sudo /usr/local/bin/containerd config default |tee /etc/containerd/config.toml

  # 修改Containerd的配置文件sudosed-i"s#SystemdCgroup\ \=\ false#SystemdCgroup\ \=\ true#g" /etc/containerd/config.toml
  cat /etc/containerd/config.toml |grep SystemdCgroup
  sudosed-i"s#registry.k8s.io\/pause:3.8#qinghub.net:5000\/qingcloudtech\/pause:3.9#g" /etc/containerd/config.toml
  cat /etc/containerd/config.toml |grep sandbox_image
  sudosed-i"s#config_path\ \=\ \"\"#config_path\ \=\ \"/etc/containerd/certs.d\"#g" /etc/containerd/config.toml
  cat /etc/containerd/config.toml |grep certs.d

  mkdir /etc/containerd/certs.d/qinghub.net:5000 -pvsudobash-c'cat > /etc/containerd/certs.d/qinghub.net:5000/hosts.toml << EOF
server = "qinghub.net:5000"
[host."qinghub.net:5000"]
    capabilities = ["pull", "resolve"]
EOF'mkdir /etc/containerd/certs.d/docker.io -pvsudobash-c'cat > /etc/containerd/certs.d/docker.io/hosts.toml << EOF
server = "https://docker.io"
[host."https://qinghub.net:5000"]
  capabilities = ["pull", "resolve"]
[host."https://dockerproxy.com"]
  capabilities = ["pull", "resolve"]
[host."https://docker.m.daocloud.io"]
  capabilities = ["pull", "resolve"]
[host."https://reg-mirror.qiniu.com"]
  capabilities = ["pull", "resolve"]
[host."http://hub-mirror.c.163.com"]
  capabilities = ["pull", "resolve"]
EOF'

  systemctl daemon-reload
  systemctl restart containerd.service
}################################################ 描述: 安装cni文件# QingHub Studio官网: https://qinghub.net# 如过您安装遇到问题,请到官网查找官方联系方式或加支持群:#                                https://qinghub.net###############################################functioninstall_cni_plugins(){DEST="/opt/cni/bin"sudomkdir-p"$DEST"echo-e"${GREEN}[INFO] 下载并安装cni_plugins二级制文件 ${cni_plugins_name}${NC}"if[[-e /usr/bin/curl ]];then# 离线下载文件请修改TODOcurl-L${cni_plugins_url}|sudotar-C"$DEST"-xz||{echo-e"${RED}[ERROR] 下载cni_plugins二进制文件失败 ${NC}"exit1}elsewget-c"$cni_plugins_url"|sudotar-C"$DEST"-xz||{echo-e"${RED}[ERROR] 下载cni_plugins二进制文件失败 ${NC}"exit1}fiecho-e"${GREEN}[INFO] 安装cni_plugins成功${NC}"}################################################ 描述: 拷贝runc文件# QingHub Studio官网: https://qinghub.net# 如过您安装遇到问题,请到官网查找官方联系方式或加支持群:#                                https://qinghub.net###############################################functioninstall_runc(){DEST="/usr/bin"sudomkdir-p"$DEST"cd"$DEST"echo-e"${GREEN}[INFO] 下载并安装runc二级制文件 ${runc_name}${NC}"if[[-e /usr/bin/curl ]];then# 离线下载文件请修改TODOcurl-L-O${runc_url}||{echo-e"${RED}[ERROR] 下载并安装runc二进制文件失败 ${NC}"exit1}elsewget-c"$runc_url"||{echo-e"${RED}[ERROR] 下载runc二进制文件失败 ${NC}"exit1}fiif[-f$DEST/runc.amd64 ];thenchmod +x $DEST/runc.amd64
     mv$DEST/runc.amd64 $DEST/runc
  fiecho-e"${GREEN}[INFO] 安装runc成功${NC}"}################################################ 描述: 拷贝crictl工具文件# QingHub Studio官网: https://qinghub.net# 如过您安装遇到问题,请到官网查找官方联系方式或加支持群:#                                https://qinghub.net###############################################functioninstall_crictl(){DEST="/usr/local/bin"sudomkdir-p"$DEST"echo-e"${GREEN}[INFO] 下载并安装crictl二级制文件 ${crictl_name}${NC}"if[[-e /usr/bin/curl ]];then# 离线下载文件请修改TODOsudocurl-L${crictl_url}|sudotar-C$DEST-xz||{echo-e"${RED}[ERROR] 下载crictl二进制文件失败 ${NC}"exit1}elsesudowget-c"$crictl_url"|sudotar-C"$DEST"-xz||{echo-e"${RED}[ERROR] 下载crictl二进制文件失败 ${NC}"exit1}fiecho-e"${GREEN}[INFO] 安装crictl成功${NC}"#生成配置文件sudobash-c"cat > /etc/crictl.yaml <<EOF
runtime-endpoint: unix:///run/containerd/containerd.sock
image-endpoint: unix:///run/containerd/containerd.sock
timeout: 10
EOF"
  systemctl restart containerd
}################################################ 描述: 安装kubeadmin,kubelet,kubectl,在每个节点都需要安装kubeadmin,kubelet,# kubectl根据情况在合适的控制平台节点安装,可以修改参数$QINGCLOUD_KUBECTL_FLAG=no关闭安装# QingHub Studio官网: https://qinghub.net# 如过您安装遇到问题,请到官网查找官方联系方式或加支持群:#                                https://qinghub.net###############################################functioninstall_kubeadm(){TEMP="/tmp"echo-e"${GREEN}[INFO] 下载Kubernetes二级制文件 ${KUBERNETES_VERSION}${NC}"if[[-e /usr/bin/curl ]];then# 离线下载文件请修改TODOsudocurl-L"${kubernetes_server_url}"|sudotar-C"$TEMP"-xz||{echo-e"${RED}[ERROR] 下载Kubernetes二进制文件失败 ${NC}"exit1}elsesudowget-c"$kubernetes_server_url"|sudotar-C"$TEMP"-xz||{echo-e"${RED}[ERROR] 下载Kubernetes二进制文件失败 ${NC}"exit1}fiDEST="/usr/bin"cd$DESTsudocp$TEMP/kubernetes/server/bin/{kubeadm,kubelet}.sudochmod +x {kubeadm,kubelet}echo-e"${GREEN}[INFO] 成功安装kubeadm,kubelet到${DEST}目录 ${NC}"echo-e"${GREEN}[INFO] 创建kubelet.service 文件 ${NC}"sudobash-c"cat > /usr/lib/systemd/system/kubelet.service <<EOF
[Unit]
Description=kubelet: The Kubernetes Node Agent
Documentation=https://kubernetes.io/docs/
Wants=network-online.target
After=network-online.target

[Service]
ExecStart=${DEST}/kubelet
Restart=always
StartLimitInterval=0
RestartSec=10

[Install]
WantedBy=multi-user.target
EOF"sudomkdir-p /usr/lib/systemd/system/kubelet.service.d
  echo-e"${GREEN}[INFO] 创建10-kubeadm.conf 文件 ${NC}"sudobash-c"cat > /usr/lib/systemd/system/kubelet.service.d/10-kubeadm.conf <<EOF
[Service]
Environment=\"KUBELET_KUBECONFIG_ARGS=--bootstrap-kubeconfig=/etc/kubernetes/bootstrap-kubelet.conf --kubeconfig=/etc/kubernetes/kubelet.conf\"
Environment=\"KUBELET_CONFIG_ARGS=--config=/var/lib/kubelet/config.yaml\"
EnvironmentFile=-/var/lib/kubelet/kubeadm-flags.env
EnvironmentFile=-/etc/sysconfig/kubelet
ExecStart=
ExecStart=$DEST/kubelet \\\$KUBELET_KUBECONFIG_ARGS\\\$KUBELET_CONFIG_ARGS\\\$KUBELET_KUBEADM_ARGS\\\$KUBELET_EXTRA_ARGS
EOF"sudobash-c"cat > /etc/sysconfig/kubelet <<EOF
KUBELET_EXTRA_ARGS=
EOF"#创建必须要的几个目录sudomkdir-p /var/lib/kubelet
  sudomkdir-p /etc/kubernetes/manifests
  sudo systemctl enable kubelet
  if["$QINGCLOUD_KUBECTL_FLAG"=="yes"];thencd$DESTsudocp${TEMP}/kubernetes/server/bin/kubectl .sudochmod +x kubectl
    echo-e"${GREEN}[INFO] 成功安装kubectl到${DEST}目录 ${NC}"fiif[[-d"${TEMP}/kubernetes"]];thensudorm-rf"${TEMP}/kubernetes-server-linux-amd64"echo-e"${GREEN}[INFO] 临时安装文件${TEMP}/kubernetes-server-linux-amd64正常删除 ${NC}"fi}################################################ 描述: 初始化控制平面节点。# ${QINGCLOUD_ADVERTISE_ADDRESS}       ApiServer地址,请根据情况填写,可以是配置的高可用地址# ${LOCAL_IMAGE_DOMAIN}               本地容器镜像仓库地址# ${LOCAL_IMAGE_NAMESPACE}            本地容器镜像命名空间# ${KUBERNETES_VERSION}               K8S版本# QingHub Studio官网: https://qinghub.net# 如过您安装遇到问题,请到官网查找官方联系方式或加支持群:#                                https://qinghub.net###############################################functioninit_cluster(){echo-e"${GREEN}[INFO] ==========初始化第一个控制平面,请根据输出结果初始其他他节点========= ${NC}"
  kubeadm init \
    --apiserver-advertise-address="${QINGCLOUD_ADVERTISE_ADDRESS}"\
    --image-repository "${LOCAL_IMAGE_DOMAIN}/${LOCAL_IMAGE_NAMESPACE}"\
    --kubernetes-version "${KUBERNETES_VERSION}"\
    --cri-socket=unix:///run/containerd/containerd.sock \
    --service-cidr=10.96.0.0/16 \
    --pod-network-cidr=172.16.0.0/16
}# 主入口地址,根据实际可以手动执行相关内容functionmain{echo-e"${GREEN}[INFO] ==========开始安装kubernetes========= ${NC}"#安装containerd
    install_cri_containerd_cni
    #安装cni plugin
    install_cni_plugins
    #安装containerd 配置文件
    install_containerd_config
    #安装crictl
    install_crictl
    #安装runc
    install_runc
    #安装kubeadm
    install_kubeadm
    #初始化集群master节点if["$QINGCLOUD_KUBECTL_FLAG"=="yes"];then
      init_cluster
    fiecho-e"${GREEN}[INFO] ==========完成安装kubernetes========= ${NC}"}

main
执行命令初始化第一个控制平面节点
在上节的安装过程中,实际以及包含了初始化第一个控制平面的脚本,由于其重要性,这里单独提出来详细说明。
通过执行kubeadm init 指令快速初始化控制平面,可以通过直接待参数的方式或通过–config加配置文件的方式实现:
配置参数形式
kubeadm init \
  --apiserver-advertise-address="${QINGCLOUD_ADVERTISE_ADDRESS}"\
  --image-repository "${LOCAL_IMAGE_DOMAIN}/${LOCAL_IMAGE_NAMESPACE}"\
  --kubernetes-version "${KUBERNETES_VERSION}"\
  --cri-socket=unix:///run/containerd/containerd.sock \
  --service-cidr=10.96.0.0/16 \
  --pod-network-cidr=172.16.0.0/16
配置文件形式
第一步:如下命令生成默认配置文件并作修改
kubeadm config print init-defaults > initConfig.yaml
第二步:执行命令
kubeadm init --config=initConfig.yaml
准备kubectl配置文件
根据上面的指令生成的结果,拷贝如下命令后直接执行,使得kubectl后面可以直接运行
mkdir-p$HOME/.kube
sudocp-i /etc/kubernetes/admin.conf $HOME/.kube/config
sudochown$(id-u):$(id-g)$HOME/.kube/config
加入Node节点
根据执行命令生成第一个控制平面的结果,拷贝如下类似的文件到node节点。直接执行:
kubeadm join x.x.x.x:6443 --token picxyk.su53y03l1z0jh333e \
    --discovery-token-ca-cert-hash sha256:01fecbd4bdc0513811f7b65a43e41820d703a91c631e262b1ad4634e12cd0205
    --cri-socket=unix:///run/containerd/containerd.sock
执行kubectl get nodes 查看node节点执行结果
[root@itserver-master2 kube]# kubectl get nodes
NAME               STATUS   ROLES           AGE   VERSION
itserver-master2   Ready    control-plane   2h    v1.29.4
itserver-node4     Ready    <none>          1m    v1.29.4
[root@itserver-master2 kube]#
部署网络插件
我们采用calico作为网络插件,calico最新版建议的部署方式为两个步骤,执行两个文件即可:
tigera-operator.yaml、custom-resources.yaml
下载tigera-operator.yaml
https://github.com/projectcalico/calico/blob/v3.27.3/manifests/tigera-operator.yaml
https://github.com/projectcalico/calico/blob/v3.27.3/manifests/custom-resources.yaml
修改tigera-operator.yaml文件内容(离线版)
注意:修改镜像地址,请根据自己保存镜像的实际地址修改
[root@web02 v1.29.4]# cat tigera-operator.yaml | grep image:
                    image:
          image: quay.io/tigera/operator:v1.32.7
[root@web02 v1.29.4]# [root@web02 v1.29.4]# sudo sed -i "s#quay.io\/tigera#qinghub.net:5000\/qingcloudtech#g" tigera-operator.yaml[root@web02 v1.29.4]# cat tigera-operator.yaml | grep image:
                    image:
          image: qinghub.net:5000/qingcloudtech/operator:v1.32.7
[root@web02 v1.29.4]# ll
执行kubectl create -f tigera-operator.yaml
[root@itserver-master2 kube]# kubectl create  -f tigera-operator.yaml
namespace/tigera-operator created
customresourcedefinition.apiextensions.k8s.io/bgpconfigurations.crd.projectcalico.org created
customresourcedefinition.apiextensions.k8s.io/bgpfilters.crd.projectcalico.org created
customresourcedefinition.apiextensions.k8s.io/bgppeers.crd.projectcalico.org created
customresourcedefinition.apiextensions.k8s.io/blockaffinities.crd.projectcalico.org created
customresourcedefinition.apiextensions.k8s.io/caliconodestatuses.crd.projectcalico.org created
customresourcedefinition.apiextensions.k8s.io/clusterinformations.crd.projectcalico.org created
customresourcedefinition.apiextensions.k8s.io/felixconfigurations.crd.projectcalico.org created
customresourcedefinition.apiextensions.k8s.io/globalnetworkpolicies.crd.projectcalico.org created
customresourcedefinition.apiextensions.k8s.io/globalnetworksets.crd.projectcalico.org created
customresourcedefinition.apiextensions.k8s.io/hostendpoints.crd.projectcalico.org created
customresourcedefinition.apiextensions.k8s.io/ipamblocks.crd.projectcalico.org created
customresourcedefinition.apiextensions.k8s.io/ipamconfigs.crd.projectcalico.org created
customresourcedefinition.apiextensions.k8s.io/ipamhandles.crd.projectcalico.org created
customresourcedefinition.apiextensions.k8s.io/ippools.crd.projectcalico.org created
customresourcedefinition.apiextensions.k8s.io/ipreservations.crd.projectcalico.org created
customresourcedefinition.apiextensions.k8s.io/kubecontrollersconfigurations.crd.projectcalico.org created
customresourcedefinition.apiextensions.k8s.io/networkpolicies.crd.projectcalico.org created
customresourcedefinition.apiextensions.k8s.io/networksets.crd.projectcalico.org created
customresourcedefinition.apiextensions.k8s.io/apiservers.operator.tigera.io created
customresourcedefinition.apiextensions.k8s.io/imagesets.operator.tigera.io created
customresourcedefinition.apiextensions.k8s.io/installations.operator.tigera.io created
customresourcedefinition.apiextensions.k8s.io/tigerastatuses.operator.tigera.io created
serviceaccount/tigera-operator created
clusterrole.rbac.authorization.k8s.io/tigera-operator created
clusterrolebinding.rbac.authorization.k8s.io/tigera-operator created
deployment.apps/tigera-operator created
[root@itserver-master2 kube]#
查看结果
[root@itserver-master2 kube]# kubectl get pods -n tigera-operator
NAME                               READY   STATUS    RESTARTS   AGE
tigera-operator-6779dc6889-zd4zt   1/1     Running   0          55s
[root@itserver-master2 kube]#
修改custom-resources.yaml
注意: 主要修改内容:cidr: 172.16.0.0/16,需要与控制平面初始化时的地址填写的地址一直
spec:
  # Configures Calico networking.
  calicoNetwork:
    # Note: The ipPools section cannot be modified post-install.
    ipPools:
    - blockSize: 26
      cidr: 172.16.0.0/12
      encapsulation: VXLANCrossSubnet
      natOutgoing: Enabled
      nodeSelector: all()
执行kubectl create -f custom-resources.yaml
[root@itserver-master2 kube]# kubectl create  -f custom-resources.yaml
installation.operator.tigera.io/default created
apiserver.operator.tigera.io/default created
[root@itserver-master2 kube]# kubectl get ns
NAME              STATUS   AGE
calico-system     Active   48s
default           Active   3h5m
kube-node-lease   Active   3h5m
kube-public       Active   3h5m
kube-system       Active   3h5m
tigera-operator   Active   6m35s
[root@itserver-master2 kube]# kubectl get pods -n calico-system
NAME                                       READY   STATUS                  RESTARTS   AGE
calico-kube-controllers-68bf945ffc-mf7t2   0/1     ContainerCreating       0          75s
calico-node-27fgm                          0/1     Init:ImagePullBackOff   0          75s
calico-typha-5886b45b65-pmsm7              0/1     ErrImagePull            0          75s
csi-node-driver-9b29j                      0/2     ContainerCreating       0          75s
[root@itserver-master2 kube]#
calico网络安装后,检查所有空间众的pod:
[root@itserver-master2 certs.d]# kubectl get pods --all-namespaces
NAMESPACE          NAME                                       READY   STATUS    RESTARTS   AGE
calico-apiserver   calico-apiserver-864697c659-2sdhd          1/1     Running   0          4m18s
calico-apiserver   calico-apiserver-864697c659-c2vp9          1/1     Running   0          4m18s
calico-system      calico-kube-controllers-68bf945ffc-dvrlf   1/1     Running   0          63m
calico-system      calico-node-27fgm                          1/1     Running   0          18h
calico-system      calico-node-zwpls                          1/1     Running   0          17h
calico-system      calico-typha-5886b45b65-pmsm7              1/1     Running   0          18h
calico-system      csi-node-driver-9b29j                      2/2     Running   0          18h
calico-system      csi-node-driver-mrtq5                      2/2     Running   0          17h
kube-system        coredns-67bd986d4c-67fvl                   1/1     Running   0          16m
kube-system        coredns-67bd986d4c-x7vk7                   1/1     Running   0          56m
kube-system        etcd-itserver-master2                      1/1     Running   1          21h
kube-system        kube-apiserver-itserver-master2            1/1     Running   1          21h
kube-system        kube-controller-manager-itserver-master2   1/1     Running   1          21h
kube-system        kube-proxy-9rv85                           1/1     Running   0          21h
kube-system        kube-proxy-l9rht                           1/1     Running   1          17h
kube-system        kube-scheduler-itserver-master2            1/1     Running   1          21h
tigera-operator    tigera-operator-6779dc6889-zd4zt           1/1     Running   0          18h
[root@itserver-master2 certs.d]#
看到如上几个空间中的状态都变为runging时,网络部署成功
测试验证
部署nginx
第一步、部署文件准备nginx.yaml
apiVersion: v1
kind: Service
metadata:
  name: nginx
  labels:
    app: nginx
spec:
  ports:
  - port: 80
    name: web
  selector:
    app: nginx

---
apiVersion: apps/v1
kind: Deployment
metadata:
  name: nginx-deployment
spec:
  replicas: 1
  selector:
    matchLabels:
      app: nginx
  template:
    metadata:
      labels:
        app: nginx
    spec:
      containers:
      - name: nginx
        image: qingcloudtech/nginx:1.25.4
        ports:
        - containerPort: 80
          name: web
第二部、执行命令
kubectl apply -f nginx.yaml
第三步、检查service及deployment
[root@itserver-master2 kube]# kubectl get svc
NAME         TYPE        CLUSTER-IP       EXTERNAL-IP   PORT(S)   AGE
kubernetes   ClusterIP   10.96.0.1        <none>443/TCP   22h
nginx        ClusterIP   10.101.221.253   <none>80/TCP    17s
[root@itserver-master2 kube]# kubectl get deploy -o wide
NAME               READY   UP-TO-DATE   AVAILABLE   AGE   CONTAINERS   IMAGES                       SELECTOR
nginx-deployment   1/1     11           35s   nginx        qingcloudtech/nginx:1.25.4   app=nginx
[root@itserver-master2 kube]# [root@itserver-master2 kube]# curl http://172.24.128.130<!DOCTYPE html><html><head><title>Welcome to nginx!</title><style>
html { color-scheme: light dark;}
body { width: 35em; margin: 0 auto;
font-family: Tahoma, Verdana, Arial, sans-serif;}</style></head><body><h1>Welcome to nginx!</h1><p>If you see this page, the nginx web server is successfully installed and
working. Further configuration is required.</p><p>For online documentation and support please refer to
<a href="http://nginx.org/">nginx.org</a>.<br/>
Commercial support is available at
<a href="http://nginx.com/">nginx.com</a>.</p><p><em>Thank you for using nginx.</em></p></body></html>[root@itserver-master2 kube]#
至此,完成整个部署过程
你可以通过【QingHub Studio】) 套件直接安装部署,也可以手动按如下文档操作,该项目已经全面开源,完整的脚本可以从如下开源地址获取:
开源地址: https://gitee.com/qingplus/qingcloud-platform
【QingHub Studio集成开发套件】
版权归原作者 轻云UC 所有, 如有侵权,请联系我们删除。