

个人主页: 几分醉意的CSDN博客_传送门
文章目录
💖Spring集成MyBatis
spring能集成很多的框架,是spring一个优势功能。通过集成功能,让开发人员使用其他框架更方便。
集成使用的是spring ioc核心技术。
✨怎么使用mybatis
使用mybatis,需要创mybatis框架中的某些对象,使用这些对象,就能使用mybatis提供的功能了。
分析:mybatis执行sql语句,需要使用那些对象
1.需要有Dao接口的代理对象,例如StudentDao接口,需要一个它的代理对象,使用 SqlSession.getMapper(StudentDao.class),得到dao代理对象。
2.需要有SqlSessionFactory,创建SqlSessionFactory对象,才能使用openSession()得到SqlSession对象 。
3.数据源DataSource对象,使用一个更强大,功能更多的连接池对象代替mybatis自己的PooledDataSource。

✨集成的步骤
实现步骤
1.使用的mysql库, 使用学生表 student2(id int 主键列, 自动增长,
name varchar(80),
age int)
2.创建maven项目
3.加入依赖gav
spring依赖, mybatis依赖, mysql驱动。 junit依赖
mybatis-spring依赖(mybatis网站上提供的,用来在spring项目中,创建mybatis对象)
spring有关事务的依赖。
mybatis和spring整合的时候, 事务是自动提交的。
4.创建实体类Student
5.创建Dao接口和mapper文件写sql语句
6.写mybatis主配置文件
7.创建service接口和他的实现类
8.创建spring的配置文件
1)声明数据源DataSource,使用的阿里的Druid连接池
2) 声明SqlSessionFactoryBean类,在这个类内部创建的是SqlSessionFactory对象。
3)声明MapperScannerConfiguration类,在内部创建dao代理对象,创建的对象都放在spring容器中。
4)声明Service对象,把3)的中dao赋值给service属性
9.测试dao访问数据库
✨创建数据库表
这里简单的创建一下数据库表
✨pom加入依赖
<?xml version="1.0" encoding="UTF-8"?><projectxmlns="http://maven.apache.org/POM/4.0.0"xmlns:xsi="http://www.w3.org/2001/XMLSchema-instance"xsi:schemaLocation="http://maven.apache.org/POM/4.0.0 http://maven.apache.org/xsd/maven-4.0.0.xsd"><modelVersion>4.0.0</modelVersion><groupId>youfei1_v</groupId><artifactId>ch08-spring-mybatis</artifactId><version>1.0.0</version><properties><project.build.sourceEncoding>UTF-8</project.build.sourceEncoding><maven.compiler.source>1.8</maven.compiler.source><maven.compiler.target>1.8</maven.compiler.target></properties><dependencies><!--测试--><dependency><groupId>junit</groupId><artifactId>junit</artifactId><version>4.11</version><scope>test</scope></dependency><!--spring依赖--><dependency><groupId>org.springframework</groupId><artifactId>spring-context</artifactId><version>5.2.5.RELEASE</version></dependency><!--spring事务依赖--><dependency><groupId>org.springframework</groupId><artifactId>spring-tx</artifactId><version>5.2.5.RELEASE</version></dependency><dependency><groupId>org.springframework</groupId><artifactId>spring-jdbc</artifactId><version>5.2.5.RELEASE</version></dependency><!--mybatis依赖--><dependency><groupId>org.mybatis</groupId><artifactId>mybatis</artifactId><version>3.5.1</version></dependency><!--mybatis和spring集成--><dependency><groupId>org.mybatis</groupId><artifactId>mybatis-spring</artifactId><version>1.3.1</version></dependency><!--mysql驱动--><dependency><groupId>mysql</groupId><artifactId>mysql-connector-java</artifactId><version>5.1.9</version></dependency><!--阿里的连接池--><dependency><groupId>com.alibaba</groupId><artifactId>druid</artifactId><version>1.1.12</version></dependency></dependencies><build><!--用mybatis就要用到这个插件 编译java目录下,除了java文件,还编译xml和properties文件--><resources><resource><directory>src/main/java</directory><includes><include>**/*.properties</include><include>**/*.xml</include></includes><filtering>false</filtering></resource></resources></build></project>
✨创建MyBatis使用代码
首先是创建实体类,生成get、set和toString方法
publicclassStudent{privateInteger id;privateString name;privateInteger age;publicIntegergetId(){return id;}publicvoidsetId(Integer id){this.id = id;}publicStringgetName(){return name;}publicvoidsetName(String name){this.name = name;}publicIntegergetAge(){return age;}publicvoidsetAge(Integer age){this.age = age;}@OverridepublicStringtoString(){return"Student{"+"id="+ id +", name='"+ name +'\''+", age="+ age +'}';}}
然后创建Dao接口写方法
publicinterfaceStudentDao{//添加操作intinsertStudent(Student student);//查询操作List<Student>selectStudents();}
创建mapper文件(这里我起的文件名为StudentDao.xml)
<?xml version="1.0" encoding="UTF-8" ?><!DOCTYPEmapperPUBLIC"-//mybatis.org//DTD Mapper 3.0//EN""http://mybatis.org/dtd/mybatis-3-mapper.dtd"><mappernamespace="youfei1_v.Dao.StudentDao"><!-- 使用insert,update,select标签写sql --><insertid="insertStudent">
        insert into student2(name,age) values (#{name},#{age})
    </insert><selectid="selectStudents"resultType="youfei1_v.domain.Student">
        select id,name ,age from student2
    </select></mapper>
创建mybatis主配置文件(这里为给文件名起的为mybatis.xml)
<?xml version="1.0" encoding="UTF-8" ?><!DOCTYPEconfigurationPUBLIC"-//mybatis.org//DTD Config 3.0//EN""http://mybatis.org/dtd/mybatis-3-config.dtd"><configuration><!--设置日志--><settings><settingname="logImpl"value="STDOUT_LOGGING"/></settings><!--指定其它mapper文件的位置,目的是找到其它文件的sql语句--><mappers><!--使用mapper的resource属性指定mapper文件的路径。
        这个路径是从类路径根目录开始
        使用注意:mapper文件的路径使用 / 分割路径
                 一个mapper resource 指定一个mapper文件
        --><!--<mapper resource="youfei1_v/dao/StudentDao.xml"/>--><!--name:mapper文件所在的包名
        满足要求才能使用这种方式:
        1.mapper文件和dao接口在同一目录
        2.mapper文件和dao接口名称一致
        --><packagename="youfei1_v.Dao"/></mappers></configuration>
✨创建Service类
首先创建Service接口
publicinterfaceStudentService{intaddStudent(Student student);List<Student>queryStudent();}
实现这个接口
publicclassStudentServiceImplimplementsStudentService{privateStudentDao studentDao;//创建这个dao对象和set方法 publicvoidsetStudentDao(StudentDao studentDao){this.studentDao = studentDao;}@OverridepublicintaddStudent(Student student){int rows = studentDao.insertStudent(student);//方法中调用studentDao对象的方法return rows;}@OverridepublicList<Student>queryStudent(){List<Student> students = studentDao.selectStudents();return students;}}
✨创建Spring配置文件
这里我给Spring配置文件的文件名起名为applicationContext.xml
<?xml version="1.0" encoding="UTF-8"?><beansxmlns="http://www.springframework.org/schema/beans"xmlns:xsi="http://www.w3.org/2001/XMLSchema-instance"xmlns:context="http://www.springframework.org/schema/context"xsi:schemaLocation="http://www.springframework.org/schema/beans http://www.springframework.org/schema/beans/spring-beans.xsd http://www.springframework.org/schema/context https://www.springframework.org/schema/context/spring-context.xsd"><!--声明数据源DataSource 德鲁伊--><beanid="myDataSource"class="com.alibaba.druid.pool.DruidDataSource"init-method="init"destroy-method="close"><propertyname="url"value="jdbc:mysql://localhost:3306/springdb"/><propertyname="username"value="root"/><propertyname="password"value="297744"/></bean><!--声明SqlSessionFactoryBean,在这个类的内部,创建SqlSessionFactory bean的id就代表创建SqlSessionFactory对象--><beanid="factory"class="org.mybatis.spring.SqlSessionFactoryBean"><!--指定数据源--><propertyname="dataSource"ref="myDataSource"/><!--用的是什么数据源的id--><!--指定mybatis主配置文件
            Resource可以直接使用 value属性赋值。
        --><propertyname="configLocation"value="classpath:mybatis.xml"/></bean><!--
      相当于:SqlSessionFactory  factory  = new SqlSessonFactoryBuider.build(classpath:mybatis.xml)
    --><!--声明MapperScannerConfigurer
        SqlSession.getMapper(StudentDao.class)

        MapperScannerConfigurer作用是:

        循环basePackage所表示的包,把包中的每个接口都找到,调用SqlSession.getMapper
        把每个dao接口都创建出dao对象 ,dao代理对象放在容器中。

        ApplicationContext ctx = ....

        SqlSessionFactory sqlSessionFactory  = ctx.getBean("factory");
        SqlSession session = sqlSessionFactory.openSession();

        for(接口: com.bjpowernode.dao){

             接口 对象 =  session.getMapper(接口)
             springMap.put(接口名的首字母小写, 对象)  //创建dao代理,这个dao代理的对象的名字是这个接口的首字母小写。也就是bean的id
        }
    --><beanclass="org.mybatis.spring.mapper.MapperScannerConfigurer"><!--指定SqlSessionFactory对象的名称--><propertyname="sqlSessionFactoryBeanName"value="factory"/><!--指定基本包,dao接口所在的包名--><propertyname="basePackage"value="youfei1_v.Dao"/><!--创建dao代理,这个dao代理的对象的名字是这个接口名的首字母小写。也就是bean的id--></bean><!--声明service--><beanid="studentService"class="youfei1_v.service.impl.StudentServiceImpl"><propertyname="studentDao"ref="studentDao"/><!--set注入:把dao代理赋值给StudentServiceImpl类中的StudentDao对象--></bean><!--ref用的就是上面的创建出来的dao代理,的id值,这个id值就是接口名的首字母小写--><!--ref="studentDao" :studentDao指的是Student这个接口的代理。上面那个bean,创建出Student接口的代理,这个代理的id就是接口名字小写studentDao--></beans>
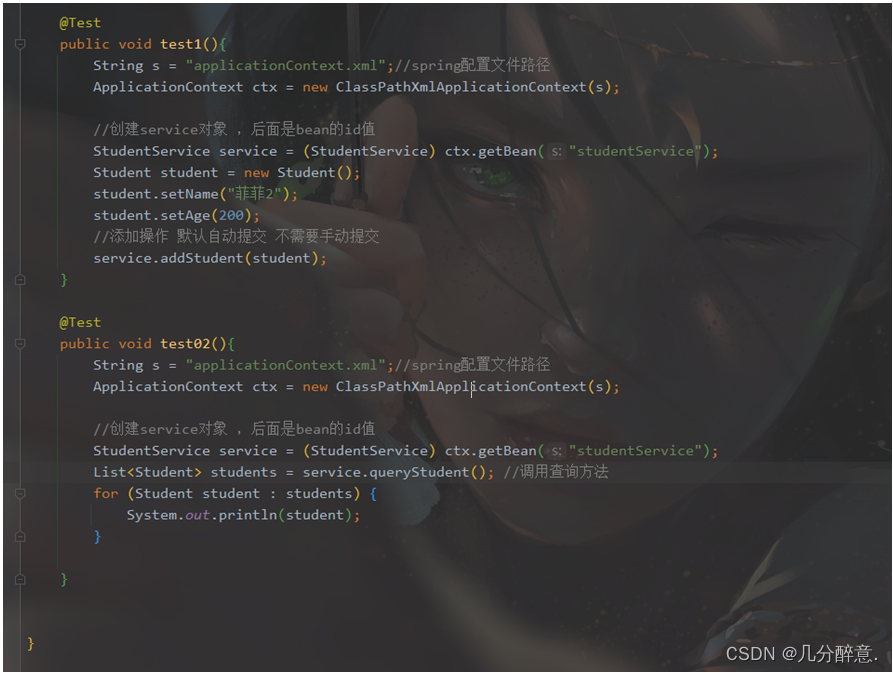
✨测试集成MyBatis
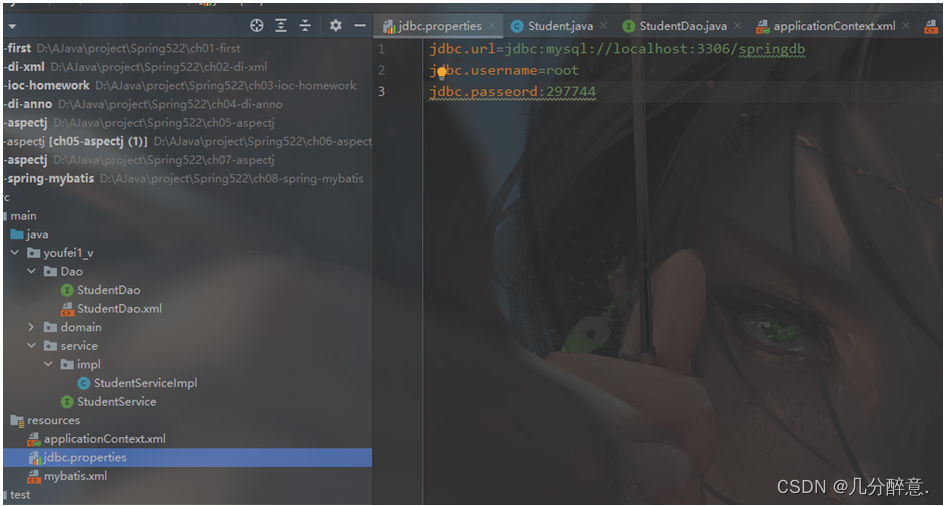
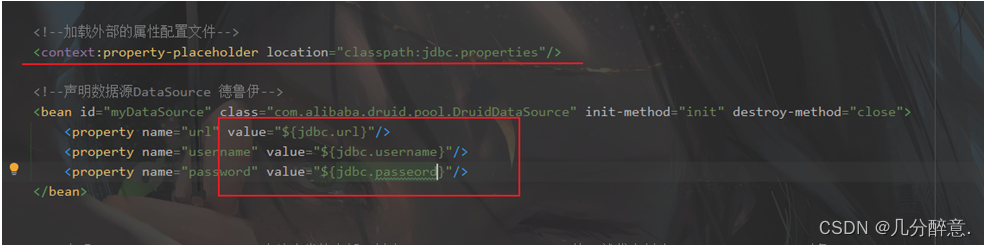
✨使用外部属性配置文件
💖投票传送门(欢迎伙伴们投票)
版权归原作者 几分醉意. 所有, 如有侵权,请联系我们删除。