🎉实战项目:Git原理与使用
- 博主主页:桑榆非晚ᴷ
- 博主能力有限,如果有出错的地方希望大家不吝赐教
- 给自己打气:成功没有快车道,幸福没有高速路。所有的成功,都来自不倦地努力和奔跑,所有的幸福都来自平凡的奋斗和坚持🥰🎉✨---
Git原理与使⽤
一、初识Git与Git的安装
1.1 初识Git
1.2 Git的安装
1.2.1 Linux — centos
# 查看git的版本git --version
# 如果没有安装git使用下面shell指令进行安装gitsudo yum install -y git
二、Git的基本操作
2.1 创建Git本地仓库
要提前说的是,仓库是进⾏版本控制的⼀个⽂件⽬录。我们要想对⽂件进⾏版本控制,就必须先创建⼀个仓库出来。
创建⼀个Git本地仓库对应的命令为 git init ,注意命令要在⽂件⽬录下执⾏,例如:[lk@VM-8-15-centos ~]$ mkdir gitcode [lk@VM-8-15-centos ~]$ cd gitcode [lk@VM-8-15-centos gitcode]$ pwd /home/lk/gitcode [lk@VM-8-15-centos gitcode]$ git init Initialized empty Git repositoryin /home/lk/gitcode/.git/ [lk@VM-8-15-centos gitcode]$ ls -a ... .git [lk@VM-8-15-centos gitcode]$我们发现,当前⽬录下多了⼀个 .git 的隐藏⽂件, .git ⽬录是Git来跟踪管理仓库的,不要⼿动修改这个⽬录⾥⾯的⽂件,不然改乱了,就把Git仓库给破坏了。
2.2 配置Git
当安装Git后⾸先要做的事情是设置你的用户名称和e-mail地址,这是⾮常重要的。
# --global为可选选项,如果选择--global选项配置的用户名和用户地址会在当前机器的所有Git仓库起效# 如果你希望在不同仓库中使⽤不同的name或email,可以不要 --global选项# 但要注意的是,执⾏命令时必须要在仓库⾥# 设置配置指令:git config [--global] user.name "Your Name"git config [--global] user.email "Your Email"# 查看配置命令为:git config -l
# 删除对应的配置命令为:# 需要注意的是由--global设置的配置删除时也必须带上--global指令git config [--global] --unset user.name
git config [--global] --unset user.email
具体操作如下:
[lk@VM-8-15-centos gitcode]$ git config --global user.email "[email protected]"[lk@VM-8-15-centos gitcode]$ git config --global user.name "lk"[lk@VM-8-15-centos gitcode]$ git config -l
[email protected]
user.name=lk
push.default=matching
core.repositoryformatversion=0
core.filemode=true
core.bare=false
core.logallrefupdates=true
user.name=lk
[email protected]
[lk@VM-8-15-centos gitcode]$
2.3 认识工作区、暂存区、版本库
2.3.1 工作区、暂存区、版本库相关概念
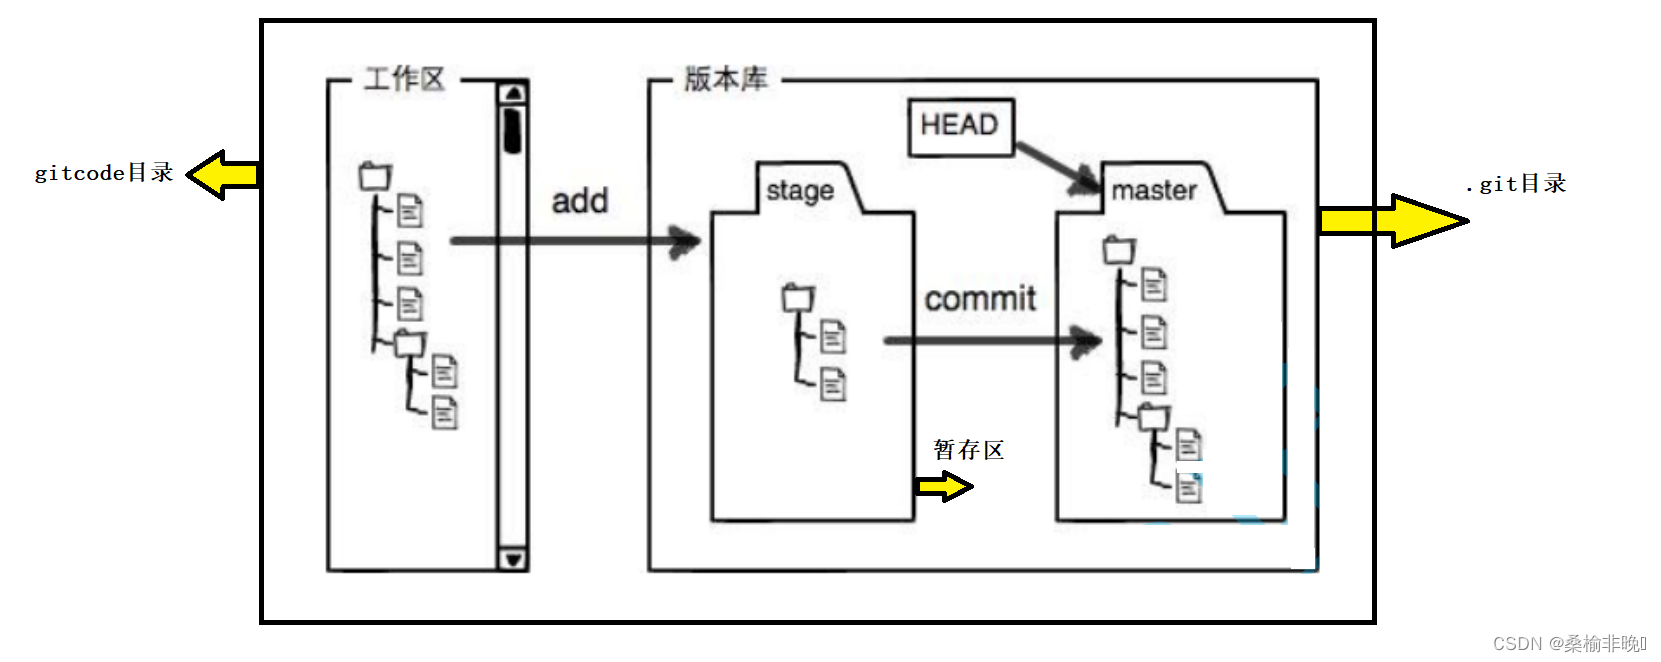
- 工作区: 是在电脑上你要写代码或⽂件的⽬录。
- 暂存区:英⽂叫stage或index。⼀般存放在 .git⽬录下的index⽂件(.git/index)中,我们 把暂存区有时也叫作索引(index)。
- 版本库:⼜名仓库,英⽂名repository 。⼯作区有⼀个隐藏⽬录 .git ,它不算⼯作区,⽽是Git的版本库。这个版本库⾥⾯的所有⽂件都可以被Git管理起来,每个⽂件的修改、删除,Git都能跟踪,以便任何时刻都可以追踪历史,或者在将来某个时刻可以“还原”。
- 图中左侧为⼯作区,右侧为版本库。Git的版本库⾥存了很多东西,其中最重要的就是暂存区。
- 在创建Git版本库时,Git会为我们⾃动创建⼀个唯⼀的master分⽀,以及指向master的⼀个指针叫HEAD。(分⽀和HEAD的概念后⾯再说)
- 当对⼯作区修改(或新增)的⽂件执⾏ git add 命令时,暂存区⽬录树的⽂件索引会被更新。
- 当执⾏提交操作 git commit 时,master分⽀会做相应的更新,可以简单理解为暂存区的⽬录树才会被真正写到版本库中。
注意:
- 通过新建或粘贴进⽬录的⽂件,并不能称之为向仓库中新增⽂件,⽽只是在⼯作区新增了⽂件。必须要通过使⽤ git add 和 git commit 命令才能将⽂件添加到仓库中进⾏管理!!!
2.3.2 添加文件场景一
在工作区下新建⼀ReadMe⽂件,我们可以使⽤ git add命令可以将⽂件添加到暂存区:
- 添加⼀个或多个⽂件到暂存区: git add [file1] [file2] …
- 添加指定⽬录到暂存区,包括⼦⽬录: git add [dir]
- 添加当前⽬录下的所有⽂件改动到暂存区: git add .
再使⽤ git commit 命令将暂存区内容添加到本地仓库中:
- 提交暂存区全部内容到本地仓库中: git commit -m “message”
- 提交暂存区的指定⽂件到仓库区: git commit [file1] [file2] … -m “message”
注意 :
- git commit 后⾯的 -m 选项,要跟上描述本次提交的message,由用户⾃⼰完成,这部分内容绝对不能省略,并要好好描述,是⽤来记录你的提交细节,是给我们⼈看的。
例如:
[lk@VM-8-15-centos gitcode]$ ls -a
...  .git
[lk@VM-8-15-centos gitcode]$ touch ReadMe
[lk@VM-8-15-centos gitcode]$ vim ReadMe
[lk@VM-8-15-centos gitcode]$ cat ReadMe
hello git[lk@VM-8-15-centos gitcode]$ gitadd ReadMe
[lk@VM-8-15-centos gitcode]$ git commit -m "commit my fisrt file"[master (root-commit) 5e321a1] commit my fisrt file1file changed, 2 insertions(+)
create mode 100644 ReadMe
[lk@VM-8-15-centos gitcode]$
git commit 命令执⾏成功后会告诉我们,1个⽂件被改动(就是我们新添加的ReadMe⽂件),插⼊了两⾏内容(ReadMe有两⾏内容)。
我们还可以多次add不同的⽂件,⽽只commit⼀次便可以提交所有⽂件,是因为需要提交的⽂件是通通被add到暂存区中,然后⼀次性commit暂存区的所有修改。
例如:[lk@VM-8-15-centos gitcode]$ touch file1 file2 file3 [lk@VM-8-15-centos gitcode]$ gitadd file1 [lk@VM-8-15-centos gitcode]$ gitadd file2 [lk@VM-8-15-centos gitcode]$ gitadd file3 [lk@VM-8-15-centos gitcode]$ git commit -m "add 3 files"[master b794954]add3 files 3 files changed, 0 insertions(+), 0 deletions(-) create mode 100644 file1 create mode 100644 file2 create mode 100644 file3 [lk@VM-8-15-centos gitcode]$截⾄⽬前为⽌,我们已经更够将代码直接提交⾄本地仓库了。我们可以使⽤ git log 命令,来查看下历史提交记录:
[lk@VM-8-15-centos gitcode]$ git log commit b794954cfa68bc7d0573ec80ff71ac7f42ba6cd8 Author: lk <[email protected]> Date: Wed Jun 1417:47:22 2023 +0800 add3 files commit b26e3384e5618a32bdce915356e1cebff1c64af8 Author: lk <[email protected]> Date: Wed Jun 1417:38:08 2023 +0800 first commit file[lk@VM-8-15-centos gitcode]$该命令显⽰从最近到最远的提交⽇志,并且可以看到我们commit时的⽇志消息。如果嫌输出信息太多,看得眼花缭乱的,可以试试加上 –pretty=oneline 参数:
[lk@VM-8-15-centos gitcode]$ git log --pretty=oneline
b794954cfa68bc7d0573ec80ff71ac7f42ba6cd8 (HEAD -> master)add3 files
b26e3384e5618a32bdce915356e1cebff1c64af8 first commit file[lk@VM-8-15-centos gitcode]$
需要说明的是,我们看到的⼀⼤串类似 b794954…f42ba6cd8 的是每次提交的commit id (版本号),Git的 commit id 不是1,2,3……递增的数字,⽽是⼀个SHA1计算出来的⼀个⾮常⼤的数字,⽤⼗六进制表示(你看到的 commit id 和我的肯定不⼀样,以你⾃⼰的为准)
2.3.3 查看
.git
⽂件
[lk@VM-8-15-centos gitcode]$ tree .git
.git
|-- branches
|-- COMMIT_EDITMSG
|-- config
|-- description
|-- HEAD
|-- hooks
||-- applypatch-msg.sample
||-- commit-msg.sample
||-- post-update.sample
||-- pre-applypatch.sample
||-- pre-commit.sample
||-- prepare-commit-msg.sample
||-- pre-push.sample
||-- pre-rebase.sample
|`-- update.sample
|-- index
|-- info
|`-- exclude
|-- logs
||-- HEAD
|`-- refs
|`-- heads
|`-- master
|-- objects
||-- 0e
||`-- 6b1780b73cd9220ec5073dc64b42f7ad4bd945
||-- 15||`-- a37e9ef171cca4a5d985fccd1fcf9414b2c7cf
||-- 8d
||`-- 0e41234f24b6da002d962a26c2495ea16a425f
||-- b2
||`-- 6e3384e5618a32bdce915356e1cebff1c64af8
||-- b7
||`-- 94954cfa68bc7d0573ec80ff71ac7f42ba6cd8
||-- e6
||`-- 9de29bb2d1d6434b8b29ae775ad8c2e48c5391
||-- info
|`-- pack
`-- refs
 |-- heads
 |`-- master
   `-- tags

18 directories, 24 files
解释:
index:就是我们的暂存区,add后的内容都是添加到这⾥的。HEAD:就是我们的默认指向master分⽀的指针:master内存放的就是最近一次提交的commit id 。[lk@VM-8-15-centos gitcode]$ cat .git/HEAD ref: refs/heads/master [lk@VM-8-15-centos gitcode]$ cat .git/refs/heads/master b794954cfa68bc7d0573ec80ff71ac7f42ba6cd8 [lk@VM-8-15-centos gitcode]$打印的b794954cfa68bc7d0573ec80ff71ac7f42ba6cd8是什么东西呢?保存的就是最新的commit id。
[lk@VM-8-15-centos gitcode]$ git log --pretty=oneline b794954cfa68bc7d0573ec80ff71ac7f42ba6cd8 add3 files b26e3384e5618a32bdce915356e1cebff1c64af8 first commit file[lk@VM-8-15-centos gitcode]$验证果然是最新一次提交的commit id。
3.objects: 为Git的对象库,⾥⾯包含了创建的各种版本库对象及内容。当执⾏ git add 命令时,暂存区的⽬录树被更新,同时⼯作区修改(或新增)的⽂件内容被写⼊到对象库中的⼀个新的对象中,就位于".git/objects"⽬录下,让我们来看看这些对象有何⽤处:
[lk@VM-8-15-centos gitcode]$ ls .git/objects/ 0e 15 8d b2 b7 e6 info pack查找object时要将 commit id 分成2部分,其前2位是⽂件夹名称(0e 15 8d b2 b7 e6),后38位是⽂件名称。找到这个⽂件之后,⼀般不能直接看到⾥⾯是什么,该类⽂件是经过 sha (安全哈希算法)加密过的⽂件,好在我们可以使 git cat-file命令来查看版本库对象的内容:
[lk@VM-8-15-centos gitcode]$ git cat-file -p b794954cfa68bc7d0573ec80ff71ac7f42ba6cd8 tree 15a37e9ef171cca4a5d985fccd1fcf9414b2c7cf parent b26e3384e5618a32bdce915356e1cebff1c64af8 author lk <[email protected]>1686736042 +0800 committer lk <[email protected]>1686736042 +0800 add3 files [lk@VM-8-15-centos gitcode]$parent里面的是上一次提交的commit id,验证:
[lk@VM-8-15-centos gitcode]$ git cat-file -p b26e3384e5618a32bdce915356e1cebff1c64af8
tree 0e6b1780b73cd9220ec5073dc64b42f7ad4bd945
author lk <[email protected]>1686735488 +0800
committer lk <[email protected]>1686735488 +0800

first commit file[lk@VM-8-15-centos gitcode]$
2.3.4 添加文件场景二
学习到这⾥,我们已经清楚了如何向仓库中添加⽂件,并且对于⼯作区、暂存区、版本库也有了⼀定的认识。那么我们再展⽰⼀种添加⽂件的场景,能加深对⼯作区、暂存区、版本库的理解,示例如 下:
[lk@VM-8-15-centos gitcode]$ touch file4
[lk@VM-8-15-centos gitcode]$ gitadd file4
[lk@VM-8-15-centos gitcode]$ touch file5
[lk@VM-8-15-centos gitcode]$ git commit -m "add file"[master a64bf65]addfile1file changed, 0 insertions(+), 0 deletions(-)
 create mode 100644 file4
[lk@VM-8-15-centos gitcode]$
提交后发现打印了 1 file changed, 0 insertions(+), 0 deletions(-) ,意思是只有⼀个⽂件改变了,这时我们提出了疑问,不是新增了两个⽂件吗? 再来回忆下, git add 是将⽂件添加到暂存区, git commit是将暂存区的内容添加到本地仓库中。由于我们并没有使⽤ git add file5,file5就不在暂存区中维护,所以我们git commit的时候其实只是把已经在暂存区的file4提交了,⽽遗漏了⼯作区的file5。如何提交file5呢?很简单,再次 add , commit即可。
[lk@VM-8-15-centos gitcode]$ gitadd file5
[lk@VM-8-15-centos gitcode]$ git commit -m "add file5"[master d25e733]add file5
1file changed, 0 insertions(+), 0 deletions(-)
create mode 100644 file5
[lk@VM-8-15-centos gitcode]$
2.4 修改文件
Git⽐其他版本控制系统设计得优秀,因为Git跟踪并管理的是修改,⽽⾮⽂件。
什么是修改?⽐如你新增了⼀⾏,这就是⼀个修改,删除了⼀⾏,也是⼀个修改,更改了某些字符,也是⼀个修改,删了⼀些⼜加了⼀些,也是⼀个修改,甚⾄创建⼀个新⽂件,也算⼀个修改。 让我们将ReadMe⽂件进⾏⼀次修改:[lk@VM-8-15-centos gitcode]$ vim ReadMe [lk@VM-8-15-centos gitcode]$ cat ReadMe hello git hello world hello bit [lk@VM-8-15-centos gitcode]$ git status # On branch master# Changes not staged for commit:# (use "git add <file>..." to update what will be committed)# (use "git checkout -- <file>..." to discard changes in working directory)## modified: ReadMe# no changes added to commit (use "git add" and/or "git commit -a")[lk@VM-8-15-centos gitcode]$上⾯的结果告诉我们,ReadMe被修改过了,但还没有完成添加与提交。⽬前,我们只知道⽂件被修改了,如果能知道具体哪些地⽅被修改了,就更好了。有同学会说,我刚
改的我知道呀!可是,你还记得你三天前写了什么代码吗?或者没写?我们可能不记得了,但是Git提供了指令可以显示:[lk@VM-8-15-centos gitcode]$ gitdiff ReadMe diff --git a/ReadMe b/ReadMe index 8d0e412..bab5abf 100644 --- a/ReadMe +++ b/ReadMe @@ -1 +1,3 @@ hello git +hello world +hello bit [lk@VM-8-15-centos gitcode]$git diff [file] 命令⽤来显⽰暂存区和⼯作区⽂件的差异,显⽰的格式正是Unix通⽤的diff格式。
也可以使⽤ git diff HEAD – [file] 命令来查看版本库和⼯作区⽂件的区别。[lk@VM-8-15-centos gitcode]$ gitdiff -- ReadMe diff --git a/ReadMe b/ReadMe index 8d0e412..bab5abf 100644 --- a/ReadMe +++ b/ReadMe @@ -1 +1,3 @@ hello git +hello world +hello bit [lk@VM-8-15-centos gitcode]$
2.5 版本回退
之前我们也提到过,Git能够管理⽂件的历史版本,这也是版本控制器重要的能⼒。如果有⼀天你发现之前的⼯作做的出现了很⼤的问题,需要在某个特定的历史版本重新开始,这个时候,就需要版本 回退的功能了。 执⾏ git reset命令⽤于回退版本,可以指定退回某⼀次提交的版本。
要解释⼀下“回退”本质是要将版本库中的内容进⾏回退,⼯作区或暂存区是否回退由命令参数决定:
git reset 命令语法格式为: git reset [–soft | --mixed | --hard] [HEAD]
--mixed为默认选项,使⽤时可以不⽤带该参数。该参数将暂存区的内容退回为指定提交版本内 容,⼯作区⽂件保持不变。--soft参数对于⼯作区和暂存区的内容都不变,只是将版本库回退到某个指定版本。--hard参数将暂存区与⼯作区都退回到指定版本。切记⼯作区有未提交的代码时不要⽤这个命令,因为⼯作区会回滚,你没有提交的代码就再也找不回了,所以使⽤该参数前⼀定要慎重。HEAD◦ 可直接写成commit id,表示指定退回的版本 ◦ HEAD表示当前版本 ◦ HEAD^上⼀个版本 ◦ HEAD^^上上⼀个版本 ◦ 以此类推…- 可以使⽤〜数字表示: ◦ HEAD
0表⽰当前版本 ◦ HEAD1上⼀个版本 ◦ HEAD^2上上⼀个版本 ◦ 以此类推…为了便于表述,⽅便测试回退功能,我们先做⼀些准备⼯作:更新3个版本的ReadMe,并分别进⾏3次提交,如下所示:
# 第⼀次修改提交[lk@VM-8-15-centos gitcode]$ vim ReadMe [lk@VM-8-15-centos gitcode]$ cat ReadMe hello git hello world hello bit hello version1 [lk@VM-8-15-centos gitcode]$ gitadd ReadMe [lk@VM-8-15-centos gitcode]$ git commit -m "add version1"[master 4007e3d]add version1 1file changed, 3 insertions(+)# 第二次修改提交[lk@VM-8-15-centos gitcode]$ vim ReadMe [lk@VM-8-15-centos gitcode]$ cat ReadMe hello git hello world hello bit hello version1 hello version2 [lk@VM-8-15-centos gitcode]$ gitadd ReadMe [lk@VM-8-15-centos gitcode]$ git commit -m "add version2"[master fe7e07b]add version2 1file changed, 1 insertion(+)# 第三次修改提交[lk@VM-8-15-centos gitcode]$ vim ReadMe [lk@VM-8-15-centos gitcode]$ cat ReadMe hello git hello world hello bit hello version1 hello version2 hello version3 [lk@VM-8-15-centos gitcode]$ gitadd ReadMe [lk@VM-8-15-centos gitcode]$ git commit -m "add version3"[master 63fc4ea]add version3 1file changed, 1 insertion(+)[lk@VM-8-15-centos gitcode]$现在,如果我们在提交完version3后,发现version3编写错误,想回退到version2,重新基于version2开始编写。由于我们在这⾥希望的是将⼯作区的内容也回退到 version 2 版本,所以需要⽤到
--hard参数,示例如下:
[lk@VM-8-15-centos gitcode]$ git log --pretty=oneline
63fc4ea08d26fcd7fc1f978e734028aa3204f990 add version3
fe7e07bc1914b723e6df5bdd92f13614664c72c7 add version2
4007e3d8ffd827e61ceb146953fb109e4d5855d0 add version1
d25e7338fe756717a957b05bafedd1f2088e616b add file5
a64bf65c26e7de2bf6a93a915cc39ddf286d1d8f addfile
b794954cfa68bc7d0573ec80ff71ac7f42ba6cd8 add3 files
b26e3384e5618a32bdce915356e1cebff1c64af8 first commit file[lk@VM-8-15-centos gitcode]$ git reset --hard HEAD^
# [lk@VM-8-15-centos gitcode]$ git reset --hard fe7e07bc1914b723e6df5bdd92f13614664c72c7
HEAD is now at fe7e07b add version2
[lk@VM-8-15-centos gitcode]$ cat ReadMe
hello git
hello world
hello bit
hello version1
hello version2
[lk@VM-8-15-centos gitcode]$
我们惊奇的发现,此时 ReadMe ⽂件的内容,已经回退到version2了!,当前,我们再次⽤ git log 查看⼀下提交⽇志,发现 HEAD 指向了version2,如下所示:
[lk@VM-8-15-centos gitcode]$ git log --pretty=oneline fe7e07bc1914b723e6df5bdd92f13614664c72c7 add version2 4007e3d8ffd827e61ceb146953fb109e4d5855d0 add version1 d25e7338fe756717a957b05bafedd1f2088e616b add file5 a64bf65c26e7de2bf6a93a915cc39ddf286d1d8f addfile b794954cfa68bc7d0573ec80ff71ac7f42ba6cd8 add3 files b26e3384e5618a32bdce915356e1cebff1c64af8 first commit file[lk@VM-8-15-centos gitcode]$到这⾥⼀般回退功能就演示完了,但现在如果我后悔了,想再回到version3怎么办?我们可以继续使⽤git reset 命令,回退到 version 3 版本,但我们必须要拿到 version 3 的 commit id 去指定回退的版本。但我们看到了 git log 并不能打印出version 3 的 commit id ,运⽓好的话我们可以从终端上去找找之前的记录,运⽓不好的话commit id 已经被我们搞丢了。Git还提供了⼀个 git reflog 命令能补救⼀下,该命令⽤来记录本地的每⼀次命令。
[lk@VM-8-15-centos gitcode]$ git reflog
fe7e07b HEAD@{0}: reset: moving to HEAD^
63fc4ea HEAD@{1}: commit: add version3
fe7e07b HEAD@{2}: commit: add version2
4007e3d HEAD@{3}: commit: add version1
d25e733 HEAD@{4}: commit: add file5
a64bf65 HEAD@{5}: commit: addfile
b794954 HEAD@{6}: commit: add3 files
b26e338 HEAD@{7}: commit (initial): first commit file[lk@VM-8-15-centos gitcode]$ git reset --hard 63fc4ea
HEAD is now at 63fc4ea add version3
[lk@VM-8-15-centos gitcode]$ cat ReadMe
hello git
hello world
hello bit
hello version1
hello version2
hello version3
[lk@VM-8-15-centos gitcode]$ git log --pretty=oneline
63fc4ea08d26fcd7fc1f978e734028aa3204f990 add version3
fe7e07bc1914b723e6df5bdd92f13614664c72c7 add version2
4007e3d8ffd827e61ceb146953fb109e4d5855d0 add version1
d25e7338fe756717a957b05bafedd1f2088e616b add file5
a64bf65c26e7de2bf6a93a915cc39ddf286d1d8f addfile
b794954cfa68bc7d0573ec80ff71ac7f42ba6cd8 add3 files
b26e3384e5618a32bdce915356e1cebff1c64af8 first commit file[lk@VM-8-15-centos gitcode]$
可往往是理想很丰满,现实很⻣感。在实际开发中,由于⻓时间的开发了,导致 commit id 早就找不到了,可突然某⼀天,我⼜想回退到version3,那该如何操作呢?貌似现在不可能了。。。
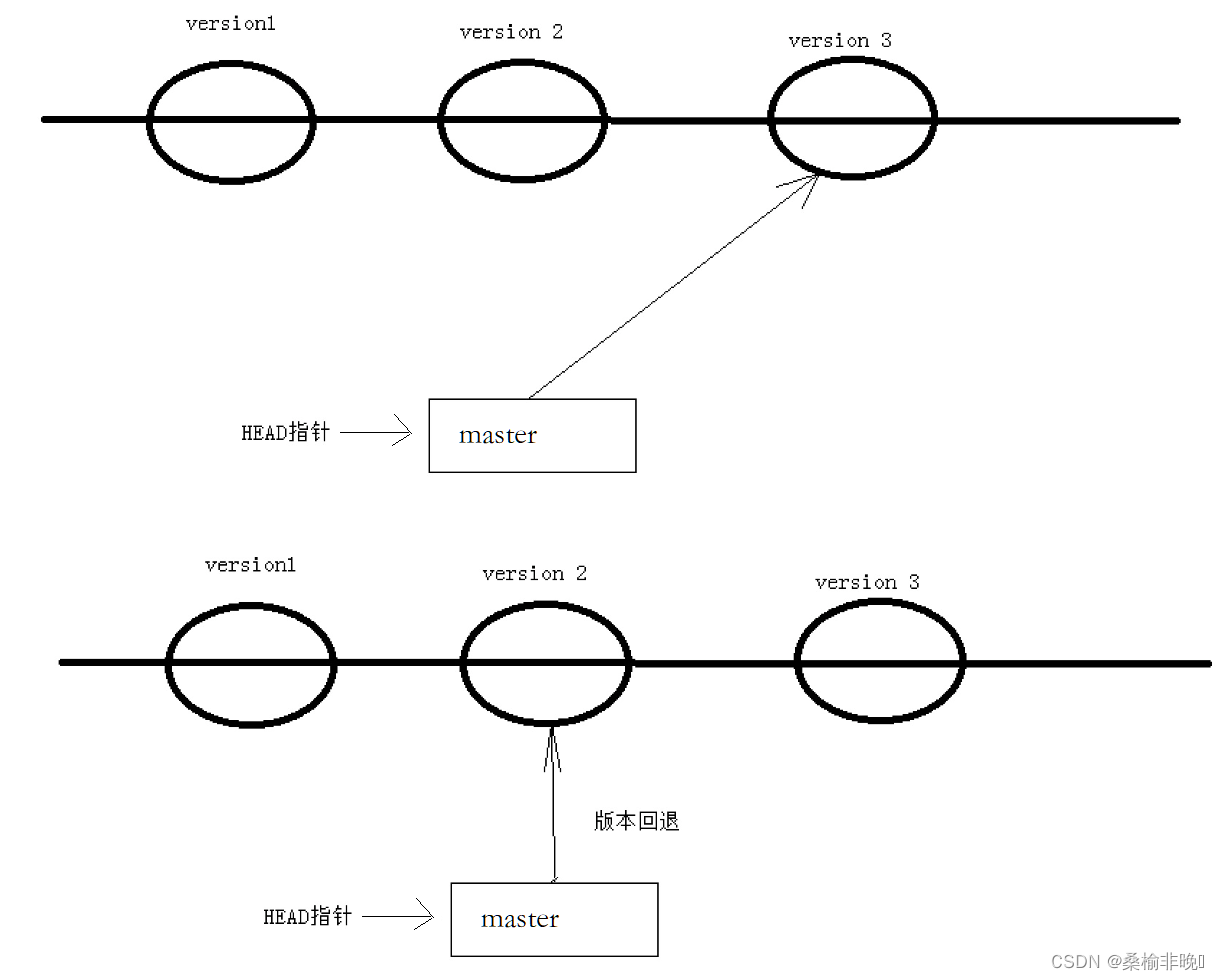
值得说的是,Git的版本回退速度⾮常快,因为Git在内部有个指向当前分⽀(此处是master)的HEAD指针, refs/heads/master ⽂件⾥保存当前 master 分⽀的最新 commit id 。当我们在回退版本的时候,Git仅仅是更改了 refs/heads/master 中存储的commit id,可以简单理解成如下示意图:
2.6 撤销修改
如果我们在我们的⼯作区写了很⻓时间代码,越写越写不下去,觉得⾃⼰写的实在是垃圾,想恢复到上⼀个版本,从新开始写。
2.6.2 情况一
对于⼯作区的代码,还没有 add
Git为我们提供了更好的⽅式,我们可以使⽤ git checkout – [file] 命令让⼯作区⽂件回到最近⼀次 add 或commit 时的状态。要注意 git checkout – [file] 命令中的–很重要,切记不要省略,⼀旦省略,该命令就变为其他意思了,后⾯我们再说。示例如下:[lk@VM-8-15-centos gitcode]$ vim ReadMe [lk@VM-8-15-centos gitcode]$ cat ReadMe hello git hello world hello bit hello version1 hello version2 hello version3 This piece of code is like shit #新增代码[lk@VM-8-15-centos gitcode]$ git status # On branch master# Changes not staged for commit:# (use "git add <file>..." to update what will be committed)# (use "git checkout -- <file>..." to discard changes in working directory)## modified: ReadMe# no changes added to commit (use "git add" and/or "git commit -a")# 恢复到上⼀次 add 或 commit[lk@VM-8-15-centos gitcode]$ git checkout -- ReadMe [lk@VM-8-15-centos gitcode]$ cat ReadMe hello git hello world hello bit hello version1 hello version2 hello version3 [lk@VM-8-15-centos gitcode]$ git status # On branch master nothing to commit, working directory clean [lk@VM-8-15-centos gitcode]$还有一种比较笨的方法就是自己手动的删掉自己写的代码。虽然这样是可行的,但是严重不推荐这么做。这里是⾟亏我们⼯作效率不⾼,才写了⼀⾏代码就发现不⾏了,要是你写了3天,⼀直都没有提交,该怎么删掉呢?你⾃⼰都忘了⾃⼰新增过哪些,有同学说,我可以 git diff xxx ?⼀下,看看差别在删啊,那你肯定⼜要花3天时间删代码了,并且很⼤的概率还会改出bug。⼀周过去了,你怎么向你的⽼板交代呢?
2.6.2 情况二
已经 add ,但没有 commit
[lk@VM-8-15-centos gitcode]$ vim ReadMe
[lk@VM-8-15-centos gitcode]$ cat ReadMe
hello git
hello world
hello bit
hello version1
hello version2
hello version3
This piece of code is like shit #新增代码# add 存⼊暂存区[lk@VM-8-15-centos gitcode]$ gitadd ReadMe
[lk@VM-8-15-centos gitcode]$ git status
# On branch master# Changes to be committed:#   (use "git reset HEAD <file>..." to unstage)##    modified:   ReadMe#[lk@VM-8-15-centos gitcode]$
让我们来回忆⼀下学过的 git reset 回退命令,该命令如果使⽤ –mixed 参数,可以将暂存区的内容退回为指定的版本内容,但⼯作区⽂件保持不变。那我们就可以回退下暂存区的内容了!!
[lk@VM-8-15-centos gitcode]$ vim ReadMe
[lk@VM-8-15-centos gitcode]$ cat ReadMe
hello git
hello world
hello bit
hello version1
hello version2
hello version3
This piece of code is like shit #新增代码[lk@VM-8-15-centos gitcode]$ gitadd ReadMe
[lk@VM-8-15-centos gitcode]$ git status
# On branch master# Changes to be committed:#   (use "git reset HEAD <file>..." to unstage)##    modified:   ReadMe#[lk@VM-8-15-centos gitcode]$ git reset HEAD ReadMe
Unstaged changes after reset:
M    ReadMe
[lk@VM-8-15-centos gitcode]$ git status
# On branch master# Changes not staged for commit:#   (use "git add <file>..." to update what will be committed)#   (use "git checkout -- <file>..." to discard changes in working directory)##    modified:   ReadMe#
no changes added to commit (use "git add" and/or "git commit -a")[lk@VM-8-15-centos gitcode]$ git checkout -- ReadMe
[lk@VM-8-15-centos gitcode]$ git status
# On branch master
nothing to commit, working directory clean
[lk@VM-8-15-centos gitcode]$ cat ReadMe
hello git
hello world
hello bit
hello version1
hello version2
hello version3
[lk@VM-8-15-centos gitcode]$
2.6.3 情况三
已经 add ,并且也 commit 了
不要担⼼,我们可以 git reset --hard HEAD^ 回退到上⼀个版本!不过,这是有条件的,就是你还没有把⾃⼰的本地版本库推送到远程。还记得Git是分布式版本控制系统吗?我们后⾯会讲到远程版本库,⼀旦你推送到远程版本库,你就真的惨了……[lk@VM-8-15-centos gitcode]$ vim ReadMe [lk@VM-8-15-centos gitcode]$ cat ReadMe hello git hello world hello bit hello version1 hello version2 hello version3 This piece of code is like shit #新增代码[lk@VM-8-15-centos gitcode]$ gitadd ReadMe [lk@VM-8-15-centos gitcode]$ git commit -m "test quash"[master ffb2bd6]test quash 1file changed, 1 insertion(+)[lk@VM-8-15-centos gitcode]$ git status # On branch master nothing to commit, working directory clean [lk@VM-8-15-centos gitcode]$ git reset --hard HEAD^ HEAD is now at 63fc4ea add version3 [lk@VM-8-15-centos gitcode]$ cat ReadMe hello git hello world hello bit hello version1 hello version2 hello version3 [lk@VM-8-15-centos gitcode]$
2.7 分支管理
2.7.1 理解分支
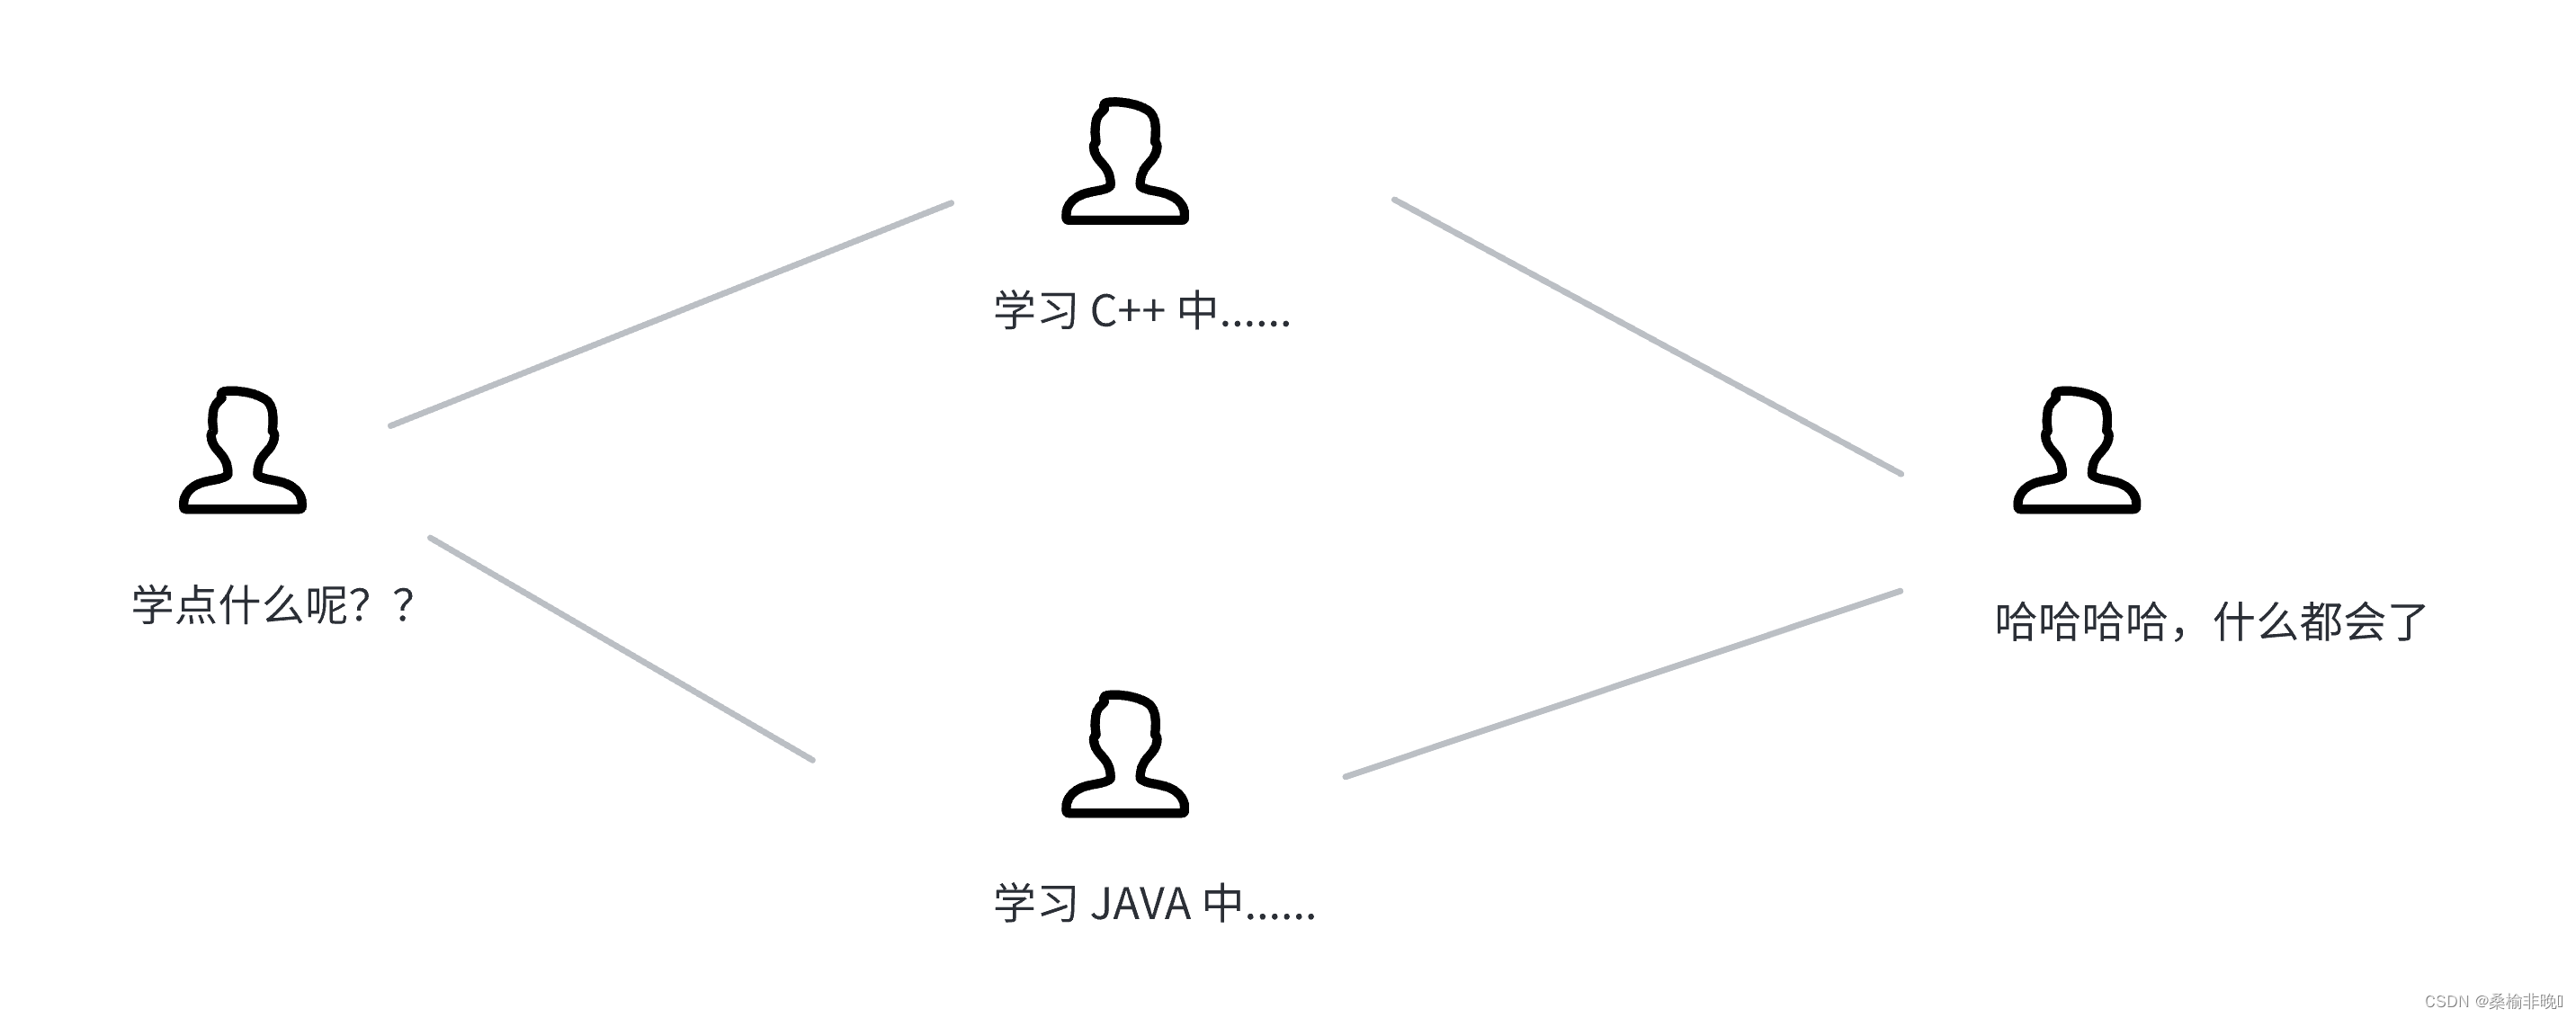
本章开始介绍Git的杀⼿级功能之⼀(注意是之⼀,也就是后⾯还有之⼆,之三……):分⽀。分⽀就是科幻电影⾥⾯的平⾏宇宙,当你正在电脑前努⼒学习C++的时候,另⼀个你正在另⼀个平⾏宇宙⾥努⼒学习JAVA。如果两个平⾏宇宙互不⼲扰,那对现在的你也没啥影响。不过,在某个时间点,两个平⾏宇宙合并了,结果,你既学会了C++⼜学会了JAVA!
在版本回退⾥,你已经知道,每次提交,Git都把它们串成⼀条时间线,这条时间线就可以理解为是⼀个分⽀。截⽌到⽬前,只有⼀条时间线,在Git⾥,这个分⽀叫主分⽀,即master分⽀。再来理解⼀下HEAD,HEAD严格来说不是指向提交,⽽是指向master,master才是指向提交的,所以,HEAD指向的就是当前分⽀。
每次提交,master分⽀都会向前移动⼀步,这样,随着你不断提交,master分⽀的线也越来越⻓,⽽HEAD只要⼀直指向master分⽀即可指向当前分⽀。
通过查看当前的版本库,我们也能清晰的理出思路:[lk@VM-8-15-centos gitcode]$ cat .git/HEAD ref: refs/heads/master [lk@VM-8-15-centos gitcode]$ cat .git/refs/heads/master 63fc4ea08d26fcd7fc1f978e734028aa3204f990 [lk@VM-8-15-centos gitcode]$
2.7.2 创建分支
Git⽀持我们查看或创建其他分⽀,在这⾥我们来创建第⼀个⾃⼰的分⽀dev ,对应的命令为:
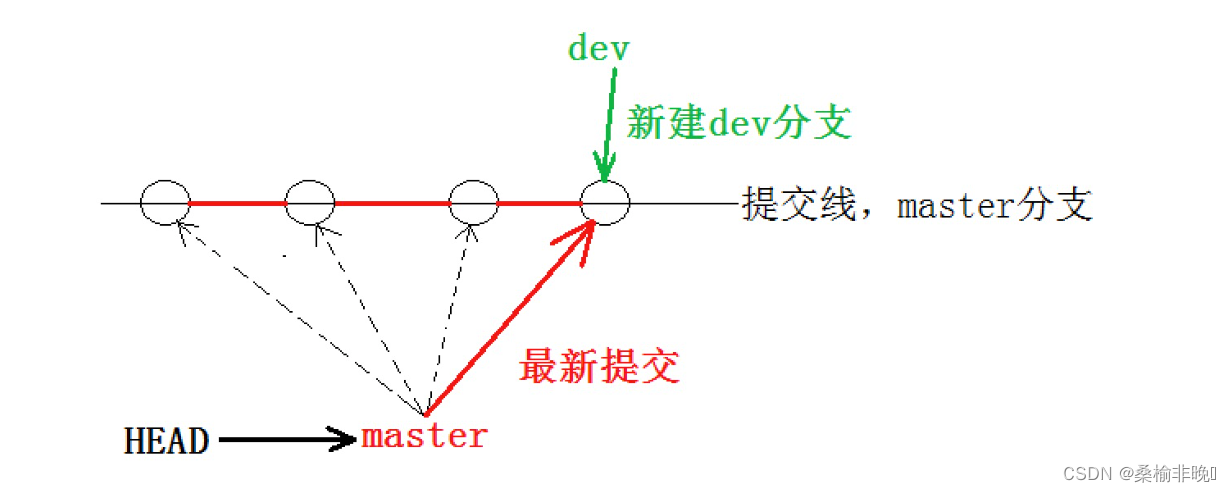
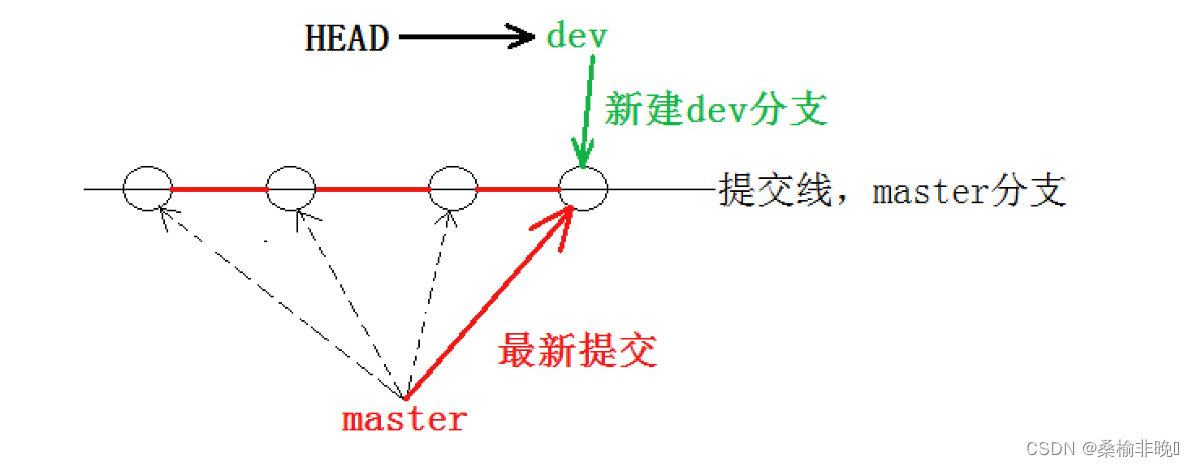
# 查看分支[lk@VM-8-15-centos gitcode]$ git branch * master # 创建分支dev[lk@VM-8-15-centos gitcode]$ git branch dev # 查看分支[lk@VM-8-15-centos gitcode]$ git branch dev * master [lk@VM-8-15-centos gitcode]$当我们创建新的分⽀后,Git新建了⼀个分支叫dev, * 表示当前 HEAD指针指向的分⽀是 master 分⽀。另外,可以通过⽬录结构发现,新的 dev 分⽀:
[lk@VM-8-15-centos gitcode]$ ls .git/refs/heads/ dev master [lk@VM-8-15-centos gitcode]$ cat .git/refs/heads/* 63fc4ea08d26fcd7fc1f978e734028aa3204f990 63fc4ea08d26fcd7fc1f978e734028aa3204f990 [lk@VM-8-15-centos gitcode]$发现⽬前dev和master指向同⼀个commit id。并且也可以验证下HEAD⽬前是指向 master 的。
[lk@VM-8-15-centos gitcode]$ cat .git/HEAD ref: refs/heads/master [lk@VM-8-15-centos gitcode]$ cat .git/refs/heads/master 63fc4ea08d26fcd7fc1f978e734028aa3204f990 [lk@VM-8-15-centos gitcode]$⼀张图总结:
2.7.3 切换分支
那如何切换到dev分⽀下进⾏开发呢?使⽤ git checkout 命令即可完成切换,示例如下:
[lk@VM-8-15-centos gitcode]$ git checkout dev
Switched to branch 'dev'[lk@VM-8-15-centos gitcode]$ git branch
* dev
  master
[lk@VM-8-15-centos gitcode]$ cat .git/HEAD
ref: refs/heads/dev
[lk@VM-8-15-centos gitcode]$
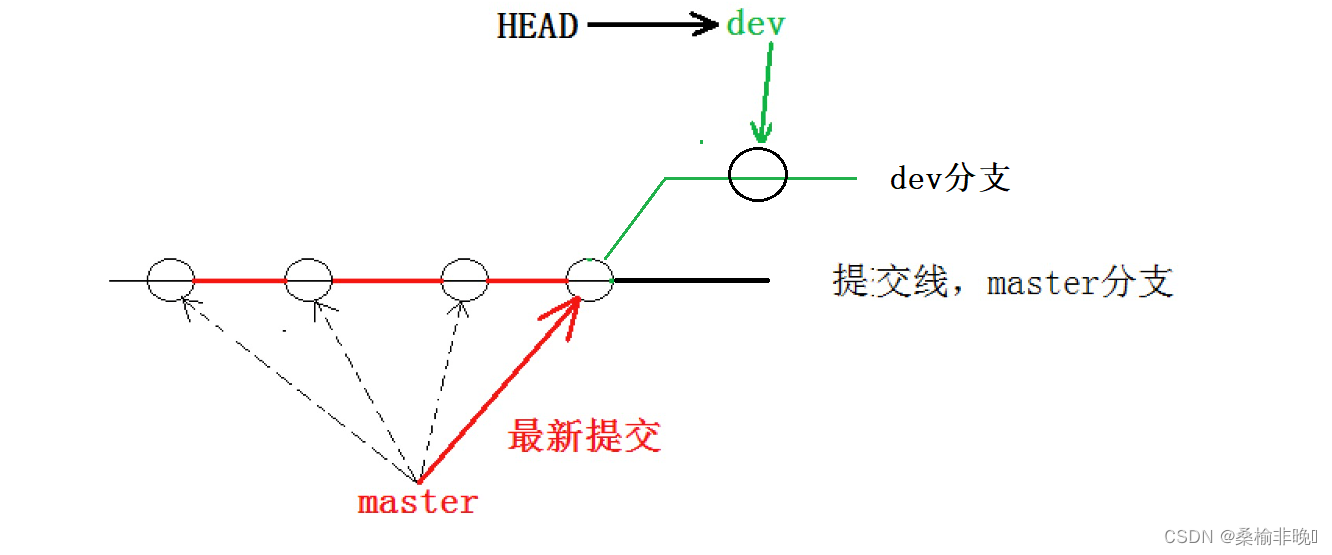
⼀张图总结:
我们发现HEAD已经指向了dev,就表⽰我们已经成功的切换到了dev上!接下来,在 dev 分⽀下修改ReadMe⽂件,新增⼀⾏内容,并进⾏⼀次提交操作:[lk@VM-8-15-centos gitcode]$ git branch * dev master [lk@VM-8-15-centos gitcode]$ vim ReadMe [lk@VM-8-15-centos gitcode]$ cat ReadMe hello git hello world hello bit hello version1 hello version2 hello version3 write aaa for new branch [lk@VM-8-15-centos gitcode]$ gitadd.[lk@VM-8-15-centos gitcode]$ git commit -m "modify ReadMe dev"[dev b75997a] modify ReadMe dev 1file changed, 1 insertion(+)现在,dev分⽀的⼯作完成,我们就可以切换回master分⽀:
[lk@VM-8-15-centos gitcode]$ git checkout master Switched to branch 'master'[lk@VM-8-15-centos gitcode]$ cat ReadMe hello git hello world hello bit hello version1 hello version2 hello version3切换回master分⽀后,发现ReadMe⽂件中新增的内容不⻅了!!!赶紧再切回dev看看:
[lk@VM-8-15-centos gitcode]$ git checkout dev Switched to branch 'dev'[lk@VM-8-15-centos gitcode]$ cat ReadMe hello git hello world hello bit hello version1 hello version2 hello version3 write aaa for new branch [lk@VM-8-15-centos gitcode]$在dev分⽀上,内容还在。为什么会出现这个现象呢?我们来看看dev分⽀和master分⽀指向,发现两者指向的提交是不⼀样的:
[lk@VM-8-15-centos gitcode]$ cat .git/refs/heads/dev
b75997a0868853b6eb093e917b9910e4942b0c07
[lk@VM-8-15-centos gitcode]$ cat .git/refs/heads/master
63fc4ea08d26fcd7fc1f978e734028aa3204f990
[lk@VM-8-15-centos gitcode]$
看到这⾥就能明⽩了,因为我们是在dev分⽀上提交的,⽽master分⽀此刻的提交点并没有变,此时的状态如图如下所示。
在
2.7.4合并分支
为了在master主分⽀上能看到新的提交,就需要将 dev 分⽀合并到 master 分⽀,示例如下:
[lk@VM-8-15-centos gitcode]$ git branch
* dev
  master
# 切换到master分支上进行合并[lk@VM-8-15-centos gitcode]$ git checkout master
Switched to branch 'master']# 合并dev分支[lk@VM-8-15-centos gitcode]$ git merge dev
Updating 63fc4ea..b75997a
Fast-forward
ReadMe |1 +
1file changed, 1 insertion(+)[lk@VM-8-15-centos gitcode]$ cat ReadMe
hello git
hello world
hello bit
hello version1
hello version2
hello version3
write aaa for new branch
[lk@VM-8-15-centos gitcode]$
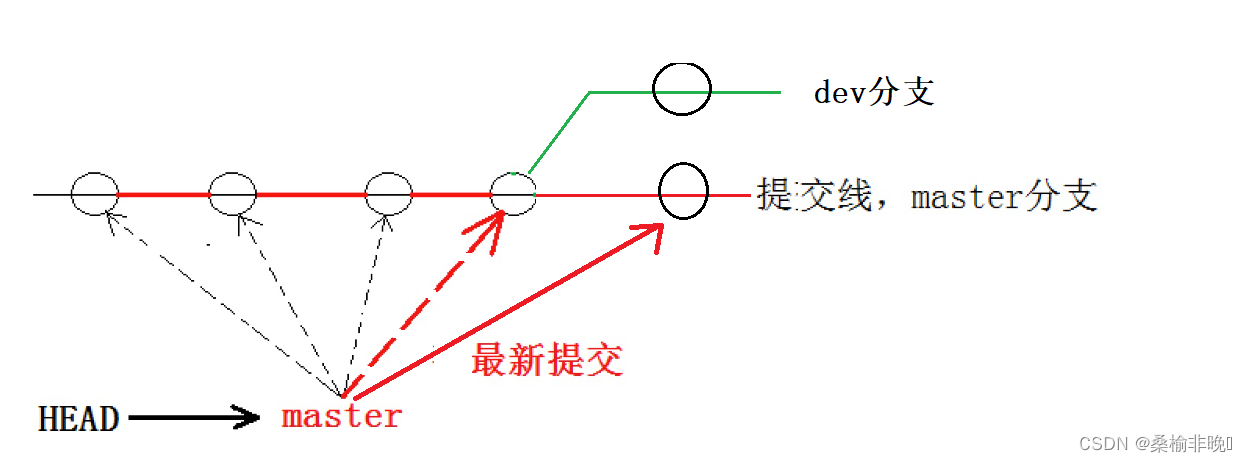
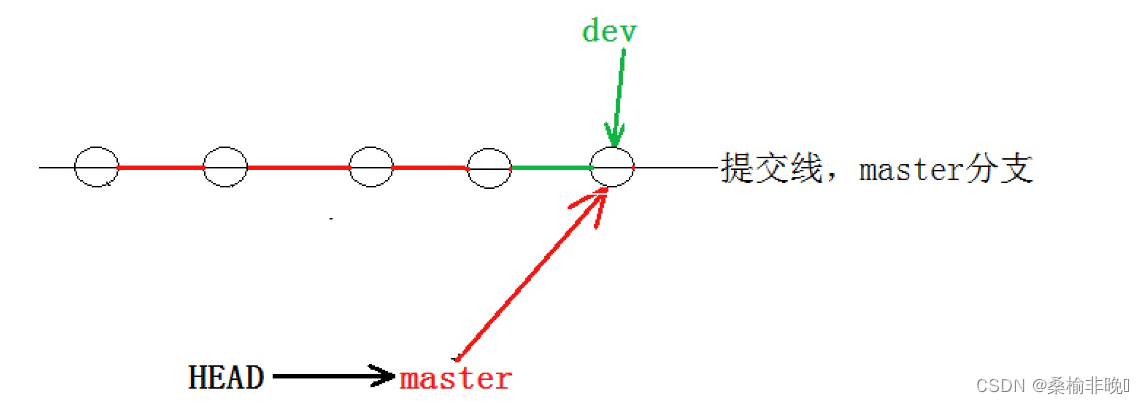
git merge 命令⽤于合并指定分⽀到当前分⽀。合并后,master就能看到dev分⽀提交的内容了。此时的状态如图如下所示:
注意:
在Fast-forward的模式下其实就是把dev内的commit id赋值给了master。验证如下:[lk@VM-8-15-centos gitcode]$ cat .git/refs/heads/master b75997a0868853b6eb093e917b9910e4942b0c07 [lk@VM-8-15-centos gitcode]$ cat .git/refs/heads/dev b75997a0868853b6eb093e917b9910e4942b0c07 [lk@VM-8-15-centos gitcode]$Fast-forward代表“快进模式”,也就是直接把master指向dev的当前提交,所以合并速度⾮常快。当然,也不是每次合并都能Fast-forward,我们后⾯会讲其他⽅式的合并。
2.7.5 删除分支
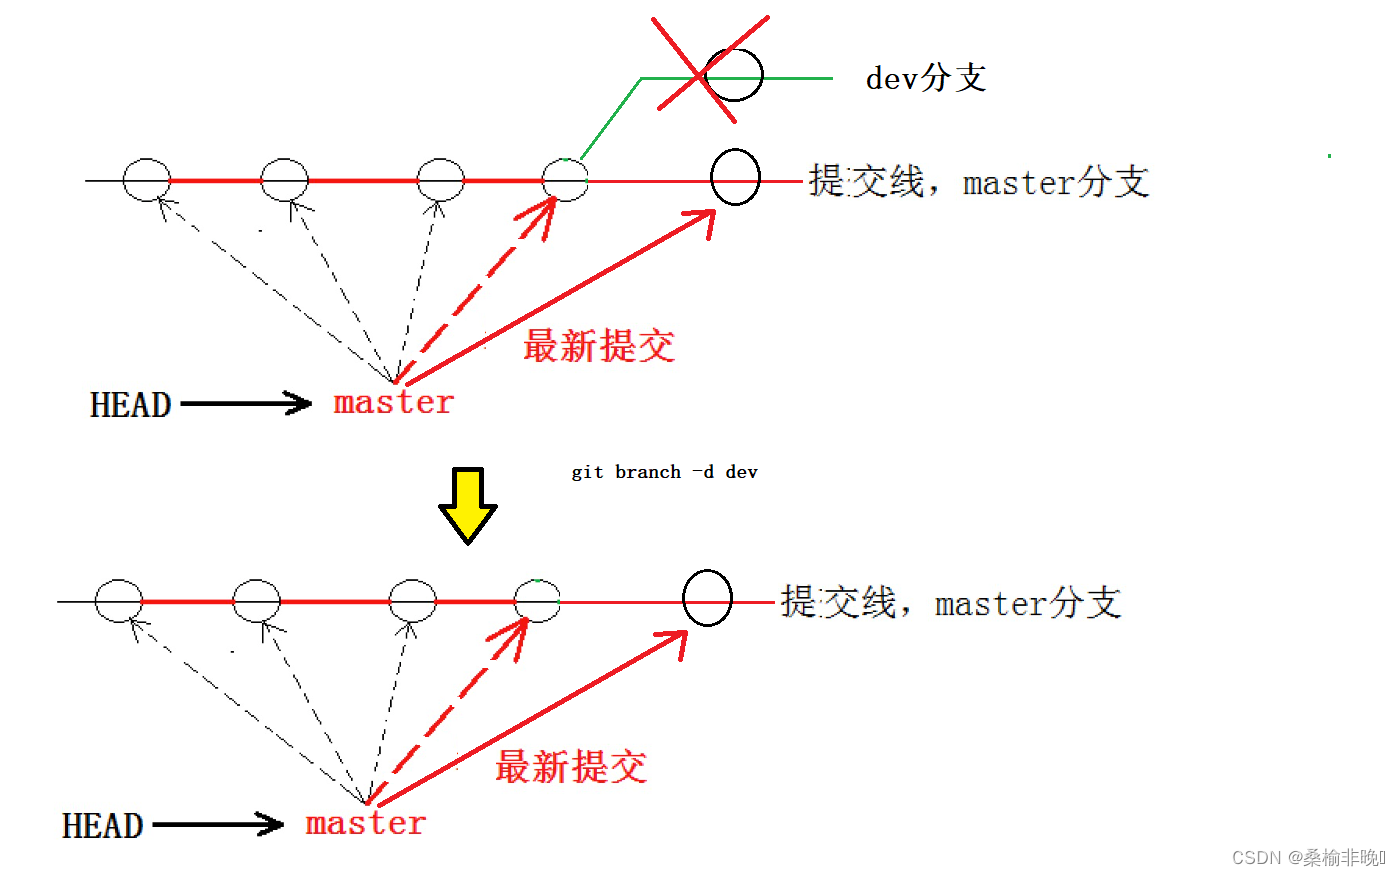
合并完成后,dev分⽀对于我们来说就没⽤了,那么dev分⽀就可以被删除掉,注意如果当前正处于要被删除分⽀下,就不能删除当前分⽀,如:
[lk@VM-8-15-centos gitcode]$ git branch
* dev
  master
[lk@VM-8-15-centos gitcode]$ git branch -d dev
error: Cannot delete the branch 'dev'which you are currently on.
[lk@VM-8-15-centos gitcode]$
⽽可以在其他分⽀下删除当前分⽀,如:
[lk@VM-8-15-centos gitcode]$ git checkout master
Switched to branch 'master'[lk@VM-8-15-centos gitcode]$ git branch
  dev
* master
[lk@VM-8-15-centos gitcode]$ git branch -d dev
Deleted branch dev (was b75997a).
[lk@VM-8-15-centos gitcode]$ git branch
* master
[lk@VM-8-15-centos gitcode]$
此时的状态如图如下所示:
因为创建、合并和删除分⽀⾮常快,所以Git⿎励你使⽤分⽀完成某个任务,合并后再删掉分⽀,这和直接在master分⽀上⼯作效果是⼀样的,但过程更安全。
2.7.6 合并冲突
可是,在实际分⽀合并的时候,并不是想合并就能合并成功的,有时候可能会遇到代码冲突的问题。为了演示这问题,创建⼀个新的分⽀dev1 ,并切换⾄⽬标分⽀,我们可以使⽤ git checkout -b dev1 ⼀步完成创建并切换的动作, 示例如下:
[lk@VM-8-15-centos gitcode]$ git checkout -b dev1
Switched to a new branch 'dev1'[lk@VM-8-15-centos gitcode]$ git branch
* dev1
  master
[lk@VM-8-15-centos gitcode]$ vim ReadMe
[lk@VM-8-15-centos gitcode]$ cat ReadMe
hello git
hello world
hello bit
hello version1
hello version2
hello version3
# 将 aaa 改为 bbbwrite bbb for new branch
[lk@VM-8-15-centos gitcode]$ gitadd.[lk@VM-8-15-centos gitcode]$ git commit -m "modify ReadMe dev1"[dev1 6f6e984] modify ReadMe dev1
1file changed, 1 insertion(+), 1 deletion(-)[lk@VM-8-15-centos gitcode]$
切换⾄ master 分⽀,观察 ReadMe ⽂件内容:
[lk@VM-8-15-centos gitcode]$ git checkout master
Switched to branch 'master'[lk@VM-8-15-centos gitcode]$ cat ReadMe
hello git
hello world
hello bit
hello version1
hello version2
hello version3
write aaa for new branch
[lk@VM-8-15-centos gitcode]$
我们发现,切回来之后,⽂件内容由变成了⽼的版本,这种现象很正常,我们现在也完全能理解。此时在master分⽀上,我们对ReadMe⽂件再进⾏⼀次修改,并进⾏提交,如下:
[lk@VM-8-15-centos gitcode]$ vim ReadMe
[lk@VM-8-15-centos gitcode]$ cat ReadMe
hello git
hello world
hello bit
hello version1
hello version2
hello version3
# 将 aaa 改为cccwrite ccc for new branch
[lk@VM-8-15-centos gitcode]$ gitadd.[lk@VM-8-15-centos gitcode]$ git commit -m "modify ReadMe master"[master 81fccde] modify ReadMe master
1file changed, 1 insertion(+), 1 deletion(-)[lk@VM-8-15-centos gitcode]$
现在, master 分⽀和 dev1 分⽀各⾃都分别有新的提交,变成了这样:
这种情况下,Git只能试图把各⾃的修改合并起来,但这种合并就可能会有冲突,如下所示:[lk@VM-8-15-centos gitcode]$ git branch dev1 * master [lk@VM-8-15-centos gitcode]$ git merge dev1 Auto-merging ReadMe CONFLICT (content): Merge conflict in ReadMe Automatic merge failed; fix conflicts and then commit the result. [lk@VM-8-15-centos gitcode]$ git status # On branch master# You have unmerged paths.# (fix conflicts and run "git commit")## Unmerged paths:# (use "git add <file>..." to mark resolution)## both modified: ReadMe# no changes added to commit (use "git add" and/or "git commit -a")[lk@VM-8-15-centos gitcode]$发现ReadMe⽂件有冲突后,可以直接查看⽂件内容:
[lk@VM-8-15-centos gitcode]$ cat ReadMe hello git hello world hello bit hello version1 hello version2 hello version3 <<<<<<< HEAD write ccc for new branch =======write bbb for new branch >>>>>>> dev1 [lk@VM-8-15-centos gitcode]$此时我们必须要⼿动调整冲突代码,并需要再次提交修正后的结果!!(再次提交很重要,切勿忘记)
[lk@VM-8-15-centos gitcode]$ vim ReadMe
[lk@VM-8-15-centos gitcode]$ cat ReadMe
hello git
hello world
hello bit
hello version1
hello version2
hello version3
write bbb for new branch
[lk@VM-8-15-centos gitcode]$ gitadd.[lk@VM-8-15-centos gitcode]$ git commit -m "merge ReadMe"[master 1358fcd] merge ReadMe
[lk@VM-8-15-centos gitcode]$
到这⾥冲突就解决完成,此时的状态变成了
⽤带参数的git log也可以看到分⽀的合并情况,具体⼤家可以⾃⾏搜索 git log 的⽤法:[lk@VM-8-15-centos gitcode]$ git log --graph --pretty=oneline --abbrev-commit * 1358fcd merge ReadMe |\| * 6f6e984 modify ReadMe dev1 * | 81fccde modify ReadMe master |/ * b75997a modify ReadMe dev * 63fc4ea add version3 * fe7e07b add version2 * 4007e3d add version1 * d25e733 add file5 * a64bf65 addfile * b794954 add3 files * b26e338 first commit file[lk@VM-8-15-centos gitcode]$最后,不要忘记dev1分⽀使⽤完毕后就可以删除了:
[lk@VM-8-15-centos gitcode]$ git branch
  dev1
* master
lk@VM-8-15-centos gitcode]$ git branch -d dev1
Deleted branch dev1 (was 6f6e984).
[lk@VM-8-15-centos gitcode]$
2.8 分支管理策略
2.8.1 Fast-forward模式与普通模式
通常合并分⽀时,如果可能,Git会采⽤ Fast forward 模式。还记得如果我们采⽤ Fast
forward 模式之后,形成的合并结果是什么呢?回顾⼀下
在这种 Fast forward 模式下,删除分⽀后,查看分⽀历史时,会丢掉分⽀信息,看不出来最新提交到底是merge进来的还是正常提交的。但在合并冲突部分,我们也看到通过解决冲突问题,会再进⾏⼀次新的提交,得到的最终状态为:
那么这就不是 Fast forward 模式了,这样的好处是,从分⽀历史上就可以看出分⽀信息。例如我们现在已经删除了在合并冲突部分创建的 dev1 分⽀,但依旧能看到master其实是由其他分⽀合并得到:[lk@VM-8-15-centos gitcode]$ git log --graph --pretty=oneline --abbrev-commit * 1358fcd merge ReadMe |\| * 6f6e984 modify ReadMe dev1 * | 81fccde modify ReadMe master |/ * b75997a modify ReadMe dev * 63fc4ea add version3 * fe7e07b add version2 * 4007e3d add version1 * d25e733 add file5 * a64bf65 addfile * b794954 add3 files * b26e338 first commit file[lk@VM-8-15-centos gitcode]$Git⽀持我们强制禁⽤ Fast forward 模式,那么就会在merge时⽣成⼀个新的 commit id。这样,从分⽀历史上就可以看出分⽀信息。
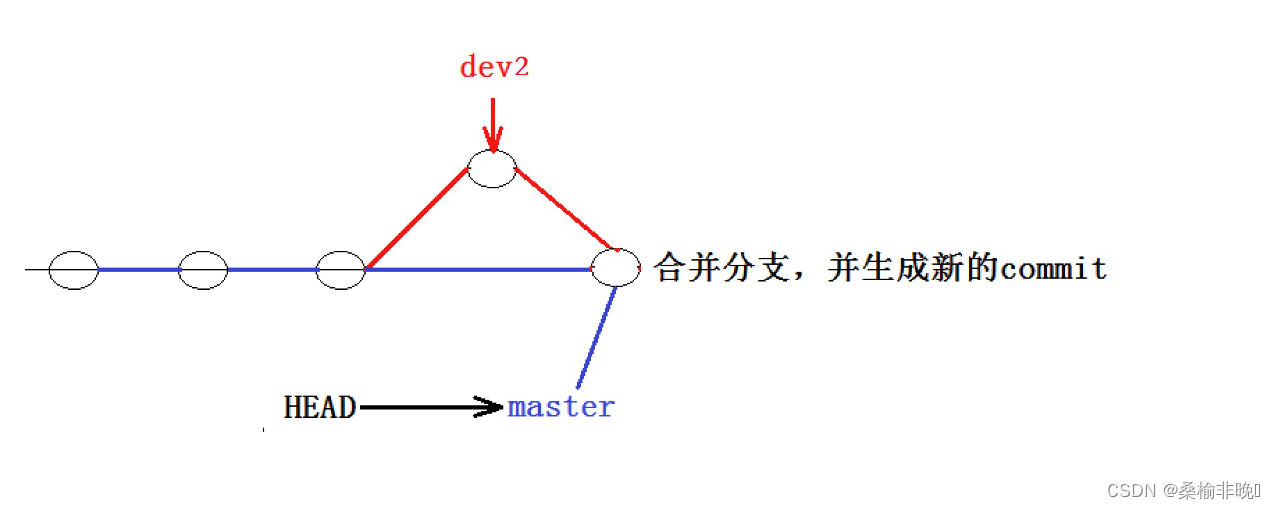
下⾯我们实战⼀下 --no-ff ⽅式的 git merge 。⾸先,创建新的分⽀ dev2 ,并切换⾄新的分⽀:[lk@VM-8-15-centos gitcode]$ git checkout -b dev2 Switched to a new branch 'dev2'[lk@VM-8-15-centos gitcode]$ vim ReadMe [lk@VM-8-15-centos gitcode]$ cat ReadMe hello git hello world hello bit hello version1 hello version2 hello version3 write bbb for new branch fortest --no-ff [lk@VM-8-15-centos gitcode]$ gitadd.[lk@VM-8-15-centos gitcode]$ git commit -m "modify ReadMe dev2"[dev2 1336ba8] modify ReadMe dev2 1file changed, 1 insertion(+)[lk@VM-8-15-centos gitcode]$ git checkout master Switched to branch 'master'[lk@VM-8-15-centos gitcode]$ git merge --no-ff -m "merge with --no-ff" dev2 Merge made by the 'recursive' strategy. ReadMe |1 + 1file changed, 1 insertion(+)[lk@VM-8-15-centos gitcode]$ cat ReadMe hello git hello world hello bit hello version1 hello version2 hello version3 write bbb for new branch fortest --no-ff [lk@VM-8-15-centos gitcode]$ git log --graph --pretty=oneline --abbrev-commit [lk@VM-8-15-centos gitcode]$请注意 --no-ff 参数,表⽰禁⽤ Fast forward 模式。禁⽤ Fast forward 模式后合并会创建⼀个新的 commit ,所以加上 -m 参数,把描述写进去。
合并后,查看分⽀历史:[lk@VM-8-15-centos gitcode]$ git log --graph --pretty=oneline --abbrev-commit * e10a529 merge with --no-ff |\| * 1336ba8 modify ReadMe dev2 |/ * 1358fcd merge ReadMe |\| * 6f6e984 modify ReadMe dev1 * | 81fccde modify ReadMe master |/ * b75997a modify ReadMe dev * 63fc4ea add version3 * fe7e07b add version2 * 4007e3d add version1 * d25e733 add file5 * a64bf65 addfile * b794954 add3 files * b26e338 first commit file[lk@VM-8-15-centos gitcode]$可以看到,不使⽤ Fast forward 模式,merge后就像这样:
所以在合并分⽀时,加上 –no-ff 参数就可以⽤普通模式合并,合并后的历史有分⽀,能看出来曾经做过合并,⽽ fast forward 合并就看不出来曾经做过合并。
2.8.2 分支策略
在实际开发中,我们应该按照⼏个基本原则进⾏分⽀管理:
⾸先,master分⽀应该是⾮常稳定的,也就是仅⽤来发布新版本,平时不能在上⾯⼲活;
那在哪⼲活呢?⼲活都在dev分⽀上,也就是说,dev分⽀是不稳定的,到某个时候,⽐如1.0版本发布时,再把dev分⽀合并到master上,在master分⽀发布1.0版本;
你和你的⼩伙伴们每个⼈都在dev分⽀上⼲活,每个⼈都有⾃⼰的分⽀,时不时地往dev分⽀上合并就可以了。
所以,团队合作的分⽀看起来就像这样:
2.8.3 bug分支
假如我们现在正在dev2分⽀上进⾏开发,开发到⼀半,突然发现 master 分⽀上⾯有bug,需要解决。在Git中,每个bug都可以通过⼀个新的临时分⽀来修复,修复后,合并分⽀,然后将临时分⽀删除。
可现在dev2 的代码在⼯作区中开发了⼀半,还⽆法提交,怎么办?例如:[lk@VM-8-15-centos gitcode]$ git branch * dev2 master [lk@VM-8-15-centos gitcode]$ vim ReadMe [lk@VM-8-15-centos gitcode]$ cat ReadMe hello git hello world hello bit hello version1 hello version2 hello version3 write bbb for new branch fortest --no-ff I am coding... [lk@VM-8-15-centos gitcode]$ git status # On branch dev2# Changes not staged for commit:# (use "git add <file>..." to update what will be committed)# (use "git checkout -- <file>..." to discard changes in working directory)## modified: ReadMe# no changes added to commit (use "git add" and/or "git commit -a")[lk@VM-8-15-centos gitcode]$ git checkout master M ReadMe Switched to branch 'master'[lk@VM-8-15-centos gitcode]$ cat ReadMe hello git hello world hello bit hello version1 hello version2 hello version3 write bbb for new branch fortest --no-ff I am coding... [lk@VM-8-15-centos gitcode]$ git checkout dev2 M ReadMe Switched to branch 'dev2'[lk@VM-8-15-centos gitcode]$Git提供了 git stash 命令,可以将当前的⼯作区信息进⾏储藏,被储藏的内容可以在将来某个时间恢复出来。
[lk@VM-8-15-centos gitcode]$ git checkout dev2
M    ReadMe
Switched to branch 'dev2'# 将工作区的信息进行储藏[lk@VM-8-15-centos gitcode]$ git stash
Saved working directory and index state WIP on dev2: 1336ba8 modify ReadMe dev2
HEAD is now at 1336ba8 modify ReadMe dev2
[lk@VM-8-15-centos gitcode]$ git status
# On branch dev2
nothing to commit, working directory clean
[lk@VM-8-15-centos gitcode]$ cat ReadMe
hello git
hello world
hello bit
hello version1
hello version2
hello version3
write bbb for new branch
fortest --no-ff
[lk@VM-8-15-centos gitcode]$ git checkout master
Switched to branch 'master'[lk@VM-8-15-centos gitcode]$ cat ReadMe
hello git
hello world
hello bit
hello version1
hello version2
hello version3
write bbb for new branch
fortest --no-ff
# 创建bug分支[lk@VM-8-15-centos gitcode]$ git checkout -b fix_bug
Switched to a new branch 'fix_bug'# 在 bug分支上进行修改bug[lk@VM-8-15-centos gitcode]$ vim ReadMe
[lk@VM-8-15-centos gitcode]$ cat ReadMe
hello git
hello world
hello bit
hello version1
hello version2
hello version3
write bbb for new branch
fortest --no-ff fix bug
# 修复bug完成后在bug分支上进行提交[lk@VM-8-15-centos gitcode]$ gitadd ReadMe
[lk@VM-8-15-centos gitcode]$ git commit -m "fix bug"[fix_bug 73b2f67] fix bug
1file changed, 1 insertion(+), 1 deletion(-)[lk@VM-8-15-centos gitcode]$
修复完成后,切换到 master 分⽀,并完成合并,最后删除 fix_bug 分⽀:
[lk@VM-8-15-centos gitcode]$ git checkout master
Switched to branch 'master'
[lk@VM-8-15-centos gitcode]$ git merge --no-ff -m "merge fix_bug branch" fix_bug
Merge made by the 'recursive' strategy.
ReadMe | 2 +-
1 file changed, 1 insertion(+), 1 deletion(-)
[lk@VM-8-15-centos gitcode]$ cat ReadMe
hello git
hello world
hello bit
hello version1
hello version2
hello version3
write bbb for new branch
for test --no-ff fix bug
[lk@VM-8-15-centos gitcode]$ git branch -d fix_bug
Deleted branch fix_bug (was 73b2f67).
[lk@VM-8-15-centos gitcode]$
⾄此,bug?的修复⼯作已经做完了,我们还要继续回到? dev2 ?分⽀进⾏开发。切换回 dev2 分⽀:
[lk@VM-8-15-centos gitcode]$ git checkout dev2
Switched to branch 'dev2'
[lk@VM-8-15-centos gitcode]$ git status
# On branch dev2
nothing to commit, working directory clean
[lk@VM-8-15-centos gitcode]$
⼯作区是⼲净的,刚才的⼯作现场存到哪去了?⽤ git stash list 命令看看:
[lk@VM-8-15-centos gitcode]$ git stash list
stash@{0}: WIP on dev2: 1336ba8 modify ReadMe dev2
[lk@VM-8-15-centos gitcode]$
⼯作现场还在,Git把stash内容存在某个地⽅了,但是需要恢复⼀下,如何恢复现场呢?我们可以使⽤ git stash pop 命令,恢复的同时会把stash也删了,示例如下:
[lk@VM-8-15-centos gitcode]$ git stash pop
# On branch dev2
# Changes not staged for commit:
#   (use "git add <file>..." to update what will be committed)
#   (use "git checkout -- <file>..." to discard changes in working directory)
#
#    modified:   ReadMe
#
no changes added to commit (use "git add" and/or "git commit -a")
Dropped refs/stash@{0} (c92d6c7983e54496c2585fa1e0a1d01e615ed182)
[lk@VM-8-15-centos gitcode]$
再次查看的时候,我们已经发现已经没有现场可以恢复了
[lk@VM-8-15-centos gitcode]$ git stash list
[lk@VM-8-15-centos gitcode]$
另外,恢复现场也可以采⽤ git stash apply 恢复,但是恢复后,stash内容并不删除,你需要⽤ git stash drop 来删除;你可以多次stash,恢复的时候,先⽤ git stash list 查看,然后恢复指定的stash,⽤命令git stash apply stash@{0} ,这部分请同学们⾃⾏使⽤。
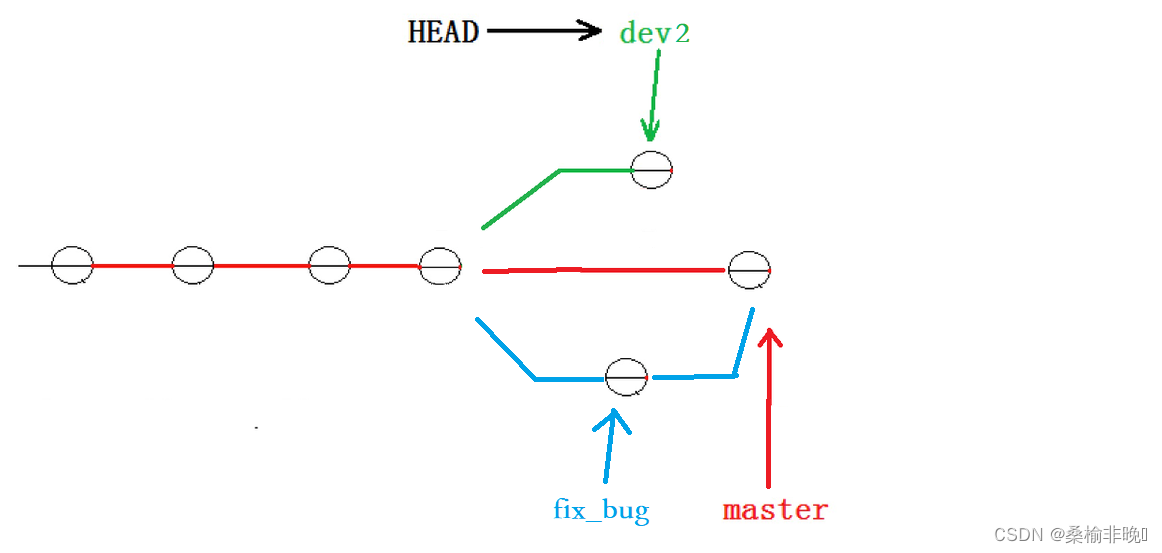
恢复完代码之后我们便可以继续完成开发,开发完成后便可以进⾏提交,例如:[lk@VM-8-15-centos gitcode]$ cat ReadMe hello git hello world hello bit hello version1 hello version2 hello version3 write bbb for new branch fortest --no-ff I am coding... [lk@VM-8-15-centos gitcode]$ vim ReadMe [lk@VM-8-15-centos gitcode]$ git status # On branch dev2# Changes not staged for commit:# (use "git add <file>..." to update what will be committed)# (use "git checkout -- <file>..." to discard changes in working directory)## modified: ReadMe# no changes added to commit (use "git add" and/or "git commit -a")[lk@VM-8-15-centos gitcode]$ gitdiff -- ReadMe diff --git a/ReadMe b/ReadMe index 0b7fc16..943004b 100644 --- a/ReadMe +++ b/ReadMe @@ -6,3 +6,4 @@ hello version2 hello version3 write bbb for new branch fortest --no-ff +I am coding... done[lk@VM-8-15-centos gitcode]$ gitadd.[lk@VM-8-15-centos gitcode]$ git commit -m "modify ReadMe dev2"[dev2 a9d1906] modify ReadMe dev2 1file changed, 1 insertion(+)[lk@VM-8-15-centos gitcode]$但我们注意到了,修复?bug?的内容,并没有在? dev2 上显⽰。此时的状态图为:
Master 分⽀⽬前最新的提交,是要领先于新建 dev2 时基于的 master 分⽀的提交的,所以我们在 dev2 中当然看不⻅修复bug的相关代码。我们的最终⽬的是要让 master 合并 dev2 分⽀的,那么正常情况下我们切回 master 分⽀直接合并即可,但这样其实是有⼀定⻛险的。是因为在合并分⽀时可能会有冲突,⽽代码冲突需要我们⼿动解决(在 master 上解决)。我们⽆法保证对于冲突问题可以正确地⼀次性解决掉,因为在实际的项⽬中,代码冲突不只⼀两⾏那么简单,有可能⼏⼗上百⾏,甚⾄更多,解决的过程中难免⼿误出错,导致错误的代码被合并到 master 上。
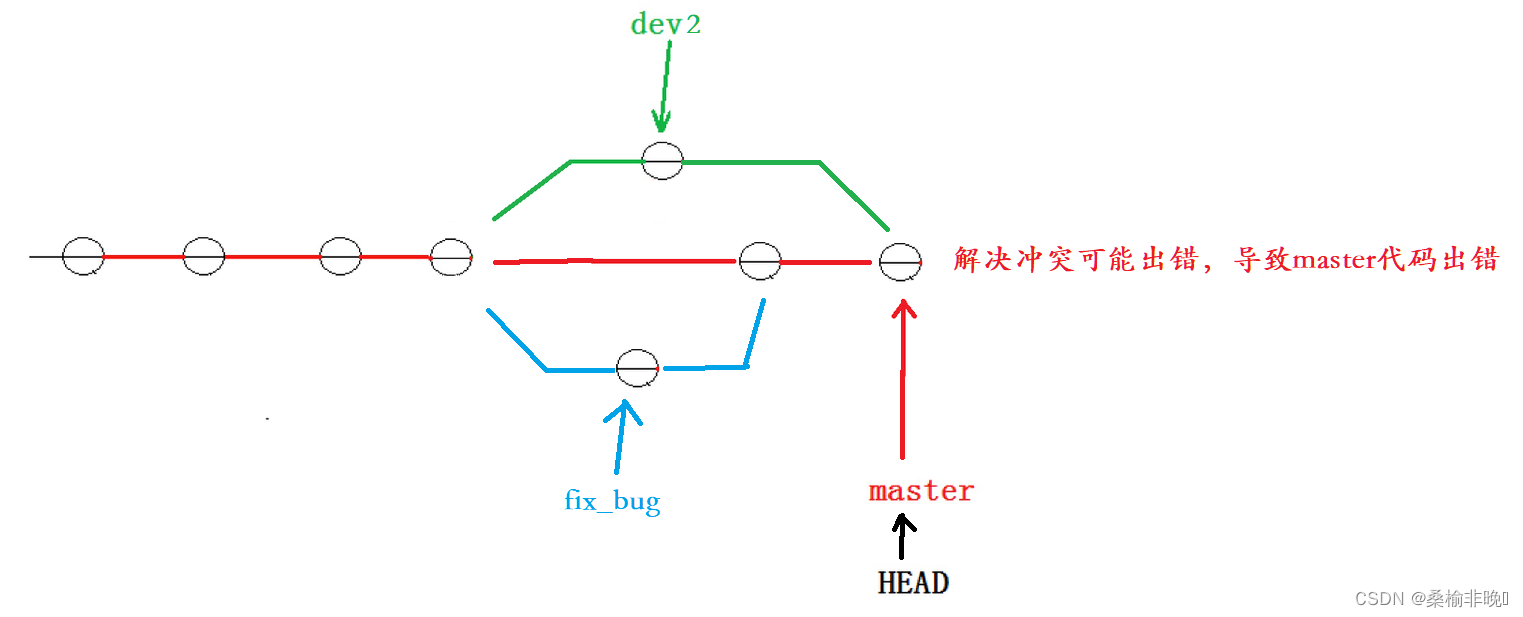
此时的状态为:
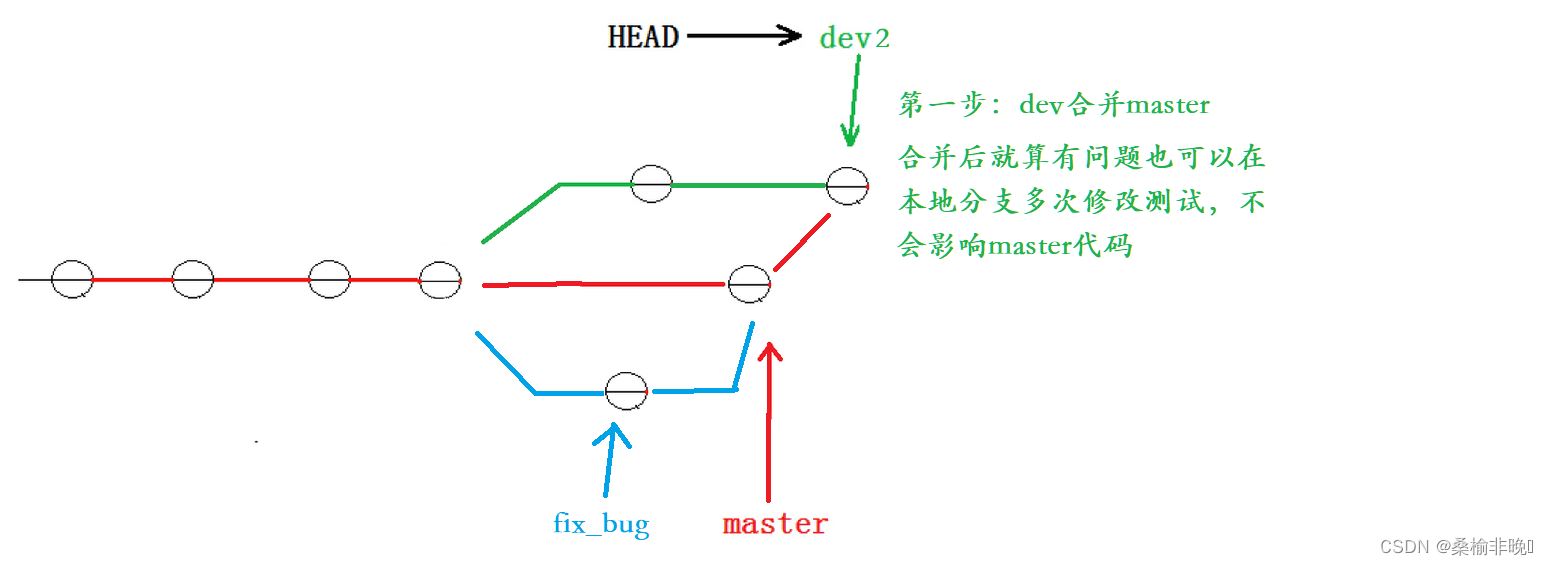
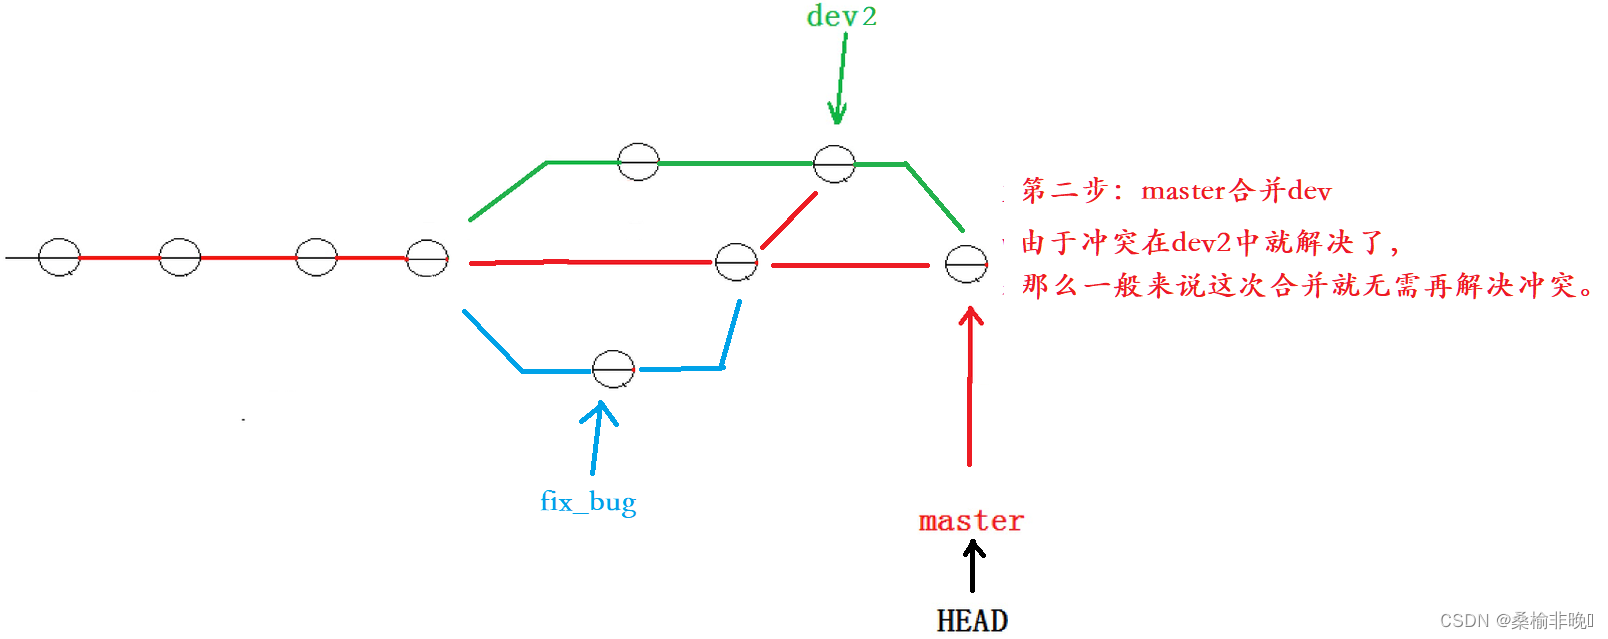
解决这个问题的⼀个好的建议就是:最好在⾃⼰的分⽀上合并下 master ,再让 master 去合并dev ,这样做的⽬的是有冲突可以在本地分⽀解决并进⾏测试,⽽不影响 master 。
此时的状态为:
对应的实操演⽰如下,要说明的是,以下演⽰的merge操作,没有使⽤ –no-ff ,但上述的图示是禁⽤ Fast forward 了模式后得出的,主要是为了⽅便解释问题。[lk@VM-8-15-centos gitcode]$ git branch * dev2 master # dev2合并master[lk@VM-8-15-centos gitcode]$ git merge master Auto-merging ReadMe CONFLICT (content): Merge conflict in ReadMe Automatic merge failed; fix conflicts and then commit the result. # 合并时发生冲突[lk@VM-8-15-centos gitcode]$ cat ReadMe hello git hello world hello bit hello version1 hello version2 hello version3 write bbb for new branch <<<<<<< HEAD fortest --no-ff I am coding... done=======fortest --no-ff fix bug >>>>>>> master # 解决冲突[lk@VM-8-15-centos gitcode]$ vim ReadMe [lk@VM-8-15-centos gitcode]$ cat ReadMe hello git hello world hello bit hello version1 hello version2 hello version3 write bbb for new branch fortest --no-ff fix bug I am coding... done# 重新提交[lk@VM-8-15-centos gitcode]$ gitadd.[lk@VM-8-15-centos gitcode]$ git commit -m "merge master"[dev2 1cd9096] merge master [lk@VM-8-15-centos gitcode]$ git status # On branch dev2 nothing to commit, working directory clean # 切回master[lk@VM-8-15-centos gitcode]$ git checkout master Switched to branch 'master'# master合并 dev2 无需解决冲突[lk@VM-8-15-centos gitcode]$ git merge dev2 Updating ae6df02..1cd9096 Fast-forward ReadMe |1 + 1file changed, 1 insertion(+)[lk@VM-8-15-centos gitcode]$ git status # On branch master nothing to commit, working directory clean # 删除dev2分支[lk@VM-8-15-centos gitcode]$ git branch -d dev2 Deleted branch dev2 (was 1cd9096). [lk@VM-8-15-centos gitcode]$
2.8.3 删除临时分支
软件开发中,总有⽆穷⽆尽的新的功能要不断添加进来。 添加⼀个新功能时,你肯定不希望因为⼀些实验性质的代码,把主分⽀搞乱了,所以,每添加⼀个新功能,最好新建⼀个分⽀,我们可以将其称之为feature分⽀,在上⾯开发,完成后,合并,最 后,删除feature 分⽀。
可是,如果我们今天正在某个 feature 分⽀上开发了⼀半,被产品经理突然叫停,说是要停⽌新功 能的开发。虽然⽩⼲了,但是这个 feature 分⽀还是必须就地销毁,留着⽆⽤了。这时使⽤传统 的 git branch -d 命令删除分⽀的⽅法是不⾏的。演示如下:# 创建并切换分支到 dev3[lk@VM-8-15-centos gitcode]$ git checkout -b dev3 Switched to a new branch 'dev3'# 开始开发新功能并提交[lk@VM-8-15-centos gitcode]$ vim ReadMe [lk@VM-8-15-centos gitcode]$ cat ReadMe hello git hello world hello bit hello version1 hello version2 hello version3 write bbb for new branch fortest --no-ff fix bug I am coding... done i am writing new features ... [lk@VM-8-15-centos gitcode]$ gitadd.[lk@VM-8-15-centos gitcode]$ git commit -m "modify ReadMe dev3"[dev3 e419541] modify ReadMe dev3 1file changed, 1 insertion(+)# 此时,新功能叫停# 切换会master分支准备删除dev3分支[lk@VM-8-15-centos gitcode]$ git checkout master Switched to branch 'master'# 常规删除dev3分支失败[lk@VM-8-15-centos gitcode]$ git branch -d dev3 error: The branch 'dev3' is not fully merged. If you are sure you want to delete it, run 'git branch -D dev3'.直接使⽤传统的删除分⽀的⽅法不⾏,按照提示,有了如下⽅式:
[lk@VM-8-15-centos gitcode]$ git branch -D dev3
Deleted branch dev3 (was e419541).
[lk@VM-8-15-centos gitcode]$ git branch
* master
[lk@VM-8-15-centos gitcode]$
2.8.4 分支小结
分⽀在实际中有什么⽤呢?假设你准备开发⼀个新功能,但是需要两周才能完成,第⼀周你写了50%的代码,如果⽴刻提交,由于代码还没写完,不完整的代码库会导致别⼈不能⼲活了。如果等代码全部写完再⼀次提交,⼜存在丢失每天进度的巨⼤⻛险。
现在有了分⽀,就不⽤怕了。你创建了⼀个属于你⾃⼰的分⽀,别⼈看不到,还继续在原来的分⽀上正常⼯作,⽽你在⾃⼰的分⽀上⼲活,想提交就提交,直到开发完毕后,再⼀次性合并到原来的分⽀上,这样,既安全,⼜不影响别⼈⼯作。
并且Git无论创建、切换和删除分⽀,Git在1秒钟之内就能完成!⽆论你的版本库是1个⽂件还是1万个⽂件。
三、Git的远程操作
3.1 理解分布式版本控制系统
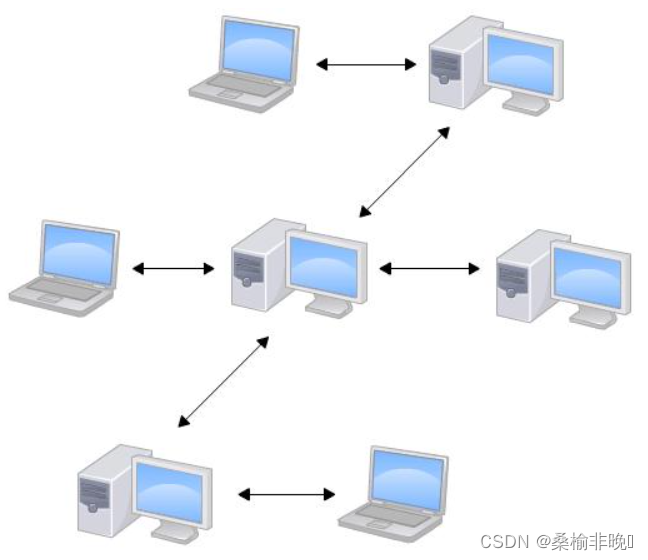
我们⽬前所说的所有内容(⼯作区,暂存区,版本库等等),都是在本地!也就是在你的笔记本或者计算机上。⽽我们的Git其实是分布式版本控制系统!什么意思呢??可以简单理解为,我们每个⼈的电脑上都是⼀个完整的版本库,这样你⼯作的时候,就不需要联网了,因为版本库就在你⾃⼰的电脑上。既然每个⼈电脑上都有⼀个完整的版本库,那多个⼈如何协作呢?⽐⽅说你在⾃⼰电脑上改了⽂件A,你的同事也在他的电脑上改了⽂件A,这时,你们俩之间只需把各⾃的修改推送给对⽅,就可以互相看到对⽅的修改了。
分布式版本控制系统的安全性要⾼很多,因为每个⼈电脑⾥都有完整的版本库,某⼀个⼈的电脑坏掉了不要紧,随便从其他⼈那⾥复制⼀个就可以了。在实际使⽤分布式版本控制系统的时候,其实很少在两⼈之间的电脑上推送版本库的修改,因为可能你们俩不在⼀个局域⽹内,两台电脑互相访问不了。也可能今天你的同事病了,他的电脑压根没有开机。因此,分布式版本控制系统通常也有⼀台充当“中央服务器”的电脑,但这个服务器的作⽤仅仅是⽤来⽅便“交换”⼤家的修改,没有它⼤家也⼀样⼲活,只是交换修改不⽅便⽽已。有了这个“中央服务器”的电脑,这样就不怕本地出现什么故障了(⽐如运⽓差,硬盘坏了,上⾯的所有东西全部丢失,包括git的所有内容) 。
3.2 远程仓库
Git是分布式版本控制系统,同⼀个Git仓库,可以分布到不同的机器上。怎么分布呢?最早,肯定只有⼀台机器有⼀个原始版本库,此后,别的机器可以“克隆”这个原始版本库,⽽且每台机器的版本库其实都是⼀样的,并没有主次之分。
你肯定会想,⾄少需要两台机器才能玩远程库不是?但是我只有⼀台电脑,怎么玩?其实⼀台电脑上也是可以克隆多个版本库的,只要不在同⼀个⽬录下。不过,现实⽣活中是不会有⼈这么傻的在⼀台电脑上搞⼏个远程库玩,因为⼀台电脑上搞⼏个远程库完全没有意义,⽽且硬盘挂了会导致所有库都挂掉,所以我也不告诉你在⼀台电脑上怎么克隆多个仓库。
实际情况往往是这样,找⼀台电脑充当服务器的⻆⾊,每天24⼩时开机,其他每个⼈都从这个“服务器”仓库克隆⼀份到⾃⼰的电脑上,并且各⾃把各⾃的提交推送到服务器仓库⾥,也从服务器仓库中拉取别⼈的提交。
完全可以⾃⼰搭建⼀台运⾏Git的服务器,不过现阶段,为了学Git先搭个服务器绝对是⼩题⼤作。好在这个世界上有个叫GitHub的神奇的⽹站,从名字就可以看出,这个⽹站就是提供Git仓库托管服务
的,所以,只要注册⼀个GitHub账号,就可以免费获得Git远程仓库。
github是国外的⽹站,速度⽐较慢,我们课堂上同统⼀采⽤码云来托管代码。下来,我们从零开始,使⽤⼀下码云远程仓库。
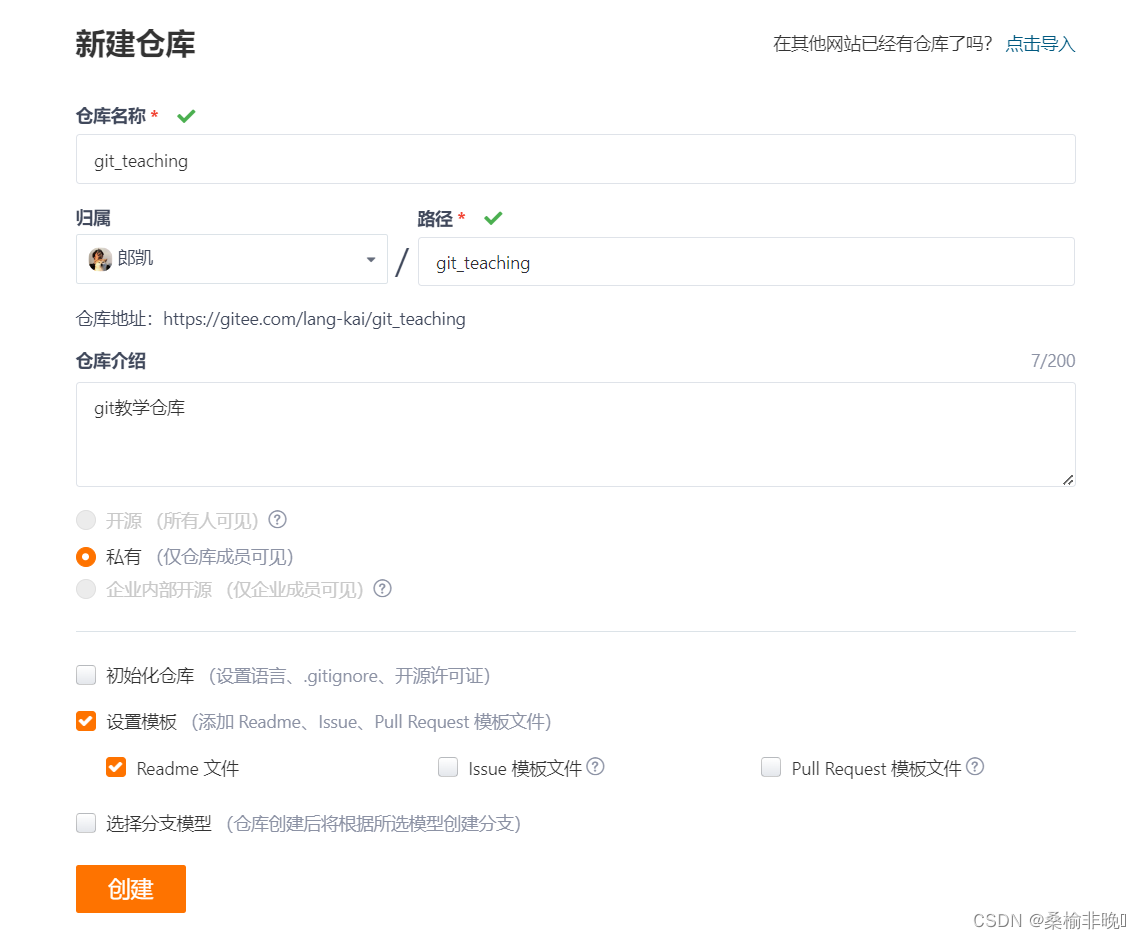
3.3 新建远程仓库
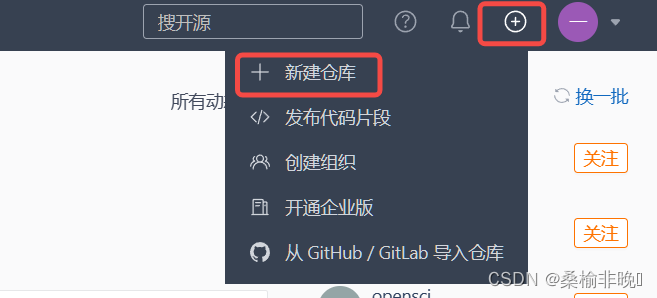
新建远程项⽬仓库:
填写基本信息
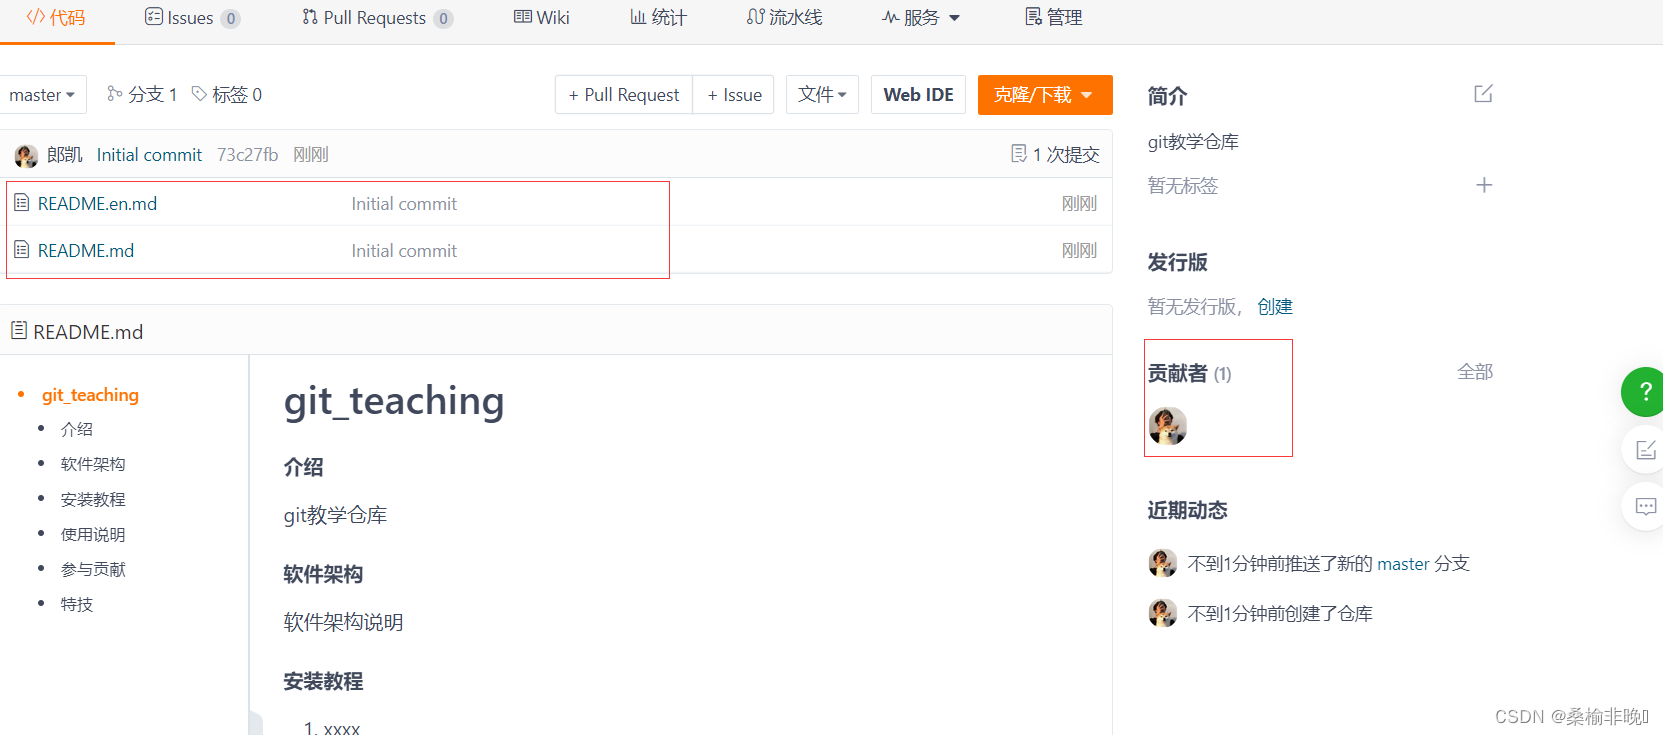
创建成功
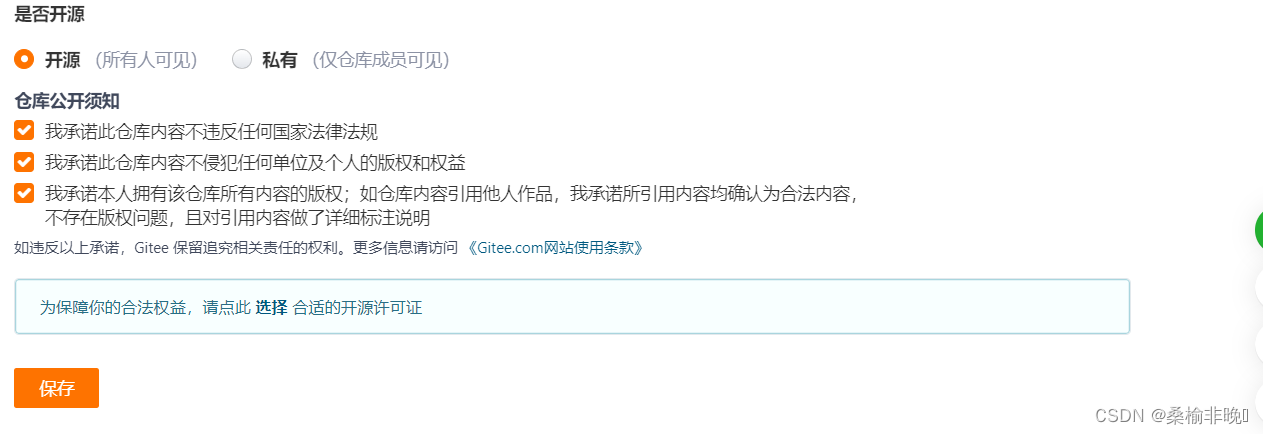
创建成功后,我们可以对远程仓库进⾏⼀个基本的设置:开源or私有
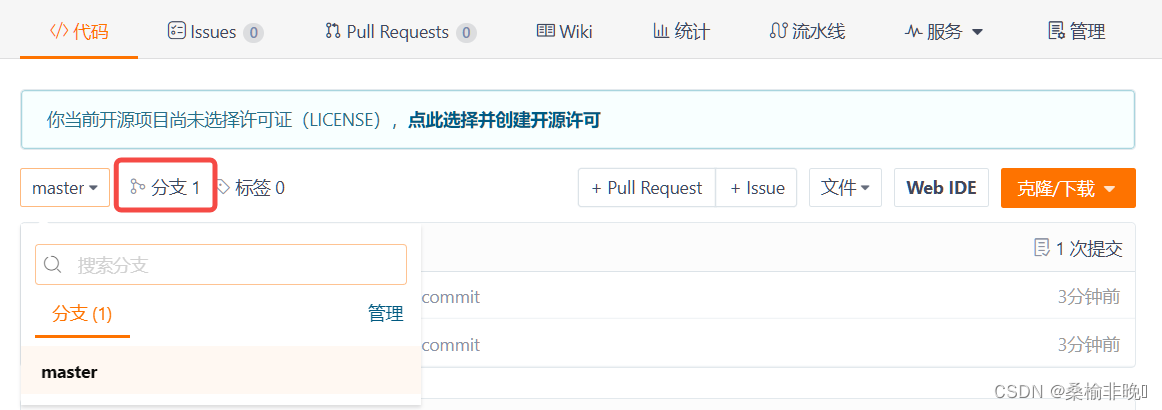
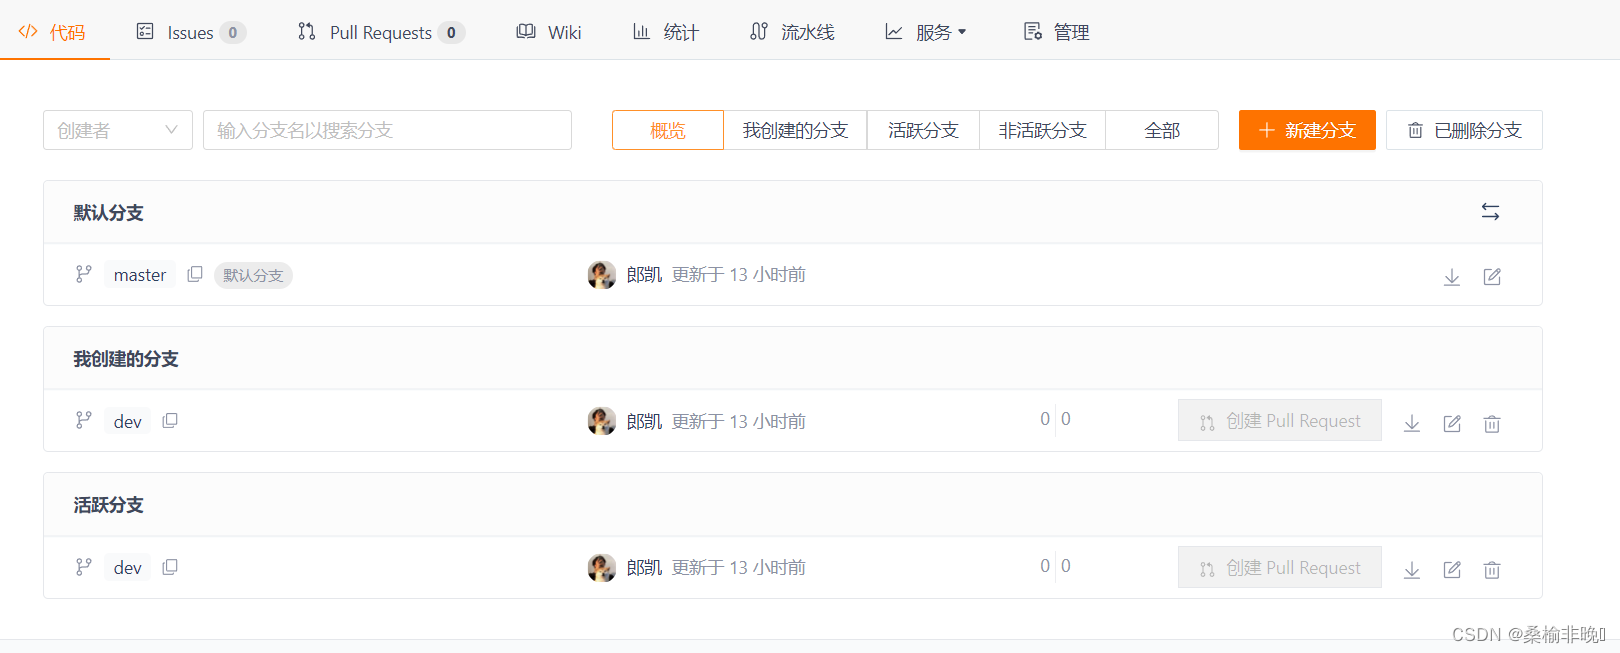
从创建好的远程仓库中我们便能看到,之前在本地学习过的分⽀,也存在于远程仓库中并被管理起来了。刚创建的仓库有且只有⼀个默认的master分⽀。
3.4 克隆远程仓库
克隆/下载远端仓库到本地,需要使⽤
git clone命令,后⾯跟上我们的远端仓库的链接,远端仓库的链接可以从仓库中找到:选择“克隆/下载”获取远程仓库链接:
SSH协议和HTTPS协议是Git最常使⽤的两种数据传输协议。SSH协议使⽤了公钥加密和公钥登陆机制,体现了其实⽤性和安全性,使⽤此协议需要将我们的公钥放上服务器,由Git服务器进⾏管理。使⽤HTTPS⽅式时,没有要求,可以直接克隆下来。
- 使⽤HTTPS⽅式:
[lk@VM-8-15-centos ~]$ git clone https://gitee.com/lang-kai/git_teaching.git
Cloning into 'git_teaching'...\
remote: Enumerating objects: 4, done.
remote: Counting objects: 100% (4/4), done.
remote: Compressing objects: 100% (4/4), done.
remote: Total 4(delta 0), reused 0(delta 0), pack-reused 0
Unpacking objects: 100% (4/4), done.
[lk@VM-8-15-centos ~]$ ls
c-plus-plus  gitcode  git_teaching  practice  project  temp
thirdpart  threadpool.gz
[lk@VM-8-15-centos ~]$ ls ./git_teaching/
README.en.md  README.md
[lk@VM-8-15-centos ~]$
[lk@VM-8-15-centos ~]$ cd git_teaching/
# 设置配置[lk@VM-8-15-centos git_teaching]$ git config --global user.name "lang-kai"[lk@VM-8-15-centos git_teaching]$ git config --global user.email "[email protected]"[lk@VM-8-15-centos git_teaching]$ git config -l
[email protected]
user.name=lang-kai
push.default=matching
core.repositoryformatversion=0
core.filemode=true
core.bare=false
core.logallrefupdates=true
remote.origin.url=https://gitee.com/lang-kai/git_teaching.git
remote.origin.fetch=+refs/heads/*:refs/remotes/origin/*
branch.master.remote=origin
branch.master.merge=refs/heads/master
[lk@VM-8-15-centos git_teaching]$
- 使⽤SSH⽅式:
[lk@VM-8-15-centos ~]$ rm git_teaching/ -rf [lk@VM-8-15-centos ~]$ git clone [email protected]:lang-kai/git_teaching.git Cloning into 'git_teaching'... The authenticity of host'gitee.com (182.255.33.134)' can't be established. ECDSA key fingerprint is SHA256:FQGC9Kn/eye1W8icdBgrQp+KkGYoFgbVr17bmjey0Wc. ECDSA key fingerprint is MD5:27:e5:d3:f7:2a:9e:eb:6c:93:cd:1f:c1:47:a3:54:b1. Are you sure you want to continue connecting (yes/no)? yes Warning: Permanently added 'gitee.com,182.255.33.134' (ECDSA) to the list of known hosts. Permission denied (publickey). fatal: Could not read from remote repository. Please make sure you have the correct access rights and the repository exists. [lk@VM-8-15-centos ~]$使⽤SSH⽅式克隆仓库,由于我们没有添加公钥到远端库中,服务器拒绝了我们的clone链接。需要我们设置⼀下:
第⼀步:创建SSH Key。在⽤用户⽬录下,看看有没有.ssh⽬录,如果有,再看看这个⽬录下有没有id_rsa 和 id_rsa.pub 这两个⽂件,如果已经有了,可直接跳到下⼀步。如果没有,需要创建SSH Key:[lk@VM-8-15-centos ~]$ ls -a . .bashrc .dotnet .LfCache practice threadpool.gz .vimrc.bak_0331 .. .cache gitcode .local project .vim .vscode-server .bash_history .config .gitconfig .mysql_history .ssh .VimForCpp .ycm_extra_conf.py .bash_logout c-plus-plus .git-credentials .orca_term temp .viminfo .bash_profile .cquery .lesshst .pki thirdpart .vimrc # 注意要输⼊⾃⼰的邮箱,然后⼀路回⻋,使⽤默认值即可[lk@VM-8-15-centos ~]$ ssh-keygen -t rsa -C "[email protected]" Generating public/private rsa key pair. Enter fileinwhich to save the key (/home/lk/.ssh/id_rsa): Enter passphrase (empty for no passphrase): Enter same passphrase again: Your identification has been saved in /home/lk/.ssh/id_rsa. Your public key has been saved in /home/lk/.ssh/id_rsa.pub. The key fingerprint is: SHA256:3sX7ulQ6JxMDVt221B1yAw2IEdfwCcE05EytyAxyCnc [email protected] The key's randomart image is: +---[RSA 2048]----+ |oBXB=+=+||. o E .=++o=o*|| o = + +o.o...||.= + .|| S =.||... * ||.. B .||. * || oo. | +----[SHA256]-----+ [lk@VM-8-15-centos ~]$ ls -a .ssh/ ... id_rsa id_rsa.pub known_hosts [lk@VM-8-15-centos ~]$顺利的话,可以在⽤⼾主⽬录⾥找到 .ssh ⽬录,⾥⾯有 id_rsa 和 id_rsa.pub 两个⽂件,这两个就是SSH Key的秘钥对, id_rsa 是私钥,不能泄露出去, id_rsa.pub 是公钥,可以放⼼地告诉任何⼈。
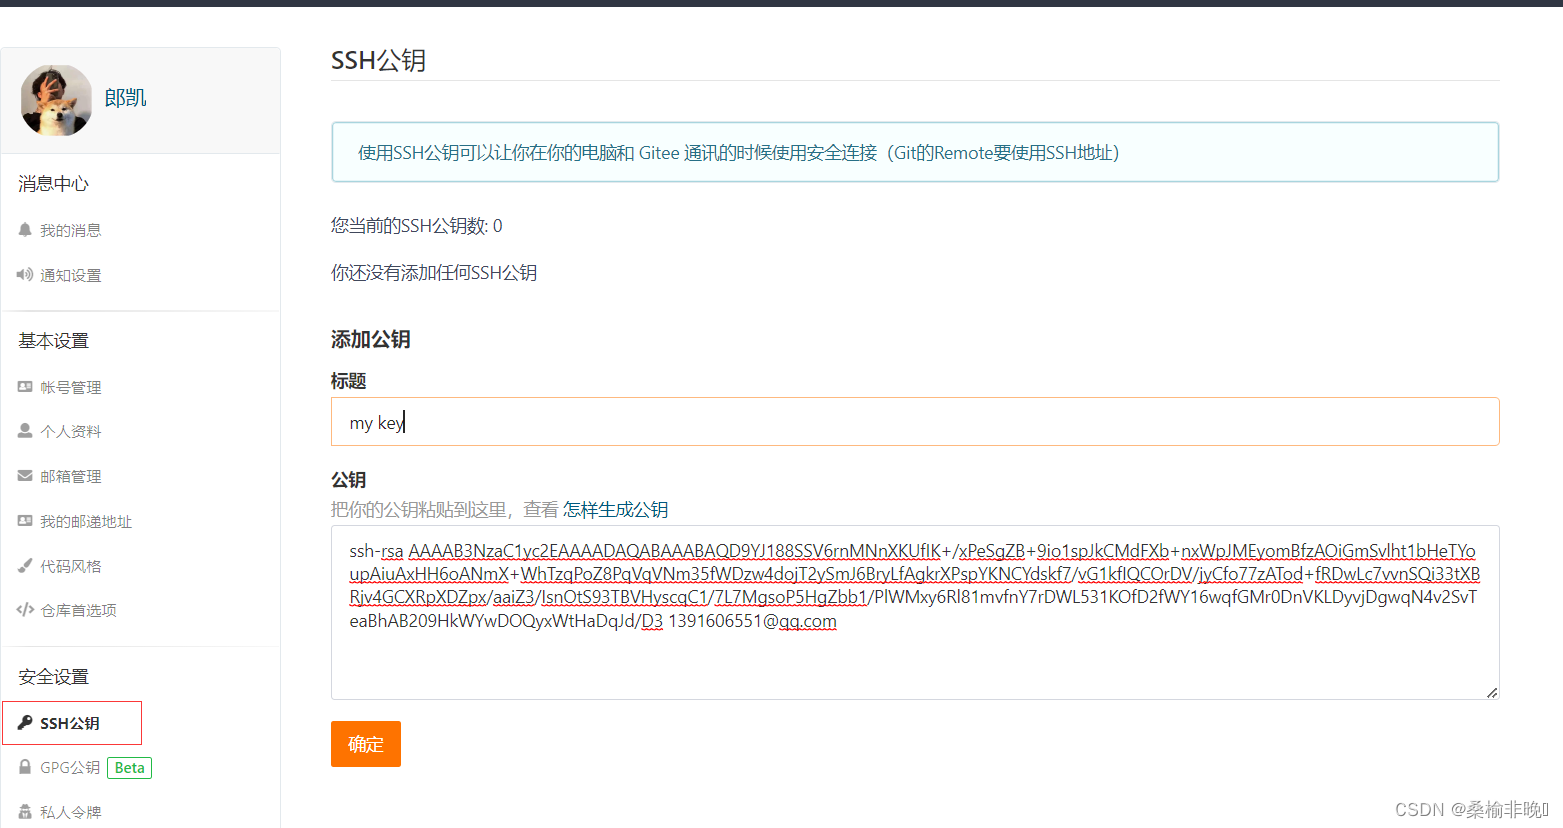
第⼆步:添加⾃⼰的公钥到远端仓库。
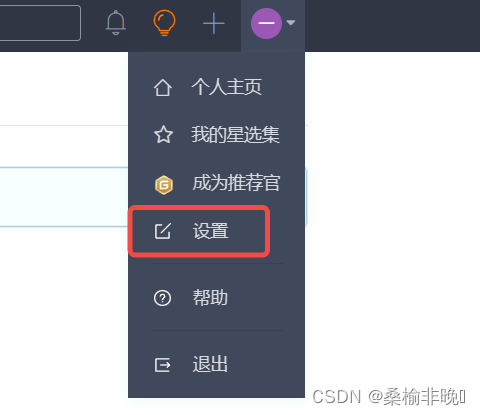
点击确认后,需要对你进⾏认证,输⼊你的账号密码即可。⾄此,我们的准备⼯作全部做完,欢快的clone吧。[lk@VM-8-15-centos ~]$ git clone [email protected]:lang-kai/git_teaching.git Cloning into 'git_teaching'... Warning: Permanently added the ECDSA host key for IP address '212.64.63.190' to the list of known hosts. remote: Enumerating objects: 8, done. remote: Counting objects: 100% (8/8), done. remote: Compressing objects: 100% (7/7), done. remote: Total 8(delta 1), reused 0(delta 0), pack-reused 0 Receiving objects: 100% (8/8), done. Resolving deltas: 100% (1/1), done. [lk@VM-8-15-centos ~]$ ls c-plus-plus gitcode git_teaching practice project temp thirdpart threadpool.gz [lk@VM-8-15-centos ~]$ ls git_teaching/ README.en.md README.md # 查看配置[lk@VM-8-15-centos ~]$ cd git_teaching/ [lk@VM-8-15-centos git_teaching]$ git config -l [email protected] user.name=lang-kai push.default=matching core.repositoryformatversion=0 core.filemode=true core.bare=false core.logallrefupdates=true [email protected]:lang-kai/git_teaching.git remote.origin.fetch=+refs/heads/*:refs/remotes/origin/* branch.master.remote=origin branch.master.merge=refs/heads/master [lk@VM-8-15-centos git_teaching]$成功后!如果有多个⼈协作开发,GitHub/Gitee允许添加多个公钥,只要把每个⼈的电脑上的Key都添加到GitHub/Gitee,就可以在每台电脑上往GitHub/Gitee上提交推送了。
当我们从远程仓库克隆后,实际上Git会⾃动把本地的master分⽀和远程的master分⽀对应起来。并且,远程仓库的默认名称是origin 。在本地我们可以使⽤ git remote 命令,来查看远程库的信息,如:[lk@VM-8-15-centos git_teaching]$ git remote \ origin或者,用
git remote -v显示更详细的信息
[lk@VM-8-15-centos git_teaching]$ git remote -v
origin    [email protected]:lang-kai/git_teaching.git (fetch)
origin    [email protected]:lang-kai/git_teaching.git (push)
上⾯显⽰了可以抓取和推送的origin的地址。如果没有推送权限,就看不到?push?的地址。推送是什么意思呢?我们继续往下看。
3.5 向远程仓库推送
本地已经 clone 成功远程仓库后,我们便可以向仓库中提交内容,例如新增⼀个 file.txt ⽂件:
# 新建文件[lk@VM-8-15-centos git_teaching]$ touch file.txt [lk@VM-8-15-centos git_teaching]$ vim file.txt [lk@VM-8-15-centos git_teaching]$ cat file.txt hello git# 提交文件[lk@VM-8-15-centos git_teaching]$ gitadd.[lk@VM-8-15-centos git_teaching]$ git commit -m "create file.txt"[master f72e38b] create file.txt 1file changed, 1 insertion(+) create mode 100644 file.txt [lk@VM-8-15-centos git_teaching]$ git status # On branch master# Your branch is ahead of 'origin/master' by 1 commit.# (use "git push" to publish your local commits)# nothing to commit, working directory clean [lk@VM-8-15-centos git_teaching]$提交时要注意,如果我们之前设置过全局的?name?和?e-mail,这两项配置需要和?gitee?上配置的用户名和邮箱⼀致,否则会出错。或者从来没有设置过全局的name和e-mail,那么我们第⼀次提交时也会报错。这就需要我们重新配置下了,同样要注意需要和gitee上配置的⽤户名和邮箱⼀致。如何配置已讲过,在这⾥就不再赘述。
到这⾥我们已经将内容提交⾄本地仓库中,如何将本地仓库的内容推送⾄远程仓库呢,需要使⽤ git push 命令,该命令⽤于将本地的分⽀版本上传到远程并合并,命令格式如下:git push <远程主机名><本地分⽀名>:<远程分⽀名># 如果本地分⽀名与远程分⽀名相同,则可以省略冒号:git push <远程主机名><本地分⽀名>此时我们要将本地的master分⽀推送到origin主机的master分⽀,则可以
[lk@VM-8-15-centos git_teaching]$ git push origin master:master Warning: Permanently added the ECDSA host key for IP address '212.64.63.215' to the list of known hosts. Counting objects: 4, done. Delta compression using up to 2 threads. Compressing objects: 100% (2/2), done. Writing objects: 100% (3/3), 312 bytes |0 bytes/s, done.\ Total 3(delta 0), reused 0(delta 0)\ remote: Powered by GITEE.COM [GNK-6.4]\ To [email protected]:lang-kai/git_teaching.git f3fc572..f72e38b master -> master [lk@VM-8-15-centos git_teaching]$推送成功!这⾥由于我们使⽤的是SSH协议,是不⽤每⼀次推送都输⼊密码的,⽅便了我们的推送操作。如果你使⽤的是HTTPS协议,有个麻烦地⽅就是每次推送都必须输⼊⼝令。
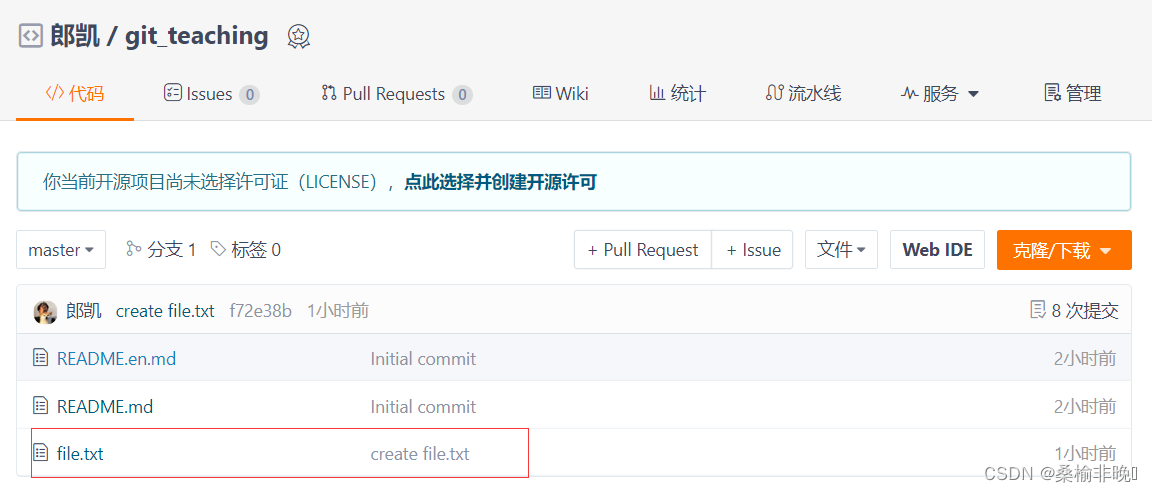
接下来,看看码云远端:
代码已经被推送⾄远端了:
3.6 拉去远程仓库
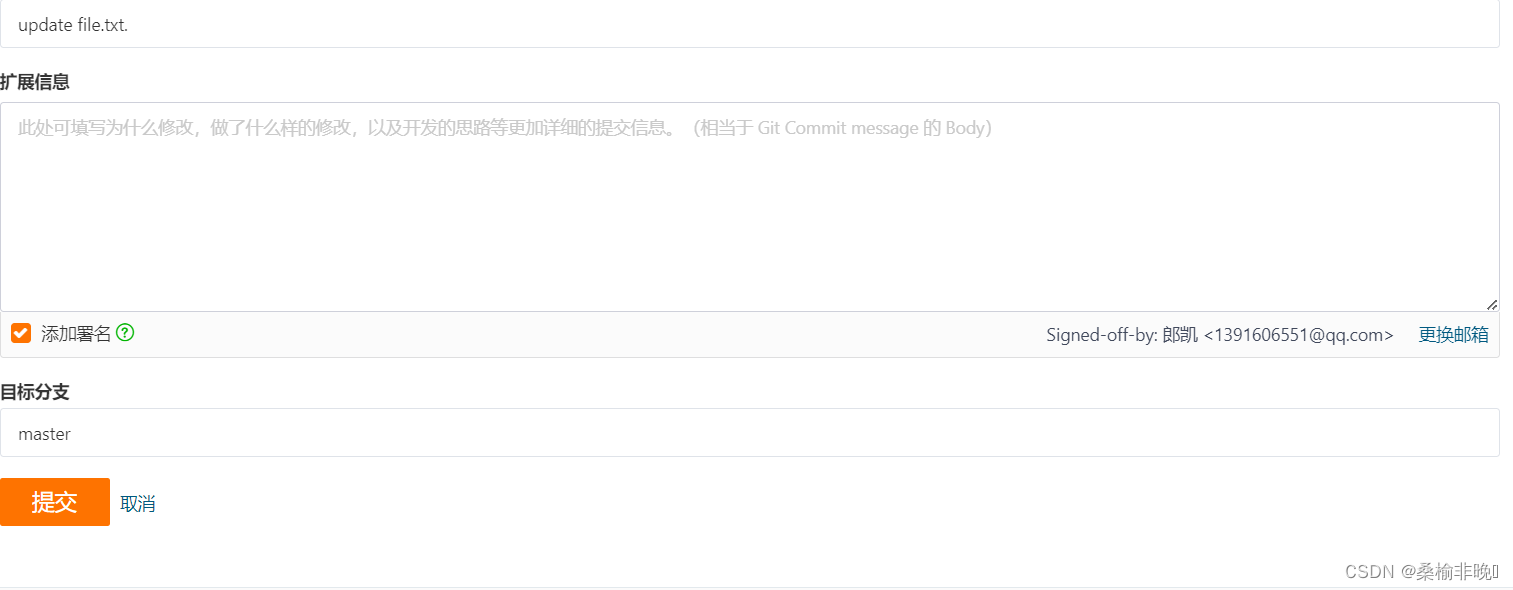
在gitee上点击file.txt⽂件并在线修改它:
此时,远程仓库是要领先于本地仓库⼀个版本,为了使本地仓库保持最新的版本,我们需要拉取下远端代码,并合并到本地。Git提供了 git pull 命令,该命令⽤于从远程获取代码并合并本地的版本。格式如下:git pull <远程主机名><远程分⽀名>:<本地分⽀名># 如果远程分⽀是与当前分⽀合并,则冒号后⾯的部分可以省略。git pull <远程主机名><远程分⽀名>使⽤⼀下:
[lk@VM-8-15-centos git_teaching]$ git pull origin master:master
remote: Enumerating objects: 5, done.
remote: Counting objects: 100% (5/5), done.
remote: Compressing objects: 100% (2/2), done.
remote: Total 3(delta 1), reused 0(delta 0), pack-reused 0
Unpacking objects: 100% (3/3), done.
From gitee.com:lang-kai/git_teaching
   f72e38b..eb501af  master     -> master
Warning: fetch updated the current branch head.
Warning: fast-forwarding your working tree from
Warning: commit f72e38bf236a9744d3a125ed29417bb5c709073c.
Already up-to-date.
[lk@VM-8-15-centos git_teaching]$ cat file.txt
hello git
第一处修改内容
[lk@VM-8-15-centos git_teaching]$
我们发现,拉取成功了!
四、配置Git
4.1 忽略特殊⽂件
在⽇常开发中,我们有些⽂件不想或者不应该提交到远端,⽐如保存了数据库密码的配置⽂件,那怎么让Git知道呢?在Git⼯作区的根⽬录下创建⼀个特殊的 .gitignore ⽂件,然后把要忽略的⽂件名填进去,Git就会⾃动忽略这些⽂件了。
不需要从头写 .gitignore ⽂件,gitee在创建仓库时就可以为我们⽣成,不过需要我们主动勾选⼀下:
如果当时没有选择这个选择,在⼯作区创建⼀个也是可以的。⽆论哪种⽅式,最终都可以得到⼀个完整的 .gitignore ⽂件,例如我们想忽略以 .so和 .ini 结尾所有⽂件, .gitignore 的内容如下:[lk@VM-8-15-centos git_teaching]$ touch .gitignore [lk@VM-8-15-centos git_teaching]$ vim .gitignore [lk@VM-8-15-centos git_teaching]$ vim .gitignore [lk@VM-8-15-centos git_teaching]$ cat .gitignore # My configurations: *.ini *.so [lk@VM-8-15-centos git_teaching]$ gitadd.[lk@VM-8-15-centos git_teaching]$ git commit -m "add .gitignore"[master 0891f0f]add .gitignore 1file changed, 3 insertions(+) create mode 100644 .gitignore [lk@VM-8-15-centos git_teaching]$ git push origin master:master Counting objects: 4, done. Delta compression using up to 2 threads. Compressing objects: 100% (2/2), done. Writing objects: 100% (3/3), 364 bytes |0 bytes/s, done. Total 3(delta 0), reused 0(delta 0) remote: Powered by GITEE.COM [GNK-6.4] To [email protected]:lang-kai/git_teaching.git eb501af..0891f0f master -> master [lk@VM-8-15-centos git_teaching]$接着我们就来验证⼀下.gitignore⽂件的能⼒,在⼯作区新增两个⽂件 a.so、 b.ini :
[lk@VM-8-15-centos git_teaching]$ touch a.so b.ini
[lk@VM-8-15-centos git_teaching]$ git status
# On branch master
nothing to commit, working directory clean
[lk@VM-8-15-centos git_teaching]$
检验 .gitignore 的标准就是 git status 命令是不是说 working tree clean 。我们发现
Git并没有提⽰在⼯作区中有⽂件新增,果然 .gitignore ⽣效了!但有些时候,你就是想添加⼀个⽂件到Git,但由于这个⽂件被 .gitignore 忽略了,根本添加不了,那么可以⽤ -f 强制添加:gitadd -f [filename]或者你发现,可能是 .gitignore 写得有问题,需要找出来到底哪个规则写错了,⽐如说a.s⽂件是要被添加的,可以⽤
git check-ignore命令检查:
[lk@VM-8-15-centos git_teaching]$ git check-ignore -v a.so
.gitignore:3:*.so    a.so
[lk@VM-8-15-centos git_teaching]$
Git会告诉我们, .gitignore 的第3⾏规则忽略了该⽂件,于是我们就可以知道应该修订哪个规则。
还有些时候,当我们编写了规则排除了部分⽂件时,例如:# 排除所有.开头的隐藏⽂件: .*但是我们发现 .* 这个规则把 .gitignore 也排除了。虽然可以⽤ git add -f 强制添加进去,但有强迫症的童鞋还是希望不要破坏 .gitignore 规则,这个时候,可以添加⼀条例外规则:
# 排除所有.开头的隐藏⽂件: .* # 不排除.gitignore!.gitignore把指定⽂件排除在 .gitignore 规则外的写法就是 ! +⽂件名,所以,只需把例外⽂件添加去即可。
实例演示:[lk@VM-8-15-centos git_teaching]$ vim .gitignore [lk@VM-8-15-centos git_teaching]$ gitadd.[lk@VM-8-15-centos git_teaching]$ git commit -m "modify .gitignore"[master 506ef2c] modify .gitignore 1file changed, 2 insertions(+)[lk@VM-8-15-centos git_teaching]$ git push origin master:master Counting objects: 5, done. Delta compression using up to 2 threads. Compressing objects: 100% (2/2), done. Writing objects: 100% (3/3), 383 bytes |0 bytes/s, done. Total 3(delta 0), reused 0(delta 0) remote: Powered by GITEE.COM [GNK-6.4] To [email protected]:lang-kai/git_teaching.git 0891f0f..506ef2c master -> master [lk@VM-8-15-centos git_teaching]$
4.2 给命令配置别名
在我们使⽤Git期间,有些命令敲的时候着实让⼈头疼(太⻓了。。)。幸运的是,git⽀持对命令进⾏简化!
举个例⼦,将git status简化为
git st,对应的命令为:
git config --global alias.st status–global 参数是全局参数,也就是这些命令在这台电脑的所有Git仓库下都有⽤。如果不加,那只针对当前的仓库起作用。
好了,现在敲git st看看效果:
[lk@VM-8-15-centos git_teaching]$ git config --global alias.st status
[lk@VM-8-15-centos git_teaching]$ git st
# On branch master
nothing to commit, working directory clean
[lk@VM-8-15-centos git_teaching]$
再来配置⼀个
git last,让其显⽰最后⼀次提交信息:
git config --global alias.last 'log -1'这样,⽤
git last就能显⽰最近⼀次的提交:
[lk@VM-8-15-centos git_teaching]$ git config --global alias.last 'log -1'[lk@VM-8-15-centos git_teaching]$ git last \
commit 506ef2ca90f88ad5f365663dd3eaaff2f3f817c2
Author: lang-kai <[email protected]>
Date:   Fri Jun 1619:47:11 2023 +0800

   modify .gitignore
[lk@VM-8-15-centos git_teaching]$
不过,我个⼈还是不推荐⼤家现在去使⽤他,等⼤家⼯作了,再去简化⾃⼰的⼯作吧,⽬前所有的命令都要⼿动完成,尽快适应Git。
五、标签管理
5.1 理解标签
标签 tag ,可以简单的理解为是对某次 commit 的⼀个标识,相当于起了⼀个别名。例如,在项⽬发布某个版本的时候,针对最后⼀次 commit 起⼀个 v1.0这样的标签来标识⾥程碑的意义。这有什么⽤呢?相较于难以记住的 commit id , tag 很好的解决这个问题,因为 tag ⼀定要给⼀个让⼈容易记住,且有意义的名字。当我们需要回退到某个重要版本时,直接使⽤标签就能很快定位到。
5.2 创建标签
在Git中打标签⾮常简单,⾸先,切换到需要打标签的分⽀上
[lk@VM-8-15-centos git_teaching]$ git branch
* master
[lk@VM-8-15-centos git_teaching]$
然后,敲命令
git tag [name]就可以打⼀个新标签:
[lk@VM-8-15-centos git_teaching]$ git tag v1.0
[lk@VM-8-15-centos git_teaching]$
可以⽤命令
git tag查看所有标签:
[lk@VM-8-15-centos git_teaching]$ git tag
v1.0
[lk@VM-8-15-centos git_teaching]$
默认标签是打在最新提交的 commit 上的。那如何在指定的commit上打标签呢?⽅法是找到历史提交的commit id,然后打上就可以了,实例如下:
# 历史记录[lk@VM-8-15-centos git_teaching]$ git log --pretty=oneline --abbrev-commit
506ef2c modify .gitignore
0891f0f add .gitignore
eb501af update file.txt
f72e38b create file.txt
73c27fb Initial commit
# 对create file.txt 这次提交打标签[lk@VM-8-15-centos git_teaching]$ git tag v0.9 f72e38b
[lk@VM-8-15-centos git_teaching]$ git tag
v0.9
v1.0
[lk@VM-8-15-centos git_teaching]$
注意,标签不是按时间顺序列出,⽽是按字⺟排序的。可以⽤
git show [tagname]查看标签信息。
[lk@VM-8-15-centos git_teaching]$ git show v1.0
commit 506ef2ca90f88ad5f365663dd3eaaff2f3f817c2
Author: lang-kai <[email protected]>
Date:   Fri Jun 1619:47:11 2023 +0800

  modify .gitignore

diff --git a/.gitignore b/.gitignore
index a6d81d6..d8e6bc3 100644
--- a/.gitignore
+++ b/.gitignore
@@ -1,3 +1,5 @@
# My configurations:
*.ini
*.so
+.*
+!.gitignore
[lk@VM-8-15-centos git_teaching]$
Git还提供可以创建带有说明的标签,⽤-a指定标签名,-m指定说明⽂字,格式为:
git tag -a [name] -m "XXX"[commit_id]另外,打完标签之后,使⽤ tree .git 命令查看⼀下你的本地库有什么变化,肯定能帮助你理解!
5.3 操作标签
如果标签打错了,也可以删除:
[lk@VM-8-15-centos git_teaching]$ git tag
v0.9
v1.0
[lk@VM-8-15-centos git_teaching]$ git tag -d v0.9
Deleted tag 'v0.9'(was f72e38b)[lk@VM-8-15-centos git_teaching]$ git tag
v1.0
[lk@VM-8-15-centos git_teaching]$
因为创建的标签都只存储在本地,不会⾃动推送到远程。所以,打错的标签可以在本地安全删除。如果要推送某个标签到远程,使⽤命令
git push origin <tagname>[lk@VM-8-15-centos git_teaching]$ git tag v1.0 [lk@VM-8-15-centos git_teaching]$ git push origin v1.0 Total 0(delta 0), reused 0(delta 0) remote: Powered by GITEE.COM [GNK-6.4] To [email protected]:lang-kai/git_teaching.git * [new tag] v1.0 -> v1.0 [lk@VM-8-15-centos git_teaching]$此时,查看远端码云,看到了标签已经被更新!完美!
当然,如果你本地有很多标签,也可以⼀次性的全部推送到远端:git push origin --tags请同学们自行验证。
如果标签已经推送到远程,要删除远程标签就⿇烦⼀点,先从本地删除:[lk@VM-8-15-centos git_teaching]$ git tag\ v1.0 [lk@VM-8-15-centos git_teaching]$ git tag -d v1.0 Deleted tag 'v1.0'(was 506ef2c)[lk@VM-8-15-centos git_teaching]$然后,从远程删除。删除命令也是push,但是格式如下:
[lk@VM-8-15-centos git_teaching]$ git push origin :refs/tags/v1.0
remote: Powered by GITEE.COM [GNK-6.4]
To [email protected]:lang-kai/git_teaching.git
- [deleted]         v1.0
[lk@VM-8-15-centos git_teaching]$
六、多人协作
6. 1多人协作一
⽬前,我们所完成的⼯作如下:
- 基本完成Git的所有本地库的相关操作,git基本操作,分⽀理解,版本回退,冲突解决等等
- 申请码云账号,将远端信息clone到本地,以及推送和拉取。
是时候⼲最重要的⼀件事情了,实现多⼈协作开发!为了做这件事情,我们需要先做⼀准备⼯作。
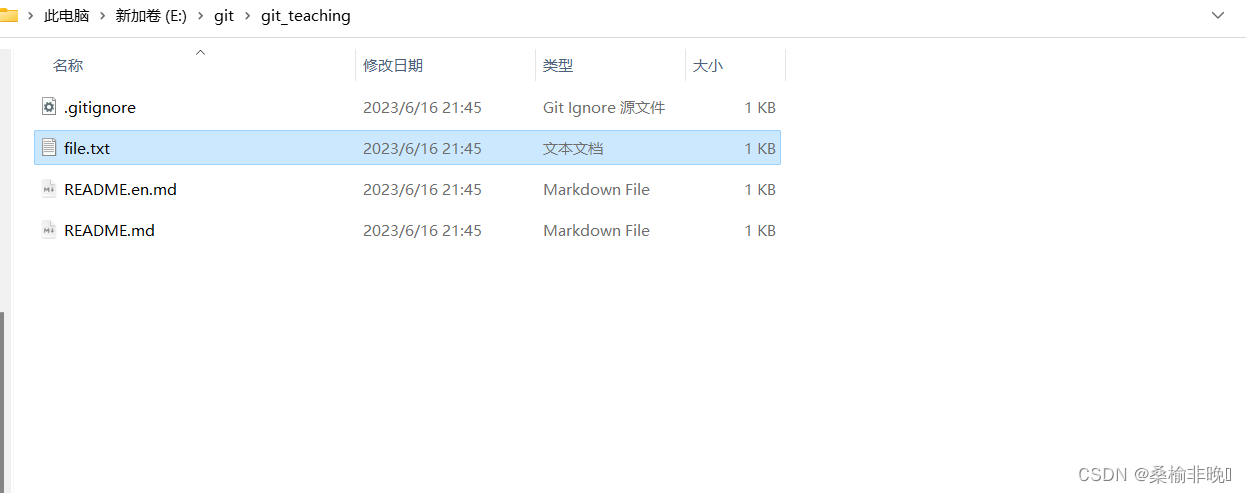
我们之前已经将项⽬clone到了指定⽬录,如:[lk@VM-8-15-centos git_teaching]$ pwd /home/lk/git_teaching [lk@VM-8-15-centos git_teaching]$我们在windows环境下,再clone同⼀个项⽬仓库,来模拟和你⼀起协作开发的另⼀⼩伙伴:
PS E:\git>git clone https://gitee.com/lang-kai/git_teaching.git
Cloning into 'git_teaching'...
remote: Enumerating objects: 24, done.
remote: Counting objects: 100% (24/24), done.
remote: Compressing objects: 100% (19/19), done.
remote: Total 24(delta 6), reused 0(delta 0), pack-reused 0
Receiving objects: 100% (24/24), 6.39 KiB |3.19 MiB/s, done.
Resolving deltas: 100% (6/6), done.
PS E:\git>
Clone成功
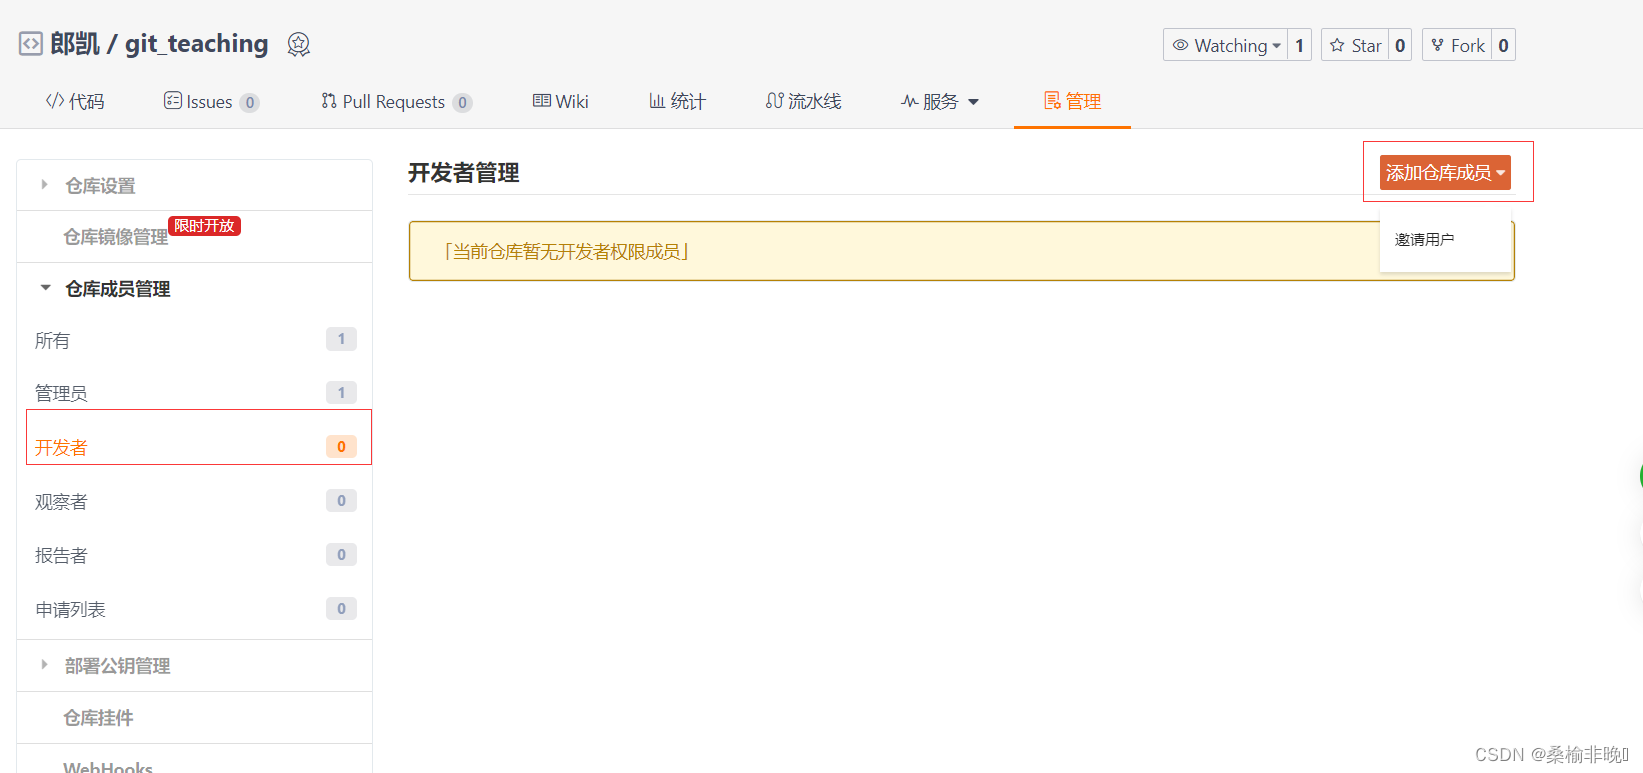
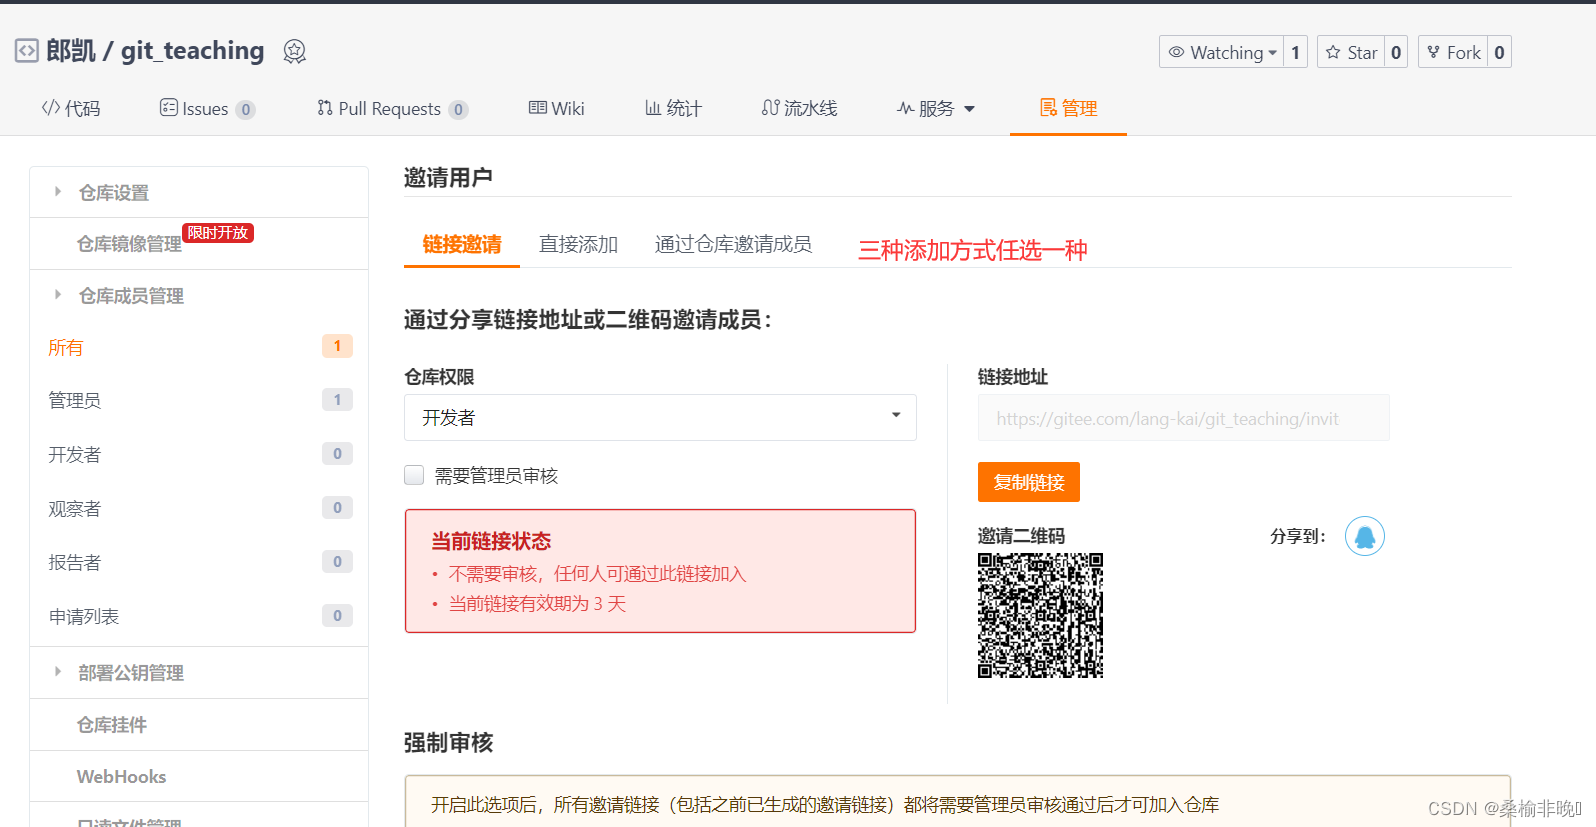
注意,这里中是模拟了两个用户,实际开发中,每个用户都有⾃⼰的gitee/github账号,如果要多⼈进⾏协同开发,必须要将用户添加进开发者,用户才有权限进⾏代码提交:
邀请⽤⼾:
到此,相当于有了两个用户,分别在linux和windows上针对于同项⽬进⾏协作开发,我们的准备⼯作到此结束。
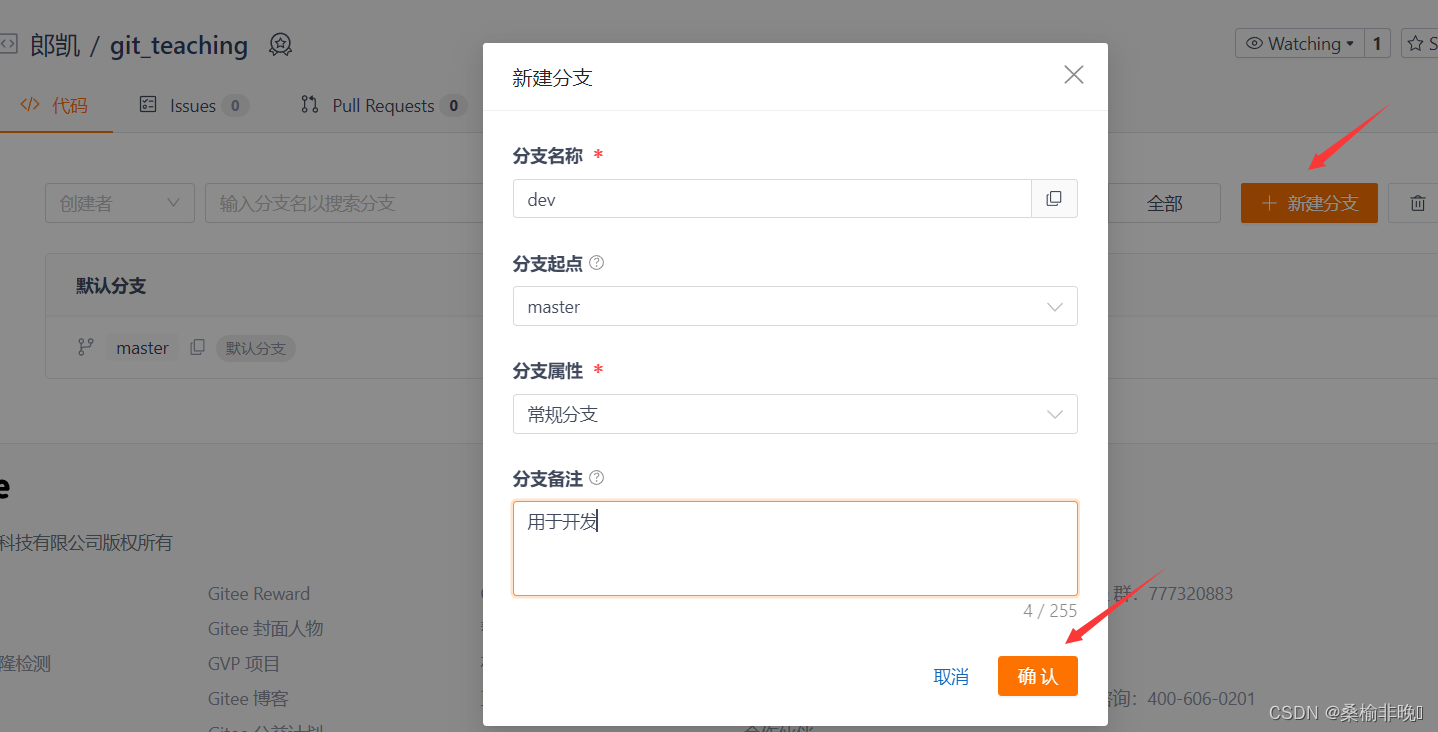
⽬前,我们的仓库中只有⼀个master主分⽀,但在实际的项⽬开发中,在任何情况下其实都是不允许直接在master分⽀上修改代码的,这是为了保证主分⽀的稳定。所以在开发新功能时,常常会新建其他分⽀,供开发时进⾏迭代使⽤。
那么接下来,就让我们在gitee上新建dev远程分⽀供我们使⽤:
创建成功:
创建成功的远程分⽀是可以通过Git拉取到本地来,以实现完成本地开发⼯作。
接下来让我们和另⼀名开发的⼩伙伴都将远程仓库进⾏⼀次拉取操作,并观察结果:[lk@VM-8-15-centos git_teaching]$ git pull From gitee.com:lang-kai/git_teaching * [new branch] dev -> origin/dev Already up-to-date. # 注:之前讲的 git branch 其实只能查看本地分⽀,要查看远程分⽀需要加上-r选项。# 但前提是要pull⼀下拉取最新的远端仓库,才能看到最新的内容。[lk@VM-8-15-centos git_teaching]$ git branch -r origin/HEAD -> origin/master origin/dev origin/master [lk@VM-8-15-centos git_teaching]$ git checkout -b dev origin/dev Branch dev set up to track remote branch dev from origin. Switched to a new branch 'dev'[lk@VM-8-15-centos git_teaching]$拉取后便可以看到远程的dev分⽀,接着切换到dev分⽀供我们进⾏本地开发。要说明的是,我们切换到的是本地的dev分⽀,根据⽰例中的操作,会将本地分⽀和远程分⽀的进⾏关系链接。
对于⼩伙伴要操作的是:PS E:\git\git_teaching>git pull From https://gitee.com/lang-kai/git_teaching * [new branch] dev -> origin/dev Already up to date. PS E:\git\git_teaching>git branch -a * master remotes/origin/HEAD -> origin/master remotes/origin/dev remotes/origin/master PS E:\git\git_teaching>git checkout -b dev Switched to a new branch 'dev' PS E:\git\git_teaching>现在,你和你的⼩伙伴就可以在 dev 上完成开发。
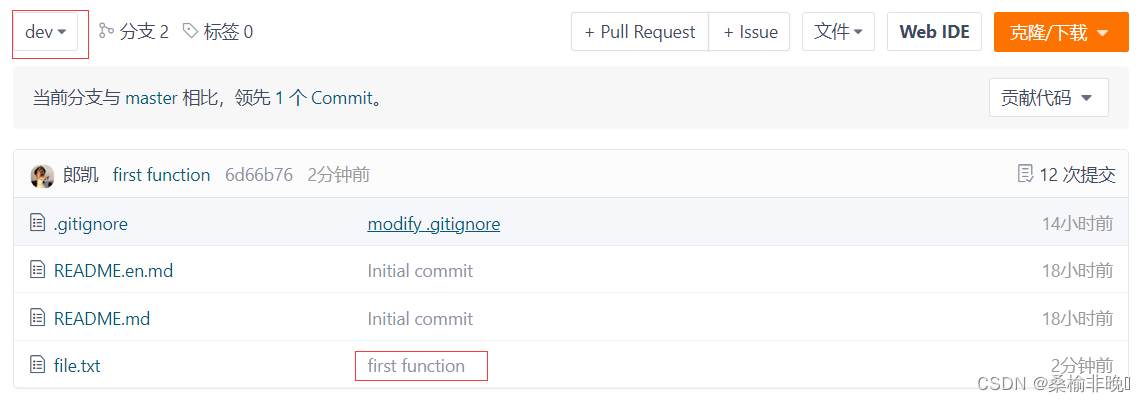
⾸先,让我们在 dev 分⽀上进⾏⼀次开发,并 push 到远程。例如:[lk@VM-8-15-centos git_teaching]$ vim file.txt [lk@VM-8-15-centos git_teaching]$ cat file.txt hello git 第一处修改内容 complete the first function![lk@VM-8-15-centos git_teaching]$ gitadd file.txt [lk@VM-8-15-centos git_teaching]$ git commit -m "first function"[dev 6d66b76] first function1file changed, 2 insertions(+), 1 deletion(-)[lk@VM-8-15-centos git_teaching]$ git push origin dev:dev Counting objects: 5, done. Delta compression using up to 2 threads. Compressing objects: 100% (3/3), done. Writing objects: 100% (3/3), 315 bytes |0 bytes/s, done. Total 3(delta 1), reused 0(delta 0) remote: Powered by GITEE.COM [GNK-6.4] To [email protected]:lang-kai/git_teaching.git 506ef2c..6d66b76 dev -> dev [lk@VM-8-15-centos git_teaching]$让我们来看看码云上⽬前仓库的状态:
⾄此,我们已经将代码成功推送⾄码云,接下来假如你的⼩伙伴要和你协同开发,碰巧也要对file.txt⽂件作修改,并试图推送,例如:PS E:\git\git_teaching>cat .\file.txt hello git 第一处修改内容 complete the second function! PS E:\git\git_teaching>gitadd .\file.txt PS E:\git\git_teaching>git commit -m "second function"[dev c9548f1] second function1file changed, 2 insertions(+), 1 deletion(-) PS E:\git\git_teaching>git push origin dev:dev To https://gitee.com/lang-kai/git_teaching.git ![rejected] dev -> dev (fetch first) error: failed to push some refs to 'https://gitee.com/lang-kai/git_teaching.git' hint: Updates were rejected because the remote contains work that you do hint: not have locally. This is usually caused by another repository pushing hint: to the same ref. You may want to first integrate the remote changes hint: (e.g., 'git pull ...') before pushing again. hint: See the 'Note about fast-forwards'in'git push --help'for details. PS E:\git\git_teaching>这时推送失败,因为你的⼩伙伴的最新提交和你推送的提交有冲突,解决办法也很简单,Git已经提⽰
我们,先⽤ git pull 把最新的提交从 origin/dev 抓下来,然后,在本地进⾏合并,并解决冲
突,再推送。操作如下:# git pull以后发现本地dev分支与远程dev分支没有建立连接 PS E:\git\git_teaching>git pull There is no tracking information for the current branch. Please specify which branch you want to merge with. See git-pull(1)for details. git pull <remote><branch> If you wish to set tracking information for this branch you can do so with: git branch --set-upstream-to=origin/<branch> dev # 验证是否真的没有建立连接 PS E:\git\git_teaching>git branch -vv * dev c9548f1 second function master 506ef2c [origin/master] modify .gitignore # 本地分支dev与远程分支dev建立连接 PS E:\git\git_teaching>git branch --set-upstream-to=origin/dev dev Branch 'dev'set up to track remote branch 'dev' from 'origin'.# 查看是否建立连接 PS E:\git\git_teaching>git branch -vv * dev c9548f1 [origin/dev: ahead 1, behind 1] second function master 506ef2c [origin/master] modify .gitignore # 重新拉去,发现由冲突 PS E:\git\git_teaching>git pull Auto-merging file.txt CONFLICT (content): Merge conflict in file.txt Automatic merge failed; fix conflicts and then commit the result. # 查看冲突 PS E:\git\git_teaching>cat .\file.txt hello git 第一处修改内容 <<<<<<< HEAD complete the second function!======= complete the first function!>>>>>>> 6d66b769ba91ea3271145b9186129ef84685b1af PS E:\git\git_teaching>解决冲突,重新推送:
# 冲突解决
PS E:\git\git_teaching>cat .\file.txt
hello git
第一处修改内容
complete the first function!
complete the second function!# 重新提交
PS E:\git\git_teaching>gitadd .\file.txt
PS E:\git\git_teaching>git commit -m "merge dev"[dev 8652a46] merge dev
PS E:\git\git_teaching>git push origin dev:dev
Enumerating objects: 10, done.
Counting objects: 100% (10/10), done.
Delta compression using up to 16 threads
Compressing objects: 100% (6/6), done.
Writing objects: 100% (6/6), 626 bytes |626.00 KiB/s, done.
Total 6(delta 2), reused 0(delta 0), pack-reused 0
remote: Powered by GITEE.COM [GNK-6.4]
To https://gitee.com/lang-kai/git_teaching.git
  6d66b76..8652a46  dev -> dev
PS E:\git\git_teaching>
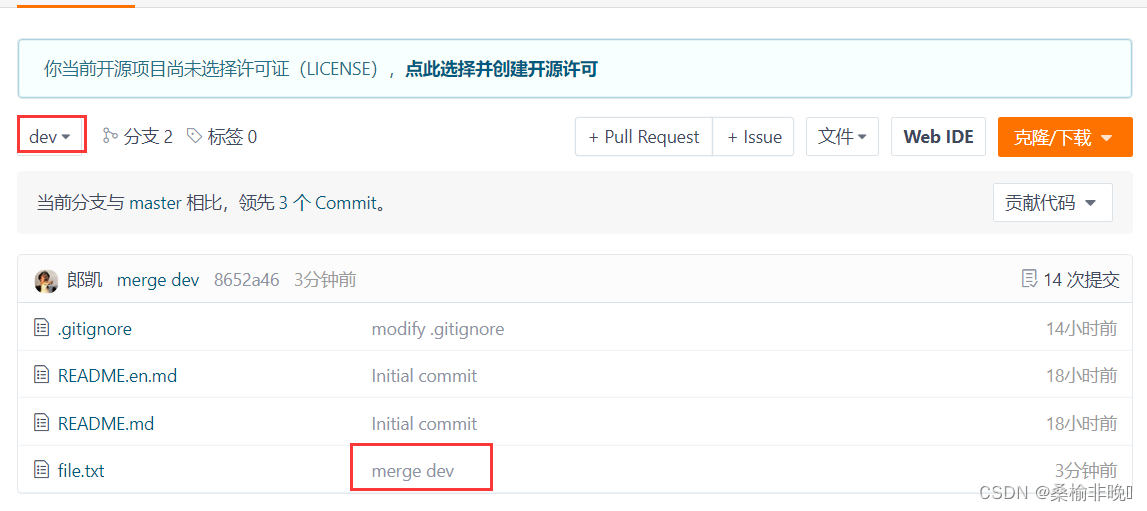
此时,我们看到远端的码云已经能看到我们的新提交了!
由此,两名开发者已经开始可以进⾏协同开发了,不断的 git pull/add/commit/push ,遇到了冲突,就使⽤我们之前讲的冲突处理解决掉冲突。
对于你来说,要想看到⼩伙伴的代码,只需要 pull ⼀下即可,例如:[lk@VM-8-15-centos git_teaching]$ cat file.txt hello git 第一处修改内容 complete the first function![lk@VM-8-15-centos git_teaching]$ git pull remote: Enumerating objects: 10, done. remote: Counting objects: 100% (10/10), done. remote: Compressing objects: 100% (6/6), done. remote: Total 6(delta 2), reused 0(delta 0), pack-reused 0 Unpacking objects: 100% (6/6), done. From gitee.com:lang-kai/git_teaching 6d66b76..8652a46 dev -> origin/dev Updating 6d66b76..8652a46 Fast-forward file.txt |1 + 1file changed, 1 insertion(+)[lk@VM-8-15-centos git_teaching]$ cat file.txt hello git 第一处修改内容 complete the first function! complete the second function![lk@VM-8-15-centos git_teaching]$最后不要忘记,虽然我们是在分⽀上进⾏多⼈协作开发,但最终的⽬的是要将开发后的代码合并到
master上去,让我们的项⽬运⾏最新的代码。接下来我们就需要做这件事情了:# 切换⾄ master分⽀, pull ⼀下,保证本地的master是最新内容。# 合并前这么做是⼀个好习惯[lk@VM-8-15-centos git_teaching]$ git checkout master Switched to branch 'master'[lk@VM-8-15-centos git_teaching]$ git pull Already up-to-date. # 切换⾄ dev 分⽀, 合并 master 分⽀# 这么做是因为如果有冲突,可以在dev分⽀上进⾏处理,⽽不是在在master上解决冲突。# 这么做是⼀个好习惯[lk@VM-8-15-centos git_teaching]$ git checkout dev Switched to branch 'dev'[lk@VM-8-15-centos git_teaching]$ git merge master Already up-to-date. # 切换⾄ master 分⽀,合并 dev 分⽀[lk@VM-8-15-centos git_teaching]$ git checkout master Switched to branch 'master'[lk@VM-8-15-centos git_teaching]$ git merge dev Updating 506ef2c..8652a46 Fast-forward file.txt |4 +++- 1file changed, 3 insertions(+), 1 deletion(-)[lk@VM-8-15-centos git_teaching]$ cat file.txt hello git 第一处修改内容 complete the first function! complete the second function![lk@VM-8-15-centos git_teaching]$ git status # On branch master# Your branch is ahead of 'origin/master' by 3 commits.# (use "git push" to publish your local commits)# nothing to commit, working directory clean # 将 master 分⽀推送⾄远端[lk@VM-8-15-centos git_teaching]$ git push origin master:master Total 0(delta 0), reused 0(delta 0) remote: Powered by GITEE.COM [GNK-6.4] To [email protected]:lang-kai/git_teaching.git 506ef2c..8652a46 master -> master [lk@VM-8-15-centos git_teaching]$ git status # On branch master nothing to commit, working directory clean [lk@VM-8-15-centos git_teaching]$此时,查看远端仓库,master已经是最新代码了:
此时,dev分⽀对于我们来说就没⽤了,那么dev分⽀就可以被删除掉。我们可以直接在远程仓库中将dev分⽀删除掉。
总结⼀下,在同⼀分⽀下进⾏多⼈协作的⼯作模式通常是这样:
- ⾸先,可以试图⽤git push origin branch-name 推送⾃⼰的修改;
- 如果推送失败,则因为远程分⽀⽐你的本地更新,需要先⽤git pull试图合并;
- 如果合并有冲突,则解决冲突,并在本地提交;
- 没有冲突或者解决掉冲突后,再⽤git?push?origin?branch-name推送就能成功!
- 功能开发完毕,将分⽀merge进master,最后删除分⽀。
6.2 多人协作二
⼀般情况下,如果有多需求需要多⼈同时进⾏开发,是不会在⼀个分⽀上进⾏多⼈开发,⽽是⼀个需求或⼀个功能点就要创建⼀个 feature 分⽀。
现在同时有两个需求需要你和你的⼩伙伴进⾏开发,那么你们俩便可以各⾃创建⼀个分⽀来完成⾃⼰
的⼯作。在上个部分我们已经了解了可以从码云上直接创建远程分⽀,其实在本地创建的分⽀也可以
通过推送的⽅式发送到远端。在这个部分我们就来⽤⼀下这种⽅式。[lk@VM-8-15-centos git_teaching]$ git branch dev * master [lk@VM-8-15-centos git_teaching]$ git pull Already up-to-date. [lk@VM-8-15-centos git_teaching]$ git checkout -b feature-1 Switched to a new branch 'feature-1'[lk@VM-8-15-centos git_teaching]$ vim function1 [lk@VM-8-15-centos git_teaching]$ cat function1 i am coding! Done![lk@VM-8-15-centos git_teaching]$ gitadd function1 [lk@VM-8-15-centos git_teaching]$ git commit -m "add function1"[feature-1 35bd943]add function1 1file changed, 2 insertions(+) create mode 100644 function1 [lk@VM-8-15-centos git_teaching]$ git push origin feature-1 Counting objects: 4, done. Delta compression using up to 2 threads. Compressing objects: 100% (2/2), done. Writing objects: 100% (3/3), 285 bytes |0 bytes/s, done. Total 3(delta 1), reused 0(delta 0) remote: Powered by GITEE.COM [GNK-6.4] remote: Create a pull request for'feature-1' on Gitee by visiting: remote: https://gitee.com/lang-kai/git_teaching/pull/new/lang-kai:feature-1...lang-kai:master To [email protected]:lang-kai/git_teaching.git * [new branch] feature-1 -> feature-1 # 查看本地分支与远程分支的连接状态,显然这样创建的分支没有建立连接关系[lk@VM-8-15-centos git_teaching]$ git branch -vv dev 8652a46 [origin/dev] merge dev * feature-1 35bd943 add function1 master 8652a46 [origin/master] merge dev [lk@VM-8-15-centos git_teaching]$对于⼩伙伴来说,可以进⾏以下操作:
PS E:\git\git_teaching>git branch
  dev
* master
PS E:\git\git_teaching>git pull
remote: Enumerating objects: 4, done.
remote: Counting objects: 100% (4/4), done.
remote: Compressing objects: 100% (2/2), done.
remote: Total 3(delta 1), reused 0(delta 0), pack-reused 0
Unpacking objects: 100% (3/3), 265 bytes |24.00 KiB/s, done.
From https://gitee.com/lang-kai/git_teaching
  506ef2c..8652a46  master     -> origin/master
* [new branch]      feature-1  -> origin/feature-1
Updating 506ef2c..8652a46
Fast-forward
 file.txt |4 +++-
 1file changed, 3 insertions(+), 1 deletion(-)
PS E:\git\git_teaching>git checkout -b feature-2
Switched to a new branch 'feature-2'
PS E:\git\git_teaching>cat .\function2
i am coding!
PS E:\git\git_teaching>gitadd .\function2
PS E:\git\git_teaching>git commit -m "modify function2"[feature-2 0493323] modify function2
 1file changed, 1 insertion(+)
 create mode 100644 function2
PS E:\git\git_teaching>git push origin feature-2
Enumerating objects: 4, done.
Counting objects: 100% (4/4), done.
Delta compression using up to 16 threads
Compressing objects: 100% (2/2), done.
Writing objects: 100% (3/3), 282 bytes |282.00 KiB/s, done.
Total 3(delta 1), reused 0(delta 0), pack-reused 0
remote: Powered by GITEE.COM [GNK-6.4]
remote: Create a pull request for'feature-2' on Gitee by visiting:
remote:     https://gitee.com/lang-kai/git_teaching/pull/new/lang-kai:feature-2...lang-kai:master
To https://gitee.com/lang-kai/git_teaching.git
* [new branch]      feature-2 -> feature-2
PS E:\git\git_teaching>
此时,在本地,你看不⻅他新建的⽂档,他看不⻅你新建的⽂档。并且推送各⾃的分⽀时,并没有任何冲突,你俩互不影响,⽤起来很舒服!!
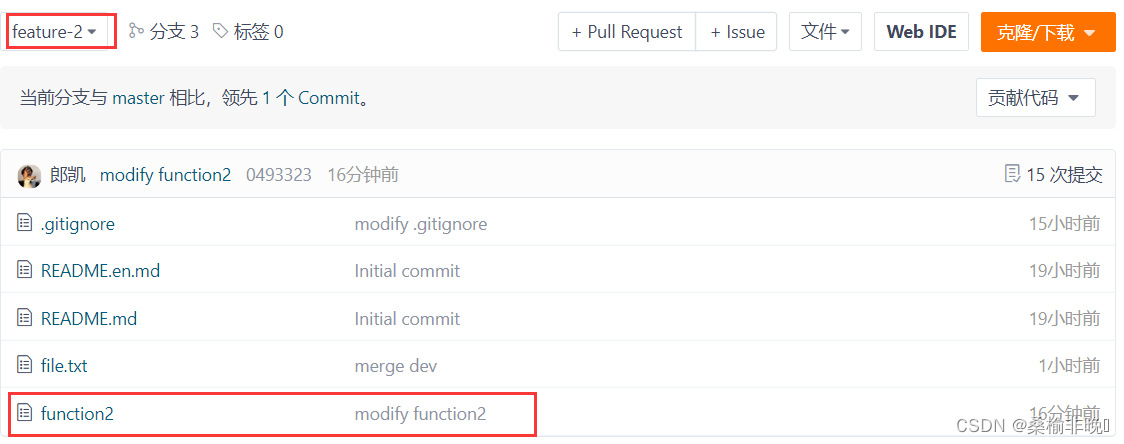
再来看下远端码云上此时的状态:
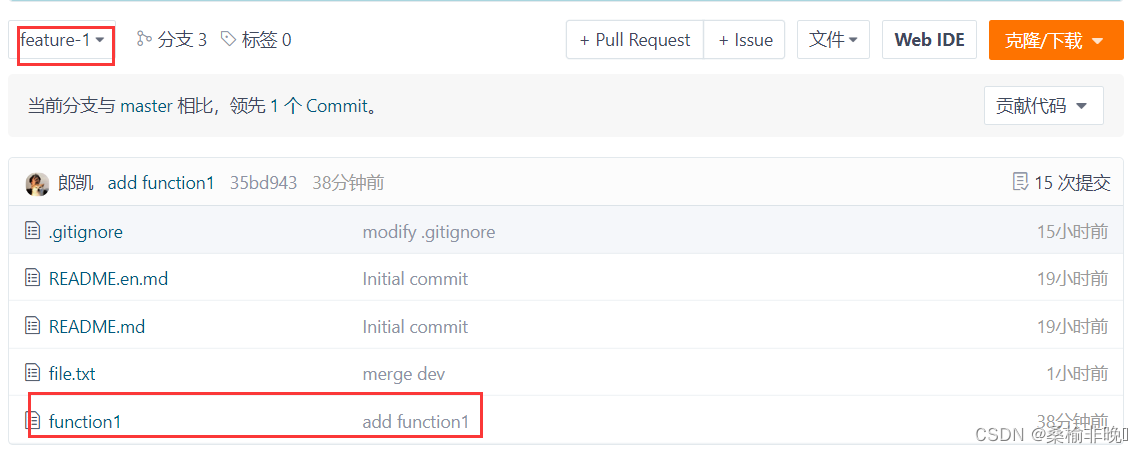
对于你的feature-1分支:
对于⼩伙伴的feature-2分⽀:
正常情况下,你俩就可以在⾃⼰的分⽀上进⾏专业的开发了!
但天有不测⻛云,你的⼩伙伴突然⽣病了,但需求还没开发完,需要你帮他继续开发,于是他便把
feature-2分⽀名告诉你了。这时你就需要在⾃⼰的机器上切换到feature-2分⽀帮忙继续开发,要做
的操作如下:# 必须先拉取远端仓库内容[lk@VM-8-15-centos git_teaching]$ git pull remote: Enumerating objects: 4, done. remote: Counting objects: 100% (4/4), done. remote: Compressing objects: 100% (2/2), done. remote: Total 3(delta 1), reused 0(delta 0), pack-reused 0 Unpacking objects: 100% (3/3), done.] From gitee.com:lang-kai/git_teaching * [new branch] feature-2 -> origin/feature-2 There is no tracking information for the current branch. Please specify which branch you want to merge with. See git-pull(1)for details git pull <remote><branch> If you wish to set tracking information for this branch you can do so with: git branch --set-upstream-to=origin/<branch> feature-1 # 可以看到远程已经有了feature-2[lk@VM-8-15-centos git_teaching]$ git branch -a dev * feature-1 master remotes/origin/HEAD -> origin/master remotes/origin/dev remotes/origin/feature-1 remotes/origin/feature-2 remotes/origin/master # 切换到feature-2分⽀上,可以和远程的feature-2分⽀关联起来,# 否则将来只使⽤ git push 推送内容会失败[lk@VM-8-15-centos git_teaching]$ git checkout -b feature-2 origin/feature-2 Branch feature-2 set up to track remote branch feature-2 from origin. Switched to a new branch 'feature-2'[lk@VM-8-15-centos git_teaching]$ ls a.so b.ini file.txt function2 README.en.md README.md [lk@VM-8-15-centos git_teaching]$切换成功后,便可以看⻅feature-2分⽀中的function2⽂件了,接着就可以帮⼩伙伴进⾏开发:
[lk@VM-8-15-centos git_teaching]$ vim function2
[lk@VM-8-15-centos git_teaching]$ cat function2
i am coding!help done![lk@VM-8-15-centos git_teaching]$ gitadd function2
[lk@VM-8-15-centos git_teaching]$ git commit -m "modify function2"[feature-2 89b0324] modify function2
1file changed, 2 insertions(+), 1 deletion(-)[lk@VM-8-15-centos git_teaching]$ git push origin feature-2:feature-2
Counting objects: 5, done.
Delta compression using up to 2 threads.\
Compressing objects: 100% (2/2), done.
Writing objects: 100% (3/3), 277 bytes |0 bytes/s, done.
Total 3(delta 1), reused 0(delta 0)
remote: Powered by GITEE.COM [GNK-6.4]
To [email protected]:lang-kai/git_teaching.git
  0493323..89b0324  feature-2 -> feature-2
[lk@VM-8-15-centos git_teaching]$
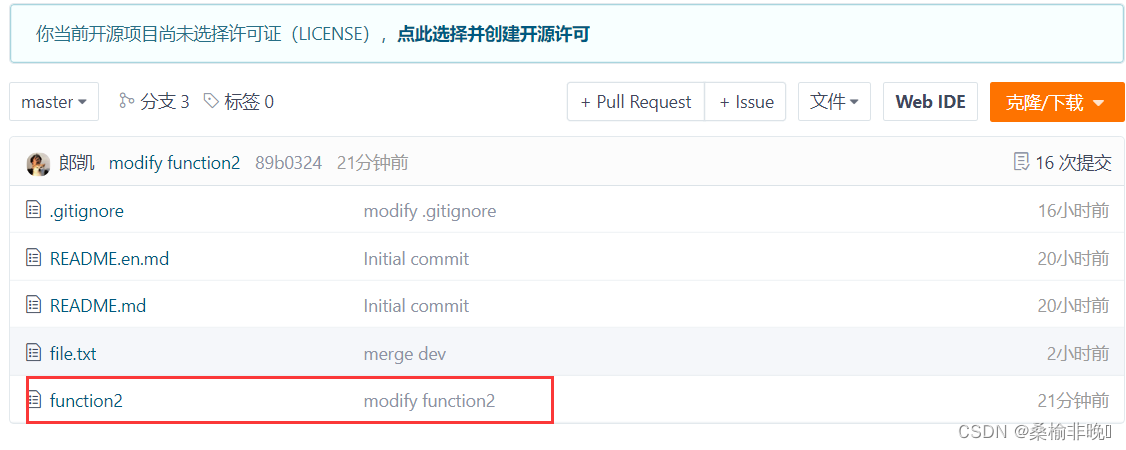
查看远程状态,推送成功了:
这时,你的⼩伙伴已经修养的差不多,可以继续进⾏⾃⼰的开发⼯作,那么他⾸先要获取到你帮他开发的内容,然后接着你的代码继续开发。或者你已经帮他开发完了,那他也需要在⾃⼰的电脑上看看你帮他写的代码:PS E:\git\git_teaching>git pull remote: Enumerating objects: 5, done. remote: Counting objects: 100% (5/5), done. remote: Compressing objects: 100% (2/2), done. remote: Total 3(delta 1), reused 0(delta 0), pack-reused 0 Unpacking objects: 100% (3/3), 257 bytes |19.00 KiB/s, done. From https://gitee.com/lang-kai/git_teaching 0493323..89b0324 feature-2 -> origin/feature-2 There is no tracking information for the current branch. Please specify which branch you want to merge with. See git-pull(1)for details. git pull <remote><branch> If you wish to set tracking information for this branch you can do so with: git branch --set-upstream-to=origin/<branch> feature-2 PS E:\git\git_teaching>cat .\function2 i am coding! PS E:\git\git_teaching>Pull⽆效的原因是⼩伙伴没有指定本地feature-2分⽀与远程origin/feature-2分⽀的链接,根据提⽰,设置feature-2和origin/feature-2的链接即可:
PS E:\git\git_teaching>git branch --set-upstream-to=origin/feature-2 feature-2
Branch 'feature-2'set up to track remote branch 'feature-2' from 'origin'.
PS E:\git\git_teaching>git pull
Updating 0493323..89b0324
Fast-forward
 function2 |3 ++-
 1file changed, 2 insertions(+), 1 deletion(-)
PS E:\git\git_teaching>cat .\function2
i am coding!help done!
PS E:\git\git_teaching>
⽬前,⼩伙伴的本地代码和远端保持严格⼀致。你和你的⼩伙伴可以继续在不同的分⽀下进⾏协同开发了。
各⾃功能开发完毕后,不要忘记我们需要将代码合并到master中才算真正意义上的开发完毕。由于你的⼩伙伴率先开发完毕,于是开始 merge :PS E:\git\git_teaching>git checkout master Switched to branch 'master' Your branch is up to date with 'origin/master'. PS E:\git\git_teaching>git pull Already up to date. PS E:\git\git_teaching>git checkout feature-2 Switched to branch 'feature-2' Your branch is up to date with 'origin/feature-2'. PS E:\git\git_teaching>git merge master Already up to date. PS E:\git\git_teaching>git checkout master Switched to branch 'master' Your branch is up to date with 'origin/master'. PS E:\git\git_teaching>git merge feature-2 Updating 8652a46..89b0324 Fast-forward function2 |2 ++ 1file changed, 2 insertions(+) create mode 100644 function2 PS E:\git\git_teaching>git status On branch master Your branch is ahead of 'origin/master' by 2 commits. (use "git push" to publish your local commits) nothing to commit, working tree clean PS E:\git\git_teaching>git push Total 0(delta 0), reused 0(delta 0), pack-reused 0 remote: Powered by GITEE.COM [GNK-6.4] To https://gitee.com/lang-kai/git_teaching.git 8652a46..89b0324 master -> master PS E:\git\git_teaching>此时远程仓库的状态:
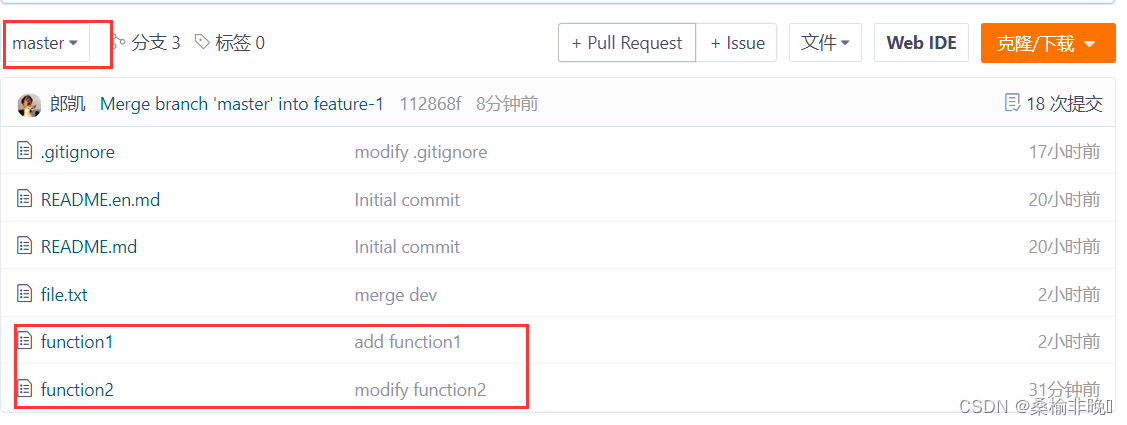
当你的⼩伙伴将其代码 merge 到 master 后,这时你也开发完成了,也需要进⾏ merge 到master 操作,于是你:[lk@VM-8-15-centos git_teaching]$ git checkout master Switched to branch 'master'[lk@VM-8-15-centos git_teaching]$ git pull From gitee.com:lang-kai/git_teaching 8652a46..89b0324 master -> origin/master Updating 8652a46..89b0324 Fast-forward function2 |2 ++ 1file changed, 2 insertions(+) create mode 100644 function2 [lk@VM-8-15-centos git_teaching]$ git checkout feature-1 Switched to branch 'feature-1'[lk@VM-8-15-centos git_teaching]$ git merge master Merge made by the 'recursive' strategy. function2 |2 ++ 1file changed, 2 insertions(+) create mode 100644 function2 [lk@VM-8-15-centos git_teaching]$ git merge master Already up-to-date. [lk@VM-8-15-centos git_teaching]$ ls a.so b.ini file.txt function1 function2 README.en.md README.md [lk@VM-8-15-centos git_teaching]$ git checkout master Switched to branch 'master'[lk@VM-8-15-centos git_teaching]$ git merge feature-1 Updating 89b0324..112868f Fast-forward function1 |2 ++ 1file changed, 2 insertions(+) create mode 100644 function1 [lk@VM-8-15-centos git_teaching]$ git status # On branch master# Your branch is ahead of 'origin/master' by 2 commits.# (use "git push" to publish your local commits)# nothing to commit, working directory clean [lk@VM-8-15-centos git_teaching]$ git push Counting objects: 4, done. Delta compression using up to 2 threads. Compressing objects: 100% (2/2), done. Writing objects: 100% (2/2), 306 bytes |0 bytes/s, done. Total 2(delta 1), reused 0(delta 0) remote: Powered by GITEE.COM [GNK-6.4] To [email protected]:lang-kai/git_teaching.git 35bd943..112868f feature-1 -> feature-1 89b0324..112868f master -> master [lk@VM-8-15-centos git_teaching]$ git status # On branch master nothing to commit, working directory clean [lk@VM-8-15-centos git_teaching]$此时远程仓库的状态:
此时, feature-1 和 feature-2 分⽀对于我们来说就没⽤了,那么我们可以直接在远程仓库中
将dev分⽀删除掉。
这就是多⼈协作的⼯作模式,⼀旦熟悉了,就⾮常简单。
6.3 远程分⽀删除后,本地git branch -a依然能看到的解决办法
当前我们已经删除了远程的⼏个分⽀,使⽤? git branch -a ?命令可以查看所有本地分⽀和远程分
⽀,但发现很多在远程仓库已经删除的分⽀在本地依然可以看到。例如:[lk@VM-8-15-centos git_teaching]$ git pull Already up-to-date. [lk@VM-8-15-centos git_teaching]$ git branch -a dev feature-1 feature-2 * master remotes/origin/HEAD -> origin/master remotes/origin/dev remotes/origin/feature-1 remotes/origin/feature-2 remotes/origin/master [lk@VM-8-15-centos git_teaching]$使⽤命令
git remote show origin,可以查看remote地址,远程分⽀,还有本地分⽀与之相
对应关系等信息。[lk@VM-8-15-centos git_teaching]$ git remote show origin * remote origin Fetch URL: [email protected]:lang-kai/git_teaching.git Push URL: [email protected]:lang-kai/git_teaching.git HEAD branch: master Remote branches: master tracked refs/remotes/origin/dev stale (use 'git remote prune' to remove) refs/remotes/origin/feature-1 stale (use 'git remote prune' to remove) refs/remotes/origin/feature-2 stale (use 'git remote prune' to remove) Local branches configured for'git pull': dev merges with remote dev feature-2 merges with remote feature-2 master merges with remote master Local ref configured for'git push': master pushes to master (up to date)[lk@VM-8-15-centos git_teaching]$此时我们可以看到那些远程仓库已经不存在的分⽀,根据提⽰,使⽤
git remote prune origin命令:
[lk@VM-8-15-centos git_teaching]$ git remote prune origin
Pruning origin
URL: [email protected]:lang-kai/git_teaching.git
* [pruned] origin/dev
* [pruned] origin/feature-1
* [pruned] origin/feature-2
[lk@VM-8-15-centos git_teaching]$ git branch -a
  dev
  feature-1
  feature-2
* master
  remotes/origin/HEAD -> origin/master
  remotes/origin/master
[lk@VM-8-15-centos git_teaching]$
这样就删除了那些远程仓库不存在的分⽀。对于本地仓库的删除,之前的课程已经学过了,⼤家可以⾃⾏从操作。
版权归原作者 桑榆非晚ᴷ 所有, 如有侵权,请联系我们删除。
![[外链图片转存失败,源站可能有防盗链机制,建议将图片保存失败,源站可能有防盗链机制,建议将图片保存下来直接上传上传(imY8zj1iPfVm-1682861111511)(C:\Users\13916\Pictures\Saved Pictures\壁纸\微信图片_20221128141855.jpg)(C:\Users\13916\Pictures\Saved Pictures\壁纸\微信图片_20221128141855.jpg)]](https://img-blog.csdnimg.cn/1ffaa77bbc864c51926cc5e4d98fda53.jpeg)
