实验大纲
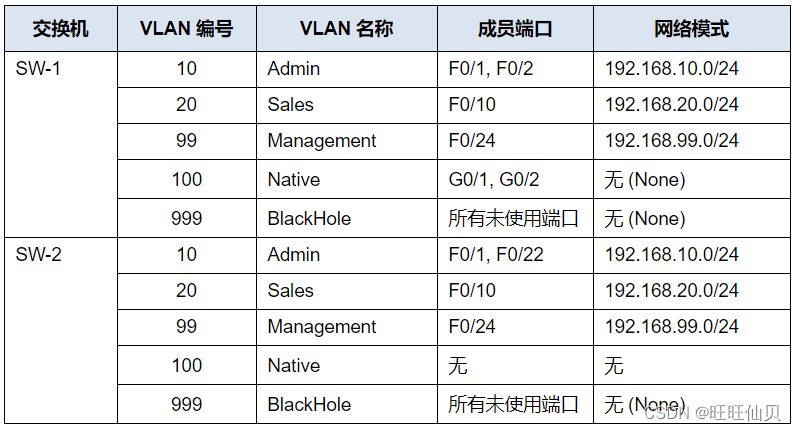
VLAN 表

目标 第1步:创建一条安全的中继
第2步:保护未使用的交换机端口
第3步:实施端口安全
第4步:启用 DHCP 监听
第5步:配置快速 PVST+、PortFast 和 BPDU 防护
背景 您正在给两台仅仅 完成了一部分配置的接入层交换机配置增强安全功能。您需要根据下面的需求,来实施这个模块中介绍过的各项安全措施 。注意 ,网络已经配置好了路由策略,所以在配置完成时, 不同VLAN中的主机应该可以相互通信。
第1步:创建一条安全的中继
a.连接这两台接入层交换机的G0/2端口

SW-2>en
SW-2#conf t
Enter configuration commands, one per line.  End with CNTL/Z.
SW-2(config)#interface range g0/1-2
SW-2(config-if-range)#switchport mode trunk
b.把这两台交换机的G0/1和G0/2端口配置为中继(Trunk)端口
SW-1>en
SW-1#conf t
Enter configuration commands, one per line.  End with CNTL/Z.
SW-1(config)#interface range g0/1-2
SW-1(config-if-range)#switchport mode trunk
c.在链路两端禁用DTP协商
SW-1(config)#interface range g0/1-2
SW-1(config-if-range)#switchport nonegotiate
SW-2(config)#interface range g0/1-2
SW-2(config-if-range)#switchport  nonegotiate
d.在两台交换机上创建VLAN 100,并且把它命名为Native
SW-1(config)#vlan 100
SW-1(config-vlan)#name Native
SW-2(config)#vlan 100
SW-2(config-vlan)#name Native
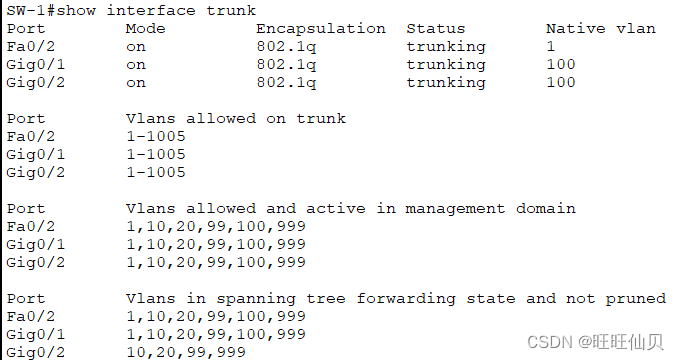
e.配置两台交换机的所有中继端口,让它们以VLAN 100作为本征 VLAN
SW-1(config)#interface range g0/1-2
SW-1(config-if-range)#switchport trunk native vlan 100
SW-2(config)#interface range g0/1-2
SW-2(config-if-range)#switchport trunk native vlan 100
第2步:保护未使用的交换机端口
a.在SW-1上关闭所有未使用的交换机端口
SW-1(config)#interface range f0/3-9,f0/11-23
SW-1(config-if-range)#shutdown
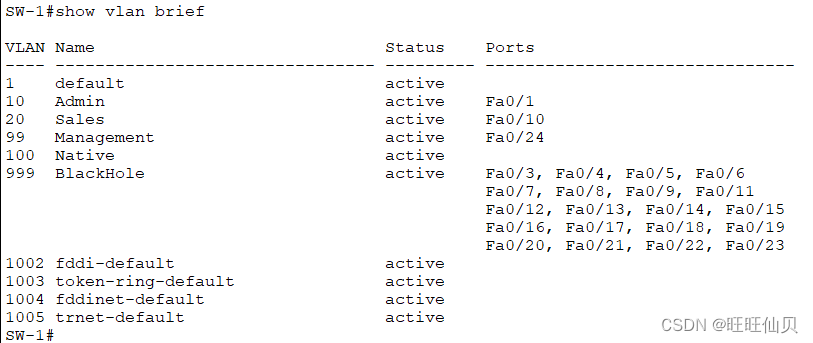
b.在SW-1上创建VLAN 999,并且把它命名为BlackHole
SW-1(config)#vlan 999
SW-1(config-vlan)#name BlackHole
c.把所有未使用的交换机端口都划分到BlackHole这个VLAN当中
SW-1(config)#interface range f0/3-9,f0/11-23
SW-1(config-if-range)#switchport access vlan 999

第3步:实施端口安全
a.在交换机SW-1的所有活动接入端口上激活端口安全
show interface trunk

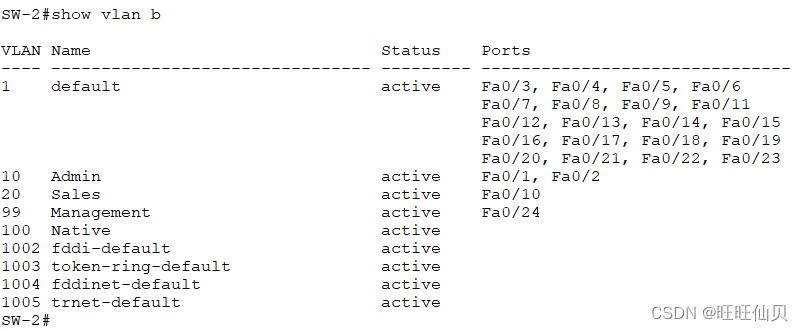
SW-2#show vlan b 可以看到f0/2在vlan 10中

SW-2#show interface fastEthernet 0/2 switchport
Operational Mode: static access

在交换机SW-1把接口f0/2设置为access接口
SW-1(config)#interface f0/2
SW-1(config-if)#switchport mode access
SW-1(config-if)#switchport access vlan 10

SW-1(config)#interface range f0/1-2,f0/10,f0/24
SW-1(config-if-range)#switchport port-security
b.配置这些活动端口,让端口最多允许学习4个MAC地址
SW-1(config-if-range)#switchport port-security maximum 4
c.使用端口安全特性,给SW-1上的F0/1静态配置PC的MAC地址
SW-1(config)#interface f0/1
SW-1(config-if)#switchport port-security mac-address 0010.11E8.3CBB
d.对每个活动接入端口进行配置,让它把学习到的 MAC地址添加到运行配置文件中
SW-1(config)#interface range f0/1-2,f0/10,f0/24
SW-1(config-if-range)#switchport port-security mac-address sticky
e.配置端口安全违规模式,让端口在超出最大MAC 地址数量时丢弃数据包,创建一个系统日志条目,但并不禁用这个端口
SW-1(config-if-range)#switchport port-security violation restrict
第4步:配置 DHCP 监听
a.在SW-1上把中继端口配置为可信端口
SW-1(config)#interface range g0/1-2
SW-1(config-if-range)#ip dhcp snooping trust
b.在SW-1上的不可信端口配置速率限制,限制速率为每秒5个DHCP数据包
SW-1(config)#interface range f0/1-2,f0/10,f0/24
SW-1(config-if-range)#ip dhcp snooping limit rate 5
c.在SW-2上全局启用DHCP监听,给VLAN 10、20和99启用DHCP监听
SW-2>en
SW-2#conf t
Enter configuration commands, one per line.  End with CNTL/Z.
SW-2(config)#ip dhcp snooping vlan 10,20,99
注意: 在Packet Tracer中,DHCP监听配置的打分可能会出现问题。
第5步:配置 PortFast 和 BPDU 防护
a.在SW-1上给所有在用的接入端口启用PortFast特性
SW-1(config)#interface range f0/1-2,f0/12,f0/24
SW-1(config-if-range)#spanning-tree portfast
b.在SW-1上给所有在用的接入端口启用BPDU防护
SW-1(config-if-range)#spanning-tree bpduguard enable
c.配置SW-2,让所有接入端口默认使用PortFast
SW-2(config)#spanning-tree portfast default
版权归原作者 旺旺仙贝 所有, 如有侵权,请联系我们删除。