
目录
昨天把软件测试基础基本上看完了,因为我最近工作问题,需要着重研究下Cunit这个单元测试框架,上午把之前学的基础整理出来了。
刚刚研究了下Cunit除了基本 (Basic)接口,还有三个接口没使用过,我也会经量都尝试下。
下个星期我的任务是写一个墨水屏的驱动,测试的学习估摸着会比较慢了,不会像前面一天一篇道两篇的笔记记录,咱尽量嗷。
CUnit
上面纯属瞎扯淡嗷,接下来本来也想着cv一些简介什么的,想了想算了,几乎每篇文章都有,咱直接附上具有代表性的一个自己看吧。
CUnit首页
CUnit文档手册
CUnit用户手册(中文)
CUnit 2-1-3下载地址
看过学习软件测试(一)C单元测试、测试基本流程、HTML基础这篇文章的应该也看过了其中一部分内容,这篇文章整理汇总了下。
CUnit Windows 安装
cunit在windows下安装:https://blog.csdn.net/godmaycry/article/details/77480549(已验证可用)

https://cloud.tencent.com/developer/article/1648952 文章中提到以下问题 (但我没遇到错误,以及提到了使用VS Code IDE)
安装完毕把C:\mingw-w64\x86_64-8.1.0-posix-seh-rt_v6-rev0\mingw64\msys\mingw\lib\libcunit.a拷贝到
C:\mingw-w64\x86_64-8.1.0-posix-seh-rt_v6-rev0\mingw64\lib。
(不拷贝在下面gcc或者clang运行中,加入-lcunit参数会提示..lib: can’t find -lcunit的错误)

接下来把C:\mingw-w64\x86_64-8.1.0-posix-seh-rt_v6-rev0\mingw64\msys\mingw\include\CUnit\目录中的所有.h文件
拷贝到C:\mingw-w64\x86_64-8.1.0-posix-seh-rt_v6-rev0\mingw64\include中去。

注意:编译的时候需要连接cunit
示例:gcc -o test test.c -lcunit
CUnit Linux(Ubuntu) 安装
软件源中与CUnit相关的包有:
libcunit1 libcunit1-dev libcunit1-doc libcunit1-ncurses libcunit1-ncurses-dev
使用apt-get install安装即可。
安装步骤
tar -jxvf CUnit-2.1-3.tar.bz2
cd CUnit-2.1-3
libtoolize -f -c -i
aclocal
autoconf
autoheader
automake
chmod u+x configure
./configure –prefix=/opt/cunit
make
make install
cunit安装成功后会生成4个文件夹:doc、include、lib、share。
- doc目录是一些简介以及使用说明。
- include和lib目录中是我们需要的头文件以及库文件。
- share目录中有Automated模式下需要的文件。
一键把cunit测试结果(Basic)和gcov覆盖率结果合并
gcov
gcc -fprofile-arcs -ftest-coverage -o test test.c    编译生成可执行文件(test)和.gcno文件
执行可执行文件./test 生成文件gcda
gcov test.c 生成gcov文件,该文件有代码覆盖率和每行代码执行次数
python代码
main.py
print("Hello World %d "%2)
flist =['data1.txt','data2.txt']
ofile =open('list.txt','w')for fr in flist:for txt inopen(fr,'r'):print(txt)
        ofile.write(txt)
ofile.close()
bat代码
gcc -fprofile-arcs -ftest-coverage -o test _4_book.c -lcunit
test.exe=> data1.txt
gcov _4_book.c=> data2.txt
ren _4_book.c.gcov data3.txt
main.py
del data1.txt
del data2.txt
cunit测试代码(拿官方历程改了下)
/*
 *  Simple example of a CUnit unit test.
 *
 *  This program (crudely) demonstrates a very simple "black box"
 *  test of the standard library functions fprintf() and fread().
 *  It uses suite initialization and cleanup functions to open
 *  and close a common temporary file used by the test functions.
 *  The test functions then write to and read from the temporary
 *  file in the course of testing the library functions.
 *
 *  The 2 test functions are added to a single CUnit suite, and
 *  then run using the CUnit Basic interface.  The output of the
 *  program (on CUnit version 2.0-2) is:
 *
 *           CUnit : A Unit testing framework for C.
 *           http://cunit.sourceforge.net/
 *
 *       Suite: Suite_1
 *         Test: test of fprintf() ... passed
 *         Test: test of fread() ... passed
 *
 *       --Run Summary: Type      Total     Ran  Passed  Failed
 *                      suites        1       1     n/a       0
 *                      tests         2       2       2       0
 *                      asserts       5       5       5       0
 *//* 根据书上程序流图编写 */

#include <stdio.h>
#include <string.h>
#include "CUnit/Basic.h"/* Pointer to the file used by the tests. */staticFILE*temp_file =NULL;/* The suite initialization function.
 * Opens the temporary file used by the tests.
 * Returns zero on success, non-zero otherwise.
 *//* 第一步 套件初始化 编写init套件*/
int init_suite1(void){if(NULL==(temp_file =fopen("temp.txt","w+"))){return-1;}else{return0;}}/* The suite cleanup function.
 * Closes the temporary file used by the tests.
 * Returns zero on success, non-zero otherwise.
 *//* 第一步 套件初始化 编写clean套件*/
int clean_suite1(void){if(0!=fclose(temp_file)){return-1;}else{
      temp_file =NULL;return0;}}/* Simple test of fprintf().
 * Writes test data to the temporary file and checks
 * whether the expected number of bytes were written.
 */voidtestFPRINTF(void){
   int i1 =10;if(NULL!= temp_file){CU_ASSERT(0==fprintf(temp_file,""));CU_ASSERT(2==fprintf(temp_file,"Q\n"));CU_ASSERT(7==fprintf(temp_file,"i1 = %d", i1));}}/* Simple test of fread().
 * Reads the data previously written by testFPRINTF()
 * and checks whether the expected characters are present.
 * Must be run after testFPRINTF().
 */voidtestFREAD(void){
   unsigned char buffer[20];if(NULL!= temp_file){rewind(temp_file);CU_ASSERT(9==fread(buffer,sizeof(unsigned char),20, temp_file));CU_ASSERT(0==strncmp(buffer,"Q\ni1 = 10",9));}}

float bookExample(float x,float y,float z){if((y>1)&&(z==0)){
      x = x/y;}if((y==2)||(x>1)){
      x = x+1;}return x;}voidtestBookExample(void){//满足判定覆盖标准的测试用例CU_ASSERT(2==bookExample(1,2,1))CU_ASSERT(1==bookExample(3,3,0))//满足条件覆盖标准的测试用例CU_ASSERT(1.5==bookExample(1,2,0))CU_ASSERT(3==bookExample(2,1,1))//满足判定/条件覆盖标准的测试用例CU_ASSERT(3==bookExample(4,2,0))CU_ASSERT(1==bookExample(1,1,1))//满足条件组合覆盖标准的测试用例CU_ASSERT(3==bookExample(4,2,0))CU_ASSERT(2==bookExample(1,2,1))CU_ASSERT(3==bookExample(2,1,0))CU_ASSERT(1==bookExample(1,1,1))//满足路径覆盖标准的测试用例CU_ASSERT(3==bookExample(4,2,0))CU_ASSERT(1==bookExample(3,3,0))CU_ASSERT(3==bookExample(2,1,0))CU_ASSERT(1==bookExample(1,1,1))}/* The main() function for setting up and running the tests.
 * Returns a CUE_SUCCESS on successful running, another
 * CUnit error code on failure.
 */
int main(){
   CU_pSuite pSuite =NULL;//初始化结构体/* initialize the CUnit test registry *//* 第二步 初始化注册表 */if(CUE_SUCCESS!=CU_initialize_registry())returnCU_get_error();/* add a suite to the registry *//* 第三步 添加套件到测试注册表 */
   pSuite =CU_add_suite("Suite_1", init_suite1, clean_suite1);if(NULL== pSuite){// 如果添加套件失败CU_cleanup_registry();// 清理注册表并报错returnCU_get_error();}/* add the tests to the suite *//* 第四步 添加测试套件 *//* NOTE - ORDER IS IMPORTANT - MUST TEST fread() AFTER fprintf() */if((NULL==CU_add_test(pSuite,"test of fprintf()", testFPRINTF))||(NULL==CU_add_test(pSuite,"test of fread()", testFREAD))||(NULL==CU_add_test(pSuite,"test of BookExample()", testBookExample))){// 如果添加测试套件失败清理注册表并报错CU_cleanup_registry();returnCU_get_error();}/* Run all tests using the CUnit Basic interface *//* 第五步 使用适当的接口运行测试 *//*
   CU_BRM_NORMAL    Normal模式-失败和运行摘要打印[default]
   CU_BRM_SILENT    静默模式-除了框架错误消息外,不输出任何输出。
   CU_BRM_VERBOSE   详细模式——运行详细信息的最大输出。
   */CU_basic_set_mode(CU_BRM_VERBOSE);// 设置基本接口的运行模式CU_basic_run_tests();// 使用基本接口运行所有注册的CUnit测试/* 第六步 清理测试注册表 */CU_cleanup_registry();returnCU_get_error();}
Automated
上面的CUnit的输出方式是Basic(基本)
怎么将输出模式换成Automated?
常规的6个步骤还是不变,只需要在最后那加两个函数:CU_automated_run_tests();
CU_list_tests_to_file();
想了解细节的看文档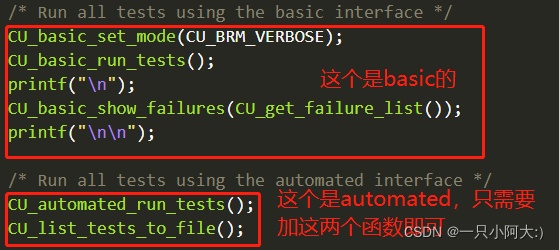
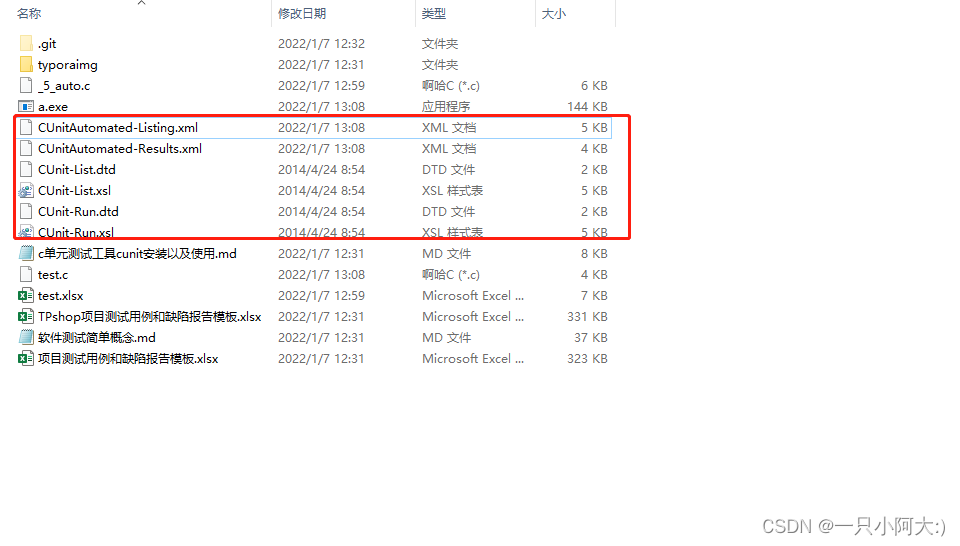
开始我尝试Automated的输出方式时生成了两个XML文件,死活显示不出来像官方截图那样的,如何我错误的去查如何查看XML文件以及XML转Markdown等等,到最后我看到了一篇文章,原来是我少了几个文件。
文章中提到
配置使用Automated模式,重新编译运行后会生成CUnitAutomated-Listing.xml和CUnitAutomated-Results.xml两个文件。文件名是在不设定的情况下,使用默认文件名。

把项目生成的CUnitAutomated-Listing.xml和CUnitAutomated-Results.xml,与CUnit安装目录下的CUnit-List.dtd、CUnit-List.xsl、CUnit-Run.dtd和CUnit-Run.xsl,
共六个文件,放到一个文件夹下,拷贝到window系统下,使用IE浏览器打开。

注意,要用IE浏览器进行打开,谷歌浏览器和狐火浏览器都无法正确打开。
CUnitAutomated是XML默认名字
可以通过CU_set_output_filename("");函数更改名字
Test-Listing.xml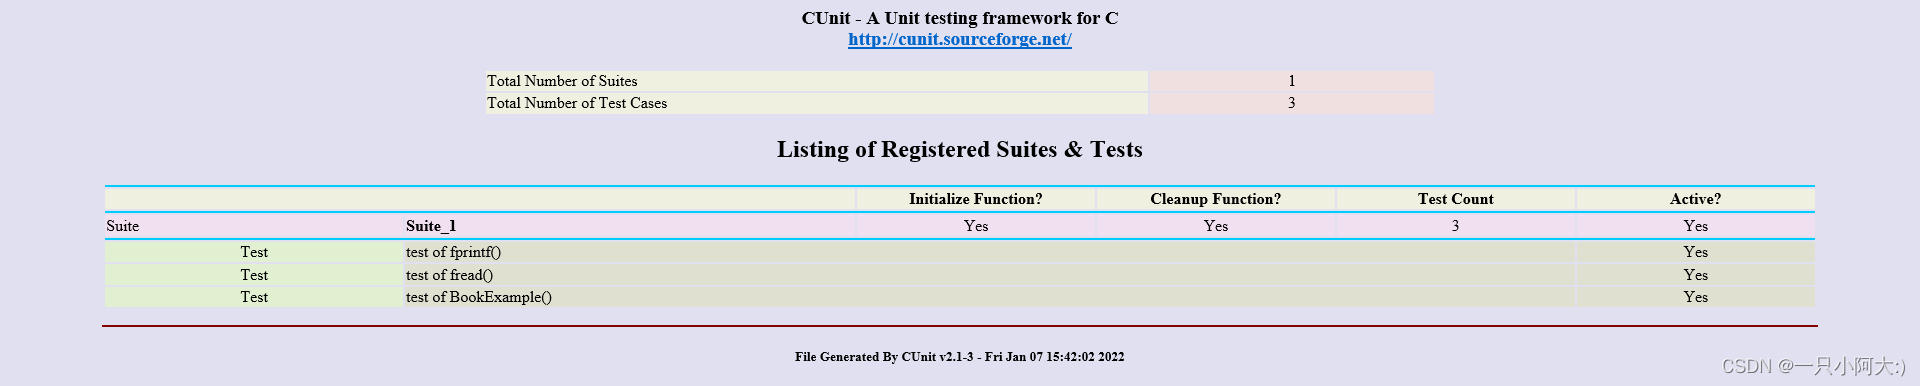
Test-Results.xml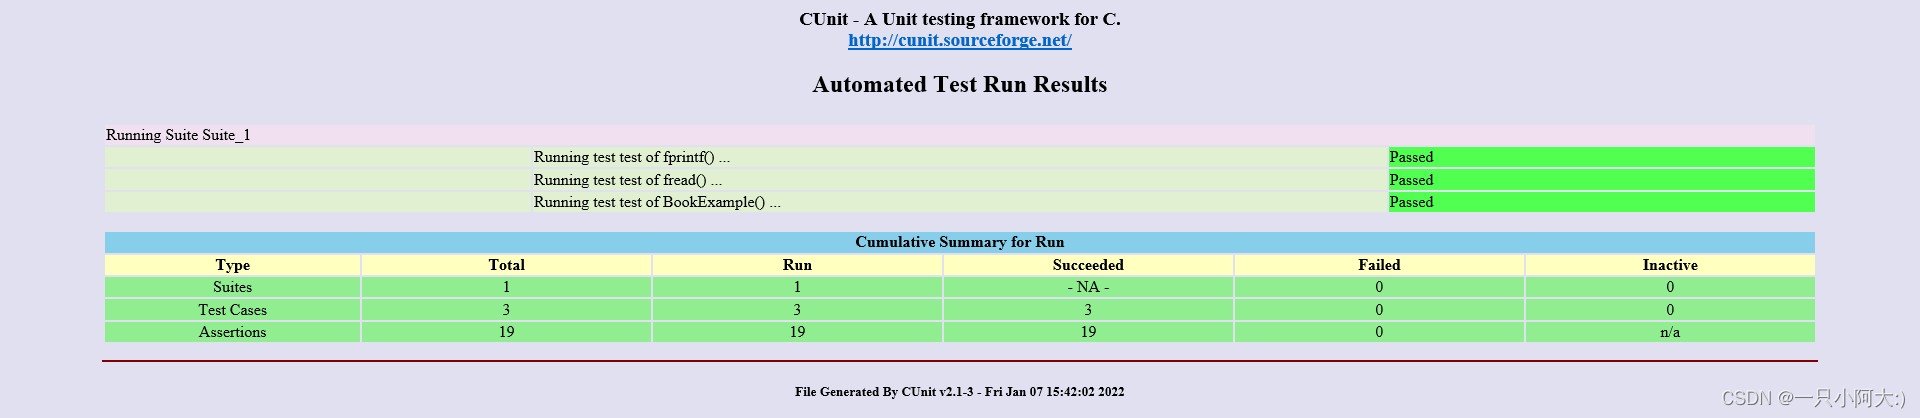
Console
跟automated一样,需要在第五步把运行CU_console_run_tests();
然后编译,在cmd中执行生成的可执行文件。
R就是Run全部执行basic(基本)输出
S是就是选择要测试的套件以及测试然后执行,不像R一样全部执行,只执行我们选择的。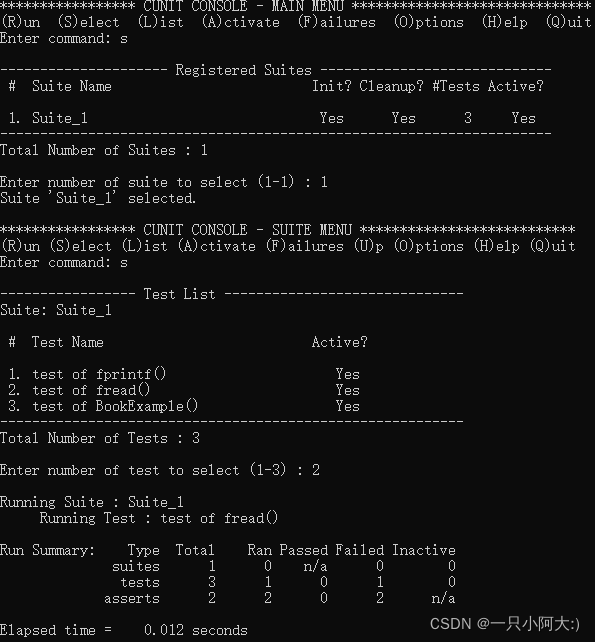
L也就是List列表,把当前套件和需要测试的内容显示出来
A也就是Activate,更改test的活跃状态,也就是测不测,不活跃就不测
F就是Failures,查看测试失败的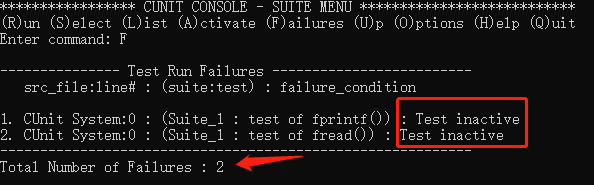
U就是UP,我现在在suite这一层,Run也只是在当前套件中全部执行,如果up跳到上一层,就是执行全部套件(suite)的test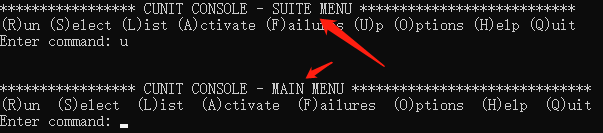
O也就是option选项,选择未激活的套件/测试被视为运行时失败。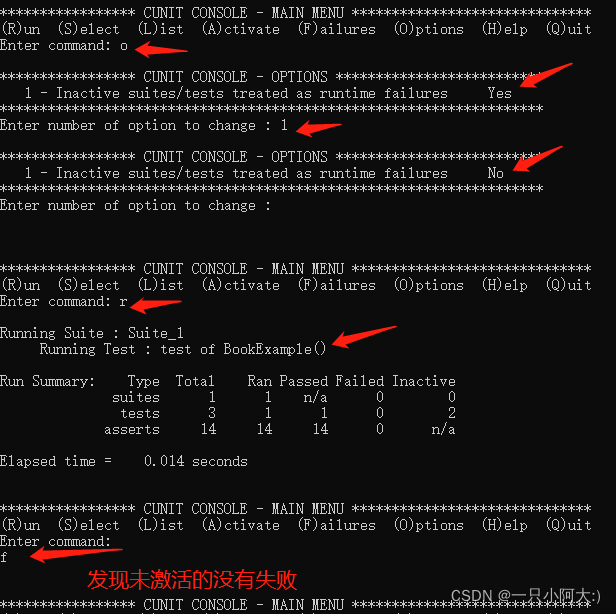
H也就是help帮助啦,也就是对每个字母的解释。
Q也就是quit,退出此系统。
curses
还有个cures输出模式,需要在linux下才能使用,后续我使用的话会补充。
版权归原作者 一只小阿大:) 所有, 如有侵权,请联系我们删除。