
使用 Environment 测试配置信息
在《定制配置:如何创建自定义的配置信息?》中,我们介绍了自定义配置信息的实现方式。而在 Spring Boot 应用程序中,Service 层通常依赖于配置文件,所以我们也需要对配置信息进行测试。
配置信息的测试方案分为两种,第一种依赖于物理配置文件,第二种则是在测试时动态注入配置信息。
第一种测试方案比较简单,在 src/test/resources 目录下添加配置文件时,Spring Boot 能读取这些配置文件中的配置项并应用于测试案例中。在介绍具体的实现过程之前,我们有必要先来了解一下 Environment 接口,该接口定义如下:
publicinterfaceEnvironmentextendsPropertyResolver{
    String[] getActiveProfiles();
    String[] getDefaultProfiles();
    booleanacceptsProfiles(String... profiles);
}
在上述代码中我们可以看到,Environment 接口的主要作用是处理 Profile,而它的父接口 PropertyResolver 定义如下代码所示:
publicinterfacePropertyResolver{
    booleancontainsProperty(String key);
    String getProperty(String key);
    String getProperty(String key, String defaultValue);
    <T> T getProperty(String key, Class<T> targetType);
    <T> T getProperty(String key, Class<T> targetType, T defaultValue);
    String getRequiredProperty(String key)throws IllegalStateException;
    <T> T getRequiredProperty(String key, Class<T> targetType)throws IllegalStateException;
    String resolvePlaceholders(String text);
    String resolveRequiredPlaceholders(String text)throws IllegalArgumentException;
}
显然,PropertyResolver 的作用是根据各种配置项的 Key 获取配置属性值。
现在,假设 src/test/resources 目录中的 application.properties 存在如下配置项:
springcss.order.point = 10
那么,我们就可以设计如下所示的测试用例了。
@RunWith(SpringRunner.class)@SpringBootTestpublicclassEnvironmentTests{

    @Autowired
    public Environment environment;

    @Test
    publicvoidtestEnvValue(){
        Assert.assertEquals(10, Integer.parseInt(environment.getProperty("springcss.order.point")));
    }
}
这里我们注入了一个 Environment 接口,并调用了它的 getProperty 方法来获取测试环境中的配置信息。
除了在配置文件中设置属性,我们也可以使用 @SpringBootTest 注解指定用于测试的属性值,示例代码如下:
@RunWith(SpringRunner.class)@SpringBootTest(properties = {" springcss.order.point = 10"})publicclassEnvironmentTests{

    @Autowired
    public Environment environment;

    @Test
    publicvoidtestEnvValue(){
        Assert.assertEquals(10, Integer.parseInt(environment.getProperty("springcss.order.point")));
    }
}
使用 Mock 测试 Service 层
正如这一讲开篇时提到,Service 层依赖于数据访问层。因此,对 Service 层进行测试时,我们还需要引入新的技术体系,也就是应用非常广泛的 Mock 机制。
接下来,我们先看一下 Mock 机制的基本概念。
Mock 机制
Mock 的意思是模拟,它可以用来对系统、组件或类进行隔离。
在测试过程中,我们通常关注测试对象本身的功能和行为,而对测试对象涉及的一些依赖,仅仅关注它们与测试对象之间的交互(比如是否调用、何时调用、调用的参数、调用的次数和顺序,以及返回的结果或发生的异常等),并不关注这些被依赖对象如何执行这次调用的具体细节。因此,Mock 机制就是使用 Mock 对象替代真实的依赖对象,并模拟真实场景来开展测试工作。
使用 Mock 对象完成依赖关系测试的示意图如下所示:
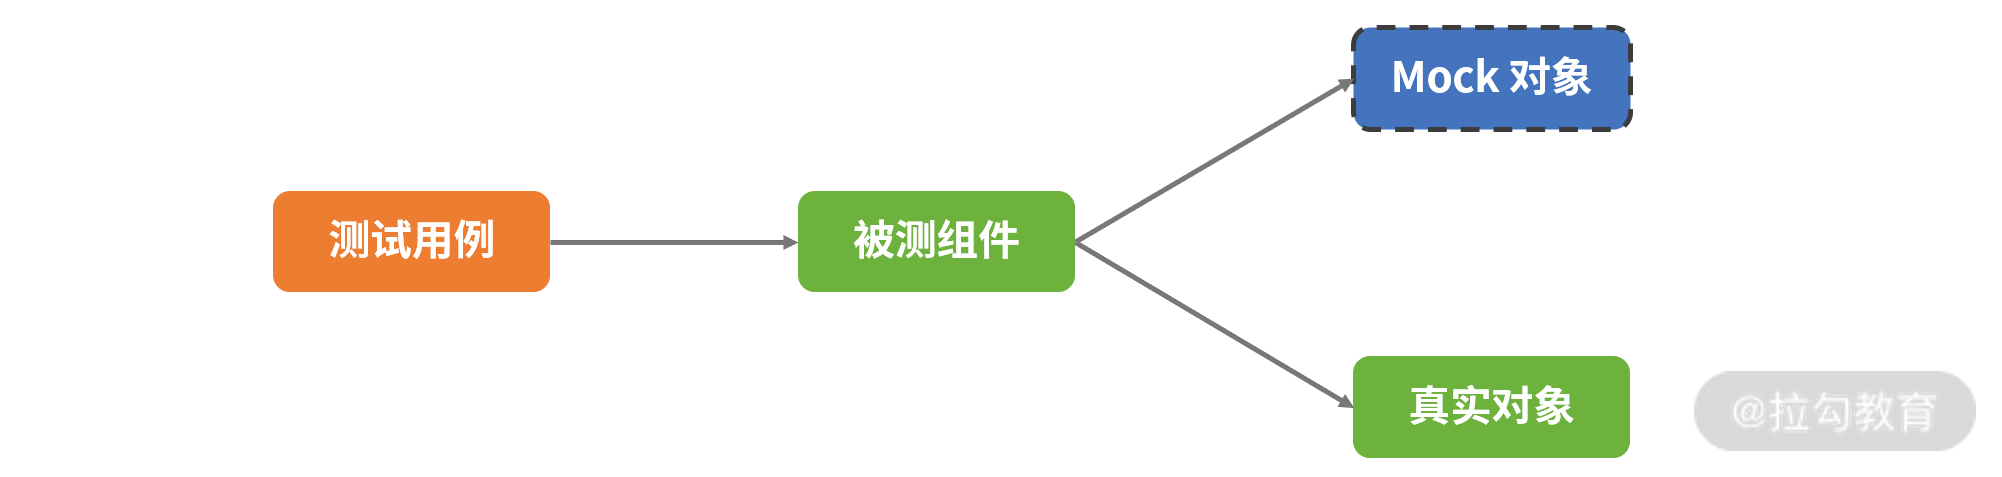
Mock 对象与依赖关系测试示意图
从图中可以看出,在形式上,Mock 是在测试代码中直接 Mock 类和定义 Mock 方法的行为,通常测试代码和 Mock 代码放一起。因此,测试代码的逻辑从测试用例的代码上能很容易地体现出来。
下面我们一起看一下如何使用 Mock 测试 Service 层。
使用 Mock
23 讲中我们介绍了 @SpringBootTest 注解中的 SpringBootTest.WebEnvironment.MOCK 选项,该选项用于加载 WebApplicationContext 并提供一个 Mock 的 Servlet 环境,内置的 Servlet 容器并没有真实启动。接下来,我们针对 Service 层演示一下这种测试方式。
首先,我们来看一种简单场景,在 customer-service 中存在如下 CustomerTicketService 类:
@ServicepublicclassCustomerTicketService{

    @Autowired
    private CustomerTicketRepository customerTicketRepository;

    public CustomerTicket getCustomerTicketById(Long id){
        return customerTicketRepository.getOne(id);
    }
    …
}
这里我们可以看到,以上方法只是简单地通过 CustomerTicketRepository 完成了数据查询操作。
显然,对以上 CustomerTicketService 进行集成测试时,还需要我们提供一个 CustomerTicketRepository 依赖。
下面,我们通过以下代码演示一下如何使用 Mock 机制完成对 CustomerTicketRepository 的隔离。
@RunWith(SpringRunner.class)@SpringBootTest(webEnvironment =SpringBootTest.WebEnvironment.MOCK)publicclassCustomerServiceTests{@MockBeanprivateCustomerTicketRepository customerTicketRepository;@TestpublicvoidtestGetCustomerTicketById()throwsException{Long id =1L;Mockito.when(customerTicketRepository.getOne(id)).thenReturn(newCustomerTicket(1L,1L, “Order00001”, “DemoCustomerTicket1”,newDate()));CustomerTicket actual = customerTicketService.getCustomerTicketById(id);assertThat(actual).isNotNull();assertThat(actual.getOrderNumber()).isEqualTo(“Order00001”);}}
首先,我们通过 @MockBean 注解注入了 CustomerTicketRepository;然后,基于第三方 Mock 框架 Mockito 提供的 when/thenReturn 机制完成了对 CustomerTicketRepository 中 getCustomerTicketById() 方法的 Mock。
当然,如果你希望在测试用例中直接注入真实的CustomerTicketRepository,这时就可以使用@SpringBootTest 注解中的 SpringBootTest.WebEnvironment.RANDOM_PORT 选项,示例代码如下:
@RunWith(SpringRunner.class)@SpringBootTest(webEnvironment =SpringBootTest.WebEnvironment.RANDOM_PORT)publicclassCustomerServiceTests{@AutowiredprivateCustomerTicketRepository customerTicketRepository;@TestpublicvoidtestGetCustomerTicketById()throwsException{Long id =1L;CustomerTicket actual = customerTicketService.getCustomerTicketById(id);assertThat(actual).isNotNull();assertThat(actual.getOrderNumber()).isEqualTo(“Order00001”);}}
运行上述代码后就会以一个随机的端口启动整个 Spring Boot 工程,并从数据库中真实获取目标数据进行验证。
以上集成测试的示例中只包含了对 Repository 层的依赖,而有时候一个 Service 中可能同时包含 Repository 和其他 Service 类或组件,下面回到如下所示的 CustomerTicketService 类:
@ServicepublicclassCustomerTicketService{

    @Autowired
    private OrderClient orderClient;

    private OrderMapper getRemoteOrderByOrderNumber(String orderNumber){

        return orderClient.getOrderByOrderNumber(orderNumber);
    }
    …
}
这里我们可以看到,在该代码中,除了依赖 CustomerTicketRepository 之外,还同时依赖了 OrderClient。
请注意:以上代码中的 OrderClient 是在 customer-service 中通过 RestTemplate 访问 order-service 的远程实现类,其代码如下所示:
@ComponentpublicclassOrderClient{

    @Autowired
    RestTemplate restTemplate;

    public OrderMapper getOrderByOrderNumber(String orderNumber){

        ResponseEntity<OrderMapper> restExchange = restTemplate.exchange(
                "http://localhost:8083/orders/{orderNumber}", HttpMethod.GET, null,
                OrderMapper.class, orderNumber);

         OrderMapper result = restExchange.getBody();

        return result;
    }
}
CustomerTicketService 类实际上并不关注 OrderClient 中如何实现远程访问的具体过程。因为对于集成测试而言,它只关注方法调用返回的结果,所以我们将同样采用 Mock 机制完成对 OrderClient 的隔离。
对 CustomerTicketService 这部分功能的测试用例代码如下所示,可以看到,我们采用的是同样的测试方式。
@TestpublicvoidtestGenerateCustomerTicket()throwsException{Long accountId =100L;String orderNumber ="Order00001";Mockito.when(this.orderClient.getOrderByOrderNumber(“Order00001”)).thenReturn(newOrderMapper(1L, orderNumber, “deliveryAddress”));Mockito.when(this.localAccountRepository.getOne(accountId)).thenReturn(newLocalAccount(100L, “accountCode”, “accountName”));CustomerTicket actual = customerTicketService.generateCustomerTicket(accountId, orderNumber);assertThat(actual.getOrderNumber()).isEqualTo(orderNumber);}
这里提供的测试用例演示了 Service 层中进行集成测试的各种手段,它们已经能够满足一般场景的需要。
测试 Controller 层
对 Controller 层进行测试之前,我们先来提供一个典型的 Controller 类,它来自 customer-service,如下代码所示:
@RestController@RequestMapping(value="customers")publicclassCustomerController{@AutowiredprivateCustomerTicketService customerTicketService;@PostMapping(value = “/{accountId}/{orderNumber}”)publicCustomerTicketgenerateCustomerTicket(@PathVariable(“accountId”)Long accountId,@PathVariable(“orderNumber”)String orderNumber){CustomerTicket customerTicket = customerTicketService.generateCustomerTicket(accountId, orderNumber);return customerTicket;}}
关于上述 Controller 类的测试方法,相对来说比较丰富,比如有 TestRestTemplate、@WebMvcTest 注解和 MockMvc 这三种,下面我们逐一进行讲解。
使用 TestRestTemplate
Spring Boot 提供的 TestRestTemplate 与 RestTemplate 非常类似,只不过它专门用在测试环境中。
如果我们想在测试环境中使用 @SpringBootTest,则可以直接使用 TestRestTemplate 来测试远程访问过程,示例代码如下:
@RunWith(SpringRunner.class)@SpringBootTest(webEnvironment =SpringBootTest.WebEnvironment.RANDOM_PORT)publicclassCustomerController2Tests{@AutowiredprivateTestRestTemplate testRestTemplate;@MockBeanprivateCustomerTicketService customerTicketService;@TestpublicvoidtestGenerateCustomerTicket()throwsException{Long accountId =100L;String orderNumber ="Order00001";given(this.customerTicketService.generateCustomerTicket(accountId, orderNumber)).willReturn(newCustomerTicket(1L, accountId, orderNumber, “DemoCustomerTicket1”,newDate()));CustomerTicket actual = testRestTemplate.postForObject(“/customers/” + accountId+ “/” + orderNumber,null,CustomerTicket.class);assertThat(actual.getOrderNumber()).isEqualTo(orderNumber);}}
上述测试代码中,首先,我们注意到 @SpringBootTest 注解通过使用 SpringBootTest.WebEnvironment.RANDOM_PORT 指定了随机端口的 Web 运行环境。然后,我们基于 TestRestTemplate 发起了 HTTP 请求并验证了结果。
特别说明:这里使用 TestRestTemplate 发起请求的方式与 RestTemplate 完全一致,你可以对《服务调用:如何使用 RestTemplate 消费 RESTful 服务?》的内容进行回顾。
使用 @WebMvcTest 注解
接下来测试方法中,我们将引入一个新的注解 @WebMvcTest,该注解将初始化测试 Controller 所必需的 Spring MVC 基础设施,CustomerController 类的测试用例如下所示:
@RunWith(SpringRunner.class)@WebMvcTest(CustomerController.class)publicclassCustomerControllerTestsWithMockMvc{@AutowiredprivateMockMvc mvc;@MockBeanprivateCustomerTicketService customerTicketService;@TestpublicvoidtestGenerateCustomerTicket()throwsException{Long accountId =100L;String orderNumber ="Order00001";given(this.customerTicketService.generateCustomerTicket(accountId, orderNumber)).willReturn(newCustomerTicket(1L,100L, “Order00001”, “DemoCustomerTicket1”,newDate()));this.mvc.perform(post(“/customers/” + accountId+ “/” + orderNumber).accept(MediaType.APPLICATION_JSON)).andExpect(status().isOk());}}
以上代码的关键是 MockMvc 工具类,所以接下来我们有必要对它进一步展开说明。
MockMvc 类提供的基础方法分为以下 6 种,下面一一对应来看下。
- Perform:执行一个 RequestBuilder 请求,会自动执行 SpringMVC 流程并映射到相应的 Controller 进行处理。
- get/post/put/delete:声明发送一个 HTTP 请求的方式,根据 URI 模板和 URI 变量值得到一个 HTTP 请求,支持 GET、POST、PUT、DELETE 等 HTTP 方法。
- param:添加请求参数,发送 JSON 数据时将不能使用这种方式,而应该采用 @ResponseBody 注解。
- andExpect:添加 ResultMatcher 验证规则,通过对返回的数据进行判断来验证 Controller 执行结果是否正确。
- andDo:添加 ResultHandler 结果处理器,比如调试时打印结果到控制台。
- andReturn:最后返回相应的 MvcResult,然后执行自定义验证或做异步处理。
执行该测试用例后,从输出的控制台日志中我们不难发现,整个流程相当于启动了 CustomerController 并执行远程访问,而 CustomerController 中使用的 CustomerTicketService 则做了 Mock。
显然,测试 CustomerController 的目的在于验证其返回数据的格式和内容。在上述代码中,我们先定义了 CustomerController 将会返回的 JSON 结果,然后通过 perform、accept 和 andExpect 方法模拟了 HTTP 请求的整个过程,最终验证了结果的正确性。
使用 @AutoConfigureMockMvc 注解
请注意 @SpringBootTest 注解不能和 @WebMvcTest 注解同时使用。
在使用 @SpringBootTest 注解的场景下,如果我们想使用 MockMvc 对象,那么可以引入 @AutoConfigureMockMvc 注解。
通过将 @SpringBootTest 注解与 @AutoConfigureMockMvc 注解相结合,@AutoConfigureMockMvc 注解将通过 @SpringBootTest 加载的 Spring 上下文环境中自动配置 MockMvc 这个类。
使用 @AutoConfigureMockMvc 注解的测试代码如下所示:
@RunWith(SpringRunner.class)@SpringBootTest@AutoConfigureMockMvcpublicclassCustomerControllerTestsWithAutoConfigureMockMvc{@AutowiredprivateMockMvc mvc;@MockBeanprivateCustomerTicketService customerTicketService;@TestpublicvoidtestGenerateCustomerTicket()throwsException{Long accountId =100L;String orderNumber ="Order00001";given(this.customerTicketService.generateCustomerTicket(accountId, orderNumber)).willReturn(newCustomerTicket(1L,100L, “Order00001”, “DemoCustomerTicket1”,newDate()));this.mvc.perform(post(“/customers/” + accountId+ “/” + orderNumber).accept(MediaType.APPLICATION_JSON)).andExpect(status().isOk());}}
在上述代码中,我们使用了 MockMvc 工具类完成了对 HTTP 请求的模拟,并基于返回状态验证了 Controller 层组件的正确性。
Spring Boot 中的测试注解总结
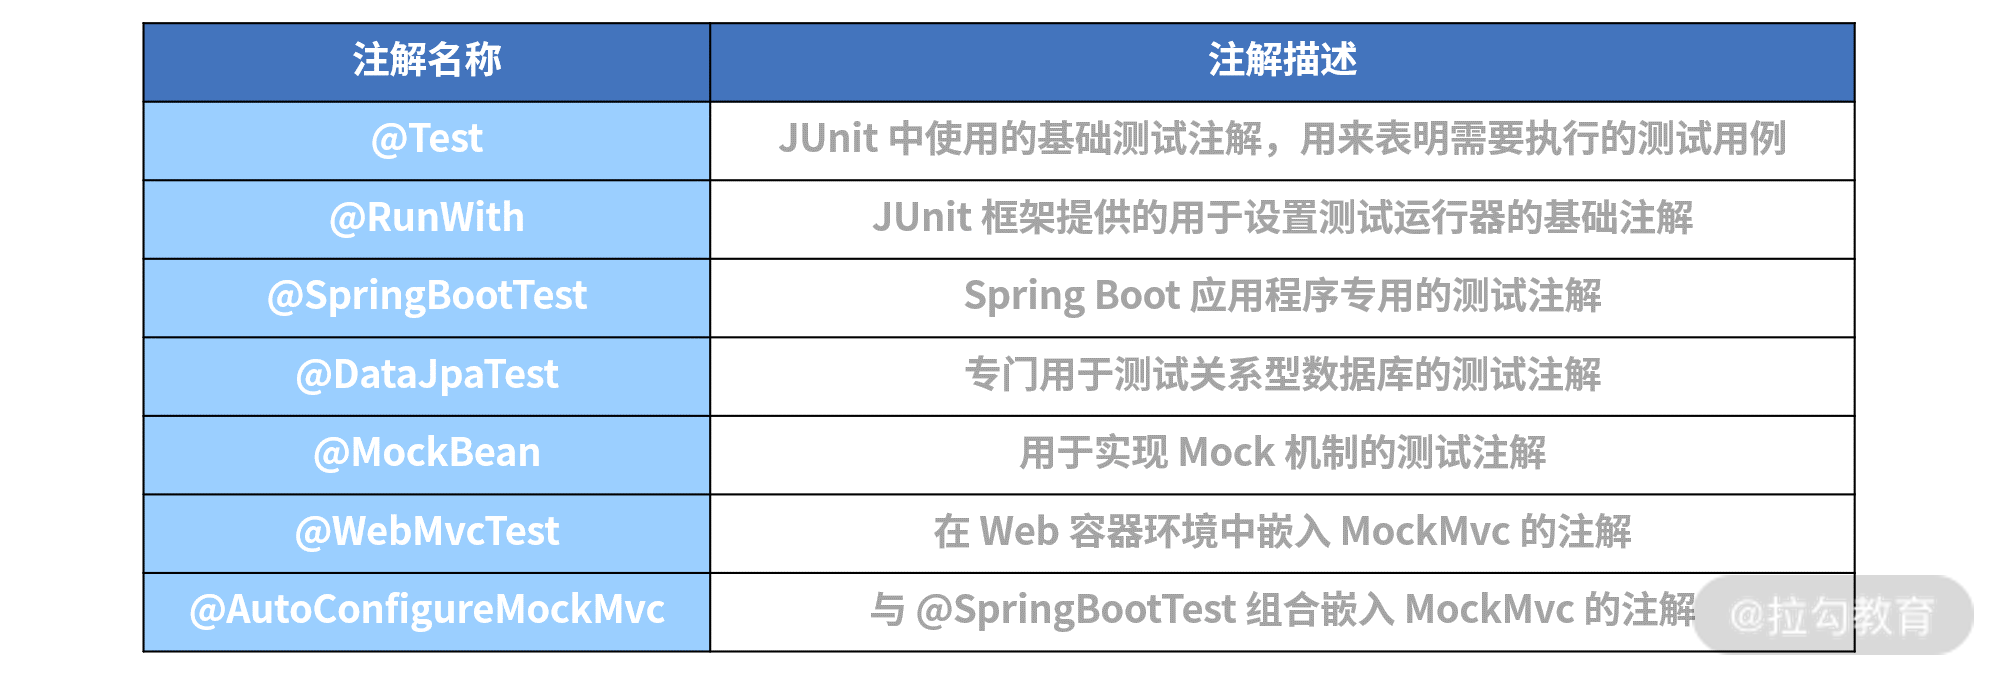
通过前面内容的学习,相信你已经感受到了各种测试注解在测试 Spring Boot 应用程序的过程中所发挥的核心作用。
如下所示表格,我们罗列了一些经常使用的测试注解及其描述。
版权归原作者 我乐了. 所有, 如有侵权,请联系我们删除。