
引言
对于文件上传,在开发主要涉及到以下两个方面:
- 单个文件上传
- 和表单一起实现上传(这种情况一般都是文件上传之后,后端返回保存在服务器的文件名,最后和我们的表单一起上传)
单文件上传
element-ui中的el-upload组件默认发送post请求,在使用upload组件自动携带的请求方式发送。因此详情可参考elenent-ui官网 Element-UI官网
以下使用手动上传着重介绍一下el-upload的一部分属性参数
<el-upload
  class="upload-demo"
  ref="upload"
  action="https://jsonplaceholder.typicode.com/posts/":on-preview="handlePreview":on-remove="handleRemove":auto-upload="false"
  list-type="picture"><el-button slot="trigger" size="small" type="primary">选取文件</el-button><el-button style="margin-left: 10px;" size="small" type="success" @click="submitUpload">上传到服务器</el-button><div slot="tip"class="el-upload__tip">只能上传jpg/png文件,且不超过500kb</div></el-upload><script>exportdefault{data(){return{
        fileList:[]};},
    methods:{handleRemove(file, fileList){
        console.log(file, fileList);},handlePreview(file){
        console.log(file);},submitUpload(){this.$refs.upload.submit();},}}</script>
- data 上传时可携带的参数,这里后台用map接收
- file-list 上传的文件列表, 例如: [{name: ‘food.jpg’, url: ‘https://xxx.cdn.com/xxx.jpg’}]
- on-success 上传成功之后的钩子,可以用来清除表单校验和文件列表
- on-error 上传失败之后的钩子
- auto-upload 是否在选取文件后立即进行上传,默认为true,会自动上传,false取消自动上传
- list-type 文件列表的类型 text/picture/picture-card 默认text
- on-preview 点击文件列表中已上传的文件时的钩子
- on-change 文件状态改变时的钩子,添加文件、上传成功和上传失败时都会被调用
- slot=“trigger” 触发文件选择框的内容
- slot=“tip” 提示说明文字
和表单一起上传
需求:需同时给后端传文件FormData和其他所需参数
实现方法一:
关键点:el-upload的http-request方法获取文件File信息和FormData方式传参
http-request :覆盖默认的上传行为,可以自定义上传的实现;函数的参数里包含file对象,filename字段,action字段,以及onProgress,onSuccess,onError三个函数,可以在自定义上传中,在不同时机调用这些函数,会触发upload组件传入的上传钩子函数
<!-- 文件上传--><el-form :rules="rules":model="dataForm" ref="dataForm" label-width="150px" @submit.native.prevent><el-form-item label="名称:" prop="name"><el-input type="text" v-model.trim="dataForm.name" clearable></el-input></el-form-item><el-form-item label="文件:" prop="file"><el-upload
            class="upload-import"
            ref="uploadImport":http-request="httpRequest"
            action="":on-remove="handleRemove":file-list="fileList":limit="1"<!-- 限制上传数量-->:on-change="handleChange":auto-upload="false"<!-- 关闭自动上传-->
            accept="application/zip,.zip"><!-- 设置接收的文件类型--><el-button v-show="!hasFile" slot="trigger" size="small" type="primary">选取文件</el-button><div slot="tip"class="el-upload__tip">只能上传zip文件,且不超过10M</div></el-upload></el-form-item><el-form-item><el-button type="primary" @click="submitUpload">提交</el-button><el-button @click="resetForm('ruleForm')">重置</el-button><el-button @click="dialogFormVisible = false">取 消</el-button></el-form-item></el-form><script>exportdefault{data(){return{
            dataForm:{
              name:'',
              file:null},
            rules:{
              name:[{required:true, message:"请输入名称", trigger:"blur"},{max:50, message:"最长可输入50个字符", trigger:"blur"},{validator: isvalidatName, trigger:"blur"},],
              file:[{required:true, message:"请选择上传文件", trigger:"blur"},]},
        hasFile:false,
        fileList:[]},
    methods:{handleRemove(file, fileList){if(!fileList.length){this.hasFile =false;}this.dataForm.file =null;},handleChange(file, fileList){if(fileList.length >=2){return;}if(fileList.length ===1){this.hasFile =true;}this.dataForm.file = file;},//确定按钮//调用组件upload的submit方法,从而触发httpRequest方法,实现手动上传submitUpload(){this.$refs.dataForm.validate(valid=>{if(vaild){this.$refs.uploadImport.submit();}})},httpRequest(param){let fd =newFormData();
              fd.append('file', param.file);// 传文件
              fd.append('name',  dataForm.name);//dataPar.file.raw
              axios.post('/interface/importProject', fd ,{
                headers:{'Content-Type':'multipart/form-data'},//定义内容格式,很重要
                timeout:20000,}).then(response=>{
                console.log(res)//接口成功调用params上的onSuccess函数,会触发默认的successHandler函数//这样可以用自带的ui等///params.onSuccess({name: 'eric'})}).catch(err=>{})}})}}}</script>
实现方法二:
关键点:把表单数据作为上传时附带的额外参数提交给后台就好了。
<el-dialog title="添加歌曲":visible.sync="dialogFormVisible"><el-form :model="form":rules="rules" ref="ruleForm" label-width="100px"class="demo-ruleForm"><el-form-item label="曲名" prop="name"><el-input v-model="ruleForm.name"></el-input></el-form-item><el-form-item label="专辑" prop="introduction"><el-input  v-model="ruleForm.introduction"></el-input></el-form-item><el-form-item label="歌词" prop="lyric"><el-input type="textarea" v-model="ruleForm.lyric"></el-input></el-form-item><el-form-item label="歌曲文件" prop="introduction"><el-upload
           ref="upload":action="url":limit="2"
           multiple
           :with-credentials="true":on-success="upFile":on-remove="handleRemove":on-exceed="handleExceed":data="upData":auto-upload="false"
           accept=".KEY, .CRT"><img src="/static/images/web/upload.png" alt><span>选择上传文件</span><div slot="tip"class="el-upload__tip">只能上传.key/.crt文件,且只能上传两个</div></el-upload></el-form-item><el-form-item><el-button type="primary" @click="submitUpload">提交</el-button><el-button @click="resetForm('ruleForm')">重置</el-button><el-button @click="dialogFormVisible = false">取 消</el-button></el-form-item></el-form></el-dialog>
data(){return{
      url: service.defaults.baseURL +"aaa/bbb",// 这里写上传文件的地址
      form:{
        name:"",
        introduction:"",
        lyric:"",}};},
computed:{// 这里定义上传文件时携带的参数,即表单数据upData:function(){return{
        body:JSON.stringify(this.form)}}},
methods:{add(form){this.$refs[form].validate(asyncvalid=>{if(valid){// 表单验证通过后使用组件自带的方法触发上传事件this.$refs.upload.submit()}else{returnfalse;}});},// 成功上传文件upFile(res, file){if(res.status ==200){// 文件上传成功后的回调,比如一些提示信息或者页面跳转都写在这里this.$message.success(res.info);}else{this.$message.warning(res.info);let _this =this;setTimeout(function(){
        _this.$refs.upload.clearFiles();},1000);}},// 上传文件超出个数handleExceed(files, fileList){this.$message.warning(`当前只能选择上传2 个证书`);},//  移除文件handleRemove(res, file, fileList){this.$message.warning(`移除当前${res.name}证书,请重新选择证书上传!`);}}
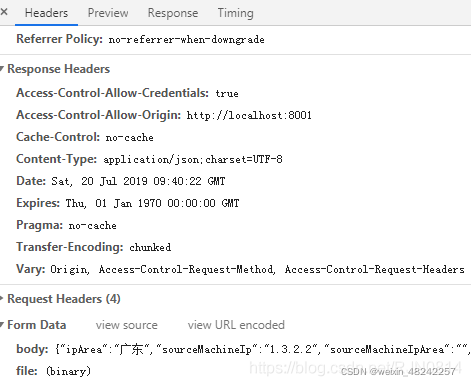
因为文件上传使用的是Content-Type: multipart/form-data;携带参数使用的是FormData格式,我们需要把表单数据转换一下格式,后台才能接收到。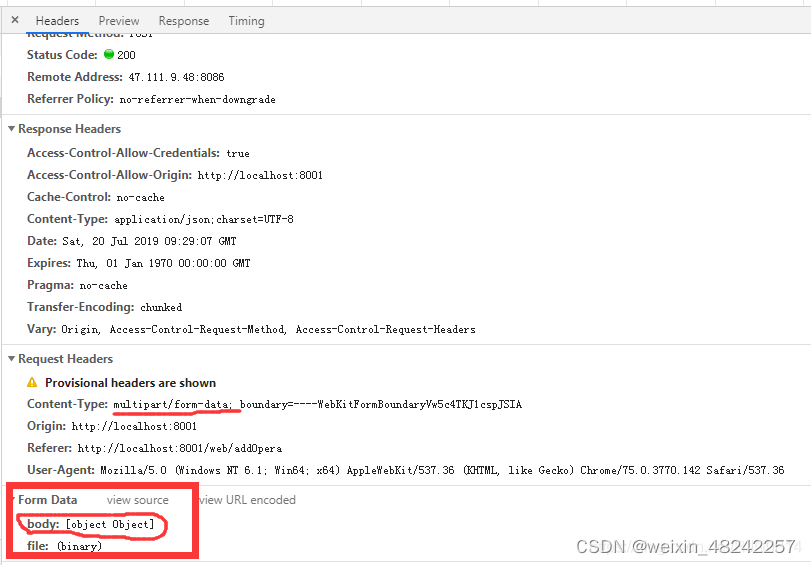
将body的格式进行转换一下:
JSON.stringify() 方法将一个 JavaScript 对象或值转换为 JSON 字符串
JSON.parse()可以将JSON字符串转为一个对象。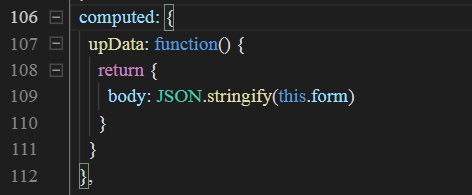
数据的编码方式
在此之前可以先了解一下文件上传的编码方式
http协议规定 POST 提交的数据必须放在消息主体(entity-body)中,但协议并没有规定数据必须使用什么编码方式。实际上,开发者完全可以自己决定消息主体的格式,只要最后发送的 HTTP 请求满足上面的格式就可以。
但是,数据发送出去,还要服务端解析成功才有意义。一般服务端语言如 php、python ,java等,以及它们的 framework,都内置了自动解析常见数据格式的功能。服务端通常是根据请求头(headers)中的 Content-Type 字段来获知请求中的消息主体是用何种方式编码,再对主体进行解析。
前端HTTP发POST请求携带参数与后端接口接收参数
补充:代理的使用
action:代表上传的地址,在开发中一般写成动态绑定的属性,在计算属性中决定其最终值。
<el-upload
  :action="uploadURL"></el-upload><script>exportdefault{data(){return{
        uploadURL:'',};},
    computed:{uploadURL(){if(process.env.NODE_ENV==='production'){return'/api/uploadFile'}return'/dev-api/api/uploadFile'}}}</script>
为什么要区分运行环境来使用不同的url?因为开发环境配置了代理
 proxy:{[REQUEST_PRE]:{
       target:'http://localhost:88',
       changeOrigin:true,
       secure:false,
       pathRewrite:{['^'+ process.env.VUE_APP_BASE_API]:''}},}
而这个值在开发环境中是"/dev-api",在生产环境是“/”
所以开发环境需要在开头加上"/dev-api",生产环境则不需要
那为什么只有这一个要单独处理,其他的url不需要呢?因为其他的url是通过axios请求的,axios中配置了baseUrl,所以其他的url不需要单独处理了
什么是代理?为什么要用代理
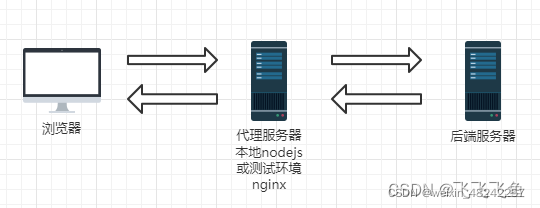
因为开发环境是配置了代理的,代理就是通过一个特殊的网络服务去访问另一个网络服务的一种间接访问方式。像我们不能直接访问国外的网站,只能使用VPN,就是是使用了代理。
那么前端为什么要代理?
- 前端应用的要能访问,那必须是放在服务器上,(服务器可以是nginx、node.js、apache、tomcat等),我们本地vue开发就是用nodejs启动了一个服务。
- 由于浏览器的同源策略(协议,IP,端口号都相同为同源),禁止网站向非同源的服务器发送ajax异步请求,也就是跨域。
因此使用代理来解决跨域问题
代理的使用
Vue代理配置
vuecli3的代理设置在vue.config.js->devServer->proxy
vite构建的vue代理设置在 vite.config.js->server->proxy
(Vite 是 vue 的作者尤雨溪在开发 vue3.0 的时候开发的一个 基于原生 ES-Module 的前端构建工具)
他们的代理配置是一样的,这里以vuecli3为例:
constREQUEST_PRE="/api"
module.exports ={// 其他配置省略// 本地代理配置
    devServer:{// 默认是false,可以将http://localhost:8080 变为 https://localhost:8080
        https:true,// 代理配置
        proxy:{// 简单写法"/normal":{
                target:'http://localhost:80',
                ws:true,// 允许websocket代理
                changeOrigin:true//允许跨域},// 变量写法[REQUEST_PRE]:{
                target:'http://localhost:88',
                ws:true,
                changeOrigin:true},// 重写,当访问http://localhost:80/req/getData// 实际上访问的是 http://localhost:8888/module/getData'/req':{
                target:'http://localhost:8888',pathRewrite:path=> path.replace('/req','/module'),//replace方法返回一个替换好的新的字符串
                ws:true,
                changeOrigin:true},},
        open:true}}
注意(坑点):
1、后面的反斜杠要保持一致,虽然对接口调用没有影响,但是对代理文件的相对路径有影响
如 /req,target就写 http://localhost:8888
如 /req/,target就写 http://localhost:8888/
2、不管是vuecli还是vite,同前缀代理是有前后顺序的,只生效前面的
比如当你调用 localhost:8080/api/other/getData
下面的写法会代理到 8888
'/api':'http://localhost:8888','/api/other':'http://localhost:88'
下面的写法会代理到 88
'/api/other':'http://localhost:88','/api':'http://localhost:8888'
接口调用
constREQUEST_PRE='/api'
axios.get({
    url:`${REQUEST_PRE}/getData`}).then(res=>{
    console.log(res)})
3、pathRewrite:对象/函数,重写目标的 url 路径。对象键将用作正则表达式来匹配路径。
// 重写路径
pathRewrite:{'^/old/api':'/new/api'}// 删除路径
pathRewrite:{'^/remove/api':''}// 添加基本路径
pathRewrite:{'^/':'/basepath/'}// 自定义重写pathRewrite:function(path ,  req){return  path . 替换('/api' , '/base/api' ) }// 自定义重写,返回 Promise pathRewrite:asyncfunction(path ,  req){const  should_add_something  =awaithttpRequestToDecideSomething( path );if( should_add_something )  path  +="something";
  返回 路径;
}
Proxy文档参考地址
process.env.NODE_ENV
- process 是 node 的全局变量,并且 process 有 env 这个属性,但是没有 NODE_ENV 这个属性
- NODE_ENV这个变量并不是 process.env 直接就有的,而是通过设置得到的。这个变量的作用是:我们可以通过判断这个变量区分开发环境或生产环境。
- 当我们设置 mode 为 development 或者 production时,webpack会自动的进行一些设置
mode: development --> process.env.NODE_ENV= development
mode: production --> process.env.NODE_ENV= production
默认情况下 --> process.env.NODE_ENV = production
版权归原作者 weixin_48242257 所有, 如有侵权,请联系我们删除。