Java基础知识点汇总
一. Java基础语法
1. 类型转换
// 强制类型转换float a =20.34f;int b =(int)a;
//自动类型转换int c =10;float d = c;
//操作较大的数时,注意溢出问题//JDK7新特性,数字之间可以用下划线分割int money =10_0000_0000;int years =20;long total = money * years;//默认两个参数都是int,计算的时候产生溢出System.out.println(total);//-1474836480long total_2 = money*((long)years);//先把一个数转化为longSystem.out.println(total_2);//20000000000
2. 方法
publicstaticvoidmain(String[] args){// 可变参数的传递Demo01 demo =newDemo01();
        demo.printMax(2,485,1,2,344,5);}publicvoidprintMax(int...numbers){//仅能为最后一个参数才能使用...}
3. 位运算
//位运算/*
        * A = 0011 1100
        * B = 0000 1101
        * --------------
        * A & B = 0000 1100       对应位置都为1才为1
        * A | B = 0011 1101       对应位置有一个为1,结果为1
        * A ^ B = 0011 0001       对应位置相同为0,不同为1
        * ~ B = 1111 0010         对应位置取反
        *
        *
        * 2 * 8 =16,  2*2*2*2
        * << 左移  *2
        * >> 右移  /2
        *
        * 0000 0000   0
        * 0000 0001   1
        * 0000 0010   2
        * 0000 0011   3
        * 0000 0100   4
        * 0000 1000   8
        * 0001 0000   16
        *
        * */
4. 循环
//增强for循环int[] numbers ={10,20,30,40};for(int x:numbers){System.out.println(x);}
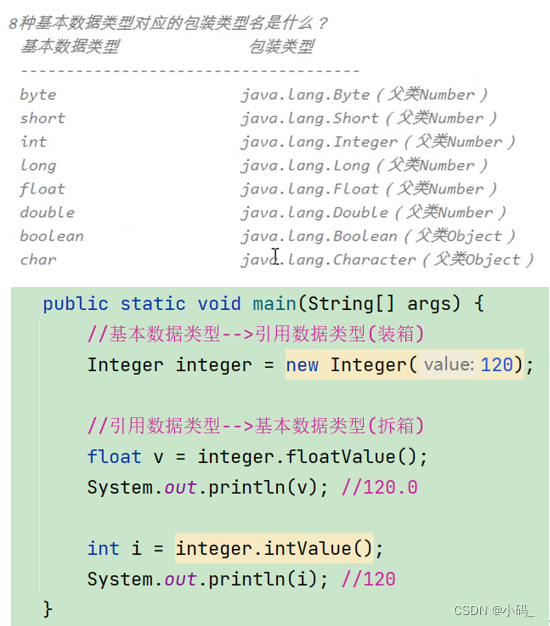
5. 装箱与拆箱
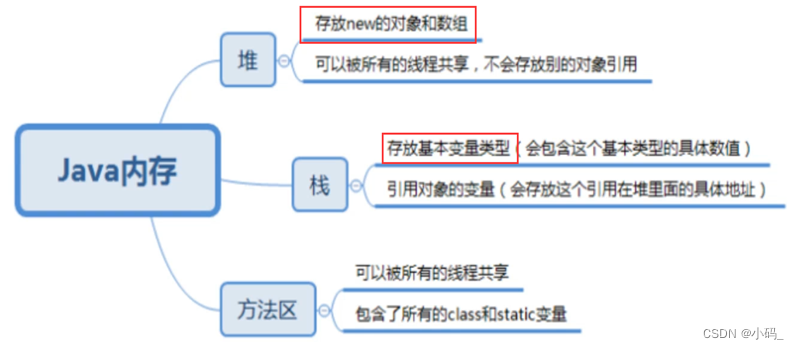
6. 内存分析
二. 面向对象
1. 概念
面向对象的本质:以类的方式组织代码,以对象的方式封装数据。
三大特性:封装,继承,多态。
2. 对象的初始化与创建
使用new关键字创建的时候,除了分配内存空间之外,还会给创建好的对象进行默认的初始化以及对类中的构造器的调用。一旦定义了有参构造,无参构造就必须要显示定义。
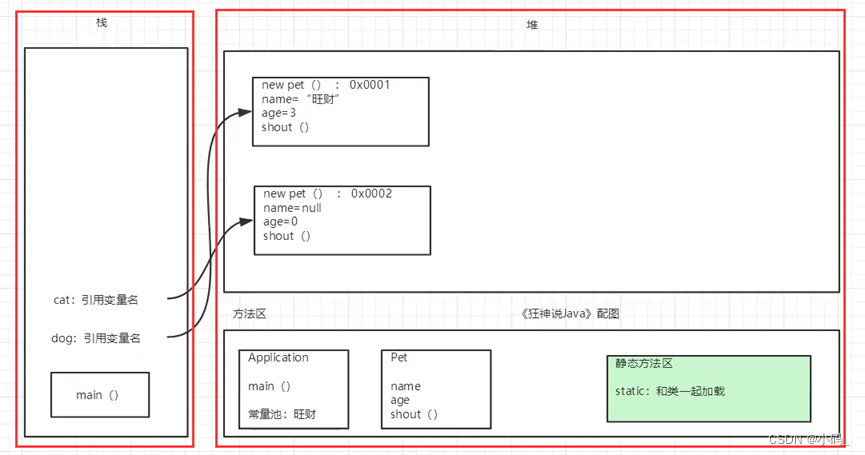
3. 创建对象的内存分析
4. 封装
程序设计的要求:“高内聚,低耦合”。高内聚就是类的内部数据操作细节自己完成,不允许外部干涉;低耦合:仅暴露少量的方法给外部使用。
封装(数据的隐藏):应禁止直接访问一个对象中数据的实际表示,而应通过操作接口来访问。
5. 继承
所有的类都默认直接或者间接继承Object类。JAVA中类只有单继承,无多继承。私有的东西无法被类继承。
6. 多态
多态存在的条件:① 有继承关系。② 子类重写父类的方法。③ 父类引用指向子类对象。④ 多态是方法的多态,属性没有多态。⑤ 对象能够执行的方法,主要看左边的类型。当子类重写了父类的方法,所调用的皆是子类的方法。
7. Instanceof
Java 中的instanceof 运算符是用来在运行时指出对象是否是特定类的一个实例。instanceof通过返回一个布尔值来指出,这个对象是否是这个特定类或者是它的子类的一个实例。
8. Static关键字、代码块
Static关键字:和类一起加载,可以直接通过 (类名.静态方法) 调用方法。
代码块:执行顺序:静态代码块 > 构造方法 > 匿名代码块。静态代码块只执行一次,即使有多个同一个类的实例,仍只运行一次。
9. 抽象类
① 抽象方法,只有方法的名字,没有方法的实现。② 不能new抽象类,只能靠子类来实现。③ 抽象方法必须在抽象类中,抽象类中可以有普通方法。③ 抽象类的所有方法,都需要由它的子类来实现。 除非子类为抽象类,则由子子类实现。
10. 接口
① Interface 定义的关键字,接口都需要有实现类。② 接口中所有方法都是抽象的:public abstract,接口只可做方法的声明。 ③ 类实现接口需要重写接口中的所有方法。④ 利用接口可以实现多继承。
11. 方法的重写和重载
- 方法的重写① 需要有继承关系,子类重写父类的方法,与属性无关。② 方法名相同,参数列表必须相同,方法体不同。③ 修饰符范围可以扩大但不能缩小:public>protected>default>private。 ④ 抛出的异常范围可以缩小但不能扩大。 ⑤ 重写的原因:父类的功能,子类可能不需要或不满足。
- 方法的重载① 重载就是在同一个类中,有相同的函数名称,但形参不同的函数。② 方法名必须相同,参数列表必须不同(参数个数不同,或类型不同,或参数排列顺序不同等) ③ 方法的返回类型可以相同也可以不同。④ 仅仅返回类型不同不足以构成方法的重载。
三. 异常处理
- 异常两大类:Exception、Error。
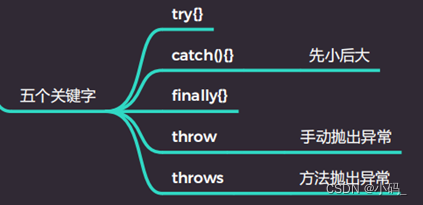
- 若多个catch捕获异常,异常等级由小到大。Finally可以不要,一定会执行,用于处理善后工作。
- 自定义异常类:类继承Exception。Throw new MyException():抛出自定义异常。
四. 集合
1. 集合的概念
① 集合是对象的容器。
② 集合不能直接存储基本数据类型,集合也不能直接存储java对象,集合当中存储的都是java对象的内存地址。(或者说集合中存储的是引用)
③ 集合类和集合接口都在java.util.* 包下。
④ 数组可存储基本类型和引用类型,集合只能存储引用类型。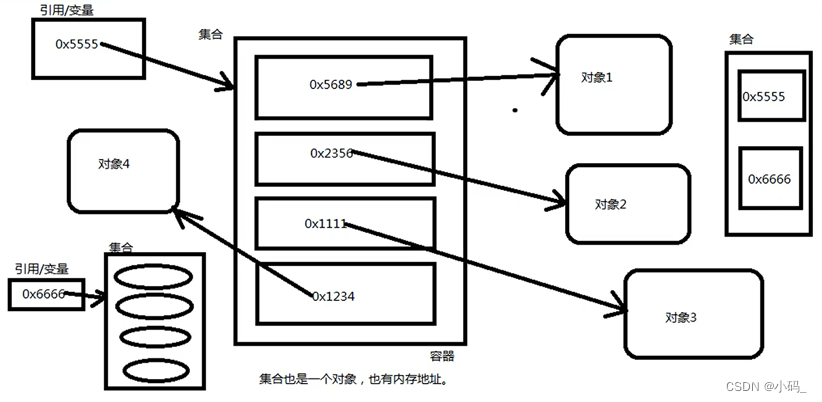
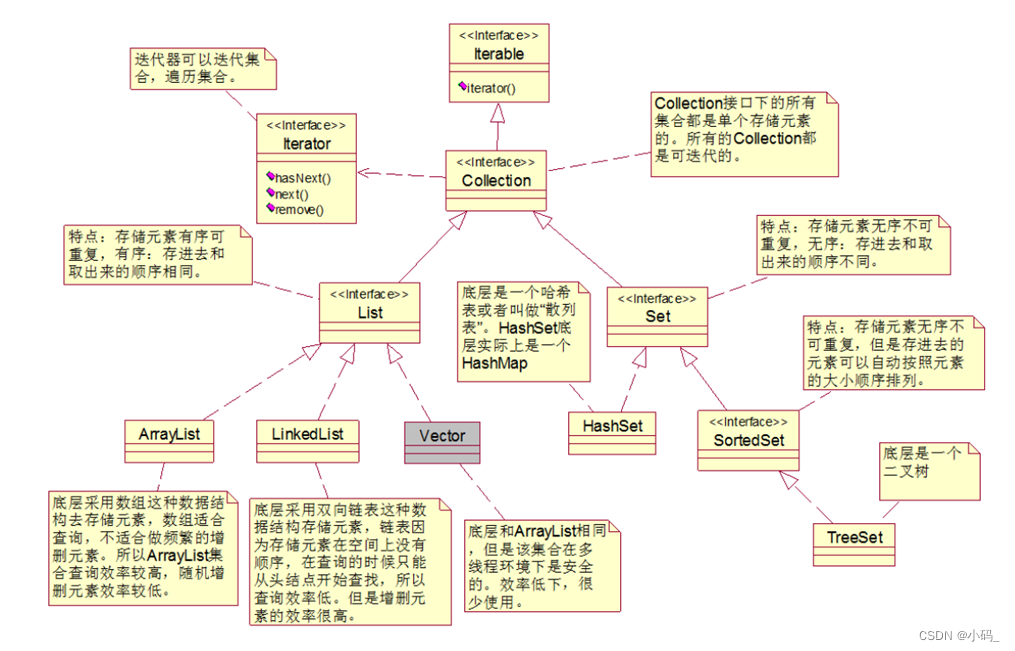
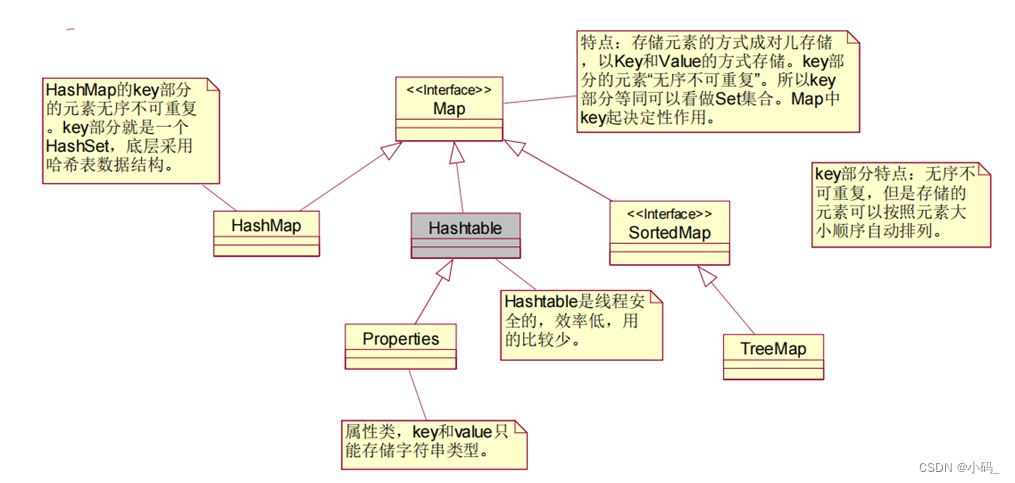
2. Collection体系
3. Collection中常用方法
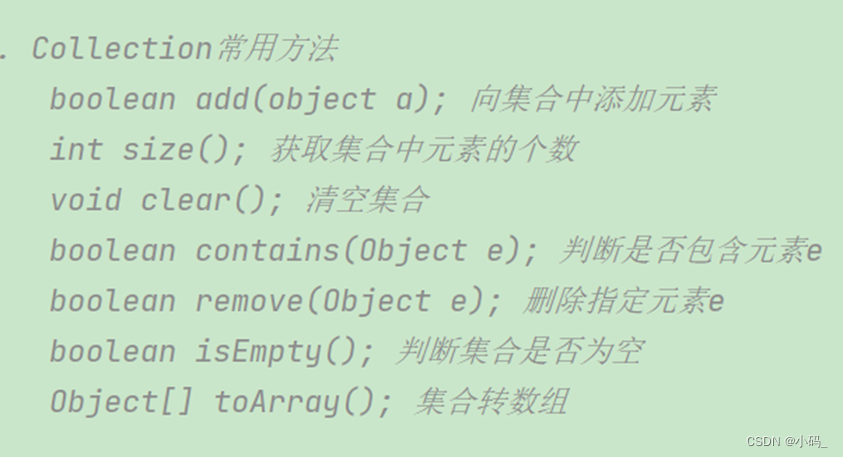
4. Iterator迭代器


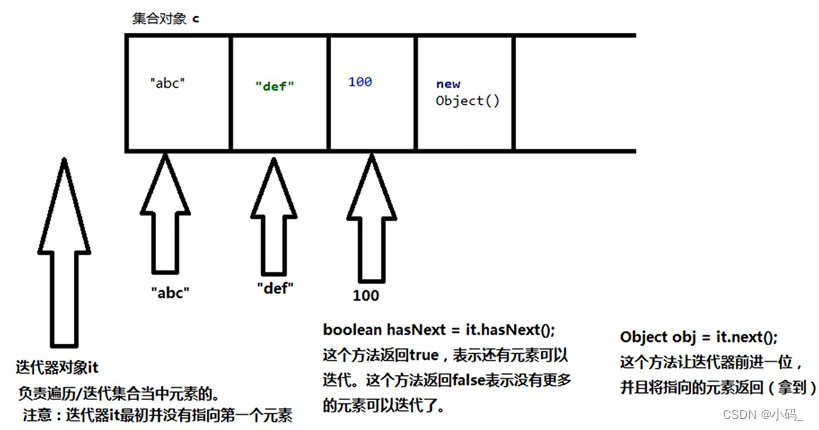
publicstaticvoidmain(String[] args){//以下遍历方式/迭代方式,是所有collection通用的一种方式。 在Map集合中不能使用。//创建集合对象Collection c =newArrayList();//后面的集合无所谓,主要是看前面的collection接口,怎么遍历/迭代。//添加元素
        c.add(120);
        c.add("hello");
        c.add(newObject());//对集合Collection进行遍历/迭代//第一步:获取集合对象的迭代器对象IteratorIterator it = c.iterator();//第二步:通过上步获得的迭代器进行遍历/*
        * 迭代器对象iterator中的方法:
        * boolean hasNext(); 如果仍有元素可以迭代,返回true。
        * Object next(); 返回迭代的下一个元素。Object obj = it.next();
        * */System.out.println("集合中元素有:");while(it.hasNext()){Object o = it.next();System.out.println(o);}}
5. Contains方法
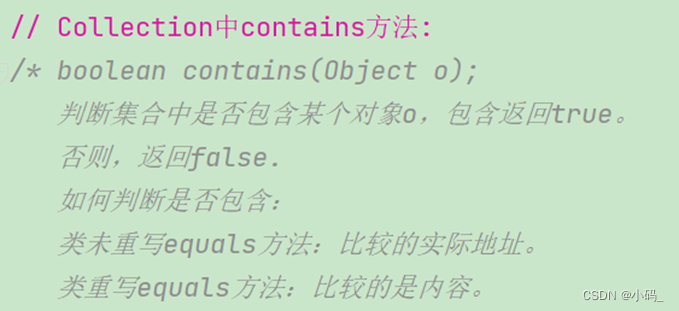

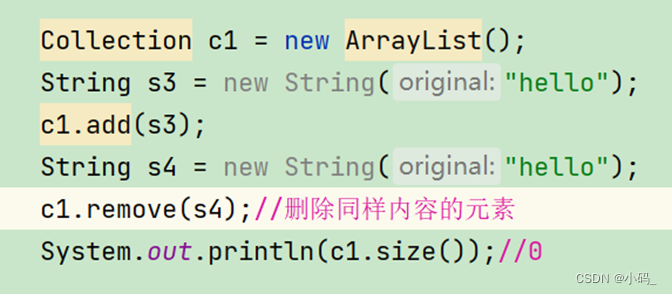
6. 集合转数组
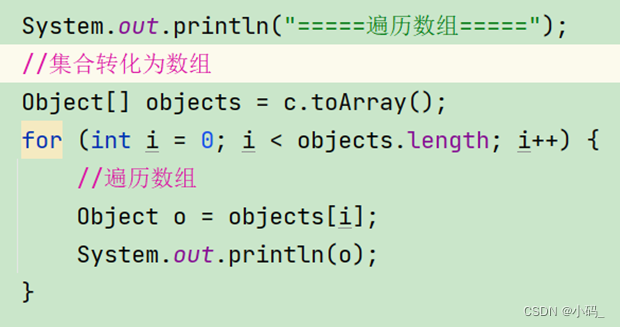
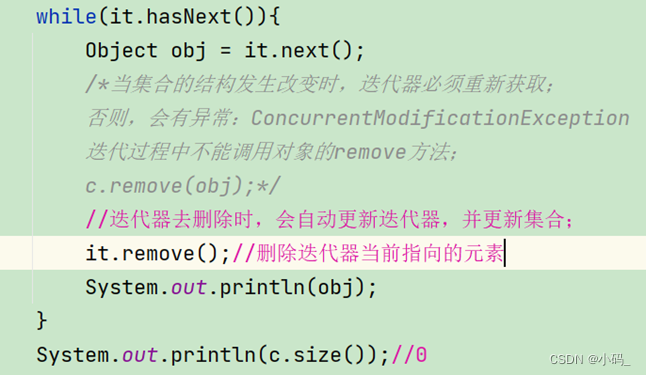
7. Remove方法
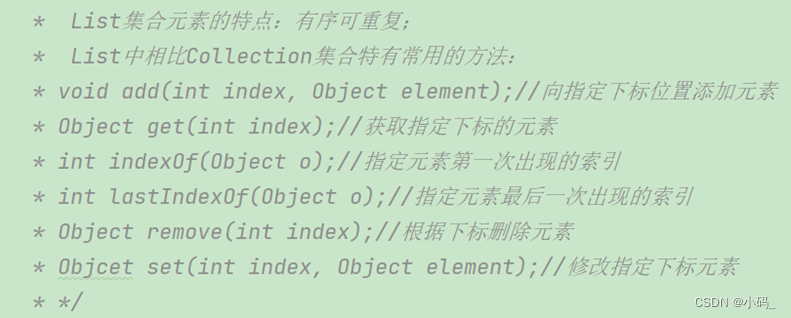
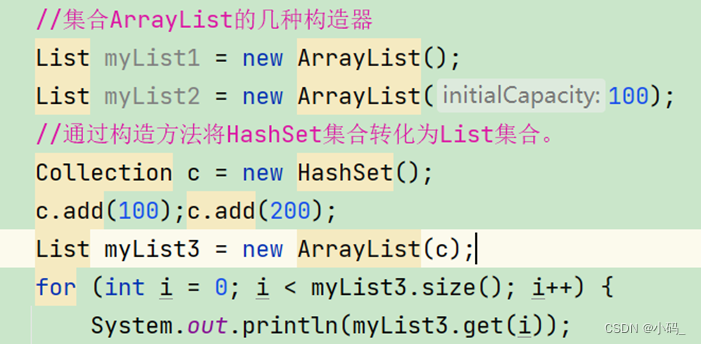
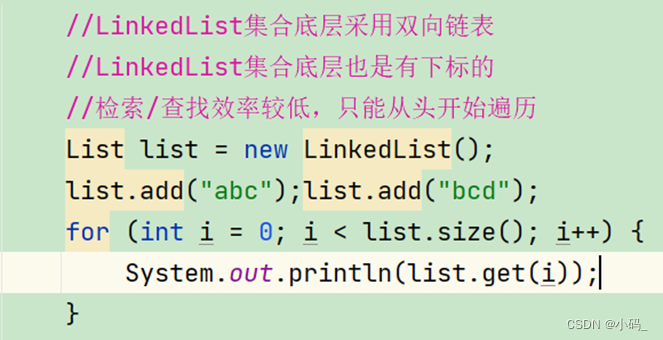
8. List集合
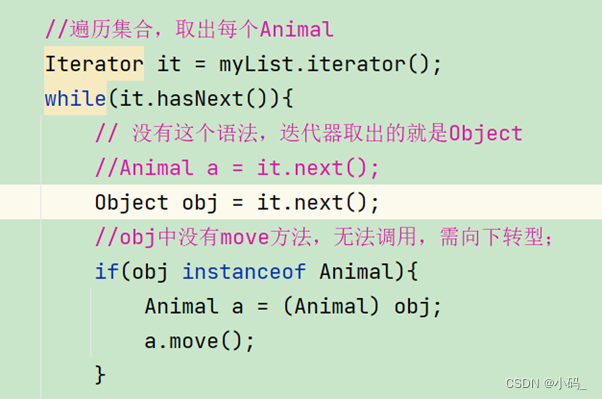
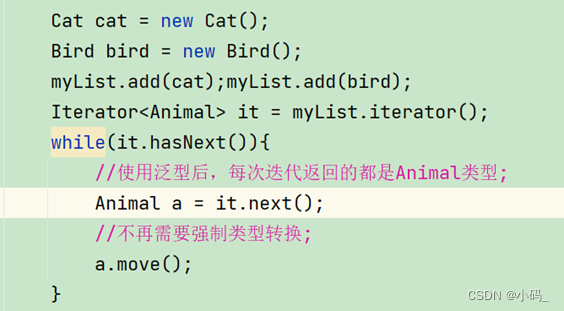
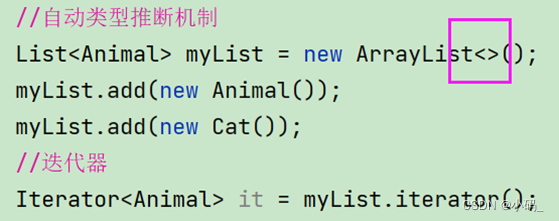
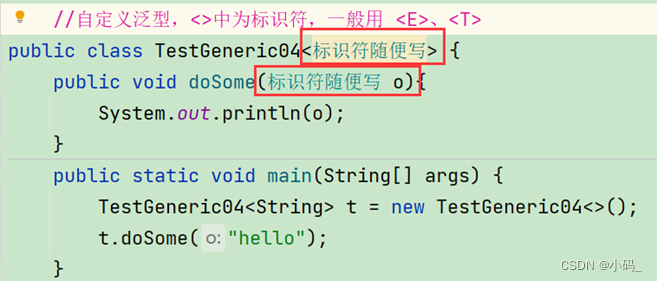
9. 泛型


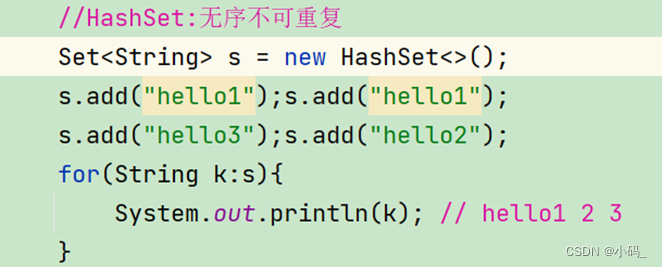
10. HashSet集合
11. TreeSet集合

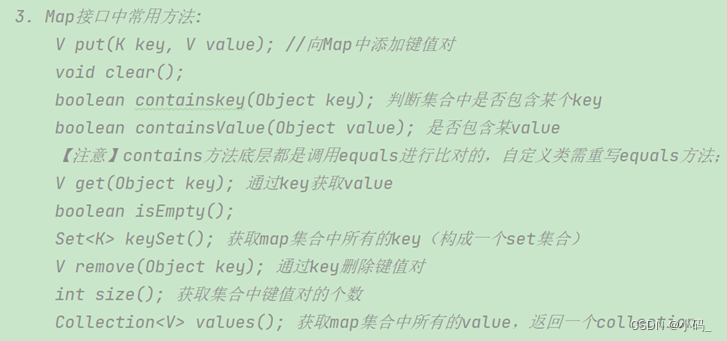
12. Map接口常用方法


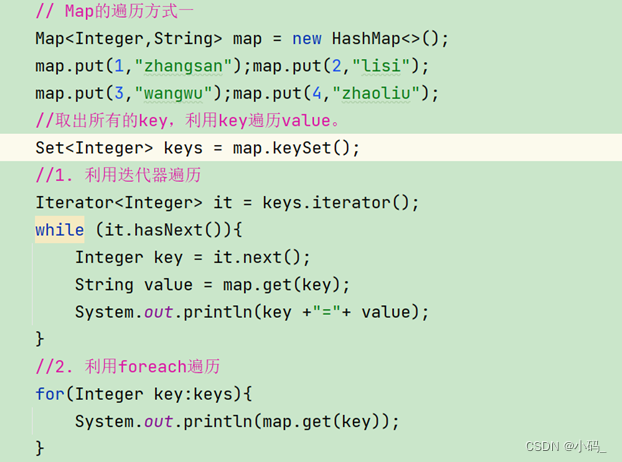
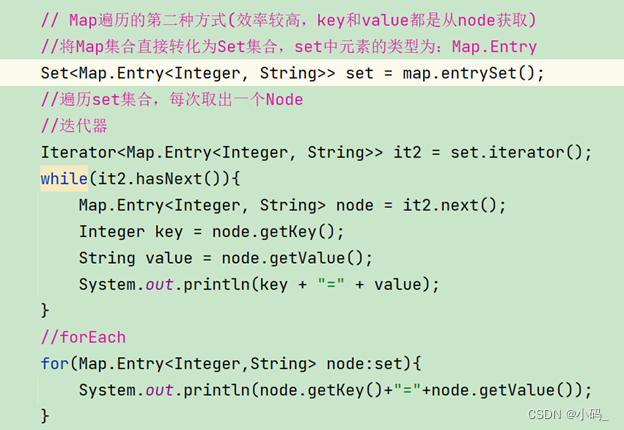
13. Map的遍历

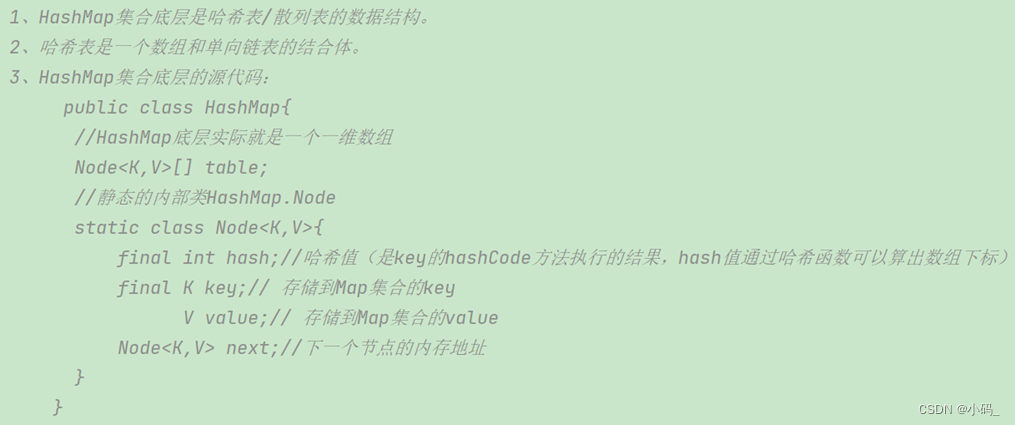
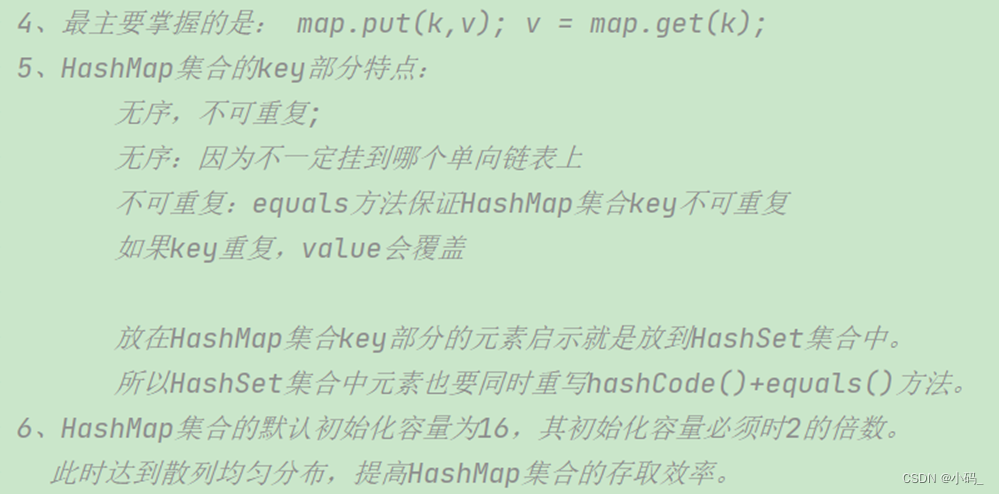
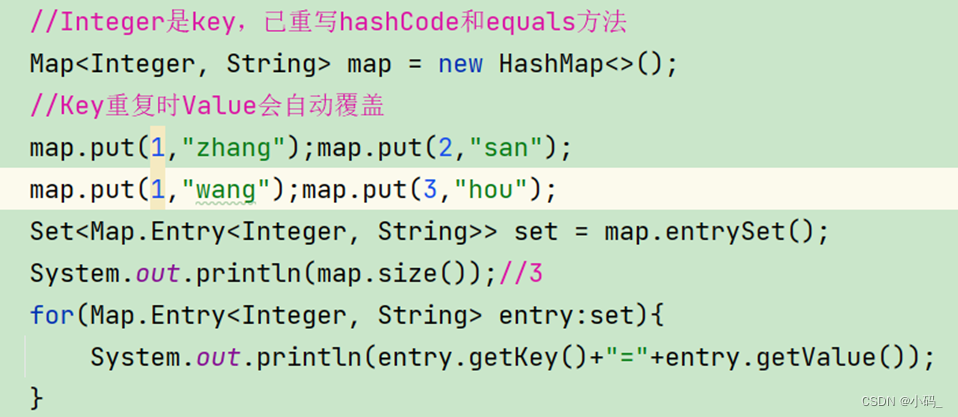
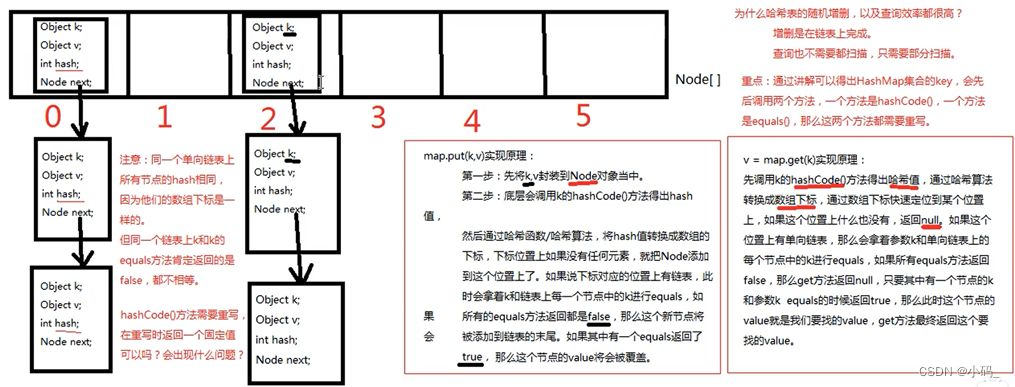
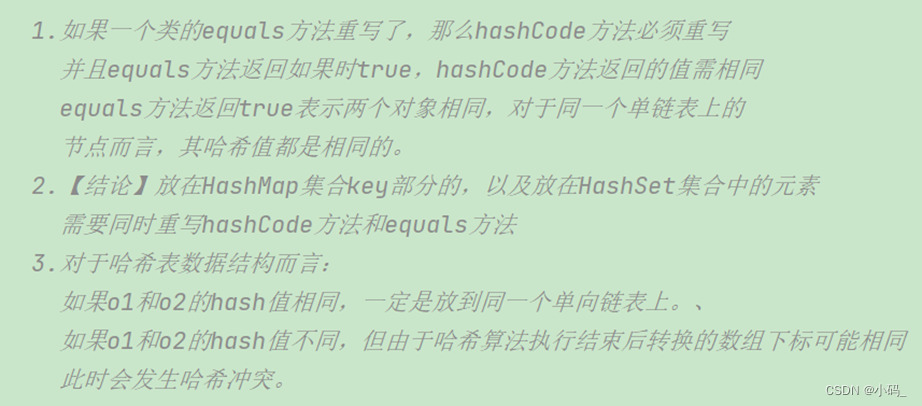
14. HashMap

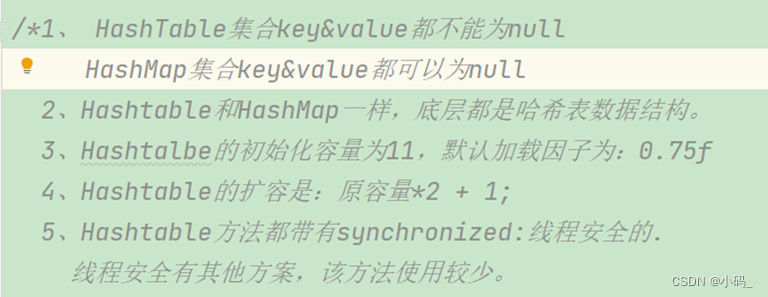
15. HashTable集合
16. Properties集合


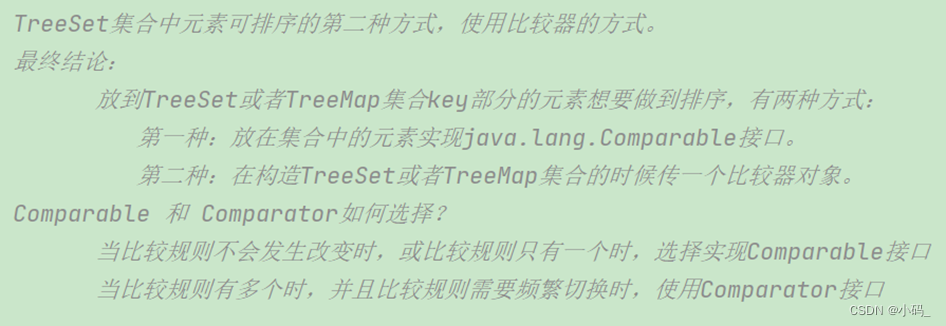
17. TreeSet集合元素排序
方法一:类实现Comparable接口,重写compareTo方法。

//自定义类型实现comparable接口,放在TreeSet集合后实现排序。//放在TreeSet集合中的元素需要实现java.lang.Comparable接口。//并且实现compareTo方法,equals方法可以不写。classCustomerimplementsComparable<Customer>{int age;publicCustomer(int age){this.age = age;}//需要在这个方法中实现比较的逻辑或规则,有程序员指定。@OverridepublicintcompareTo(Customer o){returnthis.age - o.age;//比较年龄大小}@OverridepublicStringtoString(){return"Customer{"+"age="+ age +'}';}}
方法二:编写一个类,实现Comparator接口,重写compare方法。

//给构造方法传递一个比较器TreeSet<WuGui> wuGuis =newTreeSet<>(newWuGuiComparator());//单独写一个比较器,实现java.util.Comparator接口。//而Comparable是Java.lang包下的。classWuGuiComparatorimplementsComparator<WuGui>{@Overridepublicintcompare(WuGui o1,WuGui o2){return o1.age - o2.age;}}classWuGui{int age;publicWuGui(int age){this.age = age;}@OverridepublicStringtoString(){return"WuGui{"+"age="+ age +'}';}}
方式三:匿名内部类,不单独写构造器。

//第三种方式使用匿名内部类,不用单独写构造器,直接new接口TreeSet<WuGui> wuGuis =newTreeSet<>(newComparator<WuGui>(){@Overridepublicintcompare(WuGui o1,WuGui o2){return o1.age - o2.age;}});
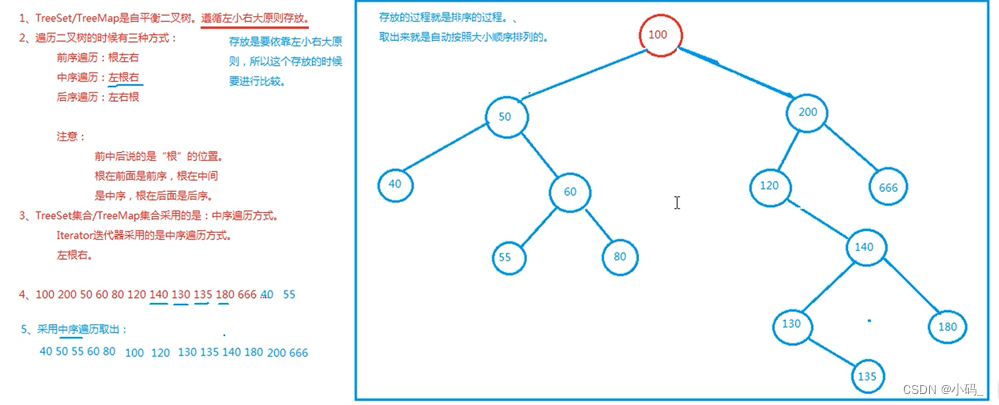
18. 自平衡二叉树
19. Collections工具类
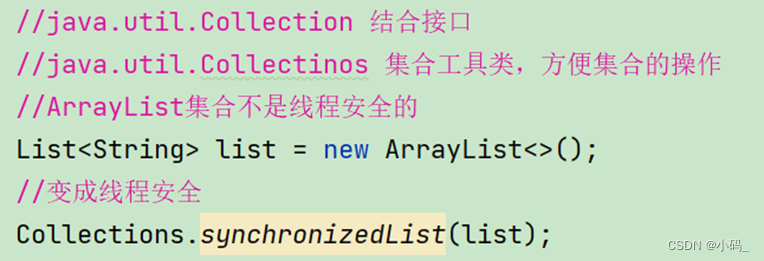
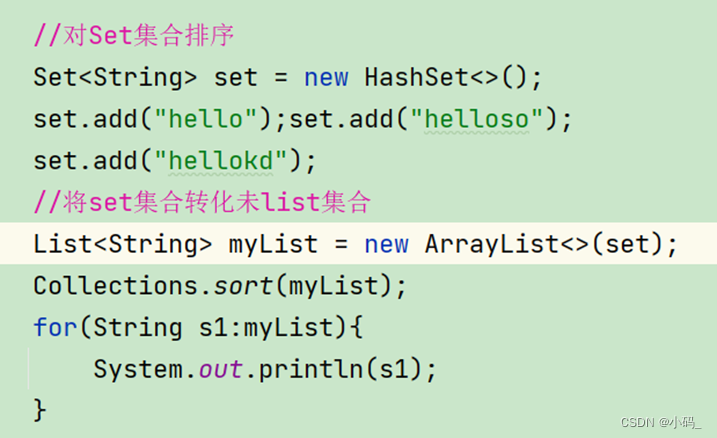
① HashSet输出的元素是无序的(存储自定义类型元素,需重写equals和hashcode方法,避免重复的问题),TreeSet输出的元素自动排序(实现接口,编写比较器)。
② HashMap中元素是没有顺序的;TreeMap中所有元素都是有某一固定顺序的。
五. IO流
1. 什么是IO
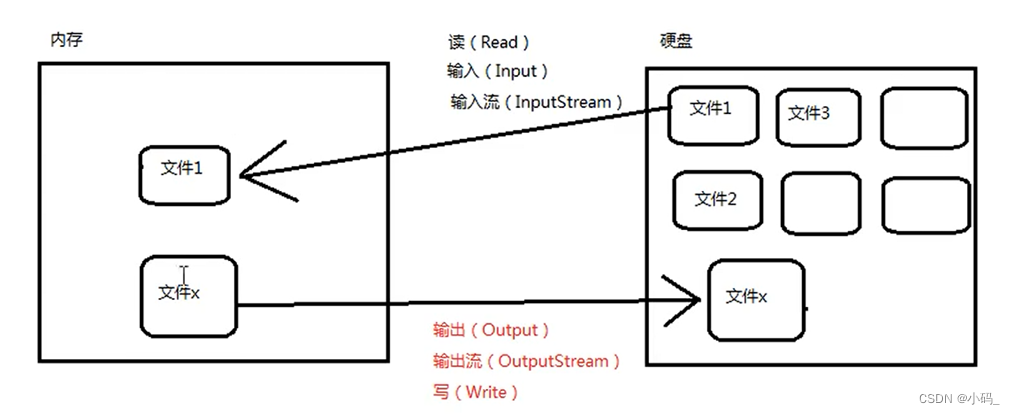
2. IO流的分类
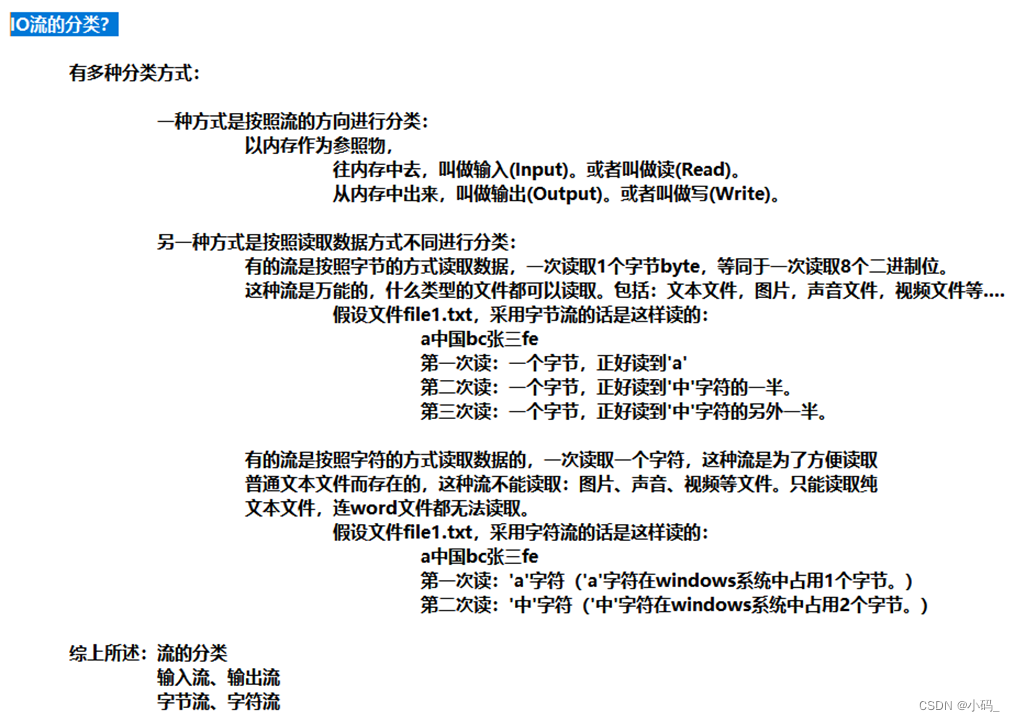
3. IO流四大家族

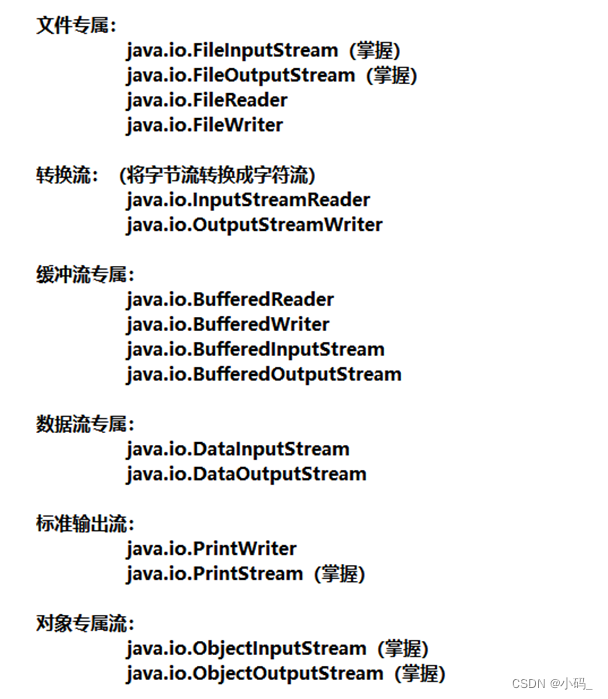
4. FileInputStream和FileOutputStream
publicclassFileInputStreamTest03{publicstaticvoidmain(String[] args){FileInputStream fis =null;try{
            fis =newFileInputStream("tempfile");byte[] bytes =newbyte[4];int readCount =0;while((readCount = fis.read(bytes))!=-1){System.out.print(newString(bytes,0,readCount));}}catch(FileNotFoundException e){
            e.printStackTrace();}catch(IOException e){
            e.printStackTrace();}finally{if(fis !=null){try{
                    fis.close();}catch(IOException e){
                    e.printStackTrace();}}}}}
publicstaticvoidmain(String[] args){FileOutputStream fos =null;try{//文件不存在会自动新建//该语句执行时,会先清空文件内容,然后再写//            fos = new FileOutputStream("testfile.txt");//以追加的方式在文件末尾写,不清空源文件
            fos =newFileOutputStream("testfile.txt",true);//开始写byte[] bytes ={97,98,99,100};//将byte数组全部写出
            fos.write(bytes);//abcd//将byte数组部分写出
            fos.write(bytes,0,2);//abcdabString s ="我是中国人";//将字符串转化为字符数组byte[] bs = s.getBytes();
            fos.write(bs);//abcdab我是中国人//输出流最后要刷新
            fos.flush();}catch(FileNotFoundException e){
            e.printStackTrace();}catch(IOException e){
            e.printStackTrace();}finally{if(fos !=null){try{
                    fos.close();}catch(IOException e){
                    e.printStackTrace();}}}}
5. FileReader和FileWriter
publicstaticvoidmain(String[] args){FileReader reader =null;try{//创建文件字符流
            reader =newFileReader("tempfile");//开始读char[] chars =newchar[4];//往char数组读
            reader.read(chars);for(char c : chars){System.out.print(c);}/*            int readCount = 0;
            while((readCount = reader.read(chars)) != -1){
                System.out.print(new String(chars,0,readCount));
            }*/}catch(FileNotFoundException e){
            e.printStackTrace();}catch(IOException e){
            e.printStackTrace();}finally{if(reader !=null){try{
                    reader.close();}catch(IOException e){
                    e.printStackTrace();}}}}
publicstaticvoidmain(String[] args){FileWriter out =null;try{//            out = new FileWriter("myfile.txt");
            out =newFileWriter("myfile.txt",true);char[] chars ={'我','是','中','国','人'};
            out.write(chars);
            out.write(chars,0,2);

            out.write("java工程师");
            out.write("\n");
            out.write("你好");

            out.flush();}catch(IOException e){
            e.printStackTrace();}finally{if(out !=null){try{
                    out.close();}catch(IOException e){
                    e.printStackTrace();}}}}
6. 文件拷贝
publicstaticvoidmain(String[] args){FileInputStream fis =null;FileOutputStream fos =null;try{
            fis =newFileInputStream("E:\\PPT模板\\An Improved DV-Hop Localization Algorithm Based on Selected Anchors.pdf");
            fos =newFileOutputStream("E:\\An Improved DV-Hop Localization Algorithm Based on Selected Anchors.pdf");byte[] bytes =newbyte[1024*1024];//每次最多读取1Mint readCount =0;while((readCount = fis.read(bytes))!=-1){
                fos.write(bytes,0,readCount);}//刷新
            fos.flush();//fos和fis关闭时,分开try。否则会影响另一个。}catch(FileNotFoundException e){
            e.printStackTrace();}catch(IOException e){
            e.printStackTrace();}finally{//fos和fis关闭时,分开try。否则会影响另一个。if(fos !=null){try{
                    fos.close();}catch(IOException e){
                    e.printStackTrace();}}if(fis !=null){try{
                    fis.close();}catch(IOException e){
                    e.printStackTrace();}}}
publicstaticvoidmain(String[] args){FileReader fr =null;FileWriter fw =null;try{

            fr =newFileReader("javase/src/com/IOStream/FileReaderTest01.java");
            fw =newFileWriter("fileReaderText.txt");char[] chars =newchar[1024*512];int readCount =0;while((readCount = fr.read(chars))!=-1){
                fw.write(chars,0,readCount);}

            fw.flush();}catch(FileNotFoundException e){
            e.printStackTrace();}catch(IOException e){
            e.printStackTrace();}finally{if(fw !=null){try{
                    fw.close();}catch(IOException e){
                    e.printStackTrace();}}if(fr !=null){try{
                    fr.close();}catch(IOException e){
                    e.printStackTrace();}}}}
7. BufferedReader和BufferedWriter
publicstaticvoidmain(String[] args)throwsException{//当一个流的构造方法中需要一个流时,被传进来的流称为节点流//外部负责包装的这个流叫包装流或处理流FileReader reader =newFileReader("fileReaderText.txt");//节点流BufferedReader br =newBufferedReader(reader);//包装流//读行String s =null;while((s = br.readLine())!=null){//读一行文本,不读换行符System.out.println(s);}

        br.close();//关闭包装流自动关闭节点流}
publicstaticvoidmain(String[] args)throwsException{//字节流FileInputStream in =newFileInputStream("fileReaderText.txt");//字节流转化为字符流InputStreamReader reader =newInputStreamReader(in);//BufferedReader构造器只能传字符流BufferedReader br =newBufferedReader(reader);//        //以上合并写法://        BufferedReader br = new BufferedReader(new InputStreamReader//                (new FileInputStream("fileReaderText.txt")));String s =null;while((s = br.readLine())!=null){System.out.println(s);}

        br.close();}
publicstaticvoidmain(String[] args)throwsException{//        BufferedWriter bw = new BufferedWriter(new FileWriter("copy.txt"));BufferedWriter bw =newBufferedWriter(newOutputStreamWriter(newFileOutputStream("copy.txt",true)));//追加
        bw.write("hello");bw.write("\n");
        bw.write("houshuaixin");
        bw.flush();bw.close();}
8. PrintStream
publicstaticvoidmain(String[] args)throwsFileNotFoundException{//java.io.PrintStream:标准的字节输入流,默认输出至控制台//分开写,标准输出流不需要close()关闭PrintStream ps =System.out;
        ps.println("hello");ps.println("better");//联合写System.out.println("helloword");//改变标准输出流的输出方向//标准输出流不在指向控制台,指向“log”文件PrintStream printStream =newPrintStream(newFileOutputStream("log.txt"));//修改输出方向至“log.txt”文件System.setOut(printStream);System.out.println("helloword");System.out.println("hellokitty");}
六. 注解
//测试元注解@MyAnnotationpublicclassTestAnnotation01{publicvoidtest(){}}//定义一个注解//Target 表示我们的注解可以用在那些地方@Target(value ={ElementType.METHOD,ElementType.TYPE})//Retention 表示我们的注解在什么地方还有效// runtime>class>source@Retention(value =RetentionPolicy.RUNTIME)//Documented 表示是否将我们的注解生成在JAVAdoc中@Documented//Inherited 子类可以继承父类的注解@Inherited@interfaceMyAnnotation{}
使用@interface自定义注解时,自动继承了java.lang.annotation.Annotation接口。
//自定义注解publicclassTestAnnotation02{//注解可以显式赋值,如果没有默认值,必须给注解赋值。@MyAnnotation2(name ="hou")publicvoidtest(){}}@Target({ElementType.TYPE,ElementType.METHOD})@Retention(RetentionPolicy.RUNTIME)@interfaceMyAnnotation2{//注解的参数:参数类型 + 参数名 + ();Stringname();//String name() default "";intage()default15;String[]schools()default{"北大","清华"};}
七. 反射
1. Class类
① Class本身也是一个类,Class对象只能由系统建立。
②一个加载的类在JVM中只会有一个Class实例(Class对象只有一个)。
③ 一个Class对象对应的是一个加载到JVM中的一个 .class 文件。
④ 通过Class实例可以获得一个类中所有被加载的结构。
2. Class类的实例
publicstaticvoidmain(String[] args)throwsClassNotFoundException{//通过反射获取类的Class对象Class c1 =Class.forName("Reflections.User");System.out.println(c1);//class Reflections.UserClass c2 =Class.forName("Reflections.User");Class c3 =Class.forName("Reflections.User");//一个类在内存中只有一个Class对象//一个类被加载后,类的整个结构都会被封装在Class对象中System.out.println(c1.hashCode());//21685669System.out.println(c2.hashCode());//21685669System.out.println(c3.hashCode());//21685669}
3. Class类的创建方式
publicstaticvoidmain(String[] args)throwsClassNotFoundException{Person person =newStudent();System.out.println("这个人是:"+person.name);//方式一:通过对象获得Class c1 = person.getClass();System.out.println(c1);//class Reflections.Student//方式二:forname获得Class c2 =Class.forName("Reflections.Student");System.out.println(c2);//class Reflections.Student//方式三:通过类名.class获得Class c3 =Student.class;System.out.println(c3);//class Reflections.Student//方式四:基本内置类型的包装类有一个TYPE属性Class c4 =Integer.TYPE;System.out.println(c4);//int//获得父类类型Class c5 = c1.getSuperclass();System.out.println(c5);//class Reflections.Person}
4. 类加载器
publicstaticvoidmain(String[] args)throwsClassNotFoundException{//获取系统类加载器ClassLoader systemClassLoader =ClassLoader.getSystemClassLoader();System.out.println(systemClassLoader);//获取系统类加载器的父类加载器---》扩展类加载器ClassLoader parent = systemClassLoader.getParent();System.out.println(parent);//获取扩展类加载器的父类加载器---》根加载器(C、C++)ClassLoader parent1 = parent.getParent();System.out.println(parent1);//null//测试当前类是那个加载器加载的ClassLoader classLoader =Class.forName("Reflections.Test04").getClassLoader();System.out.println(classLoader);//测试JDK内置的类是谁加载的ClassLoader classLoader1 =Class.forName("java.lang.Object").getClassLoader();System.out.println(classLoader1);}
5. 获取类运行时完整结构
publicstaticvoidmain(String[] args)throwsClassNotFoundException,NoSuchFieldException,NoSuchMethodException{Class c1 =Class.forName("Reflections.User");//获得类的名字System.out.println(c1.getName());//获得包名+类名System.out.println(c1.getSimpleName());//获得类名//获得类的属性System.out.println("==========获得类的属性===========");Field[] fields = c1.getFields();//只能找到public属性
        fields = c1.getDeclaredFields();//找到所有属性for(Field field:fields){System.out.println(field);}//获得指定类型的属性Field name = c1.getDeclaredField("name");System.out.println(name);//获得类的方法System.out.println("==========获得类的方法===========");Method[] methods = c1.getMethods();// 获得本类及其父类的所有public方法
        methods = c1.getDeclaredMethods();// 获得本类的所有方法for(Method method:methods){System.out.println(method);}//获得指定方法(因重载问题,需出入指定方法的参数)Method getName = c1.getMethod("getName",null);Method setName = c1.getMethod("setName",String.class);System.out.println(getName);System.out.println(setName);//获得类的构造器System.out.println("==========获得指定的构造器===========");Constructor[] constructors = c1.getConstructors();//本类的public
        constructors = c1.getDeclaredConstructors();//本类所有的//获得类的指定构造器Constructor deConstructor = c1.getDeclaredConstructor(String.class,int.class,int.class);System.out.println(deConstructor);}
6. 动态创建对象调用方法和属性
publicstaticvoidmain(String[] args)throwsClassNotFoundException,InstantiationException,IllegalAccessException,NoSuchMethodException,InvocationTargetException,NoSuchFieldException{//获得class对象Class c1 =Class.forName("Reflections.User");//创建一个对象   (针对有无参构造器)User user1 =(User) c1.newInstance();//本质是调用了类的无参构造System.out.println(user1);//通过构造器创建对象   (针对没有无参构造器)Constructor constructor = c1.getDeclaredConstructor(String.class,int.class,int.class);User user2 =(User)constructor.newInstance("hou",45,12);System.out.println(user2);//通过反射调用普通方法User user3 =(User) c1.newInstance();//通过反射获得一个方法Method setName = c1.getDeclaredMethod("setName",String.class);
        setName.invoke(user3,"hou");//invoke(对象,“传入的值”)System.out.println(user3.getName());//通过反射操作属性User user4 =(User)c1.newInstance();Field name = c1.getDeclaredField("name");//不能直接操作私有属性,需关闭程序的安全检测,属性(方法).setAccessible(true);
        name.setAccessible(true);
        name.set(user4,"侯帅鑫");System.out.println(user4.getName());}
八. 多线程
1. 概念
① 进程:是一次执行程序的过程,是系统资源分配的单位。
② 线程:一个进程通常包括若干个线程,一个进程中至少有一个线程,线程是CPU调度和执行的单位。
③ Main()为主线程,为系统的入口。
2. 创建线程的三种方式
① 自定义类继承Thread类,重写run方法,创建线程对象,调用start方法启动。
② 自定义类实现Runnable接口,重现run方法。
③ 自定义类实现Callable接口,重写call方法,需抛出异常。
publicclassTestThreads{publicstaticvoidmain(String[] args){//方式一启动线程newMyThread1().start();//方式二启动线程newThread(newMyThread2()).start();//方式三启动线程(了解)FutureTask<Integer> futureTask =newFutureTask<>(newMyThread3());newThread(futureTask).start();Integer integer =null;try{
            integer = futureTask.get();}catch(InterruptedException e){
            e.printStackTrace();}catch(ExecutionException e){
            e.printStackTrace();}System.out.println(integer);}}//1.继承Thread类classMyThread1extendsThread{@Overridepublicvoidrun(){System.out.println("MyThread1");}}//2.实现Runnable接口classMyThread2implementsRunnable{@Overridepublicvoidrun(){System.out.println("MyThread2");}}//3.实现Callable接口classMyThread3implementsCallable<Integer>{@OverridepublicIntegercall()throwsException{System.out.println("MyThread3");return100;}}
3. 静态代理
① 真实角色和代理角色都要实现同一个接口。
② 代理对象要代理真实角色。
③ 优点:代理对象可以做真实对象做不了的事,真实对象专注于做自己的事。
//静态代理publicclassStaticProxy{publicstaticvoidmain(String[] args){You you =newYou();newThread(()->System.out.println("我爱你")).start();newWeddingComp(newYou()).HappyMarry();}}interfaceMarry{voidHappyMarry();}//真是角色classYouimplementsMarry{@OverridepublicvoidHappyMarry(){System.out.println("我要结婚了");}}//代理角色classWeddingCompimplementsMarry{privateMarry target;publicWeddingComp(Marry target){this.target = target;}@OverridepublicvoidHappyMarry(){before();this.target.HappyMarry();after();}privatevoidafter(){System.out.println("收尾款");}privatevoidbefore(){System.out.println("布置婚礼现场");}}
4. Lambda表达式
publicclassTestLambda02{publicstaticvoidmain(String[] args){// Lambda表示简化ILove iLove =(int a)->{System.out.println("I Love You -->"+ a);};//简化1.参数类型
        iLove =(a)->{System.out.println("I Love You -->"+ a);};//简化2,简化括号
        iLove = a->{System.out.println("I Love You -->"+ a);};//简化3,去掉花括号 ,仅适用于只有一行代码的情况
        iLove = a ->System.out.println("I Love You -->"+ a);//前提接口为函数式接口//多个参数的类型名可同时省略,但括号必须保留

        iLove.love(2);}}interfaceILove{//函数式接口voidlove(int a);}
5. 停止线程
//停止线程//测试Stop//1.建议线程正常停止--->利用次数,不建议死循环//2.建议使用标志位---->设置一个标志位//3.不要使用stop或者destroy等过时或者JDK不建议使用的方法publicclassTestStopimplementsRunnable{//1.设置一个标识位privateboolean flag =true;@Overridepublicvoidrun(){int i =0;while(flag){System.out.println("run....."+ i++);}}//2.设置一个公开的方法停止线程publicvoidstop(){this.flag =false;}publicstaticvoidmain(String[] args){TestStop testStop =newTestStop();newThread(testStop).start();for(int i =0; i <1000; i++){System.out.println("main--->"+i);if(i ==900){//转换标识位,停止线程
                testStop.stop();System.out.println("线程停止==========");}}}}
6. 线程休眠
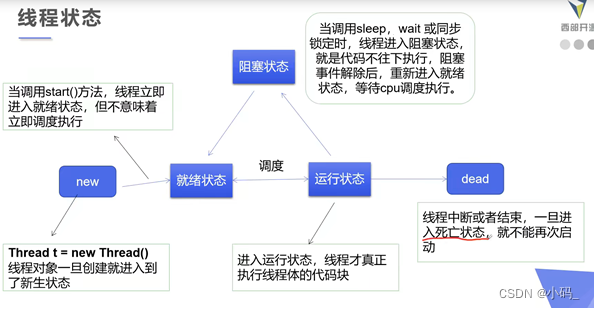
sleep时间达到后线程进入就绪状态,sleep可以模拟网络延时,倒计时等。每个对象都有一个锁,sleep不会释放锁。
//模拟倒计时publicclassTestSleep{publicstaticvoidmain(String[] args){//倒计时try{tenDown();}catch(InterruptedException e){
            e.printStackTrace();}//打印当前系统时间Date startTime =newDate(System.currentTimeMillis());//获取系统当前时间while(true){try{Thread.sleep(1000);System.out.println(newSimpleDateFormat("HH:mm:ss").format(startTime));
                startTime =newDate(System.currentTimeMillis());}catch(InterruptedException e){
                e.printStackTrace();}}}//模拟倒计时publicstaticvoidtenDown()throwsInterruptedException{int num =10;while(true){Thread.sleep(1000);System.out.println(num--);if(num<=0){break;}}}}
7. 线程礼让
让当前正在执行的线程暂停,但不阻塞,将线程由运行状态转为就绪状态,让cpu重新调度,礼让不一定成功,看cpu心情。
//测试线程礼让publicclassTestYieldimplementsRunnable{@Overridepublicvoidrun(){System.out.println(Thread.currentThread().getName()+"线程开始");Thread.yield();//线程礼让,礼让不一定成功,看CPU心情System.out.println(Thread.currentThread().getName()+"线程停止");}publicstaticvoidmain(String[] args){TestYield testYield =newTestYield();newThread(testYield,"a").start();newThread(testYield,"b").start();}}
8. 线程强制执行
待该线程执行完后,再执行其他线程,使其他线程阻塞,可以想象为插队。
publicclassTestJoinimplementsRunnable{@Overridepublicvoidrun(){for(int i =0; i <500; i++){System.out.println("线程Vip。。。。。"+ i);}}publicstaticvoidmain(String[] args){//启动线程TestJoin testJoin =newTestJoin();Thread thread =newThread(testJoin);
        thread.start();//主线程for(int i =0; i <300; i++){if(i==200){try{
                    thread.join();//线程插队}catch(InterruptedException e){
                    e.printStackTrace();}}System.out.println("主线程。。。"+ i);}}}
9. 线程状态

10. 线程优先级
线程的优先级用数字表示,范围1-10。优先级低只是表示获得调度的概率低,并不是优先级低不会被调用,具体要看CPU的调度。改变优先级和获取优先级:setPriority(int xxx)、getPriority()。
//测试线程优先级publicclassTestPriority{publicstaticvoidmain(String[] args){//主线程的优先级System.out.println(Thread.currentThread().getName()+"--->"+Thread.currentThread().getPriority());MyPriority myPriority =newMyPriority();Thread t1 =newThread(myPriority);Thread t2 =newThread(myPriority);Thread t3 =newThread(myPriority);Thread t4 =newThread(myPriority);

        t1.setPriority(8);t1.start();

        t2.setPriority(1);t2.start();

        t3.setPriority(Thread.MAX_PRIORITY);t3.start();

        t4.setPriority(6);t4.start();}}classMyPriorityimplementsRunnable{@Overridepublicvoidrun(){System.out.println(Thread.currentThread().getName()+"--->"+Thread.currentThread().getPriority());}}
11. 守护线程
线程分为用户线程和守护线程。虚拟机必须确保用户线程执行完毕,不用等待守护线程执行完毕。
publicclassTestDaemon{publicstaticvoidmain(String[] args){God god =newGod();Your your =newYour();Thread thread =newThread(god);
        thread.setDaemon(true);//默认是false表示用户线程,正常的线程都是用户线程。
        thread.start();//上帝守护线程启动,虽然god为死循环,但是用户线程结束后,它也结束newThread(your).start();//你,用户线程启动}}//上帝classGodimplementsRunnable{@Overridepublicvoidrun(){while(true){System.out.println("上帝守护着你");}}}//你classYourimplementsRunnable{@Overridepublicvoidrun(){for(int i =0; i <36500; i++){System.out.println("开心每一天");}System.out.println("=================goodbye==================");}}
12. 线程同步机制
多个线程操作同一个资源。线程同步形成的条件:队列+锁。锁机制:synchronized。
Synchronized默认锁的是this。锁的对象就是变化的量,需要增删改查的对象。
同步块:synchronized(obj){ }
//不安全的买票方案publicclassUnSafeBuyTicket{publicstaticvoidmain(String[] args){BuyTicket station =newBuyTicket();newThread(station,"aa").start();newThread(station,"bb").start();newThread(station,"cc").start();}}classBuyTicketimplementsRunnable{privateint ticketNums =10;boolean flag =true;@Overridepublicvoidrun(){while(flag){try{buy();}catch(InterruptedException e){
                e.printStackTrace();}}}//同步方法,安全的//public synchronized void buy() throws InterruptedExceptionpublicvoidbuy()throwsInterruptedException{if(ticketNums<=0){
            flag =false;return;}//模拟延时Thread.sleep(100);System.out.println(Thread.currentThread().getName()+"拿到----->"+ ticketNums--);}}
13. 死锁
死锁产生的条件:
① 互斥条件:一个资源每次只能被一个进程使用。
② 请求与保持条件:一个进程因请求资源而阻塞时,对已获得的资源保持不放。
③ 不剥夺条件:进程已获得的资源,在未使用完前,不能强行剥夺。
④ 循环等待条件:若干进程之间形成一种头尾相接的循环等待资源关系。
//测试死锁:多个线程互相抱着对方需要的资源,形成僵持publicclassTestDeadLock{publicstaticvoidmain(String[] args){Makeup g1 =newMakeup(0,"灰姑娘");Makeup g2 =newMakeup(1,"白雪公主");

        g1.start();
        g2.start();}}//口红classLipStick{}//镜子classMirror{}classMakeupextendsThread{//需要的资源只有一份,用static来保证只有一份staticLipStick lipStick =newLipStick();staticMirror mirror =newMirror();int choice;//选择String name;//使用化妆品的人publicMakeup(int choice,String name){this.choice = choice;this.name = name;}@Overridepublicvoidrun(){try{makeup();}catch(InterruptedException e){
            e.printStackTrace();}}//化妆,互相持有对方的锁,就是需要拿到对方的资源//避免死锁privatevoidmakeup()throwsInterruptedException{if(choice ==0){synchronized(lipStick){System.out.println(this.getName()+"获得口红的锁");Thread.sleep(2000);}synchronized(mirror){System.out.println(this.getName()+"获得镜子的锁");}}else{synchronized(mirror){System.out.println(this.getName()+"获得镜子的锁");Thread.sleep(2000);}synchronized(lipStick){System.out.println(this.getName()+"获得口红的锁");}}}}
14. Lock(锁)
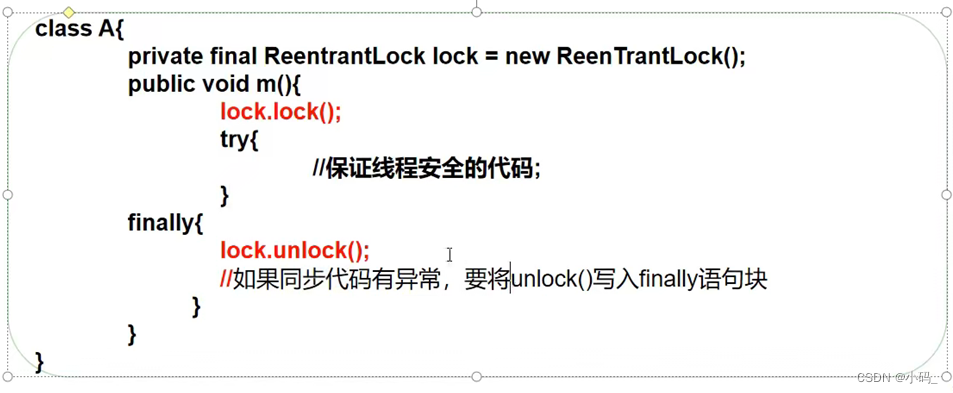
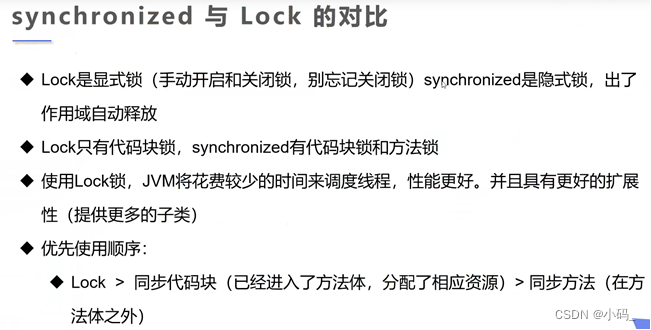
publicclassTestLock{publicstaticvoidmain(String[] args){Buyticket buyticket =newBuyticket();newThread(buyticket).start();newThread(buyticket).start();newThread(buyticket).start();}}classBuyticketimplementsRunnable{int tickeNums =10;//定义lock锁privatefinalReentrantLock lock =newReentrantLock();@Overridepublicvoidrun(){while(true){try{
                lock.lock();//加锁if(tickeNums>0){try{Thread.sleep(1000);}catch(InterruptedException e){
                        e.printStackTrace();}System.out.println(tickeNums--);}else{break;}}finally{
                lock.unlock();//解锁}}}}
15. 线程池
//测试线程池publicclassTestPool{publicstaticvoidmain(String[] args){//1.创建服务,创建线程池//newFixedThreadPool  参数为:线程池大小ExecutorService service =Executors.newFixedThreadPool(10);//执行
        service.execute(newMyThread());
        service.execute(newMyThread());
        service.execute(newMyThread());//2.关闭链接
        service.shutdown();}}classMyThreadimplementsRunnable{@Overridepublicvoidrun(){System.out.println(Thread.currentThread().getName());}}
16. wait和notify
- tt.wait(): 让正在tt对象上活动的线程进入等待状态。
- wait(): 无限期等待,直至被唤醒。
- tt.notify():唤醒正在tt对象上等待的线程。
- tt.notifyAll(): 唤醒tt对象上处于等待的所有线程。
17. 生产者消费者
packagemultiThreads.PCModel;publicclassTestBestPC{publicstaticvoidmain(String[] args){Resources resources =newResources();Thread threadProduct =newThread(newProducers(resources));Thread threadConsume =newThread(newConsumers(resources));
        threadProduct.setName("Producers");
        threadConsume.setName("Consumers");
        threadProduct.start();
        threadConsume.start();}}//资源classResources{//当前资源的数量int num =0;//当前资源的上限int size =100;}//消费者classConsumersimplementsRunnable{privateResources resources;publicConsumers(Resources resources){this.resources = resources;}@Overridepublicvoidrun(){while(true){synchronized(resources){if(resources.num ==0){System.out.println("========消费者等待=======");try{
                        resources.wait();}catch(InterruptedException e){
                        e.printStackTrace();}}
                resources.num--;System.out.println("消费者:"+Thread.currentThread().getName()+",剩余资源"+resources.num);
                resources.notify();}}}}//生产者classProducersimplementsRunnable{privateResources resources;publicProducers(Resources resources){this.resources = resources;}@Overridepublicvoidrun(){while(true){synchronized(resources){if(resources.num == resources.size){System.out.println("========生产者等待=======");try{
                        resources.wait();}catch(InterruptedException e){
                        e.printStackTrace();}}
                resources.num++;System.out.println("生产者:"+Thread.currentThread().getName()+",剩余资源"+resources.num);
                resources.notify();}}}}
版权归原作者 山野万里_ 所有, 如有侵权,请联系我们删除。