Linux学习笔记—命令篇
本笔记是根据尚硅谷的Linux视频,经过自己的总结得出来的笔记,分为两个大章节,一-四章讲的是Linux的文件目录结构、vim编辑器、网络配置和系统管理、进程和服务。第二个章节是Linux的基础常用命令总结。本篇文章基本上涵盖了所有shell命令,字数2w1+,预计阅读时间2h。
Linux基础篇见这里
文章目录
五、Linux常用的基本命令(重要)
1.什么是shell
“shell”字面意思为“壳”,可以按照字面意思理解,只不过是相对于内核来说的,shell就是保护内核的一个保护壳。他建立于内核的基础上,也是对于用户的一种表现形式,故,Linux中的shell是指一个面向用户的命令接口, 表现形式就是一个可录入用户需求的界面,这个界面可以反馈运行的信息。也可以说shell是用户和机器之间的桥梁。在本篇文章中的shell,我们使用bash。
2.帮助命令
2.1命令的分类
一部分基础功能的系统命令是直接内嵌在 shell 中的,系统加载启动之后会随着 shell一起加载,常驻系统内存中。这部分命令被称为内置(built-in)命令,相应的其它命令被称为外部命令。
2.2获得帮助信息(外部命令)—man
英文解释:
manual
基本语法:
man [命令或配置文件]
案例实操:
查看ls命令的帮助信息
[root@centos100 ~]# man ls


2.3 获得帮助信息(shell内嵌命令)—help
基本语法:
help [命令或配置文件]
案例实操:
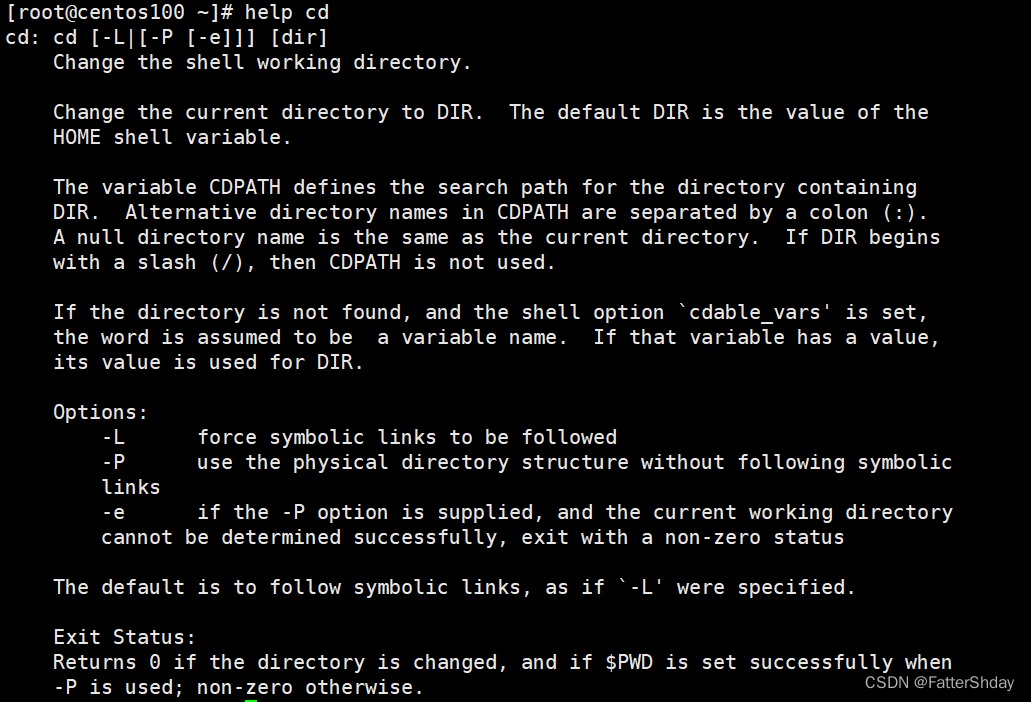
查看cd命令的帮助信息
[root@centos100 ~]# help cd

3.文件目录类
3.1列出目录的内容—ls
英文解释:
ls:list
基本语法:
ls [选项] [目录或是文件]

案例实操:
[root@centos100 ~]# ls -l
[root@centos100 ~]# ls -a

结果说明:
“…”:是当前目录的上级菜单
“.” :是当前目录
“.开头的文件”:是隐藏的文件
每行列出的信息依次是: 文件类型与权限 链接数 文件属主 文件属组 文件大小用byte 来表示 建立或最近修改的时间 名字
3.2显示当前工作目录的绝对路径—pwd
绝对路径就是从:/目录走到当前目录的那条路径
英文解释:
pwd:print working directory
基本语法:
pwd
案例实操:
[root@centos100 ~]# pwd

3.3切换目录—cd
英文解释:
cd:Change Directory
基本语法:
cd [参数]

“…”:是当前目录的上级菜单
“.” :是当前目录
案例实操:
切换到桌面(相对路径)
[root@centos100 ~]# cd 桌面

切换到桌面(绝对路径)
[root@centos100 ~]# cd /root/桌面

3.4创建一个新的目录—mkdir
英文解释:
mkdir:make directory
基本语法:
mkdir [选项] 要创建的目录

案例实操:
创建一个目录
[root@centos100 ~]# mkdir a
创建一个多层目录
[root@centos100 ~]# mkdir -p b/c/d/e/f

3.5删除一个空的目录—rmdir
英文解释:
rmdir:Remove directory
基本语法:
rmdir 要删除的空目录
案例实操:
删除一个空目录a
[root@centos100 ~]# rmdir a

删除多层目录
[root@centos100 ~]# rmdir b/c/d/e/f b/c/d/e b/c/d b/c b
或
[root@centos100 ~]# rmdir -p b/c/d/e/f

3.6创建空文件—touch
绝对路径就是从:/目录走到当前目录的那条路径
基本语法:
touch 文件名称
案例实操:
在当前目录创建文件(如果不带后缀,默认是文本文件)
[root@centos100 ~]# touch a.txt

在某个目录下创建文件
[root@centos100 ~]# touch /home/FattShday/a.txt

3.7复制文件或目录—cp
英文解释:
cp:copy
基本语法:
cp [选项] source dest


案例实操:
复制root目录下的inital -setup-ks.cfg文件,到/home/FatterShady目录下
[root@centos100 ~]# cp initial-setup-ks.cfg /home/FatterShady

复制root目录下的inital-setup-ks.cfg文件,覆盖/home/FatterShady/hello文件(hello文件是空的)
[root@centos100 ~]# cp initial-setup-ks.cfg /home/FatterShady/hello
cp:是否覆盖"/home/FatterShady/hello"? y


递归地复制a目录和a目录下的hello.txt到/home/FatterShady目录下
[root@centos100 ~]# cp -r a/ /home/FatterShady

3.8删除文件或目录—rm
英文解释:
rm:remove
基本语法:
rm [选项] deleteFile

案例实操:
删除/root目录下的helloLlnux文件
[root@centos100 ~]# rm hellolinux
rm:是否删除普通文件 "hellolinux"?y

删除/root/a目录下的hello.txt文件和a目录
[root@centos100 ~]# rm -r a
rm:是否进入目录"a"? y
rm:是否删除目录 "a/hello.txt"?y
rm:是否删除目录 "a"?

3.9移动文件与目录或重命名—mv
英文解释:
mv:move
基本语法:
重命名:
mv oldNameFile newNameFile
移动文件:
mv /temp/movefile /targetFolder
案例实操:
把/root/initial-setup-ks.cfg文件移动到/home/FatterShady目录下
[root@centos100 ~]# mv initial-setup-ks.cfg /home/FatterShady
mv:是否覆盖"/home/FatterShady/initial-setup-ks.cfg"? y

重命名/root/initial-setup-ks.cfg文件为1.cfg
[root@centos100 ~]# mv initial-setup-ks.cfg 1.cfg

3.10查看文件内容—cat
查看文件内容,从第一行开始显示。
一般查看比较小的文件,一屏幕能显示全的。
英文解释:
cat:catch
基本语法:
cat [选项] 要查看的文件

案例实操:
查看root/inital-setup-ks.cfg文件
[root@centos100 ~]# cat initial-setup-ks.cfg

3.11分屏查看文件内容—more
more 指令是一个基于 VI 编辑器的文本过滤器,它以全屏幕的方式按页显示文本文件 的内容。more 指令中内置了若干快捷键,详见操作说明。
基本语法:
more 要查看的文件
操作说明


)]
案例实操:
查看root/inital-setup-ks.cfg文件
[root@centos100 ~]# more initial-setup-ks.cfg

3.11分屏显示文件内容—less
less 指令用来分屏查看文件内容,它的功能与 more 指令类似,但是比 more 指令更加强大,支持各种显示终端。less 指令在显示文件内容时,并不是一次将整个文件加载之后才显示,而是根据显示需要加载内容,对于显示大型文件具有较高的效率。
英文解释:
cat:catch
基本语法:
less 要查看的文件

案例实操:
查看root/inital-setup-ks.cfg文件
[root@centos100 ~]# less initial-setup-ks.cfg

3.12输出内容到控制台—echo
基本语法:
echo [选项] [输出内容]
选项:
-e: 支持反斜线控制的字符转换


案例实操:
[root@centos100 ~]# echo hello world

[root@centos100 ~]# echo -e "hello\nworld"

3.13 输出重定向—>和追加—>>
基本语法:
(1)ls -l > 文件(列表的内容写入文件 a.txt 中(覆盖写))
(2)ls -al >> 文件 (列表的内容追加到文件 aa.txt 的末尾)
(3)cat 文件 1 > 文件 2 (将文件 1 的内容覆盖到文件 2)
(4)echo “内容” >> 文件
案例实操:
将ls查看的信息写入到/root/a.txt文件当中
[root@centos100 ~]# ls -l>a.txt
将ls查看的信息追加到/root/a.txt文件的末尾
[root@centos100 ~]# ls -l>>a.txt

用echo将hello单词追加到/root/a.txt当中
[root@centos100 ~]# echo hello>>a.txt

3.14显示文件头部内容—head
head 用于显示文件的开头部分内容,默认情况下 head 指令显示文件的前 10 行内容
基本语法:
head 文件(查看文件头10行内容)
head -n 5 文件(查看文件头5行内容,5可以是任意行数)

案例实操:
查看root/inital-setup-ks.cfg文件的前3行
[root@centos100 ~]# head -n 3 initial-setup-ks.cfg

3.15输出文件尾部内容—tail
tail 用于输出文件中尾部的内容,默认情况下 tail 指令显示文件的后10行内容
基本语法:
(1)tail 文件 (查看文件尾部10行内容)
(2)tail -n 5 文件 (查看文件尾部5行内容,5可以是任意行数)
(3)tail -f 文件 (实时追踪该文档的所有更新)

案例实操:
查看文件/root/a.txt尾1行的内容
[root@centos100 ~]# tail -n 1 a.txt

实时追踪该档的所有更新
[root@centos100 ~]# tail -f a.txt
3.17软连接—ln
软链接也称为符号链接,类似于 windows 里的快捷方式,有自己的数据块,主要存放了链接其他文件的路径。
英文解释:
li:link
基本语法:
ln -s [原文件或目录] [软链接名] (给原文件创建一个软链接)
经验技巧 :
删除软链接: rm -rf 软链接名,而不是 rm -rf 软链接名/
如果使用 rm -rf 软链接名/ 删除,会把软链接对应的真实目录下内容删掉
查询:通过 ll 就可以查看,列表属性第 1 位是 l,尾部会有位置指向
案例实操:
在/home/FatterShady目录下创建一个软连接linka.txt文件(来自于/root/a.txt)
[root@centos100 ~]# cd /home/FatterShady
[root@centos100 FatterShady]# ln -s /root/a.txt linka.txt

4.时间日期类
4.1显示当前时间—date
基本语法
date(显示当前时间)
date +%Y(显示当前年份)
date +%m( 显示当前月份)
date +%d( 显示当前是哪一天)
date “+%Y-%m-%d %H:%M:%S” (显示年月日时分秒)
4.2显示非当前时间—date
基本语法:
date -d ‘-0 days ago’ (显示当天时间)
date -d ‘1 days ago’ ( 显示前一天时间)
date -d ‘-1 days ago’ (显示明天时间)
5.用户管理类
5.1用户管理命令
5.1.1添加新用户—useradd
对于Linux而言,创建的新用户,都是在/home下创建一个新目录。
基本语法:
useradd 用户名 (添加新用户)
useradd -g 组名 用户名 (添加新用户到某个组)
案例实操:
添加一个tom用户
[root@centos100 ~]# cd /home/FatterShady
[root@centos100 ~]# ls  /home

添加一个david用户,并且修改主目录名字为dave
[root@centos100 ~]# useradd -d /home/dave david
[root@centos100 ~]# ls  /home

给tom用户设置密码
[root@centos100 ~]# passwd tom
更改用户 tom 的密码 。
新的 密码:
重新输入新的 密码:
passwd:所有的身份验证令牌已经成功更新。
5.1.2查看用户是否存在—id
基本语法:
id 用户名
案例实操:
查看tom用户是否存在
[root@centos100 ~]# id tom
uid=1001(tom) gid=1001(tom) 组=1001(tom)

5.1.3查看创建了哪些用户—cat /etc/passwd
案例实操:
[root@centos100 ~]# cat /etc/passwd
5.1.4切换用户—su
英文解释:
su: switch user
基本语法:
su 用户名称 (切换用户,只能获得用户的执行权限,不能获得环境变量)
su - 用户名称
(切换到用户并获得该用户的环境变量及执行权限)
案例实操:
从root用户切换到FatterShady用户
[root@centos100 ~]# su FatterShady
[FatterShady@centos100 root]$ cd
[FatterShady@centos100 ~]$ ls
a  hello  linka.txt  公共  模板  视频  图片  文档  下载  音乐  桌面
从FatterShady用户切换到root用户
[FatterShady@centos100 ~]$ su root
密码:
[root@centos100 FatterShady]# cd
[root@centos100 ~]# ls
anaconda-ks.cfg  initial-setup-ks.cfg  模板  图片  下载  桌面
a.txt            公共                  视频  文档  音乐
5.1.5查看用户登录信息—who
基本语法:
(1)whoami (显示自身用户名称)
(2)who am i (显示登录用户的用户名以及登陆时间)
案例实操:
[root@centos100 ~]# who am i
root     pts/2        2022-04-27 15:20 (192.168.75.1)
[root@centos100 ~]# whoami
root

5.1.6设置普通用户具有root权限—sudo
基本语法:
sudo 想要做的操作
案例实操:
1.修改 /etc/sudoers 文件找到下面一行(91 行),在 root 下面添加一行,想要获取root权限的用户
[root@centos100 ~]# vim /etc/sudoers
## Allow root to run any commands anywhere
root ALL=(ALL) ALL
FatterShady ALL=(ALL) ALL
2.在FatterShady用户下, 查看/root下的文件
[FatterShady@centos100 root]$ sudo ls
[sudo] FatterShady 的密码:
anaconda-ks.cfg  initial-setup-ks.cfg  模板  图片  下载  桌面
a.txt         公共               视频  文档  音乐
5.1.7删除用户—userdel
一般我们删除用户后,/home下的用户目录不去做删除
英文解释:
userdel:userdelete
基本语法:
userdel 用户名 (删除用户但保存用户主目录)
userdel -r 用户名 (用户和用户主目录,都删除)
案例实操:
删除tom用户但保存tom用户主目录
[root@centos100 ~]#userdel tom
[root@centos100 ~]#ll /home/
2)删除xiaoming用户和xiaoming用户主目录
[root@centos100 ~]#userdel -r xiaoming
5.1.8删除用户—userdel
一般我们删除用户后,/home下的用户文件夹不去做删除
英文解释:
userdel:userdelete
基本语法:
userdel 用户名 (删除用户但保存用户主目录)
userdel -r 用户名 (用户和用户主目录,都删除)
案例实操:
5.2用户组管理命令
每个用户都有一个用户组,系统可以对一个用户组中的所有用户进行集中管理。
不同Linux 系统对用户组的规定有所不同,比如Linux下的用户默认属于与它同名的用户组,这个用户组在创建用户时同时创建。
用户组的管理涉及用户组的添加、删除和修改。组的增加、删除和修改实际上就是对 /etc/group文件的更新。
一个用户可以属于多个组
5.2.1新增用户组—groupadd
基本语法:
groupadd 组名
案例实操:
添加一个boys组
[root@centos100 ~]# groupadd boys
[root@centos100 ~]# cat /etc/group

5.2.2修改用户—usermod
基本语法:
usermod -g 用户组 用户名

案例实操:
把tom和FatterShady添加到boys组中
[root@centos100 ~]# usermod -g boys tom
[root@centos100 ~]# usermod -g boys FatterShady

5.2.3修改组— groupmod
基本语法:
groupmod -n 新组名 老组名
案例实操:
将boys组改为person组
root@centos100 ~]# groupmod -n person boys

6.文件权限类
6.1文件属性
Linux系统是一种典型的多用户系统,不同的用户处于不同的地位,拥有不同的权限。 为了保护系统的安全性,Linux系统对不同的用户访问同一文件(包括目录文件)的权限做了不同的规定。在Linux中我们可以使用ll或者ls -l命令来显示一个文件的属性以及文件所属 的用户和组
如果没有权限,就会出现减号[ - ]而已。从左至右用0-9这些数字来表示:


(1)0 首位表示类型
在Linux中第一个字符代表这个文件是目录、文件或链接文件等等
- 代表文件
d 代表目录
l 链接文档(link file);
(2)第1-3位确定属主(该文件的所有者)拥有该文件的权限。—User
(3)第4-6位确定属组(所有者的同组用户)拥有该文件的权限,—Group
(4)第7-9位确定其他用户拥有该文件的权限 —Other
(5)对于rwx 作用文件和目录的不同解释
作用到文件:
[ r ]代表可读(read): 可以读取,查看
[ w ]代表可写(write): 可以修改,但是不代表可以删除该文件,删除一个文件的前提条件是对该文件所在的目录有写权限,才能删除该文件.
[ x ]代表可执行(execute):可以被系统执行
作用到目录:
[ r ]代表可读(read): 可以读取,ls查看目录内容
[ w ]代表可写(write): 可以修改,目录内创建+删除+重命名目录
[ x ]代表可执行(execute):可以进入该目录
6.2改变文件权限—chmod
英文解释:
chmod:changemod
基本语法:

第一种方式变更权限
chmod [{ugoa}{±=}{rwx}] 文件或目录
第二种方式变更权限
chmod [mode=421 ] [文件或目录]
经验技巧:
u:所有者 g:所有组 o:其他人 a:所有人(u、g、o 的总和)
r=4 w=2 x=1
rwx=4+2+1=7(实际上就是二进制编码000-111的顺序)
案例实操:
改变/root/initial-setup-ks.cfg文件的属组权限为rwx

[root@centos100 ~]# chmod g+x initial-setup-ks.cfg

改变/root/initial-setup-ks.cfg文件的所有权限为rwx
[root@centos100 ~]# chmod 777 initial-setup-ks.cfg

改变/root/hello整个文件夹里面的所有文件的所有者、所属组、其他用户都具有可读可写可执行权限

[root@centos100 ~]# chmod -R 777 hello

6.3改变所有者—chown
英文解释:
chown:change owner
基本语法:
chown [选项] [最终用户] [文件或目录] (功能描述:改变文件或者目录的所有者)

案例实操:
改变/root/initial-setup-ks.cfg文件的所有者为FatterShady

[root@centos100 ~]# chown FatterShady initial-setup-ks.cfg

改变/root/hello整个文件夹里面的所有文件的所有者

[root@centos100 ~]# chown -R FatterShady hello

6.4改变所属组—chgrp
英文解释:
chgrp:change group
基本语法:
chgrp [最终用户组] [文件或目录] (功能描述:改变文件或者目录的所属组)
案例实操:
改变/root/initial-setup-ks.cfg文件的所属组为person

[root@centos100 ~]# chgrp person initial-setup-ks.cfg

7.搜索查找类
7.1查找文件或者目录—find
find 指令将从指定目录向下递归地遍历其各个子目录,将满足条件的文件显示在终端。
基本语法:
find [搜索范围] [选项]

案例实操:
按文件名:根据名称查找/root目录下的a.txt文件。
[root@centos100 ~]# find /root -name a.txt
/root/.local/share/Trash/files/FattShday/a.txt
/root/a.txt
按拥有者:查找/home目录下,属于FatterShady的文件
[root@centos100 ~]# find /home -user FatterShady
/home/FatterShady
/home/FatterShady/.mozilla
/home/FatterShady/.mozilla/extensions
/home/FatterShady/.mozilla/plugins
/home/FatterShady/.bash_logout
/home/FatterShady/.bash_profile
/home/FatterShady/.bashrc
/home/FatterShady/.cache
/home/FatterShady/.cache/gdm
/home/FatterShady/.cache/gdm/session.log
/home/FatterShady/.cache/imsettings
/home/FatterShady/.cache/imsettings/log
/home/FatterShady/.cache/libgweather
/home/FatterShady/.cache/evolution
/home/FatterShady/.cache/evolution/addressbook
/home/FatterShady/.cache/evolution/addressbook/trash
/home/FatterShady/.cache/evolution/calendar
/home/FatterShady/.cache/evolution/calendar/trash
/home/FatterShady/.cache/evolution/mail
按文件大小:在/home目录下查找大于2M的文件(+n 大于 -n小于 n等于)
[root@centos100 ~]# find /root -size +2M
/root/.mozilla/firefox/mfyi9d38.default/places.sqlite
7.2快速定位文件路径—locate
locate 指令利用事先建立的系统中所有文件名称及路径的 locate 数据库实现快速定位给 定的文件。Locate 指令无需遍历整个文件系统,查询速度较快。为了保证查询结果的准确度,管理员必须定期更新 locate 时刻。
基本语法:
locate 搜索文件
由于 locate 指令基于数据库进行查询,所以第一次运行前,必须使用 updatedb 指令创建 locate 数据库
案例实操:
查找包含tmp的文件和tmp文件夹的名字
[root@centos100 ~]# updatedb
[root@centos100 ~]# locate tmp
/tmp
/etc/tmpfiles.d
/etc/selinux/tmp
/etc/selinux/targeted/active/modules/100/tmpreaper
/etc/selinux/targeted/active/modules/100/tmpreaper/cil
/etc/selinux/targeted/active/modules/100/tmpreaper/hll
/etc/selinux/targeted/active/modules/100/tmpreaper/lang_ext
/home/FatterShady/.cache/gnome-software/3.22/flatpak/installation-tmp
/home/FatterShady/.cache/gnome-software/3.22/flatpak/installation-tmp/.changed
/home/FatterShady/.cache/gnome-software/3.22/flatpak/installation-tmp/repo
/home/FatterShady/.cache/gnome-software/3.22/flatpak/installation-tmp/repo/config
/home/FatterShady/.cache/gnome-software/3.22/flatpak/installation-tmp/repo/extensions
/home/FatterShady/.cache/gnome-software/3.22/flatpak/installation-tmp/repo/obj
7.3过滤查找及“|”管道符 —grep
管道符,“|”,表示将前一个命令的处理结果输出传递给后面的命令处理
基本语法:
grep 选项 查找内容 源文件

案例实操:
查找/root/initial-setup-ks.cfg中包含boot的内容和行号
[root@centos100 ~]# grep -n boot initial-setup-ks.cfg
3:xconfig  --startxonboot
12:# Run the Setup Agent on first boot
13:firstboot --enable
23:network  --bootproto=dhcp --device=ens33 --onboot=off --ipv6=auto --activate
24:network  --bootproto=dhcp --hostname=CentOS100
31:# System bootloader configuration
32:bootloader --location=mbr --boot-drive=sda
38:part /boot --fstype="xfs" --ondisk=sda --size=1024
查看/root目录下包含的.cfg文件
[root@centos100 ~]# ls |grep .cfg
anaconda-ks.cfg
initial-setup-ks.cfg
8.压缩和解压类
8.1压缩—gzip/gunzip
基本语法:
gzip 文件 (功能描述:压缩文件,只能将文件压缩为*.gz 文件)
gunzip 文件.gz (功能描述:解压缩文件命令)
只能压缩文件不能压缩目录 ,不保留原来的文件 ,同时多个文件会产生多个压缩包
案例实操:
压缩/root/a.txt文件
[root@centos100 ~]# gzip a.txt
[root@centos100 ~]# ls
anaconda-ks.cfg  a.txt.gz  hello  initial-setup-ks.cfg  公共  模板  视频  图片  文档  下载  音乐  桌面
解压缩/root/a.txt.gz文件
[root@centos100 ~]# gunzip a.txt.gz
[root@centos100 ~]# ls
anaconda-ks.cfg  a.txt  hello  initial-setup-ks.cfg  公共  模板  视频  图片  文档  下载  音乐  桌面
8.2压缩—zip/unzip
基本语法:
zip [选项] XXX.zip 将要压缩的内容
unzip [选项] XXX.zip

案例实操:
压缩/root目录和目录下的所有文件,压缩包名为myroot.zip,并且保存在/root
[root@centos100 ~]# zip -r myroot.zip /root
[root@centos100 ~]# ls
anaconda-ks.cfg  a.txt  hello  initial-setup-ks.cfg  myroot.zip  公共  模板  视频  图片  文档  下载
解压缩myroot.zip到/tep目录下
[root@centos100 ~]# unzip -d /tmp myroot.zip
[root@centos100 ~]# find /tmp -name root
/tmp/root
8.3打包—tar
基本语法:
tar [选项] XXX.tar.gz 将要打包进去的内容 (打包目录,压缩后的 文件格式.tar.gz)

案例实操:
压缩打包/root目录下的a.txt hello initial-setup-ks.cfg 桌面
[root@centos100 ~]# tar -zcvf temp.tar.gz a.txt hello initial-setup-ks.cfg  桌面/
a.txt
hello/
initial-setup-ks.cfg
桌面/
桌面/.initial-.swp
桌面/.initial-setup-ks.cfg.swp
桌面/.initial-setup-ks.cfg.swo
桌面/.initial-setup-ks.cfg.swn
桌面/.initial-setup-ks.cfg.swm
桌面/.initial-setup-ks.cfg.swl
桌面/initial-setup-ks.cfg
[root@centos100 ~]# ls
anaconda-ks.cfg  a.txt  hello  initial-setup-ks.cfg  myroot.zip  temp.tar.gz  公共  模板  视频  图片  文档  下载  音乐  桌面
解压缩解包到/root/桌面
[root@centos100 ~]# tar -zxvf temp.tar.gz -C /root/桌面
[root@centos100 ~]# cd /root/桌面
[root@centos100 桌面]# ls
a.txt  hello  initial-setup-ks.cfg  桌面
9.磁盘查看和分区类
9.1查看文件和目录占用的磁盘空间—du
英文解释:
du:disk usage
基本语法:
du 目录/文件 (显示目录下每个子目录的磁盘使用情况)

案例实操:
查看/root占用的磁盘空间大小
[root@centos100 ~]# du /root -sh
46M    /root
9.2查看磁盘空间使用情况—df
英文解释:
df: disk free
基本语法:
df 选项 (列出文件系统的整体磁盘使用量,检查文件系统的磁盘空间占用情况)
案例实操:
查看磁盘使用情况
[root@centos100 ~]# df -h
文件系统        容量  已用  可用 已用% 挂载点
/dev/sda3        25G  5.2G   20G   21% /
devtmpfs        976M     0  976M    0% /dev
tmpfs           992M     0  992M    0% /dev/shm
tmpfs           992M   11M  981M    2% /run
tmpfs           992M     0  992M    0% /sys/fs/cgroup
/dev/sda1      1014M  155M  860M   16% /boot
tmpfs           199M  4.0K  199M    1% /run/user/42
tmpfs           199M   36K  199M    1% /run/user/0
9.3查看设备挂载情况—lsblk
基本语法:
lsblk
案例实操:
[root@centos100 ~]# lsblk
NAME   MAJ:MIN RM  SIZE RO TYPE MOUNTPOINT
sda      8:0    0   30G  0 disk
├─sda1   8:1    0    1G  0 part /boot
├─sda2   8:2    0    4G  0 part [SWAP]
└─sda3   8:3    0   25G  0 part /
sr0     11:0    1 1024M  0 rom
9.4挂载/卸载—mount/umount
对于Linux用户来讲,不论有几个分区,分别分给哪一个目录使用,它总归就是一个根目录、一个独立且唯一的文件结构。
Linux中每个分区都是用来组成整个文件系统的一部分,它在用一种叫做“挂载”的处理方法,它整个文件系统中包含了一整套的文件和目录,并将一个分区和一个目录联系起来,要载入的那个分区将使它的存储空间在这个目录下获得
基本语法:
mount [-t vfstype] [-o options] device dir (挂载设备)
umount 设备文件名或挂载点 (卸载设备)

案例实操:
挂载光盘镜像文件
[root@centos100 ~]# mount /dev/cdrom /mnt/cdrom
mount: /dev/sr0 写保护,将以只读方式挂载
[root@centos100 ~]# lsblk
NAME   MAJ:MIN RM  SIZE RO TYPE MOUNTPOINT
sda      8:0    0   30G  0 disk
├─sda1   8:1    0    1G  0 part /boot
├─sda2   8:2    0    4G  0 part [SWAP]
└─sda3   8:3    0   25G  0 part /
sr0     11:0    1  4.2G  0 rom  /mnt/cdrom
[root@centos100 ~]# ls /mnt/cdrom/
CentOS_BuildTag  EFI  EULA  GPL  images  isolinux  LiveOS  Packages  repodata  RPM-GPG-KEY-CentOS-7  RPM-GPG-KEY-CentOS-Testing-7  TRANS.TBL
卸载光盘镜像文件
[root@centos100 ~]# umount /dev/cdrom
[root@centos100 ~]# lsblk
NAME   MAJ:MIN RM  SIZE RO TYPE MOUNTPOINT
sda      8:0    0   30G  0 disk
├─sda1   8:1    0    1G  0 part /boot
├─sda2   8:2    0    4G  0 part [SWAP]
└─sda3   8:3    0   25G  0 part /
sr0     11:0    1  4.2G  0 rom
9.5分区—fdisk
基本语法:
fdisk
案例实操:
查看系统分区情况
[root@centos100 ~]# fdisk -l

磁盘 /dev/sda:32.2 GB, 32212254720 字节,62914560 个扇区
Units = 扇区 of 1 * 512 = 512 bytes
扇区大小(逻辑/物理):512 字节 / 512 字节
I/O 大小(最小/最佳):512 字节 / 512 字节
磁盘标签类型:dos
磁盘标识符:0x000b3234

   设备 Boot      Start         End      Blocks   Id  System
/dev/sda1   *        2048     2099199     1048576   83  Linux
/dev/sda2         2099200    10487807     4194304   82  Linux swap / Solaris
/dev/sda3        10487808    62914559    26213376   83  Linux
10.进程管理类
进程是正在执行的一个程序或命令,每一个进程都是一个运行的实体,都有自己的地址空间,并占用一定的系统资源。
10.1查看当前系统的进程—ps
英文解释:
ps:process status
基本语法:
ps aux | grep xxx (查看系统中所有进程)
ps -ef | grep xxx (可以查看子父进程之间的关系)

案例实操:
查看系统中所有进程
[root@centos100 ~]# ps aux
USER        PID %CPU %MEM    VSZ   RSS TTY      STAT START   TIME COMMAND
root          1  0.0  0.3 193832  6904 ?        Ss   03:43   0:07 /usr/lib/systemd/systemd --switched-root --system --deserialize 22
root          2  0.0  0.0      0     0 ?        S    03:43   0:00 [kthreadd]
root          3  0.0  0.0      0     0 ?        S    03:43   0:00 [ksoftirqd/0]
root          5  0.0  0.0      0     0 ?        S<   03:43   0:00 [kworker/0:0H]
root          7  0.0  0.0      0     0 ?        S    03:43   0:00 [migration/0]
root          8  0.0  0.0      0     0 ?        S    03:43   0:00 [rcu_bh]
root          9  0.0  0.0      0     0 ?        S    03:43   0:11 [rcu_sched]
root         10  0.0  0.0      0     0 ?        S<   03:43   0:00 [lru-add-drain]
root         11  0.0  0.0      0     0 ?        S    03:43   0:00 [watchdog/0]
root         12  0.0  0.0      0     0 ?        S    03:43   0:00 [watchdog/1]
...
USER:该进程是由哪个用户产生的
PID:进程的 ID 号
%CPU:该进程占用 CPU 资源的百分比,占用越高,进程越耗费资源;
%MEM:该进程占用物理内存的百分比,占用越高,进程越耗费资源;
VSZ:该进程占用虚拟内存的大小,单位 KB;
RSS:该进程占用实际物理内存的大小,单位 KB;
TTY:该进程是在哪个终端中运行的。对于 CentOS 来说,tty1 是图形化终端, tty2-tty6 是本地的字符界面终端。
pts/0-255 代表虚拟终端。
STAT:进程状态。常见的状态有:R:运行状态、S:睡眠状态、T:暂停状态、 Z:僵尸状态、s:包含子进程、l:多线程、+:前台显示 START:该进程的启动时间
查看子父进程的关系
[root@centos100 ~]# ps -ef
UID         PID   PPID  C STIME TTY          TIME CMD
root          1      0  0 04:21 ?        00:00:27 /usr/lib/systemd/systemd --switched-root --system --deserialize 22
root          2      0  0 04:21 ?        00:00:00 [kthreadd]
root          3      2  0 04:21 ?        00:00:00 [ksoftirqd/0]
root          5      2  0 04:21 ?        00:00:00 [kworker/0:0H]
root          7      2  0 04:21 ?        00:00:00 [migration/0]
root          8      2  0 04:21 ?        00:00:00 [rcu_bh]
root          9      2  0 04:21 ?        00:00:22 [rcu_sched]
root         10      2  0 04:21 ?        00:00:00 [lru-add-drain]
root         11      2  0 04:21 ?        00:00:00 [watchdog/0]
root         12      2  0 04:21 ?        00:00:00 [watchdog/1]
...
UID:用户 ID
PID:进程 ID
PPID:父进程 ID
C:CPU 用于计算执行优先级的因子。数值越大,表明进程是 CPU 密集型运算, 执行优先级会降低;数值越小,表明进程是 I/O 密集型运算,执行优先级会提高
STIME:进程启动的时间
TTY:完整的终端名称
TIME:CPU 时间
CMD:启动进程所用的命令和参数
10.2终止进程—kill
基本语法:
kill [选项] 进程号 (通过进程号杀死进程)
killall 进程名称 (通过进程名称杀死进程,也支持通配符,这在系统因负载过大而变得很慢时很有用)
案例实操:
杀死tom登录终端的进程
[root@centos100 ~]# ps -ef | grep sshd
root        875      1  0 04:44 ?        00:00:00 /usr/sbin/sshd -D
root      36720    875  0 18:33 ?        00:00:00 sshd: root@pts/0
root      44484    875  0 20:40 ?        00:00:00 sshd: root@pts/1
root      45029    875  2 20:47 ?        00:00:00 sshd: tom [priv]
tom       45034  45029  0 20:47 ?        00:00:00 sshd: tom@pts/2
root      45081  44489  0 20:47 pts/1    00:00:00 grep --color=auto sshd
[root@centos100 ~]# kill 45029
[root@centos100 ~]# ps -ef | grep sshd
root        875      1  0 04:44 ?        00:00:00 /usr/sbin/sshd -D
root      36720    875  0 18:33 ?        00:00:00 sshd: root@pts/0
root      44484    875  0 20:40 ?        00:00:00 sshd: root@pts/1
root      45204  44489  0 20:49 pts/1    00:00:00 grep --color=auto sshd
10.3查看进程树–pstree
基本语法:
pstree [选项]

案例实操:
[root@centos100 ~]# pstree -p
systemd(1)─┬─ModemManager(636)─┬─{ModemManager}(68+
           │                   └─{ModemManager}(68+
           ├─NetworkManager(641)─┬─{NetworkManager+
           │                     └─{NetworkManager+
           ├─VGAuthService(612)
           ├─abrt-watch-log(625)
           ├─abrt-watch-log(632)
...
10.4实时监控系统进程状态—top
基本语法:
top [选项]


筛选操作

案例实操:
[root@centos100 ~]# top
top - 21:15:05 up 16:30,  3 users,  load average: 0.00, 0.01, 0.05
Tasks: 226 total,   1 running, 225 sleeping,   0 stopped,   0 zombie
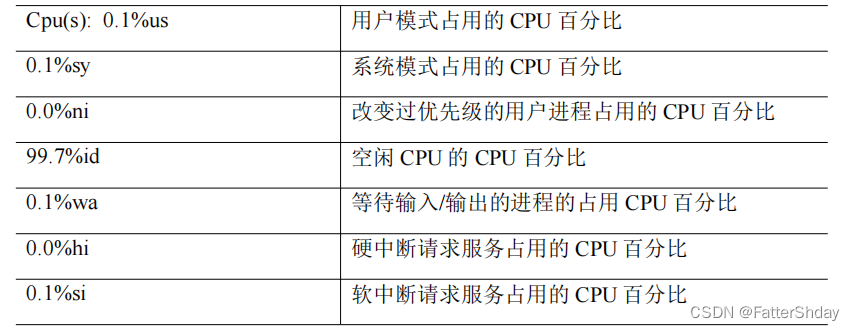
%Cpu(s):  0.0 us,  0.0 sy,  0.0 ni,100.0 id,  0.0 wa,  0.0 hi,  0.0 si,  0.0 st
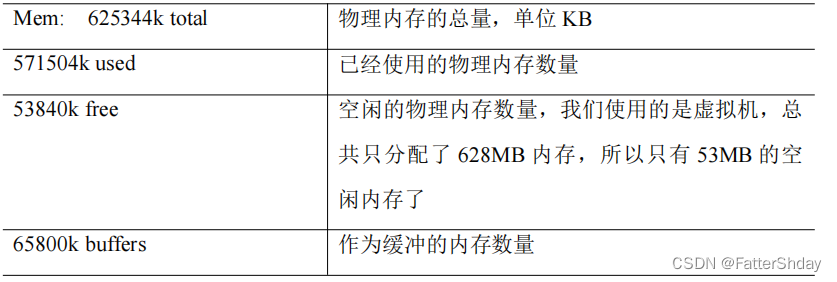
KiB Mem :  2030172 total,   121956 free,   855564 used,  1052652 buff/cache
KiB Swap:  4194300 total,  4194036 free,      264 used.   876552 avail Mem

   PID USER      PR  NI    VIRT    RES    SHR S  %CPU %MEM     TIME+ COMMAND
  5293 root      20   0       0      0      0 S   0.3  0.0   0:11.26 kworker/1:2
 46722 root      20   0  161984   2392   1580 R   0.3  0.1   0:00.80 top
     1 root      20   0  193832   6968   4144 S   0.0  0.3   0:31.76 systemd
     2 root      20   0       0      0      0 S   0.0  0.0   0:00.20 kthreadd
     3 root      20   0       0      0      0 S   0.0  0.0   0:00.42 ksoftirqd/0
     5 root       0 -20       0      0      0 S   0.0  0.0   0:00.00 kworker/0:0H
     7 root      rt   0       0      0      0 S   0.0  0.0   0:00.07 migration/0
     8 root      20   0       0      0      0 S   0.0  0.0   0:00.00 rcu_bh
     9 root      20   0       0      0      0 S   0.0  0.0   0:24.26 rcu_sched
    10 root       0 -20       0      0      0 S   0.0  0.0   0:00.00 lru-add-drain
    11 root      rt   0       0      0      0 S   0.0  0.0   0:00.45 watchdog/0
    12 root      rt   0       0      0      0 S   0.0  0.0   0:00.40 watchdog/1
    13 root      rt   0       0      0      0 S   0.0  0.0   0:00.12 migration/1                              ...
第一行信息为任务队列信息

第二行为进程信息

第三行为 CPU 信息


第四行为物理内存信息

第五行为交换分区(swap)信息

10.5显示网络状态和端口占用信息—netstat
英文解释:
netstat:net status
基本语法:
netstat -anp | grep 进程号 (查看该进程网络信息)
netstat –nlp | grep 端口号 (查看网络端口号占用情况)

案例实操:
[root@centos100 ~]# netstat -anp
Active Internet connections (servers and established)
Proto Recv-Q Send-Q Local Address           Foreign Address         State       PID/Program name
tcp        0      0 0.0.0.0:111             0.0.0.0:*               LISTEN      607/rpcbind
tcp        0      0 192.168.122.1:53        0.0.0.0:*               LISTEN      1233/dnsmasq
tcp        0      0 0.0.0.0:22              0.0.0.0:*               LISTEN      45905/sshd
tcp        0      0 127.0.0.1:631           0.0.0.0:*               LISTEN      872/cupsd
tcp        0      0 127.0.0.1:25            0.0.0.0:*               LISTEN      1066/master
tcp        0     52 192.168.75.100:22       192.168.75.1:59358      ESTABLISHED 45923/sshd: root@pt
tcp6       0      0 :::111                  :::*                    LISTEN      607/rpcbind
tcp6       0      0 :::22                   :::*                    LISTEN      45905/sshd
tcp6       0      0 ::1:631                 :::*                    LISTEN      872/cupsd
tcp6       0      0 ::1:25                  :::*                    LISTEN      1066/master
udp        0      0 0.0.0.0:5353            0.0.0.0:*                           613/avahi-daemon: r
udp        0      0 127.0.0.1:323           0.0.0.0:*                           645/chronyd
udp        0      0 0.0.0.0:48719           0.0.0.0:*                           613/avahi-daemon: r
udp        0      0 0.0.0.0:776             0.0.0.0:*                           607/rpcbind
六、软件包管理
1.RPM
1.1RPM概述
RPM(RedHat Package Manager),RedHat软件包管理工具,类似windows里面的setup.exe是Linux这系列操作系统里面的打包安装工具,它虽然是RedHat的标志,但理念是通用的。
RPM包的名称格式: Apache-1.3.23-11.i386.rpm
“apache” 软件名称
“1.3.23-11”软件的版本号,主版本和此版本
“i386”是软件所运行的硬件平台,Intel 32位处理器的统称
“rpm”文件扩展名,代表RPM包
1.2RPM查询命令—rpm-qa
基本语法:
rpm-a(查询所安装的所有 rpm 软件包)
案例实操:
查询firefox软件安装情况
[root@centos100 ~]# rpm -qa |grep firefox
firefox-52.7.0-1.el7.centos.x86_64
1.3RPM卸载命令—rpm-e
基本语法:
rpm -e RPM软件包
rpm -e --nodeps 软件包


案例实操:
卸载firefox软件
[root@centos100 ~]# rpm -e firefox
[root@centos100 ~]# rpm -qi firefox
未安装软件包 firefox
1.4RPM安装命令—rpm-ivh
基本语法:
rpm -ivh RPM 包全名

案例实操:
安装firefox软件
[root@centos100 Packages]# rpm -ivh firefox-52.7.0-1.el7.centos.x86_64.rpm
准备中...                          ################################# [100%]
正在升级/安装...
   1:firefox-52.7.0-1.el7.centos      ################################# [100%]
[root@centos100 Packages]# rpm -qi firefox
Name        : firefox
Version     : 52.7.0
Release     : 1.el7.centos
Architecture: x86_64
Install Date: 2022年05月05日 星期四 21时39分12秒
Group       : Applications/Internet
Size        : 156463701
License     : MPLv1.1 or GPLv2+ or LGPLv2+
Signature   : RSA/SHA256, 2018年03月16日 星期五 02时36分28秒, Key ID 24c6a8a7f4a80eb5
Source RPM  : firefox-52.7.0-1.el7.centos.src.rpm
Build Date  : 2018年03月15日 星期四 23时21分10秒
Build Host  : x86-01.bsys.centos.org
Relocations : (not relocatable)
Packager    : CentOS BuildSystem <http://bugs.centos.org>
Vendor      : CentOS
URL         : http://www.mozilla.org/projects/firefox/
Summary     : Mozilla Firefox Web browser
Description :
Mozilla Firefox is an open-source web browser, designed for standards
compliance, performance and portability.
2.YUM仓库配置
2.1YUM概述
YUM(全称为 Yellow dog Updater, Modified)是一个在 Fedora 和 RedHat 以及 CentOS中的 Shell 前端软件包管理器。基于 RPM 包管理,能够从指定的服务器自动下载 RPM 包并且安装,可以自动处理依赖性关系,并且一次安装所有依赖的软件包,无须繁琐地一次次下载、安装。

2.2YUM的常用命令
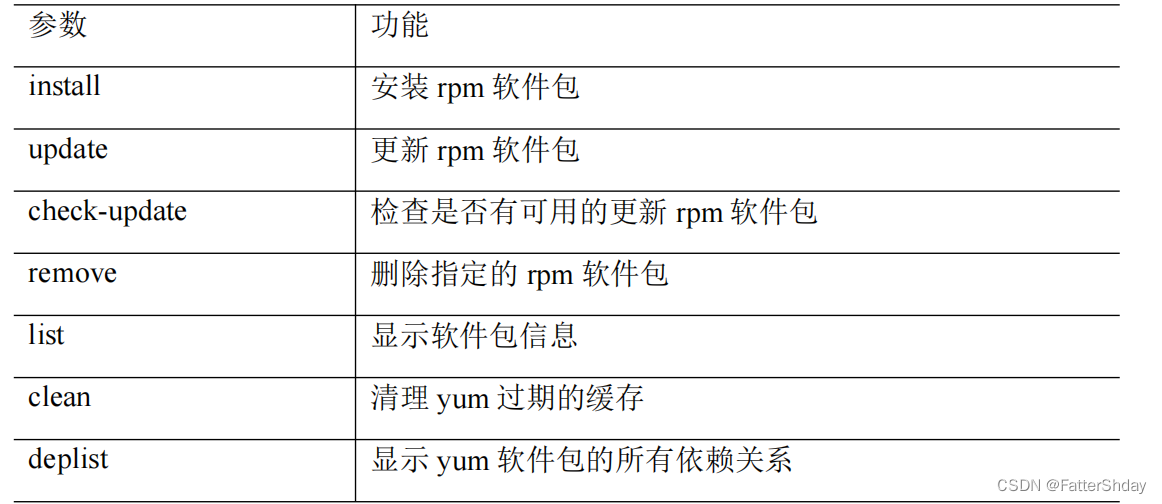
基本语法:
yum [选项] [参数]

案例实操:
采用 yum 方式安装 firefox
[root@centos100 Packages]# yum install firefox
版权归原作者 FatterShday 所有, 如有侵权,请联系我们删除。