
文章目录
提示:以下是本篇文章正文内容,SpringCloud 系列学习将会持续更新
LoadBalancer 负载均衡
前面我们讲解了如何对服务进行拆分、如何通过 Eureka 服务器进行服务注册与发现,那么现在我们来看看,它的负载均衡到底是如何实现的,实际上之前演示的负载均衡是依靠 LoadBalancer 实现的。
在2020年前的 SpringCloud 版本是采用 Ribbon 作为负载均衡实现,但是2020年的版本之后SpringCloud 把 Ribbon 移除了,进而用自己编写的 LoadBalancer 替代。
那么,负载均衡是如何进行的呢?
一、@LoadBalanced 负载均衡
我们之前注册 RestTemplate 时,就用
@LoadBalanced
注解进行了修饰:
@ConfigurationpublicclassBeanConfiguration{@Bean@LoadBalanced// 负载均衡publicRestTemplategetRestTemplate(){returnnewRestTemplate();}}// User user = this.template.getForObject("http://userservice/user/"+uid, User.class);
🌽①观察负载均衡现象
a. 我们有2个 UserApplication 的实例,可以在控制层的某个服务调用代码中添加日志打印:
当前实例的IP:PORT
@RestController@Slf4jpublicclassUserController{@ResourceprivateUserService userService;@ResourceEnvironment environment;// org.springframework.core.env.Environment@GetMapping("/user/{uid}")publicUserfindUserById(@PathVariable("uid")int uid)throwsUnknownHostException{String hostIp =InetAddress.getLocalHost().getHostAddress();String port = environment.getProperty("server.port");
        log.info(hostIp +":"+ port +" 的findUserById()被访问了!");return userService.getUserById(uid);}}
b. 然后重新启动。我们多次访问
http://localhost:8082/borrow/3
,其中 BorrowService 就会进行远程调用 UserService,这时我们通过查看 UserApplication-1 和 UserApplication-2 的控制台日志,就可以发现它们是被轮循调用的。


这样,服务自动发现以及简单的负载均衡就实现完成了,并且,如果某个微服务挂掉了,只要存在其他同样的微服务实例在运行,那么就不会导致整个微服务不可用,极大地保证了安全性。
🌽②@LoadBalanced 源码剖析
实际上,在添加 @LoadBalanced 注解之后,会启用
LoadBalancerInterceptor
拦截器对我们发起的服务调用请求进行拦截(只针对我们发起的请求)。
它实现
ClientHttpRequestInterceptor
接口:
@FunctionalInterfacepublicinterfaceClientHttpRequestInterceptor{ClientHttpResponseintercept(HttpRequest request,byte[] body,ClientHttpRequestExecution execution)throwsIOException;}
LoadBalancerInterceptor
类对 intercept()方法 的实现:
publicClientHttpResponseintercept(finalHttpRequest request,finalbyte[] body,finalClientHttpRequestExecution execution)throwsIOException{URI originalUri = request.getURI();String serviceName = originalUri.getHost();Assert.state(serviceName !=null,"Request URI does not contain a valid hostname: "+ originalUri);return(ClientHttpResponse)this.loadBalancer.execute(serviceName,this.requestFactory.createRequest(request, body, execution));}
我们可以打个断点看看实际是怎么在执行的,可以看到: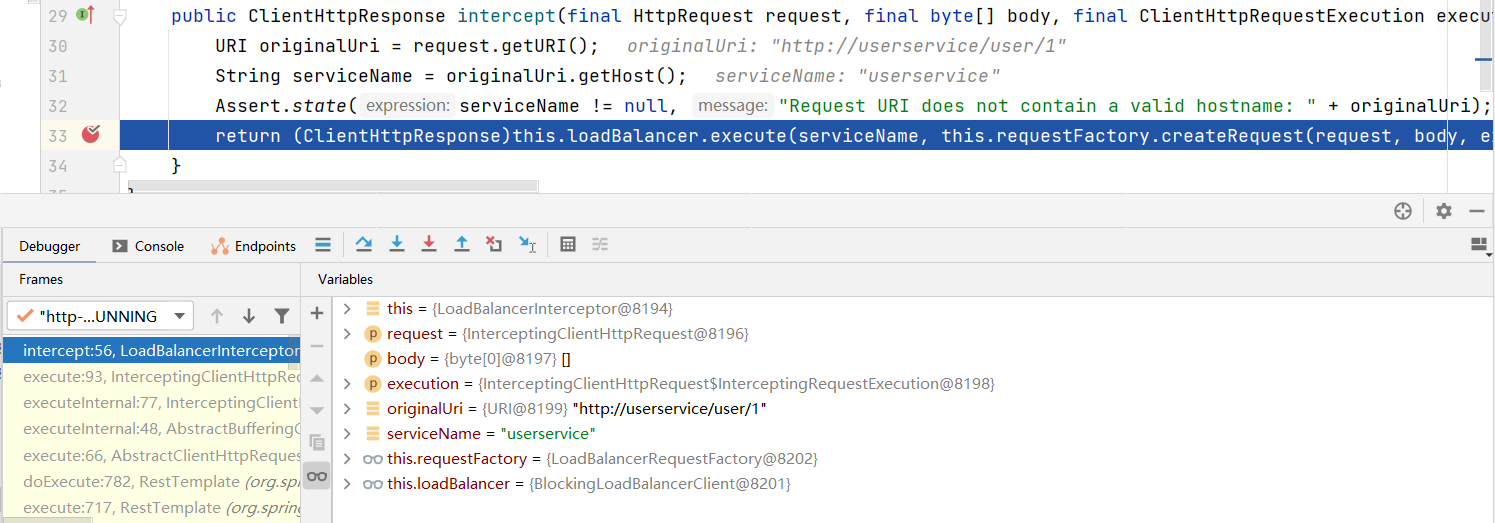
服务端会在发起请求时执行这些拦截器。它们会去找 Eureka 获取真正需要访问的主机名称。
我们来看看
BlockingLoadBalancerClient
类对 loadBalancer.execute()方法 的具体实现:
//从上面给进来了服务的名称和具体的请求实体public<T>Texecute(String serviceId,LoadBalancerRequest<T> request)throwsIOException{String hint =this.getHint(serviceId);LoadBalancerRequestAdapter<T,DefaultRequestContext> lbRequest =newLoadBalancerRequestAdapter(request,newDefaultRequestContext(request, hint));Set<LoadBalancerLifecycle> supportedLifecycleProcessors =this.getSupportedLifecycleProcessors(serviceId);
    supportedLifecycleProcessors.forEach((lifecycle)->{
        lifecycle.onStart(lbRequest);});//可以看到在这里会调用choose方法自动获取对应的服务实例信息ServiceInstance serviceInstance =this.choose(serviceId, lbRequest);if(serviceInstance ==null){
        supportedLifecycleProcessors.forEach((lifecycle)->{
            lifecycle.onComplete(newCompletionContext(Status.DISCARD, lbRequest,newEmptyResponse()));});//没有发现任何此服务的实例就抛异常(之前的测试中可能已经遇到了)thrownewIllegalStateException("No instances available for "+ serviceId);}else{//成功获取到对应服务的实例,这时就可以发起HTTP请求获取信息了returnthis.execute(serviceId, serviceInstance, lbRequest);}}
所以,实际上在进行负载均衡的时候,会向 Eureka 发起请求,选择一个可用的对应服务,然后会返回此服务的主机地址等信息:
二、自定义负载均衡
LoadBalancer 默认提供了两种负载均衡策略:
RandomLoadBalancer- 随机分配策略RoundRobinLoadBalancer- (默认)轮询分配策略
现在我们希望修改默认的负载均衡策略,可以进行指定,比如我们现在希望用户服务采用随机分配策略。
①我们需要先创建随机分配策略的配置类(不用加@Configuration):
publicclassLoadBalancerConfig{//将官方提供的 RandomLoadBalancer 注册为Bean@BeanpublicReactorLoadBalancer<ServiceInstance>randomLoadBalancer(Environment environment,LoadBalancerClientFactory loadBalancerClientFactory){String name = environment.getProperty(LoadBalancerClientFactory.PROPERTY_NAME);returnnewRandomLoadBalancer(loadBalancerClientFactory.getLazyProvider(name,ServiceInstanceListSupplier.class), name);}}
②接着我们需要为对应的服务指定负载均衡策略,直接使用注解即可:
@Configuration// 指定只要是 userservice 服务,都会使用我们指定的策略 LoadBalancerConfig@LoadBalancerClient(value ="userservice", configuration =LoadBalancerConfig.class)publicclassBeanConfiguration{@Bean@LoadBalanced// 负载均衡publicRestTemplategetRestTemplate(){returnnewRestTemplate();}}
接着我们在
BlockingLoadBalancerClient
中添加断点,观察是否采用我们指定的策略进行请求:

发现访问 userservice 服务的策略已经更改为我们指定的策略了。
三、OpenFeign 实现负载均衡
官方文档:https://docs.spring.io/spring-cloud-openfeign/docs/current/reference/html/
- Feign 是⼀个声明式的 HTTP 客户端组件,它旨在是编写 Http 客户端变得更加容易。
- OpenFeign 同时集成了
Spring Cloud LoadBalancer和Spring Cloud CircuitBreaker,提供负载均衡和熔断降级的功能。 - Feign 默认的负载均衡策略是轮询调用。
🍆①添加依赖
<dependency><groupId>org.springframework.cloud</groupId><artifactId>spring-cloud-starter-openfeign</artifactId></dependency>
🍆②启动类添加 @EnableFeignClients
@SpringBootApplication@EnableFeignClientspublicclassBorrowApplication{publicstaticvoidmain(String[] args){SpringApplication.run(BorrowApplication.class, args);}}
那么现在我们需要调用其他微服务提供的接口,该怎么做呢?
🍆③创建客户端接口 UserClient
我们的客户端接口需要用
@FeignClient
注解来指定向哪个微服务发送 HTTP 请求。
@FeignClient("userservice")//声明为 userservice 服务的 HTTP 请求客户端publicinterfaceUserClient{}
我们之前的远程调用:
RestTemplate template =newRestTemplate();User user = template.getForObject("http://userservice/user/"+uid,User.class);
现在直接在客户端接口中写入控制层的方法:
@FeignClient("userservice")publicinterfaceUserClient{//路径保证和其他微服务提供的一致即可@RequestMapping("/user/{uid}")UsergetUserById(@PathVariable("uid")int uid);//参数和返回值也保持一致}
🍆④service业务中调用客户端接口
我们直接注入使用(有 Mybatis 那味了):
@ServicepublicclassBorrowServiceImplimplementsBorrowService{@ResourceprivateBorrowMapper borrowMapper;@ResourceprivateUserClient userClient;@ResourceprivateBookClient bookClient;@OverridepublicUserBorrowViewgetBorrowViewByUid(int uid){// 现在拿到借阅关联信息了,怎么调用其他服务获取信息呢?List<Borrow> borrowList = borrowMapper.getBorrowsByUid(uid);// 直接调用客户端接口的方法User user = userClient.findUserById(uid);List<Book> bookList = borrowList
                .stream().map(b -> bookClient.findBookById(b.getBid())).collect(Collectors.toList());returnnewUserBorrowView(user, bookList);}}
继续访问进行测试:
OK,正常。
当然,Feign 也有很多的其他配置选项,这里就不多做介绍了,详细请查阅官方文档。
总结:
提示:这里对文章进行总结:
本文是对SpringCloud的学习, 了解了LoadBalancer 负载均衡策略的内部流程,学习了如何自定义负载均衡策略,并且学习了使用OpenFeign实现负载均衡。之后的学习内容将持续更新!!!
版权归原作者 一只咸鱼。。 所有, 如有侵权,请联系我们删除。