
✨ Spring整合RabbitMQ
📃个人主页:不断前进的皮卡丘
🌞博客描述:梦想也许遥不可及,但重要的是追梦的过程,用博客记录自己的成长,记录自己一步一步向上攀登的印记
🔥个人专栏:消息中间件
1.简单消息模式

1.1生产者
1.1.1 创建生产者工程 spring-rabbitmq-producer
1.1.2引入依赖
<dependencies><dependency><groupId>org.springframework</groupId><artifactId>spring-context</artifactId><version>5.1.7.RELEASE</version></dependency><dependency><groupId>org.springframework.amqp</groupId><artifactId>spring-rabbit</artifactId><version>2.1.8.RELEASE</version></dependency><dependency><groupId>junit</groupId><artifactId>junit</artifactId><version>4.12</version></dependency><dependency><groupId>org.springframework</groupId><artifactId>spring-test</artifactId><version>5.1.7.RELEASE</version></dependency></dependencies><build><plugins><plugin><groupId>org.apache.maven.plugins</groupId><artifactId>maven-compiler-plugin</artifactId><version>3.8.0</version><configuration><source>1.8</source><target>1.8</target></configuration></plugin></plugins></build>
1.1.3属性配置文件
在resources目录下面创建rabbitmq.properties属性配置文件
rabbitmq.host=192.168.137.118
rabbitmq.port=5672
rabbitmq.username=admin
rabbitmq.password=123456
rabbitmq.virtual-host=/
1.1.4spring整合配置文件
<?xml version="1.0" encoding="UTF-8"?><beansxmlns="http://www.springframework.org/schema/beans"xmlns:xsi="http://www.w3.org/2001/XMLSchema-instance"xmlns:rabbit="http://www.springframework.org/schema/rabbit"xmlns:context="http://www.springframework.org/schema/context"xsi:schemaLocation="http://www.springframework.org/schema/beans http://www.springframework.org/schema/beans/spring-beans.xsd http://www.springframework.org/schema/rabbit http://www.springframework.org/schema/rabbit/spring-rabbit.xsd http://www.springframework.org/schema/context https://www.springframework.org/schema/context/spring-context.xsd"><!-- 加载属性配置文件   --><context:property-placeholderlocation="classpath:rabbitmq.properties"></context:property-placeholder><!-- 定义rabbitmq connectionFactory --><rabbit:connection-factoryid="connectionFactory"host="${rabbitmq.host}"port="${rabbitmq.port}"username="${rabbitmq.username}"password="${rabbitmq.password}"virtual-host="${rabbitmq.virtual-host}"/><!--  创建rabbit Admin对象,用于管理交换机和队列  --><rabbit:adminconnection-factory="connectionFactory"></rabbit:admin><!--定义持久化队列,不存在则自动创建;不绑定到交换机则绑定到默认交换机
        默认交换机类型为direct,名字为:"",路由键为队列的名称,
        默认持久化,默认排他
        --><rabbit:queueid="spring_queue"name="spring_queue"auto-declare="true"></rabbit:queue><!--创建RabbitTemplate对象,用于操作消息--><rabbit:templateid="rabbitTemplate"connection-factory="connectionFactory"></rabbit:template></beans>
1.1.5发送消息
@RunWith注解的作用:让测试在spring容器环境下执行,如果测试类没有这个注解,会导致service,dao等注入失败
@RunWith(SpringRunner.class)@ContextConfiguration(locations ="classpath:spring-rabbitmq.xml")publicclassProducerTest{@AutowiredprivateRabbitTemplate rabbitTemplate;@Test/**
     * 只发队列消息
     * 默认交换机类型为 direct
     * 交换机的名称为空,路由键为队列的名称
     */publicvoidqueueTest(){//路由键与队列同名
        rabbitTemplate.convertAndSend("spring_queue","只发队列spring_queue的消息。");}}
1.2消费者
1.2.1创建消费者工程 spring-rabbitmq-consumer
1.2.2引入依赖
<dependencies><dependency><groupId>org.springframework</groupId><artifactId>spring-context</artifactId><version>5.1.7.RELEASE</version></dependency><dependency><groupId>org.springframework.amqp</groupId><artifactId>spring-rabbit</artifactId><version>2.1.8.RELEASE</version></dependency><dependency><groupId>junit</groupId><artifactId>junit</artifactId><version>4.12</version></dependency><dependency><groupId>org.springframework</groupId><artifactId>spring-test</artifactId><version>5.1.7.RELEASE</version></dependency></dependencies><build><plugins><plugin><groupId>org.apache.maven.plugins</groupId><artifactId>maven-compiler-plugin</artifactId><version>3.8.0</version><configuration><source>1.8</source><target>1.8</target></configuration></plugin></plugins></build>
1.2.3属性配置文件
在resources目录下面创建rabbitmq.properties属性配置文件
rabbitmq.host=192.168.137.118
rabbitmq.port=5672
rabbitmq.username=admin
rabbitmq.password=123456
rabbitmq.virtual-host=/
1.2.4spring整合配置文件
<?xml version="1.0" encoding="UTF-8"?><beansxmlns="http://www.springframework.org/schema/beans"xmlns:xsi="http://www.w3.org/2001/XMLSchema-instance"xmlns:rabbit="http://www.springframework.org/schema/rabbit"xmlns:context="http://www.springframework.org/schema/context"xsi:schemaLocation="http://www.springframework.org/schema/beans http://www.springframework.org/schema/beans/spring-beans.xsd http://www.springframework.org/schema/rabbit http://www.springframework.org/schema/rabbit/spring-rabbit.xsd http://www.springframework.org/schema/context https://www.springframework.org/schema/context/spring-context.xsd"><!-- 加载属性配置文件 --><context:property-placeholderlocation="classpath:rabbitmq.properties"></context:property-placeholder><!-- 定义rabbitmq connectionFactory --><!-- 定义rabbitmq connectionFactory --><!-- 定义rabbitmq connectionFactory --><rabbit:connection-factoryid="connectionFactory"host="${rabbitmq.host}"port="${rabbitmq.port}"username="${rabbitmq.username}"password="${rabbitmq.password}"virtual-host="${rabbitmq.virtual-host}"/><!--用来处理消息的消费者 --><beanid="springQueueListener"class="com.zyh.listener.SpringQueueListener"></bean><!-- 监听器绑定队列,这样队列中来消息就被监听器处理掉 --><rabbit:listener-containerconnection-factory="connectionFactory"><!-- 监听哪一个队列,谁来监听 --><rabbit:listenerref="springQueueListener"queue-names="spring_queue"></rabbit:listener></rabbit:listener-container></beans>
1.2.5消息监听器
publicclassSpringQueueListenerimplementsMessageListener{@OverridepublicvoidonMessage(Message message){try{byte[] body = message.getBody();String msg=newString(body,"UTF-8");MessageProperties messageProperties = message.getMessageProperties();System.out.println("msg = "+msg);System.out.println("messageProperties = "+ messageProperties);}catch(UnsupportedEncodingException e){
            e.printStackTrace();}}}
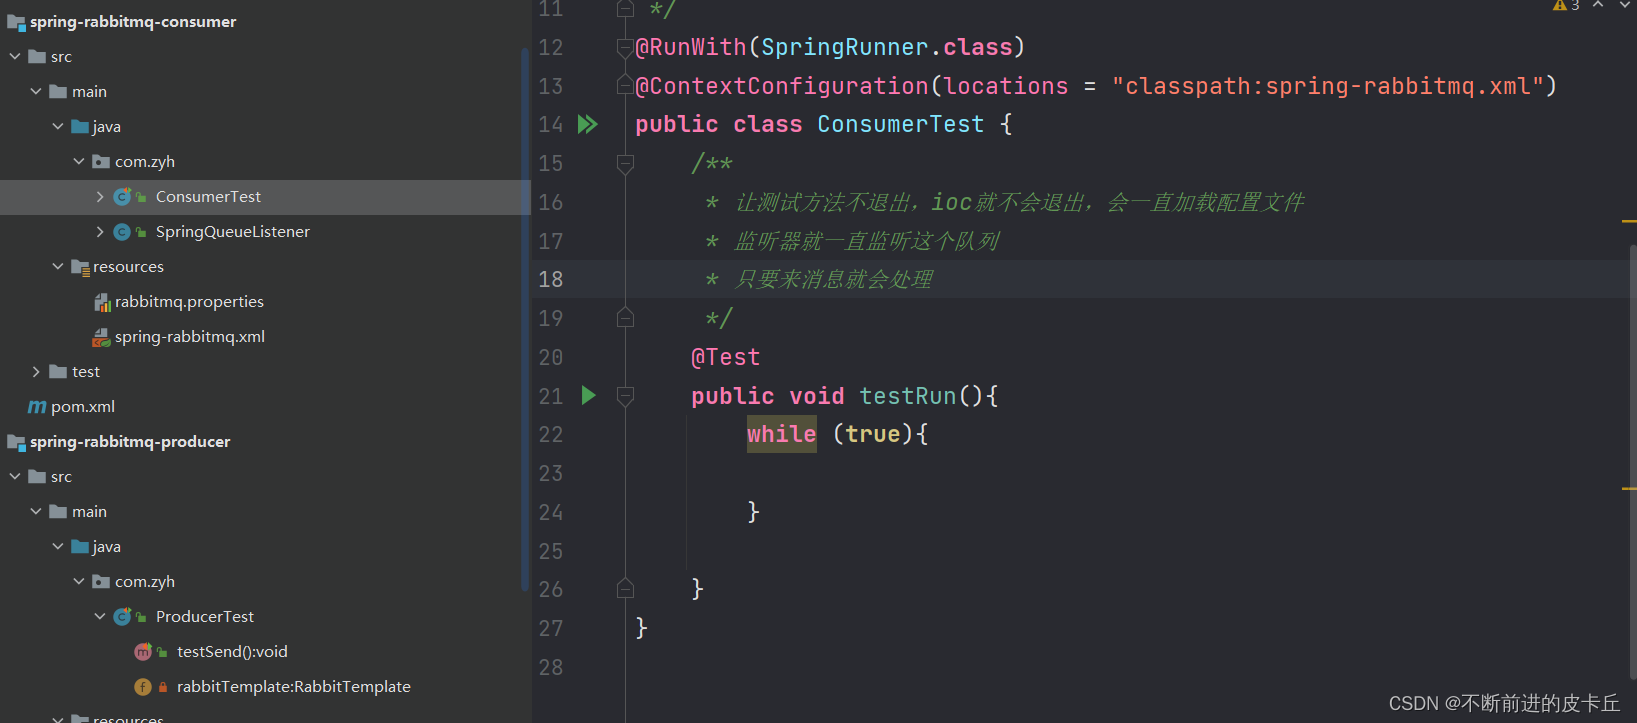
1.2.6测试
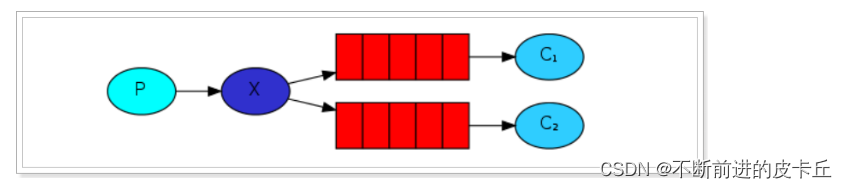
2.发布订阅模式
2.1生产者
2.1.1spring整合配置文件
<!-- ~~~~~~~~~~~~~~~~~~~~~~~~~~~~广播;所有队列都能收到消息~~~~~~~~~~~~~~~~~~~~~~~~~~~~ --><!--定义广播交换机中的持久化队列,不存在则自动创建--><rabbit:queueid="spring_fanout_queue_1"name="spring_fanout_queue_1"auto-declare="true"/><!--定义广播交换机中的持久化队列,不存在则自动创建--><rabbit:queueid="spring_fanout_queue_2"name="spring_fanout_queue_2"auto-declare="true"/><!--定义广播类型交换机;并绑定上述两个队列--><rabbit:fanout-exchangeid="spring_fanout_exchange"name="spring_fanout_exchange"auto-declare="true"><rabbit:bindings><rabbit:bindingqueue="spring_fanout_queue_1"/><rabbit:bindingqueue="spring_fanout_queue_2"/></rabbit:bindings></rabbit:fanout-exchange>
2.1.2发送消息
@RunWith(SpringRunner.class)@ContextConfiguration(locations ="classpath:spring-rabbitmq.xml")publicclassProducerTest{@AutowiredprivateRabbitTemplate rabbitTemplate;/**
     * 发送广播
     * 交换机类型为 fanout
     * 绑定到该交换机的所有队列都能够收到消息
     */@TestpublicvoidfanoutTest(){/**
         * 参数1:交换机名称
         * 参数2:路由键名(广播设置为空)
         * 参数3:发送的消息内容
         */
        rabbitTemplate.convertAndSend("spring_fanout_exchange","","发送到spring_fanout_exchange交换机的广播消息");}}
2.2消费者
2.2.1spring整合配置文件
<beanid="fanoutListener1"class="com.zyh.listener.FanoutListener1"/><beanid="fanoutListener2"class="com.zyh.listener.FanoutListener2"/><rabbit:listener-containerconnection-factory="connectionFactory"auto-declare="true"><rabbit:listenerref="fanoutListener1"queue-names="spring_fanout_queue_1"/><rabbit:listenerref="fanoutListener2"queue-names="spring_fanout_queue_2"/></rabbit:listener-container>
2.2.2广播监听器1
publicclassFanoutListener1implementsMessageListener{publicvoidonMessage(Message message){try{String msg =newString(message.getBody(),"utf-8");System.out.printf("广播监听器1:接收路由名称为:%s,路由键为:%s,队列名为:%s的消息:%s \n",
                    message.getMessageProperties().getReceivedExchange(),
                    message.getMessageProperties().getReceivedRoutingKey(),
                    message.getMessageProperties().getConsumerQueue(),
                    msg);}catch(Exception e){
            e.printStackTrace();}}}
2.2.3广播监听器2
publicclassFanoutListener2implementsMessageListener{publicvoidonMessage(Message message){try{String msg =newString(message.getBody(),"utf-8");System.out.printf("广播监听器2:接收路由名称为:%s,路由键为:%s,队列名为:%s的消息:%s \n",
                    message.getMessageProperties().getReceivedExchange(),
                    message.getMessageProperties().getReceivedRoutingKey(),
                    message.getMessageProperties().getConsumerQueue(),
                    msg);}catch(Exception e){
            e.printStackTrace();}}}
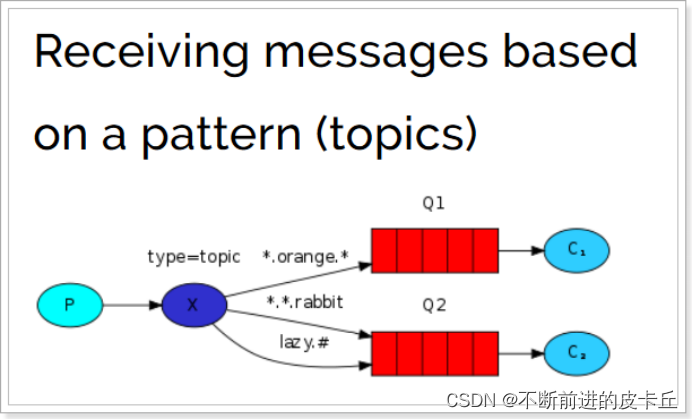
3.Topics 通配符模式
3.1生产者
3.1.1spring整合配置文件
<!-- ~~~~~~~~~~~~~~~~~~~~~~~~~~~~通配符;*匹配一个单词,#匹配多个单词 ~~~~~~~~~~~~~~~~~~~~~~~~~~~~ --><!--定义广播交换机中的持久化队列,不存在则自动创建--><rabbit:queueid="spring_topic_queue_star"name="spring_topic_queue_star"auto-declare="true"/><!--定义广播交换机中的持久化队列,不存在则自动创建--><rabbit:queueid="spring_topic_queue_well"name="spring_topic_queue_well"auto-declare="true"/><!--定义广播交换机中的持久化队列,不存在则自动创建--><rabbit:queueid="spring_topic_queue_well2"name="spring_topic_queue_well2"auto-declare="true"/><rabbit:topic-exchangeid="spring_topic_exchange"name="spring_topic_exchange"auto-declare="true"><rabbit:bindings><rabbit:bindingpattern="zyh.*"queue="spring_topic_queue_star"/><rabbit:bindingpattern="zyh.#"queue="spring_topic_queue_well"/><rabbit:bindingpattern="yh.#"queue="spring_topic_queue_well2"/></rabbit:bindings></rabbit:topic-exchange>
3.1.1发送消息
@RunWith(SpringRunner.class)@ContextConfiguration(locations ="classpath:spring-rabbitmq.xml")publicclassProducerTest{@AutowiredprivateRabbitTemplate rabbitTemplate;/**
     * 通配符
     * 交换机类型为 topic
     * 匹配路由键的通配符,*表示一个单词,#表示多个单词
     * 绑定到该交换机的匹配队列能够收到对应消息
     */@TestpublicvoidtopicTest(){/**
         * 参数1:交换机名称
         * 参数2:路由键名
         * 参数3:发送的消息内容
         */
        rabbitTemplate.convertAndSend("spring_topic_exchange","zyh.bj","发送到spring_topic_exchange交换机zyh.bj的消息");
        rabbitTemplate.convertAndSend("spring_topic_exchange","zyh.bj.1","发送到spring_topic_exchange交换机zyh.bj.1的消息");
        rabbitTemplate.convertAndSend("spring_topic_exchange","zyh.bj.2","发送到spring_topic_exchange交换机zyh.bj.2的消息");
        rabbitTemplate.convertAndSend("spring_topic_exchange","yh.cn","发送到spring_topic_exchange交换机yh.cn的消息");}}
3.2消费者
3.2.1spring整合配置文件
<beanid="topicListenerStar"class="com.zyh.listener.TopicListenerStar"/><beanid="topicListenerWell"class="com.zyh.listener.TopicListenerWell"/><beanid="topicListenerWell2"class="com.zyh.listener.TopicListenerWell2"/><rabbit:listener-containerconnection-factory="connectionFactory"auto-declare="true"><rabbit:listenerref="topicListenerStar"queue-names="spring_topic_queue_star"/><rabbit:listenerref="topicListenerWell"queue-names="spring_topic_queue_well"/><rabbit:listenerref="topicListenerWell2"queue-names="spring_topic_queue_well2"/></rabbit:listener-container>
3.2.2星号通配符监听器
publicclassTopicListenerStarimplementsMessageListener{publicvoidonMessage(Message message){try{String msg =newString(message.getBody(),"utf-8");System.out.printf("通配符*监听器:接收路由名称为:%s,路由键为:%s,队列名为:%s的消息:%s \n",
                    message.getMessageProperties().getReceivedExchange(),
                    message.getMessageProperties().getReceivedRoutingKey(),
                    message.getMessageProperties().getConsumerQueue(),
                    msg);}catch(Exception e){
            e.printStackTrace();}}}
3.2.3井号通配符监听器
publicclassTopicListenerWellimplementsMessageListener{publicvoidonMessage(Message message){try{String msg =newString(message.getBody(),"utf-8");System.out.printf("通配符#监听器:接收路由名称为:%s,路由键为:%s,队列名为:%s的消息:%s \n",
                    message.getMessageProperties().getReceivedExchange(),
                    message.getMessageProperties().getReceivedRoutingKey(),
                    message.getMessageProperties().getConsumerQueue(),
                    msg);}catch(Exception e){
            e.printStackTrace();}}}
3.2.4井号通配符监听器2
publicclassTopicListenerWell2implementsMessageListener{publicvoidonMessage(Message message){try{String msg =newString(message.getBody(),"utf-8");System.out.printf("通配符#监听器2:接收路由名称为:%s,路由键为:%s,队列名为:%s的消息:%s \n",
                    message.getMessageProperties().getReceivedExchange(),
                    message.getMessageProperties().getReceivedRoutingKey(),
                    message.getMessageProperties().getConsumerQueue(),
                    msg);}catch(Exception e){
            e.printStackTrace();}}}
本文转载自: https://blog.csdn.net/qq_52797170/article/details/127052971
版权归原作者 不断前进的皮卡丘 所有, 如有侵权,请联系我们删除。
版权归原作者 不断前进的皮卡丘 所有, 如有侵权,请联系我们删除。