一、导入依赖
       <dependency>
            <groupId>org.springframework.boot</groupId>
            <artifactId>spring-boot-starter-test</artifactId>
            <scope>test</scope>
        </dependency>

        <dependency>
            <groupId>junit</groupId>
            <artifactId>junit</artifactId>
            <version>4.13.2</version>
            <scope>test</scope>
        </dependency>
二、在idea中创建包结构
第一步、选择file ----> 然后选择project structure选项
然后会跳转到下图页面

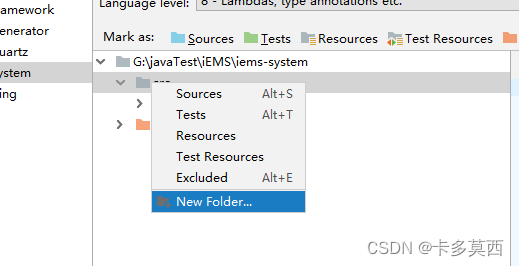
第二步,建立包文件

1,点击New Folder
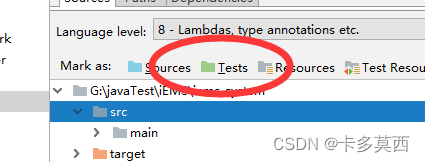
2, 把包变成Tests包

最终的文件结构:

** 3,创建测试类**
测试类规则:测试类必须和启动类保持一致。
如启动类叫做Application 那么测试类必须叫做ApplicationTests
4 测试类注解和方法
必须在测试类上添加注解@SpringBootTest
测试方法上添加注解@Test
@SpringBootTest
public class ApplicationTests {
    @Autowired
    private IOucNoticeService oucNoticeService;
    @Test
    public  void test01(){
        List<SysUser> list = oucNoticeService.selectNoticeVoisibleRangeByRoleId(3L);
        System.out.println(list.toString());
    }
}
5,操作测试
点击测试方法右边,点击启动,就可以测试,此时的测试就无须启动tomcat服务器,就可以得到想要的打印输出,通过控制台就能看到。

注意:如果你的项目有多个模块,此时测试类要建立启动类的那个模块,其包的文件结构要和启动类一致,否则就会抱以下的错误 :
java.lang.IllegalStateException: Unable to find a @SpringBootConfiguration, you need to use
其错误原因就是:试类的包名与启动器的包名不一致
解决方法:Spring Boot测试类包名与main下application.class启动类的包名默认要一致,并且包的结构也要一直,要修改包名和包的结构后问题得以解决!
如启动类叫做Application.class 那么测试类必须叫做ApplicationTests.class
如图所示:

版权归原作者 卡多莫西 所有, 如有侵权,请联系我们删除。