
📌 微信小程序第一节 ——自定义顶部、底部导航栏以及获取胶囊体位置信息。
📌 微信小程序第二节 —— 自定义组件
📌 微信小程序第三节 —— 页面跳转的那些事儿
📌 微信小程序第四节—— 网络请求那些事儿
- 😜作 者:是江迪呀
- ✒️本文关键词:
微信小程序、登陆、token、前端、后端、验证、加密- ☀️每日 一言:趁青春尚存,别为生活沉沦。
前言
在微信小程序的开发过程中,如果想要保留
用户
的
数据
(比如:
操作记录
、
购物车信息
等等)就必须要
用户
登陆。为什么呢?比如说,数据库中有一条
数据
你如何知道这条数据属于谁?属于那个用户呢?这就需要用户登录来获取
用户
的
唯一标识
从而确定这条数据是属于哪个用户的,那么如何做微信小程序的登陆功能呢?让我们使用
Springboot
框架+
AOP
一起来学习吧!
一、流程
微信小程序登录
流程:
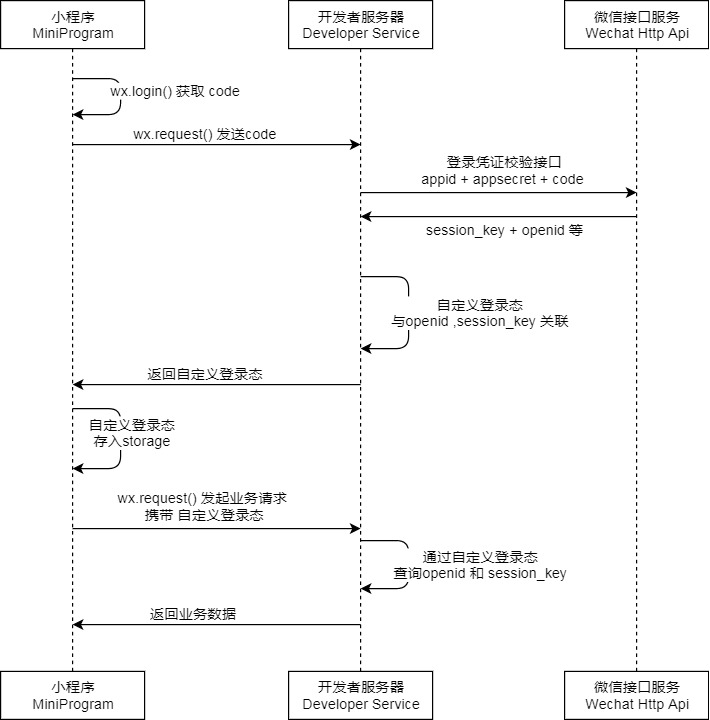
开发者服务器
处理流程:

1.1 获取用户
Code
通过
wx.login
来获取临时登录
code
:
wx.login({success(res){if(res.code){//发起网络请求
      wx.request({url:'https://example.com/onLogin',data:{code: res.code
        }})}else{
      console.log('登录失败!'+ res.errMsg)}}})
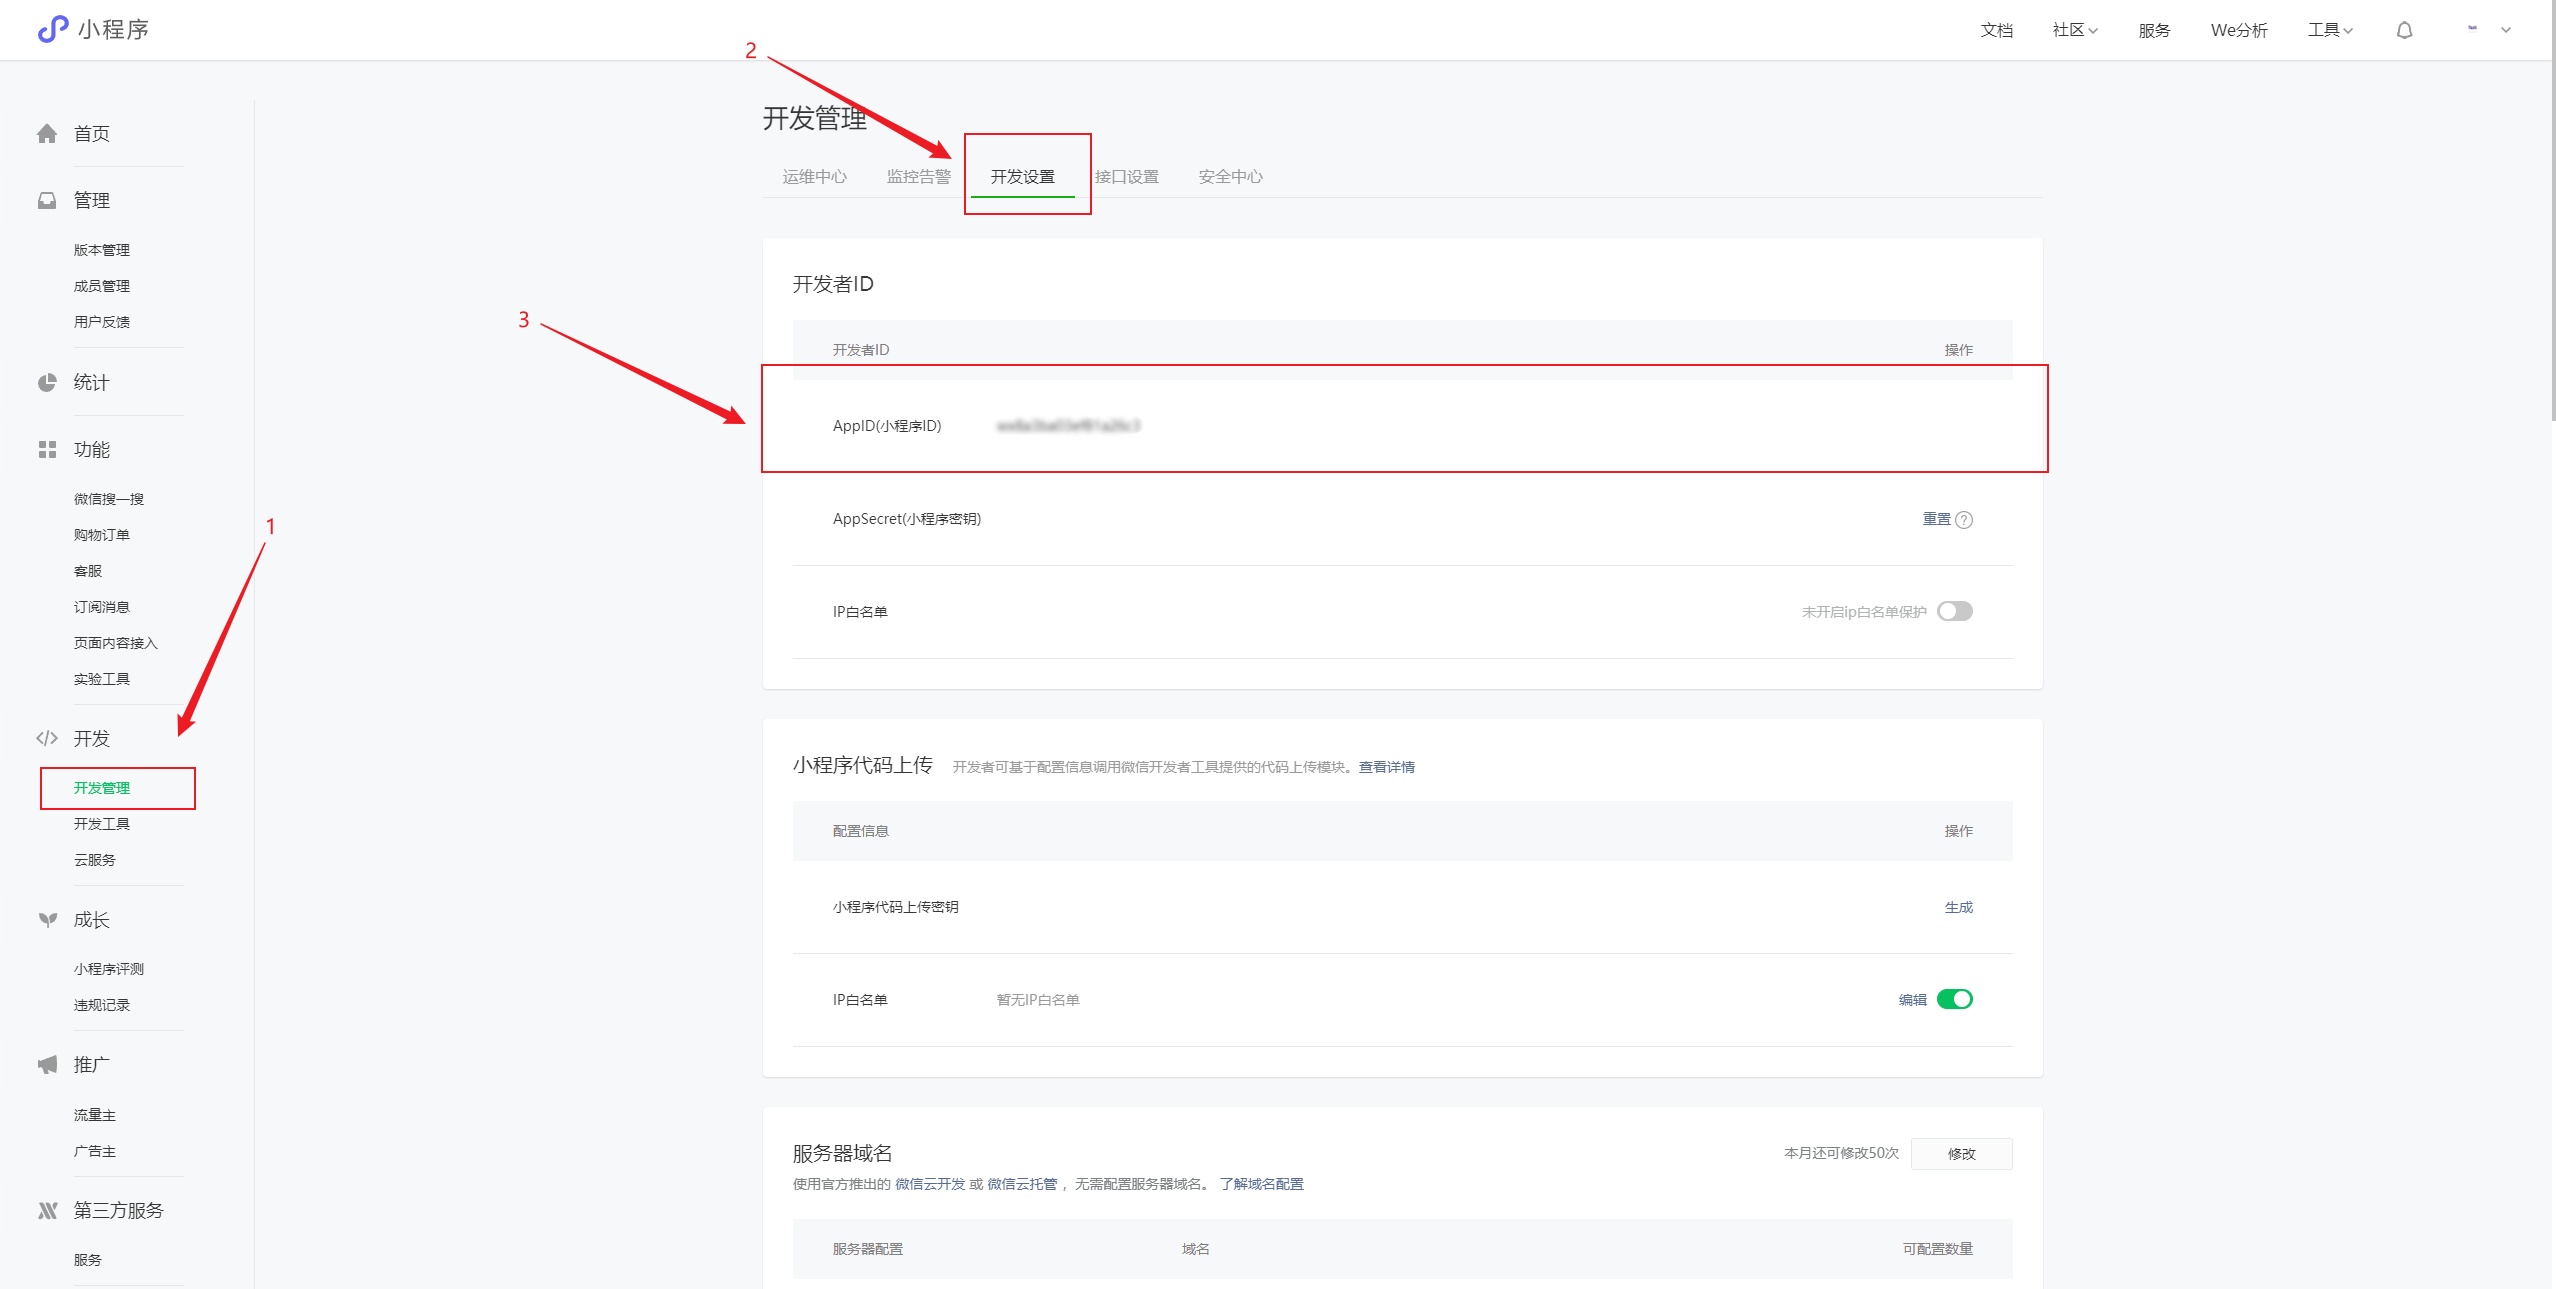
1.2 获取
appid
在注册
微信开发者账
后,可以在
微信小程序管理后台
获取
appid
:
1.3 获取
appsecret
小程序密钥同样是在注册微信开发者平台账号后,在管理后台获取的: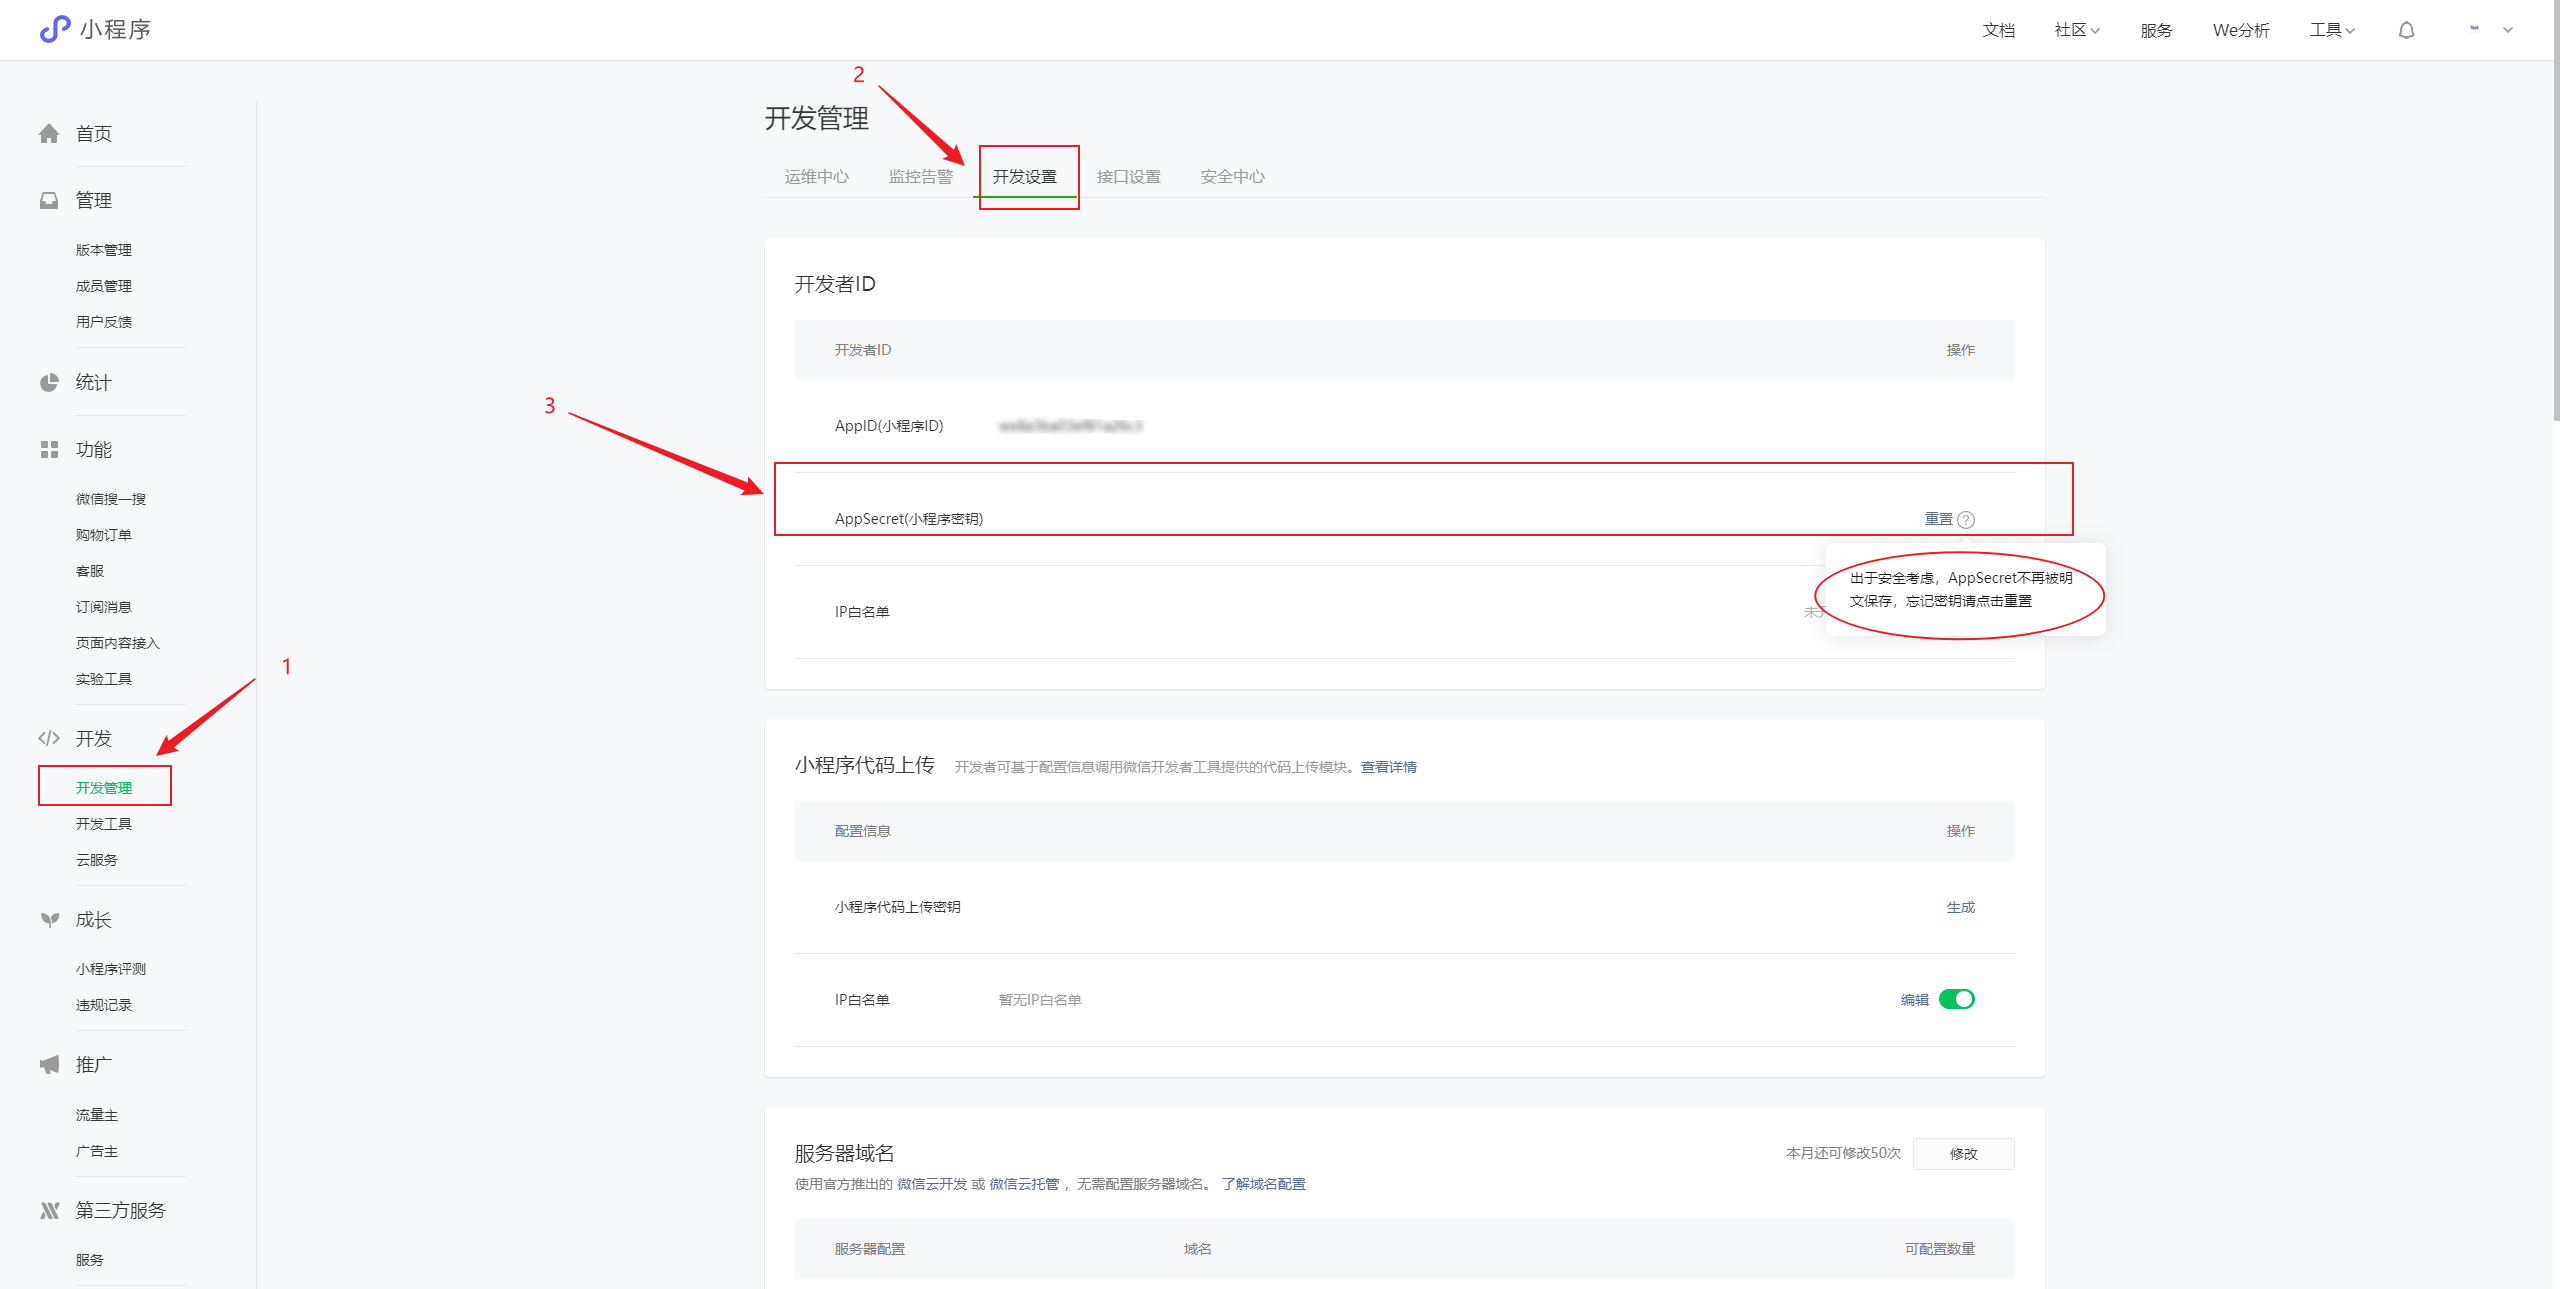
由于微信小程序密钥不以明文的方式展示,如果忘记了,
重置
下就可以了。
1.4 开发者服务向微信接口服务发起请求
拿着
微信code
、
appid
、
appsecret
在
开发者服务器
去请求
微信接口服务
换取
openId
和
secretKey
(这里我们使用ApiPost工具来进行请求,当然PostMan工具也行):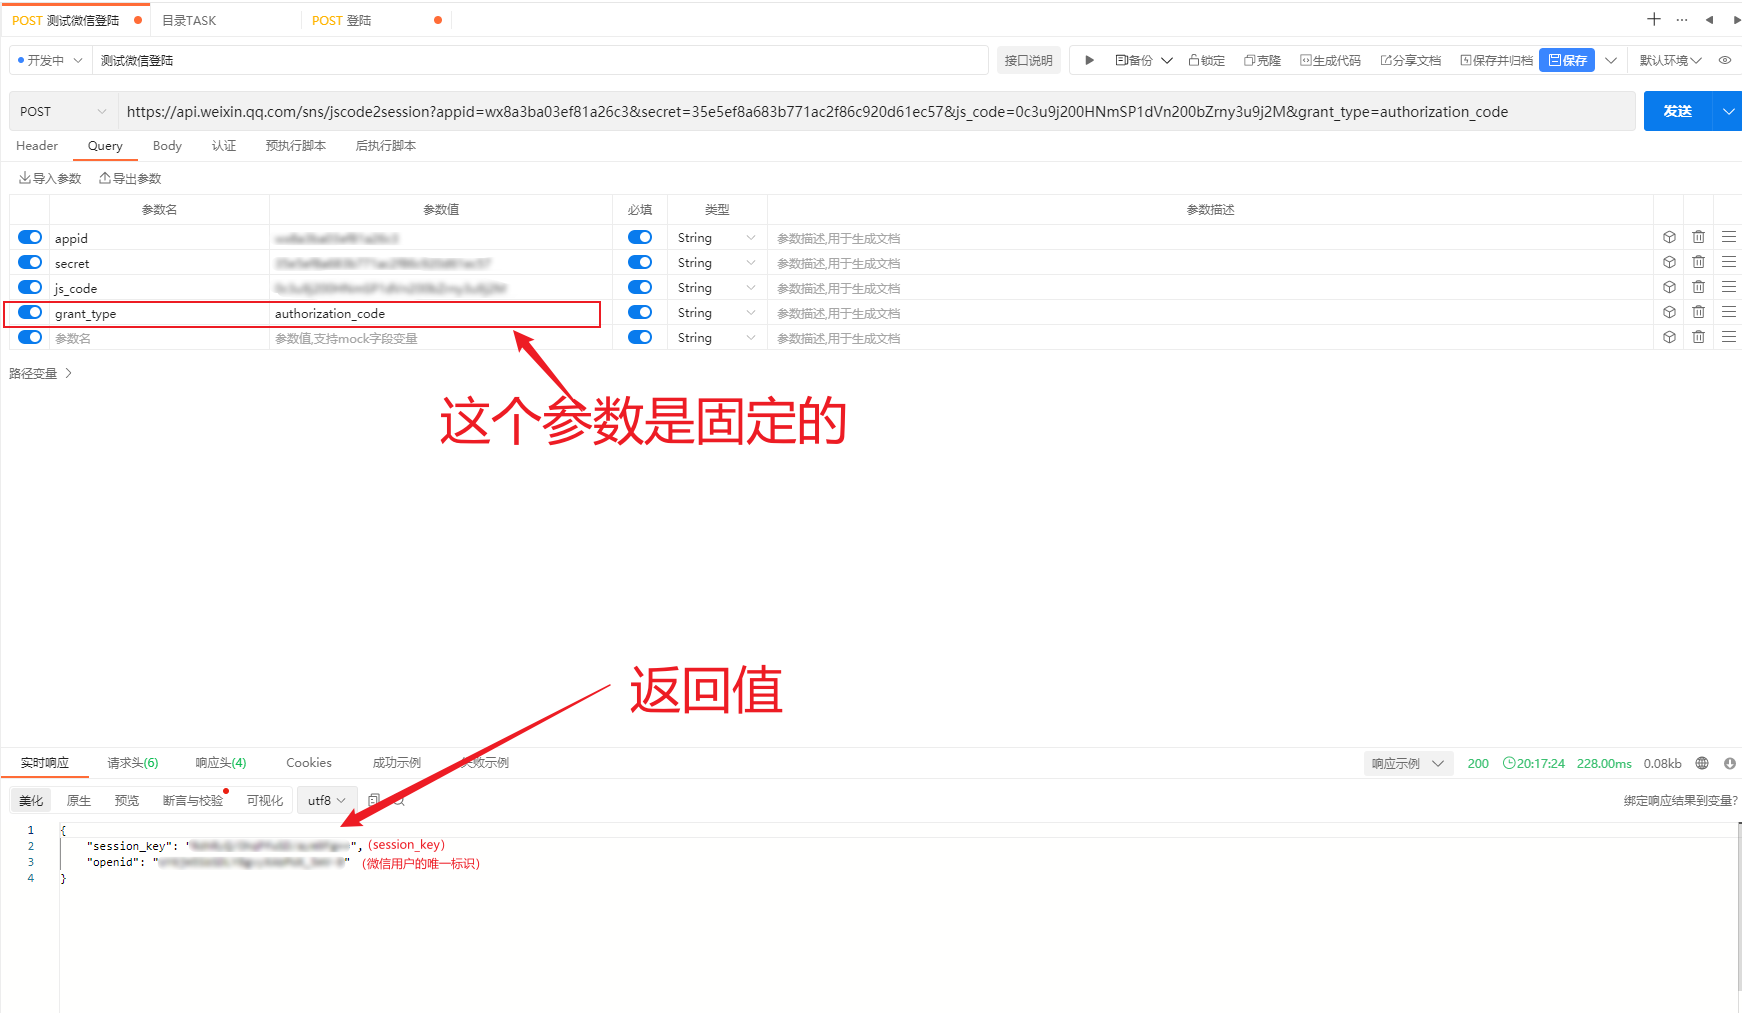
调用
微信接口服务
接口(注意是
Get
请求):
https://api.weixin.qq.com/sns/jscode2session?
1.5 返回值
{"session_key":"xxxxx","openid":"xxxxx"}
拿到返回值后,应该
入库
,保存一下。
数据库结构如下: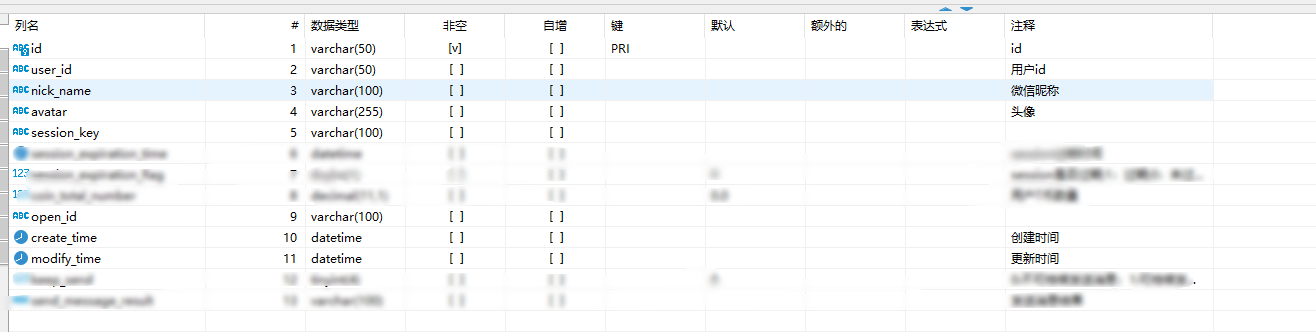
等下次该用户登录时,走完
1.4
流程后,可以根据返回值中的
openid
在我们库中找到该用户,然后进行后续的操作。
1.6 自定义
token
所谓
token
就是用来确认用户的身份证,拿到下面的返回值后,我们有下面两种方式生成
自定义token
:
(1)使用
业务ID
生成
token
(推荐使用,后续的内容都是以用户ID作为例子的):
(2)使用
session_key
生成
token
:
{"session_key":"xxxxx"}
(3)生成
token
的工具:
使用
md5
加密工具来生成
token
,工具类如下:
importcn.hutool.crypto.Mode;importcn.hutool.crypto.Padding;importcn.hutool.crypto.symmetric.AES;importjavax.crypto.spec.IvParameterSpec;importjavax.crypto.spec.SecretKeySpec;importjava.nio.charset.StandardCharsets;publicclassAESUtil{/**
     * 加密密钥
     */privatestaticfinalString ENCODE_KEY ="test_key_secret_";/**
     * 偏移量
     */privatestaticfinalString IV_KEY ="0000000000000000";publicstaticStringencryptFromString(String data,Mode mode,Padding padding){AES aes;if(Mode.CBC == mode){
            aes =newAES(mode, padding,newSecretKeySpec(ENCODE_KEY.getBytes(),"AES"),newIvParameterSpec(IV_KEY.getBytes()));}else{
            aes =newAES(mode, padding,newSecretKeySpec(ENCODE_KEY.getBytes(),"AES"));}return aes.encryptBase64(data,StandardCharsets.UTF_8);}publicstaticStringdecryptFromString(String data,Mode mode,Padding padding){AES aes;if(Mode.CBC == mode){
            aes =newAES(mode, padding,newSecretKeySpec(ENCODE_KEY.getBytes(),"AES"),newIvParameterSpec(IV_KEY.getBytes()));}else{
            aes =newAES(mode, padding,newSecretKeySpec(ENCODE_KEY.getBytes(),"AES"));}byte[] decryptDataBase64 = aes.decrypt(data);returnnewString(decryptDataBase64,StandardCharsets.UTF_8);}}
***注意:
ENCODE_KEY
加密密钥不是固定的可以自己设置,但是!!!
ENCODE_KEY
和
IV_KEY
偏移量的字符
数量
一定要保持一致!!!否者解密失败!!!***
测试:
String encryptData =AESUtil.encryptFromString("test123456..",Mode.CBC,Padding.ZeroPadding);System.out.println("加密:"+ encryptData);String decryptData =AESUtil.decryptFromString(encryptData,Mode.CBC,Padding.ZeroPadding);System.out.println("解密:"+ decryptData);
结果:
加密:UYKwmVTh39qvwHsQ+tkFow==
解密:test123456..
(5)将生成好的
token
放入到
Redis
(不重要,可以省略)
之所以放入
Redis
是因为它可以设置过期时间,可以实现
token
过期重新登录的功能。比如:如果接收到
微信小程序
请求所携带的
token
后先去
Redis
查询是否
存在
,如果
不存
在则判定过期,直接返回让再次用户登录。
@AutowiredprivateRedisTemplate redisTemplate;....//微信用户的唯一标识privateString userId='xxxxx'//将token放入redis并设置3天过期
redisTemplate.opsForValue().set(userId,JSONObject.toJSONString(userInfo),3,TimeUnit.DAYS);
(6)返回
token
给微信小程序
将
token
放到返回体中返回给微信端。
...returnreturnSuccess(token);
1.7 将
token
放到本地
在
开发者服务器
返回给微信小程序结果后,将
token
放入到本地存储。
...//将token放到本地
 wx.setStorageSync('token', result.sessionKey)...
1.8 请求带上
token
向
开发者服务器
发起请求时,在
header
中带上
token
...
wx.request({url:'https://xxxx.com/api/method',header:{"token":wx.getStorageSync('token')},success:function(res){},fail:function(res){}})...
1.9 开发者服务器验证
token
开发者服务器
在接收到微信端发起的业务请求时,通过
AOP
进行拦截获取
header
中的
token
:
(1)
AOP
统一拦截:
使用
Spring
的
AOP
来拦截请求获取
token
。
//获取tokenString token = request.getHeader("token");
 log.info("token:{}",token);
(2)解密
token
...String token ='xxxx';
log.info("解密前:{}",decryptData);String decryptData =AESUtil.decryptFromString(token,Mode.CBC,Padding.ZeroPadding);
log.info("解密结果:{}",decryptData);//拿到用户IDString userId = decryptData;...
(3)验证是否过期(不重要,可以省略的步骤)
@AutowiredprivateRedisTemplate redisTemplate;...//用户IDString userId = decryptData
ValueOperations valueOperations = redisTemplate.opsForValue();String userInfoRedis =(String)valueOperations.get(userId);...
二、前后端完整代码
2.1 前端代码
(1)登陆
 wx.login({success(res){if(res.code){
         wx.request({url:'https://xxxx.com/login/wxLogin',method:"POST",data:{"code":res.code},dataType:"json",success:function(res){
             result = res.data.result
             wx.setStorageSync('token', result.token)//页面跳转...},fail:function(res){},})}}})
(2)发起业务请求
wx.request({url:"https://xxxx.com/test/test",method:"GET",dataType:"json",data:{},//在heard中戴上tokenheader:{"token":wx.getStorageSync('token')},success:function(res){...},fail:function(res){}});
2.2 后端代码
后端使用的
Java
语言,框架是
Springboot
+
AOP
实现。
目录结构如下: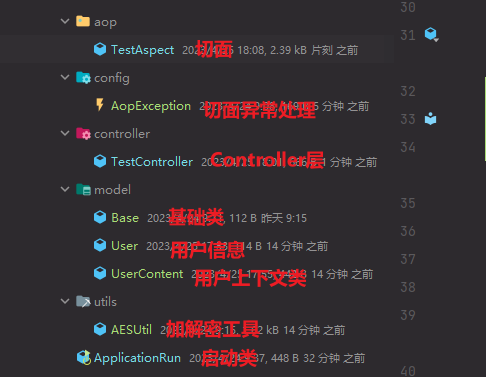
yml
配置文件:
(1)依赖
<dependency><groupId>org.springframework.boot</groupId><artifactId>spring-boot-starter-web</artifactId><version>2.1.2.RELEASE</version></dependency><dependency><groupId>org.springframework.boot</groupId><artifactId>spring-boot-starter</artifactId><version>2.3.7.RELEASE</version></dependency><dependency><groupId>org.projectlombok</groupId><artifactId>lombok</artifactId><version>1.16.16</version></dependency><dependency><groupId>org.slf4j</groupId><artifactId>slf4j-api</artifactId><version>1.7.30</version></dependency><dependency><groupId>cn.hutool</groupId><artifactId>hutool-all</artifactId><version>5.6.3</version></dependency><dependency><groupId>org.springframework.boot</groupId><artifactId>spring-boot-starter-aop</artifactId><version>3.0.4</version></dependency>
(2)切面相关代码
importlombok.extern.slf4j.Slf4j;importorg.aspectj.lang.ProceedingJoinPoint;importorg.aspectj.lang.annotation.After;importorg.aspectj.lang.annotation.Around;importorg.aspectj.lang.annotation.Aspect;importorg.aspectj.lang.annotation.Pointcut;importorg.springframework.beans.BeanUtils;importorg.springframework.beans.factory.annotation.Autowired;importorg.springframework.stereotype.Component;importorg.springframework.util.StringUtils;importjavax.servlet.http.HttpServletRequest;@Aspect@Component@Slf4jpublicclassTestAspect{@AutowiredprivateHttpServletRequest request;@Pointcut("execution(* xx.xxx.controller.*.*(..))"+"&& !execution(* xx.xxx.controller.WxLogin.*(..)")publicvoidpointCut(){}@Around(value ="pointCut()")publicObjectAround(ProceedingJoinPoint joinPoint)throwsThrowable{//获取tokenString token = request.getHeader("token");
        log.info("token:{}",token);//不存在token直接抛出异常if(StringUtils.isEmpty(token)){thrownewAopException();}//解析tokenString userId =AESUtil.decryptFromString(token,Mode.CBC,Padding.ZeroPadding);
        log.info("解析token:{}",userId);//将token 放入到 Base基础类Base base =newBase();
        base.setUserId(userId);//放到Base中finalObject[] args = joinPoint.getArgs();for(Object arg : args){if(arg instanceofBase){BeanUtils.copyProperties(base, arg);}}//放到ThreadLocal中User user =newUser();
        user.setUserId(userId);UserContent.setUserContext(user);return joinPoint.proceed();}@After(value ="pointCut()")publicvoidcontrollerAfter()throwsThrowable{
        log.info("后置通知");
        log.info("移除ThreadLocal中的用户信息:{}",UserContent.getUserContext());UserContent.removeUserContext();}}
知识点:
从上面代码中我们可以看到。我们通过解密可以拿到
UserId,这个值我们是频繁使用的,那么如何做到
随用随取呢?
第一种方式:使用Base基础类,然后让
Controller需要传递参数的
DTO都继承
Base然后就可以随时使用
UserId了。
第二种方式:使用
ThreadLocal,这种是比上一种优雅一些,也可以完全做到随用随取。但是需要注意在
会话结束后一定要移除
ThreadLocal中的用户信息,否则会导致内存溢出(这很重要),一般使用
切面的后置通知来做这件事情。
execution(* xx.xx.controller.*.*(..))解释:在方法执行时,xx.xx.controller包下的所有
类下面的所有带有任何参数的
方法都需要走这个切面。
@PointCut注解值的规则:
execution:方法执行时触发。- 第一个
*:返回任意类型。xx.xx.controller:具体的报路径。- 第二个
*:任意类。- 第三个
*:任意方法。(..):任意参数。如果想要排除
xxController类可以这样写:
@Pointcut("execution(* xx.xxx.xxxx.controller..(…)) " + “&& !execution(* xx.xxx.xxxx.controller.xxController.*(…))”)
比如 登陆的时候就需要放行登陆的接口。
publicclassAopExceptionextendsException{publicAopException(){super("登录超时,请重新登录");}}
(3)控制层代码
登陆
Controller
代码:
importorg.springframework.beans.factory.annotation.Autowired;importorg.springframework.web.bind.annotation.PostMapping;importorg.springframework.web.bind.annotation.RequestBody;importorg.springframework.web.bind.annotation.RequestMapping;importorg.springframework.web.bind.annotation.RestController;@RestController@RequestMapping("/login")publicclassWxLogin{@AutowiredprivateIWxLoginService iWxLoginService;@PostMapping("/wxLogin")publicResponsewxLogin(@RequestBodyWxLoginRequestDto requestDto){WxLoginResponseDto wxLoginResponseDto = iWxLoginService.wxLogin(requestDto);returnreturnSuccess(wxLoginResponseDto);}}
业务逻辑
Controller
代码:
importcn.trueland.model.Base;importcn.trueland.model.UserContent;importorg.springframework.web.bind.annotation.GetMapping;importorg.springframework.web.bind.annotation.RequestMapping;importorg.springframework.web.bind.annotation.RestController;@RestController@RequestMapping("/test")publicclassTestController{@GetMapping("/test")publicStringtest(Base base){return base.getUserId();}@GetMapping("/test2")publicStringtest2(){returnUserContent.getUserContext().getUserId();}}
(4)
Service
层代码:
这里我只帖登陆的
Service
层代码,业务的没有必要。
publicStringwxLogin(WxLoginRequestDto requestDto){if(StringUtils.isBlank(requestDto.getCode())){thrownewBusinessException("code为空!");}//获取微信服务接口地址String authCode2Session = wxConfig.getAuthCode2Session(requestDto.getCode());//请求微信服务接口获取 openIdString result =HttpClientUtil.doGet(authCode2Session);String openId =JSONObject.parseObject(result).getString("openid");String sessionKey =JSONObject.parseObject(result).getString("session_key");//入库 并返回  userId (逻辑省略)String userId =...;//将用户信息存入redis
        redisTemplate.opsForValue().set(userId,userId ,3,TimeUnit.DAYS);String token =AESUtil.encryptFromString(userId,Mode.CBC,Padding.ZeroPadding);return token;}
(4)实体类相关代码
importlombok.Data;@DatapublicclassWxLoginRequestDto{/**
     * code
     */privateString code;}
importlombok.Data;@DatapublicclassBase{privateString userId;}
importlombok.Data;@DatapublicclassUser{privateString userId;}
publicclassUserContent{privatestaticfinalThreadLocal<User> userInfo =newThreadLocal();publicstaticUsergetUserContext(){return userInfo.get();}publicstaticvoidsetUserContext(User userContext){
        userInfo.set(userContext);}publicstaticvoidremoveUserContext(){
        userInfo.remove();}}
(5)配置类
importlombok.Data;importorg.springframework.boot.context.properties.ConfigurationProperties;importorg.springframework.stereotype.Component;@Data@Component@ConfigurationProperties(prefix ="wx")publicclassWxConfig{/**
     * 小程序AppId
     */privateString appId;/**
     * 小程序密钥
     */privateString appSecret;/**
     * 授权类型
     */privateString grantType;/**
     * auth.code2Session 的 url
     */privateString authCodeSessionUrl;}
(6)
yml
配置信息
wx:
  app-id: xxxx
  app-secret: xxxx
  auth-code-session-url: https://api.weixin.qq.com/sns/jscode2session?
  grant-type: authorization_code
测试结果
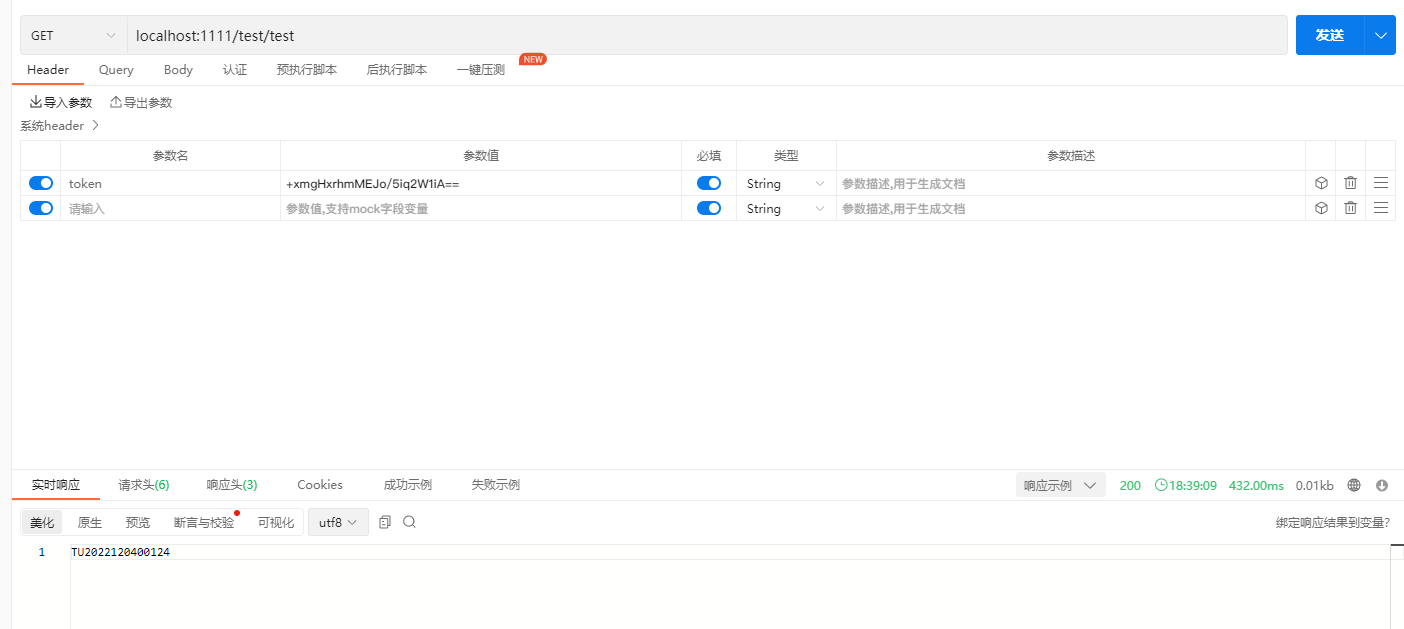
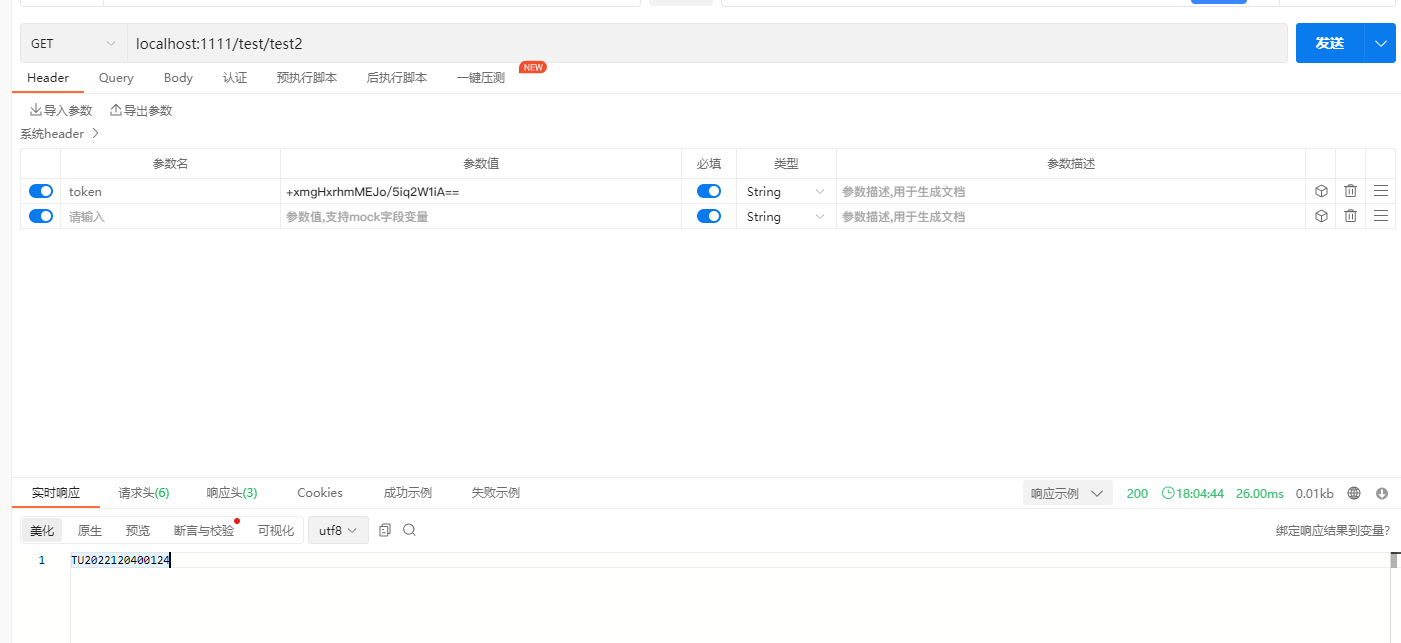
都可以拿到
UserId
并返回。
下面就可以开心的处理业务逻辑啦!!!
版权归原作者 是江迪呀 所有, 如有侵权,请联系我们删除。