文章目录
🌈前言
MySQL 是最流行的数据库之一,也是目前世界上最流行的开源关系数据库,大多应用于互联网行业。比如,在国内,大家所熟知的百度、腾讯、淘宝、京东、网易、新浪等,国外的 Google、Facebook、Twitter、GitHub 等都在使用 MySQL。社交、电商、游戏的核心存储往往也是 MySQL,本文就简单的介绍python操作MySQL增删改查基础内容。
📕往期知识点
📕往期内容回顾
💡 python+requests+BeautifulSoup实现对数据保存到mysql数据库
💡selenium自动化测试实战案例哔哩哔哩信息至Excel
💡 舍友打一把游戏的时间,我实现了一个selenium自动化测试并把数据保存到MySQL

🌈实现步骤
提示:请确认本机安装好MySQL之后再来操作以下步骤。
(一)库的安装
使用Python连接Mysql数据库需要安装相应的库(pymysql),pymysql是一个连接mysql数据库的第三方模块,可作为连接mysql数据库的客户端,对数据库进行增删改查操作。
🌌安装语法
pip install pymysql
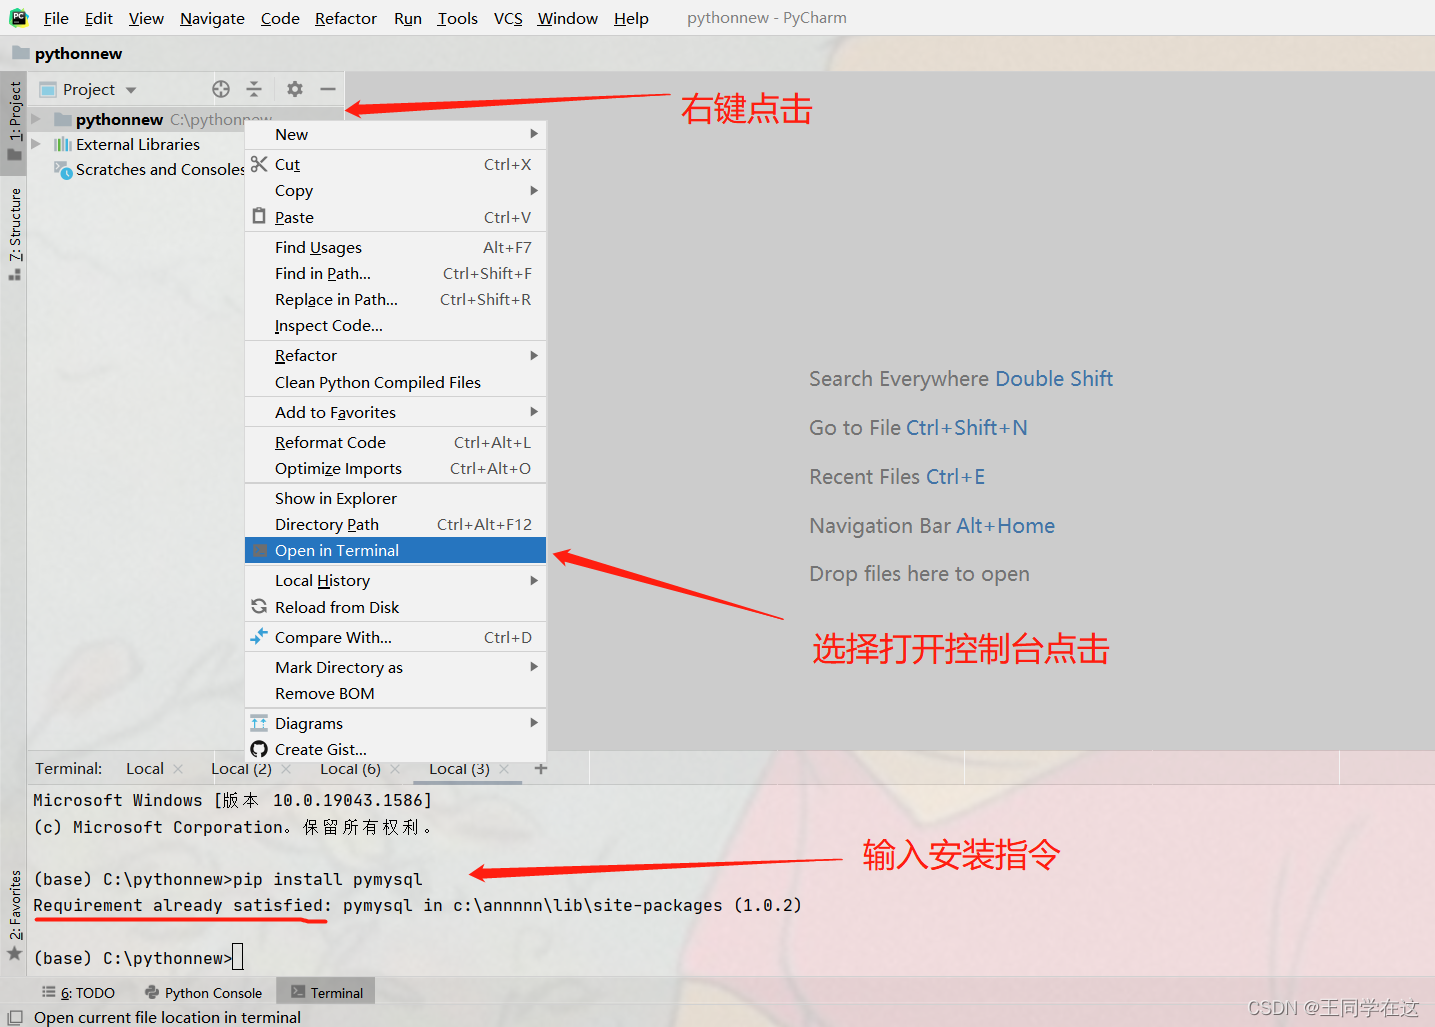
进入 cmd 输入 pip install pymysql
回车等待安装完成出现successfully即证明安装成功。
或
pyCharm中安装的方法。安装步骤如下图,因为我这里已经安装过了,会出现已经存在的提示,首次安装会出现successfull的提示。
(二)MySQL创建数据库
先在MySQL终端操作创建数据库,后面用来用连接MySQL需要指定一个数据库。
🌏创建一个名为text的数据库,编码为utf8
create database text charset=utf8;
🌏查看数据库
show databases;

查看完成出现上图的数据及表名创建成功。
(三)PyCharm连接MySQL并建表
思维导图
🌏思路分析 Python连接MySQL 的步骤
1、导入pymysql模块
2、调用pymysql模块中的connect()函数来创建连接对象
3、利用数据库对象的cursor()方法创建Cursor对象
4、用Cursor对象的execute()方法执行数据库增删改查操作,查询时可用fetchone()和fetchall()查看数据
5、用数据库对象的commit()方法提交数据
6、关闭数据库对象和Cursor对象
🌏在连接数据库之前有必要了解以下参数,能让你更快的理解它们的作用。
pymysql中connect()函数
host:连接的mysql主机,如果本机 是’localhost’
port:连接的mysql主机的端口,默认是3306
user:连接的用户名
password:连接的密码
database:数据库的名称
charset:编码方式,推荐使用utf8
pymysql对象方法的用途
游标对象的方法用途
🌏在py中,导入pymysql第三方库,配置连接mysql数据库:
import pymysql  # 实现连接mysql# 创建连接
mysql = pymysql.connect(
    host='localhost',# 连接地址, 本地user='root',# 用户
    password='111111',# 数据库密码,记得修改为自己本机的密码
    port=3306,# 端口,默认为3306charset='utf8',# 编码database='text'# 选择数据库)print(mysql)
出现如下则证明连接成功
连接失败的话,请检查账户、密码以及数据库是否正确,查看数据库是否开机。
🌏能连接上MySQL接下来就是操作PyCharm在数据库text中建一张表
这里在text数据库中建了一张student的表,里面字段有id,名字,年龄,性别。
import pymysql  # 实现连接mysql# 创建连接
mysql = pymysql.connect(
    host='localhost',# 连接地址, 本地user='root',# 用户
    password='111111',# 数据库密码
    port=3306,# 端口,默认为3306charset='utf8',# 编码database='text'# 选择数据库)# print(mysql)# 创建游标对象
db = mysql.cursor()# MySQL语法sql='create table if not exists student(' \
      'id int not null primary key auto_increment' \
      ',name varchar(50) not null ' \
      ',age int not null ' \
      ',gender char(10) not null' \
      ');'

try:
    # 执行sql
    db.execute(sql)
    mysql.commit()# 表示将修改操作提交到数据库print('创建表成功')except Exception as e:
    print('操作失败',e)
    mysql.rollback()# 表示不成功则回滚数据# 游标关闭
db.close()# 关闭连接
mysql.close()
执行后可在MySQL数据库中查看
(四)PyCharm连接MySQL实现增删改查
💖1.1 向student表(添加数据数据)
编写插入sql的语句
insert into 表名 valuses(),(),();
import pymysql  # 实现连接mysql# 创建连接
mysql = pymysql.connect(
    host='localhost',# 连接地址, 本地user='root',# 用户
    password='111111',# 数据库密码
    port=3306,# 端口,默认为3306charset='utf8',# 编码database='text'# 选择数据库)# print(mysql)# 创建游标对象
db = mysql.cursor()# MySQL语法sql='create table if not exists student(' \
      'id int not null primary key auto_increment' \
      ',name varchar(50) not null ' \
      ',age int not null ' \
      ',gender char(10) not null' \
      ');'# 添加两条数据
append ='insert into student(name,age,gender) values("小明",18,"男"),("小红",17,"女");'

try:
    # 执行sql
    db.execute(sql)# 添加
    db.execute(append)
    mysql.commit()# 表示将修改操作提交到数据库# print('创建表成功')print('添加成功')except Exception as e:
    print('操作失败',e)
    mysql.rollback()# 表示不成功则回滚数据# 游标关闭
db.close()# 关闭连接
mysql.close()
在MySQL数据库中查看,查询表中全部的数据
select * from student;
在数据库中输入语句发现表中添加了数据
💖1.2 操作student表在py中(查询数据)
编写好sql查找的语句,交给游标执行,游标调用fetchall()函数。
select * from 表名;
import pymysql  # 实现连接mysql# 创建连接
mysql = pymysql.connect(
    host='localhost',# 连接地址, 本地user='root',# 用户
    password='111111',# 数据库密码
    port=3306,# 端口,默认为3306charset='utf8',# 编码database='text'# 选择数据库)# print(mysql)# 创建游标对象
db = mysql.cursor()# MySQL语法sql='create table if not exists student(' \
      'id int not null primary key auto_increment' \
      ',name varchar(50) not null ' \
      ',age int not null ' \
      ',gender char(10) not null' \
      ');'# 添加数据# append = 'insert into student(name,age,gender) values("小明",18,"男"),("小红",17,"女");'# 查询数据
find ='select * from student'

try:
    # 执行sql
    db.execute(sql)# 添加# db.execute()# 查找数据
    db.execute(find)# 获取查询的所有记录
    res = db.fetchall()
    mysql.commit()# 表示将修改操作提交到数据库# print('创建表成功')print(res)print('查找成功')except Exception as e:
    print('操作失败',e)
    mysql.rollback()# 表示不成功则回滚数据# 游标关闭
db.close()# 关闭连接
mysql.close()
查询结果
💖1.3 操作student表在py中(更新数据)
编写更新数据的语句
update 表名 set 字段名=更新值,字段名=更新值,字段名=更新值… where 更新条件;
import pymysql  # 实现连接mysql# 创建连接
mysql = pymysql.connect(
    host='localhost',# 连接地址, 本地user='root',# 用户
    password='111111',# 数据库密码
    port=3306,# 端口,默认为3306charset='utf8',# 编码database='text'# 选择数据库)# print(mysql)# 创建游标对象
db = mysql.cursor()# MySQL语法sql='create table if not exists student(' \
      'id int not null primary key auto_increment' \
      ',name varchar(50) not null ' \
      ',age int not null ' \
      ',gender char(10) not null' \
      ');'# 添加数据# append = 'insert into student(name,age,gender) values("小明",18,"男"),("小红",17,"女");'# 查询数据# find = 'select * from student'# 更新数据update='update student set name="小芳",age=20,gender="男" where id=2;'

try:
    # 执行sql
    db.execute(sql)# 添加# db.execute()# 查找数据# db.execute(find)# 查询# res = db.fetchall()# 更新数据
    db.execute(update)

    mysql.commit()# 表示将修改操作提交到数据库# print('创建表成功')# print(res)# print('查找成功')print('更新成功')except Exception as e:
    print('操作失败',e)
    mysql.rollback()# 表示不成功则回滚数据# 游标关闭
db.close()# 关闭连接
mysql.close()
结果,这里更新了表中id为2的同学信息。
💖1.4 操作student表在py中(删除数据)
在py中编写删除语句
delete from 表名 where 删除条件;
import pymysql  # 实现连接mysql# 创建连接
mysql = pymysql.connect(
    host='localhost',# 连接地址, 本地user='root',# 用户
    password='111111',# 数据库密码
    port=3306,# 端口,默认为3306charset='utf8',# 编码database='text'# 选择数据库)# print(mysql)# 创建游标对象
db = mysql.cursor()# MySQL语法sql='create table if not exists student(' \
      'id int not null primary key auto_increment' \
      ',name varchar(50) not null ' \
      ',age int not null ' \
      ',gender char(10) not null' \
      ');'# 添加数据# append = 'insert into student(name,age,gender) values("小明",18,"男"),("小红",17,"女");'# 查询数据# find = 'select * from student'# 更新数据# update = 'update student set name="小芳",age=20,gender="男" where id=2;'# 删除数据
delect ='delete from student where name="小明";'

try:
    # 执行sql
    db.execute(sql)# 添加# db.execute()# 查找数据# db.execute(find)# 查询# res = db.fetchall()# 更新数据# db.execute(update)# 删除数据
    db.execute(delect)

    mysql.commit()# 表示将修改操作提交到数据库# print('创建表成功')# print(res)# print('查找成功')# print('更新成功')print('删除成功')except Exception as e:
    print('操作失败',e)
    mysql.rollback()# 表示不成功则回滚数据# 游标关闭
db.close()# 关闭连接
mysql.close()
结果,删除了名字为小明的信息。
🍁结语
以上就是pymysql模块简单的使用方法了,今天讲的内容,仅仅介绍了PyCharm连接MySQL数据库实现增删改查的使用,而能使我们快速便捷地处理数据的方法。
🌹
今天的学习到这里就结束啦,关注我,咱们下期再见!!

版权归原作者 王同学在这 所有, 如有侵权,请联系我们删除。