
从 0 开始实现一个 SpringBoot + Vue 项目
从 0 开始实现一个 SpringBoot + Vue 项目
参考:梦想屋A
软件和工具
- 后端开发软件:IntelliJ IDEA
- 前端开发软件:Visual Studio Code
- 后端框架:SpringBoot
- 后端语言:Java
- 前端框架:Vue
这是后面要用的妙妙小工具:
- 服务器连接工具:Termius
- 数据库:MySQL
- 数据库管理工具:Navicat Premium
- 数据库连接工具:MyBatis
- API 文档生成工具:Swagger
- API 文档美化工具:Knife4j
- UI 组件库:Element
- 网络请求库:Axios
- 字体处理库:Sfntly
- JSON 处理工具:Fastjson
- Java 工具库:Lombok
可以不必全部用这些来做,有很多类似的产品可以替代。
创建 SpringBoot 后端项目
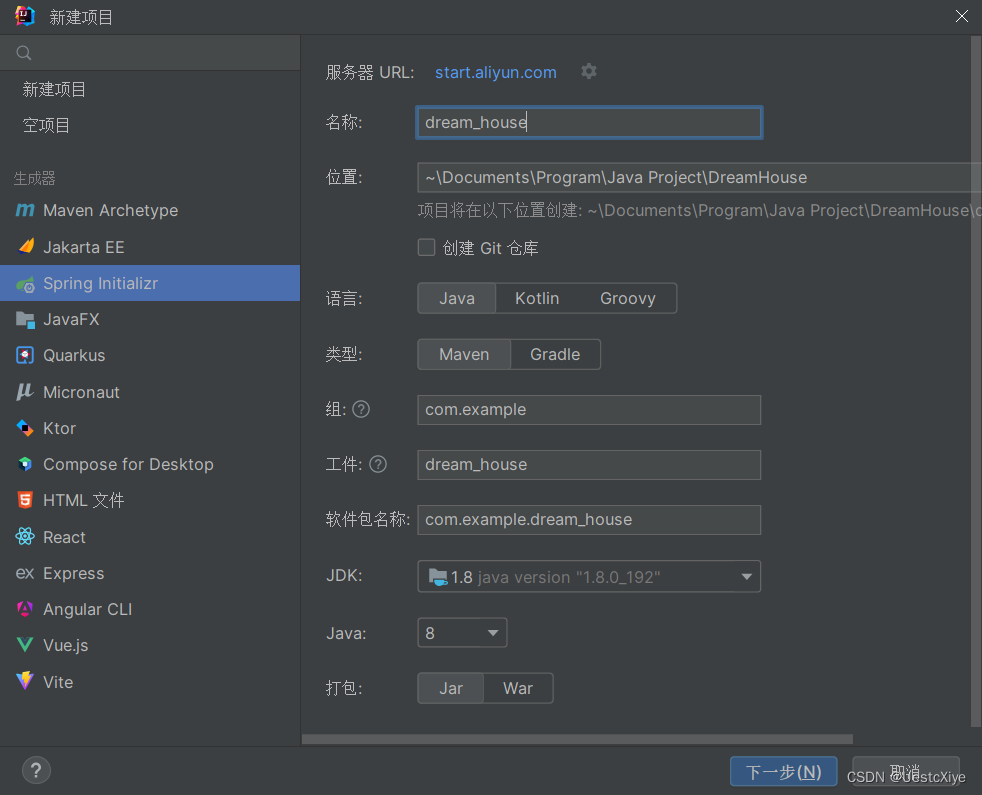
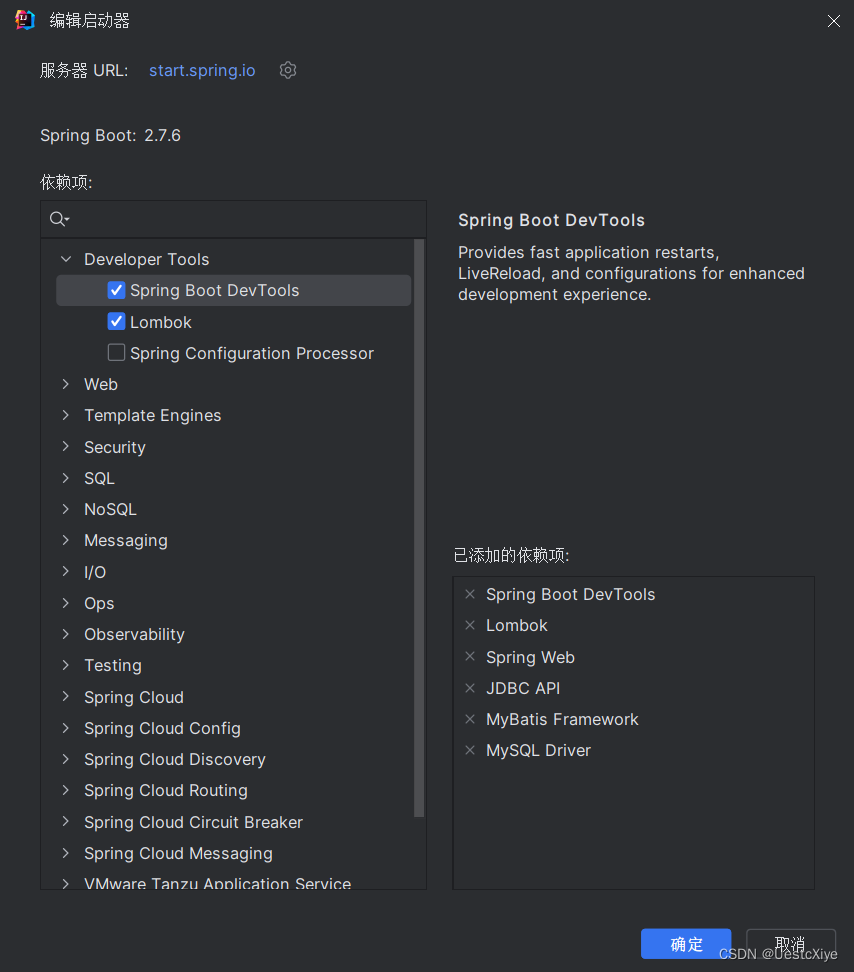
首先我们打开 IDEA,点击新建项目,选择 Spring Initializr,然后在右侧填写项目名称,类型选择 Maven,JDK 版本选择1.8,如下图所示,然后点击下一步。
在新的页面中选择 SpringBoot 版本 3.0.2,引入一些依赖,点击创建。

后面在 pom.xml 中把 Java 版本改回 1.8,SpringBoot 版本改回 2.7.6。
项目结构:
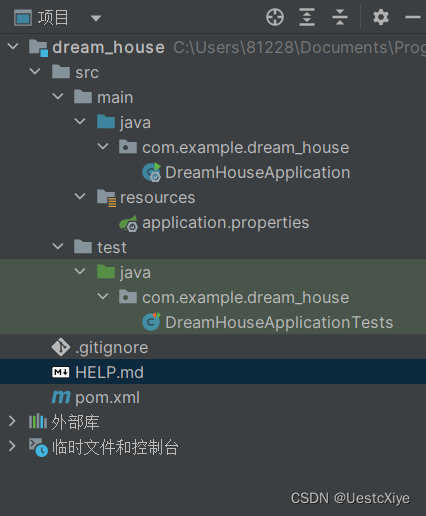
可以看到 SpringBoot 的基础结构有三个文件:
- src/main/java 下的程序入口:DreamHouseApplication
- src/main/resources 下的配置文件:application.properties
- src/test 下的测试入口:DreamHouseApplicationTests
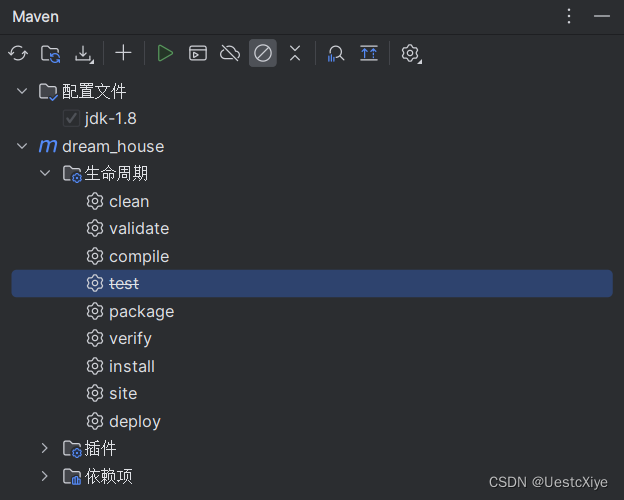
在运行类 DreamHouseApplication 同级目录下创建 controller、service、mapper、model 四个目录:
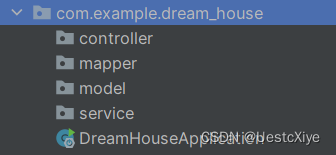
controller 层:控制层
- 作用是请求和响应控制。
- 负责前后端交互,接受前端请求,调用 service 层,接收 service 层返回的数据,最后返回具体的页面和数据到客户端。
service 层:业务逻辑层
- 作用是完成功能设计。
- 调用 mapper 层接口,接收 mapper 层返回的数据,完成项目的基本功能设计。
mapper 层:数据持久层,也被称为 dao 层
- 作用是访问数据库,向数据库发送 sql 语句,完成数据的增删改查任务。
model 层:数据库实体层,也被称为 entity 层、pojo 层
- 用于存储数据库中的数据,类属性与数据库表字段对应。
- 通常情况下,Model 层使用 ORM(对象关系映射)技术,如 JPA,MyBatis 等与数据库进行交互。
在项目目录中的 pom.xml 配置文件中引入本次项目中需要用到的相关依赖:
<!--MyBatis--><dependency><groupId>org.mybatis.spring.boot</groupId><artifactId>mybatis-spring-boot-starter</artifactId><version>3.0.0</version></dependency><!--Swagger3--><dependency><groupId>io.springfox</groupId><artifactId>springfox-boot-starter</artifactId><version>3.0.0</version></dependency><!--knife4j--><dependency><groupId>com.github.xiaoymin</groupId><artifactId>knife4j-spring-ui</artifactId><version>3.0.3</version></dependency><dependency><groupId>org.springframework.boot</groupId><artifactId>spring-boot-devtools</artifactId><scope>runtime</scope><optional>true</optional></dependency><!--JSON--><dependency><groupId>com.alibaba</groupId><artifactId>fastjson</artifactId><version>1.2.15</version></dependency><!--MySQL--><dependency><groupId>com.mysql</groupId><artifactId>mysql-connector-j</artifactId><version>8.0.31</version><scope>runtime</scope></dependency><!--Lombok--><dependency><groupId>org.projectlombok</groupId><artifactId>lombok</artifactId><optional>true</optional></dependency><dependency><groupId>org.springframework.boot</groupId><artifactId>spring-boot-starter-test</artifactId><scope>test</scope></dependency>
将这些依赖放到<dependencies></dependencies>标签内,就接着 SpringBoot 自带的一些依赖下面就行了。
稍微解释一下这些依赖:
- Lombok:可以通过注解的方式为 Java 类生成许多常用的方法,例如 getter、setter、toString、equals 等,省去了手写这些方法的代码。
- Swagger:开源的 API 文档生成工具,可以根据代码中的注释自动生成 API 文档。
- Knife4j:用来美化 Swagger 生成的 API 文档。
- MyBatis:持久层框架,主要用于简化数据库操作,提高代码可读性,降低数据访问代码的维护难度,提高效率。
- MySQL:MySQL 官方提供的 Java 用的 JDBC 驱动,它允许 Java 程序通过 JDBC API 连接到 MySQL 数据库。
- JSON:用来将 json 数据序列化和反序列化的,主要是觉得 SpringBoot 自带的 json 工具不好用。
创建 MySQL 数据库
安装 MySQL 这里就不讲了,这里用 Navicat Premium 连接数据库。
填写连接名、主机IP、端口、用户名和密码等,然后点击连接。

可以先点测试连接,显示连接成功,在点确定。
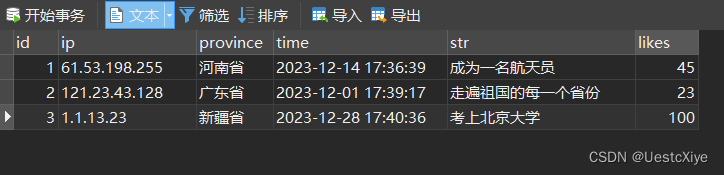
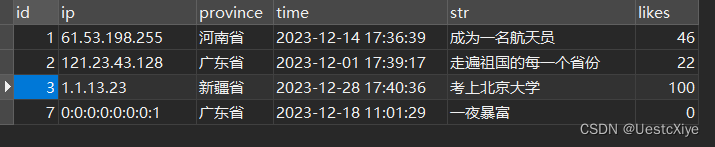
连接上数据库之后,新建数据库–>新建表–>添加 id、ip、province、time、str、likes 六个字段。
表名为 dream,具体内容如下所示:
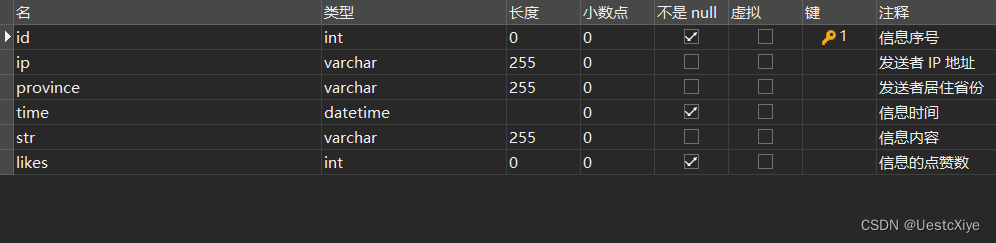
这里有两个细节:
- id 要设置自动递增
- likes 设置为无符号
友情链接:mysql自增navicat_navicat怎么设置主键自增
配置文件
让我们回到 SpringBoot,打开刚刚介绍到的配置文件 application.properties 进行项目配置:
server.port =8087

spring.mvc.pathmatch.matching-strategy = ant_path_matcher

#Swagger
swagger.enabled =true#MySQL
spring.datasource.url = jdbc:mysql:(服务器IP地址):3306/(数据库名)
spring.datasource.username =(用户名)
spring.datasource.password =(密码)
spring.datasource.driver-class-name = com.mysql.cj.jdbc.Driver
稍微解释一下:
- server.port:指定项目使用 8087 端口,默认 8080 端口。
- spring.mvc.pathmatch.matching-strategy:指定 Spring MVC 框架中 URL 路径匹配策略的实现类的类名,ant_path_matcher 是一种路径匹配策略,使用 Ant 风格的通配符来匹配 URL 路径。
- swagger.enabled:启用 Swagger 工具。
- spring.datasource.url:指定 MySQL 数据库的 URL。这里的服务器 IP 地址就是主机名,我的是 localhost(前面要带//),数据库名是 dreamhouse,完整格式:jdbc:mysql://localhost:3306/dreamhouse。
- spring.datasource.username:指定连接 MySQL 数据库使用的用户名。我的是 root。
- spring.datasource.password:指定连接 MySQL 数据库使用的密码。
- spring.datasource.driver-class-name:指定连接 MySQL 数据库使用的 JDBC 驱动程序的类名。
这里可能会有注释中文乱码问题,在设置中可以解决,全部换成 UTF-8:
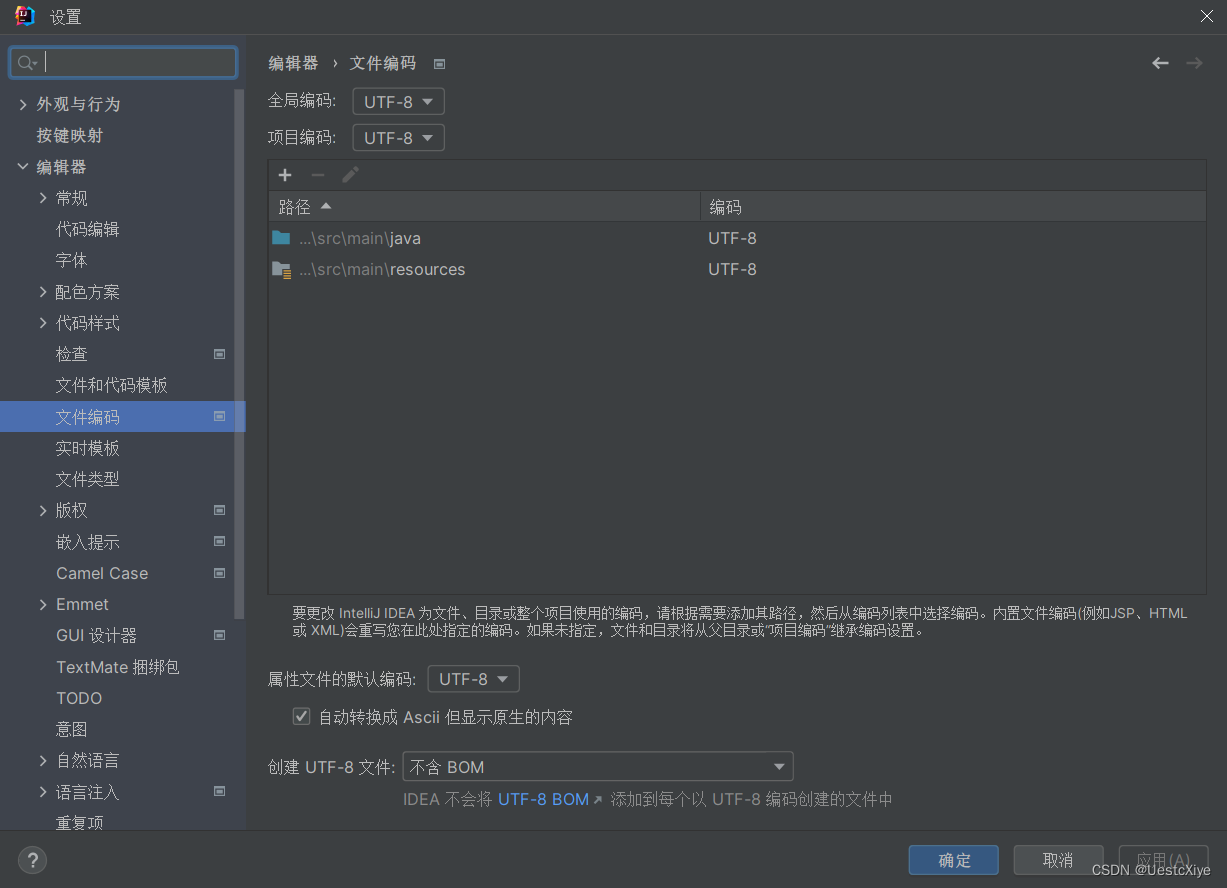
友情链接:【SpringBoot2】读取配置application.properties文件乱码问题解决
第一次用要安装点驱动啥的,点一下就安装好了,没截到图。
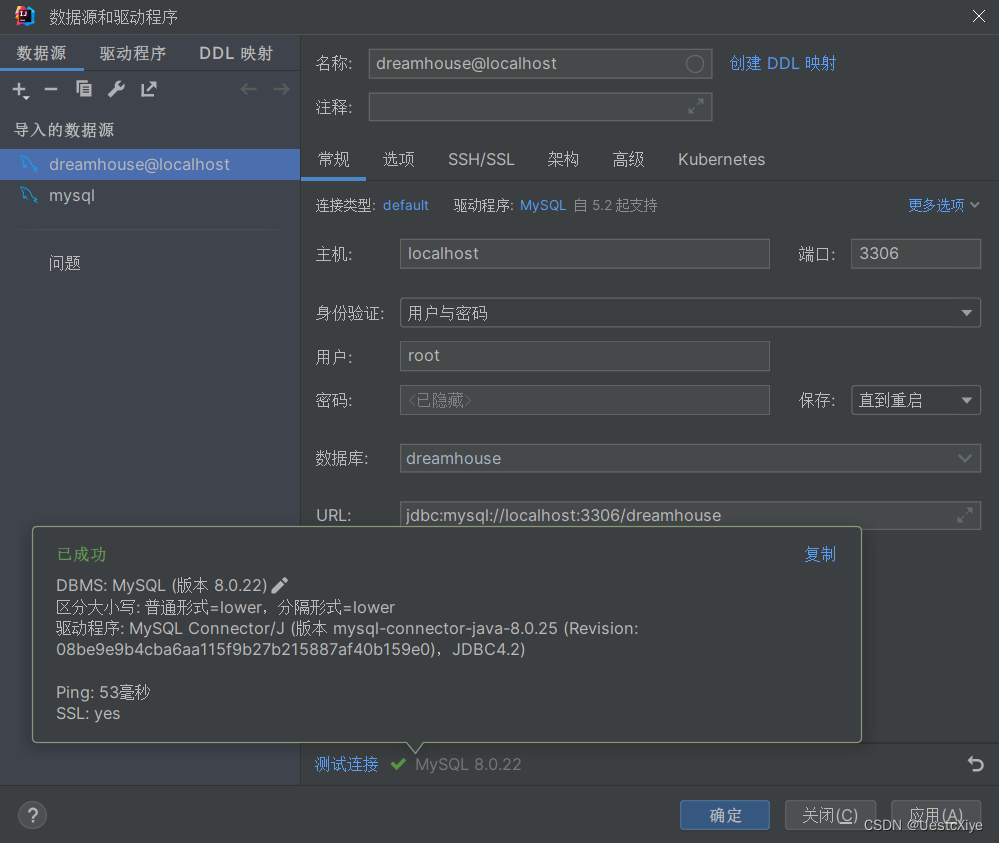
配置好以后,可以测试连接:
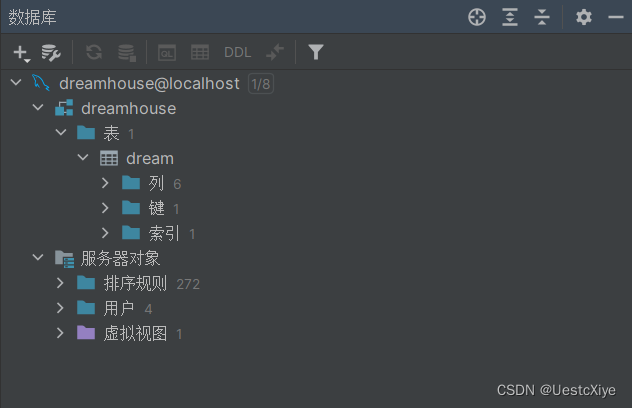
也可以在 IDEA 看到数据库:
实现增删改查接口
Model 层
回顾一下 model 层:数据库实体层,也被称为 entity 层、pojo 层
- 用于存储数据库中的数据,类属性与数据库表字段对应。
- 通常情况下,Model 层使用 ORM(对象关系映射)技术,如 JPA,MyBatis 等与数据库进行交互。
在 model 目录下新建 Data 类:
packagecom.example.dream_house.model;importio.swagger.annotations.ApiModel;importio.swagger.annotations.ApiModelProperty;importlombok.AllArgsConstructor;importlombok.NoArgsConstructor;/**
 * @BelongsProject:dream_house
 * @BelongsPackage:com.example.dream_house.model
 * @Author:Uestc_Xiye
 * @CreateTime:2023-12-17 16:29:49
 */@lombok.Data@NoArgsConstructor@AllArgsConstructor@ApiModel("数据库字段")publicclassData{@ApiModelProperty(value ="信息所属ID", required =true, example ="1")privateint id;@ApiModelProperty(value ="信息来源IP地址", required =true, example ="127.0.0.1")privateString ip;@ApiModelProperty(value ="信息来源所属省份", required =true, example ="广东")privateString province;@ApiModelProperty(value ="内容发布时间", required =true, example ="2023-12-17 16:58:00")privateString time;@ApiModelProperty(value ="梦想内容", required =true, example ="环游世界!")privateString str;@ApiModelProperty(value ="点赞数", required =true, example ="52")privateint likes;}
接下来说一下这段代码中的各个注解的作用:
- @lombok.Data:这是 Lombok 框架提供的注解,它会自动生成 getter、setter、toString、equals、hashCode 等方法。使用该注解可以简化代码,并提高开发效率。
- @NoArgsConstructor:这也是 Lombok 提供的注解,它会生成一个无参构造器,可以避免手动编写无参构造器。这个注解常用于一些框架或工具的实例化。
- @AllArgsConstructor:同样是 Lombok 提供的注解,它会生成一个全参构造器,可以避免手动编写全参构造器。这个注解也常用于一些框架或工具的实例化。
- @ApiModel:这是 Swagger 框架提供的注解,用于描述一个模型类。这个注解的作用是将模型类描述为一个 API 文档的模型,可以通过该注解指定模型类的名称和描述信息。
- @ApiModelProperty:也是 Swagger 框架提供的注解,用于描述模型类中的属性信息。该注解可以设置属性的名称、描述、是否必需等信息,以便在 Swagger 生成的 API 文档中显示。- value:属性的描述信息,用于在 API 文档中显示该属性的作用。- required:属性是否必需。当该值为 true 时,表示该属性必须包含在请求中;当该值为 false 时,表示该属性可以为空或者不包含在请求中。- example:属性的示例值。用于在 API 文档中显示该属性的样例值,方便开发者理解该属性的类型和取值范围。
mapper 层
回顾一下 mapper 层:数据持久层,也被称为 dao 层
- 作用是访问数据库,向数据库发送 sql 语句,完成数据的增删改查任务。
在 mapper 目录下新建 DataMapper 接口:
packagecom.example.dream_house.mapper;importcom.example.dream_house.model.Data;importorg.apache.ibatis.annotations.*;/**
 * @BelongsProject:dream_house
 * @BelongsPackage:com.example.dream_house.mapper
 * @Author:Uestc_Xiye
 * @CreateTime:2023-12-17 16:36:57
 */@MapperpublicinterfaceDataMapper{/**
     * 信息来源IP地址
     * @param ip
     * 信息来源省份
     * @param province
     * 信息发出时间
     * @param time
     * 信息内容
     * @param str
     * 点赞数
     * @param likes
     *
     * @return
     */@Insert("insert into dream (ip, province, time, str, likes) values(#{ip}, #{province}, #{time}, #{str}, #{likes})")intinsert(@Param("ip")String ip,@Param("province")String province,@Param("time")String time,@Param("str")String str,@Param("likes")int likes);/**
     * 信息id
     * @param id
     *
     * @return
     *
     * property属性对应Data对象中的成员名,column对应select出的字段名。
     */@Results({@Result(property ="id", column ="id"),@Result(property ="ip", column ="ip"),@Result(property ="province", column ="province"),@Result(property ="time", column ="time"),@Result(property ="str", column ="str"),@Result(property ="likes", column ="likes")})@Select("select * from dream where id = #{id}")DatafindById(@Param("id")int id);/**
     * 用Data对象来作为传参,这样语句中的#{id}、#{ip}等数据就分别对应Data对象中的id和ip等属性。
     *
     * @param data
     */@Update("update dream set ip=#{ip}, province=#{province}, time=#{time}, str=#{str}, likes=#{likes} where id=#{id}")voidupdate(Data data);/**
     * 删除该id对应的信息
     *
     * @param id
     */@Delete("delete from dream where id =#{id}")voiddelete(int id);}
相关注解的作用:
- @Mapper:是 MyBatis 框架提供的注解,用于标记一个 Java 接口,该接口用于定义数据访问方法。在使用 @Mapper 注解后,MyBatis 会自动扫描该接口,为其创建一个代理对象。该代理对象可以将接口方法与 MyBatis 的 SQL 映射文件中的 SQL 语句进行绑定,并完成数据访问的操作。
- @Insert:也是 MyBatis 框架提供的注解,该注解的值为 SQL 语句,用于指定插入操作的具体逻辑。该 SQL 语句使用了预处理语句,从而避免了 SQL 注入的问题。
- @Param:- /** */中的内容是 JavaDoc(Java文档注释),它用于对方法进行说明、描述和文档化。- 在方法中的 @Param 注解用于指定参数的名称,以便在 SQL 语句中使用相应的占位符。
- @Results:用于定义从查询结果集中将查询结果映射为 Java 对象的过程。
- @Select:同样是 MyBatis 框架提供的注解,该注解的值为 SQL 语句,用于指定查询操作的具体逻辑。
- @Update:MyBatis 框架提供的注解,用于指定更新操作的 SQL 语句。
- @Delete:MyBatis 框架提供的注解,用于指定删除操作的 SQL 语句。
service 层
简单回顾一下 service 层:业务逻辑层
- 作用是完成功能设计。
- 调用 mapper 层接口,接收 mapper 层返回的数据,完成项目的基本功能设计。
在 service 目录下新建 DataService 类:
packagecom.example.dream_house.service;importcom.example.dream_house.mapper.DataMapper;importcom.example.dream_house.model.Data;importorg.springframework.beans.factory.annotation.Autowired;importorg.springframework.stereotype.Service;/**
 * @BelongsProject:dream_house
 * @BelongsPackage:com.example.dream_house.service
 * @Author:Uestc_Xiye
 * @CreateTime:2023-12-17 17:04:45
 */@ServicepublicclassDataService{@AutowiredprivateDataMapper dataMapper;/**
     * 新增信息
     *
     * @param ip
     * @param province
     * @param time
     * @param str
     * @param likes
     * @return
     */publicStringinsert(String ip,String province,String time,String str,int likes){
        dataMapper.insert(ip, province, time, str, likes);return"succeed";}/**
     * 查询id对应的信息
     *
     * @param id
     * @return
     */publicDatafindById(int id){return dataMapper.findById(id);}/**
     * 更新信息
     *
     * @param data
     */publicvoidupdate(Data data){
        dataMapper.update(data);}/**
     * 删除id对应的信息
     *
     * @param id
     */publicvoiddelete(int id){
        dataMapper.delete(id);}}
相关注解的作用:
- @Service:用于标注一个类为 Spring 框架中的一个服务类,该类中通常包含了业务逻辑的实现。使用该注解可以使 Spring 框架自动扫描并将该类实例化,并将其作为服务类注册到容器中,以供其他组件使用。当我们需要在其他类中使用该服务类时,只需要通过依赖注入的方式获取该类的实例即可。
- @Autowired:用于实现 Spring 框架中的自动装配功能,将需要使用的 Bean 对象注入到指定的属性中。通过使用该注解,可以避免手动创建 Bean 实例和手动注入对象的麻烦。
controller 层
简单回顾一下 controller 层:控制层
- 作用是请求和响应控制。
- 负责前后端交互,接受前端请求,调用 service 层,接收 service 层返回的数据,最后返回具体的页面和数据到客户端。
在 controller 目录下新建 DataController 类:
packagecom.example.dream_house.controller;importcom.example.dream_house.model.Data;importcom.example.dream_house.service.DataService;importio.swagger.annotations.Api;importio.swagger.annotations.ApiOperation;importio.swagger.v3.oas.annotations.parameters.RequestBody;importorg.springframework.beans.factory.annotation.Autowired;importorg.springframework.web.bind.annotation.*;/**
 * @BelongsProject:dream_house
 * @BelongsPackage:com.example.dream_house.controller
 * @Author:Uestc_Xiye
 * @CreateTime:2023-12-17 17:17:36
 */@Api(tags ="API接口")@RestController@CrossOrigin(origins ="*", maxAge =3600)publicclassDataController{@AutowiredprivateDataService dataService;@ApiOperation("添加完整信息")@PostMapping("/insert")publicStringinsert(@RequestBodyData data){// @RequestBody注解用来绑定通过http请求中application/json类型上传的数据return dataService.insert(data.getIp(), data.getProvince(), data.getTime(), data.getStr(), data.getLikes());}@ApiOperation("查询id对应的信息")@GetMapping("/findById/{id}")publicDatafindById(@PathVariableint id){return dataService.findById(id);}@ApiOperation("更新信息")@PutMapping("/update")publicvoidupdate(@RequestBodyData data){
        dataService.update(data);}@ApiOperation("删除指定id的信息")@DeleteMapping("/delete/{id}")publicvoiddeleteUser(@PathVariableint id){
        dataService.delete(id);}}
相关注解的作用:
- @Api:Swagger 的注解之一,用于对 API 接口进行注释和说明。tags 属性是 Swagger 文档中的一个重要属性,可以用来将 API 接口进行分类,方便管理和查找。
- @RestController:Spring MVC 中的注解之一,用于标识该类是一个基于 RESTful 风格的 Web 服务类。
- @CrossOrigin:Spring 中的一个注解,用于支持跨域请求。跨域请求通常指在一个域名下的页面中使用 AJAX 技术向不同的域名或端口号的 Web 服务发送请求。
- @ApiOperation:Swagger 的注解之一,用于对 API 接口中的具体操作进行注释和说明。
- @PostMapping:Spring MVC 中的注解之一,表示该方法接收 POST 请求。
- @RequestBody:Spring MVC 中的注解之一,表示该方法接收的请求参数为请求体中的数据。
- @GetMapping:Spring MVC 中的注解之一,表示该方法接收 GET 请求。
- @PathVariable:Spring MVC 中的注解之一,表示该方法接收的请求参数为路径参数。
- @PutMapping:Spring MVC 中的注解之一,表示该方法接收 PUT 请求。
- @DeleteMapping:Spring MVC 中的注解之一,表示该方法接收 DELETE 请求。
这里要引入 Spring Web,不然在使用这些注解的时候报错无法解析。
测试
预先设置一些数据库内容:
在把上面的四层架构都处理完之后,我们直接启动项目。
运行 DreamHouseApplication,或者运行它的 main 方法。
踩坑 1:Please refer to dump files (if any exist) [date].dump, [date]-jvmRun[N].dump and [date].dumpstre
切换“跳过测试”模式:
友情链接:解决:Please refer to dump files (if any exist) [date].dump, [date]-jvmRun[N].dump and [date].dumpstre
踩坑点2:Consider defining a bean of type ‘com.example.dream_house.mapper.DataMapper’ in your configuration.
18:10:27.233 [Thread-1] DEBUG org.springframework.boot.devtools.restart.classloader.RestartClassLoader - Created RestartClassLoader org.springframework.boot.devtools.restart.classloader.RestartClassLoader@6d1a5149

  .   ____          _            __ _ _
 /\\ / ___'_ __ _ _(_)_ __  __ _ \ \ \ \
( ( )\___ | '_ | '_| | '_ \/ _` | \ \ \ \
 \\/  ___)| |_)| | | | | || (_| |  ) ) ) )
  '  |____| .__|_| |_|_| |_\__, | / / / /
 =========|_|==============|___/=/_/_/_/
 :: Spring Boot ::                (v2.7.6)

2023-12-17 18:10:27.843  INFO 11824 --- [  restartedMain] c.e.dream_house.DreamHouseApplication    : Starting DreamHouseApplication using Java 1.8.0_192 on LAPTOP-P25TKBR2 with PID 11824 (C:\Users\81228\Documents\Program\Java Project\DreamHouse\dream_house\target\classes started by 81228 in C:\Users\81228\Documents\Program\Java Project\DreamHouse\dream_house)
2023-12-17 18:10:27.844  INFO 11824 --- [  restartedMain] c.e.dream_house.DreamHouseApplication    : No active profile set, falling back to 1 default profile: "default"
2023-12-17 18:10:27.975  INFO 11824 --- [  restartedMain] .e.DevToolsPropertyDefaultsPostProcessor : Devtools property defaults active! Set 'spring.devtools.add-properties' to 'false' to disable
2023-12-17 18:10:27.975  INFO 11824 --- [  restartedMain] .e.DevToolsPropertyDefaultsPostProcessor : For additional web related logging consider setting the 'logging.level.web' property to 'DEBUG'
2023-12-17 18:10:29.551  WARN 11824 --- [  restartedMain] o.m.s.mapper.ClassPathMapperScanner      : No MyBatis mapper was found in '[com.example.dream_house]' package. Please check your configuration.
2023-12-17 18:10:30.264  INFO 11824 --- [  restartedMain] o.s.b.w.embedded.tomcat.TomcatWebServer  : Tomcat initialized with port(s): 8087 (http)
2023-12-17 18:10:30.265  INFO 11824 --- [  restartedMain] o.a.catalina.core.AprLifecycleListener   : An older version [1.2.24] of the Apache Tomcat Native library is installed, while Tomcat recommends a minimum version of [1.2.30]
2023-12-17 18:10:30.265  INFO 11824 --- [  restartedMain] o.a.catalina.core.AprLifecycleListener   : Loaded Apache Tomcat Native library [1.2.24] using APR version [1.7.0].
2023-12-17 18:10:30.265  INFO 11824 --- [  restartedMain] o.a.catalina.core.AprLifecycleListener   : APR capabilities: IPv6 [true], sendfile [true], accept filters [false], random [true], UDS [false].
2023-12-17 18:10:30.265  INFO 11824 --- [  restartedMain] o.a.catalina.core.AprLifecycleListener   : APR/OpenSSL configuration: useAprConnector [false], useOpenSSL [true]
2023-12-17 18:10:30.283  INFO 11824 --- [  restartedMain] o.a.catalina.core.AprLifecycleListener   : OpenSSL successfully initialized [OpenSSL 1.1.1g  21 Apr 2020]
2023-12-17 18:10:30.295  INFO 11824 --- [  restartedMain] o.apache.catalina.core.StandardService   : Starting service [Tomcat]
2023-12-17 18:10:30.295  INFO 11824 --- [  restartedMain] org.apache.catalina.core.StandardEngine  : Starting Servlet engine: [Apache Tomcat/9.0.69]
2023-12-17 18:10:30.507  INFO 11824 --- [  restartedMain] o.a.c.c.C.[Tomcat].[localhost].[/]       : Initializing Spring embedded WebApplicationContext
2023-12-17 18:10:30.507  INFO 11824 --- [  restartedMain] w.s.c.ServletWebServerApplicationContext : Root WebApplicationContext: initialization completed in 2531 ms
2023-12-17 18:10:30.645  WARN 11824 --- [  restartedMain] ConfigServletWebServerApplicationContext : Exception encountered during context initialization - cancelling refresh attempt: org.springframework.beans.factory.UnsatisfiedDependencyException: Error creating bean with name 'dataController': Unsatisfied dependency expressed through field 'dataService'; nested exception is org.springframework.beans.factory.UnsatisfiedDependencyException: Error creating bean with name 'dataService': Unsatisfied dependency expressed through field 'dataMapper'; nested exception is org.springframework.beans.factory.NoSuchBeanDefinitionException: No qualifying bean of type 'com.example.dream_house.mapper.DataMapper' available: expected at least 1 bean which qualifies as autowire candidate. Dependency annotations: {@org.springframework.beans.factory.annotation.Autowired(required=true)}
2023-12-17 18:10:30.651  INFO 11824 --- [  restartedMain] o.apache.catalina.core.StandardService   : Stopping service [Tomcat]
2023-12-17 18:10:30.679  INFO 11824 --- [  restartedMain] ConditionEvaluationReportLoggingListener :

Error starting ApplicationContext. To display the conditions report re-run your application with 'debug' enabled.
2023-12-17 18:10:30.751 ERROR 11824 --- [  restartedMain] o.s.b.d.LoggingFailureAnalysisReporter   :

***************************
APPLICATION FAILED TO START
***************************

Description:

Field dataMapper in com.example.dream_house.service.DataService required a bean of type 'com.example.dream_house.mapper.DataMapper' that could not be found.

The injection point has the following annotations:
    - @org.springframework.beans.factory.annotation.Autowired(required=true)

Action:

Consider defining a bean of type 'com.example.dream_house.mapper.DataMapper' in your configuration.
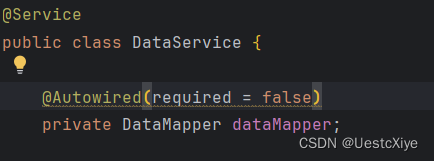
解决方法:在 dataService.java 的 private DataMapper dataMapper; 的上面的@Autowired 改成 @Autowired(required = false)。
友情链接:Consider defining a bean of type问题解决
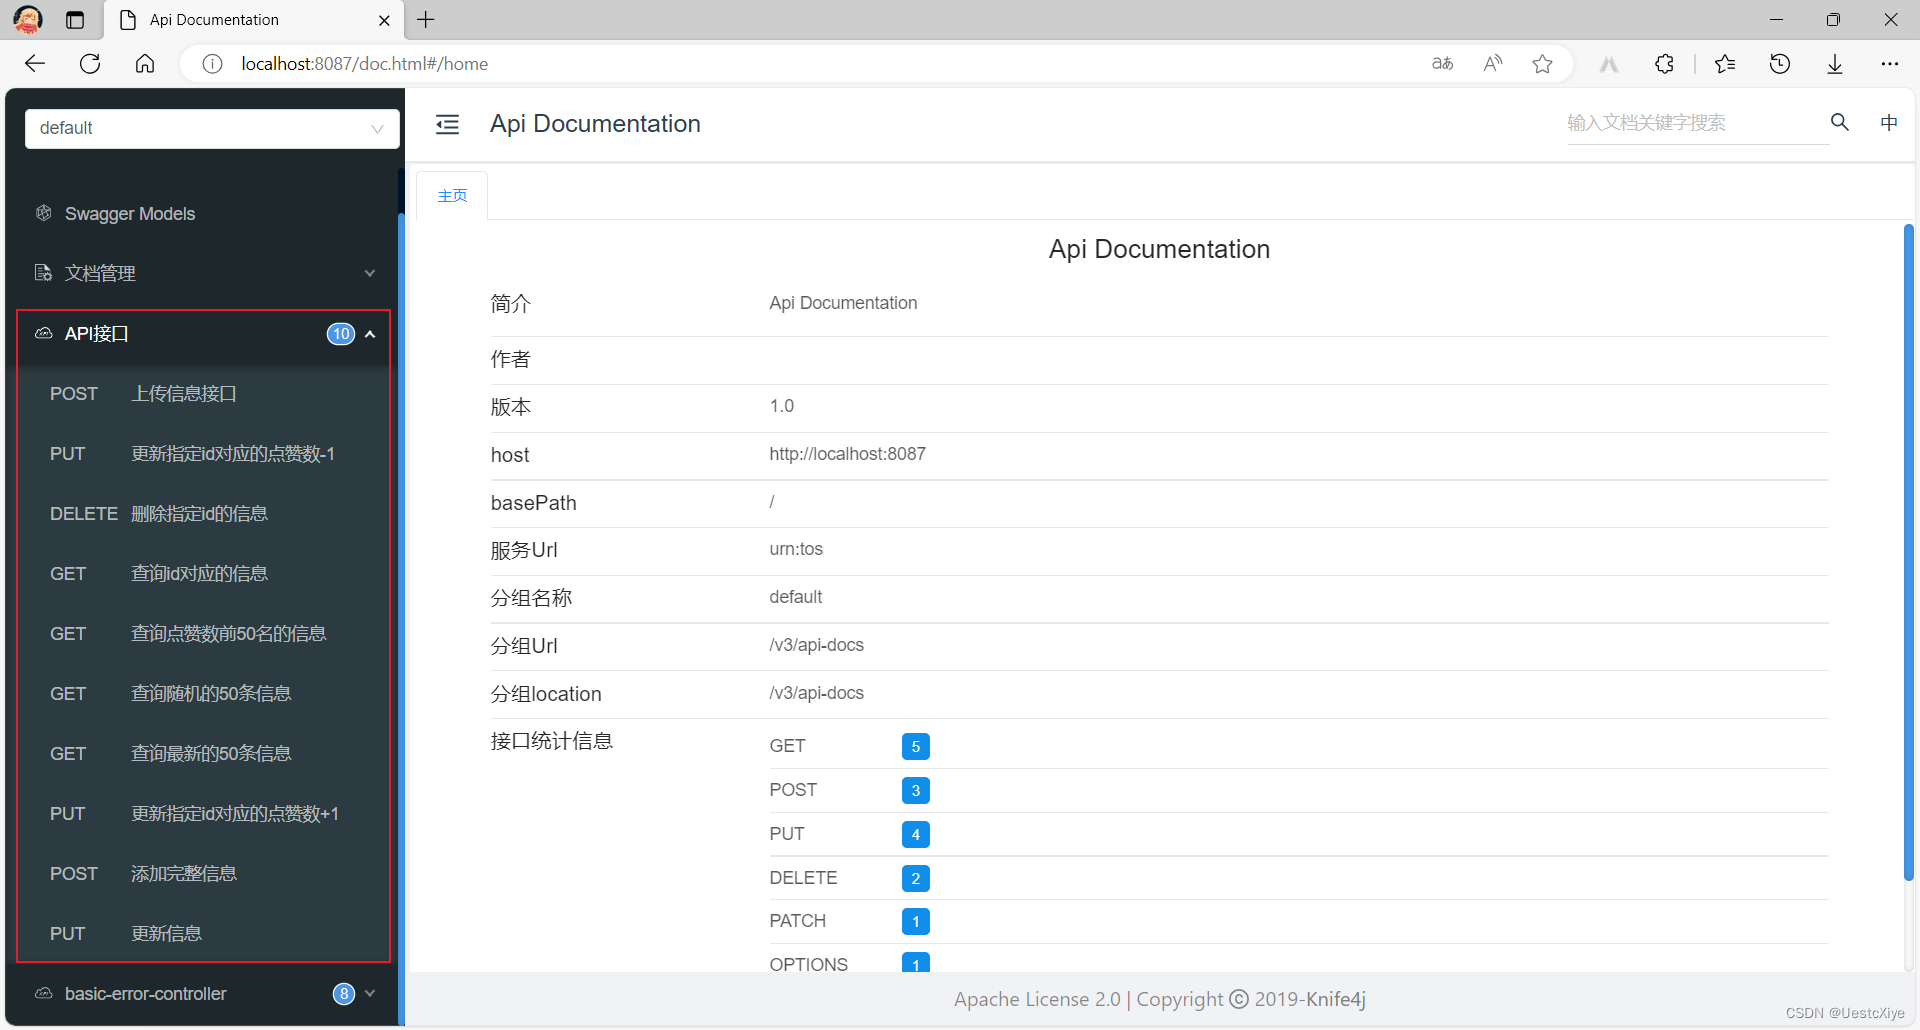
运行成功后,在浏览器中访问 http://127.0.0.1:8087/doc.html 页面,该页面是 Swagger 生成的 API 文档经过 knife4j 美化过后的 API 文档页面。
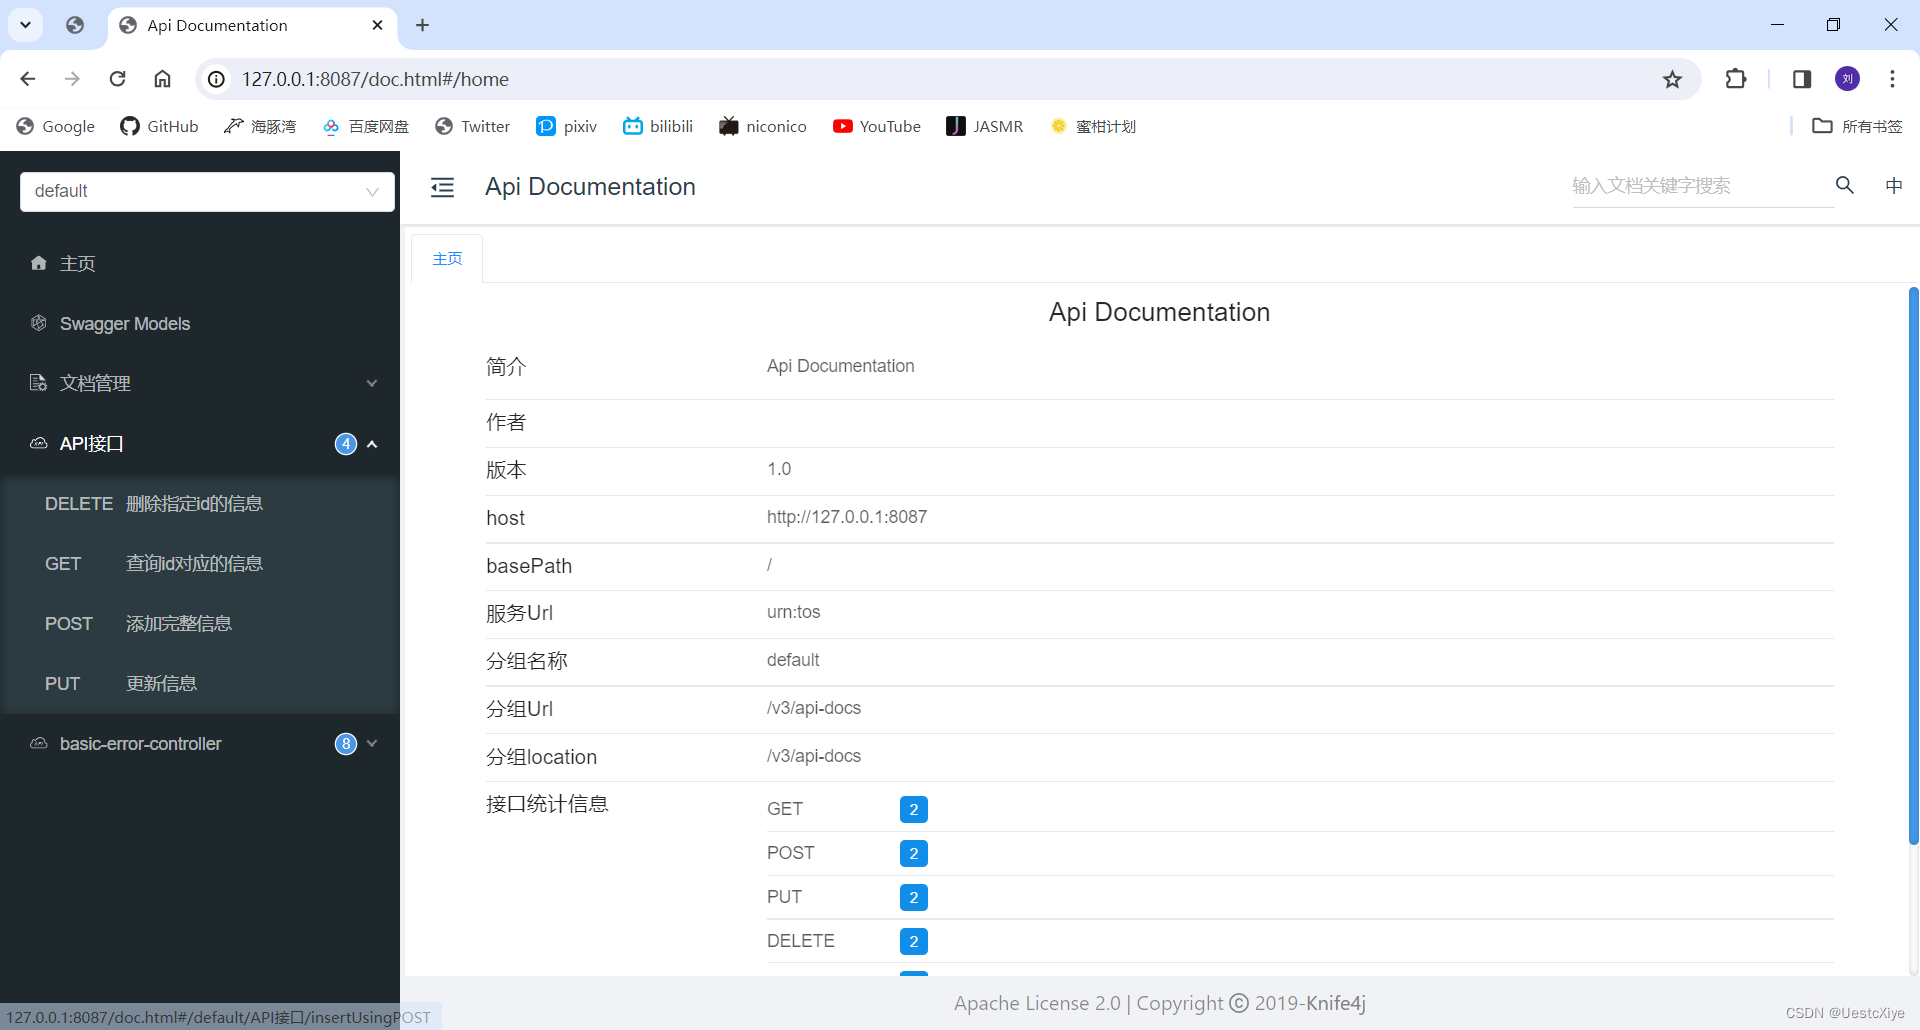
点击左侧的 “API接口” 可以看到出现了四个熟悉的接口,就是我们刚刚写的 “增删改查” 对应的接口,该 API 文档的好处就是可以在线对接口进行测试。
首先测试添加接口,依次点击并填写数据信息:
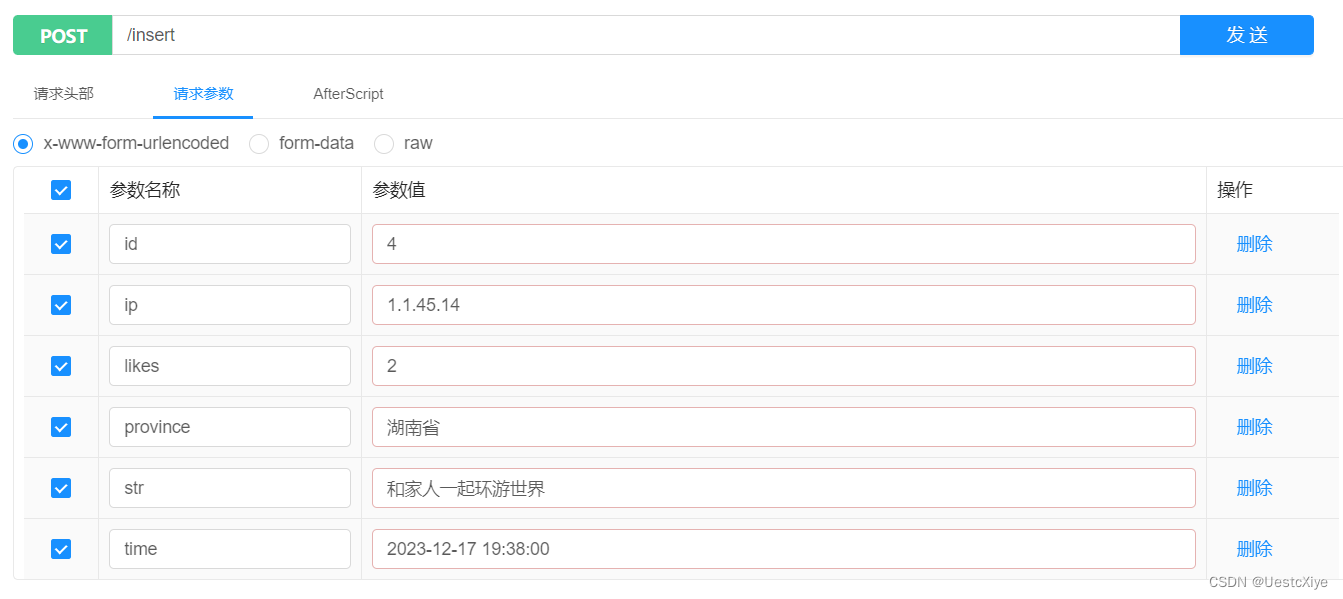
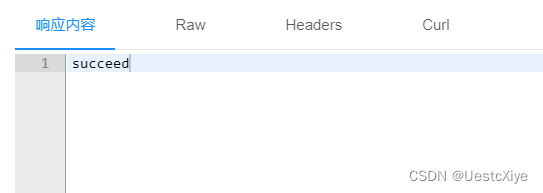
然后点击发送,看到响应内容 succeed 说明添加成功了:
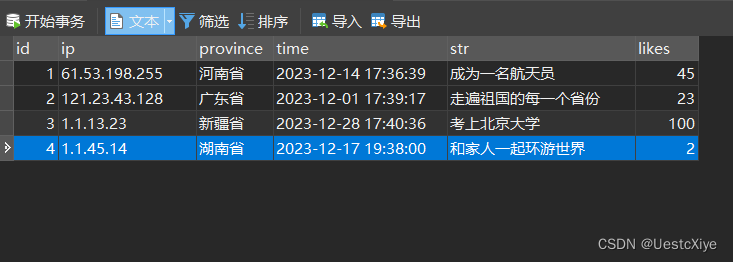
我们前往 Navicat Premium 查看数据库内容有没有变化,刷新一下页面,可以看到在最下面的数据出现了我们刚刚添加进去的内容:
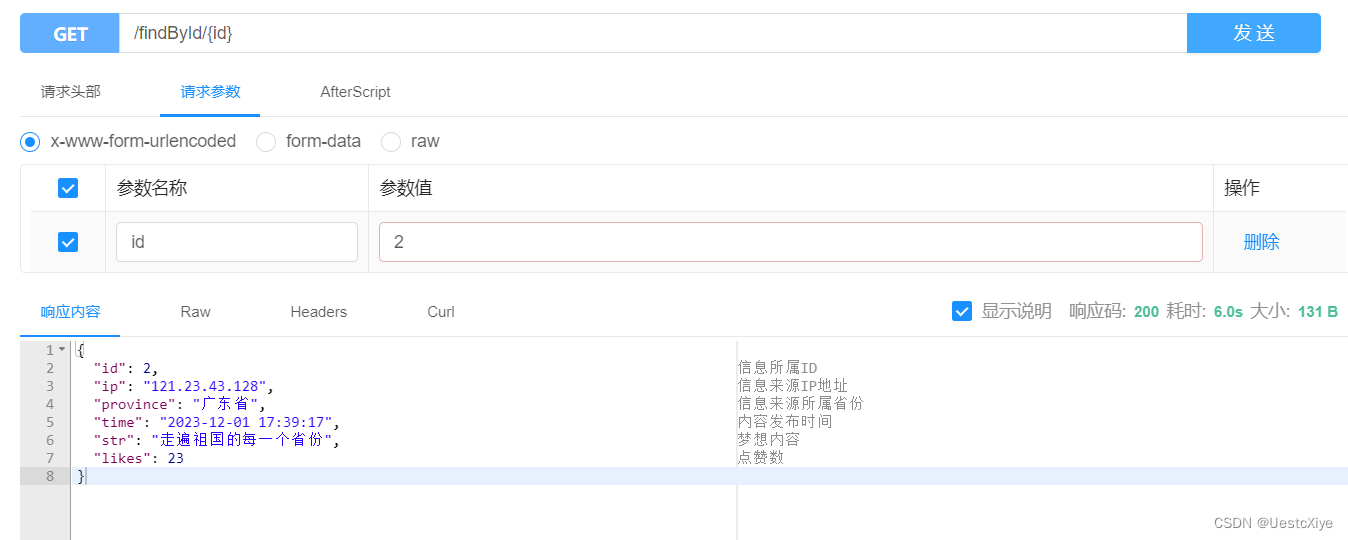
其次测试查询接口,依次点击并填写 id 信息,然后点击发送。
可以看到响应内容成功拿到数据:
然后测试更新接口,依次点击并填写信息,然后点击发送:
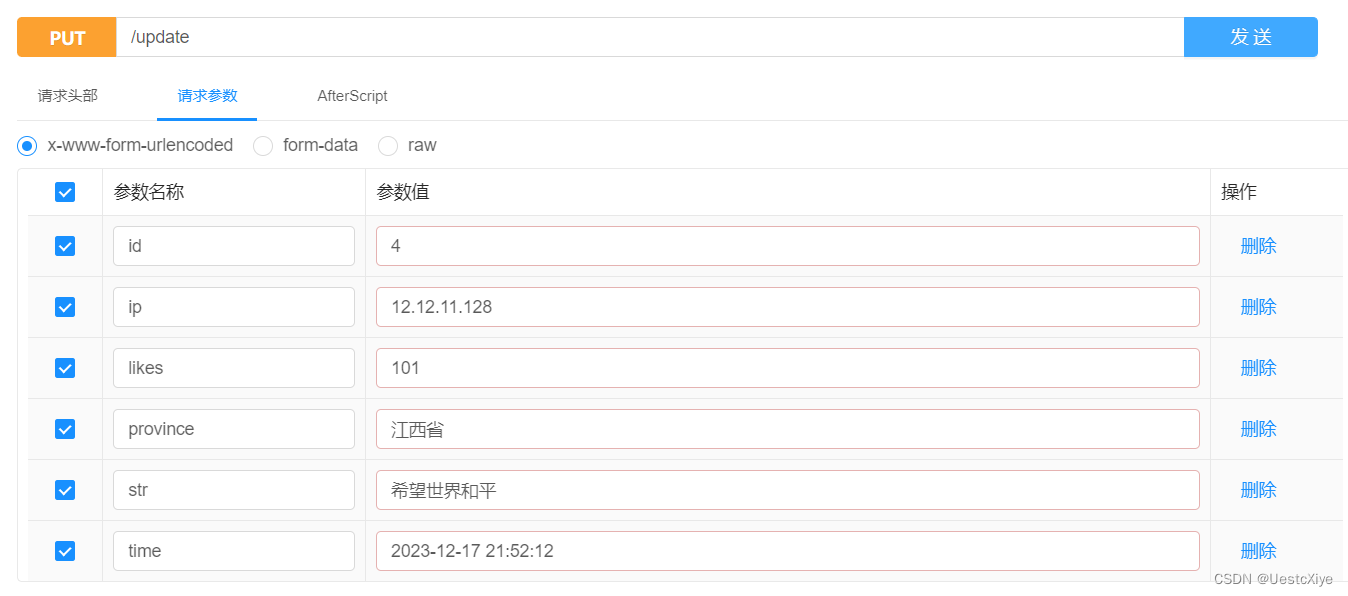
由于没有设置返回值,所以响应内容为空。
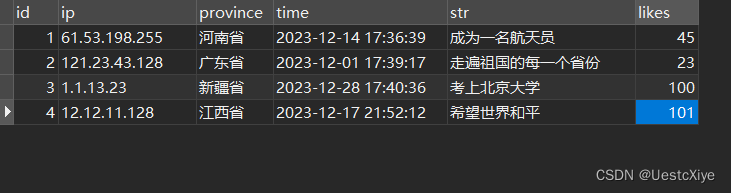
我们直接去看数据库的内容变化,刷新一下数据库,可以看到该条数据已经发生了变化:
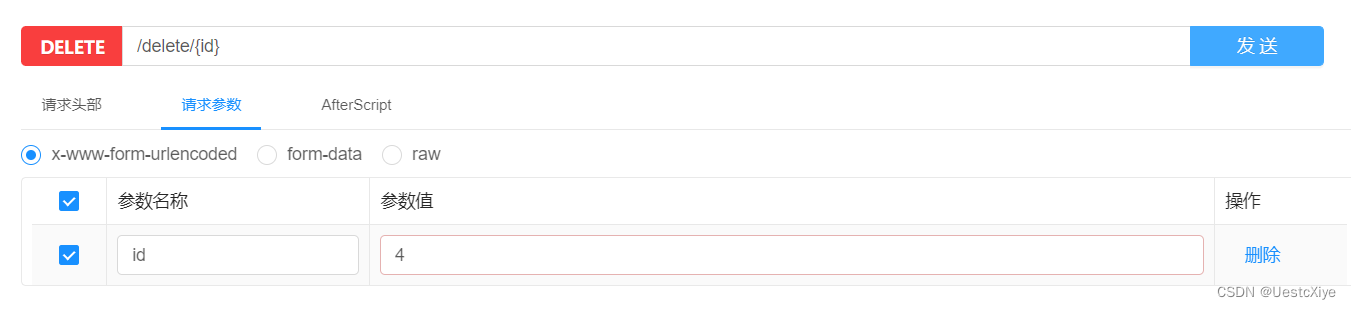
最后测试删除接口,点击并填写 id 信息,然后点击发送:
由于没有设置返回值,所以还是直接前往数据库查看,刷新数据库,发现 id 为 4 的这条数据不见了,说明接口没问题:
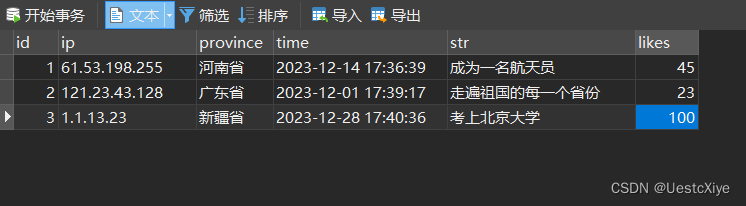
经过测试,“增删改查”四个接口全部都能够正常使用。
实现项目功能接口
上面详细介绍了编写 “增删改查” 四个接口,下面给出其他项目功能接口。
代码
model 层之前写的一个 Data 的实体类就继续保留,我们再增加一个 getUser 类,用来作为前端从接口获取到的信息的类。
原理与 Data 类相同,这里就不再进行讲解了,直接上代码:
packagecom.example.dream_house.model;importio.swagger.annotations.ApiModel;importio.swagger.annotations.ApiModelProperty;importlombok.AllArgsConstructor;importlombok.NoArgsConstructor;/**
 * @BelongsProject:dream_house
 * @BelongsPackage:com.example.dream_house.model
 * @Author:Uestc_Xiye
 * @CreateTime:2023-12-17 22:25:14
 */@lombok.Data@NoArgsConstructor@AllArgsConstructor@ApiModel("获取信息内容")publicclass getUser {@ApiModelProperty(value ="信息所属ID", required =true, example ="1")privateint id;@ApiModelProperty(value ="信息来源所属省份", required =true, example ="湖北")privateString province;@ApiModelProperty(value ="梦想内容", required =true, example ="环游世界")privateString str;@ApiModelProperty(value ="点赞数", required =true, example ="52")privateint likes;}
其实就是 Data 类去掉了 ip 和 time。
mapper 层我们需要在 DataMapper 接口中添加新的内容,新增的方法有:
- 查询点赞数前 50 名的信息。
- 查询最新的 50 条信息。
- 查询随机的 50 条信息。
- 更新指定 id 的点赞数 + 1。
- 更新指定 id 的点赞数 - 1。
方法的原理还是与之前相同,只是改变了 SQL 语句。
/**
     * 查询点赞数前50名的信息
     */@Results({@Result(property ="id", column ="id"),@Result(property ="province", column ="province"),@Result(property ="str", column ="str"),@Result(property ="likes", column ="likes")})@Select("SELECT * FROM dream ORDER BY likes DESC LIMIT 50")List<getUser>findByLikes();/**
     * 查询最新的50条信息
     */@Results({@Result(property ="id", column ="id"),@Result(property ="province", column ="province"),@Result(property ="str", column ="str"),@Result(property ="likes", column ="likes")})@Select("SELECT * FROM dream ORDER BY time DESC LIMIT 50")List<getUser>findByTime();/**
     * 查询随机的50条信息
     */@Results({@Result(property ="id", column ="id"),@Result(property ="province", column ="province"),@Result(property ="str", column ="str"),@Result(property ="likes", column ="likes")})@Select("SELECT * FROM dream ORDER BY rand() DESC LIMIT 50")List<getUser>findByRand();/**
     * 更新指定id的点赞数+1
     */@Update("UPDATE dream SET likes = likes + 1 WHERE id = #{id}")voidincreaseLikesById(int id);/**
     * 更新指定id的点赞数-1
     */@Update("UPDATE dream SET likes = likes - 1 WHERE id = #{id}")voiddecreaseLikesById(int id);
service 层在这里增加的内容比较多,因为是业务逻辑层,需要完成功能设计。
首先在 service 目录下新建 getIP、getProvince、getTime 三个类,分别用来获取用户 IP 地址、用户所在省份、内容发送时间。
getIP 类代码如下,可以从用户的请求头中筛选出用户真实的IP地址:
packagecom.example.dream_house.service;importjavax.servlet.http.HttpServletRequest;importjavax.servlet.http.HttpServletResponse;/**
 * @BelongsProject:dream_house
 * @BelongsPackage:com.example.dream_house.service
 * @Author:Uestc_Xiye
 * @CreateTime:2023-12-18 09:12:22
 */publicclass getIP {publicStringgetIp(HttpServletRequest request,HttpServletResponse response){
        response.setContentType("text/html;charset=utf-8");// 设置响应头允许ajax跨域访问,星号表示所有的异域请求都可以接受
        response.setHeader("Access-Control-Allow-Origin","*");
        response.setHeader("Access-Control-Allow-Methods","GET,POST");returngetIpAddr(request);}publicStringgetIpAddr(HttpServletRequest request){// 获取请求头"x-forwarded-for"对应的valueString ip = request.getHeader("x-forwarded-for");// 如果获取的ip值为空if(ip ==null|| ip.isEmpty()||"unknown".equalsIgnoreCase(ip)){// 则获取请求头"Proxy-Client-IP"对应的value
            ip = request.getHeader("Proxy-Client-IP");}// 如果获取的ip值仍为空if(ip ==null|| ip.isEmpty()||"unknown".equalsIgnoreCase(ip)){//则获取请求头"WL-Proxy-Client-IP"对应的value
            ip = request.getHeader("WL-Proxy-Client-IP");}// 如果以上方式获取的ip值都为空if(ip ==null|| ip.isEmpty()||"unknown".equalsIgnoreCase(ip)){//则直接获取ip地址
            ip = request.getRemoteAddr();}// 返回ip地址return ip;}}
getProvince 类代码如下,可以调用外部 API 来检测出用户 ip 地址所属的省份:
packagecom.example.dream_house.service;importcom.alibaba.fastjson.JSON;importcom.alibaba.fastjson.JSONObject;importorg.springframework.http.ResponseEntity;importorg.springframework.web.client.RestTemplate;/**
 * @BelongsProject:dream_house
 * @BelongsPackage:com.example.dream_house.service
 * @Author:Uestc_Xiye
 * @CreateTime:2023-12-18 09:23:34
 */publicclass getProvince {/**
     * @param ip
     * @return
     */publicStringget_Province(String ip){// 设置api的urlString url ="https://ip.useragentinfo.com/json?ip="+ ip;RestTemplate template =newRestTemplate();// 发起一个HTTP GET请求,获取指定URL的响应实体,String.class表示要获取的响应实体的类型是字符串类型ResponseEntity<String> response = template.getForEntity(url,String.class);// 将Spring类型转换为JSON类型JSONObject json =JSON.parseObject(response.getBody());// 取出json中的数据String province = json.getString("province");return province;}}
getTime 类代码如下,直接调用 Java 自带的包就行:
packagecom.example.dream_house.service;importjava.text.SimpleDateFormat;importjava.util.Date;/**
 * @BelongsProject:dream_house
 * @BelongsPackage:com.example.dream_house.service
 * @Author:Uestc_Xiye
 * @CreateTime:2023-12-18 09:29:50
 */publicclass getTime {publicStringget_Time(){// 设置日期格式SimpleDateFormat simpleDateFormat =newSimpleDateFormat("yyyy-MM-dd HH:mm:ss");// 获取当前系统时间String date = simpleDateFormat.format(newDate());return date;}}
接下来修改 DataService 类的内容,需要新增以下方法:
/**
     * 获取用户数据并调用mapper层上传数据库
     *
     * @param request
     * @param response
     * @param str
     * @return
     */publicStringAdd(HttpServletRequest request,HttpServletResponse response,String str){

        getIP getIP =newgetIP();
        getProvince getProvince =newgetProvince();
        getTime getTime =newgetTime();// 获取信息的IP地址String ip = getIP.getIp(request, response);// 获取信息所属省份String province = getProvince.get_Province(ip);// 获取当前时间String time = getTime.get_Time();// 设置当前点赞数为0int currentLikes =0;// 上传数据
        dataMapper.insert(ip, province, time, str, currentLikes);return"succeed";}/**
     * 查询点赞数排名前50的信息
     *
     * @return
     */publicList<getUser>findByLikes(){return dataMapper.findByLikes();}/**
     * 查询最新的50条信息
     *
     * @return
     */publicList<getUser>findByTime(){return dataMapper.findByTime();}/**
     * 查询随机的50条信息
     *
     * @return
     */publicList<getUser>findByRand(){return dataMapper.findByRand();}/**
     * 更新指定id对应的点赞数+1
     *
     * @param id
     * @return
     */publicStringincreaseLikesById(int id){
        dataMapper.increaseLikesById(id);return"succeed";}/**
     * 更新指定id对应的点赞数-1
     *
     * @param id
     * @return
     */publicStringdecreaseLikesById(int id){
        dataMapper.decreaseLikesById(id);return"succeed";}
controller 层需要新增以下接口:
@ApiOperation("上传信息接口")@PostMapping("/Add/{str}")publicStringAdd(HttpServletRequest request,HttpServletResponse response,@PathVariableString str){returndataService.Add(request, response, str);}@ApiOperation("查询点赞数前50名的信息")@GetMapping("/findByLikes")publicList<getUser>findByLikes(){return dataService.findByLikes();}@ApiOperation("查询最新的50条信息")@GetMapping("/findByTime")publicList<getUser>findByTime(){return dataService.findByTime();}@ApiOperation("查询随机的50条信息")@GetMapping("/findByRand")publicList<getUser>findByRand(){return dataService.findByRand();}@ApiOperation("更新指定id对应的点赞数+1")@PutMapping("/increaseLikesById/{id}")publicStringincreaseLikesById(@PathVariableint id){return dataService.increaseLikesById(id);}@ApiOperation("更新指定id对应的点赞数-1")@PutMapping("/decreaseLikesById/{id}")publicStringdecreaseLikesById(@PathVariableint id){return dataService.decreaseLikesById(id);}
测试
启动项目,访问 API 文档页面 http://127.0.0.1:8087/doc.html,可以看到我们编写的接口都在这里:
发现问题:上传信息接口无效。
原因是 service 层的 get_Province 函数中的:
String url ="https://ip.useragentinfo.com/json?ip="+ ip;
我们去 https://ip.useragentinfo.com 这个网址看看:

查询一下,确实能用,但是和代码里的不同,注意这里的网址:

我们把代码改一下:
String url ="https://ip.useragentinfo.com/?ip="+ ip;
还是不行,原因是这个网站已经不支持带参数查询了(悲)。
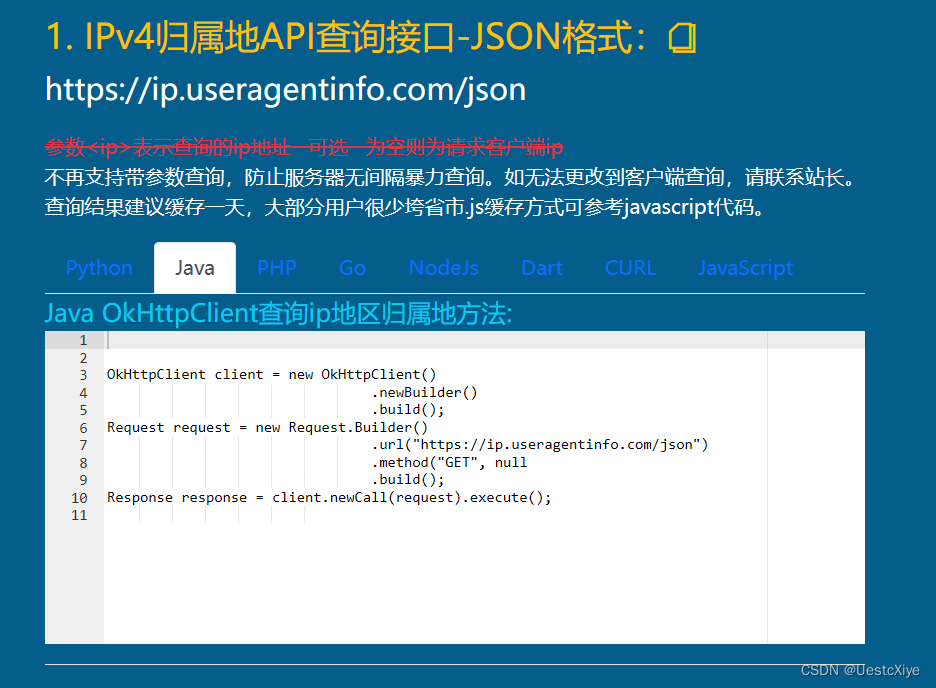
我们只能按下面的方法修改 get_IP、getIpAddr 和 getProvince 函数。
友情链接:java实现获取IP及归属地
其他测试了都没什么大问题。
有个小问题就是,测试上传信息接口的时候,是能上传,但是 IP 地址是 0:0:0:0:0:0:0:0:1。
友情链接:手把手教你用Java获取IP归属地
这里面说,在本地环境调用获取 IP,要么是 0:0:0:0:0:0:0:1,或者是局域网IP。
局域网IP是以192.168.x.x开头,或者是127.0.0.1的IP。
所以需要部署到外网服务器才能获取到公网地址,部署到外网服务器才能成功获取 IP 地址。
再查了一下,在本地测试时,这个是无解的。
要是在局域网中运行,访问时使用本身的 IP 访问。这时候请求会通过路由器转发,因此服务器获取的就是本机的局域网内 IP,在 Java 中获取的 IP 就是局域网 IP,不是 localhost 或者 127.0.0.1 这种东西。
友情链接:java获取IP为0:0:0:0:0:0:0:1的情况
详细解释:
0:0:0:0:0:0:0:1是属于 ipv6,后来我又进行另一台电脑做测试,发现这种情况只有在服务器和客户端都在同一台电脑上才会出现(例如用 localhost 访问的时候才会出现),这是hosts配置文件的问题。
友情链接:
- request.getRemoteAddr()获取ip地址时得到的值是[0:0:0:0:0:0:0:1]原因和解决方法
- 查询本地ip地址为0:0:0:0:0:0:0:1
总结:
因为电脑优先把 localhost 解析成了 IPv6,用 localhost 测试,返回 IPv6 地址,get_Province 能解析到省份。
用 127.0.0.1 测试,返回本机 IPv4 地址,get_Province 不能解析到省份,是“本机地址”。

创建 Vue 前端
安装 Node.js
Node.js 简介:Node.js 入门 | 青训营笔记
官网下载安装:https://nodejs.org/zh-cn/
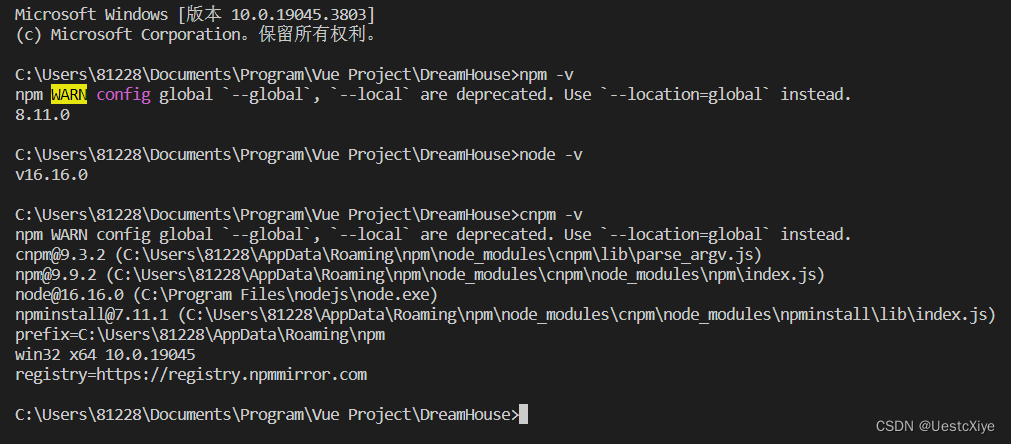
调出终端,输入指令 node -v,显示版本号说明 node 安装好了。
输入指令 npm -v,显示版本号,说明 npm 可以正常使用。

配置 npm 镜像
npm 默认的仓库地址在国外,访问速度较慢,我们切换成国内的淘宝镜像。
输入指令安装:
npm install -g cnpm --registry=https://registry.npm.taobao.org

输入指令 cnpm -v,显示版本号说明 cnpm 安装好了。
前端代码在 Visual Studio Code 上写,在它上面再测一下:
安装脚手架
终端输入指令
cnpm i -g @vue/cli
或
npm i -g @vue/cli
全局安装。
安装细节很长,这样就算成功了:

创建并配置项目
在任意位置新建一个文件夹用来放置项目。
终端中通过 cd 指令跳转到这个文件夹(我这里已经到项目文件夹了)。
输入指令
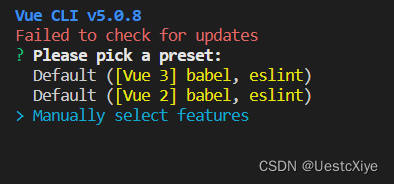
vue create dream_house
创建项目。
- 上下键:表示选择
- 回车键:表示确认
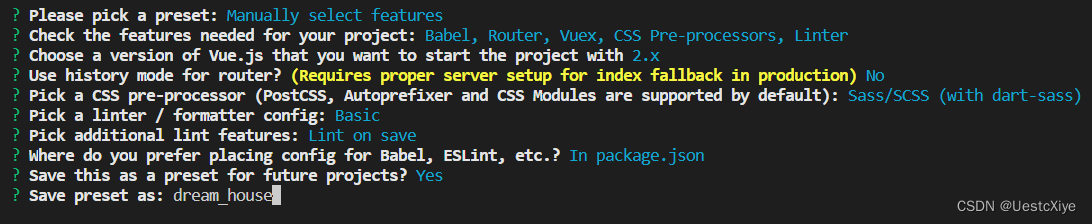
选择 Manually select features 手动配置。
选择需要安装的插件,勾选如下插件,按空格键选择:

- Babel:解析 es6 转 es5 的插件
- TypeScript:TypeScript 插件
- Progressive Web App (PWA) Support:渐进式 Web 应用程序(PWA)支持
- Router:vue 路由插件
- Vuex:Vuex 插件
- CSS Pre-processors:css 预处理插件
- Linter/Formatter:格式化程序
- Unit Testing:单元测试
- E2E Testing:端到端(end-to-end)
回车(Enter)确认。
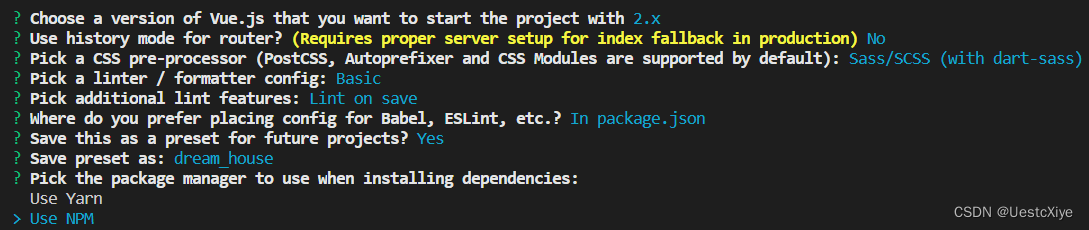
版本选择:选 2.x。

路由模式:选择是否为 history 模式,y 表示是,n 表示使用 hash 模式,这里选择的是 n。
- history:利用了 HTML5 History Interface 中新增的 pushState() 和 replaceState() 方法(需要特定浏览器支持) *hash: 浏览器 url 址栏中的 # 符号(如这个 URL:http://love.byzy.love/#/SuiJi ,hash 的值为“ #/SuiJi ”),hash 不被包括在 HTTP 请求中,所以对后端完全没有影响。因此改变 hash 不会重新加载页面,更容易进行打包上传服务器。

选择 CSS 预处理器:选第一个

选择编码规则:
- ESLint with error prevention only:只配置使用 ESLint 官网的推荐规则
- ESLint + Airbnb config:官网推荐的规则 + Airbnb 第三方的配置
- ESLint + Standard config:使用 ESLint 官网推荐的规则 + Standard 第三方的配置
- ESLint + Prettier:使用 ESLint 官网推荐的规则 + Prettier 第三方的配置
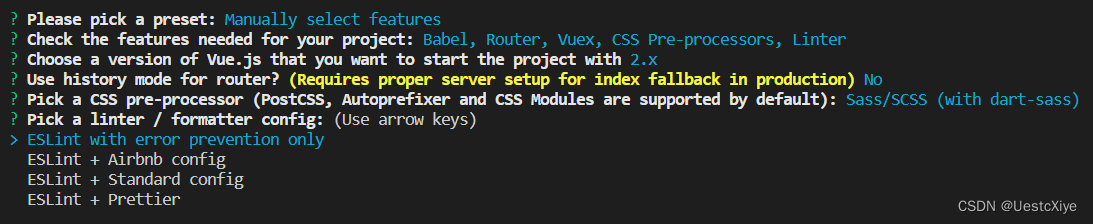
建议初学者(就是我)选择第一项,表示只有报错时才会验证。
检测条件:
- Lint on save:保存就检测
- Lint and fix on commit:fix 和 commit 时候检查

选 Lint on save。
存放配置:
- In dedicated config files:独立文件放置
- In package.json:放 package.json 里
选 In package.json。
最后输入 y:

保存配置并命名:
包管理器就选 npm:
等下载完成,显示出如下界面说明配置完成:
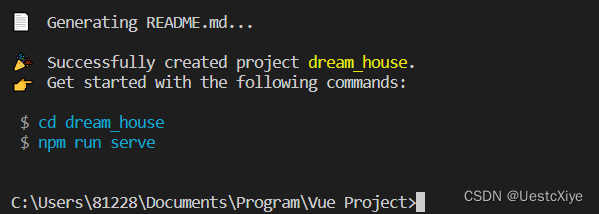
输入指令 cd dream_house 进入项目。
项目结构
Visual Studio Code 打开项目文件夹,观察左侧项目目录。
项目结构说明如下:
- node_modules: 包含所有安装的 npm 包。
- public:包含所有不需要经过 Webpack 处理的静态文件,如:index.html、favicon.ico等。 - favicon.ico- index.html
- src:包含所有源代码 - assets:存放静态资源文件,如图片、样式表等 - logo.png- components:存放 Vue 组件 - HelloWorld.vue- router:存放 Vue 路由 - index.js- store:存放 Vuex 状态管理相关的代码 - index.js- views:存放页面级别的 Vue 组件 - AboutView.vue- HomeView.vue- App.vue:Vue应用程序的根组件- main.js:Vue应用程序的入口文件
- .gitignore:Git 忽略文件列表,告诉 Git 哪些文件和目录应该被忽略,不被纳入版本控制中。
- babel.config.js:Babel 配置文件,用于转换 ES6+ 代码到 ES5,以便它们能够在更旧的浏览器中运行。
- jsconfig.json:用于配置 Vusial Studio Code 的 JavaScript 语言服务的 JSON 配置文件。它可以用来设置JS项目的编译选项、路径别名、自动引入模块等选项。
- package-lock.json:记录当前项目的依赖项及其版本信息,确保不同计算机或者环境下的依赖项保持一致。
- package.json:Vue.js 项目的元数据文件,包含项目的名称、版本、作者、依赖项等信息。其中,dependencies 字段记录的是项目的运行时依赖项,而 devDependencies 字段记录的是项目的开发时依赖项。
- README.md:项目的说明文档,描述项目的目的、功能、使用方法等等。
- vue.config.js:Vue.js 项目的配置文件,包含了一些 Vue CLI 的默认配置,可以用于自定义 Webpack 配置、开发环境的代理设置等等。使用 vue-cli-service 命令时,它将自动被加载并应用于项目配置。
Vue 组件结构
一个 Vue 组件分为三个部分,分别是:template 部分、script 部分、style 部分。
- template:组件的模板部分,用来定义组件的 html 结构。 必须在里面放置一个 html 标签来包裹所有的代码,例如 标签。
- script:组件的 JavaScript 代码部分,用来定义组件的逻辑和属性。
- style:组件的样式部分,它用来定义组件的样式。
Vue 组件调用与传值
我们就从官方的例子中来理解 Vue 组件间的传值与调用。由于 HelloWorld.vue 中的内容过多,所以我进行了删减。
观察下面的两段 Vue 代码。
HomeView.vue:
<template><divclass="home"><imgalt="Vue logo"src="../assets/logo.png"><HelloWorldmsg="Welcome to Your Vue.js App"/></div></template><script>// @ is an alias to /srcimport HelloWorld from'@/components/HelloWorld.vue'exportdefault{name:'HomeView',components:{
    HelloWorld
  }}</script>
HelloWorld.vue:
<template><divclass="hello"><h1>{{ msg }}</h1></div></template><script>exportdefault{name:'HelloWorld',props:{msg: String
  }}</script>
可以看到 HomeView.vue 组件中 template 部分有一个 HelloWorld 标签,这个就是我们自定义的 HelloWorld 组件,在这个标签中,我们将一串字符串赋值给 msg 传递了过去。
在 script 部分中,使用 ES6 的 import 语法引入了 “@/components/HelloWorld.vue” 文件,并将其赋值给 HelloWorld 变量。
- export default:使用 ES6 的 export 语法导出一个默认的对象,该对象包含了组件的各种属性和方法。
- name:定义了组件的名称,可以在代码中用来引用这个组件。
- components:定义了组件所包含的子组件。在这里,我们将 HelloWorld 子组件注册为了 HomeView 组件的一个子组件,以便在 HomeView 组件的模板中使用 HelloWorld 组件。
接下来看 HelloWorld.vue 组件中的 script 部分,我们可以看到 props 属性,这个属性定义了该组件的数据属性,也就是它的输入。在这里,我们定义了一个名为 msg 的属性,它是一个字符串类型。该属性可以从组件外部传递进来,在组件内部使用。
然后在 template 部分,
{{ msg }}
调用了该值。Vue 组件的生命周期
Vue组件的生命周期是指在组件实例化时,从开始到结束,不同阶段会自动执行的一些函数。Vue提供了一些钩子函数,让我们在这些生命周期阶段执行我们的自定义逻辑。Vue组件的生命周期可以分为以下三个阶段:
- 创建阶段:包括组件实例化、数据观测、模板编译和挂载等过程。 具体的生命周期函数有:- beforeCreate:在实例初始化之后,数据观测和事件配置之前被调用,此时data和methods 等组件属性还未初始化。- created:在实例创建完成后被立即调用,此时 data 和 methods 等组件属性已经初始化,但是 DOM 节点还未挂载。- beforeMount:在挂载开始之前被调用,此时模板已经编译完成,但是还未渲染成 DOM。- mounted:在挂载完成后被调用,此时组件已经挂载到 DOM 上,可以进行 DOM 操作和异步数据请求等操作。
- 更新阶段:更新阶段包括数据更新和重新渲染等过程。 具体的生命周期函数有:- beforeUpdate:在数据更新之前被调用,此时组件还未重新渲染。- updated:在数据更新之后被调用,此时组件已经重新渲染。
- 销毁阶段:销毁阶段包括组件销毁和清理等过程。 具体的生命周期函数有:- beforeDestroy:在实例销毁之前被调用,此时组件还未销毁,可以进行一些清理工作。- destroyed:在实例销毁之后被调用,此时组件已经完全销毁,不再可用。
在组件的生命周期中,我们可以使用这些生命周期函数来执行一些初始化、清理和动态更新等操作。例如,在 created 生命周期函数中可以发起异步请求获取数据,在 beforeDestroy 生命周期函数中可以清理定时器或取消订阅等操作。
测试 Vue 程序
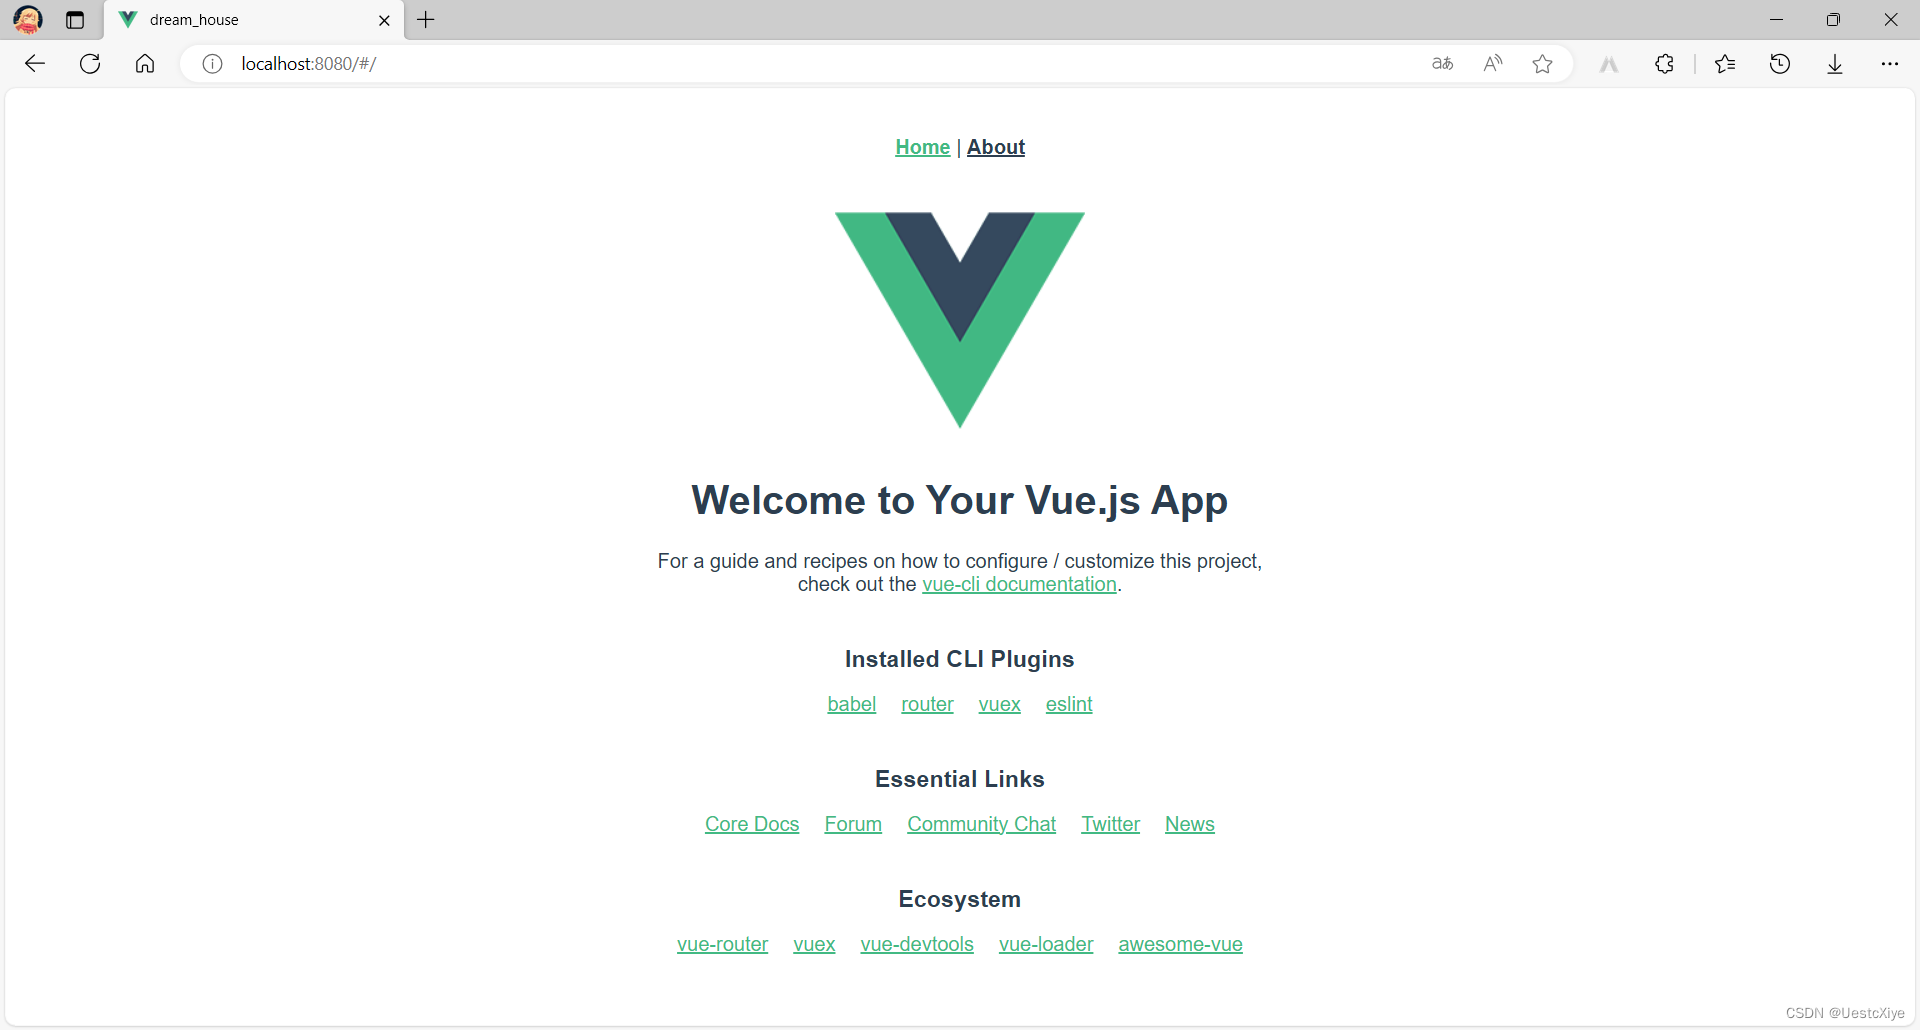
我们先看看默认的 Vue 程序如何运行。
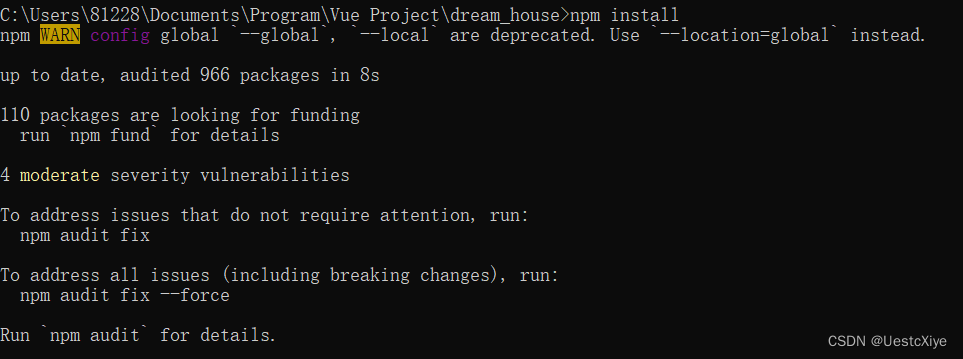
第一步:
npm install
第二步:
npm run serve
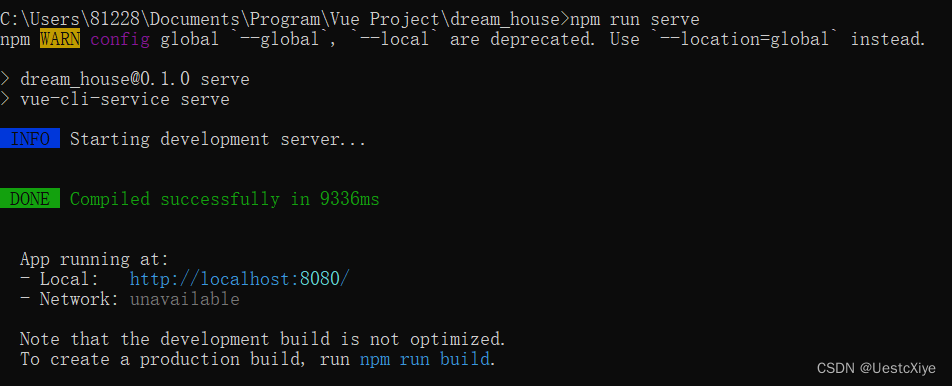
第三步:打开浏览器,进入 http://localhost:8080/
友情链接:如何运行vue项目(超详细图解)
需求分析
整理需求:
- 一个导航栏
- 三个页面
- 页面中显示每个用户发出的内容
- 可以给内容点赞
- 可以发送内容
- 先把整体页面的框架模型搭建起来,然后再进行修饰
在了解了需求之后,就可以开始动手操作了。
实现项目页面
框架搭建
在 views 目录下新建 LikesSortedView.vue、NewestView.vue、RandomView.vue。
在 components 目录下新建 UserList.vue、InputText.vue。

LikesSortedView.vue、NewestView.vue、RandomView.vue 三个组件作为三个页面,内容包括所有的 UserList.vue 组件排列起来。
UserList.vue 组件作为单个用户发送的内容,上面显示省份与点赞等内容。
InputText.vue 组件作为发送内容的组件,包括一个输入框和一个发送按钮。
项目配置
我们需要把项目运行端口更改一下,不然默认是 8080 端口。在 vue.config.js 文件中更改:
const{ defineConfig }=require('@vue/cli-service')
module.exports =defineConfig({transpileDependencies:true,devServer:{port:8086,// 此处修改你想要的端口号},})
然后在项目中我们会用到 Axios 以及 Element ,所以需要下载相关依赖并在 main.js 中引入。
- 安装 Axios 指令:
npm install axios。 - 安装 Element 指令:
npm install element-ui。
安装好以后,修改 main.js:
import Vue from'vue'import App from'./App.vue'import router from'./router'import store from'./store'import ElementUI from'element-ui';// 引入element-uiimport'element-ui/lib/theme-chalk/index.css';// element-ui的css样式要单独引入import axios from'axios'Vue.prototype.$axios = axios

Vue.use(ElementUI);

Vue.config.productionTip =falsenewVue({
  router,
  store,render:h=>h(App)}).$mount('#app')
主界面设计
主页面的设计在根组件 App.vue 中进行,主要负责一些全局内容的显示。
在 template 部分为一个标题,一个导航栏,一个 InputText 组件,一条每页都需要显示的提示文字。
<template><divid="app"><h1class="MyName">Dream House</h1><nav><router-linkto="/">排行</router-link> |
      <router-linkto="/Newest">最新</router-link> |
      <router-linkto="/Random">随机</router-link></nav><router-view/><InputText/><divclass="newText">该列表仅显示50条内容!</div></div></template>
在 script 部分引入 InputText.vue 组件。
<script>import InputText from'@/components/InputText.vue'exportdefault{name:'App',components:{
    InputText
  },}</script>
在 style 部分设置该组件的样式,以及一些全局效果。
<stylelang="scss">#app{font-family: Avenir, Helvetica, Arial, sans-serif;-webkit-font-smoothing: antialiased;-moz-osx-font-smoothing: grayscale;text-align: center;color: #2c3e50;}nav{padding: 20px;font-size: 30px;font-family: pyt;text-shadow: 2px 2px 2px rgba(0, 0, 0, 0.2);a{text-decoration: none;font-weight: bold;color: #2c3e50;&.router-link-exact-active{-webkit-tap-highlight-color: transparent; //清除蓝框
      text-decoration: none;color: #42b983;}}}.MyName{font-family: pyt;font-size: 60px;background-clip: text;-webkit-background-clip: text;-webkit-text-fill-color: transparent;background-image:linear-gradient(to right, #41ffa9,rgba(79, 168, 252, 0.6));margin: 20px 10px 0px 10px;text-shadow: 3px 3px 3px rgba(0, 0, 0, 0.2); //文本阴影
}body{background:rgb(244, 189, 255);background:linear-gradient(
    90deg,rgb(183, 180, 255) 0%,rgb(255, 255, 255) 50%,rgb(165, 240, 255) 100%
  );}// 设置全局滚动条
body::-webkit-scrollbar{width: 5px;background-color: #f5f5f5;}body::-webkit-scrollbar-thumb{border-radius: 10px;-webkit-box-shadow: inset 0 0 6px rgba(0, 0, 0, 0.3);background-color: #c4ffe4;}.newText{height: 80px;margin: 10px auto;font-size: 13px;}</style>
设置路由
在 router 目录下的 index.js 中设置路由:
import Vue from'vue'import VueRouter from'vue-router'

Vue.use(VueRouter)const routes =[{path:'/',name:'排行',component:()=>import('../views/LikesSortedView.vue')},{path:'/Newest',name:'最新',// route level code-splitting// this generates a separate chunk (Newest.[hash].js) for this route// which is lazy-loaded when the route is visited.component:()=>import(/* webpackChunkName: "about" */'../views/NewestView.vue')},{path:'/Random',name:'随机',component:()=>import('../views/RandomView.vue')}]const router =newVueRouter({
  routes
})exportdefault router
内容组件设计
UserList.vue 的 template 部分如下,显示一个主要内容,在左下角显示省份,右下角显示点赞数和一个图片按钮。
<template><divclass="UserList"><divclass="box"><divclass="box1"><divclass="str">{{str}}</div></div><divclass="box2"><divclass="province">{{province}}</div><divclass="likes">{{likes}}</div><img:src="imagePath"@click="toggleImage"class="img-btn"/></div></div></div></template>
style 部分如下,设置对应的标签显示的位置,以及样式等。
<!-- 添加“scoped作用域”属性以将 CSS 限制为此组件 --><stylescopedlang="scss">.UserList{display: flex;justify-content: center;align-items: center;}.box{border: 1px solid #ddd;border-radius: 10px;box-shadow: 2px 2px 4px #ddd;padding: 10px;display: flex;flex-direction: column; //将 flex 子元素沿竖直方向排列
  align-items: center; //将 flex 子元素在纵轴上居中对齐
  margin: 5px;width: 500px;transition: all 0.3s ease; //面板放大
}.box:hover{transform:scale(1.04); //面板放大
}.box1{width: 100%;float: left;margin: 5px;}.str{flex: 1;text-align: center;font-size: 20px;
  //font-family:wpyt;width: 100%;height: 25px;display: flex;justify-content: center;align-items: center;text-shadow: 1px 1px 1px rgba(0, 0, 0, 0.2);}.box2{width: 100%;display: flex;}.province{text-align: center;font-size: 14px;width: 120px;height: 20px;display: flex;}.likes{text-align: center;font-size: 14px;width: 100px;height: 20px;margin: auto 5px auto auto;display: flex;justify-content: flex-end;align-items: center;}.img-btn{width: 16px;height: 16px;transition: all 0.3s ease; // 设置按钮元素的过渡效果
}</style>
script 部分如下,获取从上级页面传来的数据,在 created() 钩子函数中判断是否给这个内容点过赞,并将图片按钮初始化。
<script>import axios from'axios'exportdefault{name:'UserList',props:{Obj: Object
  },data(){return{imagePath:require("@/assets/点赞-no.png"),str:this.Obj.str,province:this.Obj.province,likes:this.Obj.likes
    };},created(){if(localStorage.getItem(`isLiked${this.Obj.id}`)){this.imagePath =require("@/assets/点赞-yes.png");}},methods:{toggleImage(){// 判断是否点赞过if(this.imagePath ===require("@/assets/点赞-no.png")){// 获取按钮元素const imgBtn =this.$el.querySelector('.img-btn');// 给按钮元素应用缩放和旋转的样式
        imgBtn.style.transform ='scale(1.2) rotate(-10deg)';// 设置计时器,在 300 毫秒之后给按钮元素应用新的样式setTimeout(()=>{
          imgBtn.style.transform ='scale(1) rotate(10deg)';setTimeout(()=>{
            imgBtn.style.transform ='scale(1) rotate(0deg)';},300);},300);this.likes++;// 将图片替换为已点赞的图片this.imagePath =require("@/assets/点赞-yes.png");// 将已点赞的状态存入 localStorage
        localStorage.setItem(`isLiked${this.Obj.id}`,true);//向服务器发送发送put请求
        axios.put(`http://localhost:8087/increaseLikesById/${this.Obj.id}`).then(res=>{

            console.log(res.data);}).catch(error=>{
            console.log("点赞出错!")
            console.error(error);});}else{this.likes--;// 否则将图片替换为未点赞的图片this.imagePath =require("@/assets/点赞-no.png");// 并且删除已点赞的状态
        localStorage.removeItem(`isLiked${this.Obj.id}`);// 向服务器发送发送put请求
        axios.put(`http://localhost:8087/decreaseLikesById/${this.Obj.id}`).then(res=>{
            console.log(res.data);}).catch(error=>{
            console.log("取消点赞出错!")
            console.error(error);});}}}}</script>
按钮绑定 toggleImage() 函数,通过点击按钮触发此函数,触发图片按钮的动作,以及更换图片,并且向服务器发出 put 请求,更新数据库中的数据,更新页面中显示的数据。
assets 文件夹下要放图片:
友情链接:阿里巴巴矢量图标库
发送组件设计
InputText.vue 的 template 部分如下,只有一个输入框以及一个图片按钮。
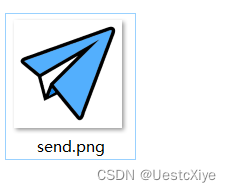
<template><divclass="InputText"><inputtype="text"maxlength="15"v-model="inputValue"placeholder="发送你的梦想!"/><imgsrc="../assets/send.png"class="submit-btn"/></div></template>
style 部分如下,依然是设置整个发送组件的样式。
<stylescopedlang="scss">.InputText{position: fixed;bottom: 10px;left: 0;right: 0;display: flex;justify-content: space-between;padding: 10px;background-color: transparent;width: 300px;margin: 0 auto;
  //设置 z-index 值为 999,显示为最顶部
  z-index: 999;}input[type="text"]{flex: 1;height: 40px;padding: 0 10px;background-color:rgba(255, 255, 255, 0.7);border: 1px solid transparent;border-radius: 20px;box-shadow: 0 0 10px #42b983;transition: all 0.3s ease-in-out;}input[type="text"]:hover{transform:scale(1.05);box-shadow: 0 0 15px rgba(24, 144, 255, 0.8);}.submit-btn{height: 40px;padding: 2px 0px 0px 10px;background-color: transparent;border: none;cursor: pointer;transform:scale(1);transition: all 0.3s ease-in-out;-webkit-tap-highlight-color:rgba(0, 0, 0, 0);}.submit-btn:hover{transform:scale(1.2);}</style>
script 部分如下,通过点击按钮触发 submit() 函数,播放按钮的动画,以及获取输入框的内容,发送到服务器上。
<script>import axios from'axios'exportdefault{name:'InputText',// 定义数据data(){return{isAnimating:false,// 用于标识动画是否正在播放inputValue:''};},methods:{// 定义提交方法submit(){// 如果动画正在播放,直接返回if(this.isAnimating)return;//向服务器发送发送post请求
      axios.post(`http://localhost:8087/Add/${this.inputValue}`).then(res=>{

          console.log(res.data);this.inputValue ='';this.$message({message:'发送成功!',type:'success',duration:2000// 自动关闭延迟时间,单位毫秒});}).catch(error=>{this.$message({message:'发送失败!',type:'error',duration:2000// 自动关闭延迟时间,单位毫秒});

          console.log("发送信息出错!")
          console.error(error);});this.isAnimating =true;// 标记动画正在播放// 获取提交按钮元素const btn =this.$el.querySelector(".submit-btn");// 记录提交按钮的原始 transform 值const originalTransform = btn.style.transform;// 设置提交按钮的 transform 值,使其向右上方移动
      btn.style.transform ="translate(100%, -100%)";// 设置动画播放完成后的回调函数setTimeout(()=>{// 将提交按钮的 transform 值设置为原始值
        btn.style.transform = originalTransform;// 标记动画已经播放完毕this.isAnimating =false;},500);}},mounted(){// 在组件挂载完成后,给提交按钮元素绑定 click 事件this.$el.querySelector(".submit-btn").addEventListener("click",this.submit);}};</script>
assets 文件夹下要放图片:
分页面设计
三个分页面的作用是向数据库发出请求,获取到内容数据,再调用内容组件将各个内容排列显示在页面上。
排行页面 LikesSortedView.vue
template 部分如下,在该部分中只使用了一个自定义组件 UserList ,使用 Vue 的模板语法动态的生成一个组件列表。
<template><divclass="PaiHang"><UserListv-for="(item, index) in Obj":key="index":Obj="item"/></div></template>
解释:
- v-for="(item, index) in Obj"指令表示对 Obj 对象进行遍历,生成对应数量的 组件。
- :key="index"属性用于标识每个组件的唯一性,使 Vue 能够更高效地管理组件的状态。
- :Obj="item"属性将当前元素的值 item 传递给 组件,作为组件的参数之一。
script 部分如下,在该页面被初始化的的时候会调用 getList() 方法从服务器拿到数据,然后将 json 数据传入对应的 UserList 组件中。
<script>// @ 是 /src 的别名import UserList from'@/components/UserList.vue'import axios from'axios'exportdefault{name:'LikesSortedView',components:{
    UserList
  },data(){return{Obj:[]}},// computed会缓存结果,methods每次都会重新计算methods:{getList(){let list =[];let newObjects ={};

      axios.get('http://localhost:8087/findByLikes').then(res=>{
          list = res.data;for(let i =0; i < list.length; i++){
            newObjects[i]= list[i];}
          console.log(newObjects);this.Obj = newObjects;}).catch(error=>{this.$message({message:'获取页面内容失败!',type:'error',duration:2000});
          console.log("获取排行出错!")
          console.error(error);});}},created(){this.getList();}}</script>
最新页面 NewestView.vue
最新页面基本上与排行页面相同,唯一不同的地方就是请求的参数不同,所以只需要把请求的 url 改一下就行了,改成 API 定义的对应的接口。
url:http://(接口IP地址):8087/findByTime
然后就是本组件的名字需要改一下。
<template><divclass="Newest"><UserListv-for="(item, index) in Obj":key="index":Obj="item"/></div></template><script>// @ 是 /src 的别名import UserList from'@/components/UserList.vue'import axios from'axios'exportdefault{name:'NewestView',components:{
      UserList
    },data(){return{Obj:[]}},// computed会缓存结果,methods每次都会重新计算methods:{getList(){let list =[];let newObjects ={};

        axios.get('http://localhost:8087/findByTime').then(res=>{
            list = res.data;for(let i =0; i < list.length; i++){
              newObjects[i]= list[i];}
            console.log(newObjects);this.Obj = newObjects;}).catch(error=>{this.$message({message:'获取页面内容失败!',type:'error',duration:2000});
            console.log("获取排行出错!")
            console.error(error);});}},created(){this.getList();}}</script>
随机页面 RandomView.vue
同理,改一下请求的 url 就行。
url:http://(接口IP地址):8087/findByRand
<template><divclass="Random"><UserListv-for="(item, index) in Obj":key="index":Obj="item"/></div></template><script>// @ 是 /src 的别名import UserList from'@/components/UserList.vue'import axios from'axios'exportdefault{name:'RandomView',components:{
      UserList
    },data(){return{Obj:[]}},// computed会缓存结果,methods每次都会重新计算methods:{getList(){let list =[];let newObjects ={};

        axios.get('http://localhost:8087/findByRand').then(res=>{
            list = res.data;for(let i =0; i < list.length; i++){
              newObjects[i]= list[i];}
            console.log(newObjects);this.Obj = newObjects;}).catch(error=>{this.$message({message:'获取页面内容失败!',type:'error',duration:2000});
            console.log("获取排行出错!")
            console.error(error);});}},created(){this.getList();}}</script>
项目启动
在终端中输入指令:
npm run serve
。
可以看到如下界面,说明项目成功运行:
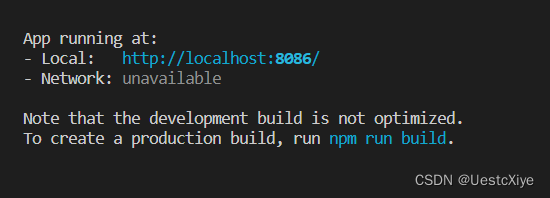
根据提示访问本地地址 http://localhost:8086/。
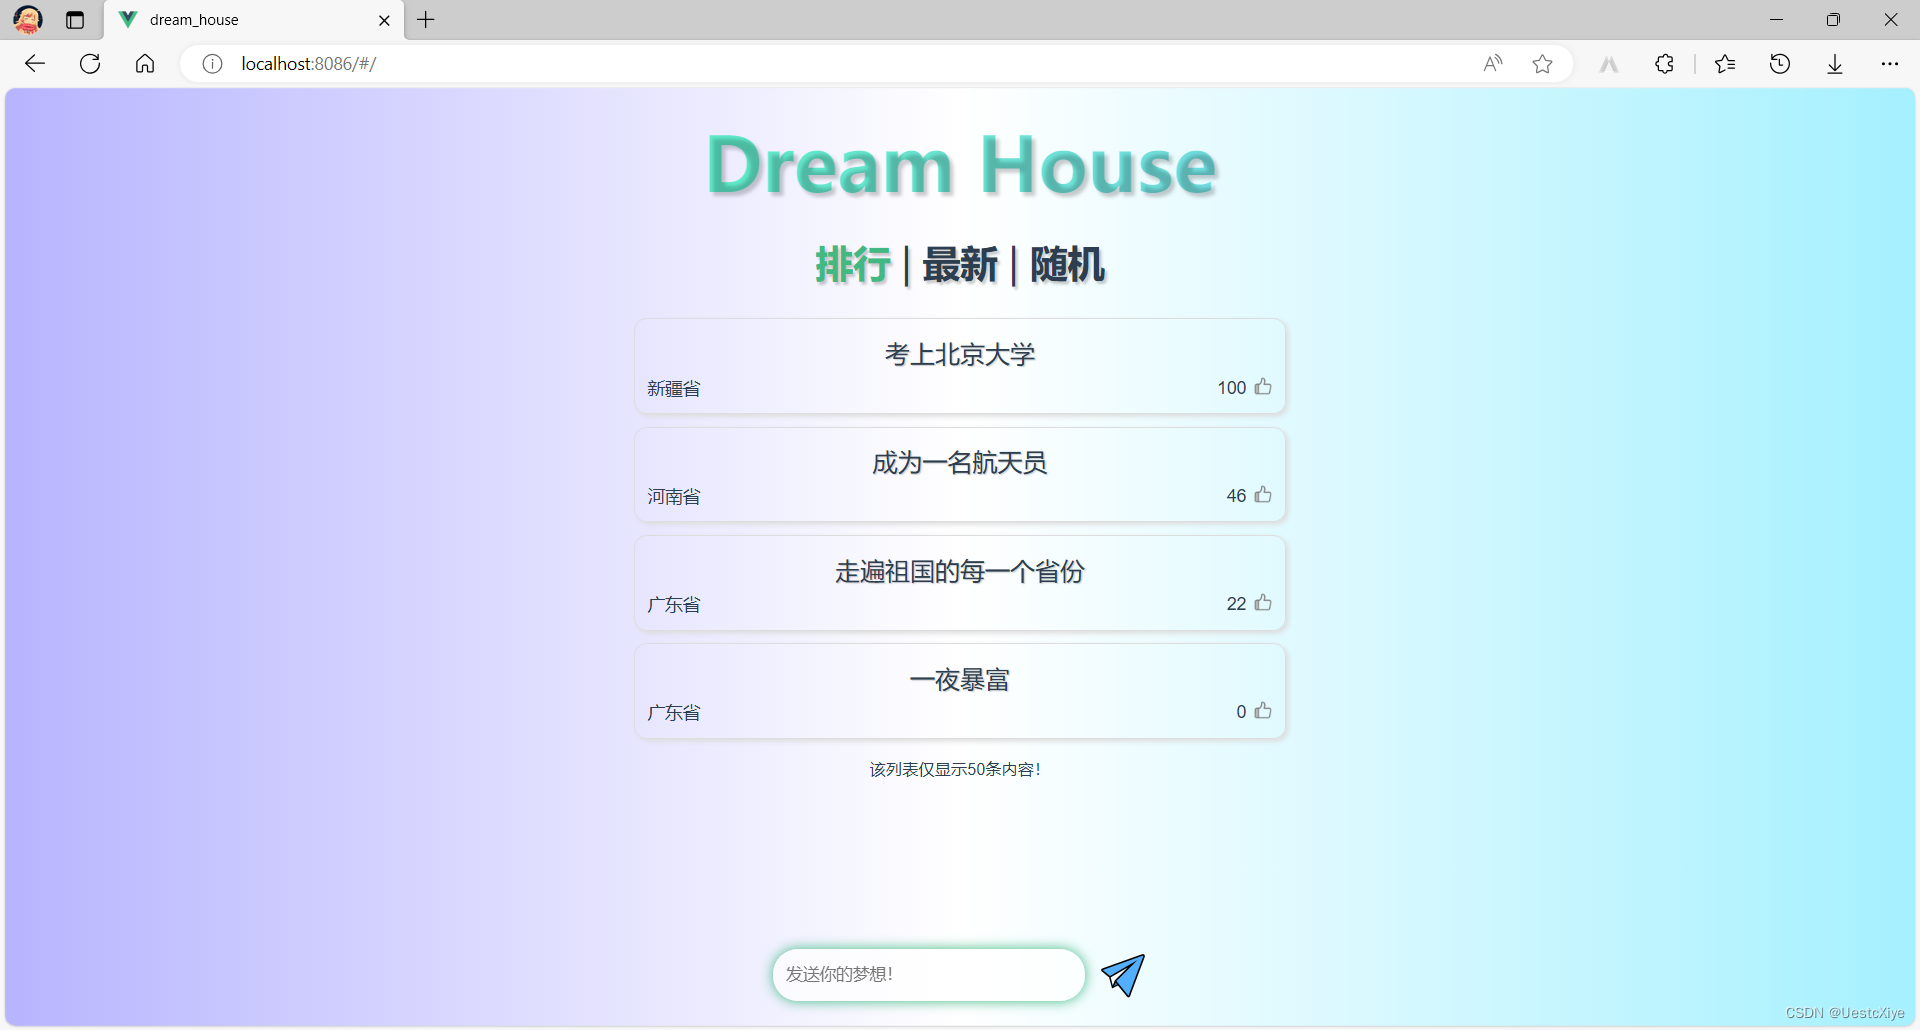
发现所有功能都正常使用,页面正常排布。
经测试,点赞按钮和发送按钮动画正常播放,页面数据正常更新,梦想内容正常发布,各功能使用正常。
至此,“梦想屋” 小项目成功完成。
源码下载
GitHub:https://github.com/UestcXiye/DreamHouse
CSDN:DreamHouse.zip
版权归原作者 UestcXiye 所有, 如有侵权,请联系我们删除。