
官网文档:https://www.elastic.co/guide/en/elasticsearch/reference/current/docker.html
docker pull docker.elastic.co/elasticsearch/elasticsearch:8.3.3
1.Create a new docker network for Elasticsearch and Kibana
docker network create elastic
2.1创建加密的keystore
docker run -it --rm \
-v /opt/services/es/config:/usr/share/elasticsearch/config \
docker.elastic.co/elasticsearch/elasticsearch:8.3.3 \
bin/elasticsearch-keystore create -p
会在opt/services/es/config下生成elasticsearch.keystore
–rm是数是说运行结束后删除镜像
2.2启动时带上密keystore文件的密码
建立/opt/services/es/config/secrets/keystore_password.txt里面放入密码
将该文件权限更改,文件归属更改,不然会报错
chmod 400 keystore_password.txt
chown 1000 keystore_password.txt
-e KEYSTORE_PASSWORD_FILE=/opt/services/es/config/secrets/keystore_password.txt
3.Start Elasticsearch in Docker. A password is generated for the elastic user and output to the terminal, plus an enrollment token for enrolling Kibana.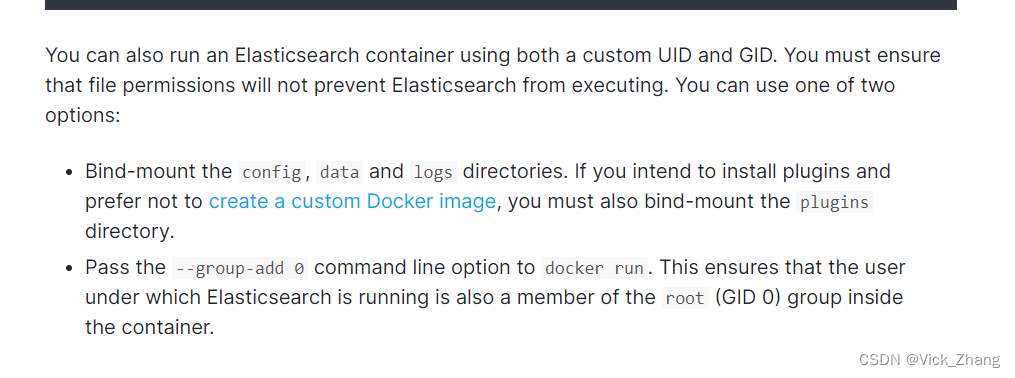
A.设置内存
1).在启动命令中加参数 用CLI_JAVA_OPTS代替ES_JAVA_OPTS不起作用
-e ES_JAVA_OPTS=“-Xms256m -Xmx256m”
2).在目录/opt/services/es/config/jvm.options.d中添加一个文件如jvm.options
-Xms256m
-Xmx256m
-XX:MaxDirectMemorySize=128m
B.Aborting auto configuration because of config dir ownership mismatch. Config dir is owned by root but auto-configuration directory would be owned by elasticsearch
以及
ERROR: [2] bootstrap checks failed. You must address the points described in the following [2] lines before starting Elasticsearch.
需要将config拥有者改为1000(elasticsearch)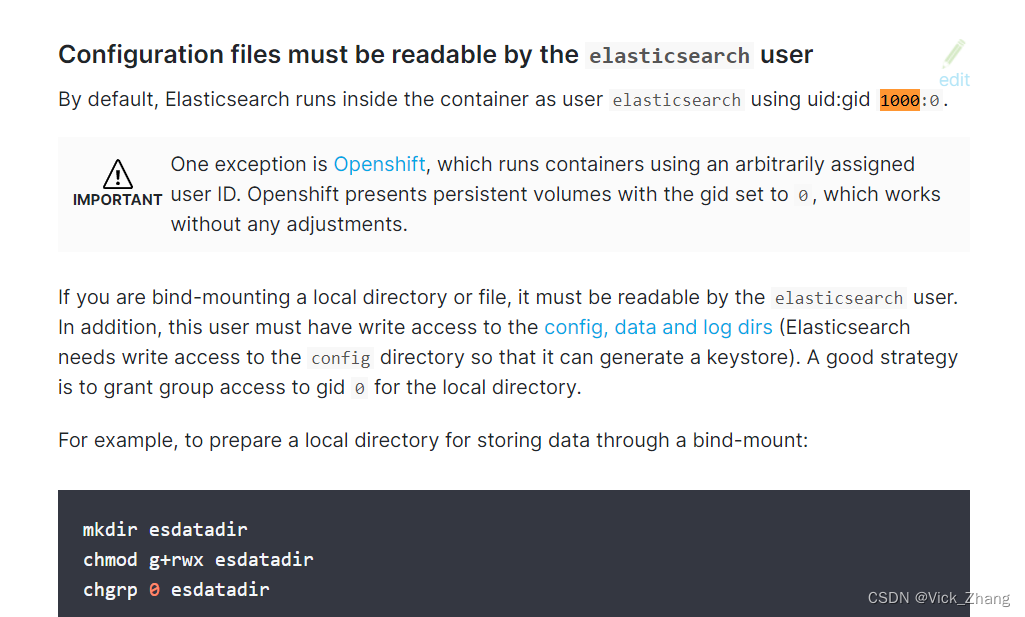
chown -R 1000 config   (1000为用户elasticsearch)
最好是
chgrp -R 0 /opt/services/es
C.docker启动es默认日志打印在console,没有记到文件
cp log4j2.properties log4j2.console.properties
cp log4j2.file.properties log4j2.properties
将log4j2.properties修改为自带的log4j2.file.properties就可以将日志记入文件
D.下面的启动错误
[2022-08-17T07:52:01,534][ERROR][o.e.b.Bootstrap          ] [4cf065c6217c] node validation exception
[2] bootstrap checks failed. You must address the points described in the following [2] lines before starting Elasticsearch.
bootstrap check failure [1] of [2]: the default discovery settings are unsuitable for production use; at least one of [discovery.seed_hosts, discovery.seed_providers, cluster.initial_master_nodes] must be configured
bootstrap check failure [2] of [2]: Transport SSL must be enabled if security is enabled. Please set [xpack.security.transport.ssl.enabled] to [true] or disable security by setting [xpack.security.enabled] to [false]
解决方式
cluster.name: "docker-cluster"
network.host: 0.0.0.0
#[2] bootstrap checks failed. You must address the points described in the following [2] lines before starting Elasticsearch.
#bootstrap check failure [1] of [2]: the default discovery settings are unsuitable for production use; at least one of [discovery.seed_hosts, discovery.seed_providers, cluster.initial_master_nodes] must be configured
#bootstrap check failure [2] of [2]: Transport SSL must be enabled if security is enabled. Please set [xpack.security.transport.ssl.enabled] to [true] or disable security by setting [xpack.security.enabled] to [false]
cluster.initial_master_nodes: ["node-1"]
xpack.security.enabled: true
xpack.security.transport.ssl.enabled: true
#end selfDefine
启动命令:
docker run --group-add 0 -it --name es01 --net elastic -e TZ=Asia/Shanghai -p 9200:9200 -p 9300:9300 -e KEYSTORE_PASSWORD_FILE=/usr/share/elasticsearch/config/secrets/keystore_password.txt -v /opt/services/es/config:/usr/share/elasticsearch/config -v /opt/services/es/logs:/usr/share/elasticsearch/logs -v /opt/services/es/data:/usr/share/elasticsearch/data -v /opt/services/es/plugins:/usr/share/elasticsearch/plugins docker.elastic.co/elasticsearch/elasticsearch:8.3.3

重设密码:
docker exec -it es01 /usr/share/elasticsearch/bin/elasticsearch-reset-password -u elastic

退出时要 CTRL+P+Q 不要ctrl+c就会保持后台运行
有可能报错
bootstrap check failure [1] of [1]: max virtual memory areas vm.max_map_count [65530] is too low, increase to at least [262144]
需修改
vi /etc/sysctl.conf
vm.max_map_count=262144
并执行命令
sysctl -p
还报错
Error opening log file ‘logs/gc.log’: Permission denied
执行cd /opt/services/es
chmod 777 -R ./logs
还报
maybe these locations are not writable or multiple nodes were started on the same data path?
chmod 777 -R ./data
3.Copy the generated password and enrollment token and save them in a secure location. These values are shown only when you start Elasticsearch for the first time.
If you need to reset the password for the elastic user or other built-in users, run the elasticsearch-reset-password tool. This tool is available in the Elasticsearch /bin directory of the Docker container. For example:
docker exec -it es01 /usr/share/elasticsearch/bin/elasticsearch-reset-password
4.Copy the http_ca.crt security certificate from your Docker container to your local machine.
docker cp es01:/usr/share/elasticsearch/config/certs/http_ca.crt /opt/services/es/
5.Open a new terminal and verify that you can connect to your Elasticsearch cluster by making an authenticated call, using the http_ca.crt file that you copied from your Docker container. Enter the password for the elastic user when prompted.
curl --cacert /opt/services/es/config/certs/http_ca.crt -u elastic https://localhost:9200
创建API Key
除了账号密码,ES还提供了一种安全的访问方式:API Key,java应用持有es签发的API Key也能顺利发送指令到es,接下来咱们先生成API Key,再在应用中使用此API Key
上面咱们将自签证书从容器中复制出来了,现在在证书所在目录执行以下命令,注意参数expiration代表这个ApiKey的有效期,我这里随意设置为10天
curl -X POST "https://localhost:9200/_security/api_key?pretty" \
--cacert http_ca.crt \
-u elastic:123456 \
-H 'Content-Type: application/json' \
-d'
{
  "name": "my-api-key-1000d",
  "expiration": "1000d"
}
'

curl -X POST "https://localhost:9200/_security/api_key?pretty" --cacert /opt/services/es/config/certs/http_ca.crt -u elastic:123456 -H 'Content-Type: application/json' -d'{"name": "my-api-key-1000d","expiration": "1000d"}'
会收到以下响应,其中的encoded字段就是API Key
{
  "id" : "2jVFgYIBH2sSqXqF4JAi",
  "name" : "my-api-key-1000d",
  "expiration" : 1746426216484,
  "api_key" : "wFD-DvY5R1OYWDAXGpW87Q",
  "encoded" : "MmpWRmdZSUJIMnNTcVhxRjRKQWk6d0ZELUR2WTVSMU9ZV0RBWEdwVzg3UQ=="
}
—es8现在用的少,要集成skywalking,而docker的skywalking现在还不支持es8,所以安装一下es7
https://www.elastic.co/guide/en/elasticsearch/reference/7.5/docker.html
docker pull elasticsearch:7.17.4
单节点运行
docker run -p 9200:9200 -p 9300:9300 -e "discovery.type=single-node" elasticsearch:7.17.4

docker run -it --name es701 --net elastic -p 9200:9200 -p 9300:9300 -e "discovery.type=single-node" -e ES_JAVA_OPTS="-Xms128m -Xmx128m"  -v /opt/services/es7/logs:/usr/share/elasticsearch/logs -v /opt/services/es7/data:/usr/share/elasticsearch/data elasticsearch:7.17.4
第二版;失败的
1.1.先启动
docker run --group-add 0 -it --name es01 --net elastic -e node.name=node-1 -e ES_JAVA_OPTS="-Xms256m -Xmx256m" -p 9200:9200 -p 9300:9300 -v /opt/services/es/logs:/usr/share/elasticsearch/logs -v /opt/services/es/data:/usr/share/elasticsearch/data -v /opt/services/es/plugins:/usr/share/elasticsearch/plugins docker.elastic.co/elasticsearch/elasticsearch:8.3.3
1.2.复制config
docker stop es01
docker cp es01:/usr/share/elasticsearch/config /opt/services/es
1.3.启动
docker run --group-add 0 -it --name es01 --net elastic -p 9200:9200 -p 9300:9300 -v /opt/services/es/config:/usr/share/elasticsearch/config -v /opt/services/es/logs:/usr/share/elasticsearch/logs -v /opt/services/es/data:/usr/share/elasticsearch/data -v /opt/services/es/plugins:/usr/share/elasticsearch/plugins docker.elastic.co/elasticsearch/elasticsearch:8.3.3
2. 创建keystore
./bin/elasticsearch-keystore create -p
3.创建CA(内含a CA certificate and private key in PKCS#12 format):为了签暑证书
#./bin/elasticsearch-certutil ca
./bin/elasticsearch-certutil ca --pem
4.创建X.509证书:You can then generate X.509 certificates and private keys by using the new CA
#./bin/elasticsearch-certutil cert --ca elastic-stack-ca.p12
./bin/elasticsearch-certutil cert --ca-cert ca/ca.crt --ca-key ca/ca.key
5.更新http层证书
./bin/elasticsearch-certutil http
6.在java中pkcs12 和jks的相互转换:
./jdk/bin/keytool -importkeystore -srckeystore elastic-certificates.p12 -srcstoretype PKCS12 -deststoretype JKS -destkeystore elastic-certificates.jks
7.将密码存入elasticsearch.keystore
./bin/elasticsearch-keystore add xpack.security.transport.ssl.keystore.secure_password
./bin/elasticsearch-keystore add xpack.security.transport.ssl.truststore.secure_password
./bin/elasticsearch-keystore add xpack.security.http.ssl.keystore.secure_password
8.查看密码库
./bin/elasticsearch-keystore list
./bin/elasticsearch-keystore show xpack.security.transport.ssl.truststore.secure_password
9.覆盖新生成的证书到/certs中
cp ca/ca.crt config/certs/http_ca.crt
cp ca/ca.key config/certs/ca.key
cp elastic-certificates.p12 config/certs/transport.p12
cp elasticsearch/http.p12 config/certs/http.p12
10.使用openssl命令导出.crt
openssl pkcs12 -in elastic-stack-ca.p12 -nokeys -out my_key_store.crt
使用openssl命令导出.key
openssl pkcs12 -in elastic-stack-ca.p12 -nocerts -nodes -out my_store.key
11.启动
docker run --group-add 0 -it --name es01 --net elastic -p 9200:9200 -p 9300:9300 -e KEYSTORE_PASSWORD_FILE=/usr/share/elasticsearch/config/secrets/keystore_password.txt -v /opt/services/es/config:/usr/share/elasticsearch/config -v /opt/services/es/logs:/usr/share/elasticsearch/logs -v /opt/services/es/data:/usr/share/elasticsearch/data -v /opt/services/es/plugins:/usr/share/elasticsearch/plugins docker.elastic.co/elasticsearch/elasticsearch:8.3.3
12.修改elastic用户密码
bin/elasticsearch-setup-passwords interactive
bin/elasticsearch-reset-password -u elastic -i
最终版:成功的
1.1.先启动
docker run --group-add 0 -it --name es01 --net elastic -e node.name=node-1 -e ES_JAVA_OPTS="-Xms256m -Xmx256m" -p 9200:9200 -p 9300:9300 -v /opt/services/es/logs:/usr/share/elasticsearch/logs -v /opt/services/es/data:/usr/share/elasticsearch/data -v /opt/services/es/plugins:/usr/share/elasticsearch/plugins docker.elastic.co/elasticsearch/elasticsearch:8.3.3
2.复制config
docker stop es01
docker cp es01:/usr/share/elasticsearch/config /opt/services/es

vi /opt/services/es/config/jvm.options.d/jvm.options
-Xms256m
-Xmx256m
-XX:MaxDirectMemorySize=128m

mkdir /opt/services/es/config/secrets
vi /opt/services/es/config/secrets/keystore_password.txt
ydsNdfeEW$df2343!

chmod 400 /opt/services/es/config/secrets/keystore_password.txt
chown 1000 /opt/services/es/config/secrets/keystore_password.txt

cp /opt/services/es/config/log4j2.properties /opt/services/es/config/log4j2.console.properties
cp /opt/services/es/config/log4j2.file.properties /opt/services/es/config/log4j2.properties
chown 1000 /opt/services/es/config/elasticsearch.keystore
3.启动
docker run --group-add 0 -it --name es01 --net elastic -p 9200:9200 -p 9300:9300 -v /opt/services/es/config:/usr/share/elasticsearch/config -v /opt/services/es/logs:/usr/share/elasticsearch/logs -v /opt/services/es/data:/usr/share/elasticsearch/data -v /opt/services/es/plugins:/usr/share/elasticsearch/plugins docker.elastic.co/elasticsearch/elasticsearch:8.3.3
4.修改elastic用户密码
docker exec -it es01 /bin/bash
bin/elasticsearch-reset-password -u elastic -i
5.设置elasticsearch.keystore密码
bin/elasticsearch-keystore passwd
添加文件/opt/services/es/config/secrets/keystore_password.txt 里面放置keystore密码
chmod 400 keystore_password.txt
chown 1000 keystore_password.txt
重启:
docker run --group-add 0 -it --name es01 --net elastic -p 9200:9200 -p 9300:9300 -e KEYSTORE_PASSWORD_FILE=/usr/share/elasticsearch/config/secrets/keystore_password.txt -v /opt/services/es/config:/usr/share/elasticsearch/config -v /opt/services/es/logs:/usr/share/elasticsearch/logs -v /opt/services/es/data:/usr/share/elasticsearch/data -v /opt/services/es/plugins:/usr/share/elasticsearch/plugins docker.elastic.co/elasticsearch/elasticsearch:8.3.3
查看es01的容器id:
docker ps|grep es01
f3930cdc6888

mkdir /opt/services/es/config/certs_new
chown 1000 /opt/services/es/config/certs_new
6.创建CA(内含a CA certificate and private key in PKCS#12 format):为了签暑证书
#./bin/elasticsearch-certutil ca
./bin/elasticsearch-certutil ca --pem
cp elastic-stack-ca.zip config/certs_new/
unzip elastic-stack-ca.zip
cp -r ca config/certs_new/
7.创建X.509证书:You can then generate X.509 certificates and private keys by using the new CA
#./bin/elasticsearch-certutil cert --ca elastic-stack-ca.p12
./bin/elasticsearch-certutil cert --ca-cert ca/ca.crt --ca-key ca/ca.key
cp elastic-certificates.p12 config/certs_new/
8.更新http层证书
./bin/elasticsearch-certutil http
基中
DNS Name=localhost
DNS Name=f3930cdc6888

IP Address=172.18.0.2
IP Address=127.0.0.1
IP Address=121.4.63.94

cp elasticsearch-ssl-http.zip config/certs_new/
unzip elasticsearch-ssl-http.zip
cp -r elasticsearch/http.p12 config/certs_new/
9.在java中pkcs12 和jks的相互转换:
p12转jks
./jdk/bin/keytool -importkeystore -srckeystore elasticsearch/http.p12 -srcstoretype PKCS12 -deststoretype JKS -destkeystore http.jks
jks转p12
./jdk/bin/keytool -importkeystore -srckeystore http.jks -destkeystore http.p12 -deststoretype pkcs12

cp http.jks config/certs_new/
10.覆盖新生成的证书到/certs中
cd config/certs_new
cp ca/ca.crt ../certs/http_ca.crt
cp ca/ca.key ../certs/ca.key
cp elastic-certificates.p12 ../certs/transport.p12
cp http.p12 ../certs/http.p12
11.更新密码
./bin/elasticsearch-keystore add xpack.security.http.ssl.keystore.secure_password
./bin/elasticsearch-keystore add xpack.security.transport.ssl.keystore.secure_password
./bin/elasticsearch-keystore add xpack.security.transport.ssl.truststore.secure_password
./bin/elasticsearch-keystore add http.jks(不能放会报错)
./bin/elasticsearch-keystore add user_elastic_password(不能放会报错)
12.查看密码库
./bin/elasticsearch-keystore list
./bin/elasticsearch-keystore show xpack.security.http.ssl.keystore.secure_password
./bin/elasticsearch-keystore show xpack.security.transport.ssl.keystore.secure_password
./bin/elasticsearch-keystore show xpack.security.transport.ssl.truststore.secure_password
12.重新启动
docker start es01
13.可选-创建API KEY
curl -X POST "https://localhost:9200/_security/api_key?pretty" --cacert /opt/services/es/config/certs/http_ca.crt -u elastic:123456 -H 'Content-Type: application/json' -d'{"name": "my-api-key-1000d","expiration": "1000d"}'

备忘:
Enter new password for the elasticsearch keystore (empty for no password):
ydsNdfeEW$df2343!1

Enter password for elastic-stack-ca.p12:
--当加了 --pem参数时没有密码
Enter password for elastic-certificates.p12 :
S0yeplHZRKyvEdWAdFKofQ1
Provide a password for the "http.p12" file:  [<ENTER> for none]
M_CBnW28QAuPJ___djbbjA1
p12转jks时,Enter destination keystore password:
S0yeplHZRKyvEdWAdFKofP1

curl --cacert /opt/services/es/config/certs/http_ca.crt -u elastic https://172.18.0.2:9200
curl --cacert /opt/services/es/config/certs/http_ca.crt -u elastic https://elastic:9200

ES时区默认为UTC时区,不能修改 在docker运行时 加参数 -e TZ=Asia/Shanghai也没用
版权归原作者 Vick_Zhang 所有, 如有侵权,请联系我们删除。