
ZooKeeper简单介绍
zookeeper是为分布式应用程序提供的高性能协调服务。zookeeper将命名、配置管理、同步和组服务等常用服务公开在一个简单的接口中,因此用户无需从头开始编写这些服务。可以使用它来实现共识、组管理、领导者选举和存在协议。还可以在此基础上满足自己的特定需求。开始学习zookeeper:zookeeper官网
zookeeper和nacos、eureka、consul都是我们常见的微服务注册中心,这篇文章就详细地介绍一下springboot整合zookeeper的步骤。
一、安装zookeeper
为了方便使用zookeeper,我们在windows系统上安装zookeeper。
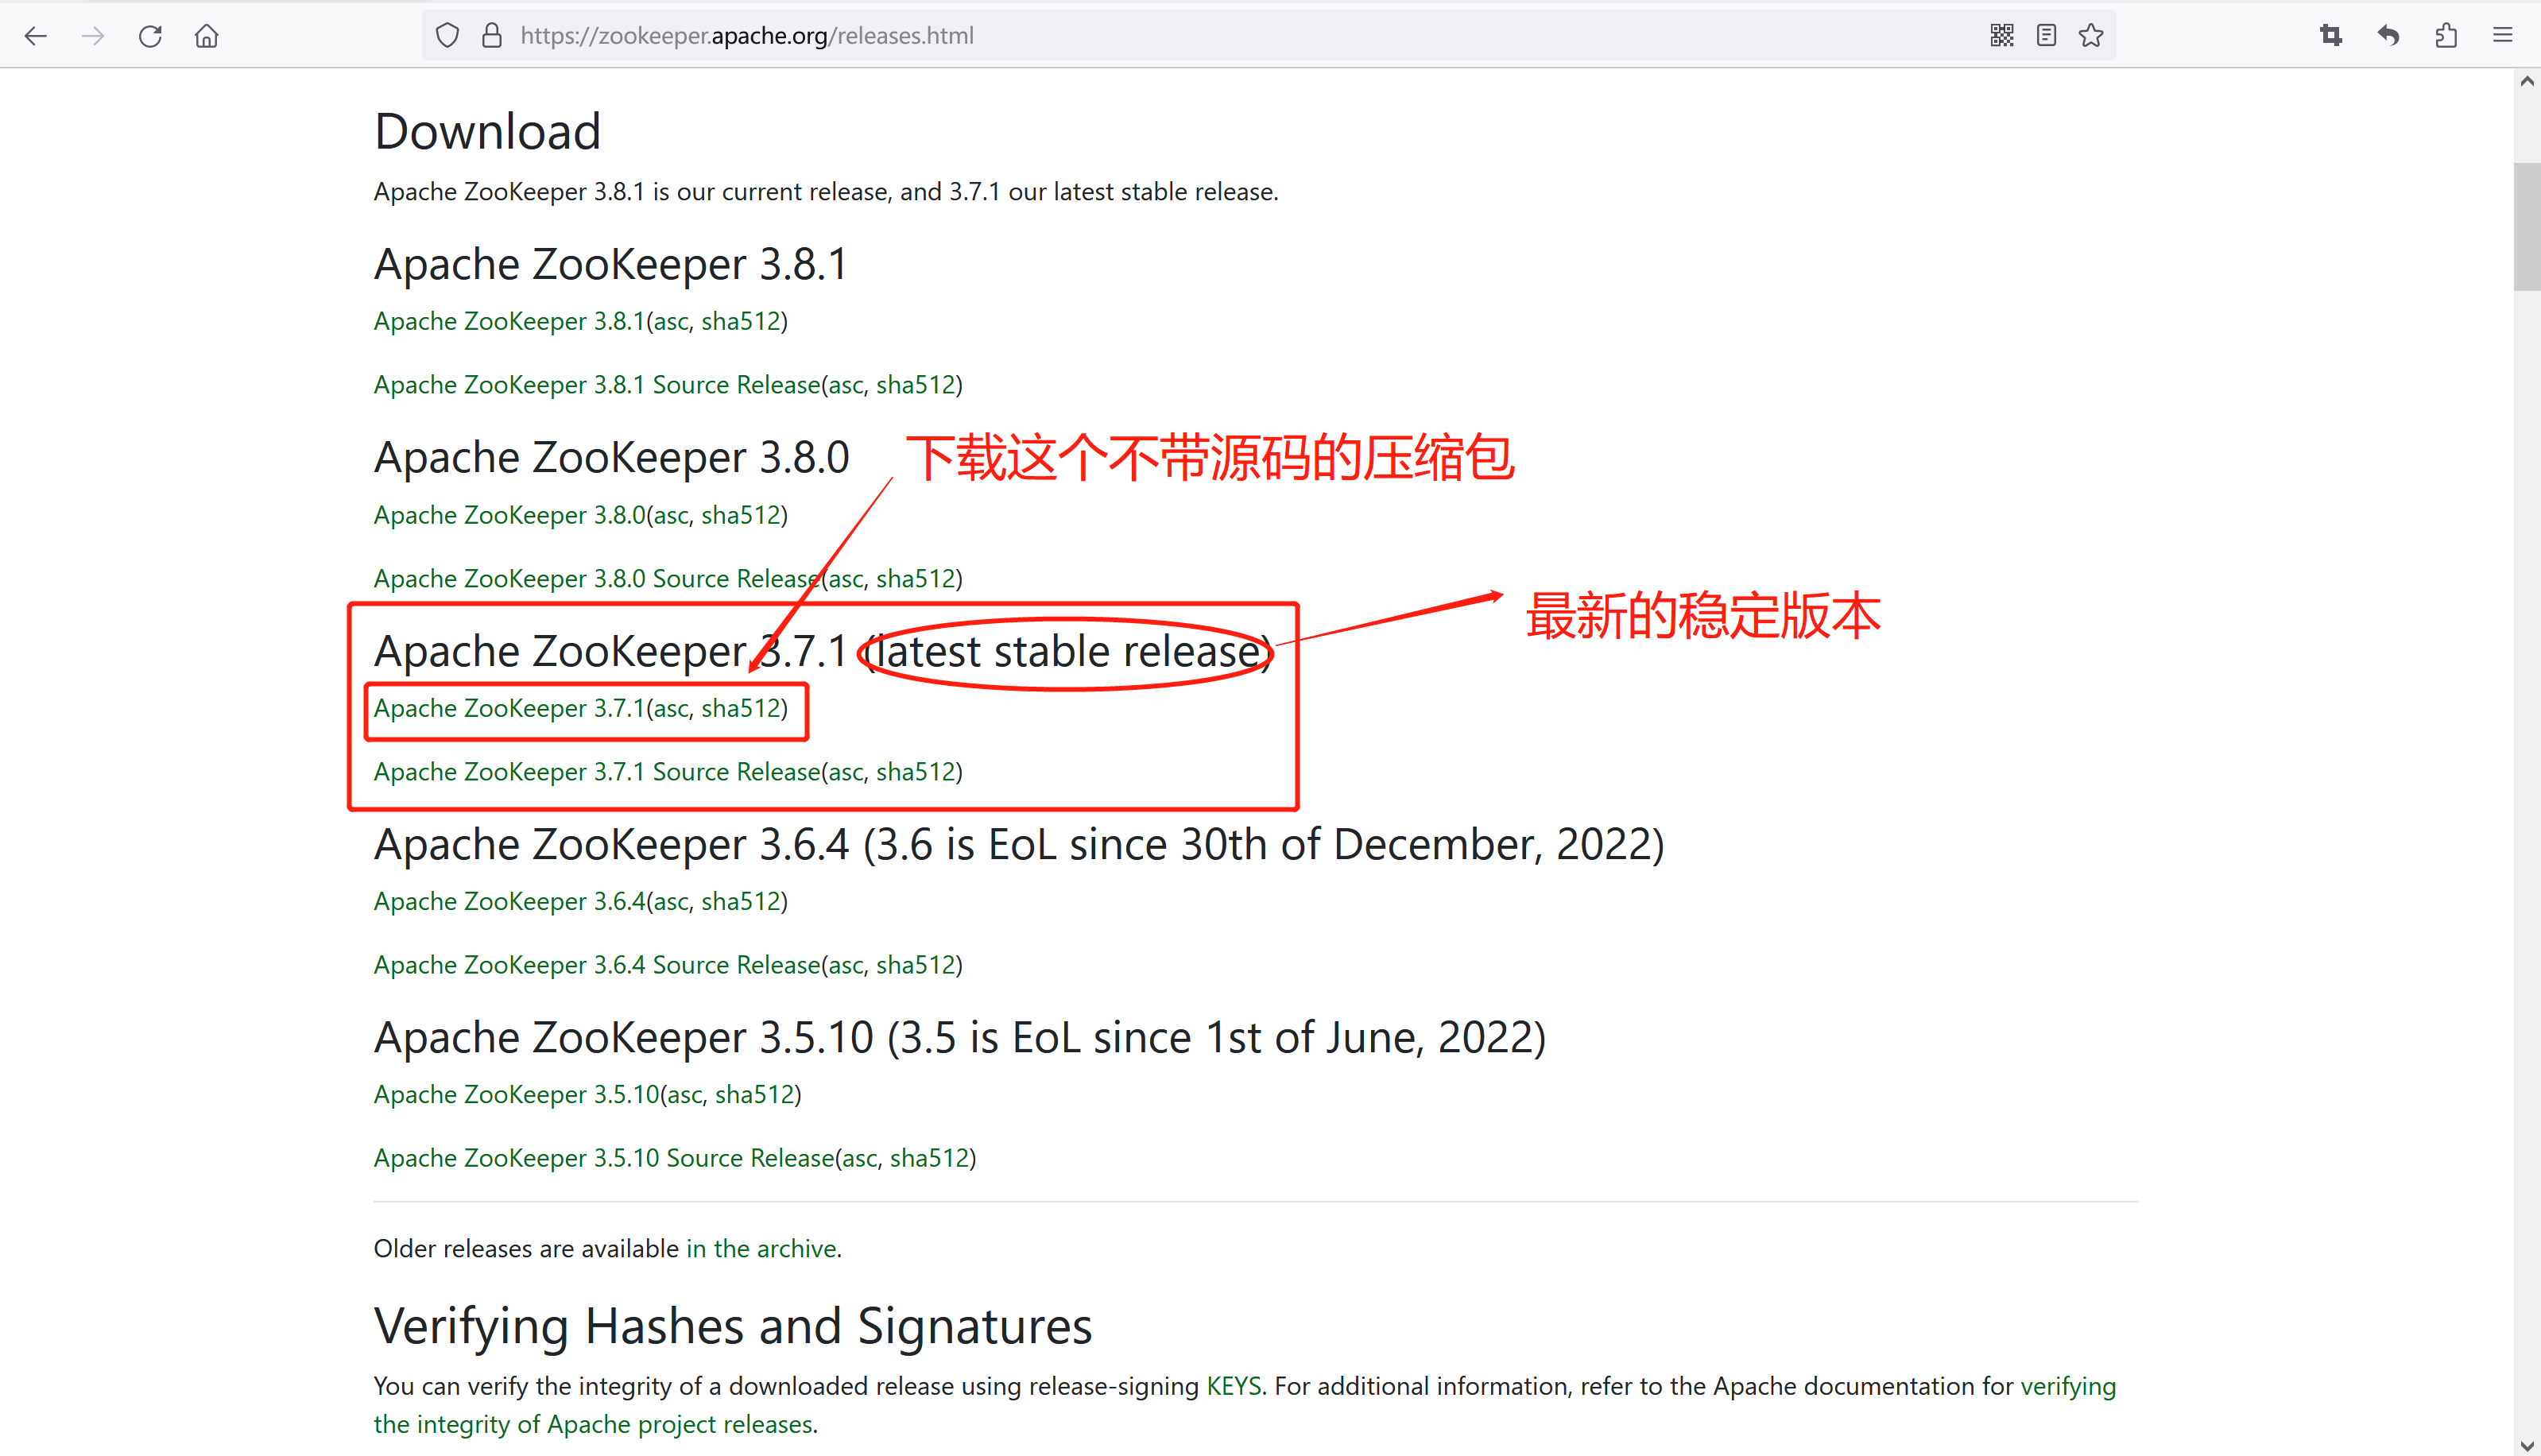
首先,需要下载zookeeper,点击链接打开zookeeper官网Apache ZooKeeper,在官网首页点击Getting Started下面的Download进入下载页面

选择下载稳定的版本
下载完成后,解压到D盘,然后打开刚刚解压的zookeeper安装目录下的config目录,复制一份zoo_sample.cfg,然后重命名为zoo.cfg,修改里面的内容,dataLogDir是新增的,原来文件里没有
dataDir:zookeeper的安装目录\data
dataLogDir:zookeeper的安装目录\log
tickTime=2000

initLimit=10

syncLimit=5

clientPort=2181

dataDir=D:\\program\\apache-zookeeper-3.7.1\\data

dataLogDir=D:\\program\\apache-zookeeper-3.7.1\\log
然后在安装目录下新建两个目录data和log

经过以上的步骤,zookeeper就算安装完了。
启动zookeeper:双击zookeeper安装目录下的zkServer.bat和zkCli.bat两个文件
二、springboot整合zookeeper
1、在IntelliJ IDEA里新建一个springboot项目,命名为zookeeper
2、在项目的pom.xml文件中引入zookeeper和相关依赖
<?xml version="1.0" encoding="UTF-8"?>
<project xmlns="http://maven.apache.org/POM/4.0.0" xmlns:xsi="http://www.w3.org/2001/XMLSchema-instance"
         xsi:schemaLocation="http://maven.apache.org/POM/4.0.0 https://maven.apache.org/xsd/maven-4.0.0.xsd">
    <modelVersion>4.0.0</modelVersion>

    <parent>
        <groupId>org.springframework.boot</groupId>
        <artifactId>spring-boot-starter-parent</artifactId>
        <version>2.5.9</version>
        <relativePath/>
    </parent>

    <groupId>com.example</groupId>
    <artifactId>zookeeper</artifactId>
    <version>0.0.1-SNAPSHOT</version>

    <properties>
        <java.version>1.8</java.version>
    </properties>

    <dependencies>
        <dependency>
            <groupId>org.springframework.boot</groupId>
            <artifactId>spring-boot-starter-web</artifactId>
        </dependency>

        <dependency>
            <groupId>org.springframework.boot</groupId>
            <artifactId>spring-boot-starter-test</artifactId>
            <scope>test</scope>
        </dependency>

        <!--lombok-->
        <dependency>
            <groupId>org.projectlombok</groupId>
            <artifactId>lombok</artifactId>
            <version>1.18.22</version>
        </dependency>

        <dependency>
            <groupId>org.apache.zookeeper</groupId>
            <artifactId>zookeeper</artifactId>
            <version>3.7.0</version>
        </dependency>

        <dependency>
            <groupId>org.apache.curator</groupId>
            <artifactId>curator-framework</artifactId>
            <version>5.2.1</version>
        </dependency>

        <dependency>
            <groupId>org.apache.curator</groupId>
            <artifactId>curator-recipes</artifactId>
            <version>5.2.1</version>
        </dependency>
    </dependencies>

    <build>
        <plugins>
            <plugin>
                <groupId>org.springframework.boot</groupId>
                <artifactId>spring-boot-maven-plugin</artifactId>
            </plugin>
        </plugins>
    </build>
</project>
3、修改application.xml配置文件,只需要指定项目启动端口号和zookeeper的服务器地址
server:
  port: 8085

zookeeper:
  host: localhost:2181
4、项目根目录下创建config包,新建一个zookeeper的配置类
package com.example.zookeeper.config;

import org.apache.curator.framework.CuratorFramework;
import org.apache.curator.framework.CuratorFrameworkFactory;
import org.apache.curator.retry.ExponentialBackoffRetry;
import org.springframework.beans.factory.annotation.Value;
import org.springframework.context.annotation.Bean;
import org.springframework.context.annotation.Configuration;

/**
 * @author heyunlin
 * @version 1.0
 */
@Configuration
public class ZookeeperConfig {
    @Value("${zookeeper.host}")
    private String host;

    @Bean
    public CuratorFramework curatorFramework() {
        CuratorFramework curatorFramework = CuratorFrameworkFactory.builder()
                .connectString(host)
                .sessionTimeoutMs(5000)
                .retryPolicy(new ExponentialBackoffRetry(500, 5))
                .build();
        curatorFramework.start();

        return curatorFramework;
    }

}
5、使用zookeeper的API
package com.example.zookeeper.controller;

import com.example.zookeeper.restful.JsonResult;
import org.apache.curator.framework.CuratorFramework;
import org.apache.zookeeper.CreateMode;
import org.apache.zookeeper.data.Stat;
import org.springframework.beans.factory.annotation.Autowired;
import org.springframework.web.bind.annotation.RequestMapping;
import org.springframework.web.bind.annotation.RequestMethod;
import org.springframework.web.bind.annotation.RestController;

import java.nio.charset.StandardCharsets;
import java.util.List;

/**
 * @author heyunlin
 * @version 1.0
 */
@RestController
@RequestMapping(path = "/zookeeper", produces = "application/json;charset=utf-8")
public class ZookeeperController {
    private final CuratorFramework curatorFramework;

    @Autowired
    public ZookeeperController(CuratorFramework curatorFramework) {
        this.curatorFramework = curatorFramework;
    }

    /**
     * 判断znode是否存在
     * @param node 节点名称
     */
    @RequestMapping(value = "/exist", method = RequestMethod.GET)
    public JsonResult<Stat> exist(String node) throws Exception {
        Stat stat = curatorFramework.checkExists().forPath(node);

        return JsonResult.success(null, stat);
    }

    /**
     * 创建一个znode
     * @param node 节点名称
     */
    @RequestMapping(value = "/create", method = RequestMethod.GET)
    public JsonResult<Void> create(String node) throws Exception {
        curatorFramework.create()
                .creatingParentContainersIfNeeded()
                /*
                创建模式:常用的有
                    PERSISTENT:持久化节点,客户端与zookeeper断开连接后,该节点依旧存在,只要不手动删除,该节点就会永远存在。
                    PERSISTENT_SEQUENTIAL:持久化顺序编号目录节点,客户端与zookeeper断开连接后,该节点依旧存在,只是zookeeper给该节点名称进行顺序编号。
                    EPHEMERAL:临时目录节点,客户端与zookeeper断开连接后,该节点被删除。
                    EPHEMERAL_SEQUENTIAL:临时顺序编号目录节点,客户端与zookeeper断开连接后,该节点被删除,只是zookeeper给该节点名称进行顺序编号。
                */
                .withMode(CreateMode.EPHEMERAL)
                .forPath(node);

        return JsonResult.success("创建成功");
    }

    /**
     * 设置znode节点的数据
     * @param node 节点名称
     * @param data 节点的数据
     */
    @RequestMapping(value = "/setData", method = RequestMethod.GET)
    public JsonResult<Void> setData(String node, String data) throws Exception {
        curatorFramework.setData().forPath(node, data.getBytes(StandardCharsets.UTF_8));

        return JsonResult.success("设置成功");
    }

    /**
     * 删除节点
     * @param node 节点名称
     */
    @RequestMapping(value = "/delete", method = RequestMethod.GET)
    public JsonResult<Void> delete(String node) throws Exception {
        curatorFramework.delete().forPath(node);

        return JsonResult.success("删除成功");
    }

    /**
     * 删除节点及其子节点的数据
     * @param node 节点名称
     */
    @RequestMapping(value = "/deleteDeeply", method = RequestMethod.GET)
    public JsonResult<Void> deleteDeeply(String node) throws Exception {
        curatorFramework.delete().deletingChildrenIfNeeded().forPath(node);

        return JsonResult.success("删除成功");
    }

    /**
     * 获取节点的数据
     * @param node 节点名称
     */
    @RequestMapping(value = "/getData", method = RequestMethod.GET)
    public JsonResult<String> getData(String node) throws Exception {
        byte[] bytes = curatorFramework.getData().forPath(node);

        return JsonResult.success(null, new String(bytes));
    }

    /**
     * 获取当前节点的子节点数据
     * @param node 节点名称
     */
    @RequestMapping(value = "/getChildren", method = RequestMethod.GET)
    public JsonResult<List<String>> getChildren(String node) throws Exception {
        List<String> list = curatorFramework.getChildren().forPath(node);

        return JsonResult.success(null, list);
    }

}
好了,文章就分享到这里了~
版权归原作者 Java程序员-小白 所有, 如有侵权,请联系我们删除。