8.1 同步调用
即客户端向服务端请求做数据处理,客户端需要一直等待服务端处理直到返回结果给客户端
同步调用存在的问题:
- 耦合度高:每次加入新的需求,都要修改原来的代码
- 性能下降:调用者需要等待服务提供者响应,如果调用链过长则响应时间等于每次调用的时间之和
- 资源浪费:调用链中的每个服务在等待响应过程中,不能释放请求占用的资源,高并发场景下会极度浪费系统资源
- 级联失败:如果服务提供者出现问题,所有调用方都会跟着出问题,如同多米诺牌一样,迅速导致整个微服务群故障
优点:
时效性较强,可以立即得到结果
8.2 异步调用
即客户端并不是直接向服务端发起请求,而是会通过一个消息队列,客户端发起请求放入消息队列后就不会去等待服务端的执行结果,而是交给消息队列去下发请求做后台处理,客户端察觉不到
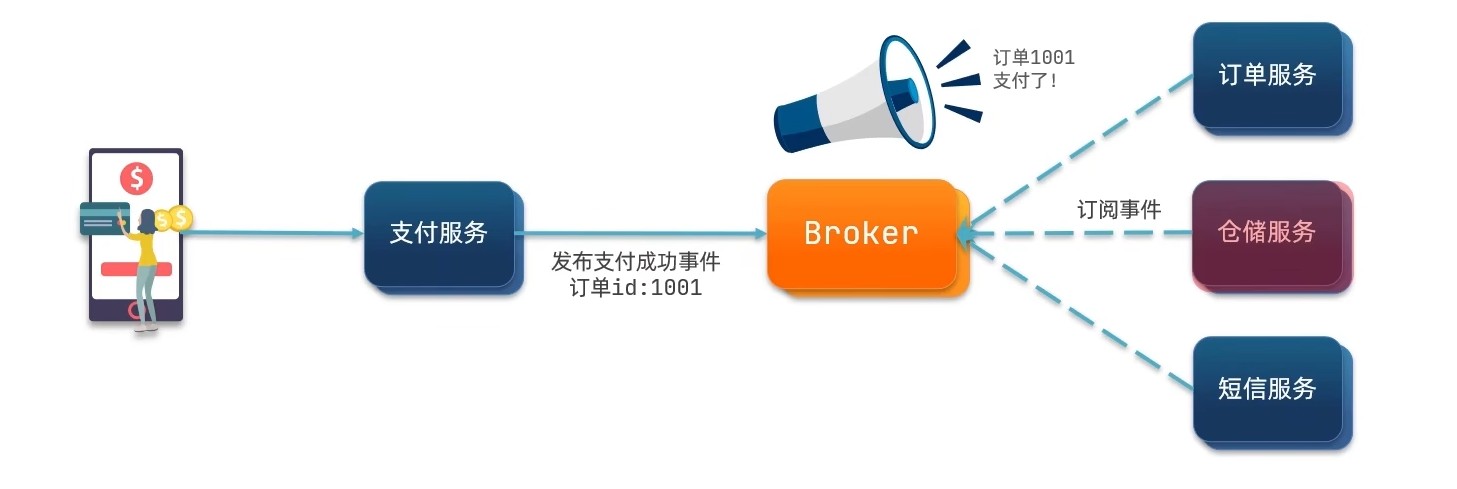
缺点:
- 依赖于消息队列的可靠性、安全性、吞吐能力
- 架构复杂,业务没有明显的流程线,不好追踪管理
优点:
- 耦合度低
- 吞吐量提升
- 故障隔离
- 流量削峰
8.3 消息队列框架比较
RabbitMQActiveMQRocketMQKafka公司/社区RabbitApache阿里Apache开发语言ErlangJavaJavaScala&Java协议支持AMQP,XMPP,SMTP,STOMPOpenWire,STOMP,REST,XMPP,AMQP自定义协议自定义协议可用性高一般高高单机吞吐量一般差高非常高消息延迟微妙级毫秒级毫秒级毫秒以内消息可靠性高一般高一般
8.4 RabbitMQ的结构
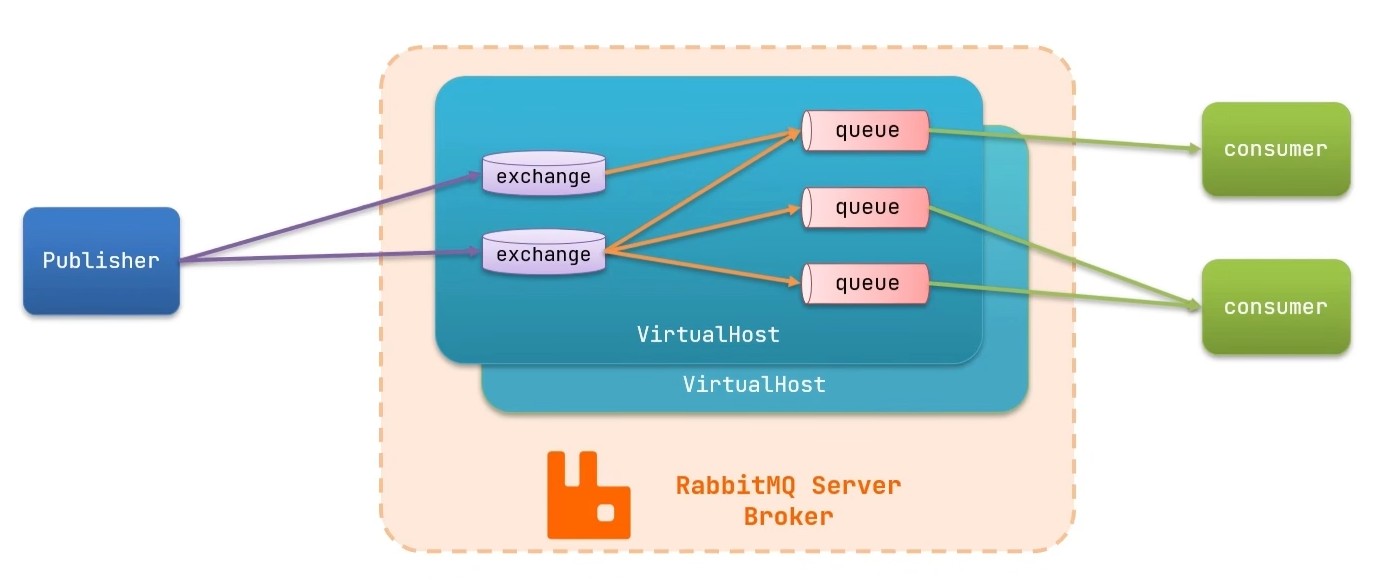
- virtual host:虚拟主机,是对 queue、exchange 等资源的逻辑分组
- exchange:路由消息到队列中
- queue:缓存消息的队列
- channel:操作MQ的工具
8.5 SpringAMQP 框架
用于操作 rabbitmq 的Spring集成框架
AMQP:是用于在应用程序或之间传递业务消息的开放标准。该协议与语言和平台无关,更符合微服务中独立性的要求。
SpringAMQP:是基于AMQP协议定义的一套API规范,提供了模板来发送和接收消息。包含两部分,其中 spring-amqp 是基础抽象, spring-rabbit 是底层的默认实现。
具体依赖:
一般引入到微服务的父工程 pom.xml 中
<dependency><groupId>org.springframework.boot</groupId><artifactId>spring-boot-starter-amqp</artifactId></dependency>
8.6 RabbitMQ 相关配置
在 application.yml 中进行配置
spring:rabbitmq:host: 81.69.245.250 # 主机名port:5672# 端口virtual-host: / # 虚拟主机username: rabbit # 用户名password: rabbit # 密码listener:simple:prefetch:1# 默认没有上限,每次只能获取一条消息,处理完成才能获取下一条消息
在服务器安装好 RabbitMQ 后,会有两个端口
port
:
- 15672:从页面直接访问进入消息管理中心端口
- 5672:代码调用 RabbitMQ 进行消息处理的端口
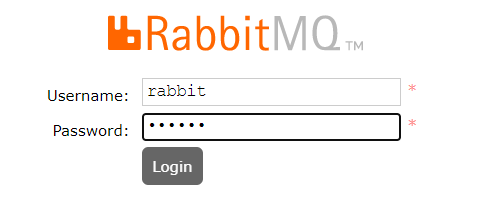
username
和
password
为登录管理界面的用户名和密码
virtual-host
:用户名所连接的虚拟主机

listener.simple.prefetch: 1
:针对于客户端的配置
- 默认客户端接收队列中的消息数量是没有上限的,即不管消息处理完了没有,都先把消息队列中的消息全部取出,这样若有多个客户机向消息队列拿消息,那么消息队列不管各个客户机的处理能力怎么样,会平均分配给这几个客户机队列中的消息,会造成处理性能好的客户机处理完消息空闲,而处理性能不好的客户机仍在排队处理消息,造成资源的浪费。
- 所以需要通过
listener.simple.prefetch: 1来对客户端进行配置,只有处理完设定的消息数后才能再向队列中拿消息
在 SpringBoot 启动类中进行配置
消息格式转换器:在将对象存入消息队列的时候,Spring 的消息对象的处理是由
org.springframework.amqp.support.converter.MessageConverter
来处理的。而默认实现是 SimpleMessageConverter,基于 JDK 的 ObjectOutputStream 完成序列化,所以默认存入消息队列中的对象是一个JDK序列化
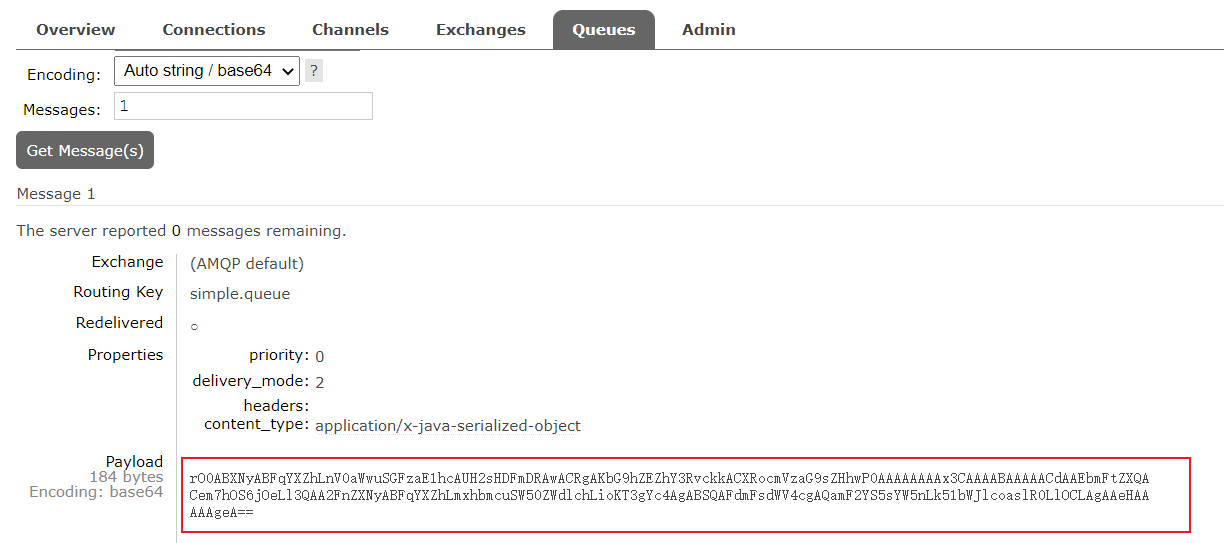
为了方便对象在存入消息队列后的可读性,可以定义一个 MessageConverter 类型的 Bean,将对象转化为 JSON 格式序列化
先在父工程的 pom.xml 中引入 json 格式转换依赖
<dependency><groupId>com.fasterxml.jackson.dataformat</groupId><artifactId>jackson-dataformat-xml</artifactId></dependency>
在模块的启动类中注入Bean
@SpringBootApplicationpublicclassPublisherApplication{publicstaticvoidmain(String[] args){SpringApplication.run(PublisherApplication.class);}/**
     * 消息对象存储,默认JDK序列化,定义为json序列化
     * @return
     */@BeanpublicJackson2JsonMessageConverterjsonMessageConverter(){returnnewJackson2JsonMessageConverter();}}
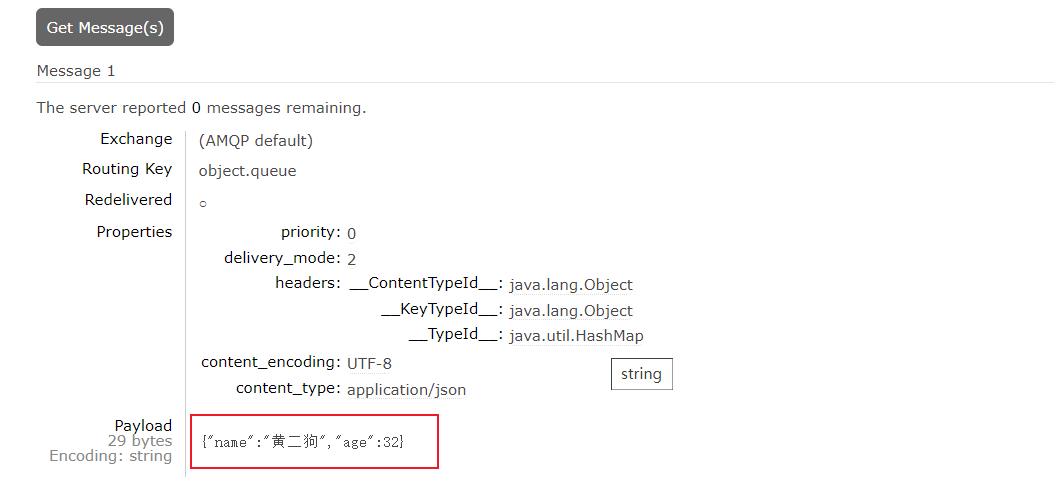
注意:发送方与接收方必须使用相同的 MessageConverter
8.7 RabbitMQ 中五种消息队列模式
官网:https://www.rabbitmq.com/getstarted.html
1. Simple Queue 基本消息模式:
最简单的模型,发送端把消息放入队列中,接收端从队列中拿消息

该种方式,若 RabbitMQ 中心没有要发送消息进入的队列或者没有接收端要接收的队列,那么需要先创建一个队列才能顺利发送或者接收
方法一:
先在 发送端 创建队列,发送消息
@RunWith(SpringRunner.class)@SpringBootTestpublicclassSpringAMTPTest{// 注入操作RabbitMQ的对象@ResourceprivateRabbitTemplate rabbitTemplate;@TestpublicvoidtestSendSimpleQueue(){// 创建一个操作队列的对象RabbitAdmin admin =newRabbitAdmin(rabbitTemplate);Queue springQueue =newQueue("simple.queue");// 在管理器中声明该队列
        admin.declareQueue(springQueue);// 队列名String queueName ="simple.queue";// 要发送的消息String message ="this is a simple queue";
        rabbitTemplate.convertAndSend(queueName,message);}}
接收端 接收
创建一个监听类,在其中添加监听方法,并定义为Component组件加入Spring中,开启启动类监听队列消息
@RabbitListener(queues ="simple.queue")publicvoidlistenSimpleQueueMessage(String msg){System.out.println("spring 消费者接收到消息:【"+ msg +"】");}
方法二:
先在 接收端 创建一个配置类,创建队列
importorg.springframework.amqp.core.Queue;@ConfigurationpublicclassQueueConfig{@BeanpublicQueuesimpleQueue(){returnnewQueue("simple.queue");}}
再创建一个监听类,在其中添加监听方法,并定义为Component组件加入Spring中,开启启动类监听队列消息
@RabbitListener(queues ="simple.queue")publicvoidlistenSimpleQueueMessage(String msg){System.out.println("spring 消费者接收到消息:【"+ msg +"】");}
发送端 发送
@RunWith(SpringRunner.class)@SpringBootTestpublicclassSpringAMTPTest{// 注入操作RabbitMQ的对象@ResourceprivateRabbitTemplate rabbitTemplate;@TestpublicvoidtestSendSimpleQueue(){// 队列名String queueName ="simple.queue";// 要发送的消息String message ="this is a simple queue";
        rabbitTemplate.convertAndSend(queueName,message);}}
2. Work Queue 工作模式:
多个接收端接收消息,提高消息处理速度,避免消息堆积
方法与模型 1 一样,接收端 增加多个消费者
@ComponentpublicclassSpringRabbitListener{@RabbitListener(queues ="work.queue")publicvoidlistenWorkQueueMessage1(String msg)throwsInterruptedException{System.out.println("spring消费者1---接收到消息:【"+ msg +"】"+LocalTime.now());Thread.sleep(20);}@RabbitListener(queues ="work.queue")publicvoidlistenWorkQueueMessage2(String msg)throwsInterruptedException{System.out.println("spring消费者2---接收到消息:【"+ msg +"】"+LocalTime.now());Thread.sleep(200);}}
关键配置:
在接收端 application.yml 中配置
spring.rabbitmq.listener.simple.prefetch: 1
使每个接收端消费完定义数量后再从消息队列中提取,减少资源浪费,提高性能
后三个模式与前两者的最大区别在于加入了 exchange(交换机),通过交换机路由到不同消息队列中,允许同一消息发送给多个消费者
3. Fanout Exchange 广播模式
会将接收到的消息路由到每一个跟其绑定的消息队列中
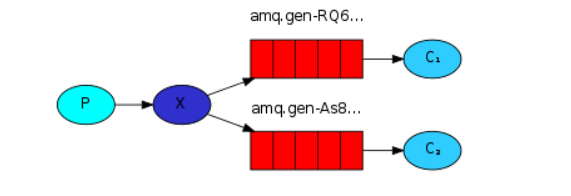
先在 接收端 创建一个监听类,在其中添加监听方法,并定义为Component组件加入Spring中,开启启动类监听队列消息
@ComponentpublicclassSpringRabbitListener{@RabbitListener(bindings =@QueueBinding(
            exchange =@Exchange(name ="cyx.fanout",type =ExchangeTypes.FANOUT),
            value =@Queue(name ="fanout.queue1")))publicvoidlistenFanoutQueue1(String msg){System.out.println("消费者接收到fanout.queue1消息:【"+ msg +"】");}@RabbitListener(bindings =@QueueBinding(
            exchange =@Exchange(name ="cyx.fanout",type =ExchangeTypes.FANOUT),
            value =@Queue(name ="fanout.queue2")))publicvoidlistenFanoutQueue2(String msg){System.out.println("消费者接收到fanout.queue2消息:【"+ msg +"】");}}
该种注解方式,若无指定的交换机或者消息队列会先创建一个,无需提前创建
发送端 发送
@RunWith(SpringRunner.class)@SpringBootTestpublicclassSpringAMTPTest{// 注入操作RabbitMQ的对象@ResourceprivateRabbitTemplate rabbitTemplate;@TestpublicvoidtestSendFanoutExchange(){// 交换机名称String exchangeName ="cyx.fanout";// 消息String message ="this is fanout...";// 发送消息
        rabbitTemplate.convertAndSend(exchangeName,"",message);}}
4. Direct Exchange 路由模式
交换机会将接收到的消息根据规则路由到指定的消息队列中,因此称为路由模式
- 每一个 Queue 都与 Exchange 设置一个 BindingKey
- 发布者发送消息时,指定消息的 RoutingKey
- Exchange 将消息路由到 BindingKey 与消息 RoutingKey 一致的队列
先在 接收端 创建一个监听类,在其中添加监听方法,并定义为Component组件加入Spring中,开启启动类监听队列消息
@ComponentpublicclassSpringRabbitListener{@RabbitListener(bindings =@QueueBinding(
            value =@Queue(name ="direct.queue1"),
            exchange =@Exchange(name ="cyx.direct",type =ExchangeTypes.DIRECT),
            key ={"red","blue"}))publicvoidlistenDirectQueue1(String msg){System.out.println("消费者接收到direct.queue1的消息:【"+ msg +"】");}@RabbitListener(bindings =@QueueBinding(
            value =@Queue(name ="direct.queue2"),
            exchange =@Exchange(name ="cyx.direct",type =ExchangeTypes.DIRECT),
            key ={"red","yellow"}))publicvoidlistenDirectQueue2(String msg){System.out.println("消费者接收到direct.queue2的消息:【"+ msg +"】");}}
发送端 发送
@RunWith(SpringRunner.class)@SpringBootTestpublicclassSpringAMTPTest{@TestpublicvoidtestSendDirectExchange(){// 交换机名称String exchangeName ="cyx.direct";// 消息String message ="this is direct...";// 发送消息
        rabbitTemplate.convertAndSend(exchangeName,"red",message);}}
5. Topic Exchange 话题模式
与路由模式类似,区别在于 routingKey 必须是多个单词的列表,并且以
.
分割,可以使路由根据通配符匹配到指定类型的消息队列中。
#
:代指 0 个或多个单词
*
:代指一个单词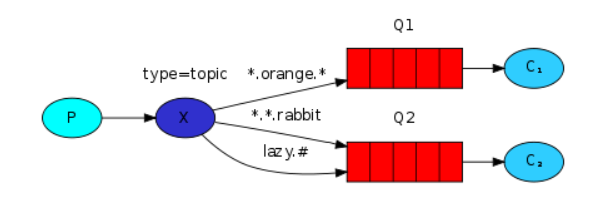
先在 接收端 创建一个监听类,在其中添加监听方法,并定义为Component组件加入Spring中,开启启动类监听队列消息
@ComponentpublicclassSpringRabbitListener{@RabbitListener(bindings =@QueueBinding(
            value =@Queue(name ="topic.queue1"),
            exchange =@Exchange(name ="cyx.topic",type =ExchangeTypes.TOPIC),
            key ="china.#"))publicvoidlistenTopicQueue1(String msg){System.out.println("消费者接收到topic.queue1的消息:【"+ msg +"】");}@RabbitListener(bindings =@QueueBinding(
            value =@Queue(name ="topic.queue2"),
            exchange =@Exchange(name ="cyx.topic",type =ExchangeTypes.TOPIC),
            key ="#.news"))publicvoidlistenTopicQueue2(String msg){System.out.println("消费者接收到topic.queue2的消息:【"+ msg +"】");}}
发送端 发送
@RunWith(SpringRunner.class)@SpringBootTestpublicclassSpringAMTPTest{// 注入操作RabbitMQ的对象@ResourceprivateRabbitTemplate rabbitTemplate;@TestpublicvoidtestSendTopicExchange(){// 交换机名称String exchangeName ="cyx.topic";// 消息String message ="this is topic...";// 发送消息
        rabbitTemplate.convertAndSend(exchangeName,"wether.news",message);}}
版权归原作者 狗二蛋的幸福生活 所有, 如有侵权,请联系我们删除。