
photo-sphere-viewer中文文档
你越是认真生活,你的生活就会越美好!
业务这边想要实现右边链接的效果阿里云付费全景图,类似VR看房,支持
360° x 360°任意旋转
,支持
自定义添加标注
,支持
切换场景
等功能,效果如下
阿里云的全景图需要付费,而且
个别功能不满足我们业务需要
,那边无法及时调整,所以后面由我们内部自己实现
前端组长这边提供了 photo-sphere-viewer 相关的文章作为参考
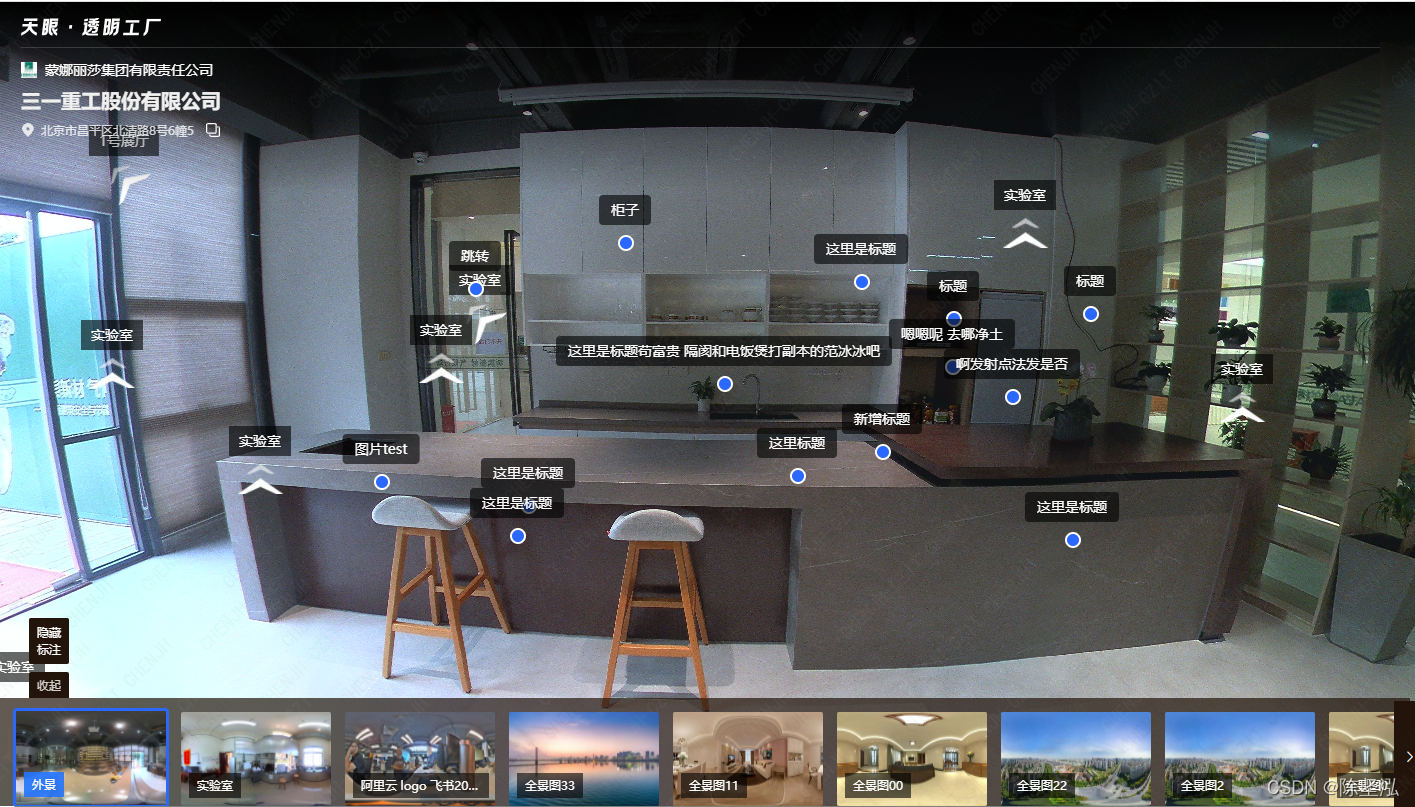
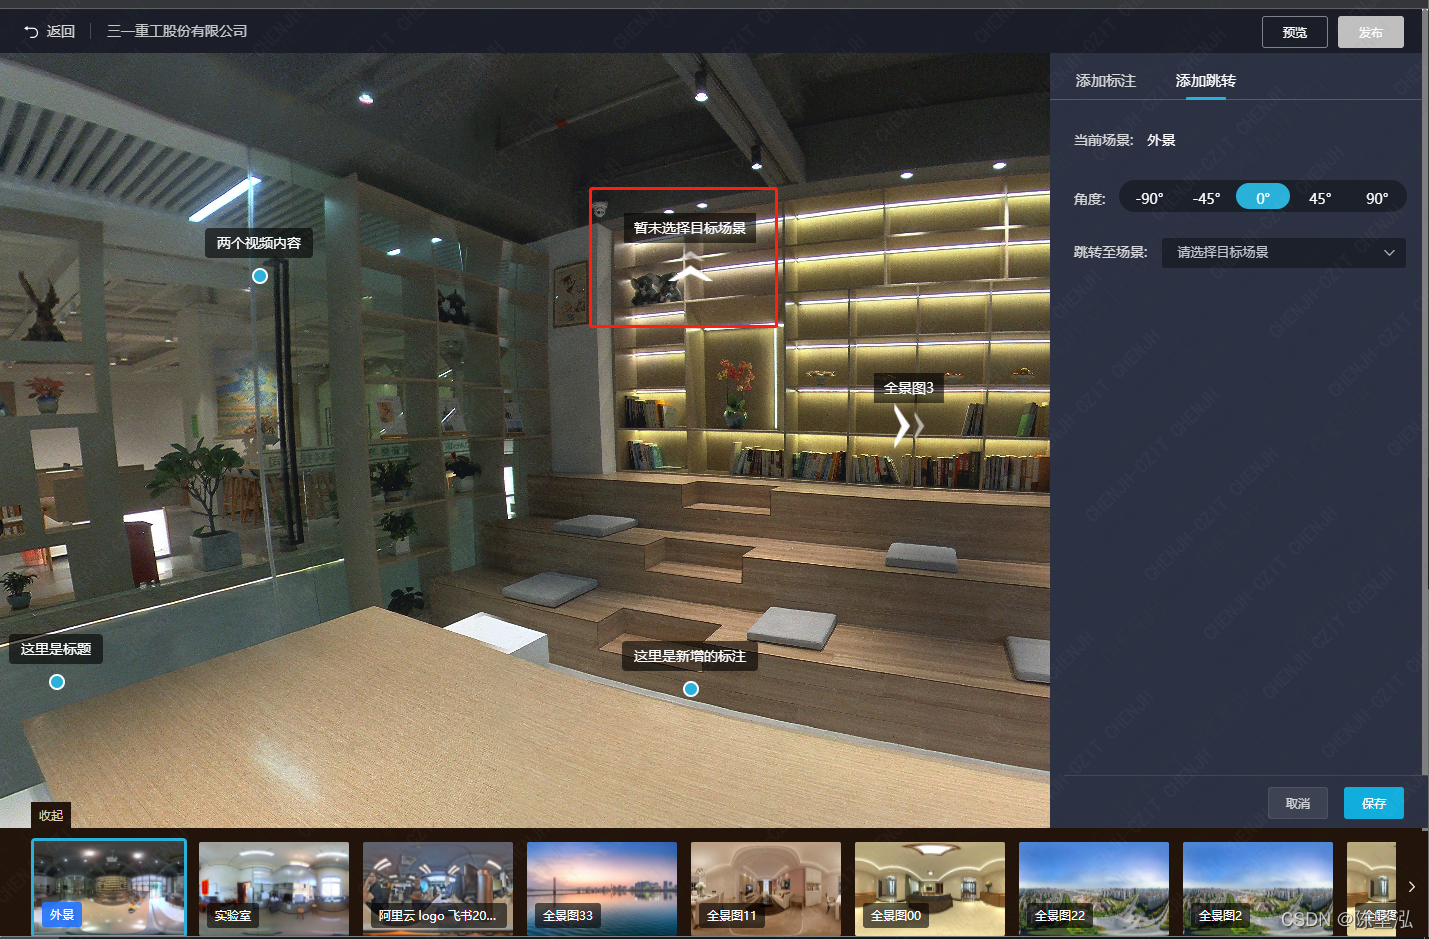
内部基于
photo-sphere-viewer
插件实现效果如下
全景图实现使用了
photo-sphere-viewer
插件,它基于three.js和uEvent 2实现
这边实现主要用了 photo-sphere-viewer和他的标记Markers插件
安装插件
使用 npm 或 yarn 下载安装
npm install photo-sphere-viewer --save

yarn add photo-sphere-viewer
文章使用的版本
"photo-sphere-viewer": "^4.3.0"
使用如下
import MarkersPlugin from'photo-sphere-viewer/dist/plugins/markers'import'photo-sphere-viewer/dist/plugins/markers.css';import{ MarkersPlugin }from'photo-sphere-viewer/dist/plugins/markers'import'photo-sphere-viewer/dist/plugins/markers.css'this.viewer =newViewer({container:document.querySelector('#viewer'),panorama:'https://aupup-mall-pub.oss-cn-shenzhen.aliyuncs.com/public/aa28925e-8ef9-4a2d-9217-e82a86b6ee15.jpg',size:{width:'100%',height:'100%',},plugins:[[MarkersPlugin,{markers:[{id:'circle',tooltip:'A circle of radius 30',circle:30,svgStyle:{fill:'rgba(255,255,0,0.3)',stroke:'yellow',strokeWidth:'2px',},longitude:-1.5,latitude:-0.28,anchor:'center right',}],}],],});
Configuration 配置项
一个陌生的对象,打断点后,去控制台查看,可以很方便看到对象的属性方法之类的信息
Standard options 常规配置
container (required)
- type: HTMLElement | string
全景图的容器,可以是DOM元素或者DOM的ID
container: document.querySelector('.viewer')

container: 'viewer' // will target [id="viewer"]
adapter 适配器
- default: equirectangular
用于加载全景图的适配器
panorama (required)
- type: *
全景图地址,如果用默认的适配器,只支持传单个
plugins 插件
- type: array
Introduction to plugins
这里只用到标注插件,后面单独介绍
caption 标题
- type: string
导航栏中显示的文本。如果导航栏被禁用,它无论如何都会显示,但没有按钮。允许使用 HTML
size 全景图宽度高度
- type: { width: integer, height: integer }
全景容器的最终尺寸。默认情况下使用容器的大小,并在窗口调整大小期间遵循
markers 标注
标注的配置
navbar 导航栏
导航栏的配置
minFov
- type: integer
- default: 30
最小视野(对应于最大缩放),介于 1 和 179 之间。
maxFov
- type: integer
- default: 90
最大视野(对应于最小缩放),介于 1 和 179 之间
defaultZoomLvl
- type: integer
- default: 50
初始缩放级别,介于 0(对于 maxFov)和 100(对于 minfov)之间。
fisheye
- type: boolean | double
- default: false
使用 true 启用鱼眼效果或指定效果强度 (true = 1.0)。
PS: 此模式可能会对标记渲染产生副作用
defaultLong
- type: double | string
- default: 0 初始经度,介于 0 和 2π 之间
defaultLat
- type: double | string
- default: 0 初始纬度,介于 -π/2 和 π/2 之间。
longitudeRange
插件VisibleRangePlugin
latitudeRange
插件VisibleRangePlugin
autorotateDelay
- type: integer
- default: null
自动旋转开始后的延迟,以毫秒为单位
autorotateSpeed
- type: string
- default: 2rpm
自动旋转速度
autorotateLat
- type: double | string
- default: defaultLat
执行自动旋转的纬度
lang
- type: object -default:
lang: {
    autorotate: 'Automatic rotation',
    zoom      : 'Zoom',
    zoomOut   : 'Zoom out',
    zoomIn    : 'Zoom in',
    move      : 'Move',
    download  : 'Download',
    fullscreen: 'Fullscreen',
    menu      : 'Menu',
    twoFingers: 'Use two fingers to navigate',
    ctrlZoom  : 'Use ctrl + scroll to zoom the image',
    loadError : 'The panorama can\'t be loaded',
}
查看器中使用的各种文本
loadingImg
- type: string
显示在加载圆圈中心的图像的路径,也就是loading图
loadingTxt
- type: string
- default: ‘Loading…’
加载圈中心显示的文本,仅在未提供loadingImg时使用
mousewheel
- type: boolean
- default: true
使用鼠标滚轮启用缩放,缩放过程会隐藏标注里的tooltip内容
mousemove
- type: boolean
- default: true
使用鼠标光标或手指在触摸屏上滑动启用全景旋转
mousewheelCtrlKey
- type: boolean
- default: false
需要使用 ctrl 键来缩放全景图。允许在不干扰查看器的情况下滚动页面。如果启用,当没有按下 ctrl 键时,会显示要求用户使用 ctrl + 滚动的覆盖图
captureCursor
- type: boolean
- default: false
只需将光标移动到视图上方而不是单击+移动即可旋转全景图
touchmoveTwoFingers
- type: boolean
- default: false
需要两个手指来旋转全景。这允许在包含查看器的页面中进行标准的触摸滚动导航。如果启用,当仅检测到一次触摸时,会显示要求用户使用两根手指的覆盖图
Advanced options 高级选项
业务开发过程,还没用到
sphereCorrection 球面校正
- type: { pan: double, tilt: double, roll: double }
- default: { pan:0, tilt:0, roll: 0 }
球体旋转角度,以弧度为单位。
PS: 如果 XMP 数据和/或 panoData 包含航向/俯仰/滚动数据,它们将在 sphereCorrection 之前应用
moveSpeed
- type: double
- default 1
全景移动的速度倍增器。用于单击移动、触摸移动和导航栏按钮。
zoomSpeed
- type: double
- default 1
用于全景变焦的速度倍增器。用于鼠标滚轮、触摸捏合和导航栏按钮。
useXmpData
- type: boolean
- default true
从 XMP 数据中读取真实图像大小,如果全景拍摄后已裁剪,则必须保持真实
panoData 全景数据
- type: object |
function<Image, object>
覆盖在全景文件中找到的 XMP 数据(或者在 useXmpData=false 时简单地定义它)。所有参数都是可选的。
panoData: {
  fullWidth: 6000,
  fullHeight: 3000,
  croppedWidth: 4000,
  croppedHeight: 2000,
  croppedX: 1000,
  croppedY: 500,
  poseHeading: 270, // 0 to 360
  posePitch: 0, // -90 to 90
  poseRoll: 0, // -180 to 180
}
它也可以是根据加载的图像动态计算裁剪配置的函数。
panoData: (image) => ({
  fullWidth    : image.width,
  fullHeight   : image.width / 2,
  croppedWidth : image.width,
  croppedHeight: image.height,
  croppedX     : 0,
  croppedY     : image.width / 2 - image.height,
})
PS: 如果 XMP 数据和/或 panoData 包含航向/俯仰/滚动数据,它们将在 sphereCorrection 之前应用
requestHeaders
- type: object | function<string, object>
加载图像文件时设置 HTTP 请求头。
requestHeaders: {
  header: value,
}
它也可以是在每次调用之前动态设置请求头的函数。这在向 Authorization 标头添加临时有效的 Bearer 时很有用。
requestHeaders: (url) => ({
   header: value,
})
canvasBackground
- type: string
- default: #000
画布的背景,在使用裁剪的全景图时可见
moveInertia
- type: boolean
- default: true
手动移动后启用平滑动画
clickEventOnMarker
插件MarkersPlugin,后面会介绍
withCredentials
- type: boolean
- default: false
对 HTTP 请求使用凭据。
keyboard 键盘
- type: boolean | object
- default:
keyboard: {
    'ArrowUp': 'rotateLatitudeUp',
    'ArrowDown': 'rotateLatitudeDown',
    'ArrowRight': 'rotateLongitudeRight',
    'ArrowLeft': 'rotateLongitudeLeft',
    'PageUp': 'zoomIn',
    'PageDown': 'zoomOut',
    '+': 'zoomIn',
    '-': 'zoomOut',
    ' ': 'toggleAutorotate'
}
启用和配置全屏键盘导航。它是一个定义键代码->动作的映射。设置为 false 以禁用。 (上面列出了所有可用的操作)
Viewer Methods方法
许多方法可用于从您的应用程序控制Viewer。 API 文档中提供了完整的方法列表
在调用任何方法之前等待Viewer就绪事件是一种很好的做法。
viewer.once('ready',()=>{
  viewer.rotate({x:1500,y:1000});});
常用方法
这里仅列出常用的方法,完整的方法列表可以看 API 文档。
初始化全景图
import{ Viewer }from'photo-sphere-viewer'import'photo-sphere-viewer/dist/photo-sphere-viewer.css'// 初始化全景图this.viewer =newViewer({container: document.querySelector('#viewer'),panorama:'https://aupup-mall-pub.oss-cn-shenzhen.aliyuncs.com/public/aa28925e-8ef9-4a2d-9217-e82a86b6ee15.jpg',// 全景图地址 size:{width:'100%',height:'100%'}})
animate(options): Animation
使用流畅的动画旋转和缩放视图。可以更改位置(经度、纬度或 x、y)和缩放级别(缩放)。
速度选项是以毫秒为单位的持续时间或包含以每分钟转数 (2rpm) 或每秒度数 (10dps) 为单位的速度的字符串。
它返回一个 PSV.Animation,它是一个带有附加取消方法的标准 Promise。
viewer.animate({longitude: Math.PI/2,latitude:'20deg',zoom:50,speed:'-2rpm',}).then(()=>/* animation complete */);
destroy()
从页面中删除Viewer并释放three.js 使用的内存。
Vue项目中,切换全景图时,需要先卸载当前的全景图
// 切换场景的话 先销毁原来的场景// 有时候this.viewer.destroy()执行会报错 如果报错 这里手动remove掉对应的元素if(this.viewer)try{this.viewer.destroy()}catch(e){
    console.log(e)const viewer = document.querySelector('#viewer')
    viewer.removeChild(viewer.childNodes[0])}
getPosition(): Position
返回视图的当前位置
getZoomLevel(): number
返回 0 到 100 之间的当前缩放级别
rotate(position)
立即旋转没有动画的视图。
// you can also use longitude and latitude
viewer.rotate({
  x: 1500,
  y: 600,
});
setOption(option, value)
更新查看器的选项。某些选项无法更改:全景、全景数据、容器、适配器和插件
viewer.setOption('fisheye', true);
setOptions(options)
一次更新多个选项。
viewer.setOptions({
  fisheye: true,
  autorotateSpeed: '-1rpm',
});
setPanorama(panorama, options): Promise
使用可选的过渡动画(默认启用)更改全景图像。如果需要,您还可以设置新的 sphereCorrection 和 panoData
viewer.setPanorama('image.jpg')
  .then(() => /* update complete */);
zoom(level) | zoomIn() | zoomOut()
在没有动画的情况下更改缩放级别。
Events 事件
Photo Sphere Viewer使用uEvent API,API 文档中提供了完整的事件列表
事件监听器以一个 Event 对象作为第一个参数,这个对象一般不使用。在此事件对象之后可以使用其他参数。
常用事件
本节描述了常用的事件,请记得查看 API 文档以获取完整列表
初始化全景图
import{ Viewer }from'photo-sphere-viewer'import'photo-sphere-viewer/dist/photo-sphere-viewer.css'// 初始化全景图this.viewer =newViewer({container: document.querySelector('#viewer'),
  panorama,// 全景图地址 size:{width:'100%',height:'100%'}})
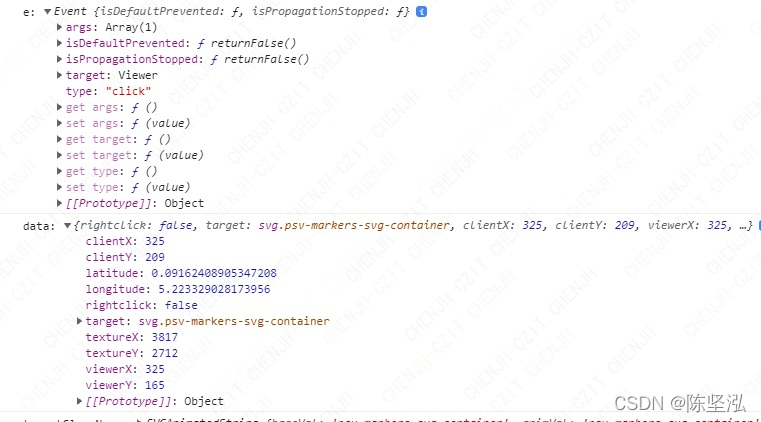
全景图点击事件 click(data) | dblclick(data)
当用户点击查看器(除了导航栏和侧面板之外的所有地方)时触发,它包含许多关于用户点击位置的信息,如果启用了 clickEventOnMarker 选项,则包括一个标记。
viewer.on('click',(e, data)=>{
  console.log(`${data.rightclick?'right ':''}clicked at longitude: ${data.longitude} latitude: ${data.latitude}`);});
点击事件总是在 dblclick 之前触发
Vue项目中使用
this.viewer.on('click',(e, data)=>{// 点击全景图事件
    console.log('e:', e)
    console.log('data:', data)}
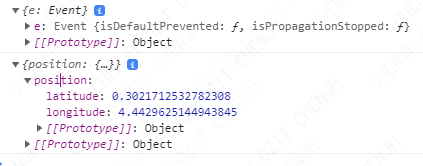
全景图位置变化时触发的回调 position-updated(position)
当视图经度和/或纬度改变时触发。
viewer.on('position-updated', (e, position) => {
  console.log(`new position is longitude: ${position.longitude} latitude: ${position.latitude}`);
});
Vue项目使用如下
this.viewer.on('position-updated',(e, position)=>{
        console.log({ e })
        console.log({ position })// 全景图位置变化时 也就是旋转时会把显示的标注tooltip内容隐藏 这里停止旋转时 让这部分标注tooltip重新展示// config.tooltip?.visible是手动添加的变量 用来判断标注的tooltip是否显示if(this.markersPlugin &&this.markersPlugin.markers &&this.currentMarkerId)setTimeout(()=>{
          Object.keys(this.markersPlugin.markers).forEach((id)=>{if(this.markersPlugin.markers[id].config.tooltip?.visible)this.markersPlugin.markers[id]['showTooltip']()})},300)})
全景图加载完成时的回调 ready
当全景图像已加载且Viewer已准备好执行第一次渲染时触发。
viewer.once('ready',()=>{
  console.log(`viewer is ready`);});
项目中在ready后会获取标注数据,生成标注
this.viewer.once('ready',()=>{// 去掉首屏loadingthis.fullLoading =false// 初始化标注this.initMarkers()// 自动水平旋转// this.viewer.startAutorotate()})
全景图缩放时的回调 zoom-updated(level)
viewer.on('zoom-updated',(e, level)=>{
  console.log(`new zoom level is ${level}`);});
MarkersPlugin 标注插件
在查看器上显示各种标记/热点。API文档
该插件文件位于photo-sphere-viewer依赖包的
dist/plugins/markers.js
和
dist/plugins/markers.css
。
用法
该插件提供了一个强大的标记系统,允许使用
可选的工具提示
和
描述
定义全景图上的兴趣点。标记可以
动态添加/删除
,您可以对用户点击/点击做出反应。
有四种类型的标记
- 使用 html 属性定义的 HTML
- 使用 image 属性定义的图像
- 使用 rect、circle、ellipse 或 path 属性定义的 SVG
可以在初始化全景图时使用标记选项或在加载后使用各种方法添加标记。
import{ Viewer }from'photo-sphere-viewer'import'photo-sphere-viewer/dist/photo-sphere-viewer.css'import{ MarkersPlugin }from'photo-sphere-viewer/dist/plugins/markers'import'photo-sphere-viewer/dist/plugins/markers.css'this.viewer =newViewer({container: document.querySelector('#viewer'),panorama:'https://aupup-mall-pub.oss-cn-shenzhen.aliyuncs.com/public/aa28925e-8ef9-4a2d-9217-e82a86b6ee15.jpg',// 全景图片mousewheel:false,fisheye:1,size:{width:'100%',height:'100%'},plugins:[[
      MarkersPlugin,{markers:[]}]],navbar:[]})this.markersPlugin =this.viewer.getPlugin(MarkersPlugin)const markerConfig ={"id":161,"status":1,"anchor":"center center","html":"<div class=\"marker-content-container published\"></div><div class=\"init-title\">图片test</div>","imageId":21,"latitude":"-0.2424036312917366","longitude":"5.328437925876281","tooltip":{"content":"\n              <div class=\"marker-tooltip-container\">\n                  <div class=\"marker-img-continaer\">\n                  \n          <div class=\"scroll-container marker-img-scroll-container \"><img src=https://aupup-mall-pub.oss-cn-shenzhen.aliyuncs.com/public/a5bd77be-f63d-4e8e-99f0-03b6fca26d03.png /><img src=https://aupup-mall-pub.oss-cn-shenzhen.aliyuncs.com/public/a00b18c3-6e0a-4166-b6fe-582490c83222.jpg /><img src=https://aupup-mall-pub.oss-cn-shenzhen.aliyuncs.com/public/0e39486e-9bea-4581-96c3-3f1a2f8ab4c3.png /></div>\n          <img class=\"btn toLeft imgToLeft\" src=data:image/png;base64,iVBORw0KGgoAAAANSUhEUgAAACQAAAA2CAYAAACvHjsIAAAAAXNSR0IArs4c6QAAA/FJREFUWEfNmWtIU1EcwM+5d05NzcxyS6dNp1l9iaQiQgiib9G3oCxJo5LCR6Zg2oOUoC/1KT8UPZ1bG6lp+ZjT1DCFBCtTZxAIaQ91803r7tlunM2FhXrv7sPd+/We8z8//q/zP/8/DNqwvRRQfvA3hMAOSGAjIZjDSDBN4qQJI7ERs3HQBCEkKUXQXADpAS0vDWKQgJD87ILifst43yhbONZAi1EhBDM4Jur4OdE/xBSMUyAvHAbgWACOv5o3Dnyhaam/y3gB+isdA8OBQXjT/NfBWbpg/AIBACCEFjGGV9HVFu9AHs1AFxYAdcS44R2VplYJyIOBAay3KOdIc2lpqWs5sFUF8kIRU4YmwQC5oQKwxuXMt+oa8vpUII6rlnJ0PwEtRF8wdv//lOA3oAUvH7aaPqn/yfZs7zKqMKb6H4iLlItN518NuVMBHPs1aXjgvfv8DoQ0KMJFNWbjgMGdQtmaLF4eG1x2OW9374eBsfJ7qmEqEy31H1UJhGmoHGmJFVCiQr6mrV6ZIYnaEOV0Op1JOw/empiYtDOBAiJxhXXi4whjIKSZjkZVhlSyUYIApmdmZ2TJqeWMYJAv4aCPMH56yQho8+aYoI4GVUb0JokUAZjNhPlYZl5Fe+fbaaZAqPIkjIZbPgPJYqSBr3Wak7JoSTQ6nCAsv9JO5Ve0dnRPMYXx7sMx7K5PQFLpRnFns+ZknCw6BgmxWKxE+pkCpa6108QWxh1hOGimDRQVFSnu1GvT5bExsQswlszzl5T1TW1GLmA8lQB8Twsocn1EwJsWbXqCPDYObbRabdbT2cWVtfWt41zBuOVASB1lERHrRF0t2hOK+Dg52mOz2W1ZuVcqq+p0Y5zCIB4A51bUUHj4WlGXXns8KVEejw632x228/nX1Jrqhu9cw3gUBC0rArU3qA7v25uSghY7HA57TmGZulJb940PGI9M+HtFoMkvvYWhoWtCAQCkSlvbmpV3rYc/GBpA+ronh/an7tmFljqdTsfFkpuahxXPRviCojRZSEgI3qXXHt22VZG0YDZHftGNp4/Vz0f5gKJ0anRoWFgY3t2iSduSlKDwOLbdnlNQplY9e8G9L9EJewSxVLSdu3BVpa1p/MGlpmgnRnToUvnobHZJZfVLPWf5yKerA0HxnbF9vlwRFF93GuPyA0HxceuzKtAQ1P910ezc/KwsOfWOy7VsH2Fl/2dbwiLpiytHlDgVOw7cNpmmfa6pOSvyvZq6Xpyb0vOuf/yRsopRFuf0GcQ2DwnuoSispzQGhNNscDdDhdOOgS5BNawE1dJDnVjBND0F1BYWUONcWKMFoQxfBDOeEsQAz08jztUbAv8BlkEdD1ECHpoAAAAASUVORK5CYII=>\n              <img class=\"btn toRight imgToRight\" src=data:image/png;base64,iVBORw0KGgoAAAANSUhEUgAAACQAAAA2CAYAAACvHjsIAAAAAXNSR0IArs4c6QAABENJREFUWEdjZKAi+P//PyOPuK7YP8Z/Cox/GcX+MTIIM/5nEGBgZGD//5+BjYHhPzMh6xgJKSAkD3IEp6ShPNP/X/r//zOq///3n4uQHnzyZDsI5BBeCX3tv//+OP3/zyBEiSOQ9ZLlIH5xPcXff/+6/mP4L0Uth8DMIclB/HK6gj9//PVm+MegQm2HkOwgUKj8+vc37P///5y0cgzIXKJCiEtSx+Tf7/9eDAz/mWjpGIIOamhoYOqassbzH8M/U1o7hKgo4xLR8aanY/CGECSa/vnQK2TwhhAoAf/8+zeWHmkG3cMYiRqUtX99/5dG69yEK+QxHMQhphVDy3KGUBJAcRAkqv7EE9JES3m4g0B1E7eoTiotqgNSPAB3EI+4ns6fv39CSNFMC7VgB4FCh0tMO5fcWjs3I1bF1EhPqr5t0un7Dx5/p8ShYAdxSBgoMPz5lUCOQRISomy3z+8pZWFhYXn56s0rF7/4hXfuPvhGjlnwgpFLXMv/318GQ3IMYWJiYnh0/VCusJAguE304uXrl04+sQvJDSlGcHSJ65RS0tJztrcUXrFgUgIPDxcPyFHPnr984eQbu/Dhw6c/SPUkI7eYjvjff/8ySdWIrt7NyUZk+fwJCVxcnNwguSfPXj5z9Ipa9OTpi5+kmM3IKa5l/v8vgycpmnCp9XKzF1sypy+ek5MD3K5+9OTZU3vPqEUvXrz+Raz5jFwi2r7/GP4bE6uBkDo/bxfxBdM7QY4CN+QePH762N4jcsmrV2+JchQjh6h2AsP//wqELCJFPsjPTXLu1I44Dg52DpC+ew8eP7Jzj1zy9t3734TMYeQU0S74z/BfgJBCUuXDAr2kZk1ujWNnZ2MH6b17/9EDW/fIpe/ff/iDzyxGTlHtclrV7FGhvjLTJzTHsLGxgh11+86D+7Yekcs+fvyE01GMHCLatcT0KEkNIZj6uMhA2Sm99TGsrKxsILEjJ86ec/WN24zLPJo7CGTxrEnNFrGRQW6gTsXnL9++iCma9uJ0EC2jDGRpSkK4Qn97VRQLCwsriH/wyKkzHoGJW3E7iEaJGmRhUkyw/ISu2mhWVlawY67fuHvb1iNy5devX//ijjIaZHuQZbHhAbJT+upj2NjYwGnn1u17d23co5Z//vwZp2NA6qheMIIMjQzxkZ4xsSWWlNwFCzGqVh0gQ0P9PaRmT20nufyBO4halSvIQEpKaLiDqNH8ABlGaR0GdxCIQUkDDaSfGrU8ioMoacKCWoxPbh7JFxTgB9eH5LaDUBxESSNfTEyY7e7FfSWggo+SliKKg0AcSrpByfFhChYm+pKNHZPPkdpCRC8gB29HEeTSQdWVhgXdoBpsAIfSYBuOQUTdIBmwgkXdoBrSgztqMA16gmvu0FDmrfuve9BzJHZoDZwjl6KDamoB5rBBNfmCHlqDYnoK2VGDagIP3WGDYooTW7+KGpPAAKzgBhlezHC8AAAAAElFTkSuQmCC>\n                </div>\n                <p class=\"marker-title\">\n                  图片test\n                </p>\n                <p class=\"marker-description\" style=display:none;>\n                  \n                </p>\n              </div>\n            ","position":"center top"},"type":"marker","title":"图片test","description":null,"attachment":{"type":"img","imgArr":["https://aupup-mall-pub.oss-cn-shenzhen.aliyuncs.com/public/a5bd77be-f63d-4e8e-99f0-03b6fca26d03.png","https://aupup-mall-pub.oss-cn-shenzhen.aliyuncs.com/public/a00b18c3-6e0a-4166-b6fe-582490c83222.jpg","https://aupup-mall-pub.oss-cn-shenzhen.aliyuncs.com/public/0e39486e-9bea-4581-96c3-3f1a2f8ab4c3.png"],"videoArr":[],"linkText":"","link":""},"angle":null,"targetSceneId":-1,"isFirstInitMarker":true}this.markersPlugin.addMarker(markerConfig)
打印
this.markersPlugin
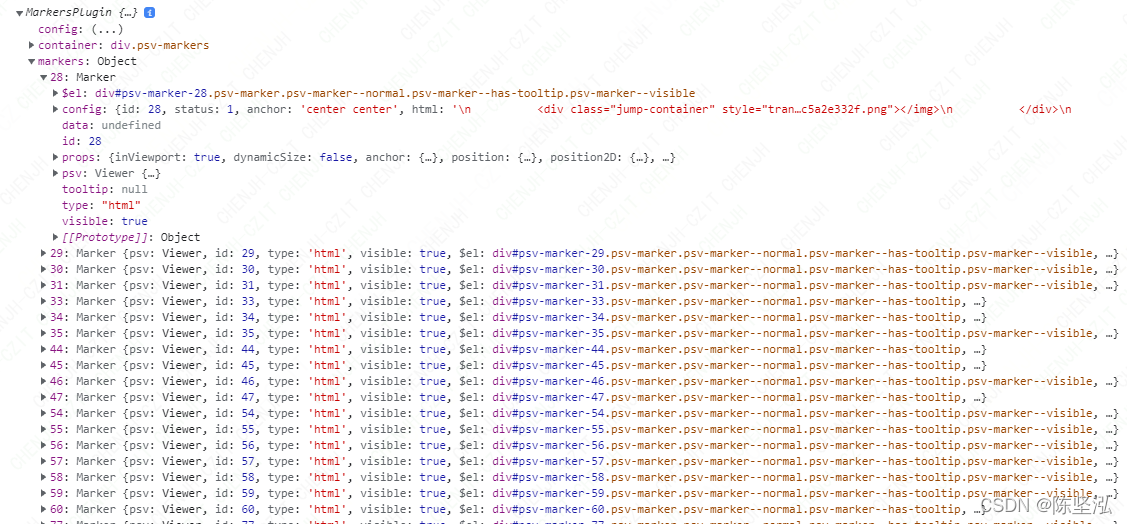
markers对象里的每一个属性都是一个标注,key值是标注的id
标注的配置重点关注
html
和
tooltip
属性,这里都用了
html字符串
,这样方便自定义,样式和交互,
除了下面表格的属性,其他的是自定义的,用来存编辑的数据,然后生成html和tooltip字段的内容
标注定义
一个标注至少得有下面一个配置
NameTypeDescription
image
string
表示标记的图像的路径。需要定义宽度和高度。
html
string
标记的 HTML 内容。建议定义宽度和高度。
square
integer
正方形的大小
rect
integer[2] |
{width:int,height:int}
长方形的大小
circle
integer
圆的半径
ellipse
integer[2] |
{cx:int,cy:int}
椭圆的半径。
path
string
路径的定义(0,0 将放置在定义的 x/y 或经度/纬度处)。
polygonPx
integer[2][]
在全景图像上的像素坐标中定义多边形的点数组。
polygonRad
double[2][]
同上,但坐标是经度和纬度。
polylinePx
integer[2][]
与polygonPx 相同,但生成多段线。
polylineRad
double[2][]
与polygonRad 相同,但生成多段线。
Examples :
{
  image: 'pin-red.png',
  html: 'Click here',
  square: 10,
  rect: [10, 5],
  rect: {width: 10, height: 5},
  circle: 10,
  ellipse: [10, 5],
  ellipse: {cx: 10, cy: 5},
  path: 'M 0 0 L 60 60 L 60 0 L 0 60 L 0 0',
  polygonPx: [[100, 200], [150, 300], [300, 200]],
  polygonRad: [[0.2, 0.4], [0.9, 1.1], [1.5, 0.7]],
  polylinePx: [[100, 200], [150, 300]],
  polylineRad: [[0.2, 0.4], [0.9, 1.1]],
}
PS:纹理坐标不适用于立方体贴图。
标注配置项
id (required)
- type: string
标记的唯一标识符。
x & y or latitude & longitude (required)
- type: integer or double
标记在纹理坐标(像素)或球坐标(弧度)中的位置。 (多边形和折线忽略此选项)
width & height (required for images, recommended for html)
- type: integer
标记的大小。 (多边形和折线忽略此选项)
scale
- type: double[] | { zoom: double[], longitude: [] }
- default: no scalling
根据缩放级别和/或经度偏移配置标记的比例。这旨在在用户缩放和移动时为标记的大小提供自然的感觉。 (多边形和折线忽略此选项)
根据缩放级别缩放,数组包含
[以最小缩放比例缩放,以最大缩放比例缩放]
scale: {
  // 标记在最小缩放级别上小两倍
  zoom: [0.5, 1]
}

// same thing
scale: [0.5, 1]
根据位置缩放,数组包含
[中心缩放,侧面缩放]
:
scale: {
  // 标记在屏幕一侧时大两倍
  longitude: [1, 2]
}
两种配置可以组合使用
scale: {
  zoom: [0.5, 1],
  longitude: [1, 1.5]
}
className
- type: string
添加到标记元素的类名。
style
- type: object
要在标记上设置的 CSS 属性(背景、边框等)。
style: {
  backgroundColor: 'rgba(0, 0, 0, 0.5)',
  cursor         : 'help'
}
svgStyle
- type: object
要在标记上设置的 SVG 属性(填充、描边等)。仅适用于 SVG 和多边形/折线标记。
svgStyle: {
  fill       : 'rgba(0, 0, 0, 0.5)',
  stroke     : '#ff0000',
  strokeWidth: '2px'
}
图像和图案背景
可以使用模式定义来定义复杂的 SVG 背景,例如图像。
首先在页面中的某处声明模式:
<svg id="patterns">
  <defs>
    <!-- define pattern origin on its center -->
    <pattern id="image" x="256" y="256" width="512" height="512" patternUnits="userSpaceOnUse">
      <image href="my-image.jpg" x="0" y="0" width="512" height="512"/>
    </pattern>
  </defs>
</svg>
并在标记中使用它:
fill: 'url(#image)'
。
anchor
- type: string
- default: ‘center center’
定义标记朝向其定义位置的放置位置。任何 CSS 位置都是有效的,例如
bottom center
或
20% 80%
。 (多边形和折线忽略此选项)
visible
- type: boolean
- default: true
标记的初始可见性。
tooltip
- type: string | {content: string, position: string}
- default: {content: null, position: ‘top center’}
tooltip内容和位置。接受的位置是顶部(top)、中间(center)、底部(bottom)和左侧(left)、中间(center)、右侧(right)的组合,中间居中(center center)除外。
tooltip: 'This is a marker' // tooltip with default position

tooltip: { // tooltip with custom position
  content : 'This is marker',
  position: 'bottom left'
}
content
- type: string
单击标记时将显示在侧面板上的 HTML 内容
hideList
- type: boolean
- default: false
在标记列表中隐藏标记。
data
- type: any
要附加到标记的任何自定义数据。
Configuration
lang
- type: object
- default:
lang: {
  markers    : 'Markers',
  markersList: 'Markers list',
}
PS: 此选项不是插件的一部分,而是与主 lang 对象合并。
hideButton
- type: boolean
- default: true
添加导航栏按钮以隐藏/显示标记。
listButton
- type: boolean
- default: true
添加导航栏按钮以显示标记列表。
clickEventOnMarker
- type: boolean
- default: false
点击标注时,除了触发select-marker 事件之外,是否要触发click事件
标注常用方法
添加标注 addMarker(properties)
向全景图添加新标记。
markersPlugin.addMarker({id:'new-marker',longitude:'45deg',latitude:'0deg',image:'assets/pin-red.png',});
编辑状态下,点击全景图会先添加一个默认的标注,然后编辑完成后,再去更新标注
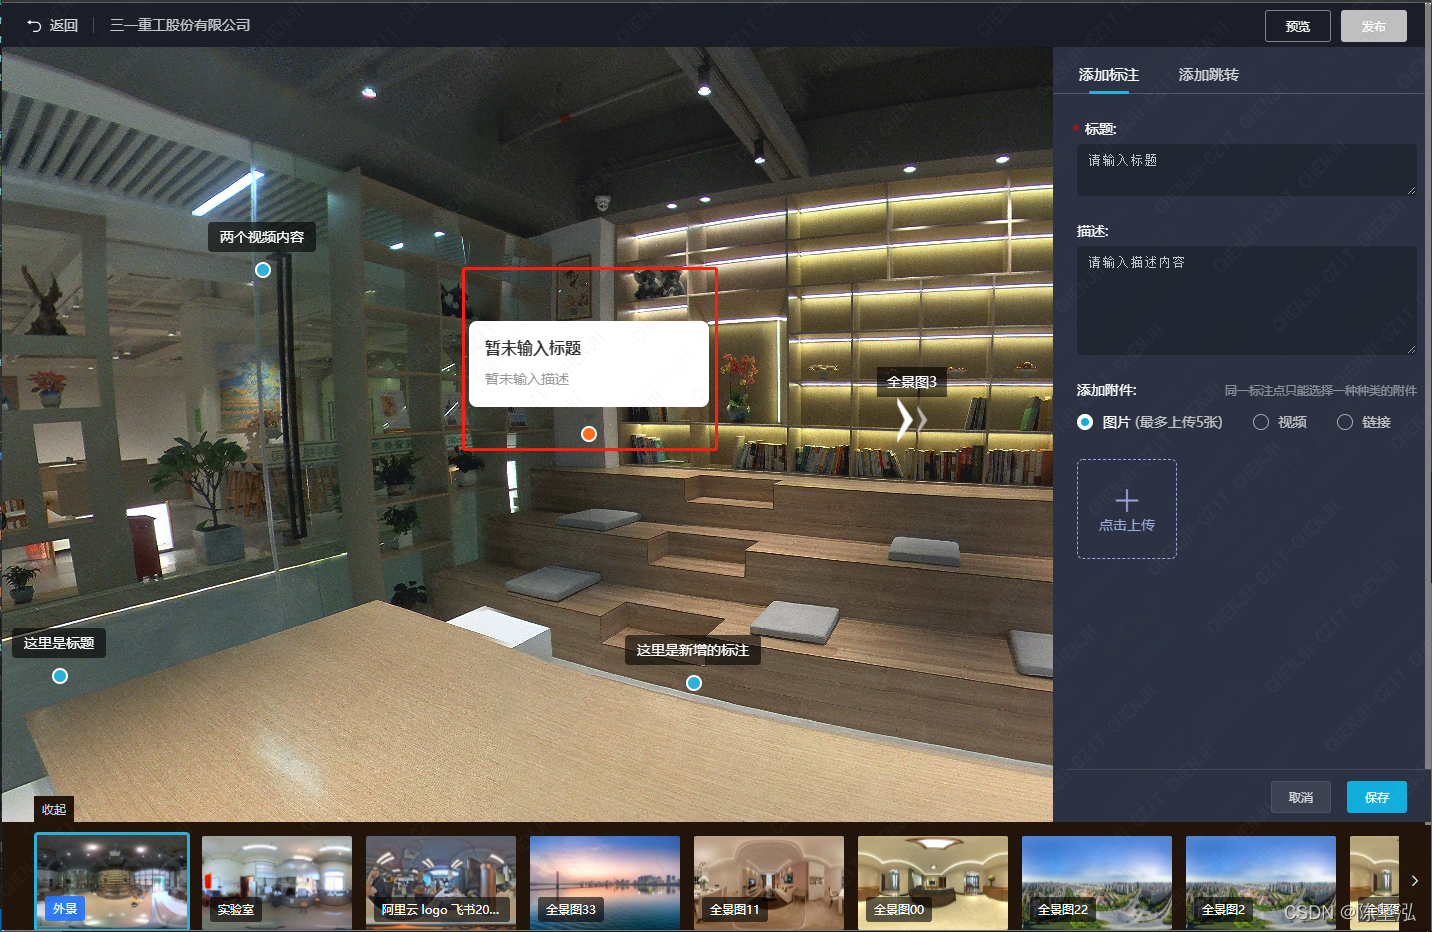
添加初始化标注代码参考如下
addMarker(e, data){// 添加初始标注 具体标注编辑后会更新// currentTabIndex 1: 添加标注 2:添加跳转if(this.currentTabIndex ===1){// console.log('添加标注')const id =`marker${+newDate()}`const config ={
          id,html:`
            <div class="marker-content-container">
            </div>
          `,longitude: data.longitude,latitude: data.latitude,anchor:'center center',tooltip:{// tooltip with custom positioncontent:`
              <div class="marker-tooltip-container">
                <p class="marker-title">
                  暂未输入标题
                </p>
                <p class="marker-description">
                  暂未输入描述
                </p>
              </div>
            `,position:'center top'},visible:true,// 标注初始显示与否type:'marker',status:1,isInitialize:true,attachment:{type:'img',imgArr:[],videoArr:[]}// note: {//   type: 'marker', // 添加标注 or 添加跳转//   status: 1, // 0 未发布 1发布//   // target: '', // 要跳转的全景图//   // angle: '', // 角度//   // sceneName: '', // 要跳转的场景名称//   isInitialize: false // 是否是初始化的值 true表示是初始化 未完成编辑的标注 如果点了取消 需要删除  如果编辑完点了保存 值变为false// }}this.markersPlugin.addMarker(config)// 显示 tooltipthis.markersPlugin.markers[id].showTooltip()// 隐藏 tooltip//   this.markersPlugin.markers[id].hideTooltip()this.currentMarkerId = id
      }elseif(this.currentTabIndex ===2){
        console.log('添加跳转')// console.log('添加跳转')const id =`jump${+newDate()}`const config ={
          id,html:`
          <div class="jump-container">
            <p class="jump-text">
              暂未选择目标场景
            </p>
            <img class="jump-arrow" src="https://aupup-mall-pub.oss-cn-shenzhen.aliyuncs.com/public/b254e741-96d5-40d9-aabd-853c5a2e332f.png"></img>
          </div>
          `,longitude: data.longitude,latitude: data.latitude,anchor:'center center',type:'jump',target:'',angle:'',sceneName:'',isInitialize:true,attachment:{type:'img',imgArr:[],videoArr:[]}// note: {//   type: 'jump', // 添加标注 or 添加跳转//   target: '', // 要跳转的全景图//   angle: '', // 角度//   sceneName: '', // 要跳转的场景名称//   isInitialize: false // 是否是初始化的值 true表示是初始化 未完成编辑的标注 如果点了取消 需要删除  如果编辑完点了保存 值变为false// }}this.markersPlugin.addMarker(config)this.currentMarkerId = id
      }},
编辑完成后保存时更新标注的代码参考如下
asyncupdateMarker(){// 将自定义编辑的内容 更新到对应标注上// currentTabIndex 1: 添加标注 2:添加跳转let config ={}const markerData =this.markersEditConfig.marker

      if(this.currentTabIndex ===1){
        console.log('添加标注')if(!markerData.title){this.$message.error('请填写标题')returnfalse}const{ title, description }= markerData
        let descriptionStyle =''if(!description) descriptionStyle ='display:none;'let attachment ='',
          content =''switch(markerData.attachment.type){case'img':{const{ length }= markerData.attachment.imgArr
          if(length >0){
            markerData.attachment.imgArr.forEach((src)=>{
              attachment +=`<img src=${src} />`})
            attachment =`
          <div class="scroll-container marker-img-scroll-container ">${attachment}</div>
          `// 左右箭头if(length >1) attachment +=`<img class="btn toLeft imgToLeft" src=${toLeft}>
              <img class="btn toRight imgToRight" src=${toRight}>`
            attachment =`<div class="marker-img-continaer">
                  ${attachment}
                </div>`}

          content =`
              <div class="marker-tooltip-container">
                  ${attachment}
                <p class="marker-title">
                  ${title}
                </p>
                <p class="marker-description" style=${descriptionStyle}>
                  ${description}
                </p>
              </div>
            `break}case'video':{const{ length }= markerData.attachment.videoArr
          if(length >0){
            markerData.attachment.videoArr.forEach((src)=>{
              attachment +=`
              <div>
                <video src=${src}></video>
                <img class="play-btn" data-src="${src}" src="https://aupup-mall-pub.oss-cn-shenzhen.aliyuncs.com/public/f1a83148-a573-4e46-a1c0-4c6db6752d81.png" />
              </div>
            `})
            attachment =`
            <div class="scroll-container marker-video-scroll-container">
                    ${attachment}
            </div>`//  左右箭头if(length >1) attachment +=`<img class="btn toLeft videoToLeft" src=${toLeft}>
              <img class="btn toRight videoToRight" src=${toRight}>
            `
            attachment =`<div class="marker-video-continaer">
                ${attachment}
                </div>  `}

          content =`
              <div class="marker-tooltip-container">
                ${attachment}
                <p class="marker-title">
                  ${title}
                </p>
                <p class="marker-description" style=${descriptionStyle}>
                  ${description}
                </p>
              </div>
            `break}case'link':// link跳转地址如果不带协议 需要补充上if(!markerData.attachment.link.includes('http')) markerData.attachment.link =`https://${markerData.attachment.link}`
          attachment =`<a href="${markerData.attachment.link}" target="_blank">${markerData.attachment.linkText} ><span class="arrow">></span></span></a>`
          content =`
              <div class="marker-tooltip-container">
                <p class="marker-title">
                  ${title}
                </p>
                <p class="marker-description" style=${descriptionStyle}>
                  ${description}
                </p>
                <div class="marker-link-container">
                  ${attachment}
                </div>
              </div>
            `breakdefault:
          console.log('default')}// console.log('content:', content)
        config ={id:this.currentMarkerId,html:`
            <div class="marker-content-container ${
  markerData.status ?'published':''}">
            </div>
          `,// longitude: data.longitude,// latitude: data.latitude,anchor:'center center',tooltip:{// tooltip with custom position
            content,position:'center top'},visible:true,// 标注初始显示与否isInitialize:false// note: {//   type: 'marker', // 添加标注 or 添加跳转//   status: 0, // 0 未发布 1发布//   isInitialize: true // 是否是初始化的值 true表示是初始化 未完成编辑的标注 如果点了取消 需要删除  如果编辑完点了保存 值变为false// }}this.markersPlugin.updateMarker(config)// 显示tooltipthis.markersPlugin.markers[this.currentMarkerId].showTooltip()}elseif(this.currentTabIndex ===2){
        console.log('添加跳转')const{ targetSceneId, angle }=this.markersEditConfig.jump
        if(!targetSceneId){this.$message.error('请选择跳转的场景')returnfalse}const jumpConfig =this.sceneArr.find((item)=> item.id === targetSceneId
        )
        console.log('jumpConfig:', jumpConfig)
        config ={id:this.currentMarkerId,html:`
          <div class="jump-container">
            <p class="jump-text">
              ${jumpConfig.sceneName}
            </p>
            <img class="jump-arrow" style="transform:rotate(${angle.replace('°','')}deg);" src="https://aupup-mall-pub.oss-cn-shenzhen.aliyuncs.com/public/b254e741-96d5-40d9-aabd-853c5a2e332f.png"></img>
          </div>
          `,isInitialize:false// note: {//   type: 'jump', // 添加标注 or 添加跳转//   target: jumpConfig.img, // 要跳转的全景图//   angle, // 角度//   sceneName: jumpConfig.sceneName, // 要跳转的场景名称//   isInitialize: true, // 是否是初始化的值 true表示是初始化 未完成编辑的标注 如果点了取消 需要删除  如果编辑完点了保存 值变为false//   sceneId: targetSceneId // 跳转场景id// }}this.markersPlugin.updateMarker(config)}
      config ={...this.markersPlugin.markers[this.currentMarkerId].config,...config
      }
      config.imageId =this.sceneArr[this.currentSceneIndex].id
      // 新增标注// 调整参数
      config.type =this.currentTabIndex ===1?'marker':'jump'if(config.type ==='marker'){
        config.title = markerData.title
        config.description = markerData.description
        config.attachment = markerData.attachment
      }elseif(config.type ==='jump'){
        config.angle =this.markersEditConfig.jump.angle
        config.targetSceneId =this.markersEditConfig.jump.targetSceneId
      }
      console.log('调整后的config:', config)// id为number类型 更新 否则 新增let res
      if(typeof config.id ==='number') res =awaitthis.$api.updateMarker(config)else res =awaitthis.$api.addMarker(config)if(res.success){// console.log('config.id:', config.id)this.markersPlugin.removeMarker(config.id)this.isEditMarker =falsethis.$nextTick(()=>{this.initMarkers()})}},
清除所有标注 clearMarkers()
删除所有标记。
获取当前标注 getCurrentMarker(): Marker
返回用户点击的最后一个标记
前往指定标注 gotoMarker(id, speed): Animation
使用可选动画将视图移动到特定标记的中心。
markersPlugin.gotoMarker('marker-1', 1500)
  .then(() => /* animation complete */);
隐藏/显示 标注 hideMarker(id) | showMarker(id) | toggleMarker(id)
更改标记的可见性
removeMarker(id) | removeMarkers(ids)
删除标记
替换标注 setMarkers(properties[])
用新标记替换所有标记
更新标注 updateMarker(properties)
使用新属性更新标记。标记类型不能更改
markersPlugin.updateMarker({
  id: 'existing-marker',
  image: 'assets/pin-blue.png'
});
标记事件
over-marker(marker) | leave-marker(marker)
当用户将光标悬停或远离标记时触发。
markersPlugin.on('over-marker',(e, marker)=>{
  console.log(`Cursor is over marker ${marker.id}`);});
select-marker(marker, data)
当用户点击标记时触发。data对象指示是否通过双击右键单击来选择标记。
插件原本通过鼠标移入移出来控制tooltio的展示隐藏
业务需要 需要改为 通过点击来控制显示隐藏
this.markersPlugin.__onMouseEnter=function(){// console.log('覆盖原生的方法 改变触发显示toolTip方式为click')}this.markersPlugin.__onMouseLeave=function(){// console.log('覆盖原生的方法 改变触发显示toolTip方式为click')}// 选中标注事件this.markersPlugin.on('select-marker',this.selectMarker)selectMarker(e, marker){// 选中标注 点击标注// console.log('选中标注 点击标注 select-marker e:', e)// console.log('marker:', marker)// 如果上次点击的未编辑保存 需要去掉this.cancelEdit()this.currentMarkerId = marker.id
      this.isEditMarker =true// currentTabIndex 1: 添加标注 2:添加跳转const{ config }= e.args[0]
      console.log('标注 config:', config)if(config.type ==='jump'){// console.log('选中的是添加跳转的标注')// 将对应标注数据更新this.currentTabIndex =2this.markersEditConfig.jump ={angle: config.angle,targetSceneId: config.targetSceneId // 目标场景id}// console.log('切换场景')// console.log('切换场景')// 编辑状态下 点击编辑  预览或者查看 点击才跳转// this.setViewer(e.args[0].config.config.target)}elseif(config.type ==='marker'){
        console.log('展示或者隐藏标注')// 将对应标注数据更新this.currentTabIndex =1this.markersEditConfig.marker.attachment = config.attachment ||{}this.markersEditConfig.marker.title = config.title
        this.markersEditConfig.marker.description = config.description

        const visible =!!marker.config.tooltip.visible
        // 隐藏/展示tooltip内容const methods = visible ?'hideTooltip':'showTooltip'// console.log('tooltipVisible:', visible)// console.log(//   'this.markersPlugin.markers[this.currentMarkerId]:',//   this.markersPlugin.markers[this.currentMarkerId]// )// 展示tooltip内容时 隐藏title 隐藏tooltip内容时 展示titlethis.markersPlugin.markers[this.currentMarkerId
        ].config.tooltip.visible =!visible
        this.markersPlugin.markers[this.currentMarkerId][methods]()}// console.log(//   'currentTabIndex 1: 添加标注 2:添加跳转  currentTabIndex:',//   this.currentTabIndex// )},this.viewer.on('click',(e, data)=>{// 点击全景图事件const{ target }= data
        // console.log('点击全景图')// console.log('e:', e)// console.log('data:', data)// console.log('target:', target)// console.log('target.parentNode:', target.parentNode)// console.log(target.parentNode.className)const targetClassName = target.className
        console.log('targetClassName:', targetClassName)if(typeof targetClassName ==='string'){// 附件为图片if(targetClassName.includes('imgToLeft')){const scrollDom =this.$el.querySelector('.marker-img-scroll-container')
            scrollDom.scrollLeft -=294returnfalse}if(targetClassName.includes('imgToRight')){const scrollDom =this.$el.querySelector('.marker-img-scroll-container')
            scrollDom.scrollLeft +=294returnfalse}// 附件为视频if(targetClassName.includes('videoToLeft')){const scrollDom =this.$el.querySelector('.marker-video-scroll-container')
            scrollDom.scrollLeft -=294returnfalse}if(targetClassName.includes('videoToRight')){const scrollDom =this.$el.querySelector('.marker-video-scroll-container')
            scrollDom.scrollLeft +=294returnfalse}if(targetClassName ==='play-btn'){
            console.log('新建一个窗口 播放视频')
            console.log('target.dataset:', target.dataset)
            window.open(target.dataset.src)returnfalse}}if(
          target.parentNode.className ==='psv-tooltip-content'|| target.parentNode.parentNode.className ==='psv-tooltip-content'|| target.parentNode.parentNode.parentNode.className
            ==='psv-tooltip-content'|| target.parentNode.parentNode.parentNode.parentNode.className
            ==='psv-tooltip-content'){// 这样标注的tooltip区域才能正常点击
          console.log('点击区域是marker-tooltip-container')returnfalse}// 如果上次点击的未编辑保存 需要去掉this.cancelEdit()this.isEditMarker =true// 重新赋值为默认值this.markersEditConfig ={marker:{status:0,// 0 未发布 1已发布title:'',// 标题description:'',// 描述attachment:{type:'img',// 附件的类型 img video linkimgArr:[],videoArr:[],// 视频linkText:'',// 文字链接的文字link:''// 链接地址}},jump:{angle:'0°',targetSceneId:''// 目标场景id}}// 添加初始标注this.addMarker(e, data)})
unselect-marker(marker)
当一个标记被选中并且用户点击其他地方时触发。
推荐阅读
Vue源码学习目录
Vue源码学习完整目录
连点成线 - 前端成长之路
连点成线 - 前端成长之路
谢谢你阅读到了最后~
期待你关注、收藏、评论、点赞~
让我们一起 变得更强
版权归原作者 陈坚泓 所有, 如有侵权,请联系我们删除。