
文章目录
多线程(初阶)
1. 线程
1.1 为什么会有线程
上一节进程的课程我们学习了,引入进程就是为了"并发编程",虽然进程能解决并发的问题,但是我们认为还不是不够理想.
因为创建进程/销毁进程/调度进程,开销有点大,
- 创建进程需要分配资源,
- 销毁进程需要释放资源.
频繁的创建和销毁进程就会开销较大.
于是程序猿就发明了一个 “线程”(Thread) 概念.线程在有些系统上也叫做"轻量级进程"
1.2 线程的概念
一个线程就是一个 “执行流”. 每个线程之间都可以按照顺讯执行自己的代码. 多个线程之间 “同时” 执行着多份代码
- 创建线程比创建进程更高效.
- 销毁线程比销毁进程更高效.
- 调度线程比调度进程更高效.
1.3 线程和进程的区别
- 进程和线程是包含关系.每个进程至少有一个线程存在,即主线程
- 进程和进程之间不共享内存空间. 同一个 进程的线程之间共享同一个内存空间.每个进程拥有独立的内存空间(虚拟地址空间),同一进程多个线程共用这个内存空间(虚拟地址空间)
- 进程是系统分配资源的最小单位,线程是系统调度的最小单位
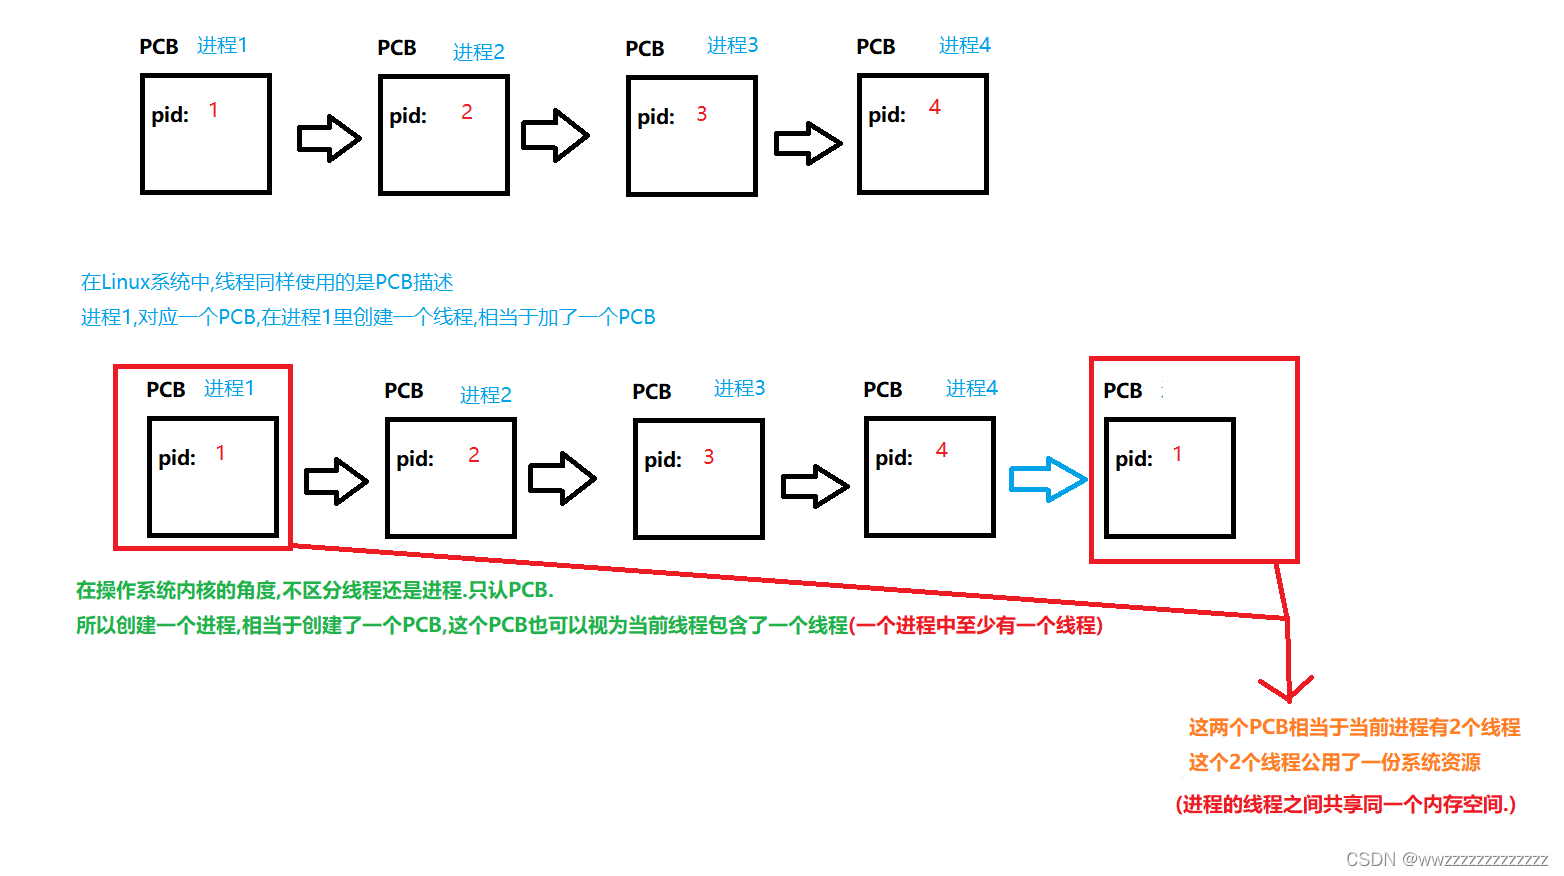
1.4 图解线程和进程的区别

1.5 Java 的线程 和 操作系统线程
在Java中使用
Thread 类
这个类的对象来表示操作系统中的线程
- 在操作系统中 ,
PCB是用来描述线程的.- 在Java代码中 ,
Thread类是用来描述线程的
2. Java中创建线程(Thread)
2.1 继承Thread类 重写run()方法
代码示例:
classMyThreadextendsThread{@Overridepublicvoidrun(){
        System.out.println("hello thread!!!");}}publicclassThreadDemo{publicstaticvoidmain(String[] args){
        Thread t =newMyThread();
        t.start();}}
2.2 实现Runnable接口 重写run()方法
代码示例:
classMyRunnableimplementsRunnable{@Overridepublicvoidrun(){
        System.out.println("hello thread !");}}publicclassThreadDemo2{publicstaticvoidmain(String[] args){
        Thread t =newThread(newMyRunnable());
        t.start();}}
2.3 继承Thread类 重写run()方法,使用匿名内部类
代码示例:
publicclassThreadDemo3{publicstaticvoidmain(String[] args){
        Thread t =newThread(){@Overridepublicvoidrun(){
                System.out.println("hello thread !");}};
        t.start();}}
2.4 实现Runnable接口 重写run()方法,使用匿名内部类
代码示例:
publicclassThreadDemo4{publicstaticvoidmain(String[] args){
        Thread t =newThread(newRunnable(){@Overridepublicvoidrun(){
                System.out.println("hello thread !!!");}});
        t.start();}}
2.5 使用lambda表达式创建 Runnable 子类对象
代码示例:
publicclassThreadDemo5{publicstaticvoidmain(String[] args){
        Thread t =newThread(()->{
            System.out.println("hello thread !");});
        t.start();}}
2.6 start 与 run 的区别
classMyThreadextendsThread{@Overridepublicvoidrun(){
        System.out.println(" thread !!! ");}}publicclassThreadDemo{publicstaticvoidmain(String[] args){
        Thread t =newMyThread();
        t.start();//1
        t.run();// 2}}
上面代码中start和run的区别.在程序的执行上结果是一样的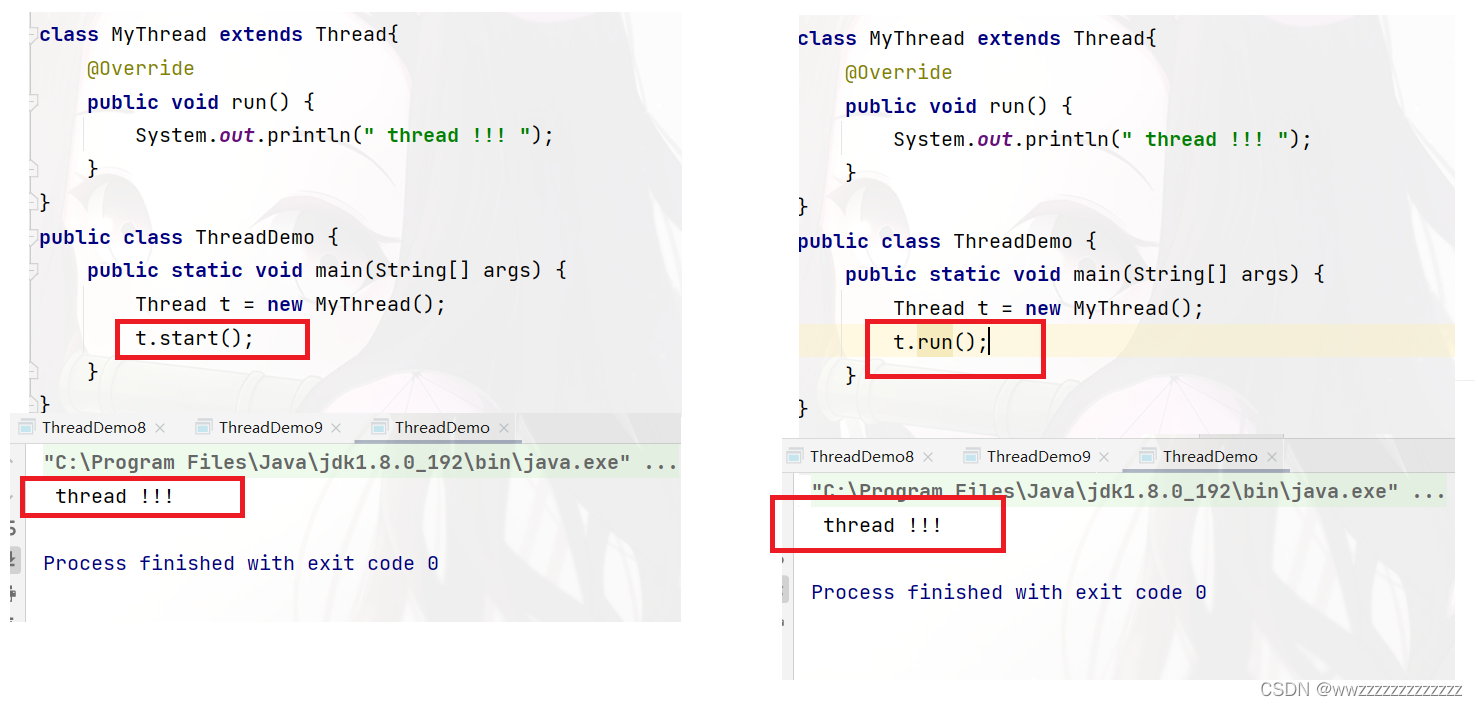
实际上.图解: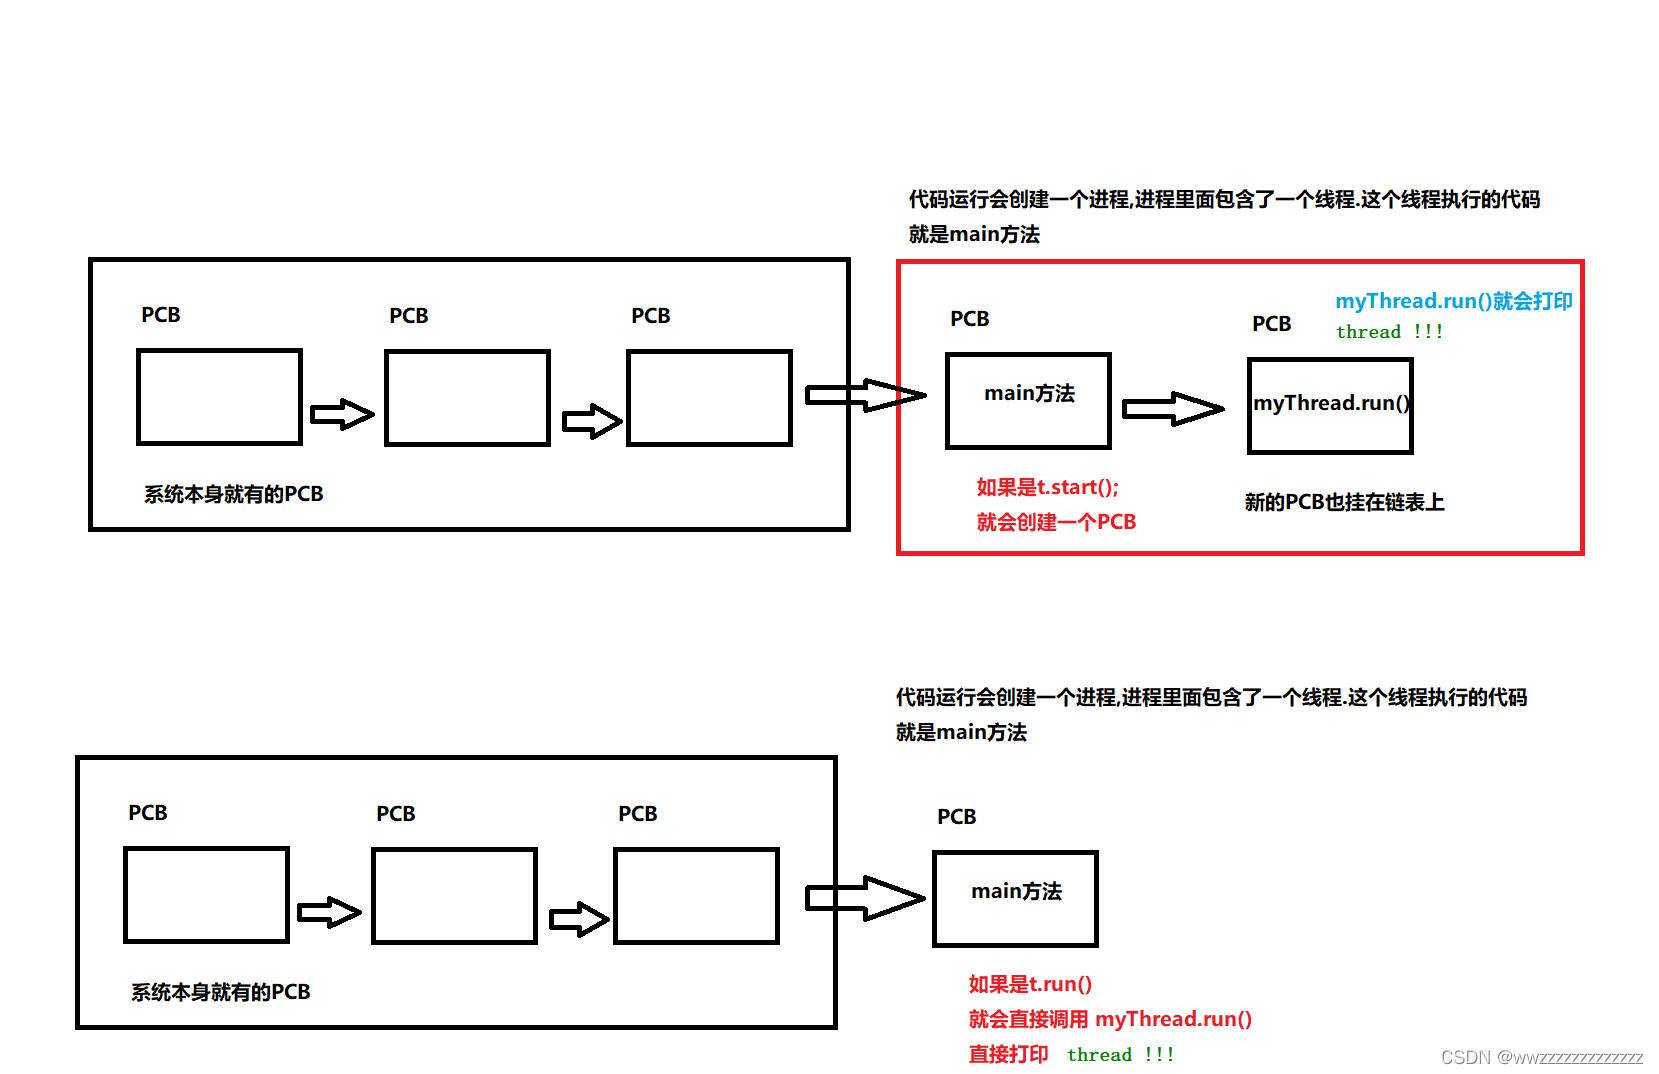
- 使用
t.start()会创建一个新的 PCB ,新的 PCB 链接在链表上,然后执行myThread.run()方法 - 使用
t.run()会直接调用myThread.run()
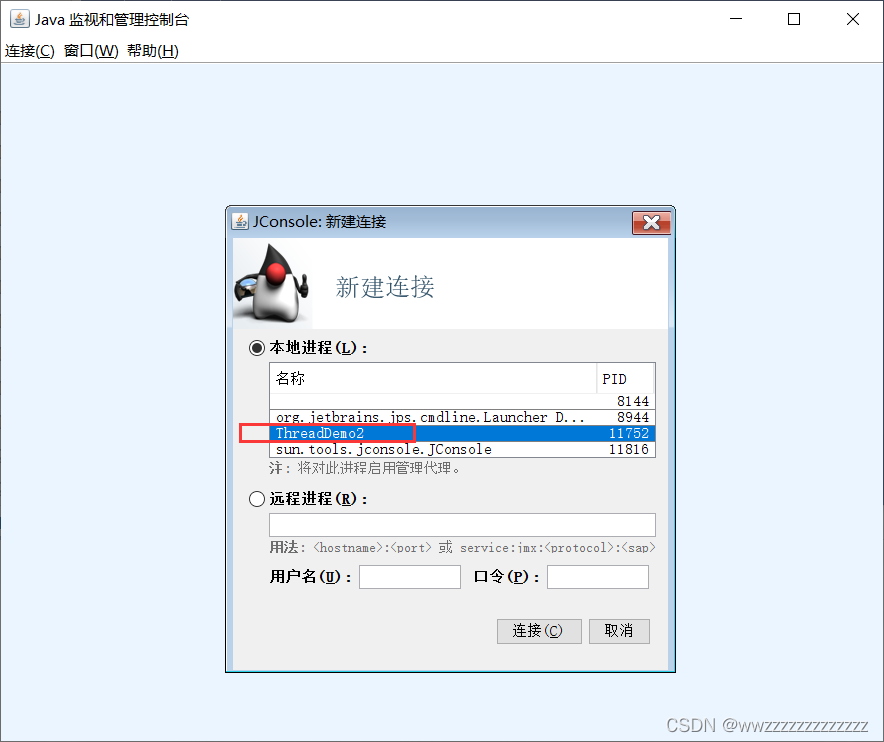
3. 使用 jconsole 命令观察线程
有如下代码:
classMyRunnableimplementsRunnable{@Overridepublicvoidrun(){while(true){
            System.out.println("hello thread !");try{
                Thread.sleep(1000);}catch(InterruptedException e){
                e.printStackTrace();}}}}publicclassThreadDemo2{publicstaticvoidmain(String[] args){
        Thread t =newThread(newMyRunnable());
        t.start();while(true){
            System.out.println("hello main !");try{
                Thread.sleep(1000);}catch(InterruptedException e){
                e.printStackTrace();}}}}
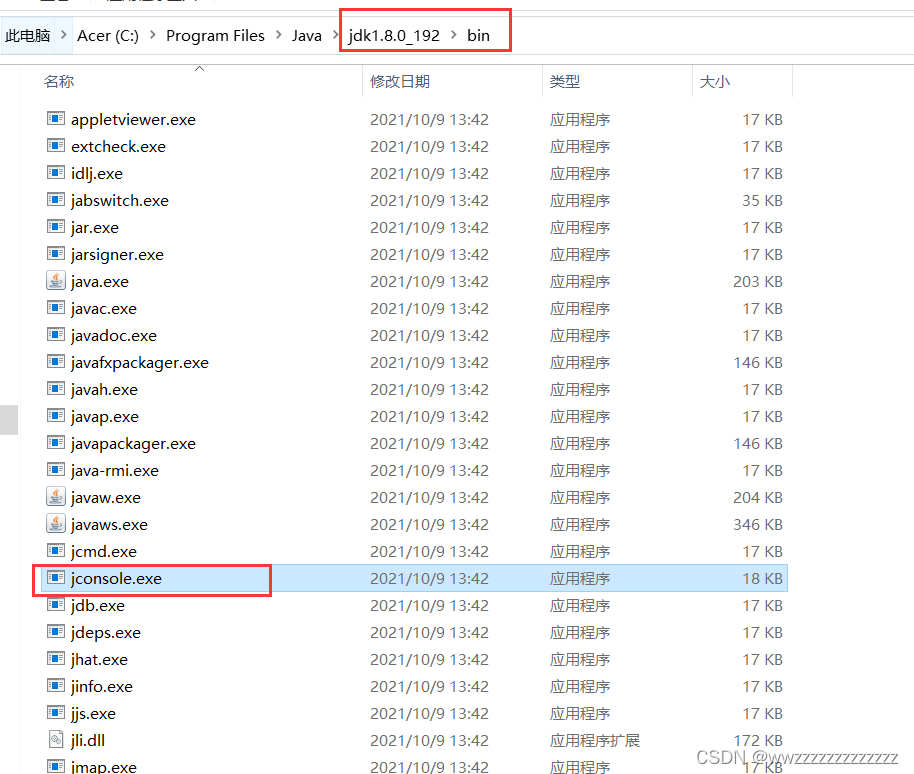
找到自己jdk安装目录下的bin目录 然后找到
jconsole.exe
4. 用代码来观看多线程的优势
这里我们使用
serial()
来表示串行方式
concurrency()
来表示并行方式
- 串行方式 a和b在同一个线程里分别自增10亿次
- 并行方式 a和b在两个线程里分别自增10亿次
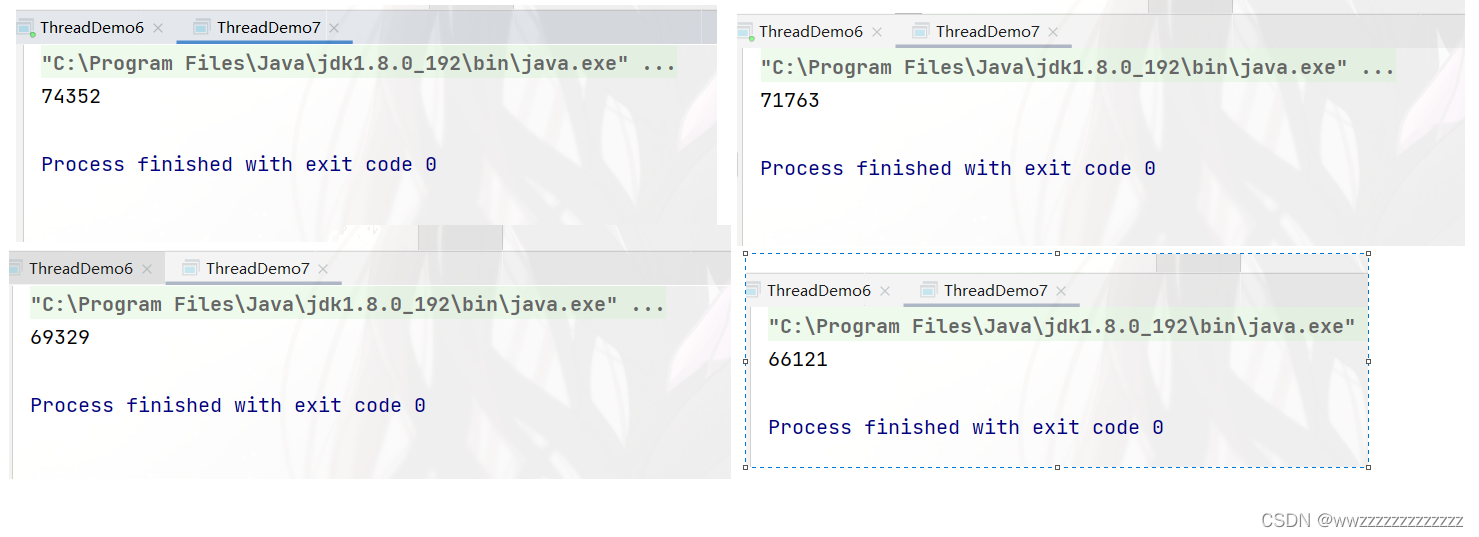
publicclassThreadDemo6{privatestaticfinallong count =10_0000_0000L;publicstaticvoidserial(){// System.currentTimeMillis(); 获取到当前系统的毫秒级时间戳long beg = System.currentTimeMillis();int a =0;for(long i =0; i < count; i++){
            a++;}int b =0;for(long i =0; i < count; i++){
            b++;}long end = System.currentTimeMillis();
        System.out.println("time: "+(end - beg));}publicstaticvoidconcurrency(){long beg = System.currentTimeMillis();

        Thread t1 =newThread(){@Overridepublicvoidrun(){int a =0;for(long i =0; i < count; i++){
                    a++;}}};
        t1.start();

        Thread t2 =newThread(){@Overridepublicvoidrun(){int b =0;for(long i =0; i < count; i++){
                    b++;}}};
        t2.start();try{//等待线程结束
            t1.join();
            t2.join();}catch(InterruptedException e){
            e.printStackTrace();}long end = System.currentTimeMillis();
        System.out.println("time: "+(end - beg));}publicstaticvoidmain(String[] args){serial();concurrency();}}
运行结果: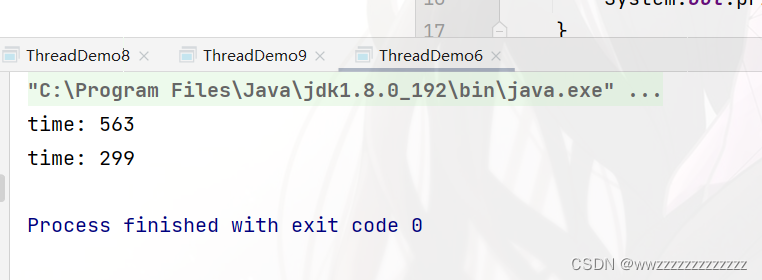
- 对于
serial(),一个线程执行了 20 亿次循环,中间可能调度若干次 - 对于
concurrency(),两个线程分别执行了10亿次循环,中间也可能调度若干次
所以多线程的运行速度加快了
5. Thread类 及 常用方法
5.1 Thread类的常见构造方法
方法说明Thread()创建线程对象Thread(Runnable target)使用 Runnable 对象创建线程对象Thread(String name)创建线程对象,并命名Thread(Runnable target, String name)使用 Runnable 对象创建线程对象,并命名【了解】Thread(ThreadGroup group,Runnable target)线程可以被用来分组管理,分好的组即为线程组,这个目前我们了解即可
代码示例:
        Thread t1 =newThread();
        Thread t2 =newThread(newMyRunnable());
        Thread t3 =newThread("线程命名");
        Thread t4 =newThread(newMyRunnable(),"线程命名");
这里演示第四种的使用方法并用jconsole观察: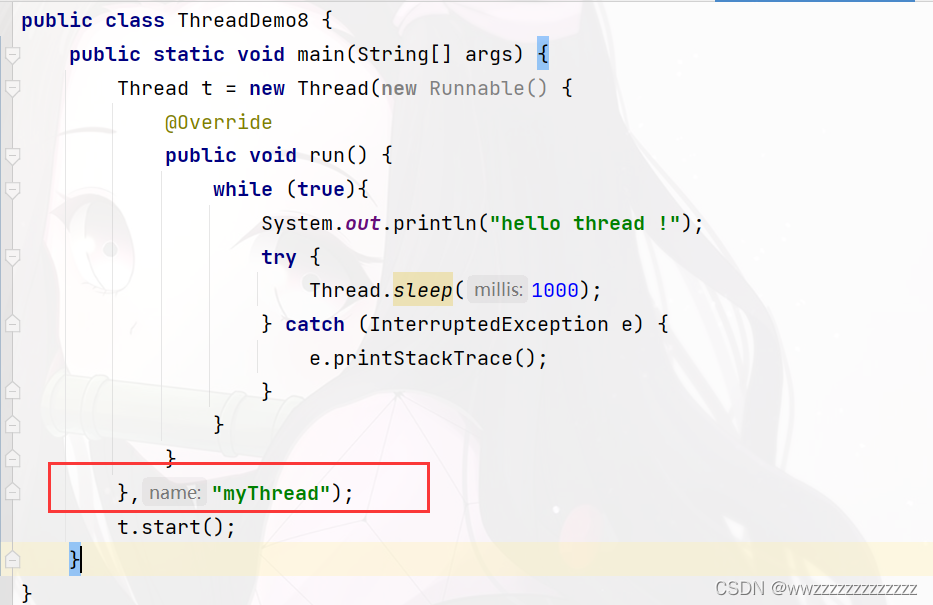
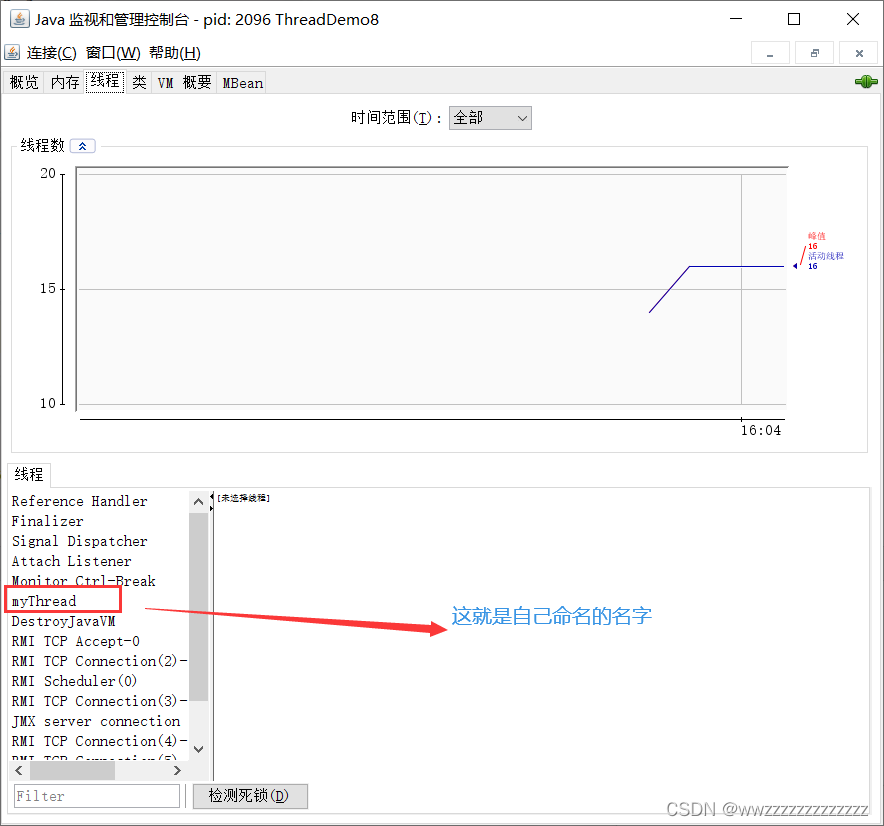
5.2 Thread类的几个常见属性
属性获取方法IDgetId()名称getName()状态getState()优先级getPriority()是否后台线程isDaemon()是否存活isAlive()是否被中断isInterrupted()
注:
- ID是唯一的标识,不同的线程不会重复
- 名称就是线程的名字
- 状态就是线程的状态,存在的意义就是辅助进行线程调度
- 优先级高的更容易被调度
- 创建的线程,默认不是后台线程,注意:JVM会在一个进程的所有非后台线程结束后,才会结束
- 是否存活,就是内核中的PCB是不是销毁了,也就是说系统中的线程是不是销毁了.简单理解,为run方法是否运行结束了.
代码示例:
publicclassThreadDemo9{publicstaticvoidmain(String[] args){
        Thread t =newThread(newRunnable(){@Overridepublicvoidrun(){while(true){// 打印当前线程的名字// Thread.currentThread() 这个静态方法,获取到当前线程实例// 哪个线程调用这个方法,就能获取到对应的实例
                    System.out.println(Thread.currentThread().getName());try{
                        Thread.sleep(1000);}catch(InterruptedException e){
                        e.printStackTrace();}}}},"myThread");

        t.start();// 在这里也打印一下这个线程的属性
        System.out.println("id: "+t.getId());
        System.out.println("name: "+t.getName());
        System.out.println("state: "+t.getState());
        System.out.println("priority: "+ t.getPriority());
        System.out.println("isDaemon: "+t.isDaemon());
        System.out.println("isInterrupted: "+t.isInterrupted());
        System.out.println("isAliveL: "+t.isAlive());}}
运行结果: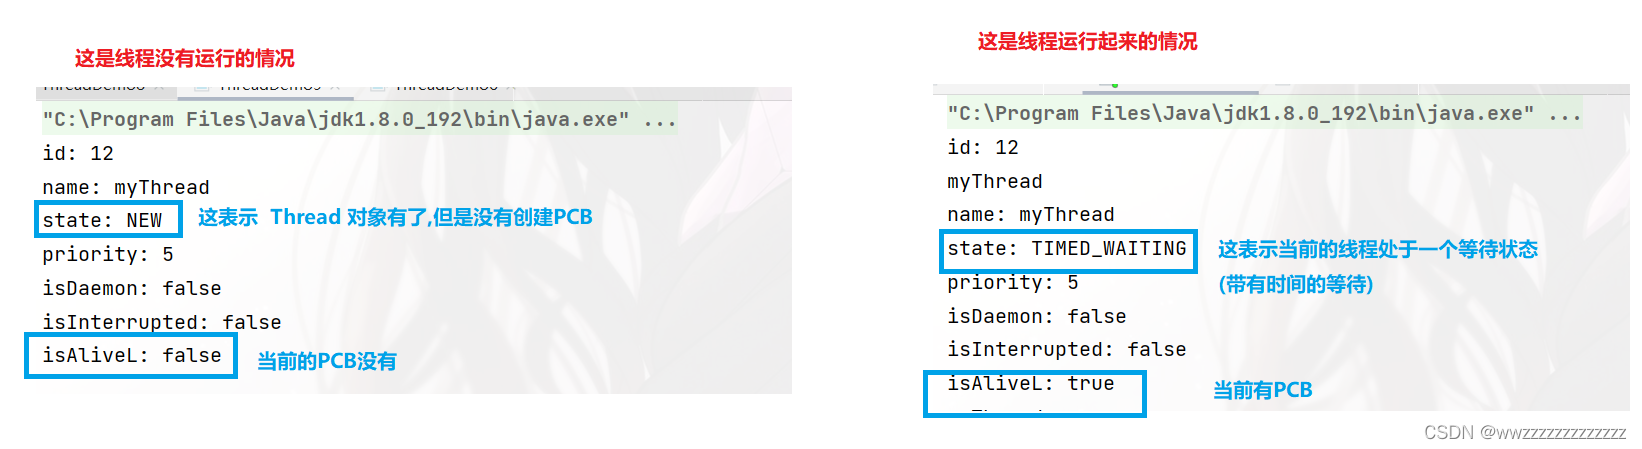
5.3 中断一个线程
5.3.1 方法一:自定义一个变量来作为循环结束的标志
publicclassThreadDemo1{privatestaticboolean flg =true;publicstaticvoidmain(String[] args)throws InterruptedException {
        Thread t =newThread(){@Overridepublicvoidrun(){while(flg){
                    System.out.println("线程正在运行...");try{
                        Thread.sleep(1000);}catch(InterruptedException e){
                        e.printStackTrace();}}
                System.out.println("线程运行结束!");}};
        t.start();

        Thread.sleep(3000);

        flg =false;}}
运行结果: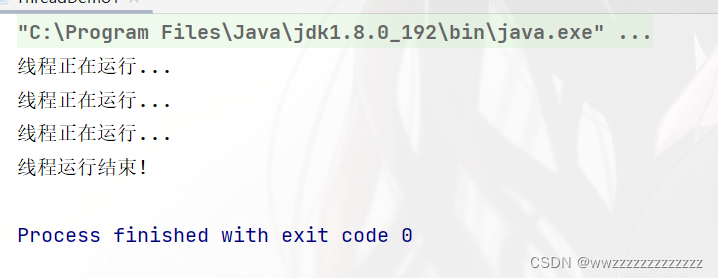
5.3.2 使用标准库里内置的标记
方法说明public void interrupt()中断对象关联的线程,如果线程正在阻塞,则以异常方式通知,否则设置标志位public static boolean interrupted()判断当前线程的中断标志位是否设置,调用后清除标志位public boolean isInterrupted()判断对象关联的线程的标志位是否设置,调用后不清除标志位
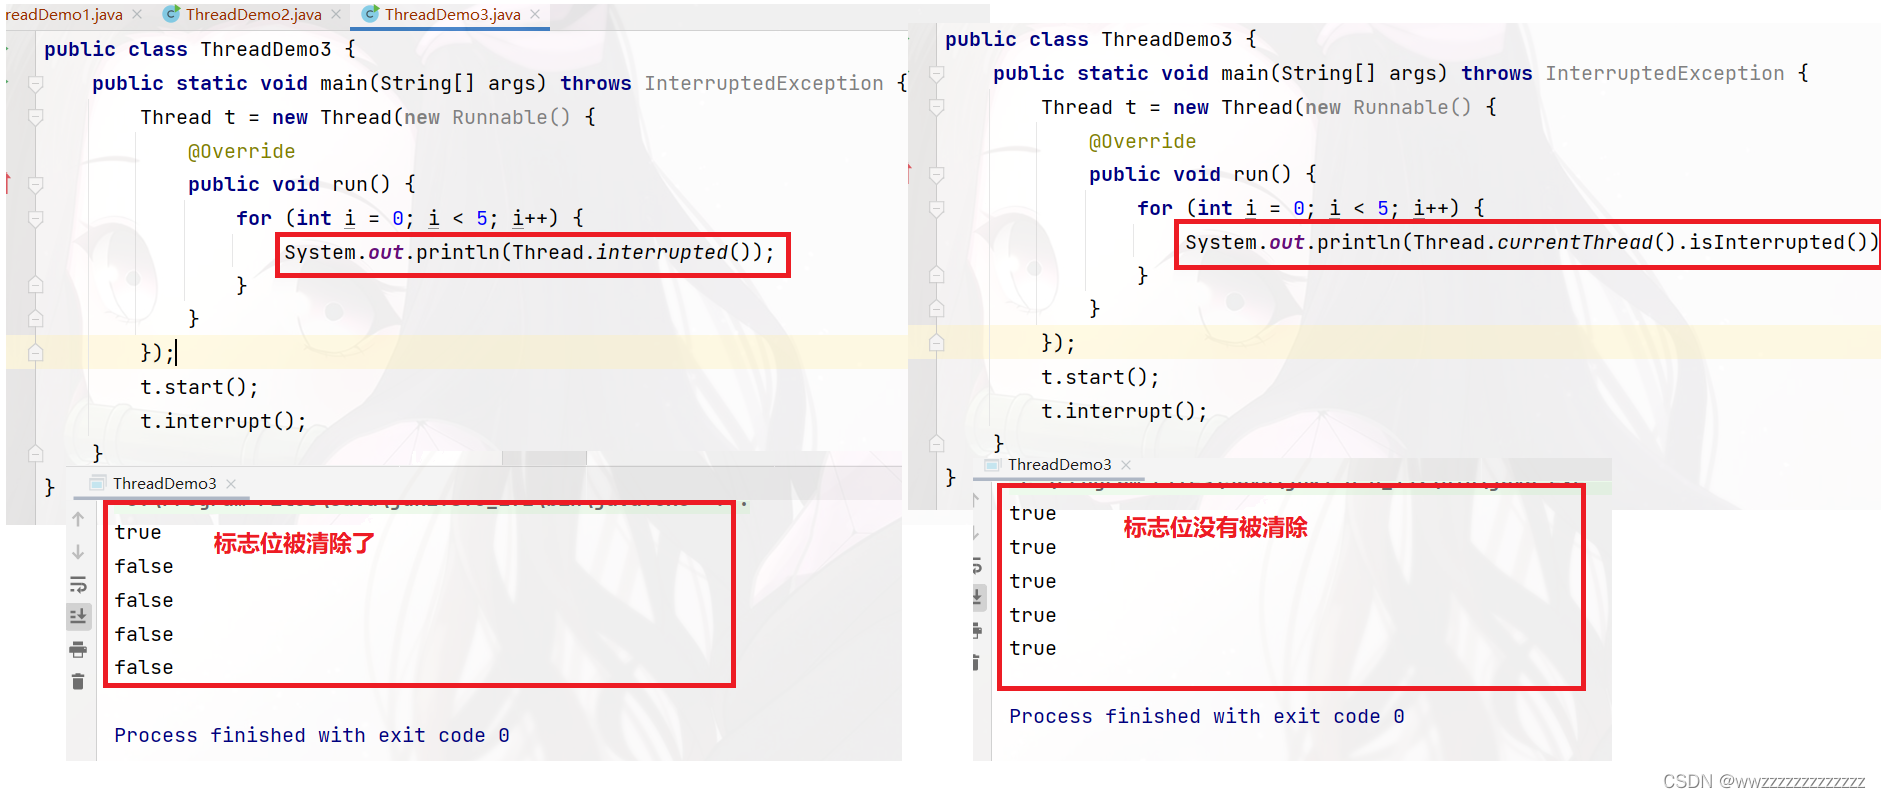
publicclassThreadDemo2{publicstaticvoidmain(String[] args){
        Thread t =newThread(){@Overridepublicvoidrun(){// 默认情况下 isInterrupted() 是false的while(!Thread.currentThread().isInterrupted()){
                    System.out.println("线程正在运行...");try{
                        Thread.sleep(1000);}catch(InterruptedException e){
                        e.printStackTrace();// 如果不加break 会触发异常,导致循环无法结束break;}}}};
        t.start();//主线程中 通过t.interrupt() 方法来设置这个标记位try{
            Thread.sleep(3000);}catch(InterruptedException e){
            e.printStackTrace();}// 这个操作就是把 Thread.currentThread().isInterrupted() 设置成true
        t.interrupt();}}
这里的
interrupt
可能有两种行为:
- 如果当前线程正在运行中,此时就会修改
Thread.currentThread().isInterrupted()标记位为true- 如果当前线程正在
sleep / wait / 等待锁 ...此时就会触发InterruptedException异常
5.3.3 观察标志位是否清除
interrupt()方法, 把标志位设成 true ,就应该结束循环interrupted()方法, 判定标记位的时候,会返回true,同时把标记位改回false,下次再调用就返回falseisInterrupted方法, 判定标记位的时候,会返回true,不会改回标记位,下次再调用就返回true.
5.4 等待一个线程
线程和线程之间,调度顺序是完全不确定的…如果想要线程的顺序可控,线程等待就是一种方法.
方法说明public void join()等待线程结束public void join(long millis)等待线程结束,最多等 millis 毫秒public void join(long millis, int nanos)等待线程结束,但可以更高精度
当执行到
t.join()
时,这里的线程会阻塞等待.
代码示例:
publicclassThreadDemo4{publicstaticvoidmain(String[] args){
        Thread t =newThread(){@Overridepublicvoidrun(){int count =0;while(count <3){
                    count++;
                    System.out.println("线程正在运行...");try{
                        Thread.sleep(1000);}catch(InterruptedException e){
                        e.printStackTrace();}}
                System.out.println("线程运行结束!");}};
        t.start();try{
            System.out.println("join 执行开始");
            t.join();//只要t线程在运行就会发生线程阻塞 直到t线程执行完毕
            System.out.println("join 执行结束");}catch(InterruptedException e){
            e.printStackTrace();}}}
运行结果: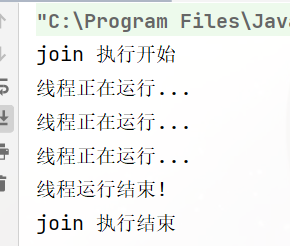
5.5 获取当前线程的引用
方法说明public static Thread currentThread();返回当前线程对象的引用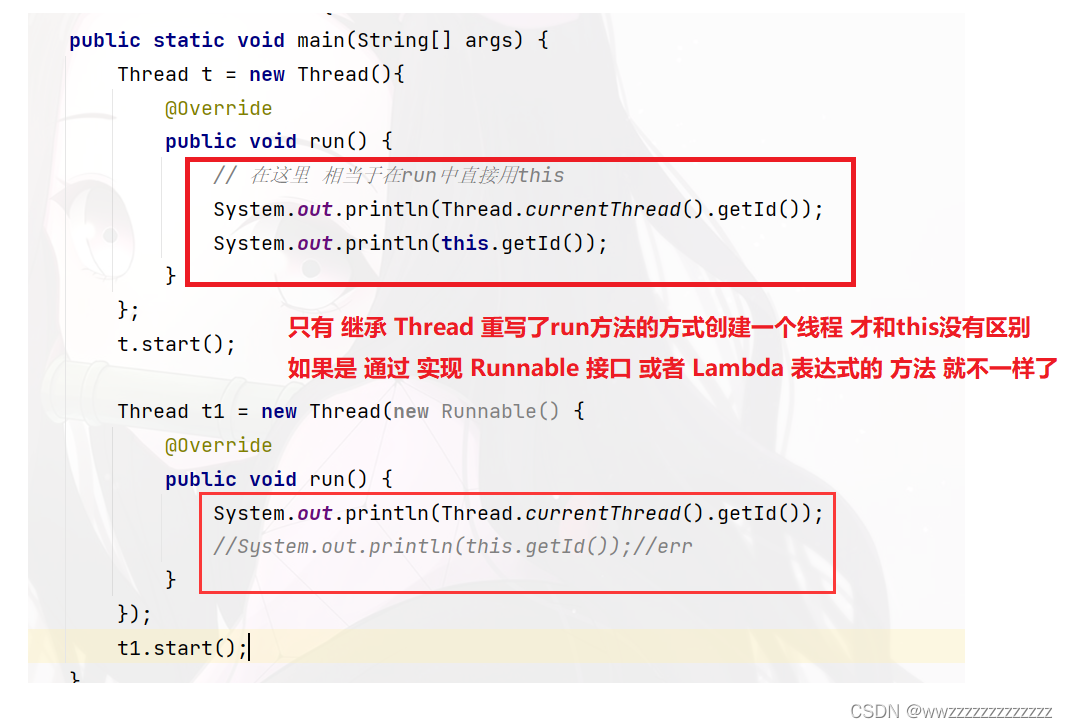
5.6 休眠当前线程
方法说明public static void sleep(long millis) throws InterruptedException休眠当前线程 millis毫秒public static void sleep(long millis, int nanos) throws InterruptedException可以更高精度的休眠
这个Sleep这个方法,本质上就是把线程PCB从就绪队列,移动到阻塞队列.
注: 当线程调用 sleep / join / wait / 等待锁 … 就会把 PCB放到另一个队列(阻塞队列)
6. 线程的状态
- NEW: Thread 对象创建了,但是内核没有创建出PCB
- RUNNABLE: 当前的PCB创建出来了,这个PCB就绪了.这个线程可能在CPU上运行,也可能在就绪队列中排队
- BLOCKED: 线程中尝试进行加锁,结果发现锁已经被其他线程占用了,此时PCB也会处于阻塞状态.这个等待会在其他线程释放锁之后被唤醒
- WAITING: PCB处于阻塞状态,(死等)
- TIMED_WAITING: 表示PCB在阻塞队列中等待,这个等待是有结束时间的等待.
- TERMINATED: 表示当前PCB已经结束了,但是Thread对象还在,此时调用获取状态,得到的就是这个状态.
注:之前我们学过的 isAlive() 方法,可以认为是处于不是 NEW 和 TERMINATED 的状态都是活着的
yield()的观察
publicclassThreadDemo6{publicstaticvoidmain(String[] args){
        Thread t1 =newThread(){@Overridepublicvoidrun(){while(true){
                    System.out.println("线程t1正在运行...");
                    Thread.yield();}}};
        Thread t2 =newThread(){@Overridepublicvoidrun(){while(true){
                    System.out.println("线程t2正在运行...");}}};
        t1.start();
        t2.start();}}
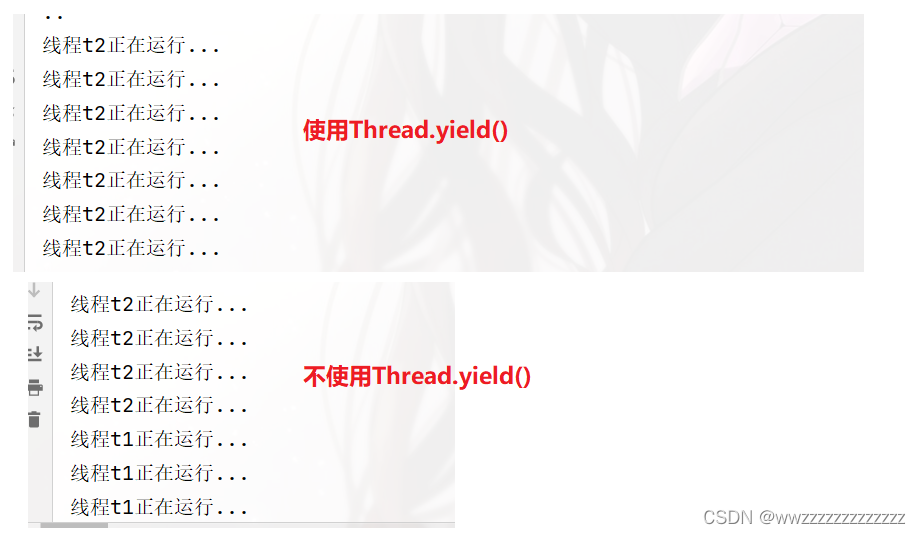
结论:
- 不使用Thread.yield(),线程t1 和线程t2 打印的结果次数差不多
- 使用Thread.yield(),线程t2 的结果远多于 线程 t1的结果次数
7. 线程安全
7.1 观察线程不安全
这里我们用两个线程分别实现count自增5w次.
publicclassThreadDemo7{staticclassCounter{publicint count =0;voidincrease(){
            count++;}}publicstaticvoidmain(String[] args)throws InterruptedException {
        Counter counter =newCounter();
        Thread t1 =newThread(){@Overridepublicvoidrun(){for(int i =0; i <50000; i++){
                    counter.increase();}}};
        Thread t2 =newThread(){@Overridepublicvoidrun(){for(int i =0; i <50000; i++){
                    counter.increase();}}};

        t1.start();
        t2.start();

        t1.join();
        t2.join();
        System.out.println(counter.count);}}
发现每次的结果不一样 且没有达到预期结果
原因分析: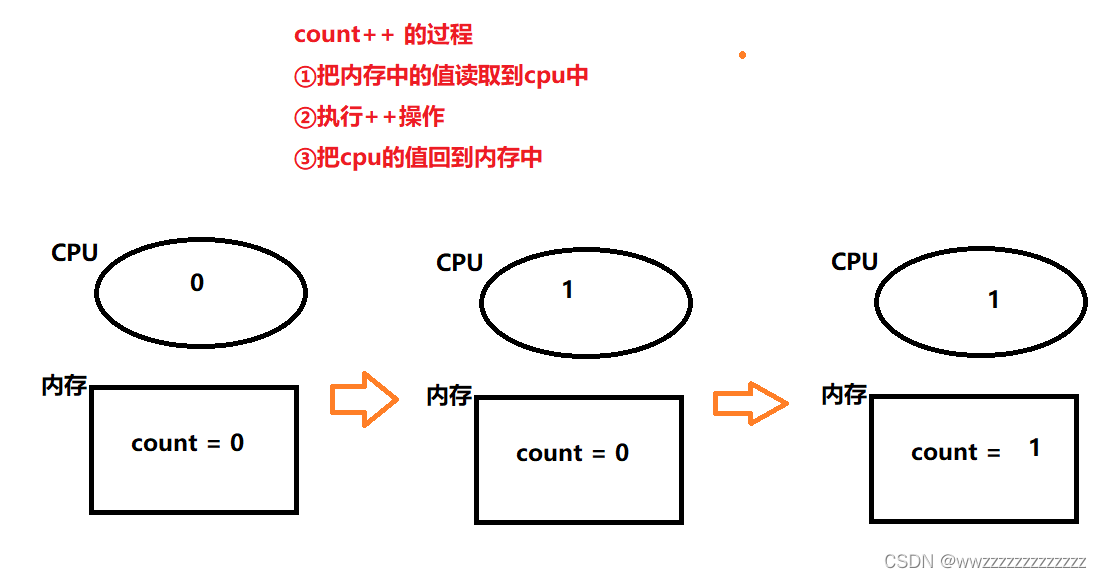
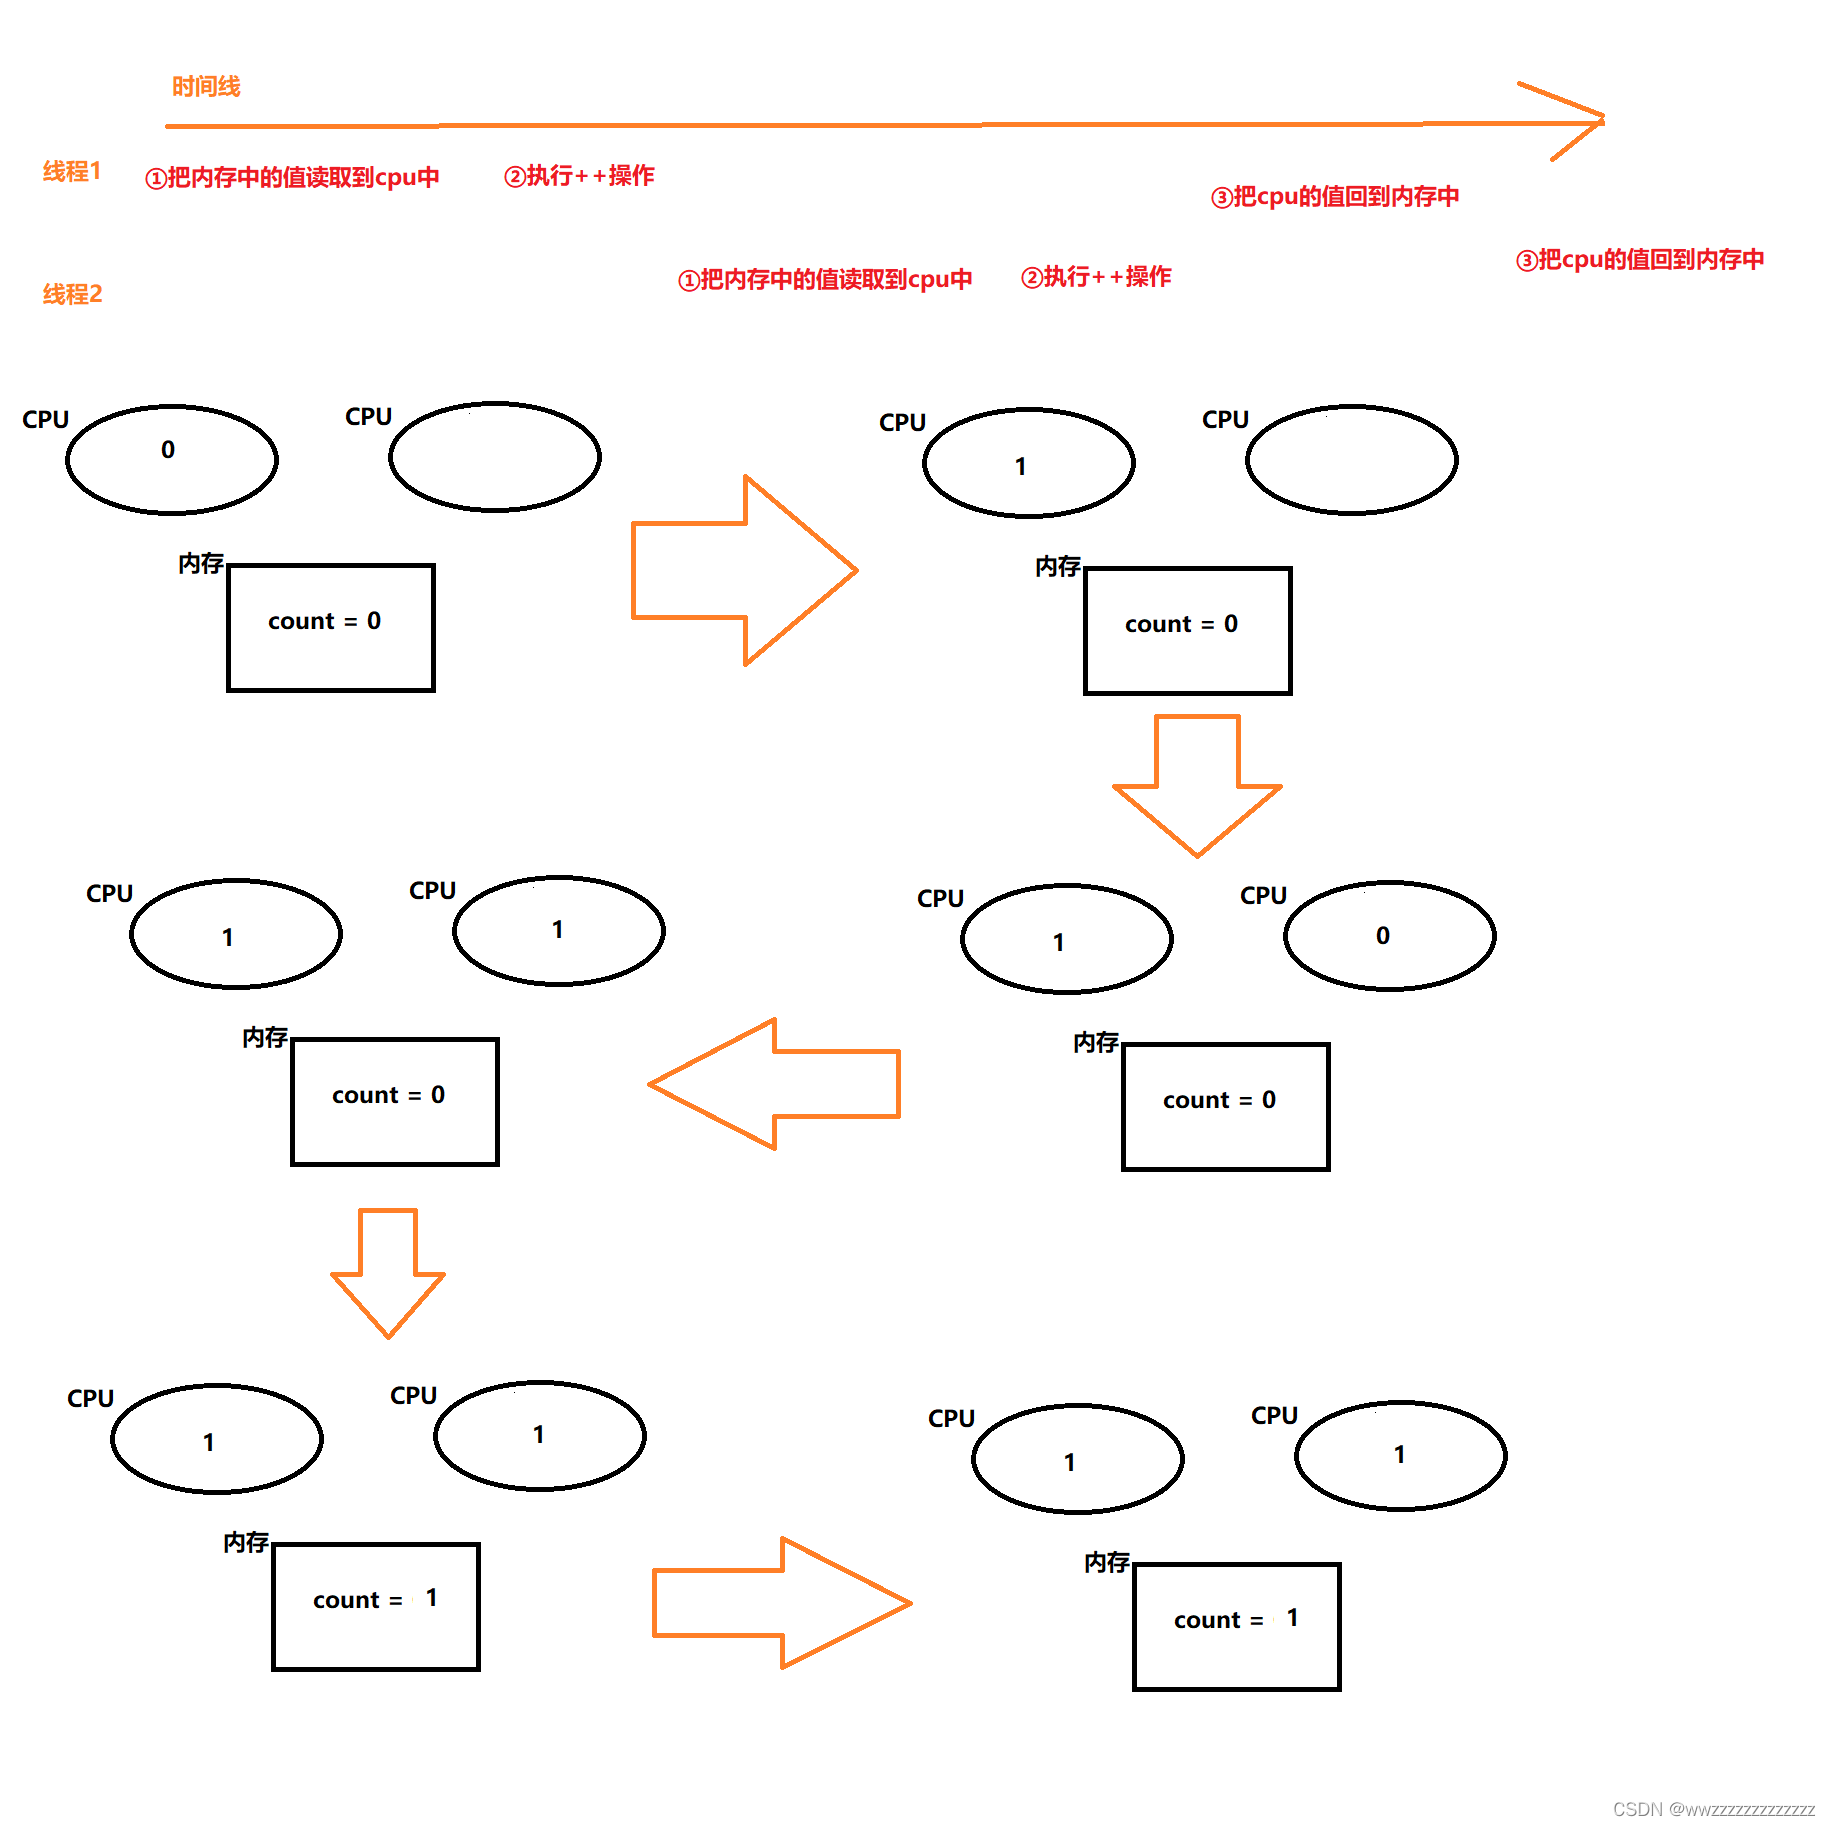
当出现这种情况的时候 count 只改变了一次.
这两个的线程的执行顺序是不确定的.
操作系统调度线程的时候,是使用"抢占式执行"的方式,某个线程啥时候能上CPU执行,啥时候切换出CPU是不确定的.
而且,两个线程在两个不同的CPU上也可以完全并行执行
结论: 两个线程的执行的具体顺序是完全无法预期的.
7.2 线程安全的概念
线程安全的定义是非常复杂的,
我们可以认为:如果多线程环境下代码运行的结果是符合我们预期的,即在单线程环境应该的结果,则说这个程序是线程安全的
7.3 线程不安全的原因
线程之间是抢占式执行的
抢占式执行导致两个线程的执行的先后顺序无法判断,我们无法改变他.
这是导致线程不安全的根本原因.
多个线程修改同一个变量
一个线程修改同一个变量,这里没有线程安全问题,没有涉及到并发,执行的结果就是预期的结果
多个线程读取同一个变量,也没有线程安全问题,读取数据只是把数据从内存读取到CPU种,读取不会修改内存数据的内容
多个线程修改不同的变量,也没有线程安全问题.
多个线程修改同一个变量,这个线程安全问题和代码的写法有关.
原子性
++的操作,本质上是三步操作,是一个"非原子"的操作
可以通过加锁的方式,把这个操作变成原子性
可见性
一个线程修改,一个线程读取.
由于编译器的优化,可能把一些中间环节的操作去掉了(循环自增的时候,++操作会比其他操作快,为了提高程序的整体效率,线程就会把①③操作省略掉,这个省略的操作是 编译器(javac)和JVM(java)综合配合达成的效果)
此时读的线程可能读到的是未修改的结果
编译器优化图解:
指令重排序
一段代码是这样的:
- 去前台取下 U 盘
- 去教室写 10 分钟作业
- 去前台取下快递
如果是在单线程情况下,JVM、CPU指令集会对其进行优化,比如,按
1->3->2
的方式执行,也是没问题,可以少跑一次前台。这种叫做指令重排序
编译器对于指令重排序的前提是 “保持逻辑不发生变化”. 这一点在单线程环境下比较容易判断, 但 是在多线程环境下就没那么容易了, 多线程的代码执行复杂程度更高, 编译器很难在编译阶段对代 码的执行效果进行预测, 因此激进的重排序很容易导致优化后的逻辑和之前不等价.
重排序是一个比较复杂的话题, 涉及到 CPU 以及编译器的一些底层工作原理, 此处不做过多讨论
8. synchronized 关键字-监视器锁monitor lock
8.1 synchronized 的使用示例
直接修饰普通方法
锁的是SynchronizedDemo 对象
publicclassSynchronizedDemo{publicsynchronizedvoidmethond(){}}
修斯静态方法
锁的是 SynchronizedDemo 类的对象
publicclassSynchronizedDemo{publicsynchronizedstaticvoidmethod(){}}
修饰代码块
锁当前对象
publicclassSynchronizedDemo{publicvoidmethod(){synchronized(this){}}}
锁类对象
publicclassSynchronizedDemo{publicvoidmethod(){synchronized(SynchronizedDemo.class){}}}
8.2 synchronized 的特性
a) 互斥性
当一个线程执行到了 synchronized修饰的对象中时,并且其他线程也进入到同一个被 synchronized 修饰的对象中时,就会产生 阻塞等待;
- 当进入synchronized修饰的对象时,就相当于加锁
- 当推出synchronized修饰的对象时,就相当于解锁

synchronized相当于在上厕所时,会锁门,如果不锁门其他人进来的时候就会出事.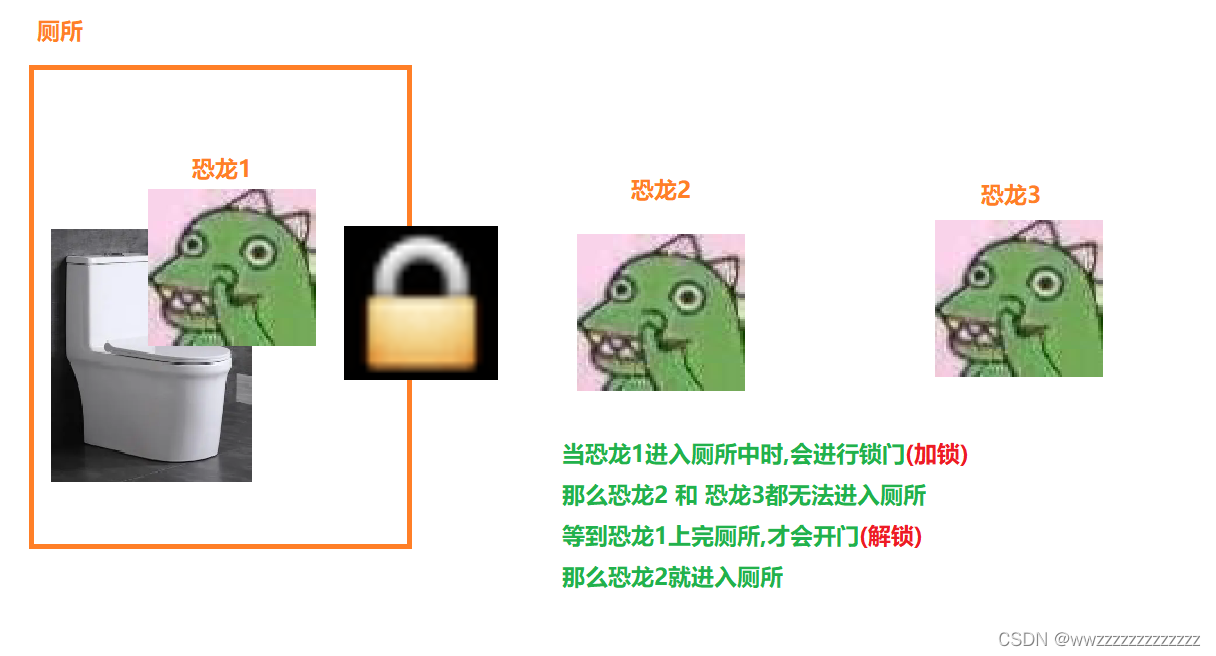
"阻塞等待":
针对每一把锁, 操作系统内部都维护了一个等待队列. 当这个锁被某个线程占有的时候, 其他线程尝试进行加锁, 就加不上了, 就会阻塞等待,一直等到之前的线程解锁之后, 由操作系统唤醒一个新的线程, 再来获取到这个锁.
注意:
- 上一个线程解锁之后, 下一个线程并不是立即就能获取到锁. 而是要靠操作系统来 “唤醒”. 这也就是操作系统线程调度的一部分工作.
- 假设有 A B C 三个线程, 线程 A 先获取到锁, 然后 B 尝试获取锁, 然后 C 再尝试获取锁, 此时 B和 C 都在阻塞队列中排队等待. 但是当 A 释放锁之后, 虽然 B 比 C 先来的, 但是 B 不一定就能获取到锁, 而是和 C 重新竞争,并不遵守先来后到的规则.
当两个线程执行到的对象是两个不同的锁时,不会产生线程阻塞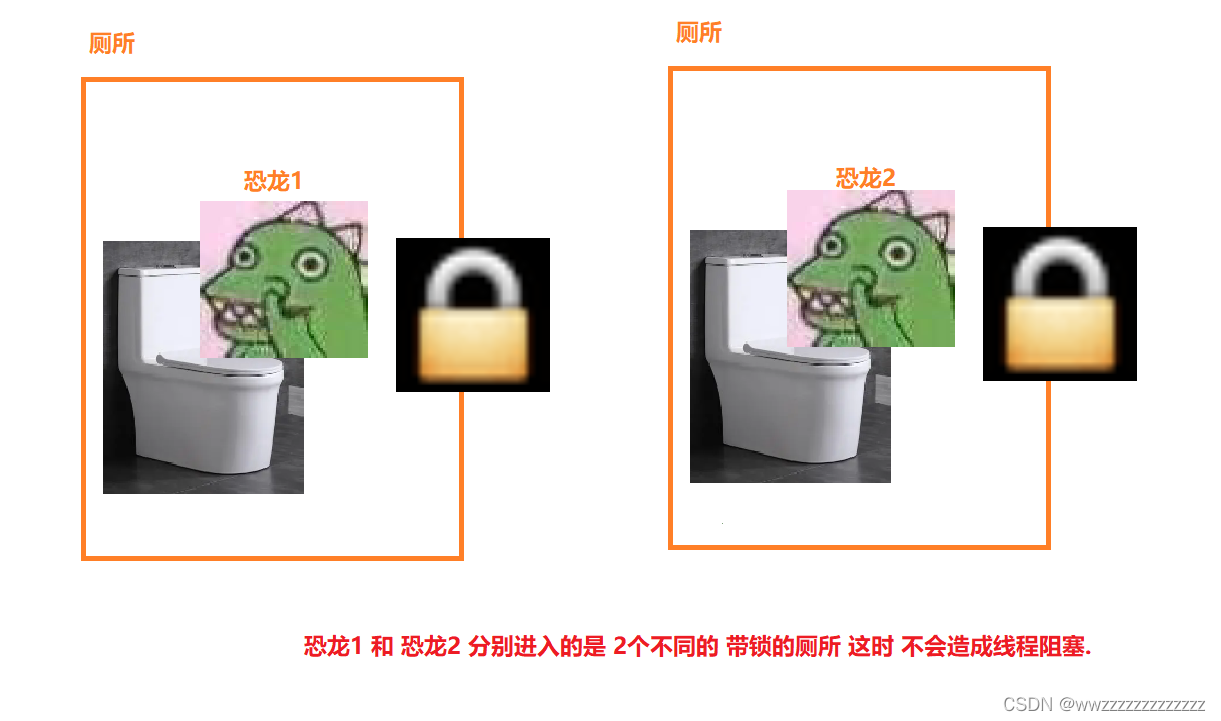
b) 刷新内存
synchronized 也可以保证内存的可见性.
编译器在执行count++时,是三步操作,编译器在操作时,会优化这里,把中间的一些 LOAD 和 SAVE 的操作省略掉.当有其他线程进行读取的时候,就可能会出错.
synchronized 就会禁止这样的现象,保证每次的操作都是进行了LOAD 和 SAVE操作.(这样就会导致程序变慢~)
c) 可重入
synchronized 允许一个线程针对一把锁,连续加锁
第一次线程没有释放锁,然后又进行加锁,按照锁的设定,第二次加锁的时候,会进行阻塞等待,直到第一次被释放,才能获取第二个锁.但是当第一个锁也是由同一个线程来完成,那么这样就无法解锁,这个时候就变成了死锁
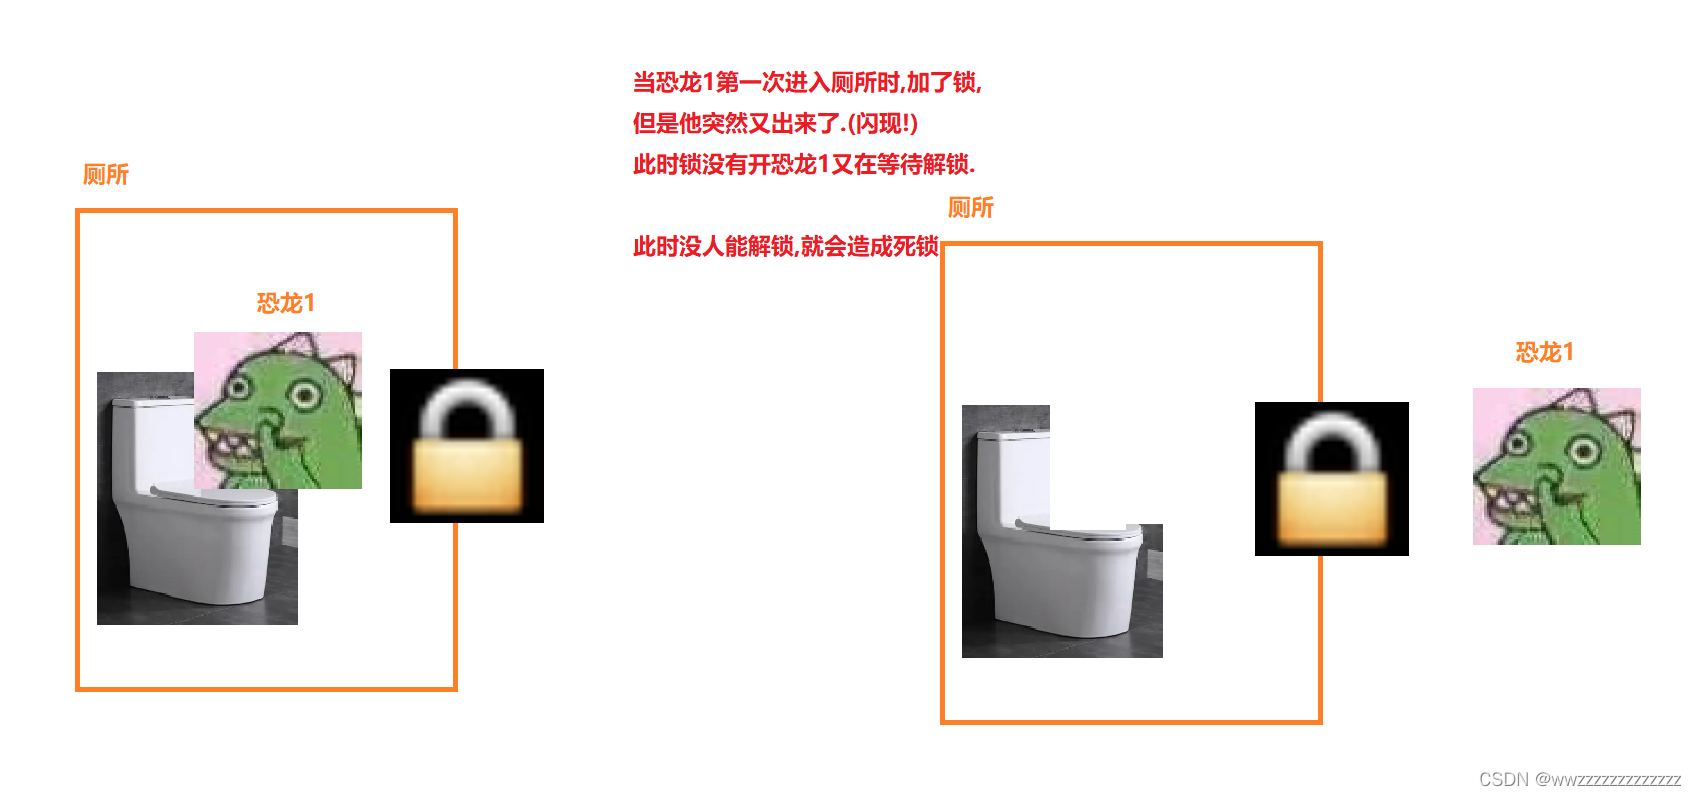
在synchronized中 实现了可重入,synchronized记录了锁是哪个线程持有的.
8.3 Java 标准库中的线程安全类
Java 标准库中很多都是线程不安全的. 这些类可能会涉及到多线程修改共享数据, 又没有任何加锁措施.
- ArrayList
- LinkedList
- HashMap
- TreeMap
- HashSet
- TreeSet
- StringBuilder
但是还有一些是线程安全的. 使用了一些锁机制来控制
- Vecter (一般不推荐使用 很多方法都加了synchronized 在单线程下影响操作效率)
- HashTable(同上不建议使用)
- ConcurrentHashMap
- StringBuffer(StringBuffer 的核心方法都带有 synchronized)
- String (虽然没有加锁, 但是String是不可变对象,不存在两个线程并发修改同一个String)
9. volatile 关键字
9.1 volatile 可以保证内存可见性
示例代码:
import java.util.Scanner;publicclassThreadDemo2{staticclassCounter{publicint flg =0;}publicstaticvoidmain(String[] args){
        Counter counter =newCounter();
        Thread t1 =newThread(){@Overridepublicvoidrun(){while(counter.flg ==0){};
                System.out.println("循环结束");}};
        Thread t2 =newThread(){@Overridepublicvoidrun(){
                Scanner sc =newScanner(System.in);
                System.out.println("请输入一个整数:");
                counter.flg = sc.nextInt();}};
        t1.start();
        t2.start();}}
这里我们可以发现,线程1快速的循环读取flg的值,编译器进行了优化,所以每次读取的时候并不都是内存的值,可能是CPU中进行读内存值了.
当线程2输入了一个整数之后,线程1感知不到线程2对flg数据的变化.
当使用
volatile
关键字之后 每次的读取就是在内存上读取了.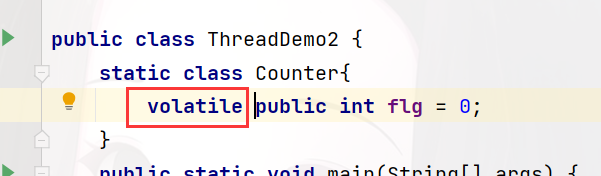
volatile不能保证原子性
9.2 Java内存模型(java memory model)
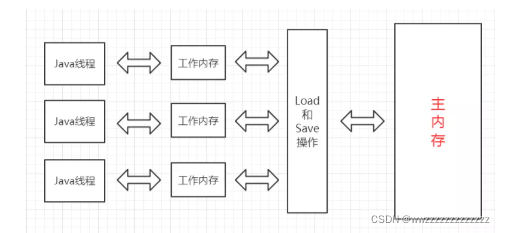
代码中在读取一个变量的时候,不一定都是在内存中读取数据的.也有可能这个数据已经在CPU或者是cashe中缓存着了.这个时候就可能绕过内存,直接从cpu或者cashe中来读取这个数据.
JMM就把CPU的寄存器 cache 同称为 “工作内存” 把真正的内存 称为"主内存"
**当使用
volatile
和
synchronized
就能够强制保证 操作是在 主内存中进行的.(相当于强制同步了主内存和工作内存中的内容)**
10. wait 和 notify
由于线程之间是抢占式执行的,导致线程之间执行的先后顺序非常难以预知.
为了控制线程之间的执行顺序我们可以通过
wait
和
notify
来完成这个协调的工作.
方法作用wait()让线程进入等待状态wait(long timeout)让线程进入等待状态(这是一个带有timeout参数的版本.可以指定等待的时间)notify()唤醒在当前对象上等待的线程notifyAll()唤醒在当前对象上等待的所有线程
10.1 wait()方法
wait 做了 三件 事情:
- 让当前线程阻塞等待
- 释放当前的锁. (wait 需要搭配 synchronized 来使用,没有synchronized使用wait时会抛出异常.
- 满足一定条件被唤醒时,重新尝试获取到这个锁.
wait 结束等待的条件:
- 其他线程调用该对象的 notify() 方法
- 当使用带参数的 wait(long timeout)方法时,超出指定的时间就会结束等待
- 当其他的线程调用该线程的
interrupted方法,导致 wait 抛出了InterruptedException异常
10.2 notify()方法
notify的使用
- notify()也必须放在synchronized中使用
- notify 操作是一次唤醒一个线程.如果有多个线程都在等待中,调用的 notify 相当于 随机唤醒一个.其他线程保持原状
- 使用notify()方法后,当前的线程不会马上被释放该对象的锁,而是要等待当前的 synchronized代码块执行完才能释放锁.
10.3 wait()方法 和 notify()方法 的使用示例
- 创建一个 WaitTask 类实现 Runnable 接口 ,重写的run()方法,用来执行wait()方法
- 创建一个 NotifyTask 类实现 Runnable 接口.发泄run()方法,用来执行notify()方法
publicclassThreadDemo{staticclassWaitTaskimplementsRunnable{private Object locker;publicWaitTask(Object locker){this.locker = locker;}@Overridepublicvoidrun(){synchronized(locker){
                System.out.println("wait() 方法 开始");try{
                    locker.wait();}catch(InterruptedException e){
                    e.printStackTrace();}
                System.out.println("wait() 方法 结束");}}}staticclassNotifyTaskimplementsRunnable{private Object locker;publicNotifyTask(Object locker){this.locker = locker;}@Overridepublicvoidrun(){synchronized(locker){
                System.out.println("notify() 方法 开始");
                locker.notify();
                System.out.println("notify() 方法 结束");}}}publicstaticvoidmain(String[] args)throws InterruptedException {
        Object locker =newObject();

        Thread t1 =newThread(newWaitTask(locker));
        Thread t2 =newThread(newNotifyTask(locker));

        t1.start();
        Thread.sleep(3000);
        t2.start();}}
运行结果:
注意事项: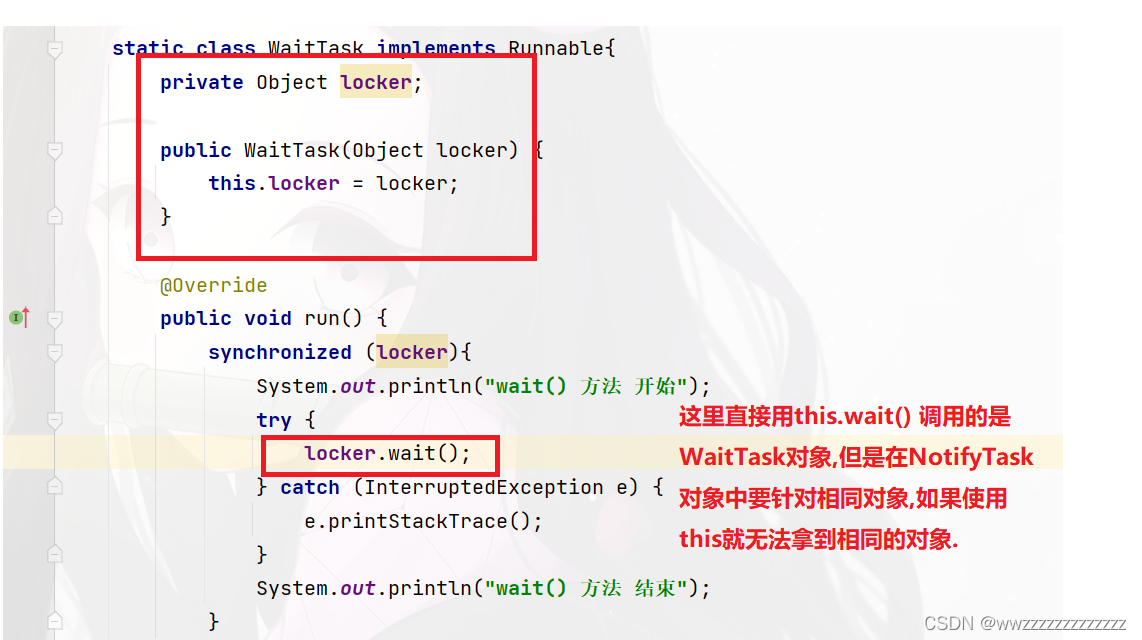
10.4 notifyAll() 方法 及 使用示例
notify()方法只是唤醒某一个等待线程,使用notifyAll()方法可以一次唤醒所有的等待线程.
示例(注:还是使用上面那个相同的WaitTask 和 NotifyTask):
publicstaticvoidmain(String[] args)throws InterruptedException {
        Object locker =newObject();

        Thread t1 =newThread(newWaitTask(locker));
        Thread t2 =newThread(newWaitTask(locker));
        Thread t3 =newThread(newWaitTask(locker));
        Thread t4 =newThread(newNotifyTask(locker));

        t1.start();
        t2.start();
        t3.start();
        Thread.sleep(3000);
        t4.start();}
运行结果:
此时发现只唤醒了一个线程.当我们将NotifyTask()中 notify()改为notifyAll()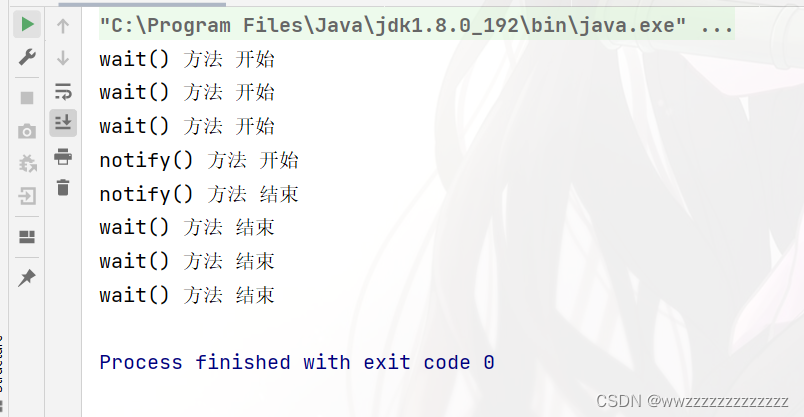
这个时候 所有的线程都被唤醒了
注意: 虽然同时唤醒了3个线程,但是这3个线程还是需要竞争锁.也就是说这3个线程并不是同时执行,仍然是有先有后的执行
图解: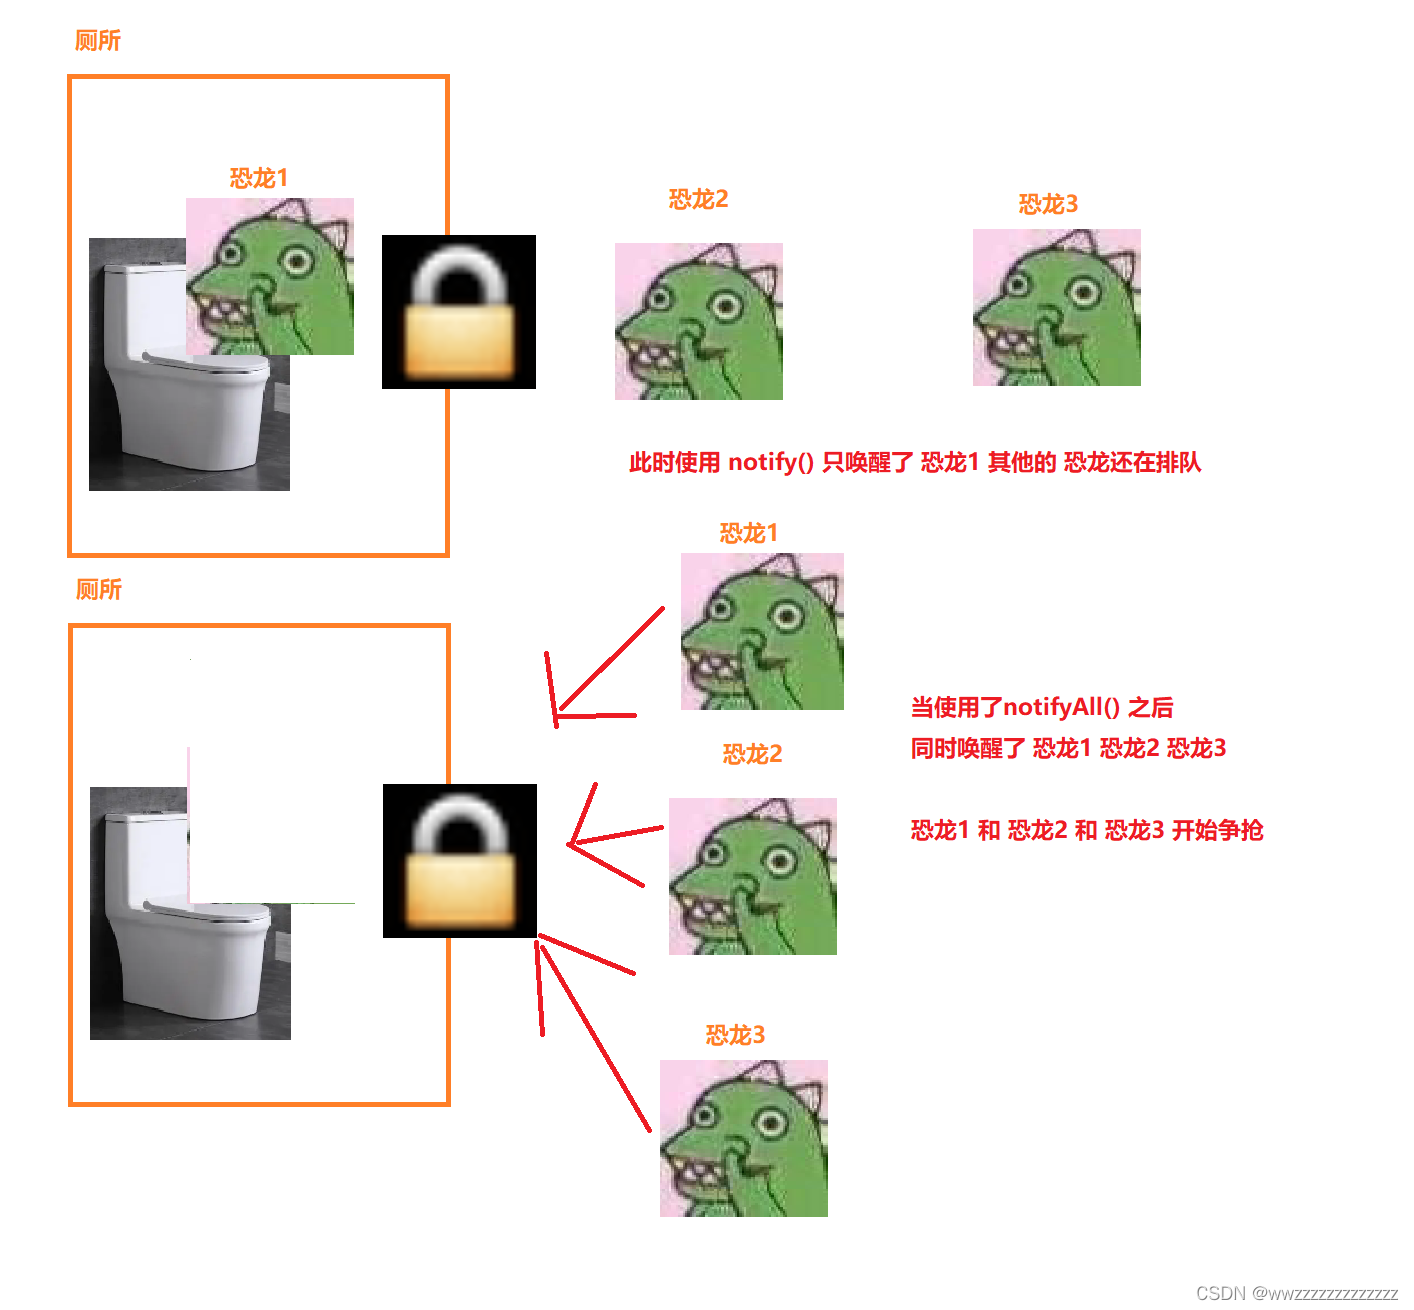
10.5 wait 和 sleep 的 区别 (面试题)
理论上 wait 和 sleep 是没有什么关联关系的.
- sleep 操作的是指定一个时间来让线程 阻塞等待, wait 操作可以指定时间等待,也可以无限的等待
- wait 唤醒可以通过三个办法:① notify 唤醒 ② 其他线程调用该线程的 interrupted 方法 ③时间到 sleep 唤醒 通过2个办法 ①时间到 ② interrupted 唤醒
- wait 需要搭配synchronized 使用,sleep不需要
- wait 主要是为了协调线程之间的先后顺序,这样的场景不适合使用sleep.sleep只是让该线程休眠,不涉及到多个线程的配合
- wait 是 Object 的方法 sleep 是 Thread 的静态方法
11. 多线程案例
11.1 单例模式
单例模式能保证某个类在程序中只存在唯一一份实例, 而不会创建出多个实例.使用单例模式就是为了限制这个类能有唯一实例
饿汉模式
在类加载阶段就把实例创建出来
classSingleton{privatestatic Singleton instance =newSingleton();//防止在类外面调用构造方法,也就禁止了调用者再其他地方创建实例的机会privateSingleton(){}publicstatic Singleton getInstance(){return instance;}}
懒汉模式 - 单线程版
通过 getInstance 方法 来获取到实例,首次调用该方法的时候,才真正创建实例.(懒加载/延时加载)
classSingleton{privatestatic Singleton instance = null;privateSingleton(){}publicstatic Singleton getInstance(){if(instance == null){
            instance =newSingleton();}return instance;}}
懒汉模式 - 多线程版
由于单线程版,在多线程情况下,如果有多个线程调用 getInstance() 方法,就可能创建出多个实例出来.
classSingleton{privatestatic Singleton instance = null;privateSingleton(){}publicstatic Singleton getInstance(){synchronized(Singleton.class){if(instance == null){
                instance =newSingleton();}}return instance;}}
懒汉模式 - 多线程版(改进版)
由于上一个代码 锁竞争的频率非常大, 每次调用getInstance()都会竞争锁.
classSingleton{privatestaticvolatile Singleton instance = null;privateSingleton(){}publicstatic Singleton getInstance(){if(instance == null){synchronized(Singleton.class){if(instance == null){
                    instance =newSingleton();}}}return instance;}}
- 这里用了双重if 来判定,就降低了对锁竞争的频率
- 这里给 instance 加了 volatile
11.2 阻塞队列
11.2.1 阻塞队列的概念
我们之前学过优先级队列,优先级队列就是一种特殊的队列.遵循队列"先进先出"的原则.
这里的阻塞队列也是一样的.
阻塞队列也是一种特殊的队列.遵循"先进先出"的原则.
阻塞队列是一种线程安全的数据结构.阻塞队列的特性:
- 当 队满 时,继续 入队就会阻塞,直到有其他线程从队列中取走元素.
- 当队空时,继续出队也会阻塞,直到有其他线程往队列中插入元素.
阻塞队列的应用场景 最典型的就是 “生产者消费者模型”
11.2.2 生产者消费者模型
生产者消费者模型就是通过一个容器来解决生产者和消费者的强耦合问题.
图解:
生产者和消费者彼此之间不需要直接通讯,而是通过一个阻塞队列来进行通讯,所以生产者就生产完数据之后就不需要再等待消费者处理,直接把数据给阻塞队列就可以了,消费者也不需要找生产者要数据,而是直接通过阻塞队列来获取数据.
阻塞队列的用途
- 削峰填谷
- 解耦
11.2.3 Java标准库中的阻塞队列
在Java标准库中内置了阻塞队列.
注意事项:
BlockingQueue是一个 接口.真正实现的类是LinkedBlockingQueue- 阻塞队列的入队方法是:
put()方法 - 阻塞队列的出队方法是:
take()方法 BlockingQueue也有offer poll peek 等方法,单是这些方法不带有阻塞特性(线程不安全)
使用示例:
import java.util.concurrent.BlockingQueue;import java.util.concurrent.LinkedBlockingQueue;publicclassTest{publicstaticvoidmain(String[] args)throws InterruptedException {
        BlockingQueue<Integer> queue =newLinkedBlockingQueue<>();
        queue.put(12312312);
        System.out.println(queue.take());}}
11.2.4 生产者消费者模型代码实现
import java.util.concurrent.BlockingQueue;import java.util.concurrent.LinkedBlockingQueue;publicclassThreadDemo{publicstaticvoidmain(String[] args){
        BlockingQueue<Integer> queue =newLinkedBlockingQueue<>();
        Thread customer =newThread(){@Overridepublicvoidrun(){while(true){try{
                        Integer value = queue.take();
                        System.out.println("消费了: "+ value);}catch(InterruptedException e){
                        e.printStackTrace();}}}};
        customer.start();

        Thread producer =newThread(){@Overridepublicvoidrun(){for(int i =1; i <=10000; i++){try{
                        queue.put(i);
                        System.out.println("生产了: "+ i);
                        Thread.sleep(1000);}catch(InterruptedException e){
                        e.printStackTrace();}}}};
        producer.start();try{
            customer.join();
            producer.join();}catch(InterruptedException e){
            e.printStackTrace();}}}
11.2.5 阻塞队列的实现
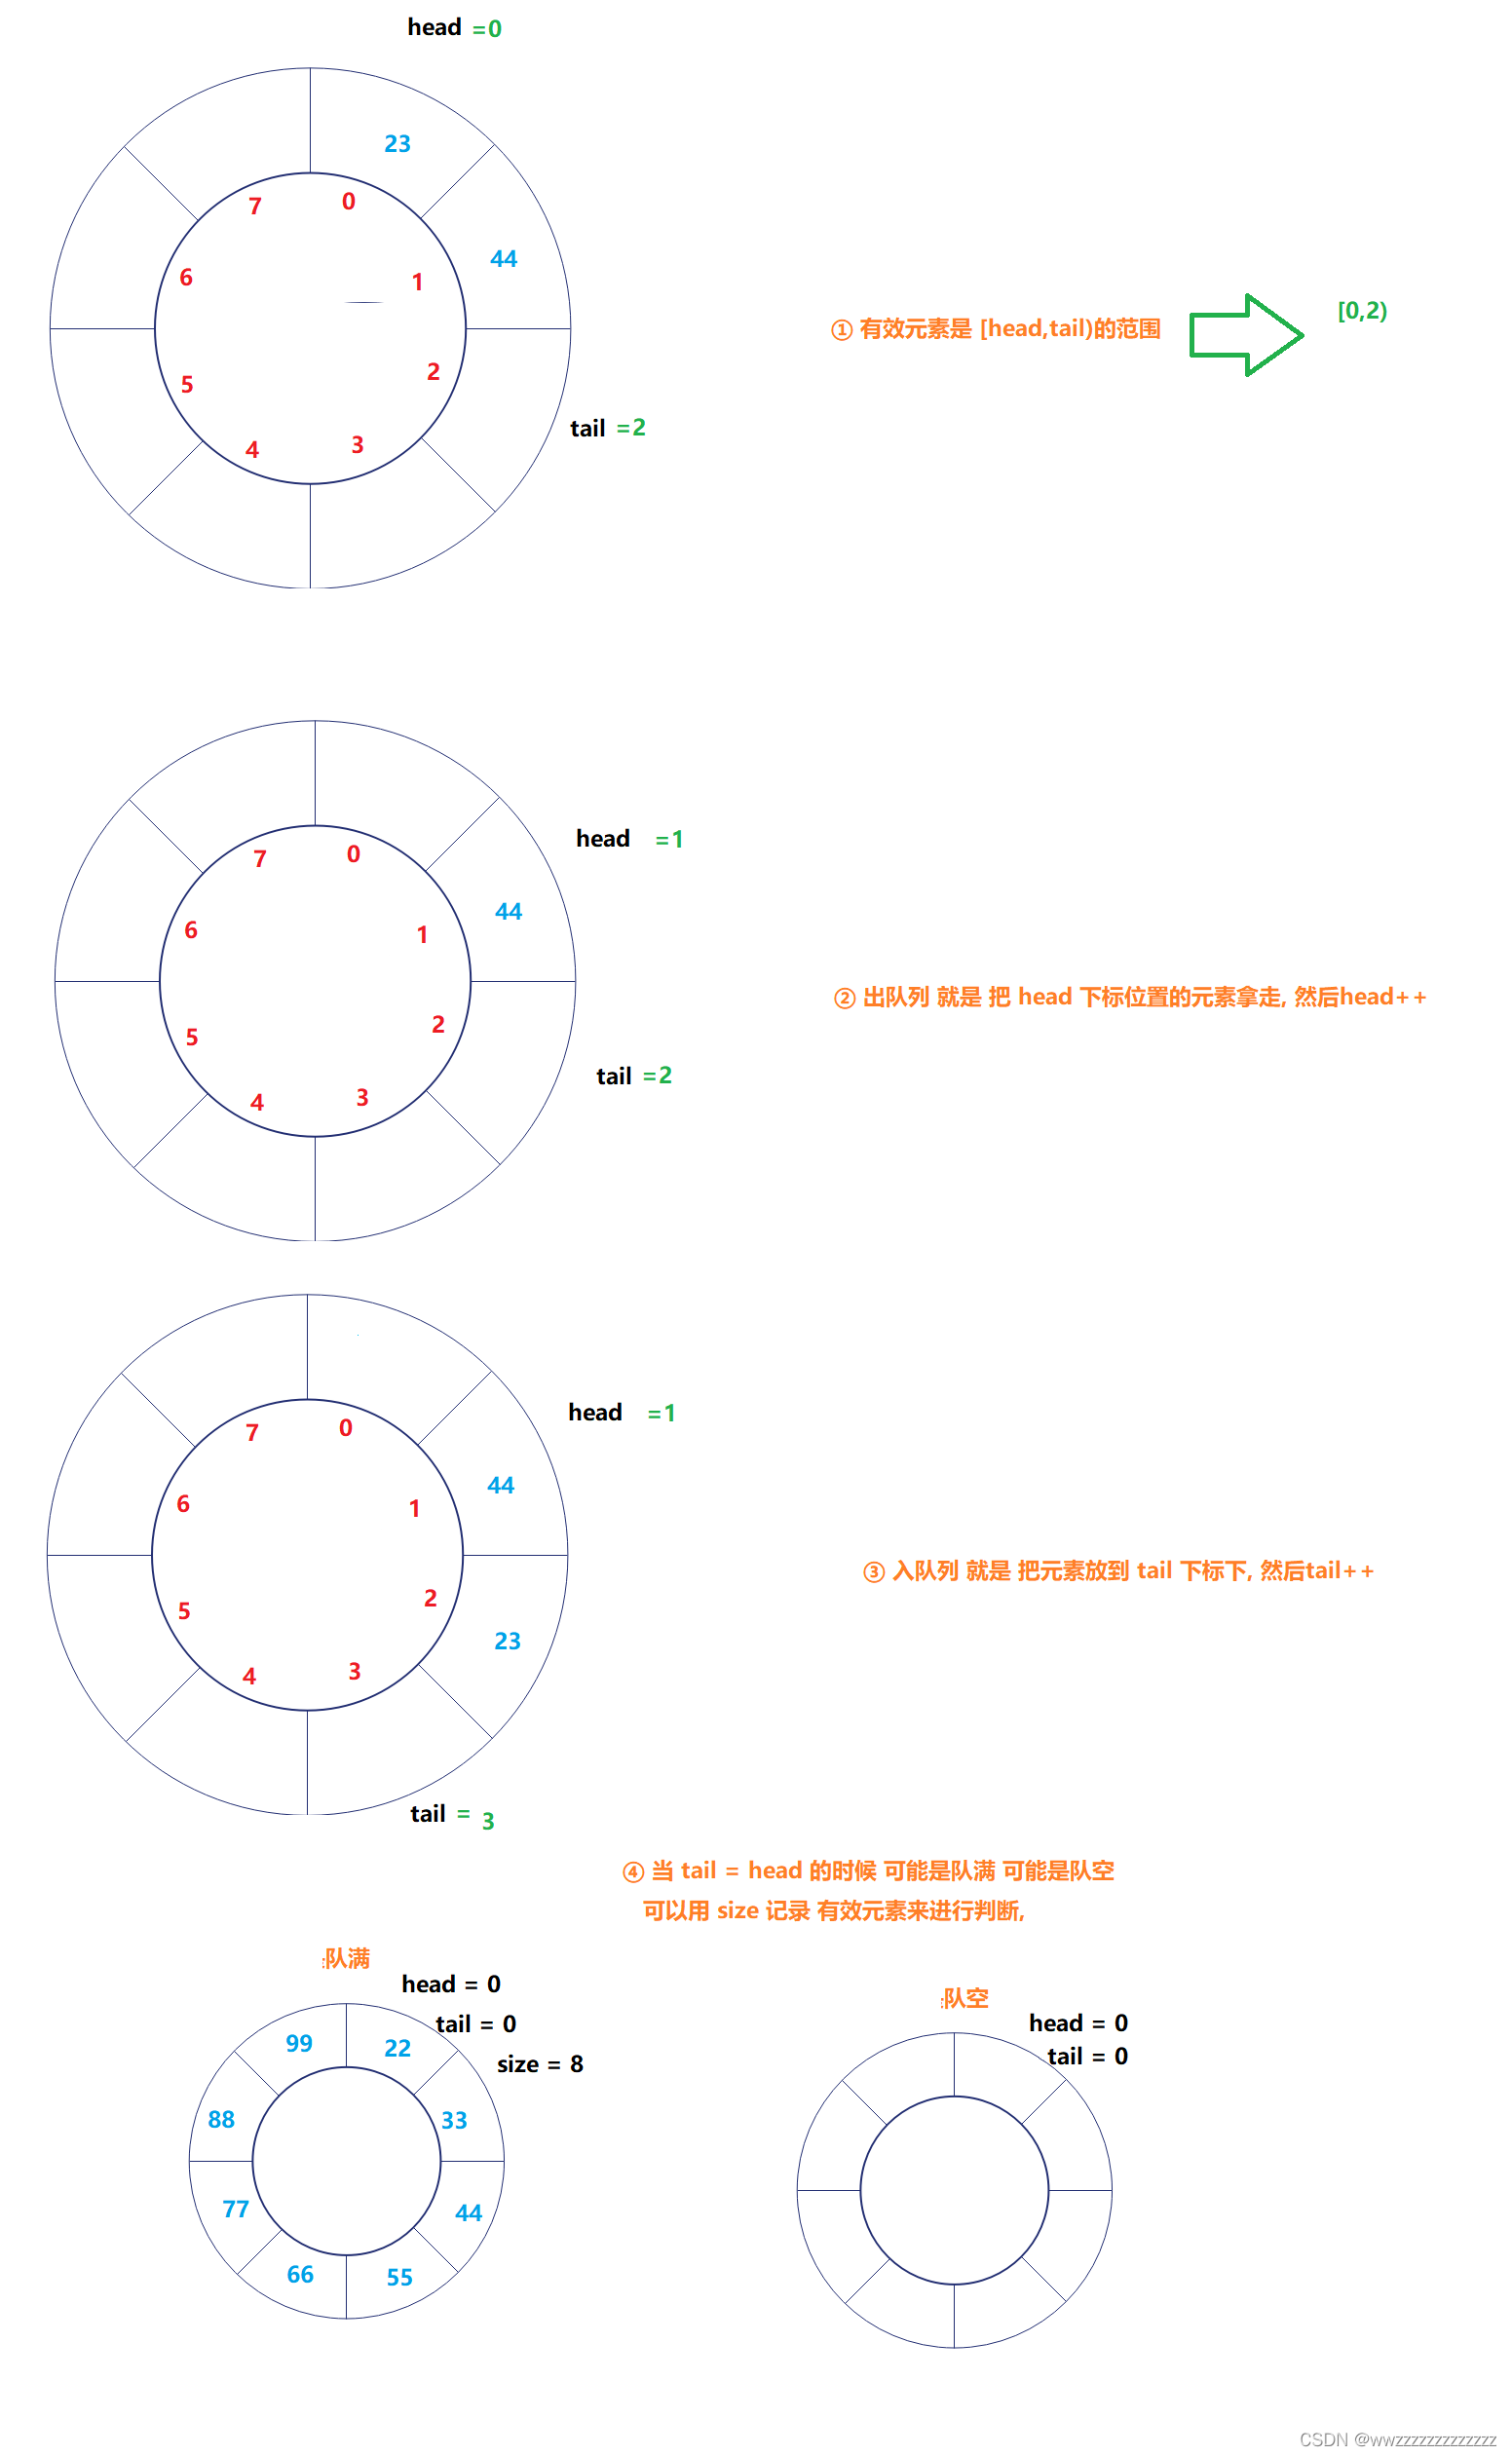
这里用"循环队列"来实现 阻塞队列
注意事项:
① 有效元素的范围是 [ head , tail) (左闭右开)
② 出队列 就是 把 head下标下的元素拿走 然后head++
③ 入队列 就是 把元素放到 tail下标下, 然后tail++
④ 当 tail == head时,可能是队空 也可能是队满,这里用size记录有效元素个数,来解决这个问题.
代码实现:
publicclassMyBlockingQueue{privateint[] items =newint[1000];privateint head =0;privateint tail =0;privateint size =0;publicvoidput(int item)throws InterruptedException {synchronized(this){// 这里的if最好换成while// 否则 notifyAll 的时候, 该线程从 wait 中被唤醒,// 但是紧接着并未抢占到锁. 当锁被抢占的时候, 可能又已经队列满了// 就只能继续等待while(size == items.length){wait();}
            items[tail]= item;
            tail++;if(tail >= items.length){
                tail =0;}
            size++;notify();}}publicinttake()throws InterruptedException {synchronized(this){while(size ==0){wait();}int ret = items[head];
            head++;if(head >= items.length){
                head =0;}
            size--;notify();return ret;}}}
测试代码:
publicstaticvoidmain(String[] args){
        MyBlockingQueue queue =newMyBlockingQueue();
        Thread customer =newThread(){@Overridepublicvoidrun(){while(true){try{
                        System.out.println("消费了: "+ queue.take());
                        Thread.sleep(1000);}catch(InterruptedException e){
                        e.printStackTrace();}}}};
        customer.start();

        Thread producer =newThread(){@Overridepublicvoidrun(){for(int i =1; i <=10000; i++){try{
                        queue.put(i);
                        System.out.println("生产了: "+ i);//Thread.sleep(2000);}catch(InterruptedException e){
                        e.printStackTrace();}}}};
        producer.start();try{
            customer.join();
            producer.join();}catch(InterruptedException e){
            e.printStackTrace();}}
11.3 定时器
11.3.1 定时器的概念
定时器也是软件开发中的一个重要组件. 类似于一个 “闹钟”. 达到一个设定的时间之后, 就执行某个指定好的代码.
示例: 比如访问某个网站,网站卡了,浏览器就会转圈圈,但是不会无限转下去,当等到一定的时间就会显示"超时访问"
11.3.2 Java标准库中的定时器
- 标准库中提供了一个
Timer类, 核心方法就是schedule() schedule包含了两个参数.第一个参数指定即将要执行的任务代码, 第二个参数指定多长时间之后 执行 (单位为毫秒)
使用示例:
import java.util.Timer;import java.util.TimerTask;publicclassThreadDemo3{publicstaticvoidmain(String[] args){
        Timer timer =newTimer();
        timer.schedule(newTimerTask(){@Overridepublicvoidrun(){
                System.out.println("hello !!!");}},3000);}}
11.3.3 定时器的实现
定时器的构成:
一个带优先级的阻塞队列
队列中的每个元素是一个 Task 对象.
Task 中带有一个时间属性, 队首元素就是即将
同时有一个 worker 线程一直扫描队首元素, 看队首元素是否需要执行
import java.util.concurrent.PriorityBlockingQueue;publicclassMyTimer{staticclassTaskimplementsComparable<Task>{// command : 这个任务是什么private Runnable command;// time : 这个任务啥时候到时间 (单位ms)privatelong time;publicTask(Runnable command,long time){this.command = command;this.time =System.currentTimeMillis()+time;}publicvoidrun(){
            command.run();}@OverridepublicintcompareTo(Task o){return(int)(this.time - o.time);}}staticclassTimer{// 使用带优先级版本的阻塞队列来组织这些任务private PriorityBlockingQueue<Task> queue =newPriorityBlockingQueue<>();private Object locker =newObject();publicvoidschedule(Runnable command,long delay){
            Task task =newTask(command,delay);
            queue.put(task);// 每次插入新的任务都要唤醒线程 让扫描现场能够重新计算wait时间,保证新任务不会操作(sleep做不到)synchronized(locker){
                locker.notify();}}publicTimer(){// 创建一个扫描线程 ( 判断任务是不是已经到时间能执行了)
            Thread t =newThread(){@Overridepublicvoidrun(){while(true){// 取出队列的首元素 判定时间是不是到了try{
                            Task task = queue.take();long curTime = System.currentTimeMillis();if(task.time > curTime){// 没到时间,暂时不执行
                                queue.put(task);// 但是当前这个代码中存在一个严重的问题,就是 while (true) 转的太快了,造成了无意义的 CPU 浪费(解决办法就是wait)// 根据时间差 进行等待synchronized(locker){
                                    locker.wait(task.time - curTime);}}else{
                                task.run();}}catch(InterruptedException e){
                            e.printStackTrace();break;}}}};
            t.start();}}publicstaticvoidmain(String[] args){
        System.out.println("程序启动");
        Timer timer =newTimer();
        timer.schedule(newRunnable(){@Overridepublicvoidrun(){
                System.out.println("hello");}},3000);}}
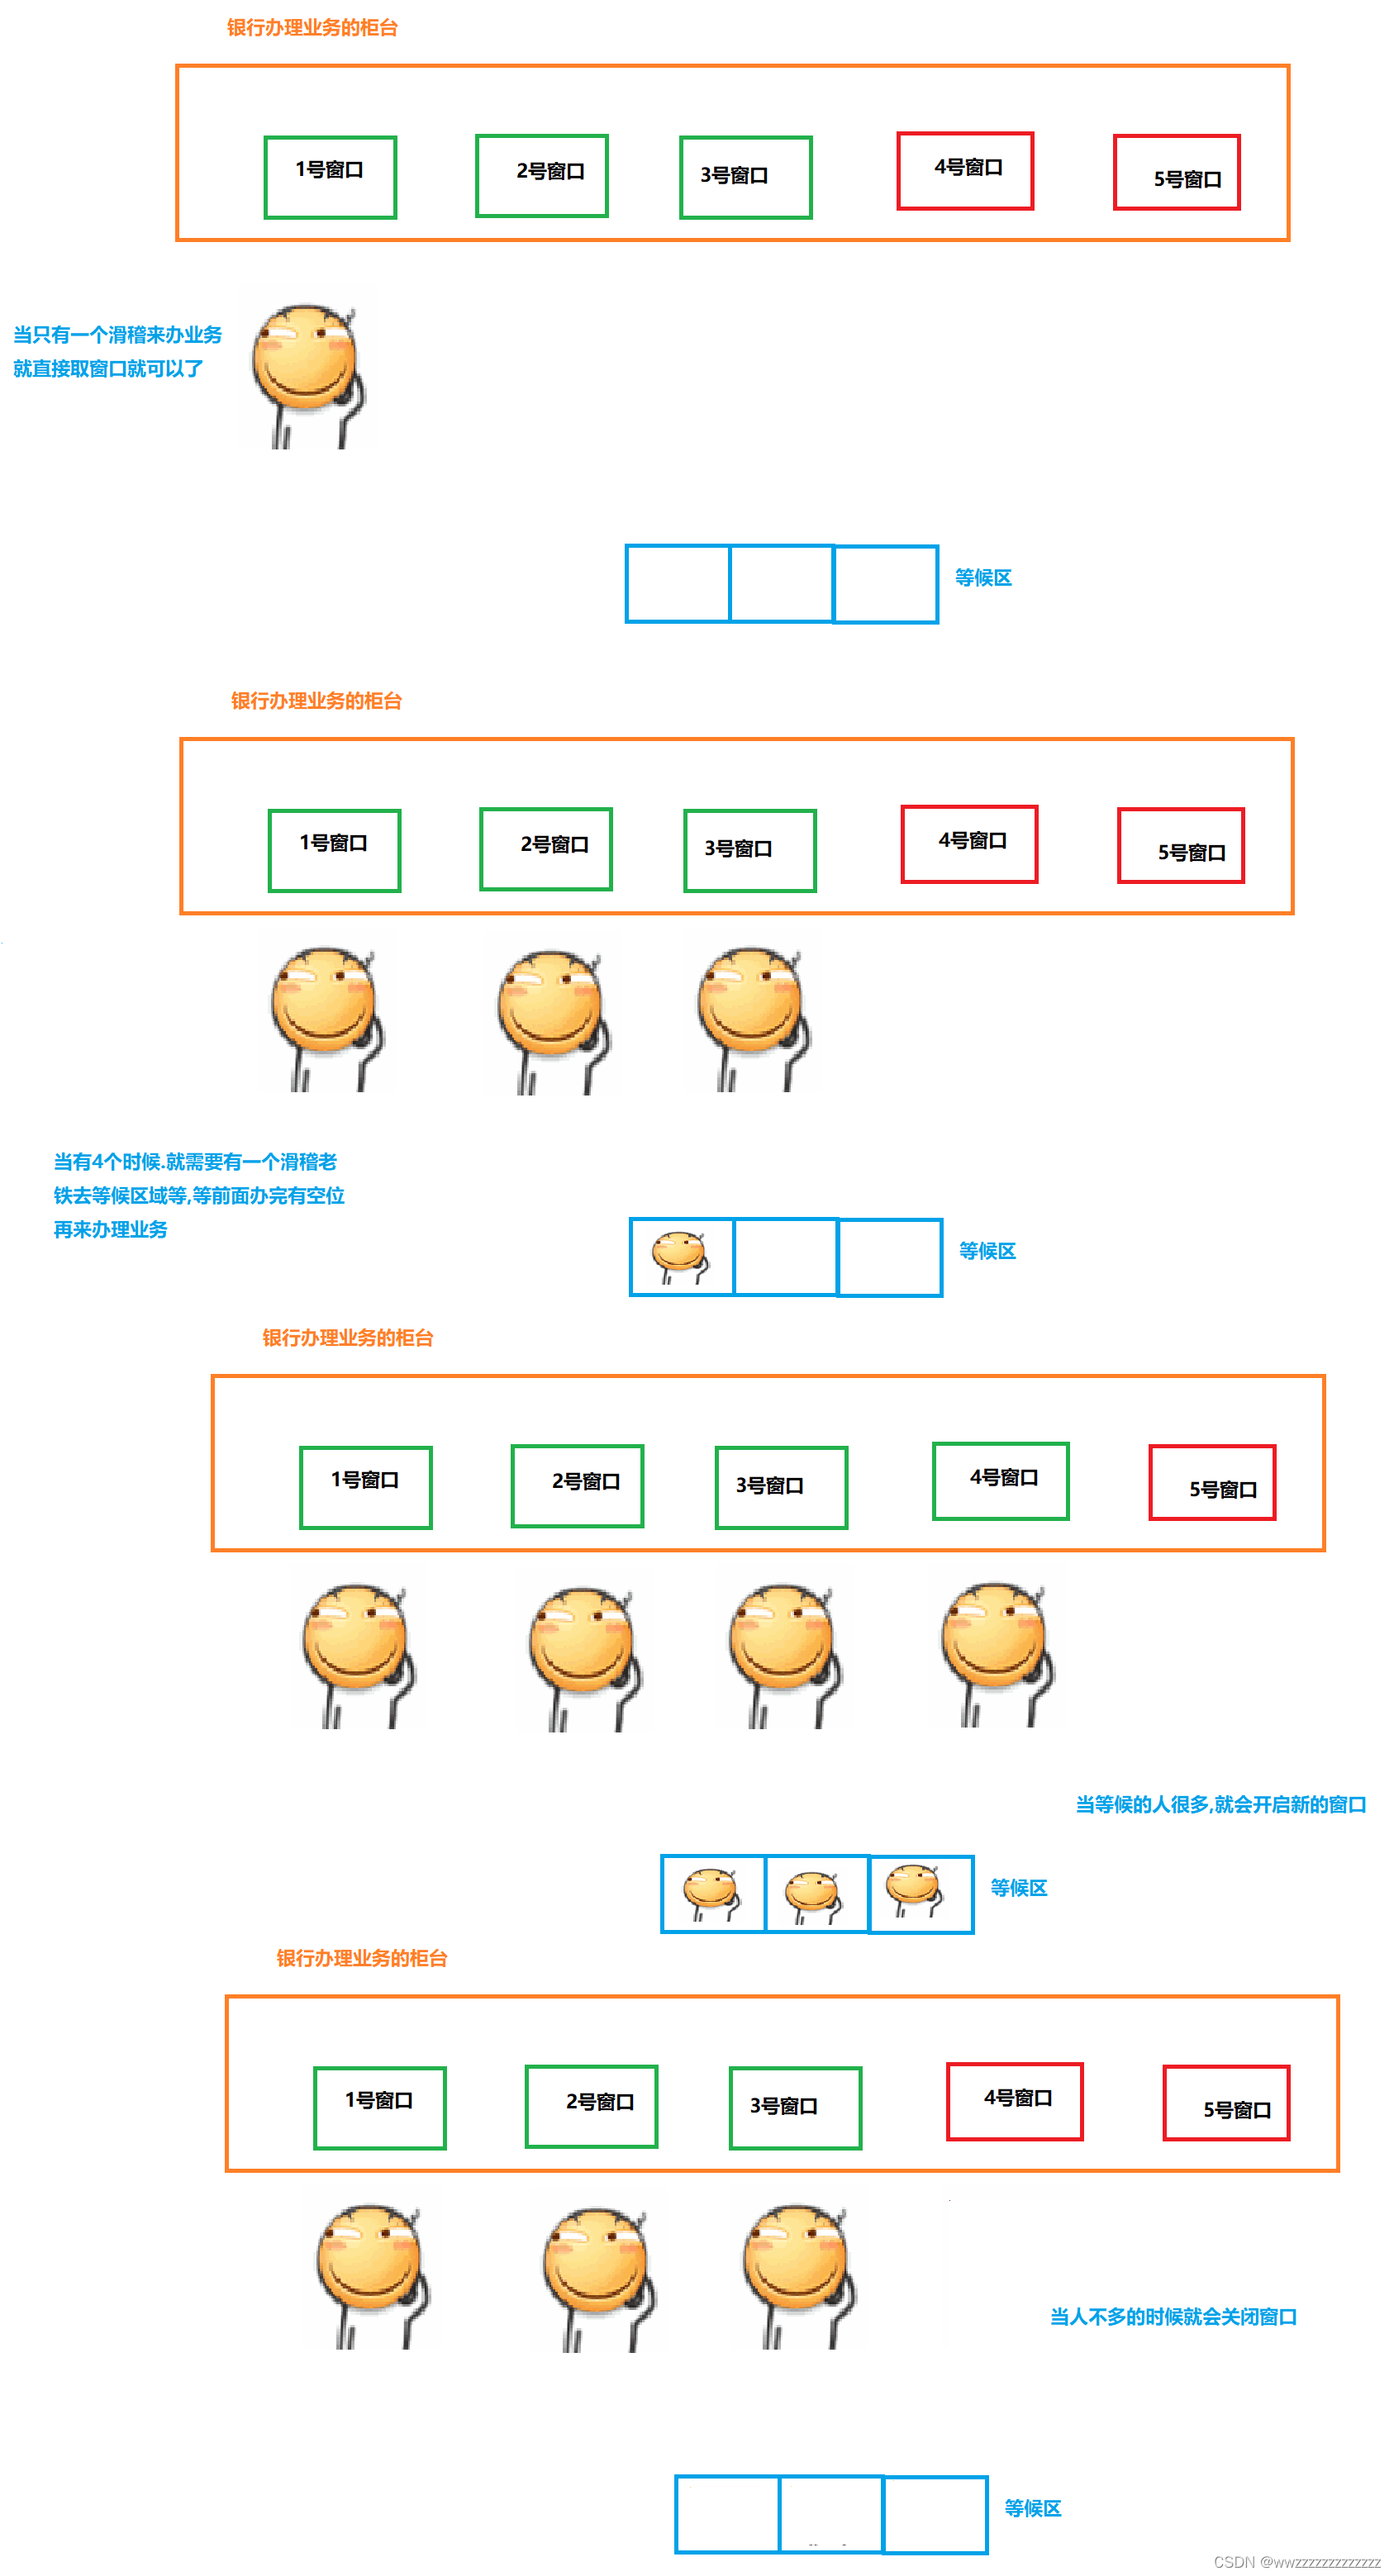
11.4 线程池
解决并发编程使用了多进程的方法,但是由于进程的创建/销毁的开销太大了,就引入了更轻量的线程.
线程相比于进程的创建/开销就快很多,但是频繁的创建销毁线程,线程的创建销毁开销也无法忽视.
因此引入了:
- 协程(这里不讲)
- 线程池
使用线程的时候,不是说需要使用的时候才创建,而是提前创建好了,放到了一个"池子"里
当我们需要的时候,直接从池子里取一个线程回来.
当我们不需要这个线程的时候,直接放回池子里
案例:
当 小明 想联系 小红的时候 就买一个手机,联系完后扔掉,
每次买手机的成本很高,小明就买了一个手机放着,每次用的时候就拿出来,不用的时候就放起来.这样就节省了很多钱.
11.4.1 线程池图解
11.4.2 Java标准库中的线程池
ThreadPoolExecutor
提供了更多的可选参数, 可以进一步细化线程池行为的设定.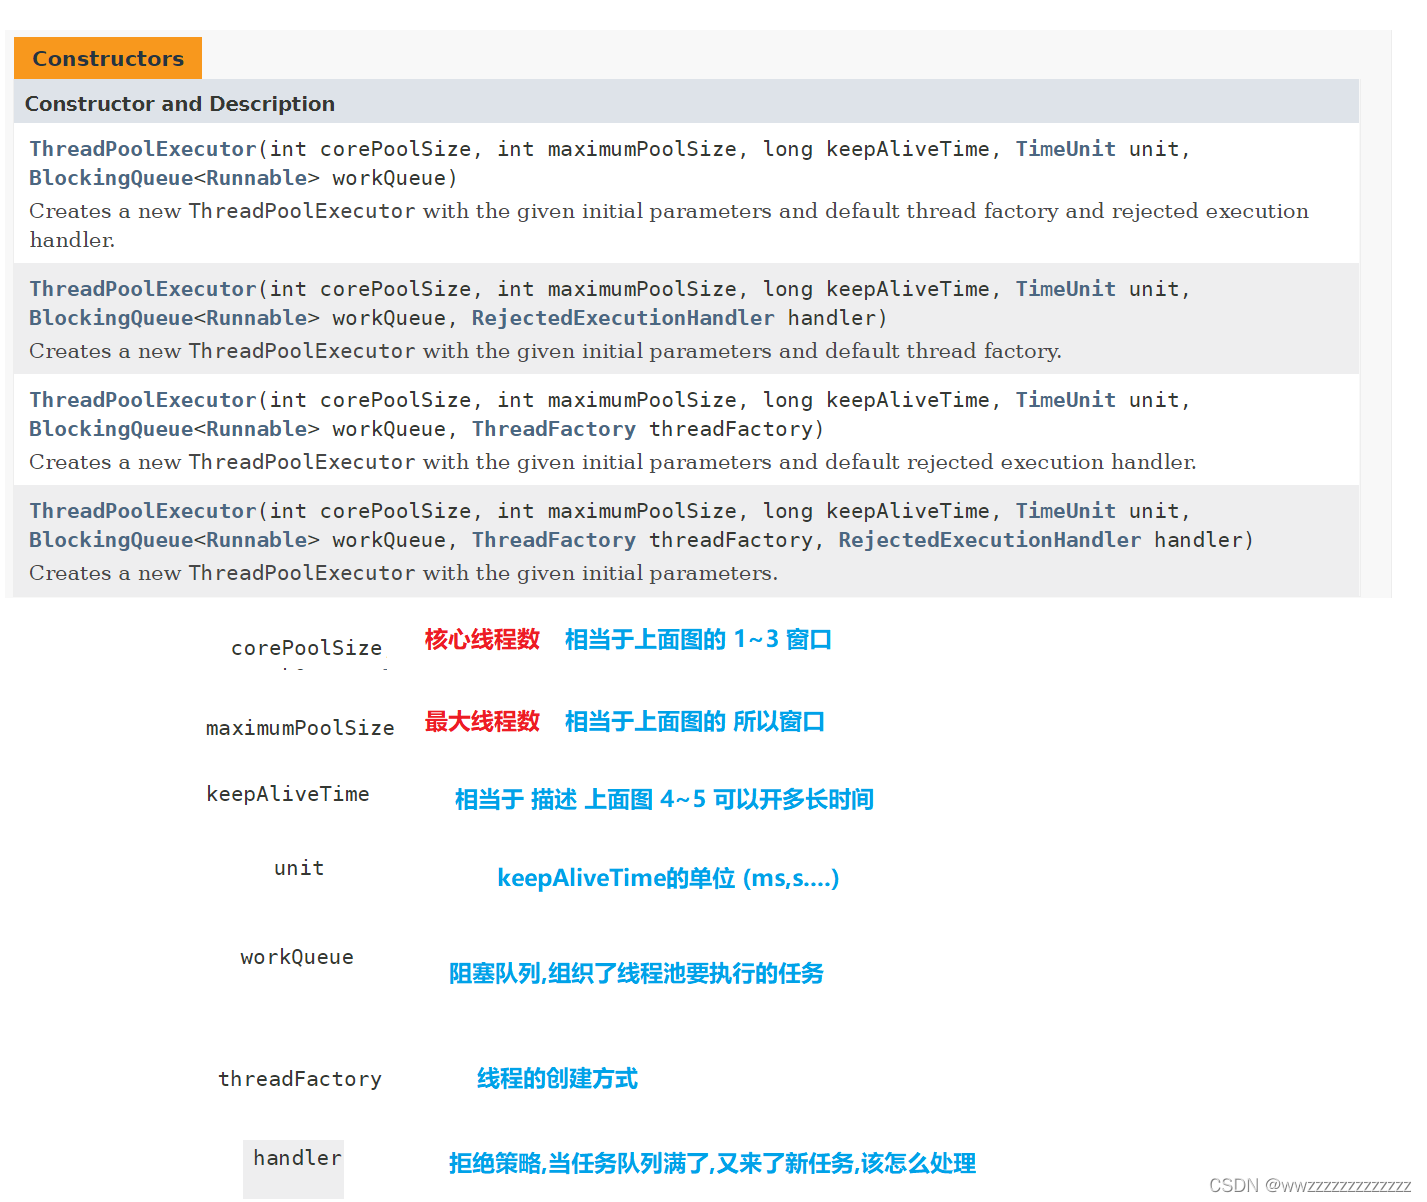
由于使用起来非常复杂,标准库又提供了一组其他的类.
Executors
本质上是
ThreadPoolExecutor
类的封装.
**
Executors
创建线程池的几种方式**
newFixedThreadPool: 创建固定线程数的线程池newCachedThreadPool: 创建线程数目动态增长的线程池.newSingleThreadExecutor: 创建只包含单个线程的线程池.newScheduledThreadPool: 设定 延迟时间后执行命令,或者定期执行命令. 是进阶版的 Timer.
使用示例:
import java.util.concurrent.ExecutorService;import java.util.concurrent.Executors;publicclassThreadDemo{publicstaticvoidmain(String[] args){
        ExecutorService pool = Executors.newFixedThreadPool(10);
        pool.submit(newRunnable(){@Overridepublicvoidrun(){
                System.out.println("hello!");}});}}
- 使用
Executors.newFixedThreadPool(10)能创建出固定包含10个线程的线程池. - 返回值类型为
ExecutorService - 通过
ExecutorService.submit可以注册一个任务到线程池中.
11.4.3 线程池的实现
- 使用 Worker 类描述一个工作线程.
- 使用 Runnable 描述一个任务
- 组织若干个任务.可以使用一个阻塞队列.
- 每个 worker 线程要做的事情: 不停的从 BlockingQueue 中取任务并执行.
import java.util.ArrayList;import java.util.List;import java.util.concurrent.BlockingQueue;import java.util.concurrent.LinkedBlockingQueue;publicclassThreadDemo2{staticclassWorkerextendsThread{private BlockingQueue<Runnable> queue = null;publicWorker(BlockingQueue<Runnable> queue){this.queue = queue;}@Overridepublicvoidrun(){while(true){try{
                    Runnable command = queue.take();
                    command.run();}catch(InterruptedException e){
                    e.printStackTrace();}}}}staticclassThreadPool{// 阻塞队列 用来组织任务private BlockingQueue<Runnable> queue =newLinkedBlockingQueue<>();// 用来存放当前的工作线程private List<Worker> workers =newArrayList<>();// 最大工作线程数privatefinalint MAX_WORKER_COUNT =10;publicvoidsubmit(Runnable command)throws InterruptedException {if(workers.size()< MAX_WORKER_COUNT){// 当前工作线程不足 创建新的线程// Worker内部需要获取到队列的内容,就需要创建一个构造方法.
                Worker worker =newWorker(queue);
                worker.start();
                workers.add(worker);}
            queue.put(command);}}publicstaticvoidmain(String[] args)throws InterruptedException {
        ThreadPool pool =newThreadPool();
        pool.submit(newRunnable(){@Overridepublicvoidrun(){
                System.out.println("hello");}});}}
版权归原作者 wwzzzzzzzzzzzzz 所有, 如有侵权,请联系我们删除。