
本文展示Spring Boot中,新版本OAuth2.0的简单实现,版本信息:
spring-boot 2.7.10
spring-security-oauth2-authorization-server 0.4.0
spring-security-oauth2-client 5.7.7
spring-boot-starter-oauth2-resource-server 2.7.10
展示三个服务,分别为
- 授权服务:作为认证中心,用于向客户端发放授权码code与令牌token
- 资源服务:保存客户端要访问的资源
- 客户端:向授权服务发起请求,获取授权码code,再用code换取token,最后使用token访问资源
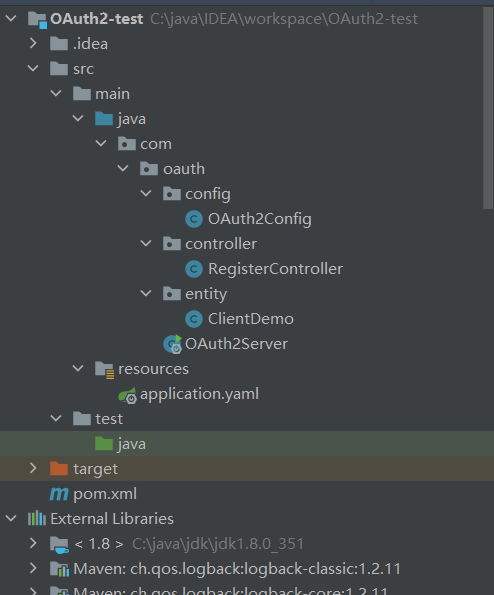
授权服务搭建
总体预览
pom
<?xml version="1.0" encoding="UTF-8"?><projectxmlns="http://maven.apache.org/POM/4.0.0"xmlns:xsi="http://www.w3.org/2001/XMLSchema-instance"xsi:schemaLocation="http://maven.apache.org/POM/4.0.0 http://maven.apache.org/xsd/maven-4.0.0.xsd"><modelVersion>4.0.0</modelVersion><groupId>org.example</groupId><artifactId>OAuth2-test</artifactId><version>1.0-SNAPSHOT</version><properties><maven.compiler.source>8</maven.compiler.source><maven.compiler.target>8</maven.compiler.target></properties><parent><groupId>org.springframework.boot</groupId><artifactId>spring-boot-starter-parent</artifactId><version>2.7.10</version></parent><dependencies><dependency><groupId>org.springframework.boot</groupId><artifactId>spring-boot-starter-security</artifactId></dependency><dependency><groupId>org.springframework.security</groupId><artifactId>spring-security-oauth2-authorization-server</artifactId><version>0.4.0</version></dependency><dependency><groupId>org.springframework.boot</groupId><artifactId>spring-boot-starter-web</artifactId></dependency><dependency><groupId>org.springframework.boot</groupId><artifactId>spring-boot-starter-jdbc</artifactId></dependency><dependency><groupId>mysql</groupId><artifactId>mysql-connector-java</artifactId><version>8.0.28</version></dependency><dependency><groupId>cn.hutool</groupId><artifactId>hutool-all</artifactId><version>5.8.26</version></dependency><dependency><groupId>org.projectlombok</groupId><artifactId>lombok</artifactId></dependency></dependencies><build><plugins><plugin><groupId>org.springframework.boot</groupId><artifactId>spring-boot-maven-plugin</artifactId></plugin></plugins></build></project>
配置类
importcom.nimbusds.jose.jwk.JWKSet;importcom.nimbusds.jose.jwk.RSAKey;importcom.nimbusds.jose.jwk.source.JWKSource;importcom.nimbusds.jose.proc.SecurityContext;importorg.springframework.beans.factory.annotation.Autowired;importorg.springframework.context.annotation.Bean;importorg.springframework.context.annotation.Configuration;importorg.springframework.jdbc.core.JdbcTemplate;importorg.springframework.security.config.Customizer;importorg.springframework.security.config.annotation.web.builders.HttpSecurity;importorg.springframework.security.config.annotation.web.configuration.EnableWebSecurity;importorg.springframework.security.config.annotation.web.configurers.oauth2.server.resource.OAuth2ResourceServerConfigurer;importorg.springframework.security.crypto.bcrypt.BCryptPasswordEncoder;importorg.springframework.security.crypto.password.*;importorg.springframework.security.crypto.scrypt.SCryptPasswordEncoder;importorg.springframework.security.oauth2.jose.jws.MacAlgorithm;importorg.springframework.security.oauth2.jwt.JwtDecoder;importorg.springframework.security.oauth2.server.authorization.JdbcOAuth2AuthorizationConsentService;importorg.springframework.security.oauth2.server.authorization.JdbcOAuth2AuthorizationService;importorg.springframework.security.oauth2.server.authorization.OAuth2AuthorizationConsentService;importorg.springframework.security.oauth2.server.authorization.OAuth2AuthorizationService;importorg.springframework.security.oauth2.server.authorization.client.JdbcRegisteredClientRepository;importorg.springframework.security.oauth2.server.authorization.client.RegisteredClientRepository;importorg.springframework.security.oauth2.server.authorization.config.annotation.web.configuration.OAuth2AuthorizationServerConfiguration;importorg.springframework.security.oauth2.server.authorization.config.annotation.web.configurers.OAuth2AuthorizationServerConfigurer;importorg.springframework.security.oauth2.server.authorization.settings.AuthorizationServerSettings;importorg.springframework.security.oauth2.server.authorization.settings.ClientSettings;importorg.springframework.security.oauth2.server.authorization.settings.TokenSettings;importorg.springframework.security.provisioning.JdbcUserDetailsManager;importorg.springframework.security.provisioning.UserDetailsManager;importorg.springframework.security.web.SecurityFilterChain;importorg.springframework.security.web.util.matcher.RequestMatcher;importjavax.sql.DataSource;importjava.security.KeyPair;importjava.security.KeyPairGenerator;importjava.security.interfaces.RSAPrivateKey;importjava.security.interfaces.RSAPublicKey;importjava.time.Duration;importjava.util.HashMap;importjava.util.Map;importjava.util.UUID;@EnableWebSecurity@ConfigurationpublicclassOAuth2Config{@AutowiredprivateJdbcTemplate jdbcTemplate;@AutowiredprivateDataSource dataSource;@BeanUserDetailsManageruserDetailsManager(){returnnewJdbcUserDetailsManager(dataSource);}@BeanpublicSecurityFilterChainauthorizationServerSecurityFilterChain(HttpSecurity http)throwsException{// 定义授权服务配置OAuth2AuthorizationServerConfigurer configurer =newOAuth2AuthorizationServerConfigurer();// 获取授权服务器相关的请求端点RequestMatcher endpointsMatcher = configurer.getEndpointsMatcher();

        http
                .authorizeHttpRequests(authorize -> authorize
                        // 配置放行的请求,/register用于客户端及用户的注册// /register/*代表放行register下的单层路径,/register/**代表其下的所有子路径.antMatchers("/register/**","/login").permitAll()// 其他任何请求都需要认证.anyRequest().authenticated())//配置登录页,用于授权请求未认证时进行用户登录授权.formLogin().and()// 忽略掉相关端点的CSRF(跨站请求伪造攻击防御): 对授权端点的访问不被CSRF拦截.csrf(
                        csrf -> csrf.ignoringRequestMatchers(endpointsMatcher)//如果是post请求,即便上面已经放行,还是会被csrf过滤器拦截,所以针对post请求,如果开启了csrf防护,需要再配置放行.ignoringAntMatchers("/register/**"))// 使用BearerTokenAuthenticationFilter对AccessToken及idToken进行解析验证// idToken是开启OIDC时,授权服务连同AccessToken(就是访问资源需要的token)一起返回给客户端的,用于客户端验证用户身份,结合此处配置使用BearerTokenAuthenticationFilter来验证idToken.oauth2ResourceServer(OAuth2ResourceServerConfigurer::jwt)// 应用授权服务器的配置,使其生效.apply(configurer);

        configurer
                //开启oidc,客户端会对资源所有者进行身份认证,确保用户身份的真实性、防止身份伪造、增强安全性。// 开启后,除了访问令牌access_token,还会多一个用户身份认证的idToken.oidc(Customizer.withDefaults())//配置用何种方式保存注册的客户端信息,默认为内存保存,这里配置为数据库保存,表名为'oauth2_registered_client'//保存客户端注册信息,主要用于后续各种认证时对比客户端是否有效.registeredClientRepository(registeredClientRepository())//配置用何种方式保存OAuth2客户端的授权请求的信息。这包括授权码、访问令牌、刷新令牌等。// 默认为内存保存,这里配置为数据库保存,表名为'oauth2_authorization'//授权信息会作为认证依据,在后续请求token时被读取,不存在授权信息则不给客户端生成token.authorizationService(authorizationService())//配置用何种方式存储用户对客户端请求的授权同意(consent)信息。// 默认为内存保存,这里配置为数据库保存,表名为'oauth2_authorization_consent'//请求code时检查是客户端否已授权,未授权不予code.authorizationConsentService(authorizationConsentService())/**
                 * OAuth2AuthorizationService 与 OAuth2AuthorizationConsentService区别:
                 *  oauth2_authorization 主要与令牌管理相关,负责存储令牌及其生命周期信息。
                 *  oauth2_authorization_consent 主要用于管理用户授权同意的记录,确保用户的授权选择被正确记录和遵守。
                 * *///配置OAuth2认证各项端点的http访问路径,如获取授权码的、获取token的、验证token的等等.authorizationServerSettings(authorizationServerSettings());return http.build();}/**
     * 注册客户端应用的保存方式, 对应 oauth2_registered_client 表
     */@BeanpublicRegisteredClientRepositoryregisteredClientRepository(){returnnewJdbcRegisteredClientRepository(jdbcTemplate);}/**
     * 令牌的发放记录, 对应 oauth2_authorization 表
     *///  @Bean 这里的bean注解放开,就可以不用在上面的OAuth2AuthorizationServerConfigurer中配置了publicOAuth2AuthorizationServiceauthorizationService(){returnnewJdbcOAuth2AuthorizationService(jdbcTemplate,registeredClientRepository());}/**
     * 把资源拥有者授权确认操作保存到数据库, 对应 oauth2_authorization_consent 表
     *///   @Bean 这里的bean注解放开,就可以不用在上面的OAuth2AuthorizationServerConfigurer中配置了publicOAuth2AuthorizationConsentServiceauthorizationConsentService(){returnnewJdbcOAuth2AuthorizationConsentService(jdbcTemplate,registeredClientRepository());}/**
     * AuthorizationServerS 的相关配置
     *///   @Bean 这里的bean注解放开,就可以不用在上面的OAuth2AuthorizationServerConfigurer中配置了publicAuthorizationServerSettingsauthorizationServerSettings(){//使用默认配置returnAuthorizationServerSettings.builder().build();}/**
     * token的配置项:过期时间、是否复用refreshToken刷新令牌等等
     * */@BeanpublicTokenSettingsclientTokenSettings(){returnTokenSettings.builder()// 令牌存活时间:2小时.accessTokenTimeToLive(Duration.ofHours(2))// 令牌可以刷新,重新获取.reuseRefreshTokens(true)// 刷新时间:30天(30天内当令牌过期时,可以用刷新令牌重新申请新令牌,不需要再认证).refreshTokenTimeToLive(Duration.ofDays(30)).build();}/**
     *  针对 OAuth 2.0 客户端的各种设置
     * */@BeanpublicClientSettingsclientSettings(){returnClientSettings.builder()// 是否需要用户授权确认.requireAuthorizationConsent(true)//指定使用client_secret_jwt认证方式时的签名算法.tokenEndpointAuthenticationSigningAlgorithm(MacAlgorithm.HS256)//如果为true,当客户端使用授权码时,服务器会强制要求提供 PKCE 参数(code verifier 和 code challenge)//.requireProofKey(true)//为 OAuth 2.0 客户端配置一个 JWKS 的 URL 地址, 当其他服务需要验证该客户端的 JWT 时,它们可以访问这个 URL 获取用于验证的公钥。//.jwkSetUrl("").build();}/**
     * 用于授权服务生成token令牌的JWT设置,如下代码使用非对称加密
     * 资源服务会通过issuer获取此配置来对token进行验证,验证通过则客户端可以访问资源
     */@BeanpublicJWKSource<SecurityContext>jwkSource()throwsException{// 生成RSA密钥对KeyPairGenerator keyPairGenerator =KeyPairGenerator.getInstance("RSA");
        keyPairGenerator.initialize(2048);KeyPair keyPair = keyPairGenerator.generateKeyPair();// 构建JWKRSAKey rsaKey =newRSAKey.Builder((RSAPublicKey) keyPair.getPublic())//公钥.privateKey(keyPair.getPrivate())//私钥// keyID是用来唯一标识密钥的,keyID可以帮助服务器区分不同的密钥。如果有多个密钥存在,服务器可以根据JWT中提供的kid值快速找到用于签名该JWT的密钥.keyID(UUID.randomUUID().toString()).build();// 构建JWKSetJWKSet jwkSet =newJWKSet(rsaKey);// 返回JWKSource实例return(jwkSelector, securityContext)-> jwkSelector.select(jwkSet);}/**
     * JWT token 解码配置
     */@BeanpublicJwtDecoderjwtDecoder(JWKSource<SecurityContext> jwkSource){returnOAuth2AuthorizationServerConfiguration.jwtDecoder(jwkSource);}/**
     * 密码编码器,用于对密码进行加密
     * 比如使用bcrypt对客户端密钥编码后,在数据库中其值大致为如下格式,多了一个{bcrypt}前缀:
     *  {bcrypt}$2a$10$BaExfIkMtKtdqMVfkxlAR.fWlRDoJrmTOEz4oM4jZ3fxkio9IMYJS
     *
     * */@BeanpublicPasswordEncoderpasswordEncoder(){Map<String,PasswordEncoder> encoders =newHashMap<>();//使用bcrypt进行密码编码(这是目前最常用和推荐的密码加密方法)。
        encoders.put("bcrypt",newBCryptPasswordEncoder());//基于 PBKDF2 算法进行密码编码
        encoders.put("pbkdf2",newPbkdf2PasswordEncoder());//基于 SCrypt 算法进行密码编码
        encoders.put("scrypt",newSCryptPasswordEncoder());//基于 SHA-256 算法进行密码编码
        encoders.put("sha256",newStandardPasswordEncoder());//DelegatingPasswordEncoder 是一个委托的密码编码器,它可以根据密码存储时的前缀标识符来选择不同的密码编码器。//DelegatingPasswordEncoder 以 "bcrypt" 为默认的编码器,同时允许使用其他定义在 encoders Map 中的编码器。PasswordEncoder passwordEncoder =newDelegatingPasswordEncoder("bcrypt", encoders);return passwordEncoder;}}
yaml文件
server:port:8080spring:datasource:url: jdbc:mysql://localhost:3306/oauth2?useUnicode=true&characterEncoding=utf8&zeroDateTimeBehavior=convertToNull&useSSL=true&serverTimezone=GMT%2B8username: root
    password: wangziyu123
    driver-class-name: com.mysql.cj.jdbc.Driver
controller
主要用于向授权服务注册客户端与用户,保存到数据库中
importcom.oauth.entity.ClientDemo;importorg.springframework.beans.factory.annotation.Autowired;importorg.springframework.security.core.userdetails.User;importorg.springframework.security.core.userdetails.UserDetails;importorg.springframework.security.crypto.password.PasswordEncoder;importorg.springframework.security.oauth2.core.AuthorizationGrantType;importorg.springframework.security.oauth2.core.ClientAuthenticationMethod;importorg.springframework.security.oauth2.core.oidc.OidcScopes;importorg.springframework.security.oauth2.server.authorization.client.RegisteredClient;importorg.springframework.security.oauth2.server.authorization.client.RegisteredClientRepository;importorg.springframework.security.oauth2.server.authorization.settings.ClientSettings;importorg.springframework.security.oauth2.server.authorization.settings.TokenSettings;importorg.springframework.security.provisioning.UserDetailsManager;importorg.springframework.web.bind.annotation.*;importjava.util.UUID;@RestController@RequestMapping("register")publicclassRegisterController{//用于把用户存储到数据库@AutowiredprivateUserDetailsManager userDetailsManager;//客户端token配置@AutowiredprivateTokenSettings clientTokenSettings;//客户端配置@AutowiredprivateClientSettings clientSettings;//注册客户端的存储库,已通过配置类指定为数据库存储@AutowiredprivateRegisteredClientRepository registeredClientRepository;//密码编码器@AutowiredprivatePasswordEncoder passwordEncoder;//用户注册方法@GetMapping("user")publicStringaddUser(String userName,String password,String role){UserDetails userDetails =User.builder().username(userName)//密码在数据库中存储为:{bcrypt}$2a$10$z******* 这样的格式,会加上{bcrypt}的前缀,后续OAuth2需要根据前缀做相关处理.password(passwordEncoder.encode(password)).roles(role).build();

        userDetailsManager.createUser(userDetails);return"用户注册成功";}//客户端注册方法@PostMapping("client")publicStringaddClient(@RequestBodyClientDemo client){RegisteredClient registeredClient =RegisteredClient.withId(UUID.randomUUID().toString())//客户端ID和密钥.clientId(client.getId()).clientSecret(passwordEncoder.encode(client.getSecret()))//客户端获取token时的认证方式,这里指定使用client_secret_basic方式,即请求头的Authentication: Basic Auth.clientAuthenticationMethod(ClientAuthenticationMethod.CLIENT_SECRET_BASIC)// 回调地址:授权码模式下,授权服务器会携带code向当前客户端的如下地址进行重定向。只能使用IP或域名,不能使用 localhost.redirectUri(client.getRedirectUri())// 授权范围(当前客户端的授权范围).scopes(scopes -> scopes.addAll(client.getScopes()))//配置支持多种授权模式.authorizationGrantType(AuthorizationGrantType.AUTHORIZATION_CODE)//授权码模式.authorizationGrantType(AuthorizationGrantType.REFRESH_TOKEN)// 刷新令牌.authorizationGrantType(AuthorizationGrantType.CLIENT_CREDENTIALS)//客户端凭证模式.authorizationGrantType(AuthorizationGrantType.PASSWORD)//密码模式// OIDC 支持, 用于客户端对用户(资源所有者)的身份认证.scope(OidcScopes.OPENID)//OIDC 并不是授权码模式的必需部分,但如果客户端请求包含 openid scope,就必须启用 OIDC 支持。.scope(OidcScopes.PROFILE)//token配置项.tokenSettings(clientTokenSettings)// 客户端配置项.clientSettings(clientSettings).build();

        registeredClientRepository.save(registeredClient);return"客户端注册成功";}/**
     * 展示授权码的回调
     * */@GetMapping("returnCode")publicStringgetCode(@RequestParamString code){return code;}}
entity
importlombok.Data;importjava.util.List;//注册客户端实体类@DatapublicclassClientDemo{privateString id;privateString secret;privateString redirectUri;privateList<String> scopes;}
主启动类
importorg.springframework.boot.SpringApplication;importorg.springframework.boot.autoconfigure.SpringBootApplication;@SpringBootApplicationpublicclassOAuth2Server{publicstaticvoidmain(String[] args){SpringApplication.run(OAuth2Server.class, args);}}
用到的数据表
security框架中的表,如下语句为mysql数据库执行,注意yaml配置的数据库要与实际建表的数据库一致
authorities表
CREATETABLE`authorities`(`username`varchar(50)NOTNULL,`authority`varchar(50)NOTNULL,UNIQUEKEY`ix_auth_username`(`username`,`authority`),CONSTRAINT`fk_authorities_users`FOREIGNKEY(`username`)REFERENCES`users`(`username`))ENGINE=InnoDBDEFAULTCHARSET=utf8mb4 COLLATE=utf8mb4_0900_ai_ci;
users表
CREATETABLE`users`(`username`varchar(50)NOTNULL,`password`varchar(500)NOTNULL,`enabled`tinyint(1)NOTNULL,PRIMARYKEY(`username`))ENGINE=InnoDBDEFAULTCHARSET=utf8mb4 COLLATE=utf8mb4_0900_ai_ci;
oauth2_authorization表
CREATETABLE`oauth2_authorization`(`id`varchar(100)NOTNULL,`registered_client_id`varchar(100)NOTNULL,`principal_name`varchar(200)NOTNULL,`authorization_grant_type`varchar(100)NOTNULL,`authorized_scopes`varchar(1000)DEFAULTNULL,`attributes`blob,`state`varchar(500)DEFAULTNULL,`authorization_code_value`blob,`authorization_code_issued_at`timestampNULLDEFAULTNULL,`authorization_code_expires_at`timestampNULLDEFAULTNULL,`authorization_code_metadata`blob,`access_token_value`blob,`access_token_issued_at`timestampNULLDEFAULTNULL,`access_token_expires_at`timestampNULLDEFAULTNULL,`access_token_metadata`blob,`access_token_type`varchar(100)DEFAULTNULL,`access_token_scopes`varchar(1000)DEFAULTNULL,`oidc_id_token_value`blob,`oidc_id_token_issued_at`timestampNULLDEFAULTNULL,`oidc_id_token_expires_at`timestampNULLDEFAULTNULL,`oidc_id_token_metadata`blob,`refresh_token_value`blob,`refresh_token_issued_at`timestampNULLDEFAULTNULL,`refresh_token_expires_at`timestampNULLDEFAULTNULL,`refresh_token_metadata`blob,PRIMARYKEY(`id`))ENGINE=InnoDBDEFAULTCHARSET=utf8mb4 COLLATE=utf8mb4_0900_ai_ci;
oauth2_authorization_consent表
CREATETABLE`oauth2_authorization_consent`(`registered_client_id`varchar(100)NOTNULL,`principal_name`varchar(200)NOTNULL,`authorities`varchar(1000)NOTNULL,PRIMARYKEY(`registered_client_id`,`principal_name`))ENGINE=InnoDBDEFAULTCHARSET=utf8mb4 COLLATE=utf8mb4_0900_ai_ci;
oauth2_registered_client表
CREATETABLE`oauth2_registered_client`(`id`varchar(100)NOTNULL,`client_id`varchar(100)NOTNULL,`client_id_issued_at`timestampNOTNULLDEFAULTCURRENT_TIMESTAMP,`client_secret`varchar(200)DEFAULTNULL,`client_secret_expires_at`timestampNULLDEFAULTNULL,`client_name`varchar(200)NOTNULL,`client_authentication_methods`varchar(1000)NOTNULL,`authorization_grant_types`varchar(1000)NOTNULL,`redirect_uris`varchar(1000)DEFAULTNULL,`scopes`varchar(1000)NOTNULL,`client_settings`varchar(2000)NOTNULL,`token_settings`varchar(2000)NOTNULL,PRIMARYKEY(`id`))ENGINE=InnoDBDEFAULTCHARSET=utf8mb4 COLLATE=utf8mb4_0900_ai_ci;
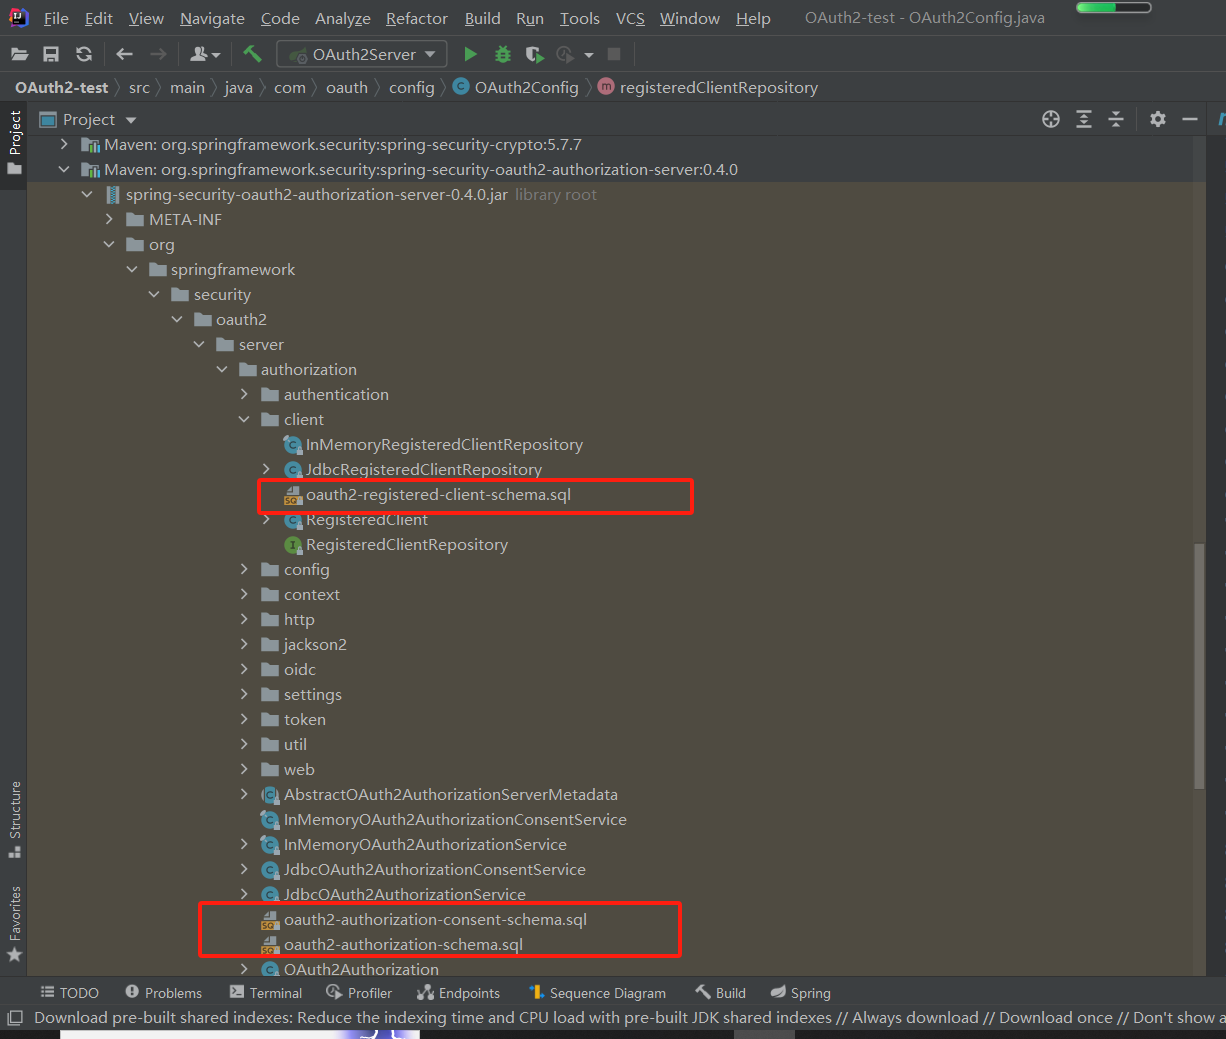
在
spring-security-oauth2-authorization-server下,可以看到对应sql
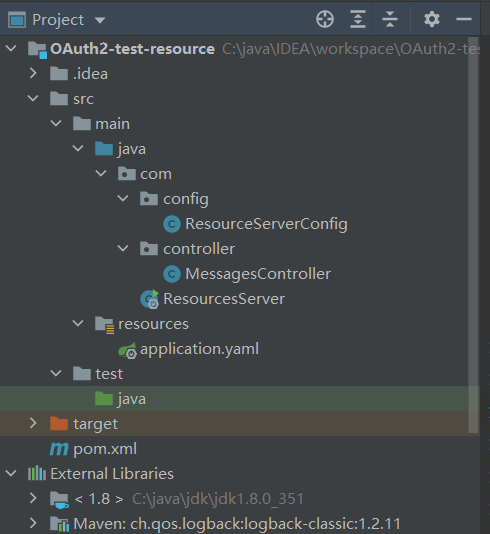
资源服务搭建
总体预览
pom
<?xml version="1.0" encoding="UTF-8"?><projectxmlns="http://maven.apache.org/POM/4.0.0"xmlns:xsi="http://www.w3.org/2001/XMLSchema-instance"xsi:schemaLocation="http://maven.apache.org/POM/4.0.0 http://maven.apache.org/xsd/maven-4.0.0.xsd"><modelVersion>4.0.0</modelVersion><groupId>org.example</groupId><artifactId>OAuth2-test-resource</artifactId><version>1.0-SNAPSHOT</version><properties><maven.compiler.source>8</maven.compiler.source><maven.compiler.target>8</maven.compiler.target></properties><parent><groupId>org.springframework.boot</groupId><artifactId>spring-boot-starter-parent</artifactId><version>2.7.10</version></parent><dependencies><dependency><groupId>org.springframework.boot</groupId><artifactId>spring-boot-starter-security</artifactId></dependency><dependency><groupId>org.springframework.boot</groupId><artifactId>spring-boot-starter-oauth2-resource-server</artifactId></dependency><dependency><groupId>org.springframework.boot</groupId><artifactId>spring-boot-starter-web</artifactId></dependency><dependency><groupId>org.projectlombok</groupId><artifactId>lombok</artifactId></dependency></dependencies><build><plugins><plugin><groupId>org.springframework.boot</groupId><artifactId>spring-boot-maven-plugin</artifactId></plugin></plugins></build></project>
配置类
importorg.springframework.context.annotation.Bean;importorg.springframework.context.annotation.Configuration;importorg.springframework.security.config.annotation.web.builders.HttpSecurity;importorg.springframework.security.config.annotation.web.configuration.EnableWebSecurity;importorg.springframework.security.web.SecurityFilterChain;@EnableWebSecurity@ConfigurationpublicclassResourceServerConfig{@BeanSecurityFilterChainsecurityFilterChain(HttpSecurity http)throwsException{

        http
                //所有请求都需要验证.authorizeHttpRequests(authorize -> authorize.anyRequest().authenticated())//开启jwt,用于令牌解析.oauth2ResourceServer(resourceServer -> resourceServer.jwt());return http.build();}}
yaml
server:port:8081spring:security:oauth2:resourceserver:jwt:#项目启动初始化时,在JwtDecoderProviderConfigurationUtils的getConfiguration方法处,发起http://127.0.0.1:8080/.well-known/openid-configuration请求,向授权服务获取元数据端点信息,#此项为必须配置,资源服务会根据此地址获取的信息来对token进行验证issuer-uri: http://127.0.0.1:8080#如果配置了issuer-uri,此项可以不配置。因为通过issuer-uri配置的值,在JwtDecoders的withProviderConfiguration方法中自动获取为http://127.0.0.1:8080/oauth2/jwks#jwk-set-uri: http://127.0.0.1:8080/oauth2/jwks
controller
importorg.springframework.security.access.prepost.PreAuthorize;importorg.springframework.web.bind.annotation.GetMapping;importorg.springframework.web.bind.annotation.RestController;@RestControllerpublicclassMessagesController{@GetMapping("/read/resource")@PreAuthorize("hasAuthority('SCOPE_read')")//限制访问资源所需要的权限publicStringgetResource1(){return"已成功获取资源";}}
主启动类
importorg.springframework.boot.SpringApplication;importorg.springframework.boot.autoconfigure.SpringBootApplication;@SpringBootApplicationpublicclassResourcesServer{publicstaticvoidmain(String[] args){SpringApplication.run(ResourcesServer.class, args);}}
请求测试
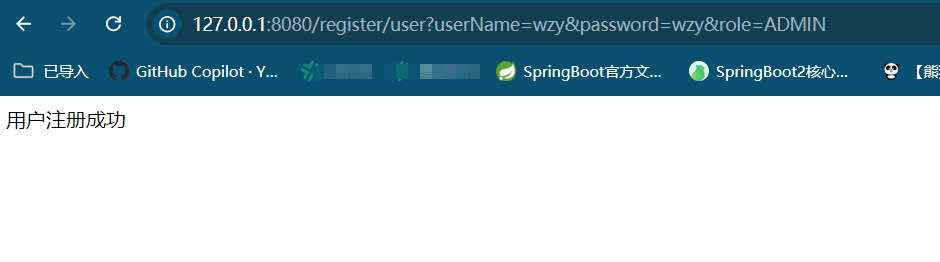
第一步注册用户与客户端
注册用户
三个参数分别是用户名、密码、权限
http://127.0.0.1:8080/register/user?userName=wzy&password=wzy&role=ADMIN
执行:
查看用户表

注册客户端
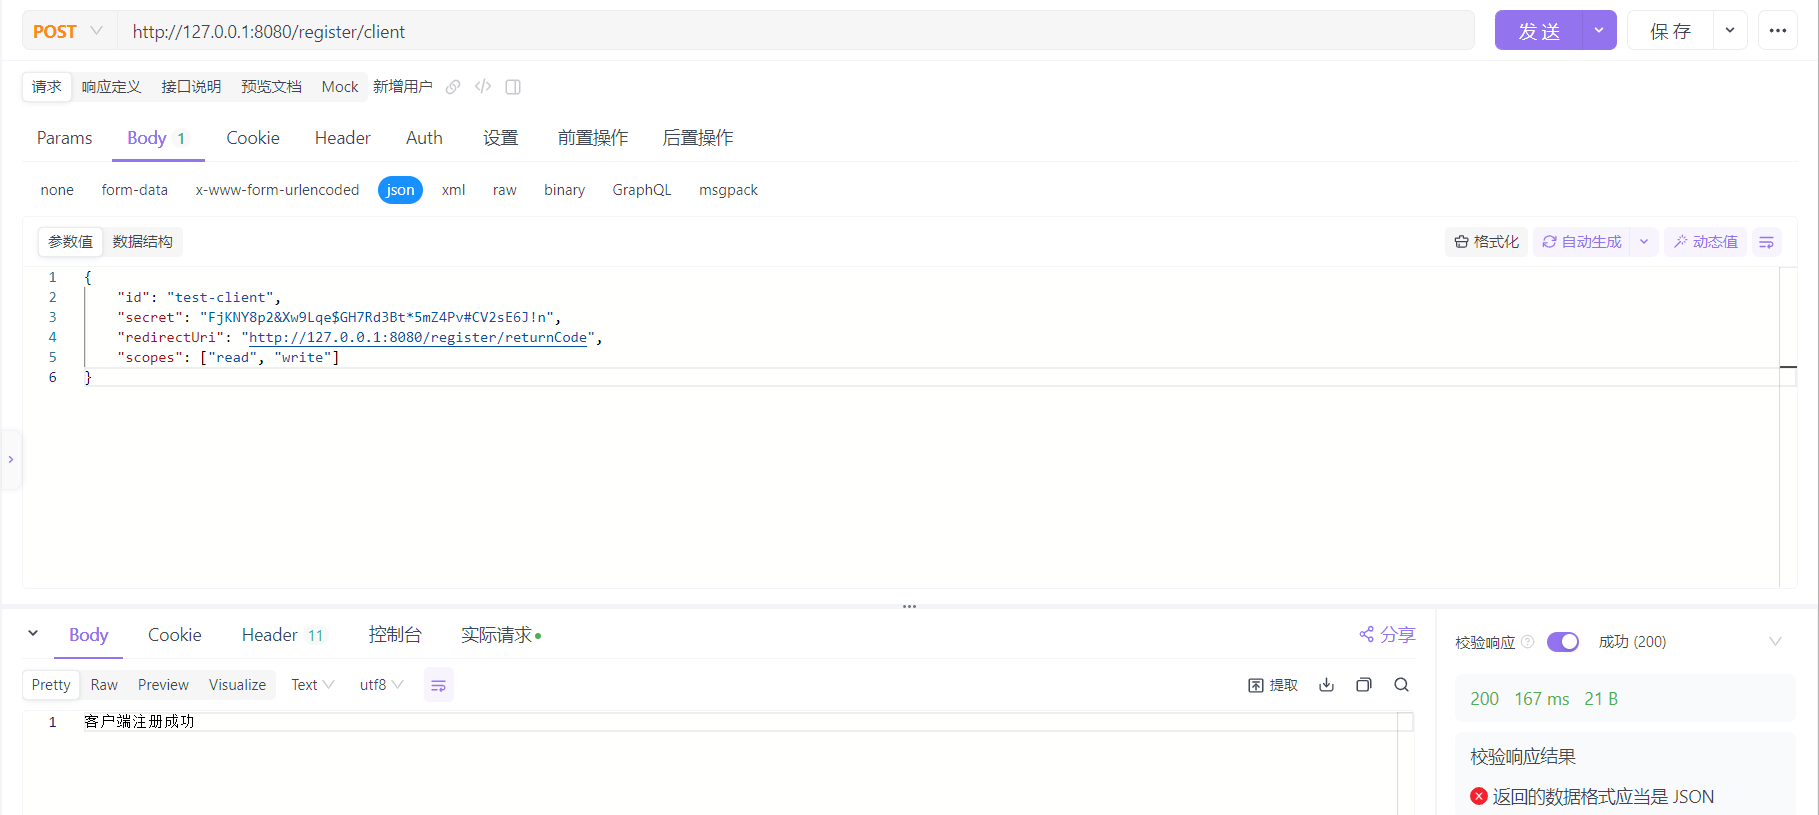
http://127.0.0.1:8080/register/client
请求体json
- id:客户端id
- secret:客户端密钥
- redirectUri:重定向地址,授权服务会将授权码通过此地址返回给客户端
- scopes:客户端的权限范围
{"id":"test-client","secret":"FjKNY8p2&Xw9Lqe$GH7Rd3Bt*5mZ4Pv#CV2sE6J!n","redirectUri":"http://127.0.0.1:8080/register/returnCode","scopes":["read","write"]}
执行请求
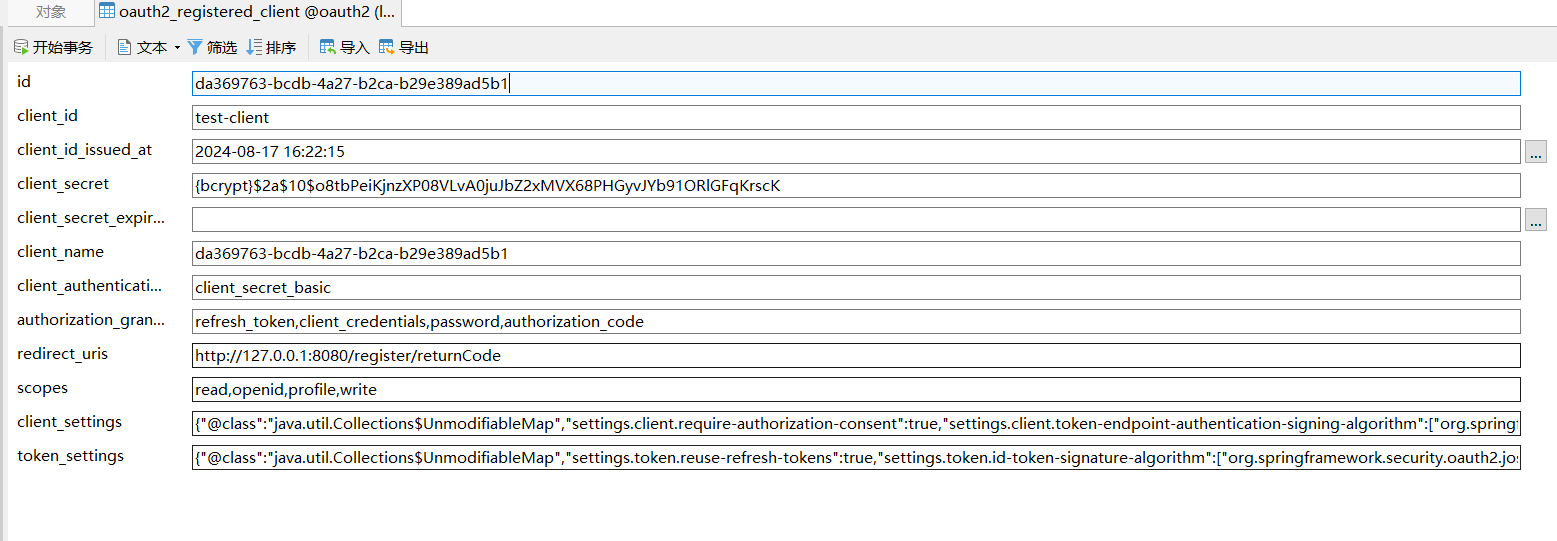
查看数据库表
oauth2_registered_client
中是否注册上:
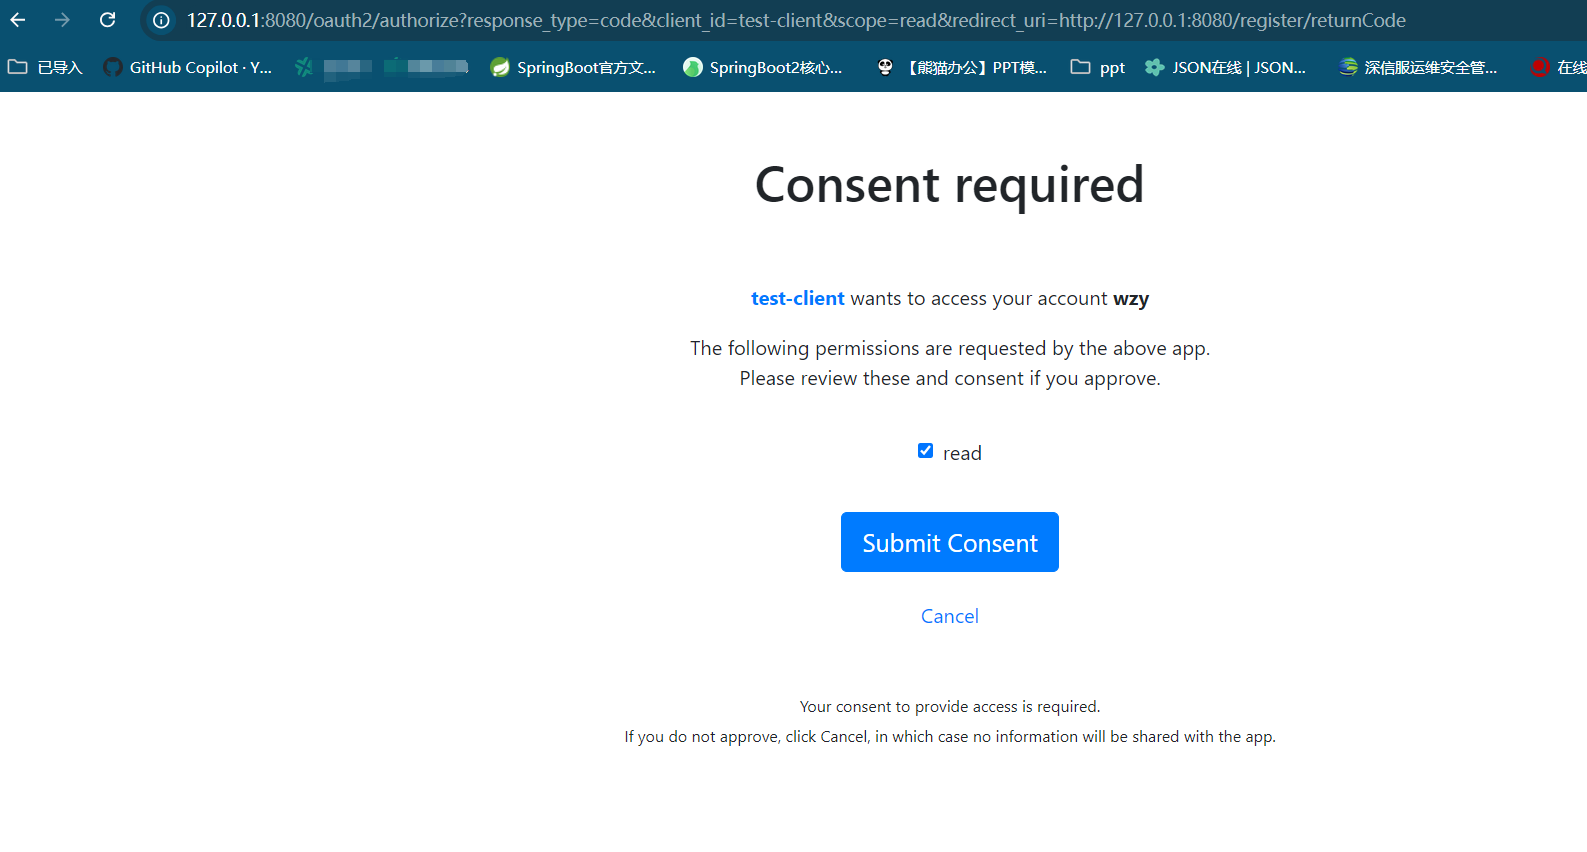
第二步获取授权码
oauth2/authorize路径为security默认的授权码请求路径
http://127.0.0.1:8080/oauth2/authorize?response_type=code&client_id=test-client&scope=read&redirect_uri=http://127.0.0.1:8080/register/returnCode
其他参数解释:
- response_type:表示客户端请求授权码
- client_id:客户端id
- scope:客户端权限范围
- redirect_uri:客户端重定向地址,要与与注册时一致
这些参数会由授权服务获取,来进行授权认证。
浏览器输入上面地址回车,自动跳转如下页面,输入注册的用户名密码点击Sign in:

上面登录后,会再跳转到下面的授权页面,勾选要授予的权限read,然后Submit:
然后会获得授权码:
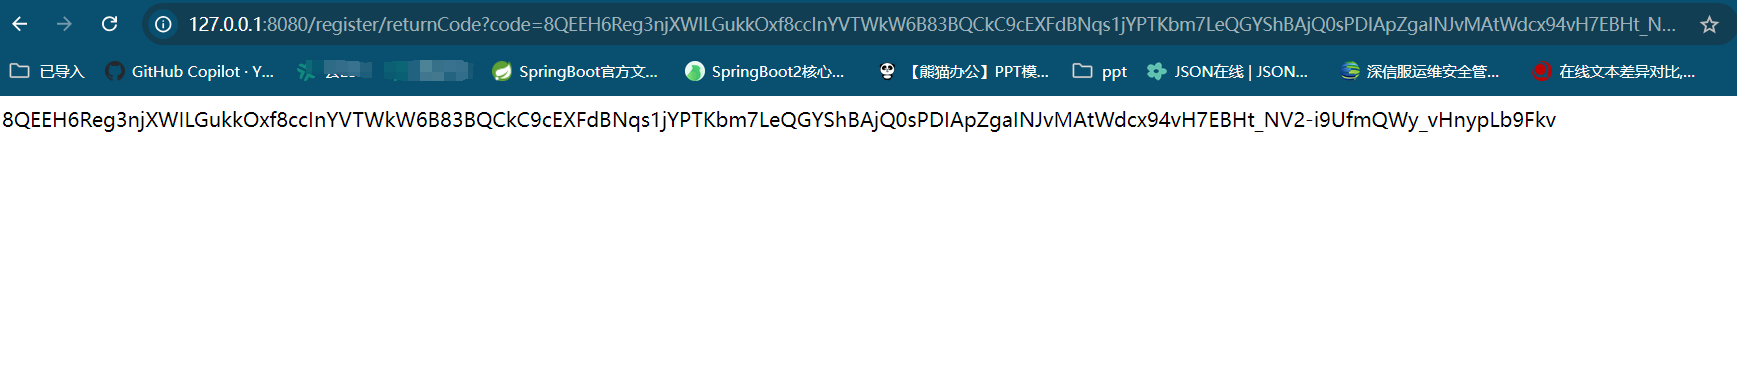
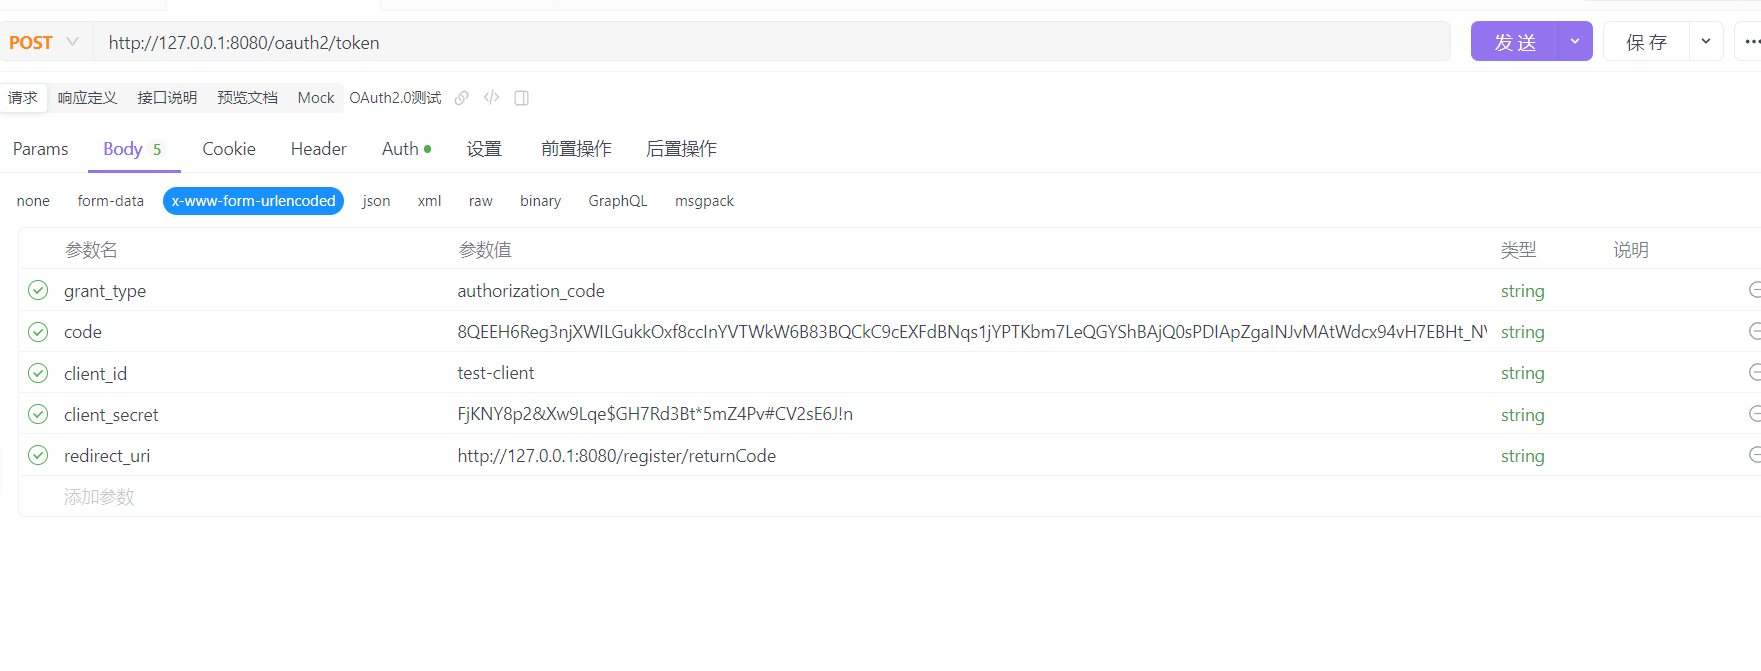
第三步换取token
请求地址
http://127.0.0.1:8080/oauth2/token
需要的参数
grant_type:授权模式,此处使用授权码模式,值固定为authorization_codecode:上一步返回的授权码redirect_uri:重定向地址,与注册客户端时保持一致- client_id:客户端id,表单中可去除参数,不是必须
- client_secret:客户端密钥,表单中可去除参数,不是必须
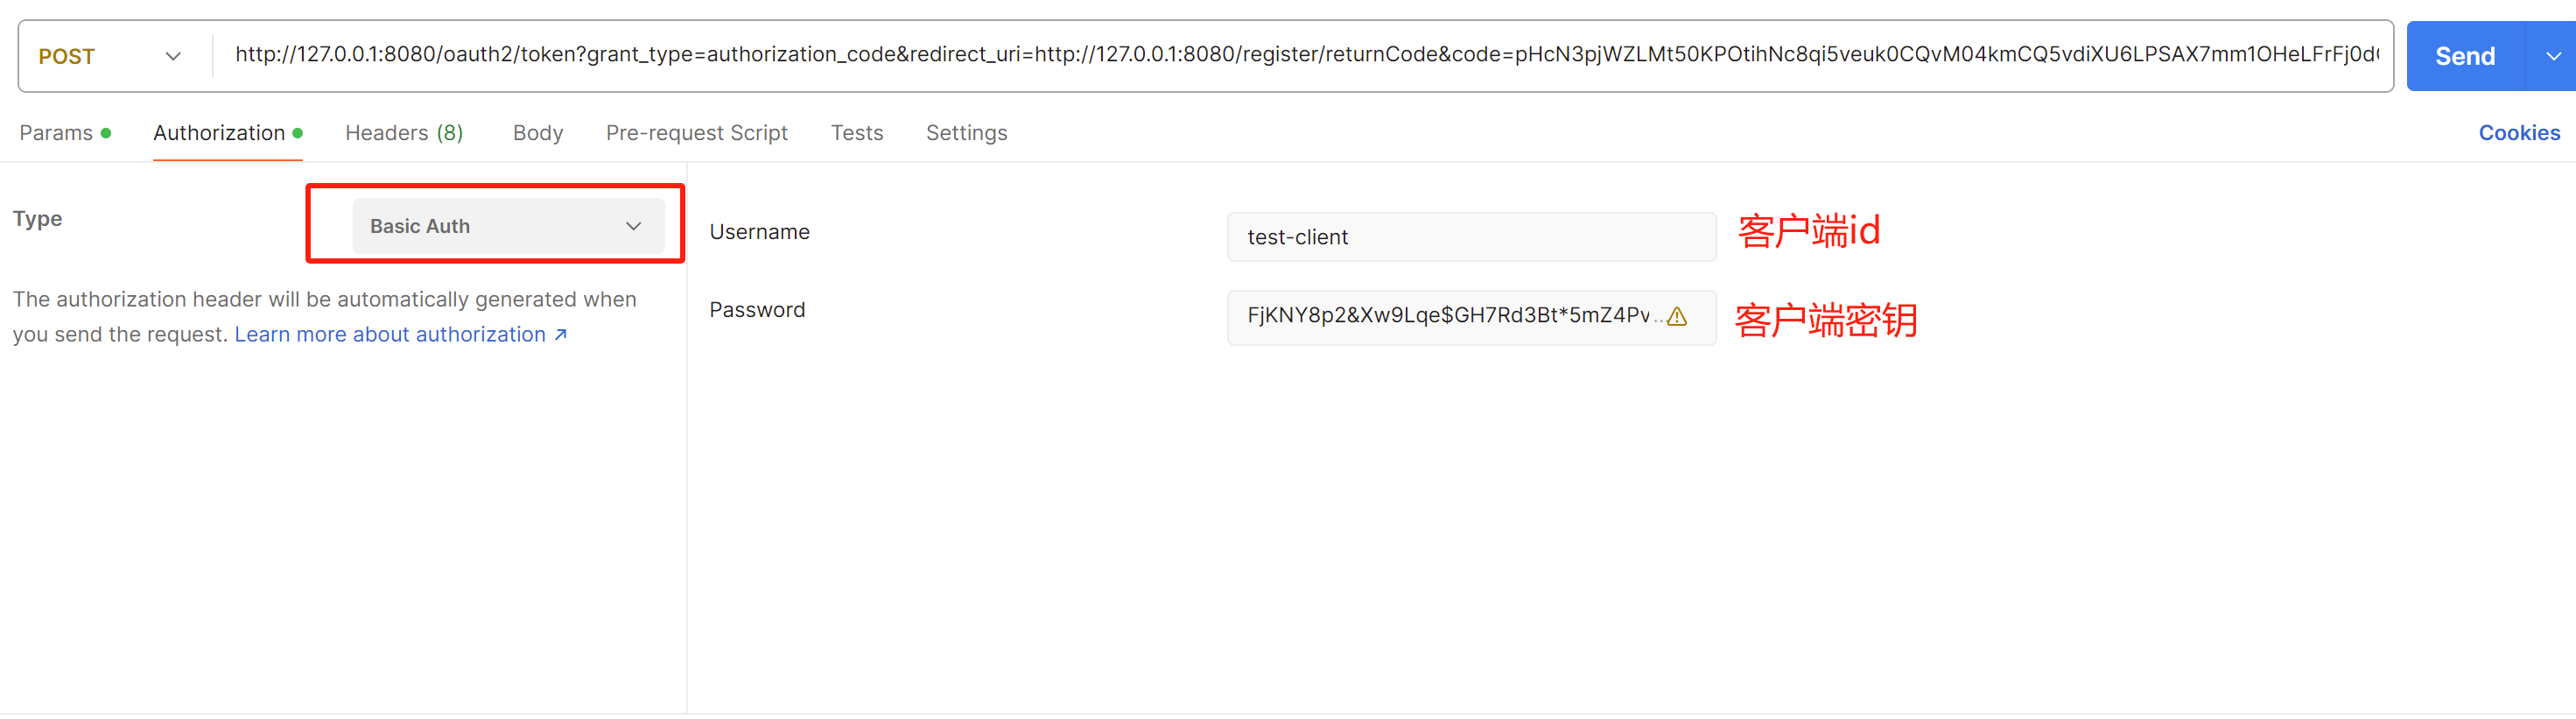
请求头
Auth
处为必填,因为授权服务要验证客户端身份,类型选
Bacis Auth
,Username为客户端id,Password为客户端密钥(未加密的)
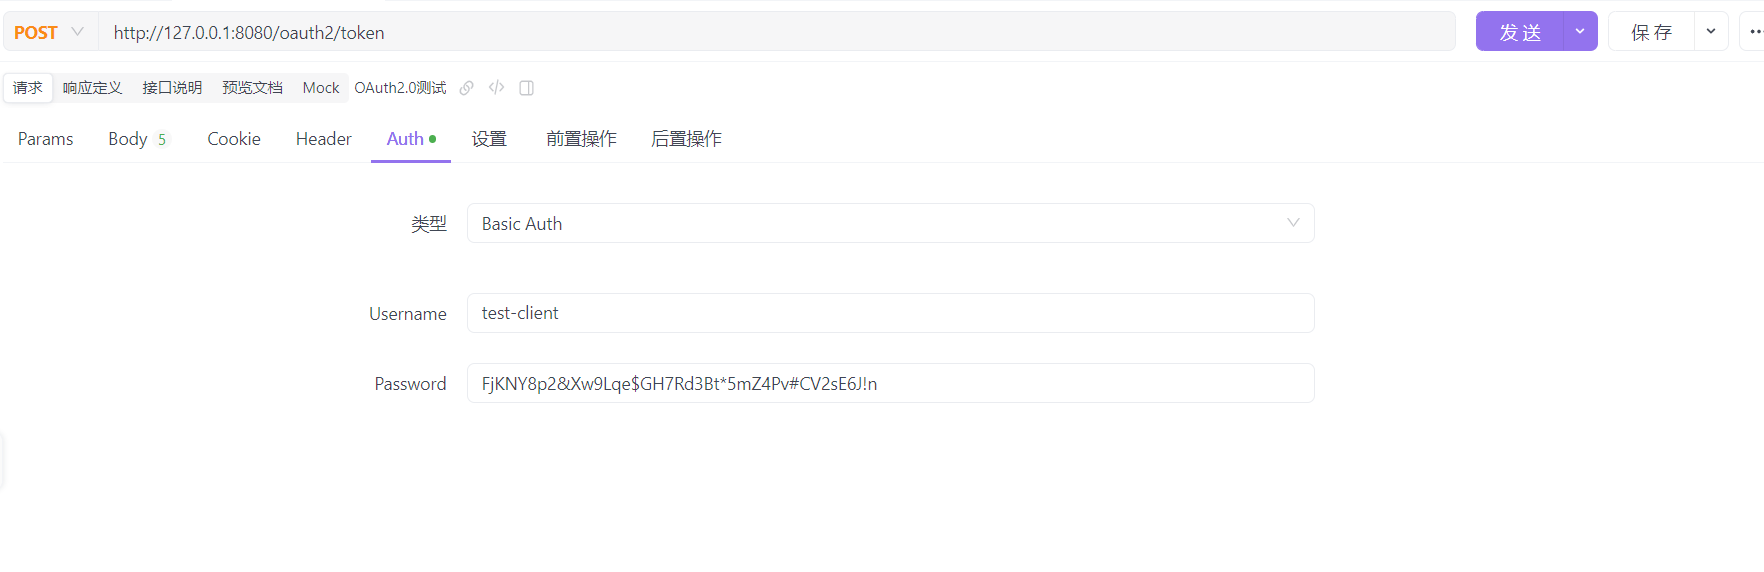
如果你用的是postman,要按如下方式填写:
实际请求中,Auth对应请求头的
'Authorization: Basic dGVzdC1jbGllbnQ6RmpLTlk4cDImWHc5THFlJEdIN1JkM0J0KjVtWjRQdiNDVjJzRTZKIW4='
,Basic后面是客户端id与密钥经过编码后的值,下面是实际请求展示:
curl --location --request POST 'http://127.0.0.1:8080/oauth2/token' \
--header 'User-Agent: Apifox/1.0.0 (https://apifox.com)' \
--header 'Authorization: Basic dGVzdC1jbGllbnQ6RmpLTlk4cDImWHc5THFlJEdIN1JkM0J0KjVtWjRQdiNDVjJzRTZKIW4=' \
--header 'Accept: */*' \
--header 'Host: 127.0.0.1:8080' \
--header 'Connection: keep-alive' \
--header 'Content-Type: application/x-www-form-urlencoded' \
--data-urlencode 'grant_type=authorization_code' \
--data-urlencode 'code=ORM8bkef2X1fhvCmrIqzXSwzYwxD-RbD4yzcotRVW36iaLJJMiLLoCe7kbRCWtmMVGCB7ESJAqkBUbSC_zoUL5KXEX63f4Mc1MVTLe_DS-PKpvAwqzYb7Hv1qQ1ftLeZ' \
--data-urlencode 'redirect_uri=http://127.0.0.1:8080/register/returnCode'
点击发送后,返回的
access_token即为令牌token
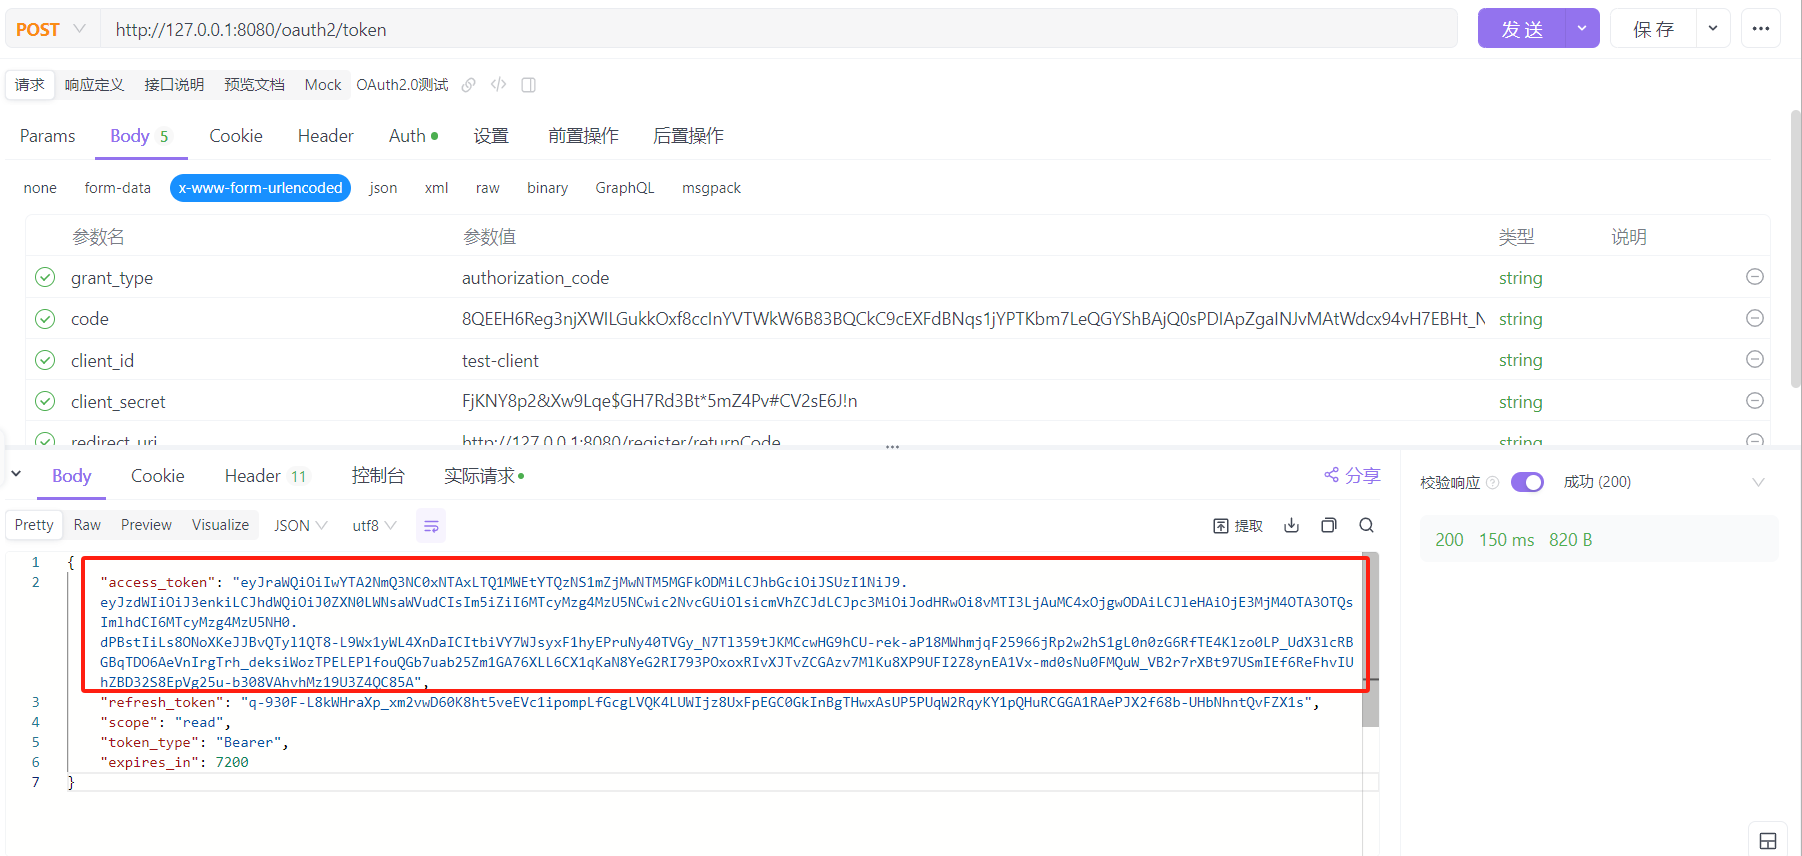
需要注意的是:授权码是一次性的,换取token后,原授权码就会失效,再获取token要使用新的授权码
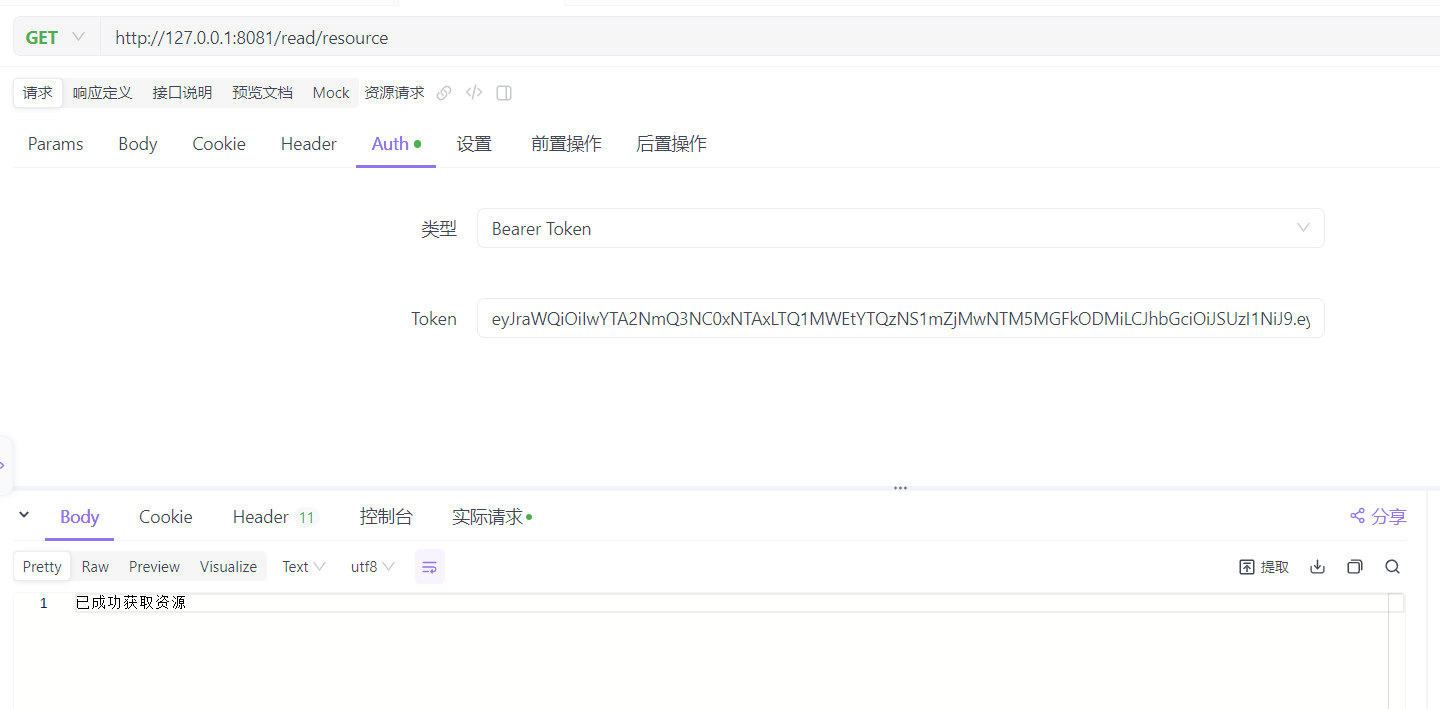
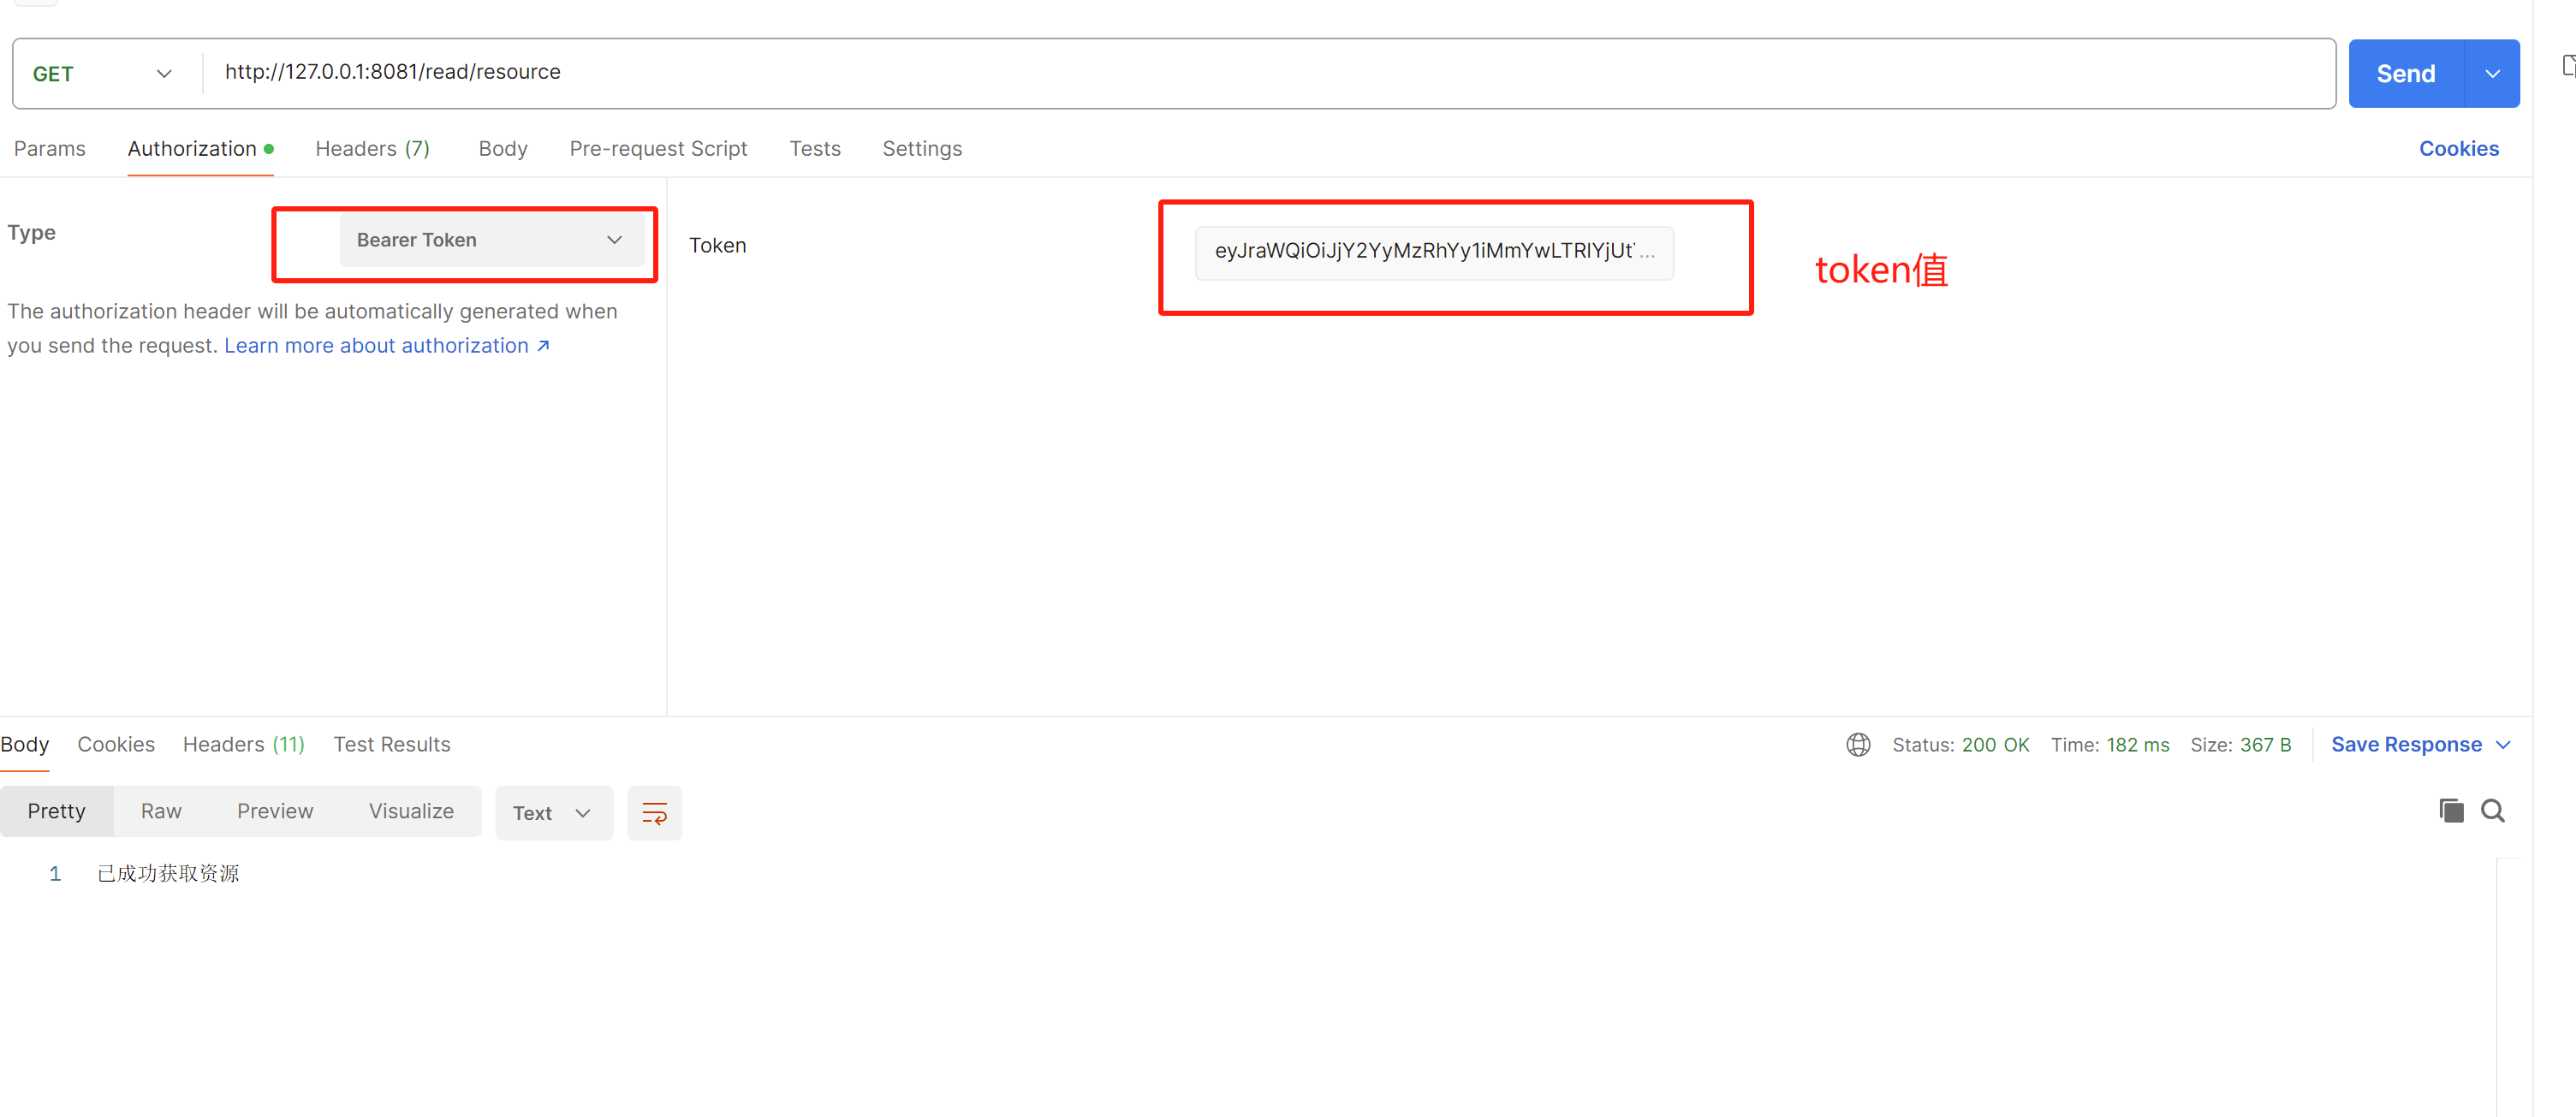
最后获取资源
地址为资源服务的controller地址
http://127.0.0.1:8081/read/resource
参数如下,token处填的就是上面获取的
access_token
,发送后返回已成功获取资源,即为成功
如果是postman测试工具,按照如下填写:
客户端
关于客户端,其实在上面的请求测试中,我们已经模拟了客户端的操作。
在实际开发中,也存在许多客户端的变体形式,可能是前后端分离的前端项目,也有可能是单独的后端微服务程序,这里以单独的Spring Boot后端程序展示OAuth2 Clinet的使用。
Spring Boot同样提供了OAuth2的客户端集成,在授权码模式下,使用
spring-boot-starter-oauth2-client
结合
@RegisteredOAuth2AuthorizedClient
注解,客户端可以自动实现授权码的请求及令牌的获取,而不需要上面的手动请求操作。
总体预览
因为SpringBoot-OAuth2的请求缓存默认使用
session
实现,本文演示又使用了三个不同端口的服务,所以结合
spring-session-data-redis
实现会话管理,来达到自动请求的目的。

pom
<?xml version="1.0" encoding="UTF-8"?><projectxmlns="http://maven.apache.org/POM/4.0.0"xmlns:xsi="http://www.w3.org/2001/XMLSchema-instance"xsi:schemaLocation="http://maven.apache.org/POM/4.0.0 http://maven.apache.org/xsd/maven-4.0.0.xsd"><modelVersion>4.0.0</modelVersion><groupId>org.example</groupId><artifactId>OAuth2-test-client</artifactId><version>1.0-SNAPSHOT</version><properties><maven.compiler.source>8</maven.compiler.source><maven.compiler.target>8</maven.compiler.target></properties><parent><groupId>org.springframework.boot</groupId><artifactId>spring-boot-starter-parent</artifactId><version>2.7.10</version></parent><dependencies><dependency><groupId>org.springframework.boot</groupId><artifactId>spring-boot-starter-web</artifactId></dependency><dependency><groupId>org.springframework.boot</groupId><artifactId>spring-boot-starter-security</artifactId></dependency><dependency><groupId>org.springframework.boot</groupId><artifactId>spring-boot-starter-oauth2-client</artifactId></dependency><!-- 用于客户端向资源服务发起请求 --><dependency><groupId>org.springframework.boot</groupId><artifactId>spring-boot-starter-webflux</artifactId></dependency><!-- 使用redis管理会话,实现不同服务的session共享 --><dependency><groupId>org.springframework.boot</groupId><artifactId>spring-boot-starter-data-redis</artifactId></dependency><dependency><groupId>org.springframework.session</groupId><artifactId>spring-session-data-redis</artifactId></dependency></dependencies></project>
yaml
server:port:8082spring:security:oauth2:client:registration:#除了重定向地址,此处的客户端各项配置要与授权服务注册客户端的RegisterController中一致test-client:provider: oauth2server #这里的值可以自定义,需要和下面的issuer-uri上面的一致client-id: test-client  #客户端idclient-secret: FjKNY8p2&Xw9Lqe$GH7Rd3Bt*5mZ4Pv#CV2sE6J!n  #客户端密钥client-authentication-method: client_secret_basic  #客户端认证方式authorization-grant-type: authorization_code   #客户端支持的授权模式#重定向地址,格式在下方注释,这里要修改为:'客户端ip:port/login/oauth2/code/客户端id值'redirect-uri:"http://127.0.0.1:8082/login/oauth2/code/test-client"#redirect-uri: "{baseUrl}/{action}/oauth2/code/{registrationId}"scope: read,openid,profile,write #权限provider:# 配置服务提供地址oauth2server:# issuer-uri 用于客户端向授权服务获取jwks信息issuer-uri: http://127.0.0.1:8080#共享session使用redis配置redis:host: 127.0.0.1
    port:6379
config
packagecom.config;importorg.springframework.context.annotation.Bean;importorg.springframework.context.annotation.Configuration;importorg.springframework.security.config.Customizer;importorg.springframework.security.config.annotation.web.builders.HttpSecurity;importorg.springframework.security.config.annotation.web.configuration.EnableWebSecurity;importorg.springframework.security.config.http.SessionCreationPolicy;importorg.springframework.security.web.SecurityFilterChain;@EnableWebSecurity@ConfigurationpublicclassOAuth2ClientConfig{@BeanSecurityFilterChainsecurityFilterChain(HttpSecurity http)throwsException{

        http
                .authorizeHttpRequests(authorize -> authorize
                        .anyRequest().authenticated()//所有请求都需要认证)//security默认情况下使用的oauth2Login配置.oauth2Login(Customizer.withDefaults())//security默认情况下使用的oauth2Client配置.oauth2Client(Customizer.withDefaults())//总是开启session.sessionManagement().sessionCreationPolicy(SessionCreationPolicy.ALWAYS);return http.build();}}
controller
使用
@RegisteredOAuth2AuthorizedClient注解作用:
- 当客户端请求资源并经过授权服务的认证后,客户端默认会将认证通过信息保存在内存中;
@RegisteredOAuth2AuthorizedClient会使用Spring MVC的请求参数解析器,将保存的认证信息转为Controller的方法参数OAuth2AuthorizedClient对象;- 最后在Controller中,可以直接从转换的
OAuth2AuthorizedClient中取出token,再请求资源示例如下:
packagecom.controller;importorg.springframework.security.oauth2.client.OAuth2AuthorizedClient;importorg.springframework.security.oauth2.client.annotation.RegisteredOAuth2AuthorizedClient;importorg.springframework.web.bind.annotation.GetMapping;importorg.springframework.web.bind.annotation.RequestMapping;importorg.springframework.web.bind.annotation.RestController;importorg.springframework.web.reactive.function.client.WebClient;importreactor.core.publisher.Mono;@RestController@RequestMapping("/getResource")publicclassClientController{@GetMapping("/getToken")publicStringgetToken(@RegisteredOAuth2AuthorizedClient("test-client")OAuth2AuthorizedClient oAuth2AuthorizedClient){return oAuth2AuthorizedClient.getAccessToken().getTokenValue();}@GetMapping("/read")publicStringgetServerARes1(@RegisteredOAuth2AuthorizedClient("test-client")OAuth2AuthorizedClient oAuth2AuthorizedClient){//向资源服务发起请求,获取资源returngetServer("http://127.0.0.1:8081/read/resource", oAuth2AuthorizedClient);}@GetMapping("/write")publicStringgetServerARes2(@RegisteredOAuth2AuthorizedClient("test-client")OAuth2AuthorizedClient oAuth2AuthorizedClient){//向资源服务发起请求,获取资源returngetServer("http://127.0.0.1:8081/write/resource", oAuth2AuthorizedClient);}/**
     * 获取token,请求资源服务
     */privateStringgetServer(String url,OAuth2AuthorizedClient oAuth2AuthorizedClient){// 获取 access_tokenString tokenValue = oAuth2AuthorizedClient.getAccessToken().getTokenValue();// 发起请求Mono<String> stringMono =WebClient.builder().defaultHeader("Authorization","Bearer "+ tokenValue).build().get().uri(url).retrieve().bodyToMono(String.class);return stringMono.block();}}
上面多了个write请求,将资源服务项目示例的Controller改为如下即可
packagecom.controller;importorg.springframework.security.access.prepost.PreAuthorize;importorg.springframework.web.bind.annotation.GetMapping;importorg.springframework.web.bind.annotation.RestController;@RestControllerpublicclassMessagesController{@GetMapping("/read/resource")@PreAuthorize("hasAuthority('SCOPE_read')")//限制访问资源所需要的权限publicStringgetResource1(){return"已成功获取资源";}@GetMapping("/write/resource")@PreAuthorize("hasAuthority('SCOPE_write')")//限制访问资源所需要的权限publicStringgetResource2(){return"已成功获取资源2";}}
主启动类
importorg.springframework.boot.SpringApplication;importorg.springframework.boot.autoconfigure.SpringBootApplication;@SpringBootApplicationpublicclassOAuth2Client{publicstaticvoidmain(String[] args){SpringApplication.run(OAuth2Client.class, args);}}
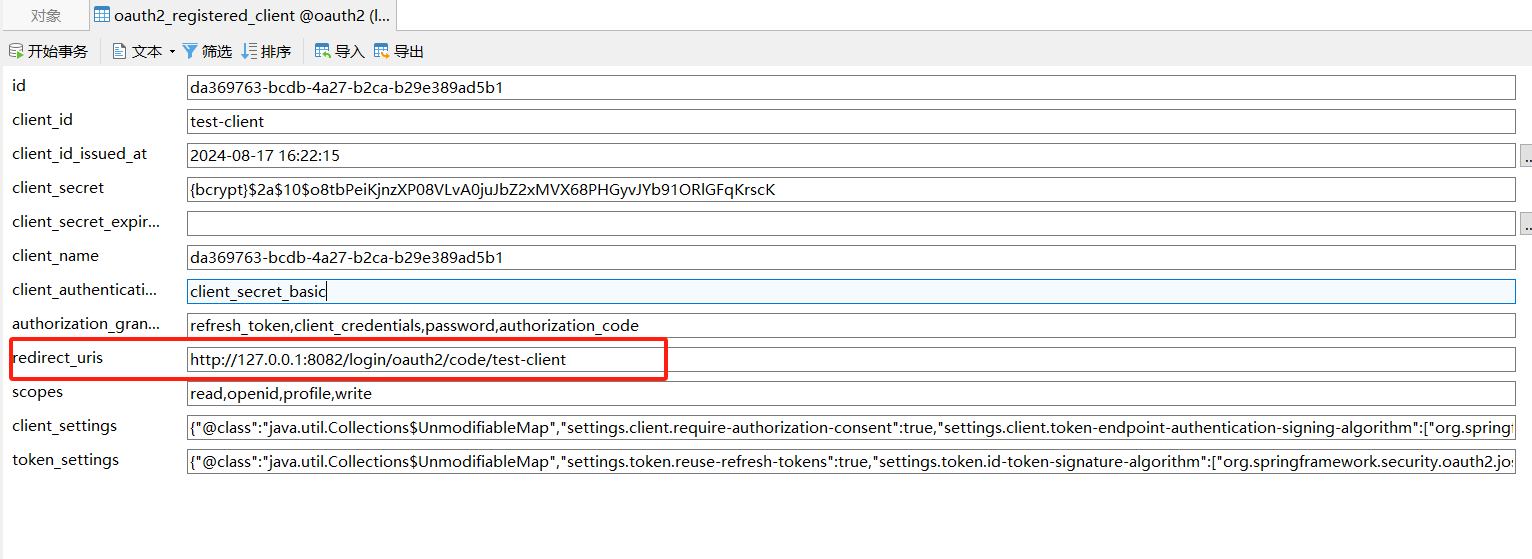
数据表修改
需要将
oauth2_registered_client表中,注册客户端的重定向地址改为yaml中配置的地址,即:
http://127.0.0.1:8082/login/oauth2/code/test-client。
如果不使用此地址,授权服务无法将授权码自动返回给客户端
为了展示新的效果,清空
oauth2_authorization
、
oauth2_authorization_consent
两张表的数据
客户端测试
先启动redis,然后是授权服务,最后启动资源服务与客户端。
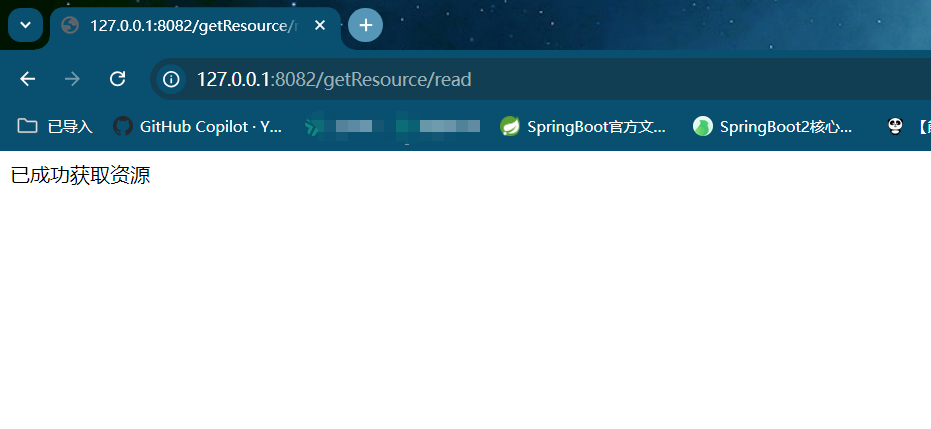
浏览器发起如下请求,来请求资源:
http://127.0.0.1:8082/getResource/read
127.0.0.1:8082/getResource/read
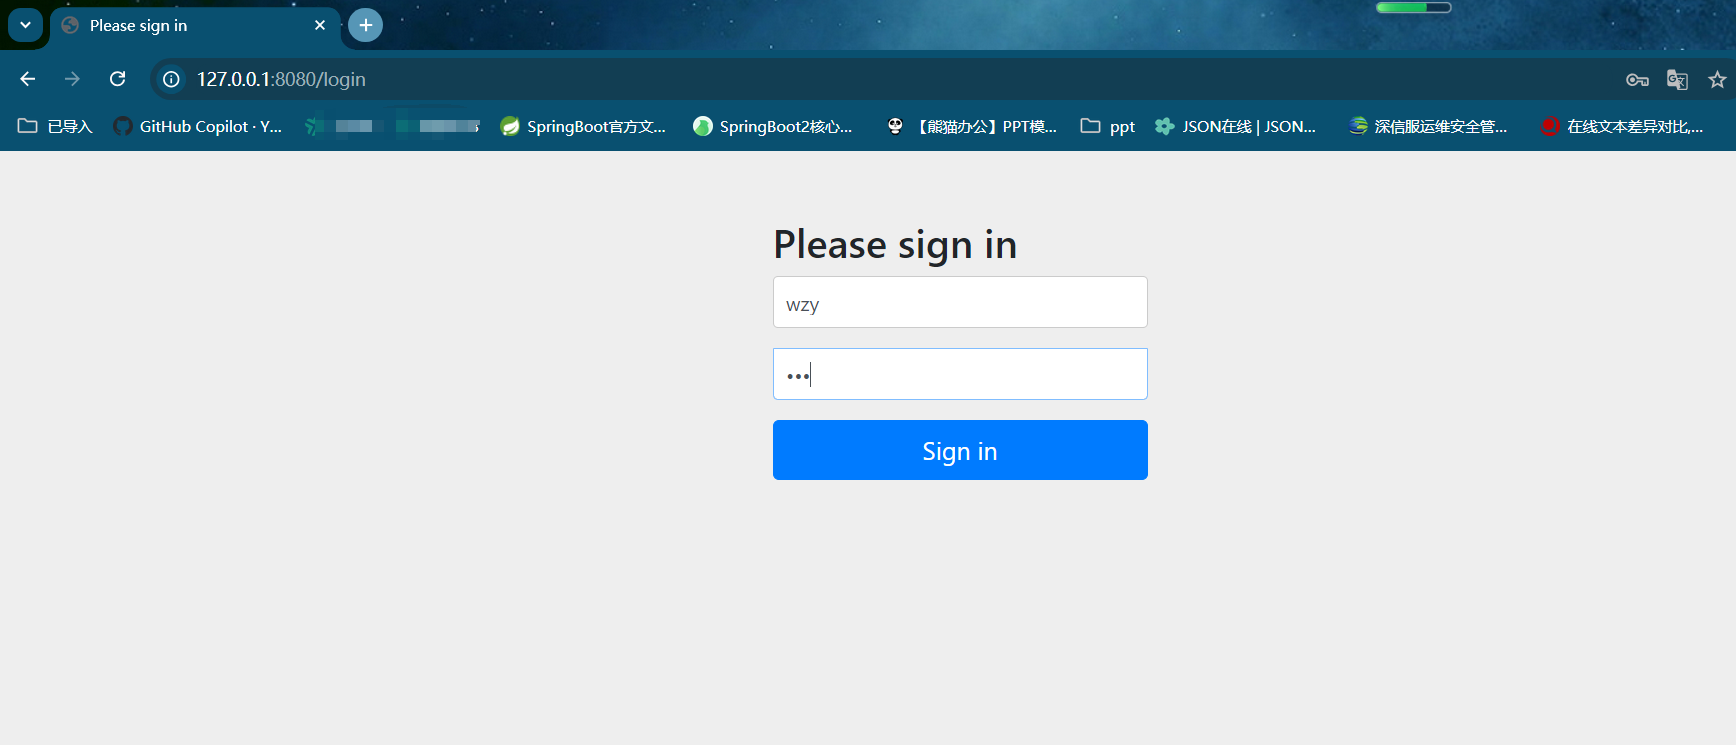
是客户端向资源服务请求资源的地址,发起请求后,因为没有权限,会被客户端过滤器拦截(第一次请求还没有保存认证信息在上下文中)。
拦截后,客户端会向授权服务发起授权码请求,然后授权服务会要求用户登录授权,所以返回的是
127.0.0.1:8080/login
的登录页面:
进行登录后,来到授权页面:
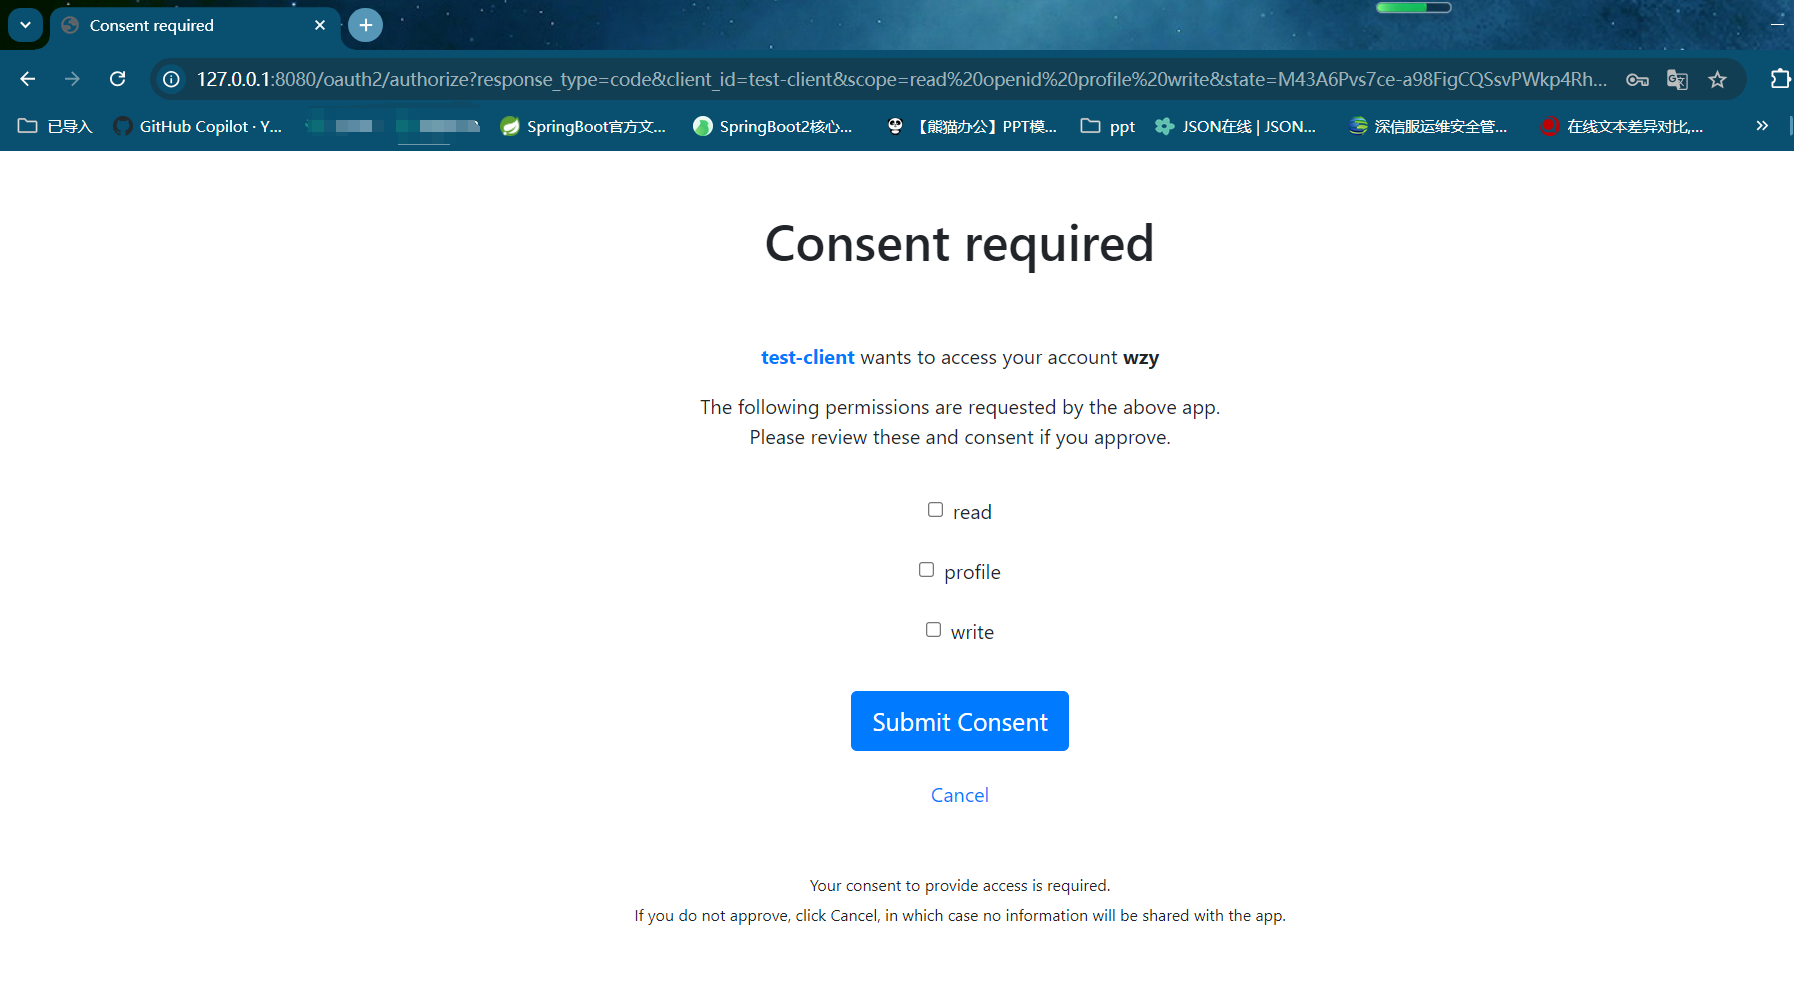
下面是图中授权页面的地址栏信息,包含客户端id、权限范围、state、重定向地址等参数:
http://127.0.0.1:8080/oauth2/authorize?response_type=code&client_id=test-client&scope=read%20openid%20profile%20write&state=M43A6Pvs7ce-a98FigCQSsvPWkp4Rhs3bgr9xQLdKsE%3D&redirect_uri=http://127.0.0.1:8082/login/oauth2/code/test-client&nonce=Y3U-NfewZBtI6P24GtRRwHuzvUx-3ZfVGh6a_jh9Rys
然后勾选三个权限,并点击submit提交。
提交后,会直接跳转到资源。授权码的获取、交换令牌、携带令牌访问资源的过程,已经由框架为我们自动实现
在发起另一个资源的访问请求:
http://127.0.0.1:8082/getResource/write
因为已经登录授权过,所以第二个资源会直接返回:
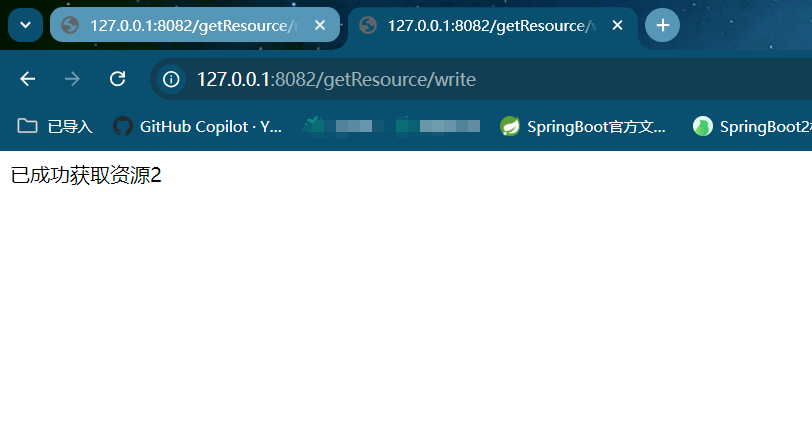
通过请求测试可以发现,进行登录授权后,浏览器直接访问到了资源,而无需再手动进行授权码及token部分的操作,实现了客户端自动获取资源的效果。
版权归原作者 Mr. bigworth 所有, 如有侵权,请联系我们删除。