
一、简介
uView组件的上传功能,单图上传、多图上传等。
官方文档地址:
https://www.uviewui.com/components/upload.html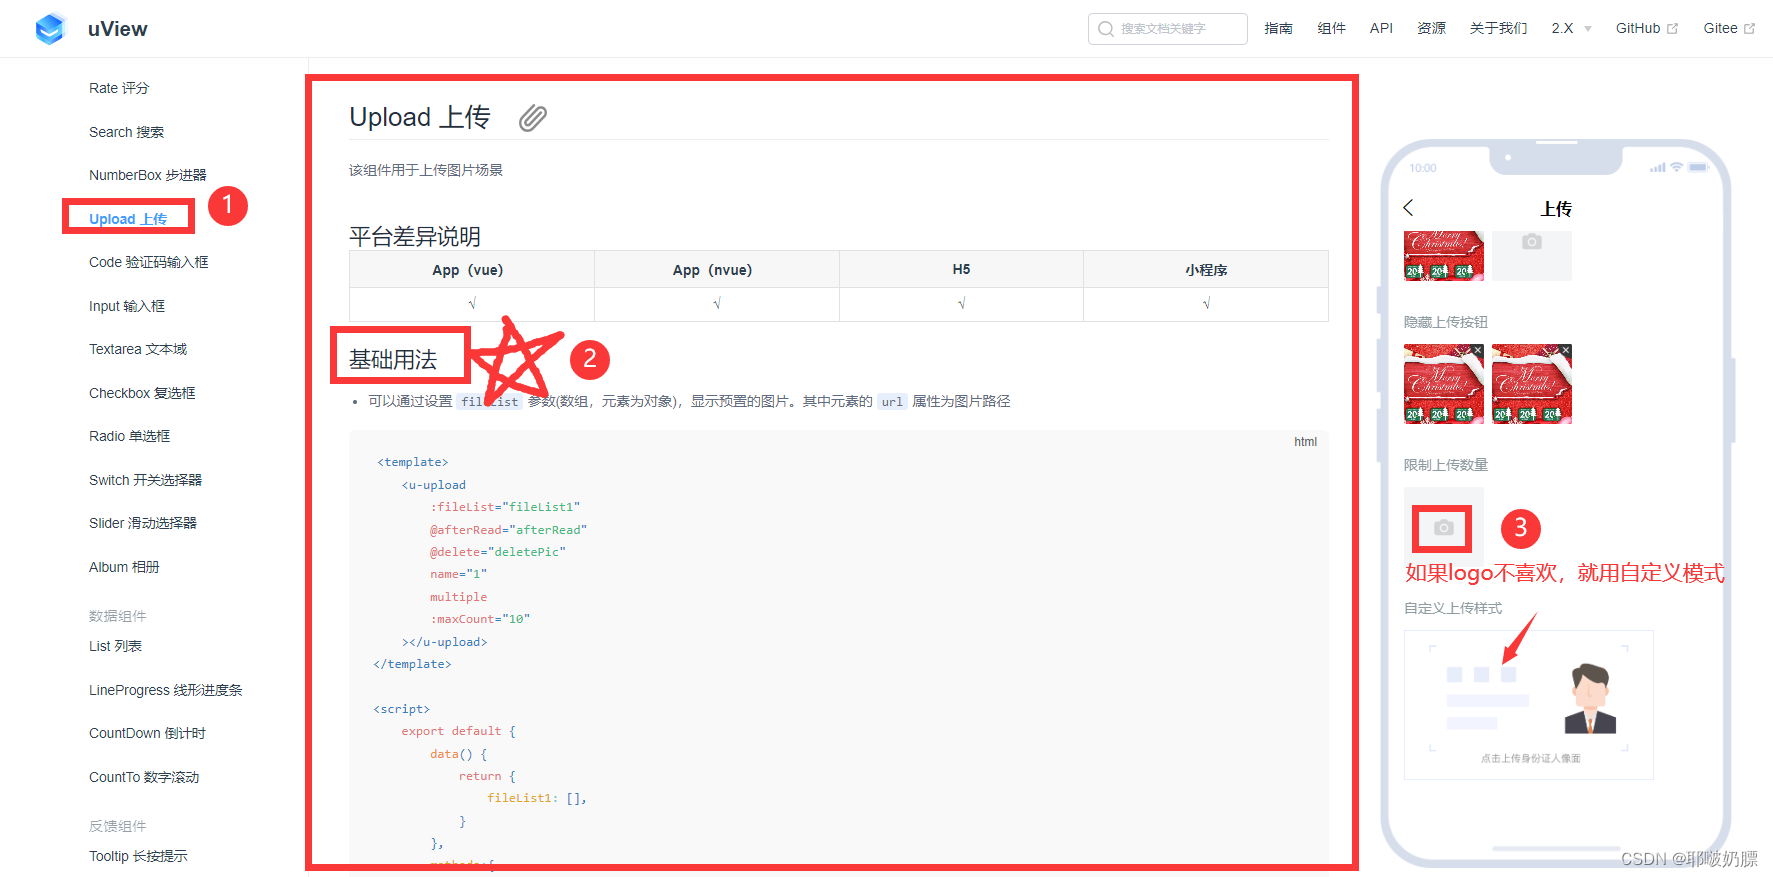
二、步骤
(一)单图上传
1.效果演示:
只能上传一张,选完之后,上传的按钮消失,当然,如果图片不合适,删掉再换一张,但就是只能上传一张。
2.代码:
<template><viewclass="content"><!-- 上传图片 --><u-upload:fileList="fileList1"@afterRead="afterRead"@delete="deletePic"name="1":multiple="false":maxCount="1"width="112rpx"height="109rpx":deletable="true":previewImage="true"><!-- 这张图片就是自定义的图片,地址填写自己本地的就行 --><imagesrc="/static/function/uploadImg.png"mode="widthFix"style="width: 112rpx;height: 110rpx;"></image></u-upload></view></template><script>exportdefault{data(){return{// 上传图片fileList1:[],}},onLoad(){},methods:{//删除图片deletePic(e){
                console.log(e);this[`fileList${e.name}`].splice(e.index,1)},// 新增图片asyncafterRead(event){
                console.log(event)// 当设置 mutiple 为 true 时, file 为数组格式,否则为对象格式let lists =[].concat(event.file)let fileListLen =this[`fileList${event.name}`].length
                lists.map((item)=>{this[`fileList${event.name}`].push({...item,status:'uploading',message:'上传中'})})for(let i =0; i < lists.length; i++){const result =awaitthis.uploadFilePromise(lists[i].url)let item =this[`fileList${event.name}`][fileListLen]this[`fileList${event.name}`].splice(fileListLen,1, Object.assign(item,{status:'success',message:'',url: result
                    }))
                    fileListLen++}},//上传图片uploadFilePromise(url){returnnewPromise((resolve, reject)=>{let a = uni.uploadFile({//url: this.$common.domain+'/api/common/upload', // 仅为示例,非真实的接口地址url:'http://192.168.2.21:7001/upload',// 仅为示例,非真实的接口地址filePath: url,name:'file',formData:{user:'test'},success:(res)=>{let data=JSON.parse(res.data)//最终传给的是字符串,这里需要转换格式resolve(data.data.url)}});})},}}</script><stylelang="scss"></style>
(二)多图上传
1.效果演示:
可一次性选多张,我这里限制为两张,上传满两张则不会显示上传的logo。点击图片可预览。
2.代码:
<template><viewclass="content"><!-- 上传图片 --><u-upload:fileList="fileList1"@afterRead="afterRead"@delete="deletePic"name="1":multiple="true":maxCount="2"width="112rpx"height="109rpx":deletable="true":previewImage="true"><!-- 这张图片就是自定义的图片,地址填写自己本地的就行 --><imagesrc="/static/function/uploadImg.png"mode="widthFix"style="width: 112rpx;height: 110rpx;"></image></u-upload></view></template><script>exportdefault{data(){return{// 上传图片fileList1:[],}},onLoad(){},methods:{//删除图片deletePic(e){
                console.log(e);this[`fileList${e.name}`].splice(e.index,1)},// 新增图片asyncafterRead(event){
                console.log(event)// 当设置 mutiple 为 true 时, file 为数组格式,否则为对象格式let lists =[].concat(event.file)let fileListLen =this[`fileList${event.name}`].length
                lists.map((item)=>{this[`fileList${event.name}`].push({...item,status:'uploading',message:'上传中'})})for(let i =0; i < lists.length; i++){const result =awaitthis.uploadFilePromise(lists[i].url)let item =this[`fileList${event.name}`][fileListLen]this[`fileList${event.name}`].splice(fileListLen,1, Object.assign(item,{status:'success',message:'',url: result
                    }))
                    fileListLen++}},//上传图片uploadFilePromise(url){returnnewPromise((resolve, reject)=>{let a = uni.uploadFile({//url: this.$common.domain+'/api/common/upload', // 仅为示例,非真实的接口地址url:'http://192.168.2.21:7001/upload',// 仅为示例,非真实的接口地址filePath: url,name:'file',formData:{user:'test'},success:(res)=>{setTimeout(()=>{resolve(res.data.data)},1000)}});})},}}</script><stylelang="scss"></style>
三、其余补充

如果一个页面上有多处上传,操作也不是很复杂,大家都是共用同一个方法。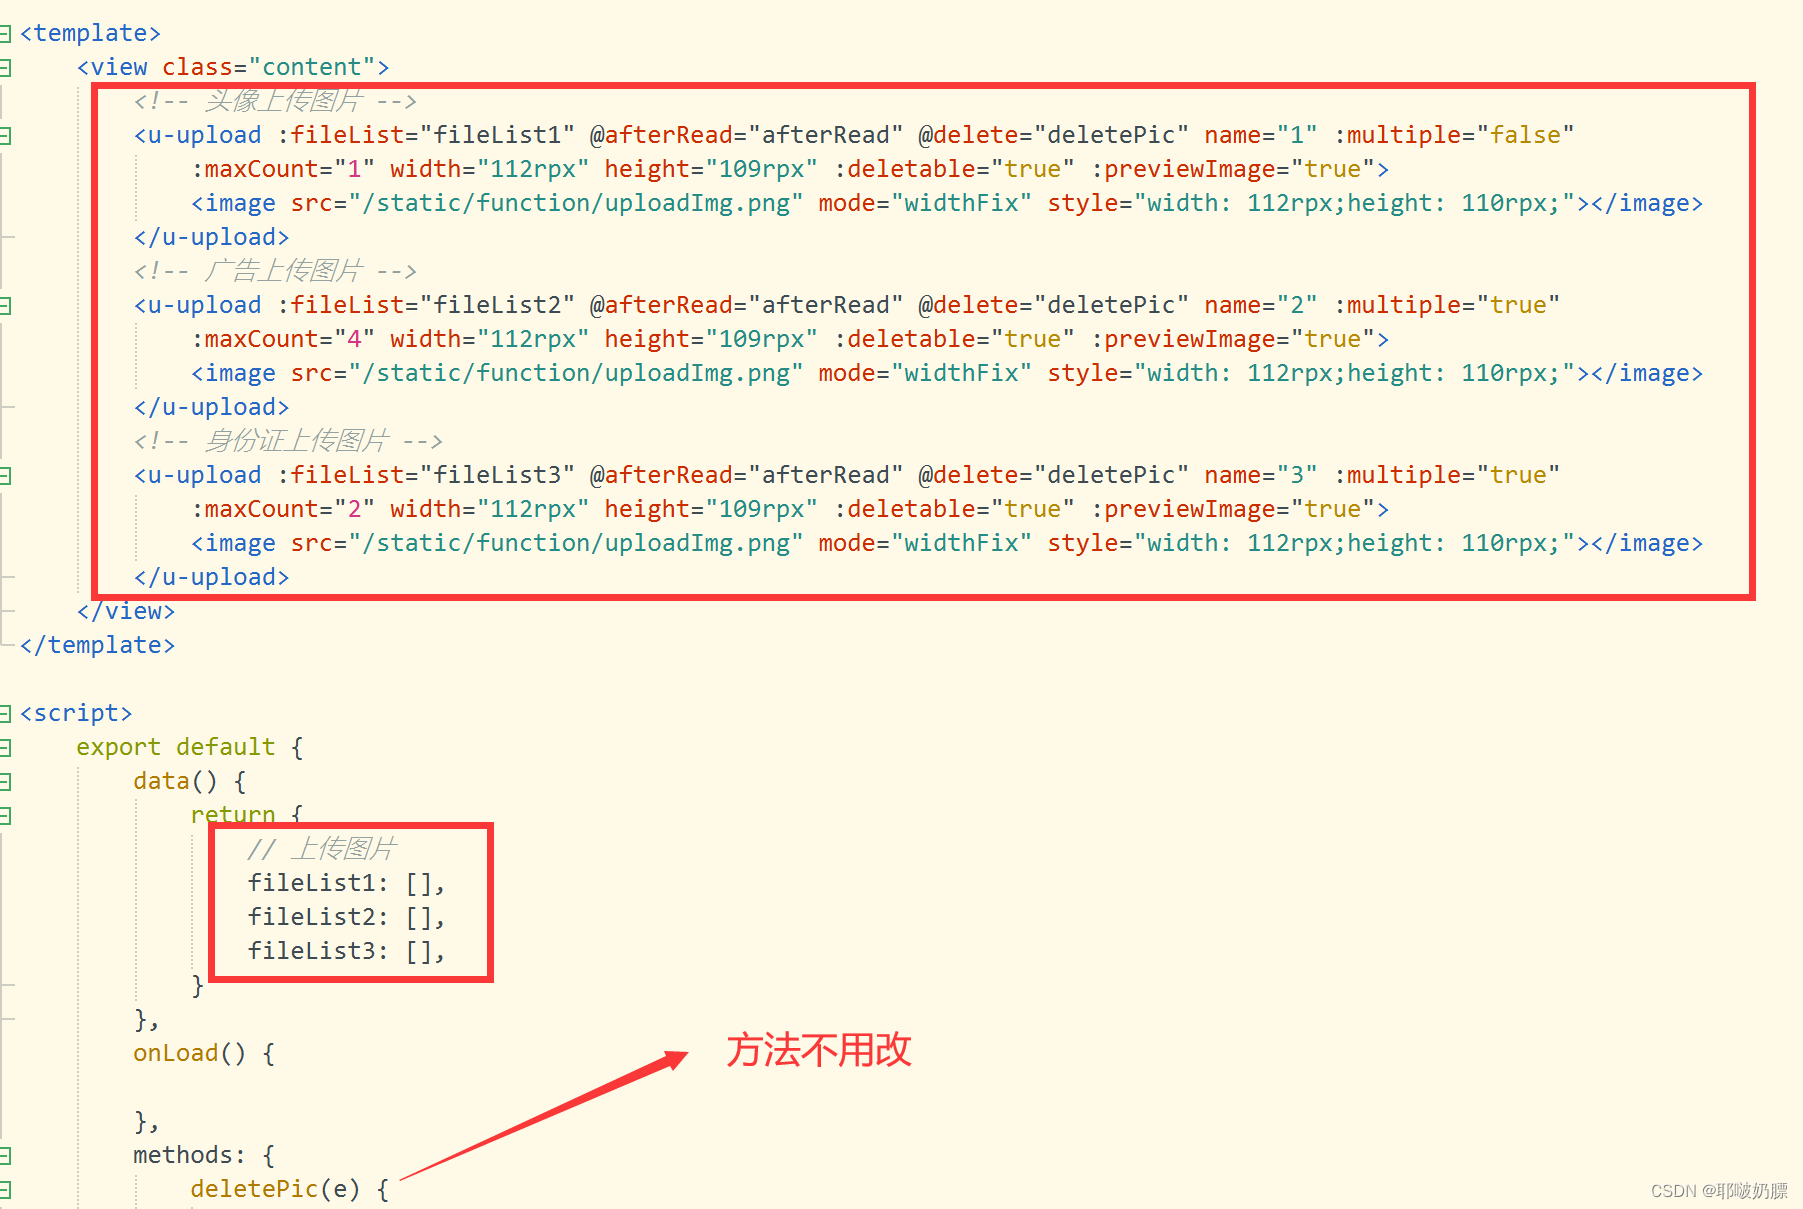
整体搬过来用即可。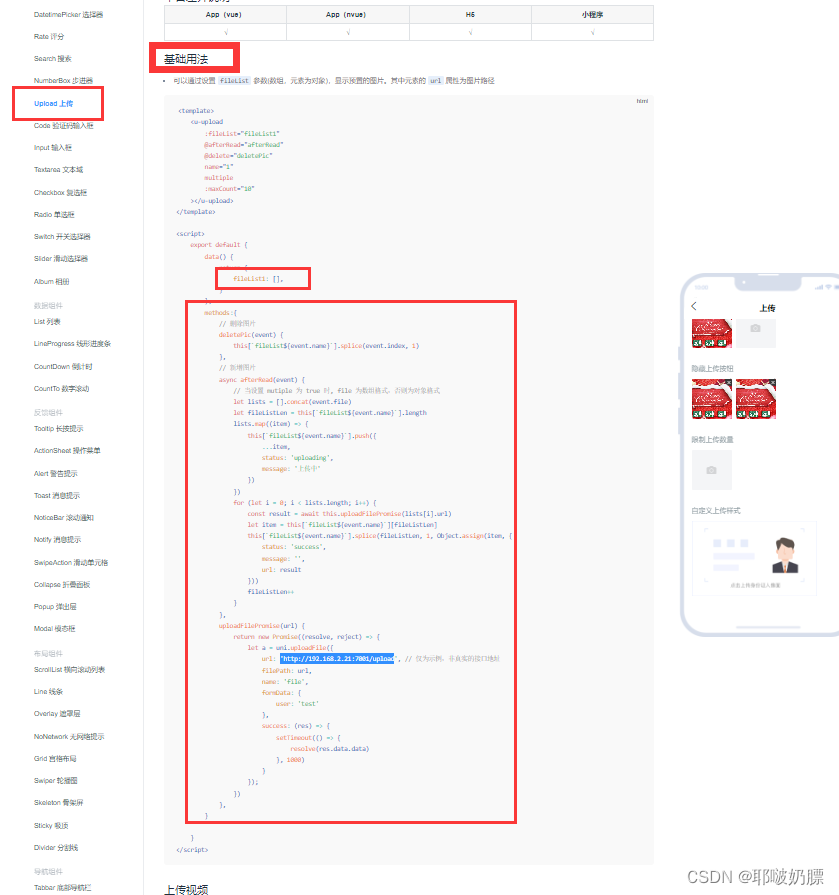
请求接口的地方需要用join处理一下
getData(){
    let images=[]this.fileList1.forEach((item)=>{
        images.push(item.url)})this.$common.request('post','/Coupon/addCoupon',{
        image:images.join(','),}).then(res =>{if(res.code ==1){this.$common.success(res.msg)setTimeout(()=>{this.$common.back()},1200)}})},
新上传代码:(多图处理)
<viewclass="imgBox"><u-upload:fileList="fileList"@afterRead="afterRead"@delete="deletePic":multiple="true":maxCount="9"><image:src="$common.image('/static/talentZone/addImg.png')"mode="aspectFill"class="fileImg"></image></u-upload></view>
data(){return{// 图片列表fileList:[]}},methods:{// 图片上传//删除图片deletePic(e){
        console.log(e);this.fileList.splice(e.index,1)},// 新增图片asyncafterRead(event){// 当设置 mutiple 为 true 时, file 为数组格式,否则为对象格式let lists =[].concat(event.file)let fileListLen =this.fileList.length
        lists.map((item)=>{this.fileList.push({...item,status:'uploading',message:'上传中'})})for(let i =0; i < lists.length; i++){const result =awaitthis.uploadFilePromise(lists[i].url)
            console.log(result);if(result.success){let item =this.fileList[fileListLen]this.fileList.splice(fileListLen,1, Object.assign(item,{status:'success',message:'',url: result
                }))
                fileListLen++}else{this.fileList.splice(fileListLen,1)}}},//上传图片uploadFilePromise(url){returnnewPromise((resolve, reject)=>{let a = uni.uploadFile({url:'http://192.168.2.21:7001/upload',// 仅为示例,非真实的接口地址,换成自己上传图片的接口filePath: url,name:'file',success:(uploadRes)=>{setTimeout(()=>{let res =JSON.parse(uploadRes.data)//最终传给的是字符串,这里需要转换格式if(res.code ==0){this.$common.msg(res.msg)resolve({success:false,url:''})return;}resolve({success:true,url:res.data.url})},2000)}});})},//点击确认还需要些许修改fabu(){let images =[]this.fileList.forEach((item)=>{
            images.push(item.url.url)})// 其他接口request('post','其他接口地址',{title:this.textValue,info:this.textValue,images: images.join(',')//重点是这里,需要看后台接收的类型进行更改}).then(res=>{if(res.code ==1){
                console.log(res);}})},}
图片上传
// 图片上传//删除图片deletePic(event){this[`fileList${event.name}`].splice(event.index,1)},// 新增图片asyncafterRead(event){// 当设置 multiple 为 true 时, file 为数组格式,否则为对象格式let lists =[].concat(event.file)let fileListLen =this[`fileList${event.name}`].length
    lists.map((item)=>{this[`fileList${event.name}`].push({...item,status:'uploading',message:'上传中'})})for(let i =0; i < lists.length; i++){const result =awaitthis.uploadFilePromise(lists[i].url)
        console.log("结果", result);if(result.success){let item =this.fileList[fileListLen]this.fileList.splice(fileListLen,1, Object.assign(item,{status:'success',message:'',url: result
            }))
            fileListLen++}else{this.fileList.splice(fileListLen,1)}}},uploadFilePromise(url){returnnewPromise((resolve, reject)=>{let a = uni.uploadFile({url: config[config.env].apiUrl +'/api/common/upload',// 仅为示例,非真实的接口地址filePath: url,name:'file',formData:{user:'test'},success:(uploadRes)=>{setTimeout(()=>{let res =JSON.parse(uploadRes.data)//最终传给的是字符串,这里需要转换格式if(res.code ==0){this.$common.msg(res.msg)resolve({success:false,url:''})return;}
                    console.log("图片", res);resolve({success:true,url: res.data.url
                    })},1000)}});})},
单图传值
data(){return{payment_credentials:''//支付凭证(线下必填)}},methods:{aaa(){if(this.fileList.length >0){this.payment_credentials =this.fileList[0].url.url
    }}}
图片回显
当内容进行修改时,需要先将上次上传过的图片进行显示(后台会返回图片数组),之后或许删除上次中的某种图片,也有可能会新上传一些图片。最后提交给后台的数据的图片数组是不带域名的。
整体步骤如下:
data(){return{// 图片列表fileList:[],//修改功能 需要提交的图片数组subImg:[]}},
1.修改,根据id 进行查询此条数据的信息,后台返回该条数据信息,这里只说图片的事。首先对
images
进行处理,字符串转化为数组,之后对分割后的数组
subImg
进行遍历循环,把图片路径(拼接好域名之后)push到
fileList
数组里面,这时候页面的图片就能显示了。
this.subImg = res.data.images.split(',')//字符串转化为数组this.subImg.forEach(item=>{
    console.log(item);this.fileList.push({url:this.$common.image(item)//拼接好域名之后push进去})})
console.log(this.fileList);

2.由于修改之后提交给后台的图片数组是不带域名的,所以自定义了一个
subImg
数组,刚上来的时候就已经赋进去了最初始的两张图,如果删除,就根据删除的下标删除掉此数组里面的图片,每次上传新图片的时候,就把新上传后返回的图片路径push进去,这样 不管是删除还是新增都能保证sunImg数组里面的图片都是最新的,且不带域名
核心代码:
this.subImg.splice(e.index,1)
this.subImg.push(res.data.url)
具体代码:
//删除图片deletePic(e){
    console.log(e);this.fileList.splice(e.index,1)this.subImg.splice(e.index,1)//新增删除代码},// 新增图片asyncafterRead(event){// 当设置 mutiple 为 true 时, file 为数组格式,否则为对象格式let lists =[].concat(event.file)let fileListLen =this.fileList.length
    lists.map((item)=>{this.fileList.push({...item,status:'uploading',message:'上传中'})})for(let i =0; i < lists.length; i++){const result =awaitthis.uploadFilePromise(lists[i].url)
        console.log(result);if(result.success){let item =this.fileList[fileListLen]this.fileList.splice(fileListLen,1, Object.assign(item,{status:'success',message:'',url: result
            }))
            fileListLen++}else{this.fileList.splice(fileListLen,1)}}},//上传图片uploadFilePromise(url){returnnewPromise((resolve, reject)=>{let a = uni.uploadFile({url: config[config.env].apiUrl +'/api/common/upload',filePath: url,name:'file',success:(uploadRes)=>{setTimeout(()=>{let res =JSON.parse(uploadRes.data)//最终传给的是字符串,这里需要转换格式if(res.code ==0){this.$common.msg(res.msg)resolve({success:false,url:''})return;}
                    console.log("图片", res.data.url);this.subImg.push(res.data.url)//新增添加代码resolve({success:true,url: res.data.url
                    })},2000)}});})},
本文转载自: https://blog.csdn.net/xulihua_75/article/details/127206064
版权归原作者 耶啵奶膘 所有, 如有侵权,请联系我们删除。
版权归原作者 耶啵奶膘 所有, 如有侵权,请联系我们删除。