
最近项目中用到流媒体平台,java平台负责信令部分,c++平台负责流媒体处理,找了评分比较好的开源项目 https://gitee.com/pan648540858/wvp-GB28181-pro
流媒体服务基于 c++写的 https://github.com/ZLMediaKit/ZLMediaKit
说明文档:https://github.com/ZLMediaKit/ZLMediaKit/wiki/%E5%BF%AB%E9%80%9F%E5%BC%80%E5%A7%8B
说明文档: https://doc.wvp-pro.cn/#/_content/introduction/compile
搭建过程(稍微有点复杂)记录分享一下:
环境依赖及版本:
jdk1.8 、 node14.21 、 mysql5.7 、 c++11 、ffmpeg6.1 、visual stuido2022 、 cmake (用vs12里自带的)、libsrtp-2.4.2 、vcpkg(git最新版) 、 openssl3.2.0
1、搭建编译c++流媒体平台ZLMediaKit项目

生成cmake项目:

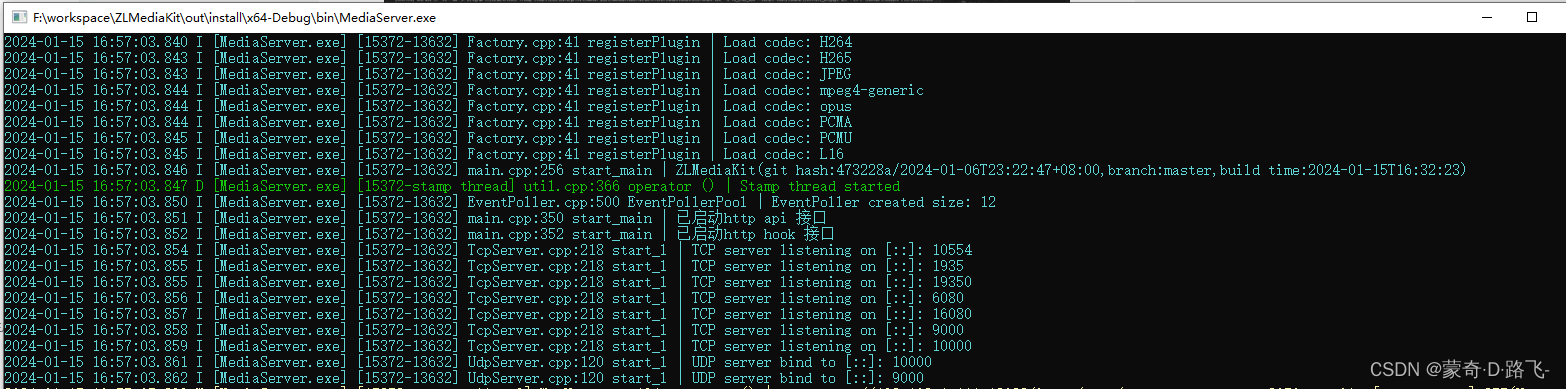
双击运行生成的exe文件,启动ZLM流媒体服务:

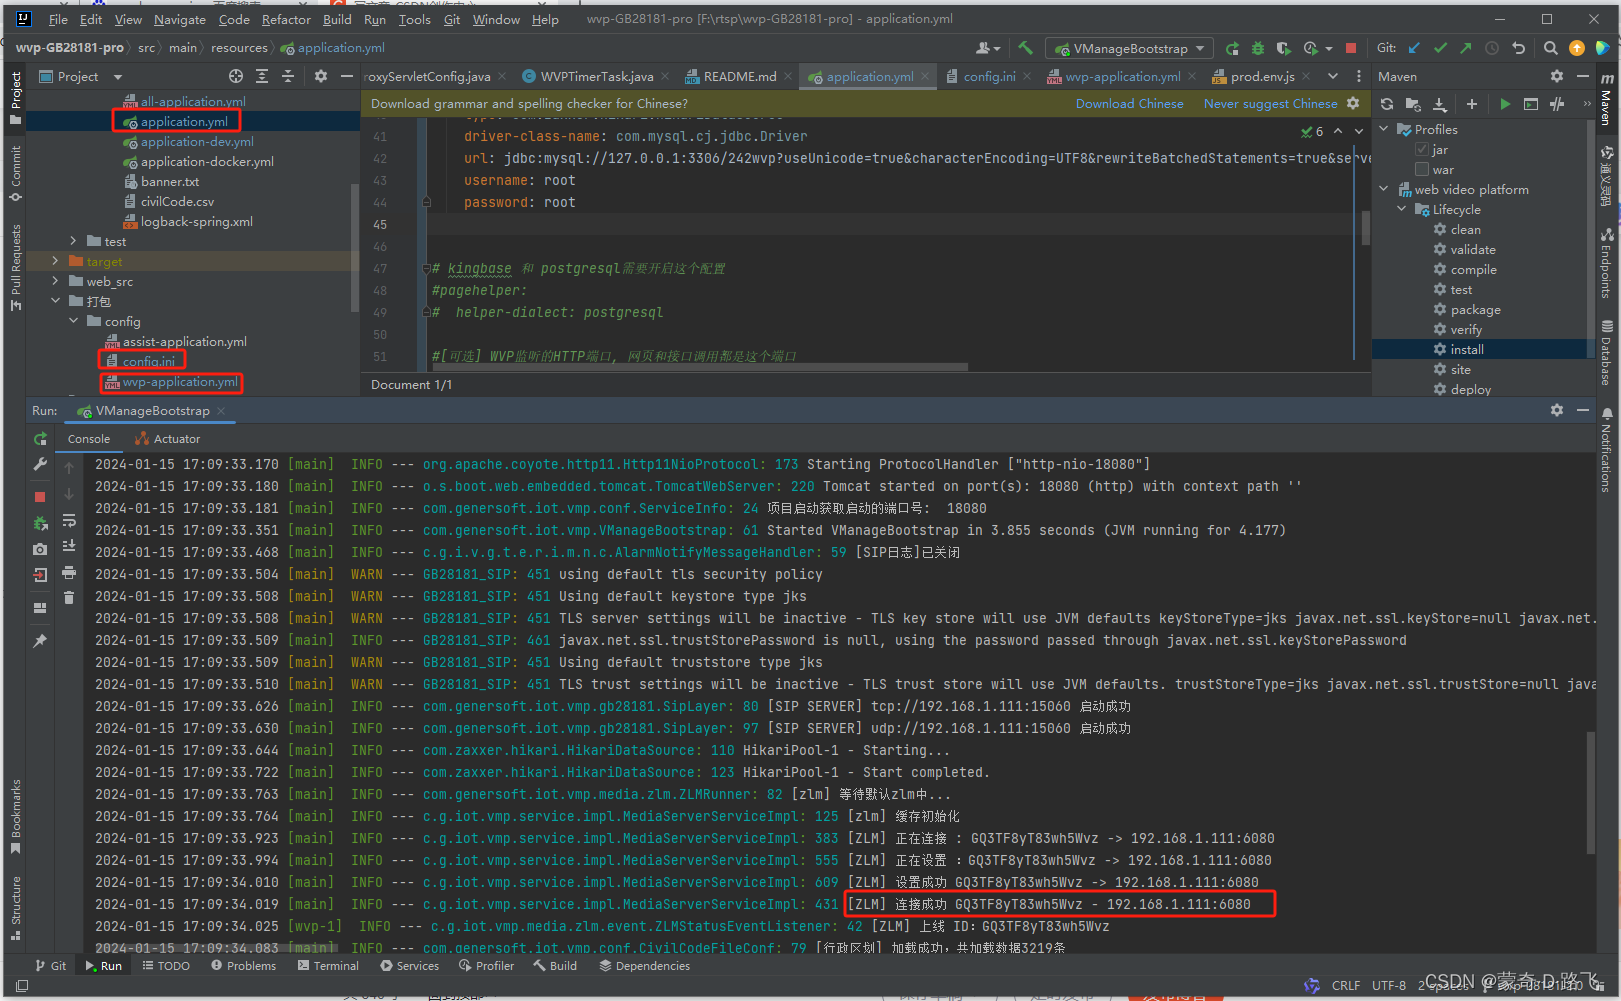
2、启动java信令平台:
注意配置文件config.ini的参数要与流媒体平台的config.ini对应一致
贴出关键配置文件application.yml
spring:
  # [可选]上传文件大小限制
  servlet:
    multipart:
      max-file-size: 10MB
      max-request-size: 100MB
  # REDIS数据库配置
  redis:
    # [可选] 超时时间
    timeout: 10000
    # 以下为单机配置
    # [必须修改] Redis服务器IP, REDIS安装在本机的,使用127.0.0.1
    host: 127.0.0.1
    #        # [必须修改] 端口号
    port: 6379
    # [可选] 数据库 DB
    database: 1
    # [可选] 访问密码,若你的redis服务器没有设置密码,就不需要用密码去连接
    password:
    # 以下为集群配置
    #        cluster:
    #            nodes: 192.168.1.66:9001,192.168.1.66:9002,192.168.1.66:9003,192.168.1.66:9004,192.168.1.66:9005,192.168.1.66:9006
    #        password: adminadmin123.
    # [可选] jdbc数据库配置, 项目使用sqlite作为数据库,一般不需要配置
  # mysql数据源
  datasource:
    # kingbase配置
    #        type: com.zaxxer.hikari.HikariDataSource
    #        driver-class-name: com.kingbase8.Driver
    #        url: jdbc:kingbase8://192.168.1.55:54321/wvp?useUnicode=true&characterEncoding=utf8
    #        username: system
    #        password: system
    # postgresql配置
    #        type: com.zaxxer.hikari.HikariDataSource
    #        driver-class-name: org.postgresql.Driver
    #        url: jdbc:postgresql://192.168.1.242:3306/242wvp
    #        username: root
    #        password: SYceshizu1234
    # mysql配置
    type: com.zaxxer.hikari.HikariDataSource
    driver-class-name: com.mysql.cj.jdbc.Driver
    url: jdbc:mysql://127.0.0.1:3306/242wvp?useUnicode=true&characterEncoding=UTF8&rewriteBatchedStatements=true&serverTimezone=PRC&useSSL=false&allowMultiQueries=true&allowPublicKeyRetrieval=true
    username: root
    password: root

# kingbase 和 postgresql需要开启这个配置
#pagehelper:
#  helper-dialect: postgresql

#[可选] WVP监听的HTTP端口, 网页和接口调用都是这个端口
server:
  port: 18080

# 作为28181服务器的配置
sip:
  # [必须修改] 本机的IP
  ip: 192.168.1.111
  # [可选] 28181服务监听的端口
  port: 15060
  # 根据国标6.1.2中规定,domain宜采用ID统一编码的前十位编码。国标附录D中定义前8位为中心编码(由省级、市级、区级、基层编号组成,参照GB/T 2260-2007)
  # 后两位为行业编码,定义参照附录D.3
  # 3701020049标识山东济南历下区 信息行业接入
  # [可选]
  domain: 3402000001
  # [可选]
  id: 34020000013000000001
  # [可选] 默认设备认证密码,后续扩展使用设备单独密码, 移除密码将不进行校验
  password: 12345678

#zlm 默认服务器配置
media:
  # [必须修改] zlm服务器唯一id,用于触发hook时区别是哪台服务器,general.mediaServerId
  id: GQ3TF8yT83wh5Wvz
  # [必须修改] zlm服务器的内网IP
  ip: 192.168.1.111
  # [必须修改] zlm服务器的http.port
  http-port: 6080
  # [可选] zlm服务器的hook.admin_params=secret
  secret: 034523TF8yT83wh5Wvz73f7
  # 启用多端口模式, 多端口模式使用端口区分每路流,兼容性更好。 单端口使用流的ssrc区分, 点播超时建议使用多端口测试
  rtp:
    # [可选] 是否启用多端口模式, 开启后会在portRange范围内选择端口用于媒体流传输
    enable: true
    # [可选] 在此范围内选择端口用于媒体流传输,
    port-range: 30000,30500 # 端口范围
    # [可选] 国标级联在此范围内选择端口发送媒体流,请不要与收流端口范围重合
    send-port-range: 50502,50506 # 端口范围
  # 录像辅助服务, 部署此服务可以实现zlm录像的管理与下载, 0 表示不使用
  record-assist-port: 18089
  # 录像路径
  record-path: ./www/record
  # 录像保存时长
  record-day: 7
# [可选] 日志配置, 一般不需要改
logging:
  config: classpath:logback-spring.xml

# [根据业务需求配置]
user-settings:
  server-id: 741266
  auto-apply-play: true
  interface-authentication: true
  interface-authentication-excludes:
    - /api/v1/**
    - /api/media/stream_info_by_app_and_stream
    - /api/v1/control/ptz
    - /api/cloud/record/*/**
  # 推流直播是否录制
  record-push-live: true
  # 国标是否录制
  record-sip: false
  # 使用推流状态作为推流通道状态
  use-pushing-as-status: false
  # 设备上线时是否自动同步通道
  sync-channel-on-device-online: false
  # 消息通道功能-缺少国标ID是否给所有上级发送消息
  send-to-platforms-when-id-lost: false
config.ini配置文件:
; auto-generated by mINI class {

[api]
apiDebug=1
defaultSnap=./www/logo.png
secret=034523TF8yT83wh5Wvz73f7
snapRoot=./www/snap/

[cluster]
origin_url=
retry_count=3
timeout_sec=15

[ffmpeg]
bin=/usr/bin/ffmpeg
cmd=%s -re -i %s -c:a aac -strict -2 -ar 44100 -ab 48k -c:v libx264 -f flv %s
log=./ffmpeg/ffmpeg.log
restart_sec=0
snap=%s -i %s -y -f mjpeg -t 0.001 %s

[general]
check_nvidia_dev=1
enableVhost=0
enable_ffmpeg_log=0
flowThreshold=1024
maxStreamWaitMS=15000
mediaServerId=GQ3TF8yT83wh5Wvz
mergeWriteMS=0
resetWhenRePlay=1
streamNoneReaderDelayMS=15000
unready_frame_cache=100
wait_add_track_ms=3000
wait_track_ready_ms=10000

[hls]
broadcastRecordTs=0
deleteDelaySec=10
fileBufSize=65536
segDur=2
segKeep=0
segNum=3
segRetain=5

[hook]
admin_params=secret=034523TF8yT83wh5Wvz73f7
alive_interval=30.000000
enable=1
on_flow_report=
on_http_access=
on_play=http://192.168.1.111:18082/index/hook/on_play
on_publish=http://192.168.1.111:18082/index/hook/on_publish
on_record_mp4=
on_record_ts=
on_rtp_server_timeout=http://192.168.1.111:18082/index/hook/on_rtp_server_timeout
on_rtsp_auth=
on_rtsp_realm=
on_send_rtp_stopped=http://192.168.1.111:18082/index/hook/on_send_rtp_stopped
on_server_keepalive=http://192.168.1.111:18082/index/hook/on_server_keepalive
on_server_started=http://192.168.1.111:18082/index/hook/on_server_started
on_shell_login=
on_stream_changed=http://192.168.1.111:18082/index/hook/on_stream_changed
on_stream_none_reader=http://192.168.1.111:18082/index/hook/on_stream_none_reader
on_stream_not_found=http://192.168.1.111:18082/index/hook/on_stream_not_found
retry=1
retry_delay=3.000000
timeoutSec=20

[http]
charSet=utf-8
dirMenu=1
forbidCacheSuffix=
forwarded_ip_header=
keepAliveSecond=15
maxReqSize=40960
notFound=<html><head><title>404 Not Found</title></head><body bgcolor="white"><center><h1>您访问的资源不存在!</h1></center><hr><center>ZLMediaKit(git hash:f6cba98/2023-02-06T14:18:21+08:00,branch:master,build time:2023-02-07T10:51:47)</center></body></html>
port=6080
rootPath=./www
sendBufSize=65536
sslport=16080
virtualPath=

[multicast]
addrMax=239.255.255.255
addrMin=239.0.0.0
udpTTL=64

[protocol]
add_mute_audio=1
continue_push_ms=3000
enable_audio=1
enable_fmp4=1
enable_hls=1
enable_mp4=0
enable_rtmp=1
enable_rtsp=1
enable_ts=1
fmp4_demand=0
hls_demand=0
hls_save_path=./www
modify_stamp=0
mp4_as_player=0
mp4_max_second=3600
mp4_save_path=./www
rtmp_demand=0
rtsp_demand=0
ts_demand=0

[record]
appName=record
fastStart=0
fileBufSize=65536
fileRepeat=0
sampleMS=500

[rtc]
externIP=192.168.1.111
port=8000
preferredCodecA=PCMA,PCMU,opus,mpeg4-generic
preferredCodecV=H264,H265,AV1,VP9,VP8
rembBitRate=0
tcpPort=8000
timeoutSec=15

[rtmp]
handshakeSecond=15
keepAliveSecond=15
modifyStamp=0
port=1935
sslport=19350

[rtp]
audioMtuSize=600
lowLatency=0
rtpMaxSize=10
videoMtuSize=1400

[rtp_proxy]
dumpDir=
h264_pt=98
h265_pt=99
opus_pt=100
port=10000
port_range=40000-40500
ps_pt=96
timeoutSec=15

[rtsp]
authBasic=0
directProxy=1
handshakeSecond=15
keepAliveSecond=15
lowLatency=0
port=10554
sslport=

[shell]
maxReqSize=1024
port=9000

[srt]
latencyMul=4
pktBufSize=8192
port=9000
timeoutSec=5

; } ---
3、启动前端工程:
注意修改本机ip
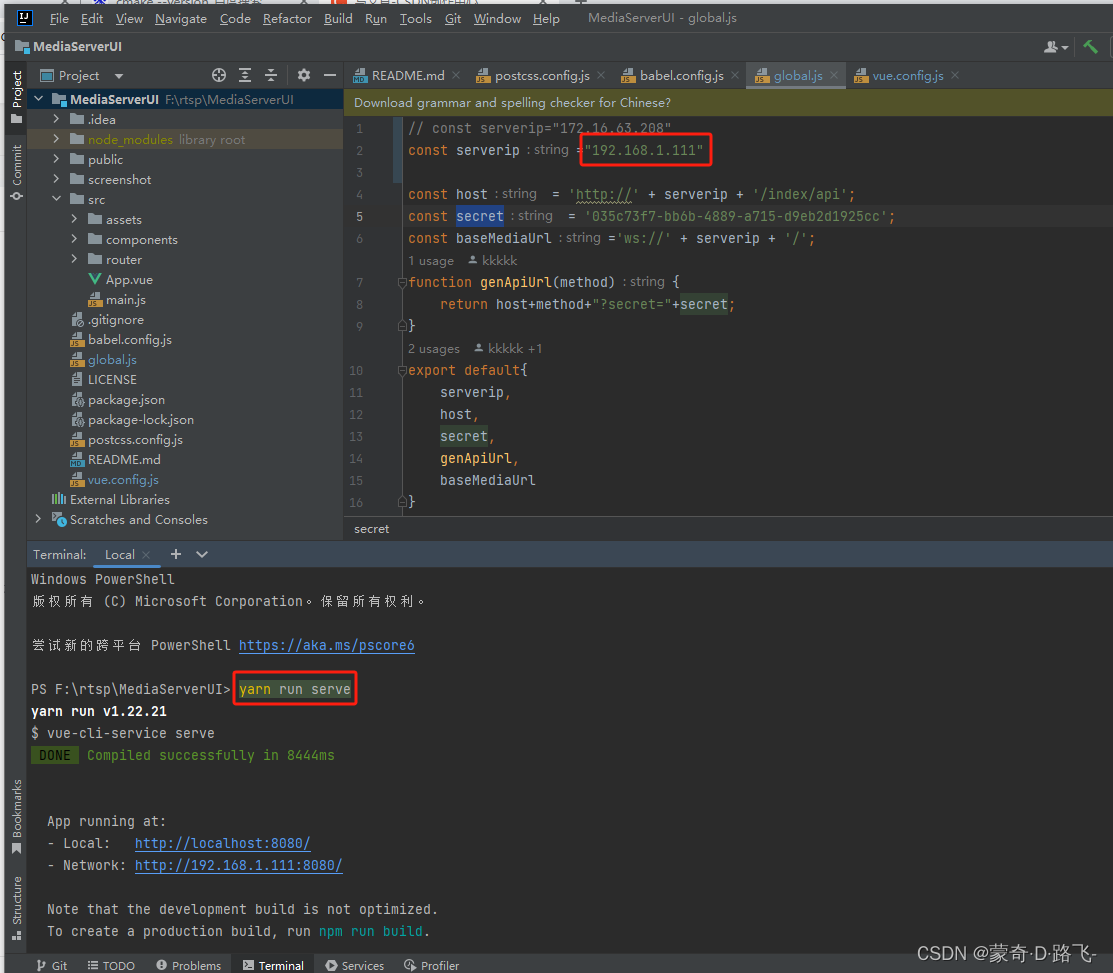
启动起来后,长这个样子,由于还没测试推流,所以看不到视频

至此,环境搭建起来了,推流测试文档地址: https://github.com/ZLMediaKit/ZLMediaKit/wiki/ZLMediaKit%E6%8E%A8%E6%B5%81%E6%B5%8B%E8%AF%95
版权归原作者 蒙奇·D·路飞- 所有, 如有侵权,请联系我们删除。