
最新给客户安装Oracle 19c数据库,网上找的教程都有各种问题,遂自己写一个傻瓜加成供大家参考,如有疑问请评论区指正,感谢!
一、安装环境准备
1、下载资源
vm虚拟机:VMware workstation player官网下载

RedHat7.9镜像:官网下载地址(需注册账号登录)

Oralce 19c安装包:官网下载地址(需注册账号登录)

虚拟机配置:redhat7.9 8G内存,100G硬盘,4核CPU
2、配置本地yum源并安装所需包
可连接公网使用yum源的跳过此步骤
使用xftp将本地iso文件传到服务器/home下
[root@db /]#cd /home
[root@db home]# ll
total 4420608
-rw-r--r--. 1 root root 4526702592 Jun 30 22:15 rhel-server-7.9-x86_64-dvd.iso
将ios文件挂载至/media下
[root@db home]# mount -o loop /home/rhel-server-7.9-x86_64-dvd.iso /media/
mount: /dev/loop0 is write-protected, mounting read-only
备份原有yum源文件
[root@db home]# cd  /etc/yum.repos.d/
[root@db yum.repos.d]# mkdir yum_bak
[root@db yum.repos.d]# mv  *.repo yum_bak/
生成新的yum源文件
[root@db yum.repos.d]# vim redhat.repo
[redhat7.9]
#源名字
name=redhat7.9
#源文件路径
baseurl=file:///media/
#是否启用
enable=1
gpgcheck=0
更新yum源
[root@db yum.repos.d]# yum clean all
[root@db yum.repos.d]# yum makecache
yum 安装oracle的依赖包
[root@db ~]# yum install -y compat-libcap1 compat-libstdc++-33 gcc-c++ ksh libaio-devel libstdc* elfutils-libelf-devel fontconfig-devel libXrender-devel glibc-devel smartmontools sysstat net-tools
3、创建oracle用户及用户组
[root@db /]# groupadd oinstall
[root@db /]# groupadd dba
[root@db /]# groupadd asmdba
[root@db /]# groupadd backupdba
[root@db /]# groupadd dgdba
[root@db /]# groupadd kmdba
[root@db /]# groupadd racdba
[root@db /]# groupadd oper
[root@db yum.repos.d]# useradd -g oinstall -G dba,asmdba,backupdba,dgdba,kmdba,racdba,oper  oracle
[root@db /]# id oracle
uid=1000(oracle) gid=1000(oinstall) groups=1000(oinstall),1001(dba),1002(asmdba),1003(backupdba),1004(dgdba),1005(kmdba),1006(racdba),1008(oper)
4、配置Linux系统内核参数
[root@db /]# vim /etc/sysctl.conf

# sysctl settings are defined through files in
# /usr/lib/sysctl.d/, /run/sysctl.d/, and /etc/sysctl.d/.
#
# Vendors settings live in /usr/lib/sysctl.d/.
# To override a whole file, create a new file with the same in
# /etc/sysctl.d/ and put new settings there. To override
# only specific settings, add a file with a lexically later
# name in /etc/sysctl.d/ and put new settings there.
#
# For more information, see sysctl.conf(5) and sysctl.d(5).

fs.aio-max-nr = 1048576
fs.file-max = 6815744
kernel.shmall = 16451328
kernel.shmmax = 33692319744
kernel.shmmni = 4096
kernel.sem = 250 32000 100 128
net.ipv4.ip_local_port_range = 9000 65500
net.core.rmem_default = 262144
net.core.rmem_max = 4194304
net.core.wmem_default = 262144
net.core.wmem_max = 1048576
sysctl -p 立即生效
[root@db /]# sysctl -p
fs.aio-max-nr = 1048576
fs.file-max = 6815744
kernel.shmall = 16451328
kernel.shmmax = 33692319744
kernel.shmmni = 4096
kernel.sem = 250 32000 100 128
net.ipv4.ip_local_port_range = 9000 65500
net.core.rmem_default = 262144
net.core.rmem_max = 4194304
net.core.wmem_default = 262144
net.core.wmem_max = 1048576
5、关闭selinux和防火墙
[root@db /]# vim /etc/selinux/config

# This file controls the state of SELinux on the system.
# SELINUX= can take one of these three values:
#     enforcing - SELinux security policy is enforced.
#     permissive - SELinux prints warnings instead of enforcing.
#     disabled - No SELinux policy is loaded.
SELINUX=disable
# SELINUXTYPE= can take one of three values:
#     targeted - Targeted processes are protected,
#     minimum - Modification of targeted policy. Only selected processes are protected.
#     mls - Multi Level Security protection.
SELINUXTYPE=targeted

[root@db /]# systemctl stop firewalld
[root@db /]# systemctl disable firewalld
Removed symlink /etc/systemd/system/multi-user.target.wants/firewalld.service.
Removed symlink /etc/systemd/system/dbus-org.fedoraproject.FirewallD1.service.
[root@db /]# systemctl status firewalld
● firewalld.service - firewalld - dynamic firewall daemon
   Loaded: loaded (/usr/lib/systemd/system/firewalld.service; disabled; vendor preset: enabled)
   Active: inactive (dead)
     Docs: man:firewalld(1)

Jun 30 22:02:52 db systemd[1]: Starting firewalld - dynamic firewall daemon...
Jun 30 22:02:52 db systemd[1]: Started firewalld - dynamic firewall daemon.
Jun 30 22:02:52 db firewalld[852]: WARNING: AllowZoneDrifting is enabled. This is considered an ins... now.
Jun 30 23:11:59 db systemd[1]: Stopping firewalld - dynamic firewall daemon...
Jun 30 23:12:00 db systemd[1]: Stopped firewalld - dynamic firewall daemon.
Hint: Some lines were ellipsized, use -l to show in full.
\
6、配置Oracle环境变量
[root@db /]# su - oracle
[oracle@db ~]$ vim .bash_profile
# .bash_profile

# Get the aliases and functions
if [ -f ~/.bashrc ]; then
        . ~/.bashrc
fi

# User specific environment and startup programs

PATH=$PATH:$HOME/.local/bin:$HOME/bin

export PATH

export ORACLE_BASE=/u01/app/oracle
export ORACLE_HOME=/u01/app/oracle/product/19.3.0/db_1
export PATH=$PATH:$ORACLE_HOME/bin:/usr/local/bin
#根据后续创建的数据库名字修改
export ORACLE_HOSTNAME=orcl
export ORACLE_SID=orcl
export LD_LIBRARY_PATH=$ORACLE_HOME/lib:$ORACLE_HOME/rdbms/lib:$ORACLE_HOME/network/lib:/lib:/usr/lib
export CLASSPATH=$ORACLE_HOME/jlib:$ORACLE_HOME/rdbms/jlib:$ORACLE_HOME/network/jlib
7、创建Oracle安装目录并修改权限
[oracle@db ~]$ logout
[root@db /]# mkdir -p /u01/app/oracle/product/19.3.0/db_1
[root@db /]# chmod -R 775 /u01
[root@db /]# chown -R oracle:oinstall /u01
8、配置图形化界面
Xmanager:破解版下载
打开本地安装的xmanager-passive,打开后右下角显示为 xmanager server:0.0
ipconfig 查看本机ip

yum 安装 xorg 包
[oracle@db ~]$ yum install -y xorg* xclock
修改oralce用户环境变量DISPLAY,
[oracle@db ~]$ export DISPLAY=192.168.36.1:0.0
[oracle@db ~]$ echo $DISPLAY
192.168.36.1:0.0
xclock调用成功则可以正常使用xmanager图形化界面
[oracle@db ~]$ xclock
Warning: Missing charsets in String to FontSet conversion

二、数据库安装
1、安装包解压
安装包上传并解压至ORACLE_HOME目录下
[root@db oracle]# cd /home/oracle/
[root@db oracle]# chown oracle:oinstall linuxx64_193000_db_home.zip
[root@db oracle]# ll
total 2987996
-rw-r--r--. 1 oracle oinstall 3059705302 Jun 30 23:46 linuxx64_193000_db_home.zip
[root@db oracle]# su - oracle
Last login: Fri Jun 30 23:49:49 CST 2023 on pts/0
[oracle@db ~]$ echo $ORACLE_HOME
/u01/app/oracle/product/19.3.0/db_1
[oracle@db ~]$ unzip /home/oracle/linuxx64_193000_db_home.zip -d $ORACLE_HOME
2、安装数据库软件
[oracle@db ~]$ cd $ORACLE_HOME
[oracle@db db_1]$ ./runInstaller
Launching Oracle Database Setup Wizard...
仅安装数据软件

安装单实例数据库
选择企业版Enterprise Edition 
选择安装位置 /u01/app/oracle 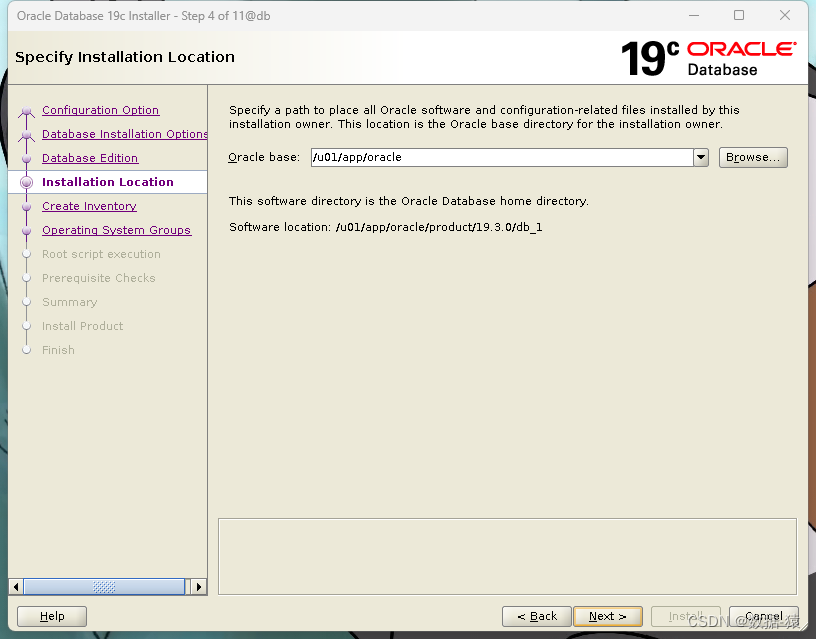
选择inventory目录,默认即可
 选择用户组,默认
 自动运行脚本,不选,下一步
 检查依赖包 ,缺少的包yum安装
rehdat7.9镜像中无compat-libstdc++包,需手动下载安装

下载compat-libstdc++-33-3.2.3 传到/home下安装,安装完成点击‘check again’,继续下一步
下载地址:compat-libstdc++-33-3.2.3
[root@db ~]# cd /home/
[root@db home]# ls
compat-libstdc++-33-3.2.3-72.el7.x86_64.rpm  oracle  rhel-server-7.9-x86_64-dvd.iso
[root@db home]# yum install -y compat-libstdc++-33-3.2.3-72.el7.x86_64.rpm
安装过程中

新开一个xshell窗口,切换到root用户下,运行脚本

[root@db home]# sh /u01/app/oraInventory/orainstRoot.sh
Changing permissions of /u01/app/oraInventory.
Adding read,write permissions for group.
Removing read,write,execute permissions for world.

Changing groupname of /u01/app/oraInventory to oinstall.
The execution of the script is complete.
[root@db home]# sh /u01/app/oracle/product/19.3.0/db_1/root.sh
Performing root user operation.

The following environment variables are set as:
    ORACLE_OWNER= oracle
    ORACLE_HOME=  /u01/app/oracle/product/19.3.0/db_1

Enter the full pathname of the local bin directory: [/usr/local/bin]:
   Copying dbhome to /usr/local/bin ...
   Copying oraenv to /usr/local/bin ...
   Copying coraenv to /usr/local/bin ...

Creating /etc/oratab file...
Entries will be added to the /etc/oratab file as needed by
Database Configuration Assistant when a database is created
Finished running generic part of root script.
Now product-specific root actions will be performed.
Oracle Trace File Analyzer (TFA - Standalone Mode) is available at :
    /u01/app/oracle/product/19.3.0/db_1/bin/tfactl

Note :
1. tfactl will use TFA Service if that service is running and user has been granted access
2. tfactl will configure TFA Standalone Mode only if user has no access to TFA Service or TFA is not installed
安装完成,点击close关闭

修改hosts文件,否则监听无法启动
[root@db home]# vim /etc/hosts
127.0.0.1   localhost localhost.localdomain localhost4 localhost4.localdomain4
::1         localhost localhost.localdomain localhost6 localhost6.localdomain6
#orcl为ORACLE_SID,根据实际修改
127.0.0.1 orcl
3、使用dbca创建数据库
[oracle@db db_1]$ dbca
创建一个数据库

选择单实例数据库,一般事务
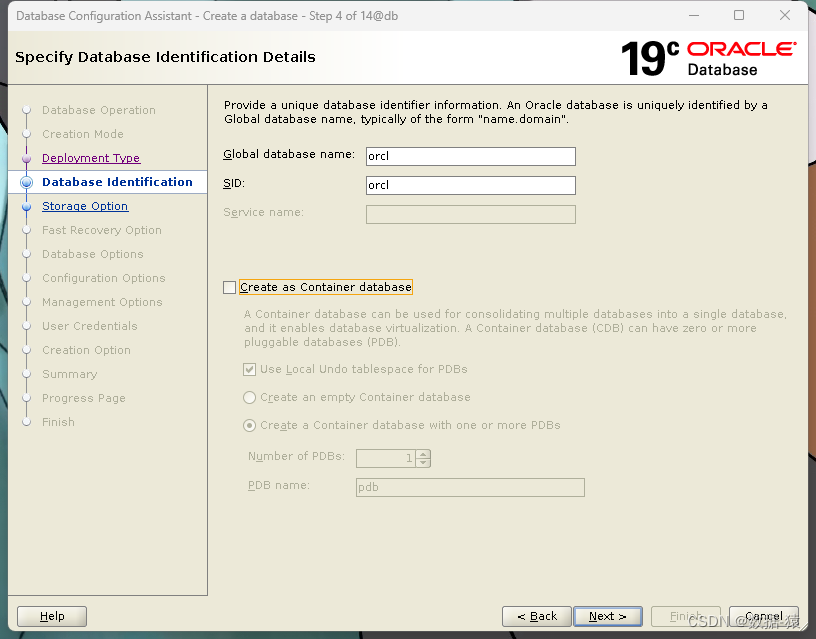
 保持database name 与sid一致,不创建容器数据库
 使用文件管理系统,OMF是否开启均可
 快速恢复区与archvinglog,开关均可
 创建监听,name:LISTENER,port:1521

直接下一步
 我的服务器内存8G,SGA+PGA选择了4G
 字符集选择GBK
 EM关闭
EM关闭
 系统账号密码设置,报错忽略

 直接下一步
直接下一步
 点击finish
 点击close关闭,至此数据库安装完成

4、 启动监听lsnrctl start
[oracle@db /]$ lsnrctl start

LSNRCTL for Linux: Version 19.0.0.0.0 - Production on 01-JUL-2023 15:29:01

Copyright (c) 1991, 2019, Oracle.  All rights reserved.

Starting /u01/app/oracle/product/19.3.0/db_1/bin/tnslsnr: please wait...

TNSLSNR for Linux: Version 19.0.0.0.0 - Production
System parameter file is /u01/app/oracle/product/19.3.0/db_1/network/admin/listener.ora
Log messages written to /u01/app/oracle/diag/tnslsnr/db/listener/alert/log.xml
Listening on: (DESCRIPTION=(ADDRESS=(PROTOCOL=tcp)(HOST=127.0.0.1)(PORT=1521)))
Listening on: (DESCRIPTION=(ADDRESS=(PROTOCOL=ipc)(KEY=EXTPROC1521)))

Connecting to (DESCRIPTION=(ADDRESS=(PROTOCOL=TCP)(HOST=orcl)(PORT=1521)))
STATUS of the LISTENER
------------------------
Alias                     LISTENER
Version                   TNSLSNR for Linux: Version 19.0.0.0.0 - Production
Start Date                01-JUL-2023 15:29:02
Uptime                    0 days 0 hr. 0 min. 0 sec
Trace Level               off
Security                  ON: Local OS Authentication
SNMP                      OFF
Listener Parameter File   /u01/app/oracle/product/19.3.0/db_1/network/admin/listener.ora
Listener Log File         /u01/app/oracle/diag/tnslsnr/db/listener/alert/log.xml
Listening Endpoints Summary...
  (DESCRIPTION=(ADDRESS=(PROTOCOL=tcp)(HOST=127.0.0.1)(PORT=1521)))
  (DESCRIPTION=(ADDRESS=(PROTOCOL=ipc)(KEY=EXTPROC1521)))
The listener supports no services
The command completed successfully
版权归原作者 数据-猿 所有, 如有侵权,请联系我们删除。