目录
什么是 Wangeditor
Wangeditor 是一款开源 Web 富文本编辑器,开箱即用,配置简单。
简洁易用,功能强大。快速接入,配置简单,几行代码即可生成。集成了所有常见功能,无需二次开发。在 Vue React 也可以快速接入。
支持 JS Vue React。不依赖任何第三方框架,可用于 jQuery Vue React 等。wangEditor 提供了官方的 Vue React 组件。
什么是 Highlight
Highlight 是一款简洁、高效的代码高亮工具。它可以将你的代码转换为带有颜色和样式的 HTML 或 Markdown 文件,让你在博客、文档或演示文稿中展示代码。
Highlight 支持包括 Java、Python、JavaScript、C++、Ruby、PHP、Swift 在内的几十种编程语言。
Highlight 提供了多种预设的代码高亮样式,你可以根据自己的喜好选择最适合的一种。当然,你也可以自定义样式,让代码更具个性化。
1. 安装
推荐使用 Visual Studio Code 进行项目和代码的编写
vite(基于vite创建vue3项目)
npm create vite
wangeditor编辑器(两个都要安装)
npminstall @wangeditor/editor
npminstall @wangeditor/editor-for-vue@next
highlight 代码高亮工具(两个都要安装)
npminstall highlight.js
npminstall @highlightjs/vue-plugin
2. 在main.js中引用
// 引入highlight的css样式和vue插件
// 这里引入的是stackoverflow-light.css,大家可以去官网查看并替换成自己喜欢的css样式
import'highlight.js/styles/stackoverflow-light.css'import'highlight.js/lib/common'import hljsVuePlugin from '@highlightjs/vue-plugin'

// 引入wangeditor的css样式
import'@wangeditor/editor/dist/css/style.css'

// 注释或删除下一行代码
// createApp(App).mount('#app')

// 使用createApp方法,创建一个Vue应用实例
const app = createApp(App)

// 注册highlight的vue插件
app.use(hljsVuePlugin)

// 挂载Vue应用实例
app.mount('#app')
3. 在vue组件中使用 highlight
3.1 < highlightjs > 用法(不推荐)
使用 <highlightjs> 组件,代码内容放在 :code=“xxx” 的 xxx 变量/常量中
Tip:只能直接高亮纯代码,但一般不这么用
示例代码:
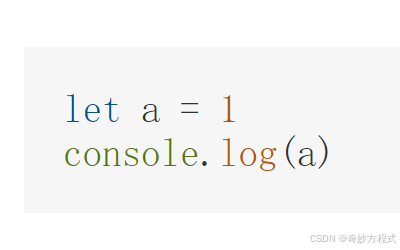
<script setup>let code =`let a =1\nconsole.log(a)`</script><template><div><highlightjs language="JavaScript" :autodetect="false" :code="code"></highlightjs></div></template>
效果:
3.2 v-higelight 用法(推荐)
引入hljs,同时定义相关指令
在组件中使用 v-higelight 属性,代码内容放在 v-html=“xxx” 的 xxx 变量/常量中
Tip:不能直接高亮代码,但能高亮html中的代码,一般是配合文本编辑器(如wangeditor)使用
示例代码:
<script setup>import hljs from "highlight.js"

    //定义指令,自动使用highlight.js渲染所有<pre><dode>代码块
    const vHigelight ={
        mounted(el){let blocks = el.querySelectorAll('pre code')
            blocks.forEach((block)=>{
                block.setAttribute('style', 'margin-top: 8px;')
                // 旧版本使用的是 highlightElement,新版本使用的是highlightBlock
                hljs.highlightBlock(block)})}}

    const valueHtml ='<pre><code class="language-javascript">let a = 1 console.log(a)</code></pre><p><br></p>'</script><template><div v-higelight v-html="valueHtml"></div></template>
效果:
4. 在vue组件中使用 wangeditor
引入 Toolbar 和 Editor(工具栏和编辑栏) ,同时引入 vue 中的相关函数
进行相关配置和初始化
示例代码(为直观演示,还会展示实际效果,自行修改或删除):
<script setup>import hljs from "highlight.js"import{ Editor, Toolbar } from '@wangeditor/editor-for-vue'import{ onBeforeUnmount, ref, shallowRef } from 'vue'

// 以下是官方要求的写法(shallowRef 仅提供一层浅层的响应性)
const editorRef = shallowRef()

// 工具栏和编辑栏 配置
const toolbarConfig ={
  excludeKeys: []}
const editorConfig ={ placeholder: '请输入内容...'}

// 组件销毁时,也及时销毁编辑器
onBeforeUnmount(()=>{
    const editor = editorRef.value
    if(editor == null)return
    editor.destroy()})

// 编辑器初始化完成时的回调函数
const editorInit =(editor)=>{
  editorRef.value = editor // 记录 editor 实例,重要!
}

// 定义指令,自动使用highlight.js渲染所有<pre><dode>代码块
  const vHigelight ={
  mounted(el){let blocks = el.querySelectorAll('pre code')
    blocks.forEach((block)=>{
      block.setAttribute('style', 'margin-top: 8px;')
      hljs.highlightBlock(block)})}}

const valueHtml = ref('')

const click =()=>{
  window.alert("模拟提交,编辑器内容为:\n\n" + valueHtml.value)}</script><template><div style="width: 60%; margin: auto"><div style="border: 1px solid #ccc"><Toolbar style="border-bottom: 1px solid #ccc" :editor="editorRef"
        :defaultConfig="toolbarConfig"mode="default"/><Editor style="min-height: 200px; overflow-y: hidden" v-model="valueHtml"
        :defaultConfig="editorConfig"mode="default" @onCreated="editorInit"/></div><div style="display: flex; justify-content: center; margin: 10px;"><!-- 前面没有安装element plus,这里就没用el-button,之后自行替换即可 --><button @click="click">提交</button></div><div><h5>生成的html内容:</h5>{{ valueHtml }}</div><div><h5>页面显示效果:</h5><!-- 这里得写上v-if="xxx",否则页面渲染不出来。猜测是不写时,先渲染 v-higelight,再渲染 v-html,使得代码高亮无效 --><div v-if="valueHtml" v-higelight v-html="valueHtml"></div></div></div></template><style scoped></style>
效果(初始状态):

效果(编辑状态,选择javascript代码块进行编辑):

效果(模拟提交状态):

版权归原作者 奇妙方程式 所有, 如有侵权,请联系我们删除。