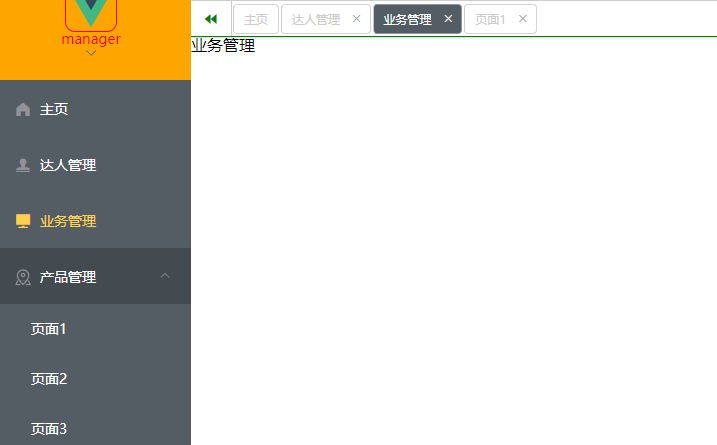
效果图

第一步:设置左侧菜单栏
左侧菜单栏,左侧菜单我这边自定义写死的数据。
分为有子菜单和没子菜单等情况,我用到的只有俩种,没有三级菜单。
HTML部分
    <el-menu
      unique-opened
      :default-active="$route.path"
      class="el-menu-vertical-demo"
      background-color="#545c64"
      text-color="#fff"
      active-text-color="#ffd04b"
      router
    > <!-- 没有子菜单 -->
      <el-menu-item
        :index="item.path"
        v-for="item in noChildren"
        :key="item.path"
        @click="clickMenu(item)"
      >
        <i :class="'el-icon-' + item.icon"></i>
        <span slot="title">{{ item.label }}</span>
      </el-menu-item>
      <!-- 有子菜单数据 -->
      <el-submenu
        index="index"
        v-for="(item, index) in hasChildren"
        :key="index">
        <template slot="title">
          <i :class="'el-icon-' + item.icon"></i>
          <span>{{ item.label }}</span>
        </template>
          <el-menu-item
            :index="subItem.path"
            v-for="(subItem, subIndex) in item.children"
            :key="subIndex"
            @click="clickMenu(subItem)"
          >
            {{ subItem.label }}
          </el-menu-item>
      </el-submenu>
   </el-menu>
自定义的数据

JS部分
//封装的左侧导航菜单自定义的数据,引入的就是上面图片中的
import navmenu from "./navmenu.js";
export default {
  //计算属性
  computed: {
    //没有子菜单
    noChildren() {
      return this.menu.filter((item) => !item.children);
      //filter()创建一个新的数组,新数组中的元素是通过检查指定数组中符合条件的所有元素,首页没有子菜单,
    },
    //有子菜单
    hasChildren() {
      return this.menu.filter((item) => item.children);
    }
  },
  data() {
    return {
      //获取菜单栏数据并赋值给menu
      menu: navmenu,
    };
  },
  methods: {
    //这边接收的循环的数据,调用vuex中的方法
    clickMenu(item) {
      this.$store.commit("selectMenu", item);
    },
  },
};
第二步:新建Tags.vue组件,自己随便放,在需要的位置引入就行
HTML部分
这是我的布局及样式,你们自己根据自己情况修改,有不足的多多指教。里面参数element-tag里面都有解释
<div class="tags">
        <!-- tags标签页 -->
        <span style="width: 40px;display: inline-block; border-right: 1px solid #ccc;">
          <i class="el-icon-caret-left"></i>
          <i class="el-icon-caret-left"></i>
        </span>
        <el-tag
          :key="tag.name"
          type="info"
          v-for="(tag,index) in tags"
          :closable="tag.name!=='home'"
          :disable-transitions="false"
          @close="handleClose(tag,index)"
          @click="changeMenu(tag)"
          :effect="$route.name === tag.name ? 'dark' : 'plain'">
          {{tag.label}}
        </el-tag>
        <span style="width: 40px;display: inline-block; position: absolute; left: 96.5%; top: 0%; border-left: 1px solid #ccc; ">
          <i class="el-icon-caret-right"></i>
          <i class="el-icon-caret-right"></i>
        </span>
    </div>
JS部分
import { mapState,mapMutations } from 'vuex'
export default {
 name: 'CommonTags',
 computed:{
    ...mapState({
        tags:state=>state.tab.tabsList
    })
  },
  methods:{
    ...mapMutations({
        close:'closeTab'
    }),
    changeMenu(tag){
        //在走一遍vuex中 selectMenu方法,将tag也是内容传递进去
        this.$store.commit('selectMenu',tag)
        this.$router.push({name:tag.name})
    },
    handleClose(tag,index){
      let length=this.tags.length-1
      this.close(tag)
      if (tag.name !== this.$route.name) {
        return
      }
      // 判断vuex中的tabsList下标,如果跟长度相等,跳转后最一个页面
      if(index===length){
       this.$router.push({name:this.tags[index-1].name})
      }else{
       this.$router.push({name:this.tags[index].name})
      }
    }
  }
}
scss样式,根据自己改吧
 .el-tag{
    margin:1px;
  }
    .tags{
      display: flex;
      align-items: center;
      position: relative;
        width: 100%;
        height: 35px;
        background-color: #fff;
      border-bottom:1px solid green ;
        line-height: 35px;
        box-shadow: -1px -2px 5px 0px rgba(16,16,16,0.75);
        -webkit-box-shadow: -1px -2px 5px 0px rgba(16,16,16,0.75);
        -moz-box-shadow: -1px -2px 5px 0px rgba(16,16,16,0.75);
    }
  .tags .el-tag{
    border-left:1px solid #ccc;
    color: #ccc;
    height: 30px;
    line-height: 28px;
    cursor: pointer;
  }
  .tags .el-tag:last-child{
    border-right:1px solid #ccc ;
  }
  .tags .el-tag--dark{
    background-color: rgb(84, 92, 100);
    color: #fff;
  }
  span{
    position: relative;
  }
  span i{
    color: green;
    margin-left: 15px;
  }
  span i:nth-child(1){
        position: absolute;
        top: 28%;
        left:-15%;
  }
第三步:vuex中部分
import Vue from 'vue'
import Vuex from 'vuex'
//持久化存储插件 import createPersistedState from 'vuex-persistedstate'
Vue.use(Vuex)
export default new Vuex.Store({
  state: {
    // 定义的数据,tab标签,这是初始化跳转页面进去就存在的,不想要可以设置
      tabsList:[
        {
            path:"/",
            name:"home",
            label:"主页",
            icon:"home"
        }
      ]
  },
  mutations: {
    //左侧菜单栏点击后将数据传递进来将数据添加到tabsList中 添加tab标签
      selectMenu(state,val){
          if(val.name!=='home'){
              let result=state.tabsList.findIndex(item=>item.name===val.name);
              result===-1 ? state.tabsList.push(val) : ''
          }
      },
    // tab标签删除
      closeTab(state,val){
          let result=state.tabsList.findIndex(item=>item.name===val.name);
          state.tabsList.splice(result,1);
      }
  },
  actions: {
  }
})
第四 路由部分
路径跟着自己的来
import Vue from 'vue'
import VueRouter from 'vue-router'
Vue.use(VueRouter)
const routes = [
  {
    path:'/',
    name:'login',
    component:()=>import('../views/login.vue')
  },
  {
    path: '/main',
    name: 'main',
    component: () => import('../views/Main.vue'),
    children:[
      {
        path: '/home',
        name: 'home',
        component: () => import('../views/Home.vue'),
      },
      .........
    ]
  }
]

const router = new VueRouter({
  mode: 'history',
  base: process.env.BASE_URL,
  routes
})
const routerPush = VueRouter.prototype.push
VueRouter.prototype.push = function push(location) {
  // 这个语句用来解决报错
  // 调用原来的push函数,并捕获异常
  return routerPush.call(this, location).catch(error=> error)
}
export default router
五使用
放自己需要的地方就行,记得注册组件

记录自己的,当个笔记。
本文转载自: https://blog.csdn.net/xcjhxh/article/details/129295359
版权归原作者 好多事。 所有, 如有侵权,请联系我们删除。
版权归原作者 好多事。 所有, 如有侵权,请联系我们删除。