
locust压测工具【学习】
1.安装:pip3 install locust
检验版本:locust -V
2.使用脚本:
from locust import task, HttpUser, constant_pacing
from locust import between, constant, tag
from locust import events
from locust.runners import MasterRunner
import csv
import time
import json
from json import JSONDecodeError
from loguru import logger

@events.test_start.add_listener# 压测开始的时候执行defon_test_start(environment,**kwargs):ifnotisinstance(environment.runner, MasterRunner):print("Beginning test setup")else:print("Started test from Master node")@events.test_stop.add_listener# 压测结束的时候执行defon_test_stop(environment,**kwargs):ifnotisinstance(environment.runner, MasterRunner):print("Cleaning up test data")else:print("Stopped test from Master node")# 请求完成后,触发监听器:定义了输出响应的相关内容,这个可以放到locufile文件里面@events.request.add_listenerdefmy_request_handler(request_type, name, response_time, response_length, response,
                       context, exception, start_time, url,**kwargs):if exception:print(f"Request to {name} failed with exception {exception}")else:print(f"request_type : {request_type}")print(f"response_time : {response_time}")print(f"response_length : {response_length}")print(f"context : {context}")print(f"start_time : {start_time}")print(f"url : {url}")print(f"Successfully made a request to: {name}")print(f"The response : {response.text}")classUser1(HttpUser):
    weight =1# user1类被执行的概率是25%,user2类被执行的概率是4分之3
    host ="https://xxx.com"# 要加载的url的前缀
    wait_time = between(2,5)# 每个用户结束,等待2-5秒# wait_time = constant(3)  # 每个用户操作完成后,等待3秒# wait_time = constant_pacing(10)  # 强制只等待10秒,优先级大于@task标记方法自定义的的sleep(20)# wait_time = constant_throughput(0.1)  # pacing的反例,这个还是等待10秒,1/值(0.1) = 10defon_start(self):"""
        每个user启动前调用on_start方法
        这是获取用户特定测试数据的好地方。每个用户执行一次
        """
        headers ={"Content-Type":"application/json"}
        self.client.headers = headers  # 这里设置的headers将给分发给每个任务的headers,避免重复去写。
        time.sleep(1)@tag("smoke","tag2")# 执行被smoke标记的任务:--tags smoke,执行没有被tag2标记的:--exclude-tags tag2/--exclude-tags tag2 smoke@task(1)# 执行脚本时,只会运行被task标记的方法作为一个测试点,其他方法都是辅助任务的deftest_login1(self):# 读取csv中的用户名、密码file=open("../data/user/userdata_1000.csv","r")
        table = csv.reader(file)for i in table:# 参数化登录的入参
            data = json.dumps({"account":"18741341234"})
            headers ={"Content-Type":"application/json"}
            r = self.client.post("/api/login", data=data, headers=headers)# self.client继承了request.session,所以不用传cookie,传登录,直接请求即可with r as response:# 断言响应的内容try:if response.status_code !=200:
                        logger.info("Did not get expected value in greeting")except JSONDecodeError:
                    response.failure("Response could not be decoded as JSON")# 如果是json格式问题,抛出自己定义的异常except KeyError:
                    response.failure("Response did not contain expected key 'greeting'")# 执行失败,抛出异常@tag("smoke1")@tag("smoke")@task(3)# 有4分之3的几率执行下面这个任务deftest_login2(self):
        data = json.dumps({"account":"18741341234"})
        headers ={"Content-Type":"application/json"}
        response = self.client.post("/api/login", data=data, headers=headers)# locust自带标准断言with response as res:try:if res.status_code !=200:
                    res.failure("脚本返回的code不是200")except JSONDecodeError:
                res.failure("Response could not be decoded as JSON")
        time.sleep(1)# self.environment.runner.quit()  # to stop the runner from a task methoddefon_stop(self):"""
        每个user运行结束后调用on_start方法
        清理测试数据等:
        (1)调用接口清理测试数据、(2)数据库清理测试数据
        """
        data = json.dumps({"account":"18741341234"})
        headers ={"Content-Type":"application/json"}
        self.client.post(self.host+"/api/login", data=data, headers=headers)
        time.sleep(1)# tasks = {test_login1: 3, test_login2: 1}  # 任务权重的第二种选择:执行1的概率是2的3倍# tasks = [test_login1, test_login2]  # 任务权重的第三种选择:随机执行列表里面的任务classUser2(HttpUser):"""
    登录
    """
    weight =4
    last_wait_time =0
    host ="https://xxx.com"
    wait_time = constant(1)defon_start(self):
        data = json.dumps({"account":"18741341234"})
        headers ={"Content-Type":"application/json"}
        self.user_specific_testdata = self.client.post("/api/login", data=data, headers=headers)
        time.sleep(1)
        self.tfjiao ="jiaotengfei"# 在on start方法中定义了self.tfjiao属性,所以下面可直接调用@tag("tag2")@taskdeftest_login3(self):print(self.tfjiao)
        self.last_wait_time +=1#
        data = json.dumps({"account":"18741341234"})
        headers ={"Content-Type":"application/json"}
        response = self.client.post("/api/login", data=data, headers=headers)assert response.status_code ==200@tag("smoke")@taskdeftest_login4(self):
        self.last_wait_time +=1#
        data = json.dumps({"account":"18741341234"})
        headers ={"Content-Type":"application/json"}
        r = self.client.post("/api/login", data=data, headers=headers)defon_stop(self):
        data = json.dumps({"account":"18741341234"})
        headers ={"Content-Type":"application/json"}
        self.client.post("/api/login", data=data, headers=headers)
        time.sleep(1)
3.发现的报错:
3.1 问题描述:浏览器中打开127.0.0.1:8089失败
出现原因:windows cmd下启动locust :locust -f test.py --host=https://www.baidu.com,
netstat -ano |findstr 8089查看端口绑定在[::]:8089
解决方法:浏览器中需访问ipv6本地地址:http://[::1]:8089/,访问成功
上面的脚本在研究中。可以实现的脚本如下所示
#该demo适用于:locust v2.1.0from locust import HttpUser, task, between, events
from locust.runners import MasterRunner

debug [email protected]_listenerdefon_locust_init(environment,**kwargs):ifisinstance(environment.runner, MasterRunner):print("I'm on master node")else:print("I'm on a worker or standalone node")# 压测开始的时候执行@events.test_start.add_listenerdefon_test_start(environment,**kwargs):print("test is starting")# 压测结束的时候执行@events.test_stop.add_listenerdefon_test_stop(environment,**kwargs):print("test is ending")classHttpDemo(HttpUser):#模拟负载的任务之间执行时等待时间的区间:单位:毫秒
    wait_time = between(0,10)#执行完一个任务后随机暂停一个时间,时间在最小值和最大值之间的随机时间

    host ='https://www.baidu.com/'# host地址defon_start(self):# 每次任务开始的时候执行print("task start")defon_stop(self):# 每次任务执行完时执行print("task stop")'''例子'''@taskdeftest(self):

        header ={"Cookies":"PSTM=1661350851; BIDUPSID=31CC3E4DAFA803DEB330A65A7EB7394D; BAIDUID_BFESS=C51B9A83C9733786E74F8D1C59C224AA:FG=1; ZFY=kb1RfJaSPQpdrwWFPtdmx5sJN84qWjSur8Ge9OeKtDw:C; BDRCVFR[BASDVugcKF6]=IdAnGome-nsnWnYPi4WUvY; delPer=0; BD_CK_SAM=1; PSINO=3; BD_UPN=12314753; BA_HECTOR=8085858h8g0l2g0h24210chp1hnmprh1f; BDORZ=FFFB88E999055A3F8A630C64834BD6D0; B64_BOT=1; BDRCVFR[eYeXh9DZh7C]=7OJcAgxuSi3mvPVUyc8mvqV; H_PS_PSSID=26350; channel=baidu.ccmmb.com; baikeVisitId=6fd4cdcf-3fce-45dc-8d64-a16a9af63eb7; COOKIE_SESSION=75_0_2_2_9_2_1_0_2_2_0_0_931_0_859_0_1669032726_0_1669031867|9#0_0_1669031867|1; H_PS_645EC=8548MtewD2voDtg/x4nqcbmCe+/Q5aYpHBFGq2oGJeohTuNBc2WuaIHBUTOtKn5WUOEwZ+8OmzjO; BDSVRTM=0"}
        req = self.client.get(self.host, headers=header, verify=False)# self.client调用get和post方法,和requests一样if req.status_code ==200:#这里的校验逻辑可以按需求写print("success")else:print("fails")if __name__ =="__main__":# 调试模式,1s执行一次if debug:from locust.env import Environment
        my_env = Environment(user_classes=[HttpDemo])
        HttpDemo(my_env).run()else:import os
        #os.system("locust -f http_demo.py --host=http://lotcheck.woa.com")  # web console
        os.system("locust -f http_demo.py --host=http://test.yourdns.com HttpDemo --headless -u 1 -r 2 --run-time 10s")# commandline启动
在cmd输入命令:locust -f load_test.py --host=https://www.baidu.com
然后通过浏览器查看http://[::1]:8089/(因为我127.0.0.1:8089打开失败了)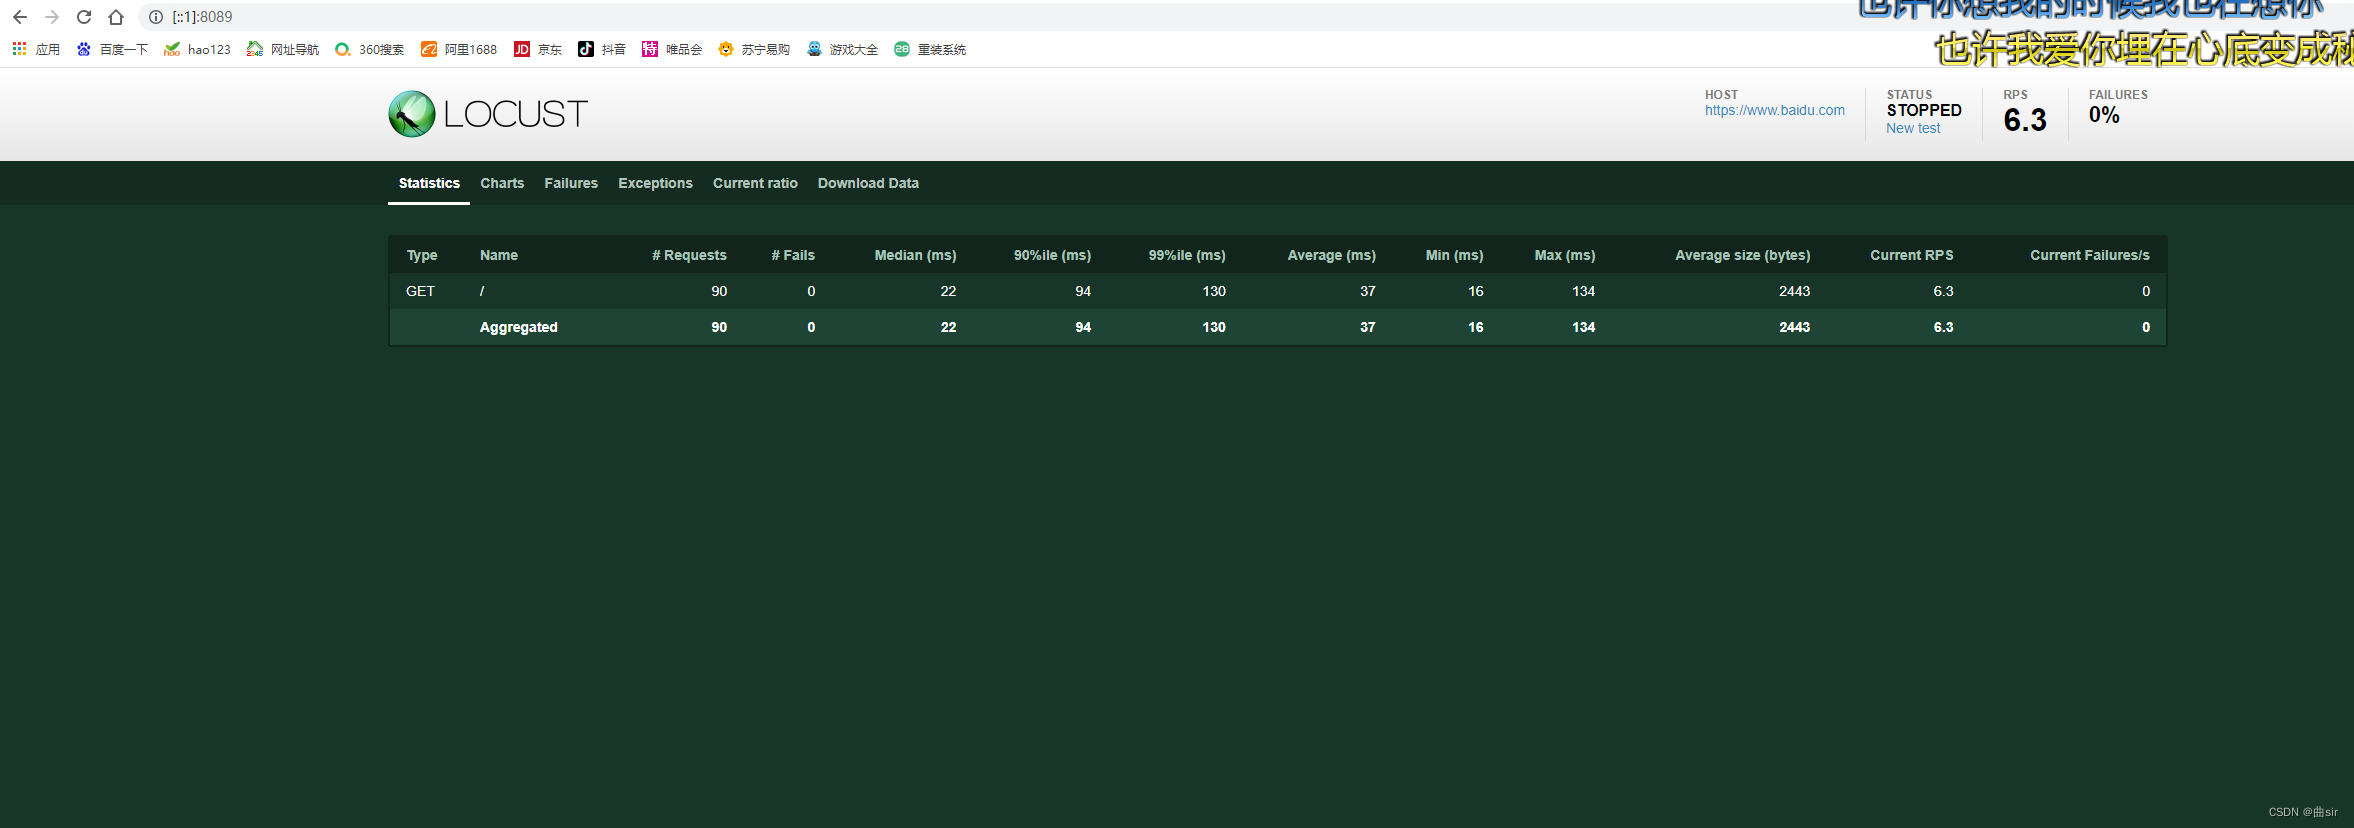
性能测试参数
Type: 请求的类型,例如GET/POST。
Name:请求的路径。这里为百度首页,即:https://www.baidu.com/
request:当前请求的数量。
fails:当前请求失败的数量。
Median:中间值,单位毫秒,一半的服务器响应时间低于该值,而另一半高于该值。
Average:平均值,单位毫秒,所有请求的平均响应时间。
Min:请求的最小服务器响应时间,单位毫秒。
Max:请求的最大服务器响应时间,单位毫秒。
Content Size:单个请求的大小,单位字节。
reqs/sec:是每秒钟请求的个数。
Locust no-web模式
熟悉 Apache ab 工具的同学都知道,它是没有界面的,通过命令行执行。 Locust 同样也提供的命令行运行,好处就是更节省客户端资源。
locust -f zkxl_verify_locust.py --host=https://www.baidu.com --headless -u 10 -r 2 -t 1m
/Library/Frameworks/Python.framework/Versions/3.8/lib/python3.8/site-packages/locust/util/deprecation.py:14: DeprecationWarning: Usage of User.task_set is deprecated since version 1.0. Set the tasks attribute instead (tasks = [UserBehavior])
warnings.warn(
locust: error: unrecognized arguments: --no-web -c
启动参数:
–no-web 表示不使用Web界面运行测试。
-c 设置虚拟用户数。
-r 设置每秒启动虚拟用户数。
-t 设置设置运行时间。
出现的报错及解决办法:
使用Locust进行性能测试,Locust no-web模式执行命令locust -f zkxl_verify_locust.py --host=https://www.baidu.com --no-web -c 10 -r 2 -t 1m
提示locust: error: unrecognized arguments: --no-web -c
image.png
参考locust官方文档https://docs.locust.io/en/latest/running-locust-without-web-ui.html?highlight=no-web
将命令参数–no-web 更改为 --headless,将命令中指定用户并发数的参数 -c 改为 -u,即更改命令为:locust -f zkxl_verify_locust.py --host=https://www.baidu.com --headless -u 10 -r 2 -t 1m 即可.
Locust–CSV存储测试数据
locust的测试数据可以保存到CSV文件中,有两种方法可以进行此操作:
首先,通过Web UI运行Locust时,可以在“Download Data”选项卡下得到CSV文件。
其次,可以使用标签运行Locust,该标签将定期保存两个CSV文件。如果计划使用–no-web标签以自动化方式运行Locust
$ locust -f examples/basic.py --csv=example --no-web -t10m
文件将被命名为example_response_times.csv 和 example_stats.csv (使用–csv=example)并记录Locust构建的信息。
如果你想要更快(慢)的写入速度,也可以自动以写入频率:
import locust.stats
默认为2秒
locust.stats.CSV_STATS_INTERVAL_SEC = 5
此数据将写入两个文件,并将_response_times.csv和_stats.csv添加到你提供的名称中:
$ cat example_response_times.csv
“Name”,“# requests”,“50%”,“66%”,“75%”,“80%”,“90%”,“95%”,“98%”,“99%”,“99.9%”,“99.99%”,“100%”
“GET /”,31,4,4,4,4,4,4,4,4,4,4,4
“/does_not_exist”,0,“N/A”,“N/A”,“N/A”,“N/A”,“N/A”,“N/A”,“N/A”,“N/A”,“N/A”
“GET /stats/requests”,38,3,4,4,4,4,5,5,5,5,5,5
“None Total”,69,3,4,4,4,4,4,5,5,5,5,5
和
$ cat example_stats.csv
“Type”,“Name”,“# requests”,“# failures”,“Median response time”,“Average response time”,“Min response time”,“Max response time”,“Average Content Size”,“Requests/s”
“GET”,“/”,51,0,4,3,2,6,12274,0.89
“GET”,“/does_not_exist”,0,56,0,0,0,0,0,0.00
“GET”,“/stats/requests”,58,0,3,3,2,5,1214,1.01
“None”,“Total”,109,56,3,3,2,6,6389,1.89
Locust 常用参数说明
打开命令提示符(或Linux终端),输入 locust --help 。
参数 说明
-h, --help 查看帮助
-H HOST, --host=HOST 指定被测试的主机,采用以格式:http://10.21.32.33
–web-host=WEB_HOST 指定运行 Locust Web 页面的主机,默认为空 ‘’。
-P PORT, --port=PORT, --web-port=PORT 指定 --web-host 的端口,默认是8089
-f LOCUSTFILE, --locustfile=LOCUSTFILE 指定运行 Locust 性能测试文件,默认为: locustfile.py
–csv=CSVFILEBASE, --csv-base-name=CSVFILEBASE 以CSV格式存储当前请求测试数据。
–master Locust 分布式模式使用,当前节点为 master 节点。
–slave Locust 分布式模式使用,当前节点为 slave 节点。
–master-host=MASTER_HOST 分布式模式运行,设置 master 节点的主机或 IP 地址,只在与 --slave 节点一起运行时使用,默认为:127.0.0.1.
–master-port=MASTER_PORT 分布式模式运行, 设置 master 节点的端口号,只在与 --slave 节点一起运行时使用,默认为:5557。注意,slave 节点也将连接到这个端口+1 上的 master 节点。
–master-bind-host=MASTER_BIND_HOST Interfaces (hostname, ip) that locust master should bind to. Only used when running with --master. Defaults to * (all available interfaces).
–master-bind-port=MASTER_BIND_PORT Port that locust master should bind to. Only used when running with --master. Defaults to 5557. Note that Locust will also use this port + 1, so by default the master node will bind to 5557 and 5558.
–expect-slaves=EXPECT_SLAVES How many slaves master should expect to connect before starting the test (only when --no-web used).
–no-web no-web 模式运行测试,需要 -c 和 -r 配合使用.
-c NUM_CLIENTS, --clients=NUM_CLIENTS 指定并发用户数,作用于 --no-web 模式。
-r HATCH_RATE, --hatch-rate=HATCH_RATE 指定每秒启动的用户数,作用于 --no-web 模式。
-t RUN_TIME, --run-time=RUN_TIME 设置运行时间, 例如: (300s, 20m, 3h, 1h30m). 作用于 --no-web 模式。
-L LOGLEVEL, --loglevel=LOGLEVEL 选择 log 级别(DEBUG/INFO/WARNING/ERROR/CRITICAL). 默认是 INFO.
–logfile=LOGFILE 日志文件路径。如果没有设置,日志将去 stdout/stderr
–print-stats 在控制台中打印数据
–only-summary 只打印摘要统计
–no-reset-stats Do not reset statistics once hatching has been completed。
-l, --list 显示测试类, 配置 -f 参数使用
–show-task-ratio 打印 locust 测试类的任务执行比例,配合 -f 参数使用.
–show-task-ratio-json 以 json 格式打印 locust 测试类的任务执行比例,配合 -f 参数使用.
-V, --version 查看当前 Locust 工具的版本.
Locust分布式运行
参考:官方文档
分布式运行Locust
一旦单台机器不够模拟足够多的用户时,Locust支持运行在多台机器中进行压力测试。
为了实现这个,你应该在 master 模式中使用–master标记来启用一个 Locust 实例。这个实例将会运行你启动测试的 Locust 交互网站并查看实时统计数据。master 节点的机器自身不会模拟任何用户。相反,你必须使用 --slave 标记启动一台到多台 Locustslave 机器节点,与标记 --master-host 一起使用(指出master机器的IP/hostname)。
常用的做法是在一台独立的机器中运行master,在slave机器中每个处理器内核运行一个slave实例。
注意:master 和每一台 slave 机器,在运行分布式测试时都必须要有 locust 的测试文件。
示例
在 master 模式下启动 Locust:
locust -f my_loucstfile.py --master
在每个 slave 中执行(192.168.0.14 替换为你 msater 的IP):
locust -f my_locustfile.py --slave --master-host=192.168.0.14
参数说明
参数
–master
设置 Locust 为 master 模式。网页交互会在这台节点机器中运行。
–slave
设置 Locust 为 slave 模式。
–master-host=X.X.X.X
可选项,与 --slave 一起结合使用,用于设置 master 模式下的 master 机器的IP/hostname(默认设置为127.0.0.1)
–master-port=5557
可选项,与 --slave 一起结合使用,用于设置 master 模式下的 master 机器中 Locust 的端口(默认为5557)。注意,locust 将会使用这个指定的端口号,同时指定端口+1的号也会被占用。因此,5557 会被使用,Locust将会使用 5557 和 5558。
–master-bind-host=X.X.X.X`
可选项,与 --master 一起结合使用。决定在 master 模式下将会绑定什么网络接口。默认设置为*(所有可用的接口)。
–master-bind-port=5557
可选项,与 --master 一起结合使用。决定哪个网络端口 master 模式将会监听。默认设置为 5557。注意 Locust 会使用指定的端口号,同时指定端口+1的号也会被占用。因此,5557 会被使用,Locust 将会使用 5557 和 5558。
–expect-slaves=X
在 no-web 模式下启动 master 时使用。master 将等待X连接节点在测试开始之前连接。
效果
如下图,我启动了一个 master 和两个 slave,由两个 slave 来向被测试系统发送请求。
image
类和方法
Locust类
client属性:
task_set: 指向一个TaskSet类,TaskSet类定义了用户的任务信息,该属性为必填;
max_wait/min_wait: 每个用户执行两个任务间隔时间的上下限(毫秒),具体数值在上下限中随机取值,若不指定则默认间隔时间固定为1秒;
host:被测系统的host,当在终端中启动locust时没有指定–host参数时才会用到;
weight:同时运行多个Locust类时会用到,用于控制不同类型任务的执行权重。如果希望让某个 locust 类经常被执行,可以在这些类上设置一个 weight 属性。
TaskSet类
TaskSet类:实现了虚拟用户所执行任务的调度算法,包括规划任务执行顺序(schedule_task)、挑选下一个任务(execute_next_task)、执行任务(execute_task)、休眠等待(wait)、中断控制(interrupt)等等。
在此基础上,我们就可以在TaskSet子类中采用非常简洁的方式来描述虚拟用户的业务测试场景,对虚拟用户的所有行为(任务)进行组织和描述,并可以对不同任务的权重进行配置。
在TaskSet子类中定义任务信息时,可以采取两种方式,@task装饰器和tasks属性。
from locust import TaskSet, task
class UserBehavior(TaskSet):
@task(1)
def test_job1(self):
self.client.get(‘/job1’)
@task(2)
def test_job2(self):
self.client.get(‘/job2’)
@task(1)中的数字表示任务的执行频率,数值越大表示执行的频率越高
TaskSet类详细说明–tasks属性
采用tasks属性定义任务:
from locust import TaskSet
def test_job1(obj):
obj.client.get(‘/job1’)
def test_job2(obj):
obj.client.get(‘/job2’)
class UserBehavior(TaskSet):
tasks = {test_job1:1, test_job2:2}
tasks = {test_job1:1, test_job2:2}中,test_job1:1,test_job2:2表示事件执行的频率,即test_job2的执行频率是test_job1的两倍
on_start函数
on_start函数是在Taskset子类中使用比较频繁的函数。在正式执行测试前执行一次,主要用于完成一些初始化的工作。
例如,当测试某个搜索功能,而该搜索功能又要求必须为登录态的时候,就可以先在on_start中进行登录操作,HttpLocust使用到了requests.Session,因此后续所有任务执行过程中就都具有登录态了
控制任务的执行顺序
在TaskSequence类中,[email protected]_task()可以用来控制任务的执行顺序;里面的数值越小执行越靠前;
休眠等待(wait)
在Taskset类中,内置WAIT_TIME功能,它用于确定模拟用户在执行任务之间将等待多长时间。Locust提供了一些内置的函数,返回一些常用的wait_time方法。
1、between(min,max)函数:用得比较多的函数
wait_time = between(3.0, 10.5):任务之间等待的时间是3到10.5秒之间的任意时间
还可以用任意函数来定义等待时间, 比如平均1秒的等待时间
wait_time = lambda self: random.expovariate(1)1000
2、constant(number)函数:
wait_time=constant(3):任务之间等待的时候是3秒钟,且等待的时候不能超过任务运行的总时间,也就是在执行py文件时设置的时间
3、constant_pacing(number)*函数:
wait_time=constant_pacing(3):所以任务每隔3秒执行,但是当到达运行的总时间时,任务运行结束;
TaskSets 嵌套
现实中有很多任务其实也是有嵌套结构的,比如用户打开一个网页首页后,用户可能会不喜欢这个网页直接离开,或者喜欢就留下来,留下来的话,可以选择看书、听音乐、或者离开;
中断控制(interrupt)
在有Taskset嵌套的情况下,执行子任务时, 通过 self.interrupt() 来终止子任务的执行, 来回到父任务类中执行, 否则子任务会一直执行;
在上一页的案例中,在stay这个类中,对interrupt()方法的调用是非常重要的,这可以让一个用户跳出stay这个类有机会执行leave这个任务,否则他一旦进入stay任务就会一直在看书或者听音乐而难以自拔。
Locust中实现参数化
在进行接口多用户并发测试时,数据的重复使用可能会造成脚本的失败,那么需要对用户数据进行参数化来使脚本运行成功。
已登录功能为例:
from locust import HttpLocust, TaskSet, task
from random import randint
Web性能测试
class UserBehavior(TaskSet):
def on_start(self):
    self.login()

# 随机返回登录用户
def login_user():
    users = {"user1":123456,"user2":123123,"user3":111222}
    data = randint(1, 3)
    username = "user"+str(data)
    password = users[username]
    return username, password

@task
def login(self):
    username, password = login_user()
    self.client.post("/login_action", {"username":username, "password":password})
class User(HttpLocust):
task_set = UserTask
min_wait = 1000
max_wait = 3000
host = “http://www.xxx.com”
创建 login_user() 方法,定义登录字典 users , 通过randint 随机获取字典中的用户数据。
在 login() 登录任务中,调用 login_user() 方法实现 随机用户的登录。
情景一
在此我们举出百度搜索的例子,假设每个人搜索的内容是不相同的;那么我们可以假设把数据放到队列中,然后从队列中依次把数据取出来;
可以利用python中Queue队列来进行处理;
Queue的种类:
Queue.Queue(maxsize=0):先进先出队列
Queue.LifoQueue(maxsize=0):后进先出队列
Queue.PriorityQueue(maxsize=0):构造一个优先队列
参数maxsize是个整数,指明了队列中能存放的数据个数的上限。一旦达到上限,插入会导致阻塞,直到队列中的数据被消费掉。如果maxsize小于或者等于0,队列大小没有限制
Queue的基本方法:
Queue.Queue(maxsize=0) 如果maxsize小于1就表示队列长度无限
Queue.LifoQueue(maxsize=0) 如果maxsize小于1就表示队列长度无限
Queue.qsize() 返回队列的大小
Queue.empty() 如果队列为空,返回True,反之False
Queue.full() 如果队列满了,返回True,反之False
Queue.get([block[, timeout]]) 读队列,timeout等待时间
Queue.put(item, [block[, timeout]]) 写队列,timeout等待时间
Queue.queue.clear() 清空队列
情景二
个别情况下测试数据可重复使用,因此我们可以把参数化数据定义为一个列表,在列表中取出数据;
Locust中实现关联
在某些请求中,需要携带之前response中提取的参数,常见场景就是session_id。Python中可用通过re正则匹配,对于返回的html页面,可用采用lxml库来定位获取需要的参数;
我们以Phpwind登陆的来进行举例,在登陆的接口中需要把token参数传给服务器,token的值由页的接口返回;
方法一:使用正则表达式
方法二:采用lxml库来定位获取需要的参数
技术点:
1、导模块:lxml模块
2、etree.HTML() 从返回html页面获取html文件的dom结构
3、xpath() 获取token的xpath路径
Locust中实现断言
from locust import HttpLocust, TaskSet, task
class UserTask(TaskSet):
@task
def job(self):
    with self.client.get('/', catch_response = True) as response:
        if response.status_code == 200:
            response.failure('Failed!')
        else:
            response.success()
class User(HttpUser):
task_create = UserTask
min_wait = 1000
max_wait = 3000
host = “https://www.baidu.com”
catch_response = True :布尔类型,如果设置为 True, 允许该请求被标记为失败。
通过 client.get() 方法发送请求,将整个请求的给 response, 通过 response.status_code 得请求响应的 HTTP 状态码。如果不为 200 则通过 response.failure(‘Failed!’) 打印失败!
参考文献:
作者:大脚丫子大怪兽
链接:https://www.jianshu.com/p/6905e322e9bb
来源:简书
版权归原作者 曲sir 所有, 如有侵权,请联系我们删除。