
🌟hello,各位读者大大们你们好呀🌟
🍭🍭系列专栏:【Linux初阶】
✒️✒️本篇内容:使用代码手段实现一个简易的命令行解释器,其中功能包括:打印输出提示符、获取用户输入、字符串切割、执行命令、ls指令下拥有颜色提示、cd、echo;
🚢🚢作者简介:计算机海洋的新进船长一枚,请多多指教( •̀֊•́ ) ̖́-
文章目录
前言
本篇文章建立在学习完进程替换的基础知识之上,如果有小伙伴对进程替换的知识不清楚,可以参考我的这篇文章:【Linux初阶】进程程序替换 | 初识、原理、函数、应用 & makefile工具的多文件编译
一、回顾execvp的应用方式
在我们学习程序替换基础知识的过程中,我们曾经接触过 execvp函数:
代码示例
#include<stdio.h>#include<unistd.h>#include<stdlib.h>#include<assert.h>#include<sys/types.h>#include<sys/wait.h>intmain(int argc,char* argv[]){printf("process is running...\n");pid_t id =fork();assert(id !=-1);if(id ==0){sleep(1);// execvp传递方法如下// ./exec ls -a -l -> "./exec" "ls" "-a" "-l"execvp(argv[1],&argv[1]);exit(1);//must failed}int status =0;pid_t ret =waitpid(id,&status,0);if(ret >0)printf("wait success: exit code: %d, sig: %d\n",(status >>8)&0xFF, status &0x7F);}
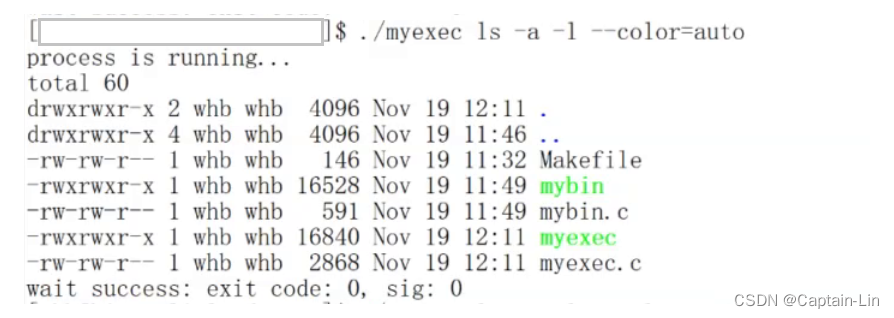
它实现了用我们自己的程序替换shell的指令,那么如果我们可以将运行的方式进一步简化,那么不就可以变成一个简易的 shell了吗?
下面,我将会带着大家结合相关知识,去制作一个简易的命令行解释器。首先,我们创建文件 myshell.c 和 Makefile,在里面进行代码的书写。
二、打印输出提示符
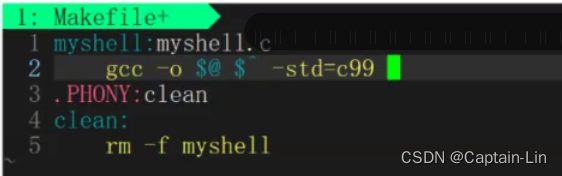
- Makefile文件编写
- myshell.c文件编写
#include<stdio.h>#include<stdlib.h>#include<unistd.h>//进程替换#include<sys/types.h>//进程等待#include<sys/wait.h>intmain(){// 输出提示符printf("用户名@主机名 当前路径# ");fflush(stdout);//刷新输出缓冲区sleep(10);}

完成之后可以输出提示符,在提示符后可以输入其他指令。
三、获取用户输入
#include<stdio.h>#include<stdlib.h>//fgets#include<unistd.h>#include<sys/types.h>#include<sys/wait.h>#include<assert.h>//断言#defineNUM1024char lineCommand[NUM];intmain(){// 输出提示符printf("用户名@主机名 当前路径# ");fflush(stdout);// 获取用户输入, 输入完成的时候,输入\nchar* s =fgets(lineCommand,sizeof(lineCommand)-1,stdin);assert(s !=NULL);(void)s;printf("test : %s\n", lineCommand);}
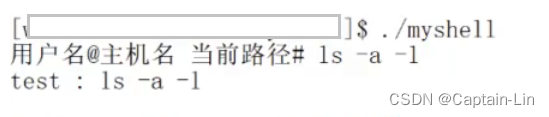
通过运行我们发现,输入指令后按回车,它把我们的回车也读取进去了,导致打印时会有一行空行,我们需要将字符串末尾处的 /n除去。
#include<stdio.h>#include<string.h>#include<stdlib.h>#include<unistd.h>#include<sys/types.h>#include<sys/wait.h>#include<assert.h>#defineNUM1024char lineCommand[NUM];intmain(){// 输出提示符printf("用户名@主机名 当前路径# ");fflush(stdout);// 获取用户输入, 输入完成的时候,输入\nchar* s =fgets(lineCommand,sizeof(lineCommand)-1,stdin);//#include <string.h>assert(s !=NULL);//#include <assert.h>(void)s;// 清除最后一个\n , abcd\n
    lineCommand[strlen(lineCommand)-1]=0;// 将最后的\n变为0printf("test : %s\n", lineCommand);}

我们发现,空行消失了!
四、字符串切割
在实际应用中,我们需要对完整的字符串进行切割,使它变成一个一个的子串,方便计算机读取(“ls -a -l -i” -> “ls” “-a” “-l” “-i”),我们可以创建
指针数组
、调用C语言中的
strtok
接口完成字符串切割。
#include<stdio.h>#include<string.h>//strtok#include<stdlib.h>#include<unistd.h>#include<sys/types.h>#include<sys/wait.h>#include<assert.h>#defineNUM1024#defineOPT_NUM64//新的宏char lineCommand[NUM];char*myargv[OPT_NUM];//指针数组intmain(){// 输出提示符printf("用户名@主机名 当前路径# ");fflush(stdout);// 获取用户输入, 输入的时候,输入\nchar* s =fgets(lineCommand,sizeof(lineCommand)-1,stdin);assert(s !=NULL);(void)s;// 清除最后一个\n , abcd\n
lineCommand[strlen(lineCommand)-1]=0;// ?//printf("test : %s\n", lineCommand);// "ls -a -l -i" -> "ls" "-a" "-l" "-i" -> 1->n// 字符串切割
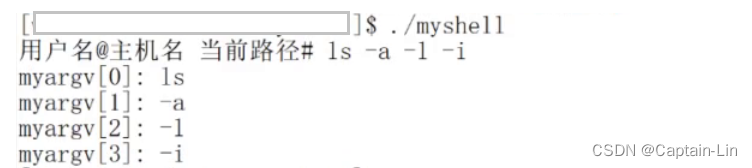
myargv[0]=strtok(lineCommand," ");//第一次分割,要传入字符串+分隔符int i =1;// 如果没有子串了,strtok会返回NULL, myargv[end] = NULLwhile(myargv[i++]=strtok(NULL," "));//第二次分割,要传入NULL+分隔符// 测试是否成功, 条件编译 - 可以结合下文理解,这里不影响#ifdefDEBUGfor(int i =0; myargv[i]; i++){printf("myargv[%d]: %s\n", i, myargv[i]);}#endif}
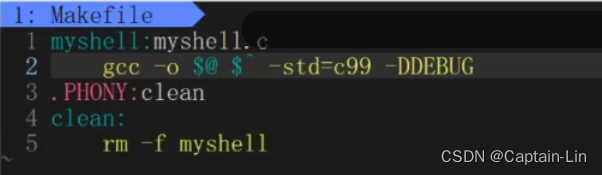
Makefile文件修改(添加一个宏,为了实现条件编译)
通过测试,我们发现完成了字符串分割。但是,新的问题又出现了,我们的命令行只跑一次吗?当然不是,因此我们要添加一个死循环,保证命令行能多次输入。
#include<stdio.h>#include<string.h>#include<stdlib.h>#include<unistd.h>#include<sys/types.h>#include<sys/wait.h>#include<assert.h>#defineNUM1024#defineOPT_NUM64char lineCommand[NUM];char*myargv[OPT_NUM];//指针数组intmain(){while(1){// 输出提示符printf("用户名@主机名 当前路径# ");fflush(stdout);// 获取用户输入, 输入的时候,输入\nchar*s =fgets(lineCommand,sizeof(lineCommand)-1,stdin);assert(s !=NULL);(void)s;// 清除最后一个\n , abcd\n
        lineCommand[strlen(lineCommand)-1]=0;// ?//printf("test : %s\n", lineCommand);// "ls -a -l -i" -> "ls" "-a" "-l" "-i" -> 1->n// 字符串切割
        myargv[0]=strtok(lineCommand," ");int i =1;// 如果没有子串了,strtok->NULL, myargv[end] = NULLwhile(myargv[i++]=strtok(NULL," "));// 测试是否成功, 条件编译#ifdefDEBUGfor(int i =0; myargv[i]; i++){printf("myargv[%d]: %s\n", i, myargv[i]);}#endif}}

至此,我们支持了命令行的多次输入。
五、执行命令
我们选择
execvp
来获取数据,因为它带有v、p,不用输入具体的路径,只需要目标文件+执行选项(数组)即可。
#include<stdio.h>#include<string.h>#include<stdlib.h>#include<unistd.h>#include<sys/types.h>#include<sys/wait.h>#include<assert.h>#defineNUM1024#defineOPT_NUM64char lineCommand[NUM];char*myargv[OPT_NUM];//指针数组intmain(){while(1){// 输出提示符printf("用户名@主机名 当前路径# ");fflush(stdout);// 获取用户输入, 输入的时候,输入\nchar*s =fgets(lineCommand,sizeof(lineCommand)-1,stdin);assert(s !=NULL);(void)s;// 清除最后一个\n , abcd\n
        lineCommand[strlen(lineCommand)-1]=0;// ?//printf("test : %s\n", lineCommand);// "ls -a -l -i" -> "ls" "-a" "-l" "-i" -> 1->n// 字符串切割
        myargv[0]=strtok(lineCommand," ");int i =1;if(myargv[0]!=NULL&&strcmp(myargv[0],"ls")==0){
            myargv[i++]=(char*)"--color=auto";}// 如果没有子串了,strtok->NULL, myargv[end] = NULLwhile(myargv[i++]=strtok(NULL," "));// 测试是否成功, 条件编译#ifdefDEBUGfor(int i =0; myargv[i]; i++){printf("myargv[%d]: %s\n", i, myargv[i]);}#endif// 执行命令pid_t id =fork();assert(id !=-1);if(id ==0){execvp(myargv[0], myargv);//目标文件+执行选项(数组)exit(1);//继续往后执行,说明替换失败,直接返回}int status =0;pid_t ret =waitpid(id,&status,0);//进程等待}}
至此,我们已经完成了一个最简单的shell了。当然,后面还有一些细节需要补充,让我们的shell更完善。
六、ls添加颜色
输入指令不能为空;ls指令下,添加颜色标识目录或文件:
#include<stdio.h>#include<string.h>#include<stdlib.h>#include<unistd.h>#include<sys/types.h>#include<sys/wait.h>#include<assert.h>#defineNUM1024#defineOPT_NUM64char lineCommand[NUM];char*myargv[OPT_NUM];//指针数组intmain(){while(1){// 输出提示符printf("用户名@主机名 当前路径# ");fflush(stdout);// 获取用户输入, 输入的时候,输入\nchar*s =fgets(lineCommand,sizeof(lineCommand)-1,stdin);assert(s !=NULL);(void)s;// 清除最后一个\n , abcd\n
lineCommand[strlen(lineCommand)-1]=0;// ?//printf("test : %s\n", lineCommand);// "ls -a -l -i" -> "ls" "-a" "-l" "-i" -> 1->n// 字符串切割
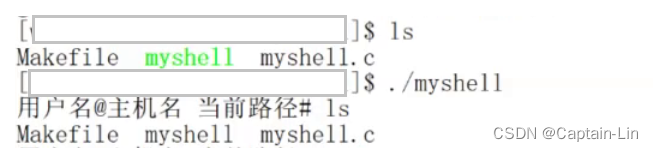
myargv[0]=strtok(lineCommand," ");int i =1;if(myargv[0]!=NULL&&strcmp(myargv[0],"ls")==0)//输入指令不能为空;ls指令下,添加颜色标识目录或文件{
myargv[i++]=(char*)"--color=auto";//添加颜色在这里!!!}// 如果没有子串了,strtok->NULL, myargv[end] = NULLwhile(myargv[i++]=strtok(NULL," "));// 测试是否成功, 条件编译#ifdefDEBUGfor(int i =0; myargv[i]; i++){printf("myargv[%d]: %s\n", i, myargv[i]);}#endif// 执行命令pid_t id =fork();assert(id !=-1);if(id ==0){execvp(myargv[0], myargv);exit(1);}int status =0;pid_t ret =waitpid(id,&status,0);}}

七、实现 cd
通过实验发现,我们自己制作的简易 shell输入
cd..
后路径不变,接下来我们就来实现 cd。在实现路径转换时,我们要清楚,当前路径是什么,实际上,当前路径就是进程的工作目录。
ls /proc/进程pid -al #查看进程属性的命令
为什么我们自己的 shell不能 cd呢?因为我们在fork创建子进程后,是在子进程中进行目录更改的,子进程拥有自己的工作目录,子进程目录的更改不影响父进程的工作目录,在子进程结束后,我们用的依旧是父进程,即shell。也就是说,在我们cd之后,再输入pwd指令,路径不会改变,因为pwd又是父进程创建的另一个子进程去执行的了!
当前的工作目录可以被修改,我们可以用
chdir
更改当前目录。
#include<stdio.h>#include<string.h>#include<stdlib.h>#include<unistd.h>#include<sys/types.h>#include<sys/wait.h>#include<assert.h>#defineNUM1024#defineOPT_NUM64char lineCommand[NUM];char*myargv[OPT_NUM];//指针数组intmain(){while(1){// 输出提示符printf("用户名@主机名 当前路径# ");fflush(stdout);// 获取用户输入, 输入的时候,输入\nchar*s =fgets(lineCommand,sizeof(lineCommand)-1,stdin);assert(s !=NULL);(void)s;// 清除最后一个\n , abcd\n
        lineCommand[strlen(lineCommand)-1]=0;// ?//printf("test : %s\n", lineCommand);// "ls -a -l -i" -> "ls" "-a" "-l" "-i" -> 1->n// 字符串切割
        myargv[0]=strtok(lineCommand," ");int i =1;if(myargv[0]!=NULL&&strcmp(myargv[0],"ls")==0){
            myargv[i++]=(char*)"--color=auto";}// 如果没有子串了,strtok->NULL, myargv[end] = NULLwhile(myargv[i++]=strtok(NULL," "));// 如果是cd命令,不需要创建子进程,让shell自己执行对应的命令,本质就是执行系统接口// 像这种不需要让我们的子进程来执行,而是让shell自己执行的命令 --- 内建/内置命令if(myargv[0]!=NULL&&strcmp(myargv[0],"cd")==0){if(myargv[1]!=NULL)chdir(myargv[1]);// chdir(需要更改的路径)continue;}// 测试是否成功, 条件编译#ifdefDEBUGfor(int i =0; myargv[i]; i++){printf("myargv[%d]: %s\n", i, myargv[i]);}#endif// 内建命令 --> echo// 执行命令pid_t id =fork();assert(id !=-1);if(id ==0){execvp(myargv[0], myargv);exit(1);}int status =0;pid_t ret =waitpid(id,&status,0);}}
八、实现echo
#include<stdio.h>#include<string.h>#include<stdlib.h>#include<unistd.h>#include<sys/types.h>#include<sys/wait.h>#include<assert.h>#defineNUM1024#defineOPT_NUM64char lineCommand[NUM];char*myargv[OPT_NUM];//指针数组int  lastCode =0;//这里添加了变量方便输出int  lastSig =0;intmain(){while(1){// 输出提示符printf("用户名@主机名 当前路径# ");fflush(stdout);// 获取用户输入, 输入的时候,输入\nchar*s =fgets(lineCommand,sizeof(lineCommand)-1,stdin);assert(s !=NULL);(void)s;// 清除最后一个\n , abcd\n
        lineCommand[strlen(lineCommand)-1]=0;// ?//printf("test : %s\n", lineCommand);// "ls -a -l -i" -> "ls" "-a" "-l" "-i" -> 1->n// 字符串切割
        myargv[0]=strtok(lineCommand," ");int i =1;if(myargv[0]!=NULL&&strcmp(myargv[0],"ls")==0){
            myargv[i++]=(char*)"--color=auto";}// 如果没有子串了,strtok->NULL, myargv[end] = NULLwhile(myargv[i++]=strtok(NULL," "));// 如果是cd命令,不需要创建子进程,让shell自己执行对应的命令,本质就是执行系统接口// 像这种不需要让我们的子进程来执行,而是让shell自己执行的命令 --- 内建/内置命令if(myargv[0]!=NULL&&strcmp(myargv[0],"cd")==0){if(myargv[1]!=NULL)chdir(myargv[1]);continue;}//实现echo - 在这里!!!if(myargv[0]!=NULL&& myargv[1]!=NULL&&strcmp(myargv[0],"echo")==0){if(strcmp(myargv[1],"$?")==0){printf("%d, %d\n", lastCode, lastSig);}else{printf("%s\n", myargv[1]);}continue;}// 测试是否成功, 条件编译#ifdefDEBUGfor(int i =0; myargv[i]; i++){printf("myargv[%d]: %s\n", i, myargv[i]);}#endif// 内建命令 --> echo// 执行命令pid_t id =fork();assert(id !=-1);if(id ==0){execvp(myargv[0], myargv);exit(1);}int status =0;pid_t ret =waitpid(id,&status,0);assert(ret >0);(void)ret;
        lastCode =((status>>8)&0xFF);//将status传换成数字信号
        lastSig =(status &0x7F);}}

结语
🌹🌹 简易命令行解释器的实现 的知识大概就讲到这里啦,博主后续会继续更新更多C++的相关知识,干货满满,如果觉得博主写的还不错的话,希望各位小伙伴不要吝啬手中的三连哦!你们的支持是博主坚持创作的动力!💪💪
版权归原作者 Captain-Lin 所有, 如有侵权,请联系我们删除。