** Vue2slot-scope插槽用法**
//vue2.x的写法
<el-table-column label="测试" align="center" prop="ce">
    <template slot-scope="scope"> //2.x的写法
        <span>{{scope.row.ce}}</span>
    </template>
</el-table-column>
** Vue3slot-scope插槽用法**
<el-table-column label="测试" align="center" prop="ce">
    <template #default="{row,$index}"> //3.x的新写法 -- #default="scope" $index
        <span>{{row.ce}}</span>
    </template>
</el-table-column>
**看完觉得没了?恭喜你没走开,下面的更精彩,分享Vue3里面v-solt插槽的四种用法: **
🧨🧨🧨第一种插槽(匿名插槽)
现在我们封装一个组件,在组件中可以自定义内容。
这个时候我们就可以使用插槽了。
插槽可以将父页面中的内容展示在子组件中指定的位置。
父页面
//父页面
<template>
    <div>
        <cha-cao>
            <template v-slot>
                匿名插槽添加的数据
            </template>
        </cha-cao>
    </div>
</template>

<script setup>
import ChaCao from "../components/ChaCao.vue"
</script>
//子组件
<template>
    <div>
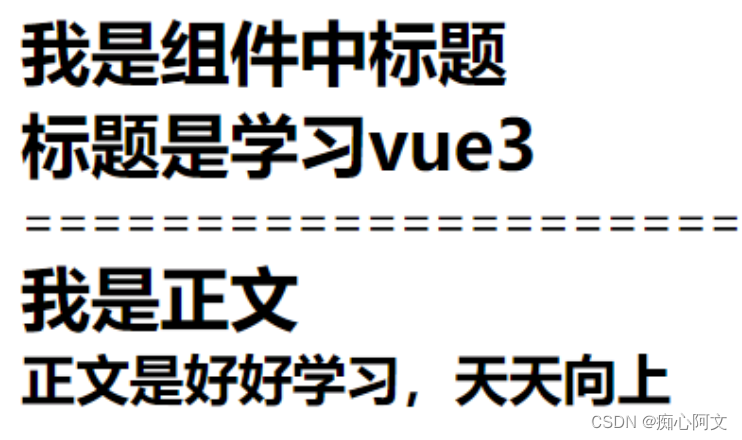
        <h2>我是组件中标题</h2>
        <!-- 匿名插槽添加的数据 将会被展示在这里  -->
        <slot></slot>
    </div>
</template>
<!-- 由于组件中只有一个插槽,我们可以不携带参数 -->

说明:
子当组件渲染的时候, 将会被替换为“匿名插槽添加的数据 ”。
插槽还可以包含任何模板代码,包括 HTML,或者其他组件。
🧨🧨🧨第二种插槽(具名插槽)以及插槽简写
很多的时候,我们可能在组件的不同位置展示不同的内容。
这个时候我们就需要使用具名插槽。
跟 v-on 和 v-bind 一样,v-slot 也有缩写。
(v-slot:) 替换为字符 #
例如 v-slot:header 可以被重写为 #header:
具名插槽的使用
<template>
    <div>
        <cha-cao>
            <template v-slot:header>
                <h2>标题是学习vue3</h2>
            </template>

            <template v-slot:cont>
                <h3>正文是好好学习,天天向上</h3>
            </template>
        </cha-cao>
    </div>
</template>
<script setup>
import ChaCao from "../components/ChaCao.vue"
</script>
子组件
<template>
    <div>
        <h2>我是组件中标题</h2>
        <slot name="header"></slot>
    </div>
    <p>========================</p>
    <div>
        <h2>我是正文</h2>
        <slot name="cont"></slot>
    </div>
</template>

🧨🧨🧨第三种插槽(作用域插槽)
有时让插槽内容能够访问子组件中才有的数据是很有用的。
当一个组件被用来渲染一个项目数组时,这是一个常见的情况,
我们希望能够自定义每个项目的渲染方式。
作用域插槽的使用
父组件.vue
<template>
    <div>
        <cha-cao :listArr="arr">
             <template v-slot:header="slotProps">
                 <h1>下面这个电视剧是自定义的哈</h1>
                 <h1>这就是作用域插槽哈</h1>
                 <h2 clas>电视剧名称:{{ slotProps.row.name }} 人物:{{slotProps.row.person }} 序号--{{ slotProps.index }} </h2>
            </template>
        </cha-cao>
    </div>
</template>

<script setup>
import ChaCao from "../components/ChaCao.vue"
let arr=[
    {name:'且试天下',person:'丰兰息'},
    {name:'请叫我总监',person:'小橘子'},
    {name:'你是我的荣耀',person:'路人甲',slotFlag:true},
]
</script>
//子组件
<template>
   <ul>
        <li v-for="( item, index ) in listArr" :key="index">
            <template v-if="!item.slotFlag">
                <h2>电视剧名称:{{ item.name }} 人物:{{item.person }} 序号:{{ index }} </h2>
            </template>
            <template v-else>
                <slot :row="item" name="header" :index="index"></slot>
            </template>
        </li>
    </ul>
</template>

<script setup>
import {defineProps} from 'vue'
defineProps({
    listArr:{
        type:Array,
        default:()=>{
            return []
        }
    },
})
</script>
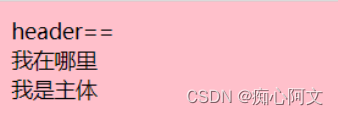
效果:

🧨🧨🧨第四种插槽-写入插槽
//父页面
<template>
  <div class="main">
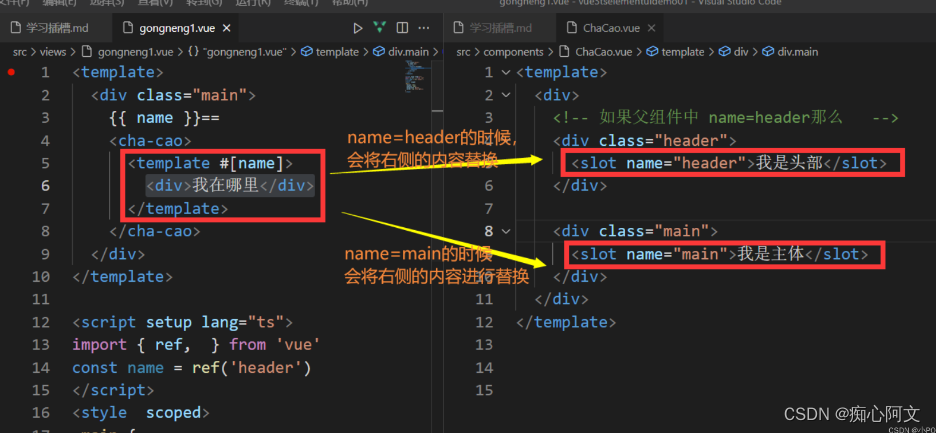
    {{ name }}==
    <cha-cao>
      <template #[name]>
        <div>我在哪里</div>
      </template>
    </cha-cao>
  </div>
</template>

<script setup lang="ts">
import { ref,  } from 'vue'
const name = ref('header')
</script>
//子组件
<template>
  <div>
    <div class="header">
      <slot name="header">我是头部</slot>
    </div>

    <div class="main">
      <slot name="main">我是主体</slot>
    </div>
  </div>
</template>


🧨🧨🧨写入插槽与具名插槽的区别?
最大的区别是name是动态的对于写入插槽来讲
具名插槽:具名插槽的name是固定值(静态值)
最后:逃不出去的浪浪山,才是每个打工人心底最大的恐惧
版权归原作者 痴心阿文 所有, 如有侵权,请联系我们删除。