第一章 前言
在我们前端开发中也经常需要把前端的静态资源放到服务器中看效果,那么我们就需要用到nginx来配置!!该文章主要以npm为例,当然还有yarn、pnpm,但是知识是相通的!!!
第二章 准备工作
2.1 项目打包理解
2.1.1 打包命令
不用说肯定是npm run build肯定是没错的
npm run build 或者
yarn run build
但是当经理对我们说,你打一个测试包发给我/你打一个生成包发给我,这个时候涉及到了多环境的打包怎么办呢,接下来就以小编的理解说说:打包的情况
2.1.2 理解npm run serve/dev 和 npm run build命令
npm ERR!Missing script: “dev“npm ERR!npm ERR! To see a list of scripts, run(npm run serve/dev/build)_❆VE❆的博客-CSDN博客
2.2 nginx参数配置理解
2.2.1 nginx常用基本命令
//开启服务
1.start nginx.exe // cmd命令进入nginx文件夹后,使用该命令
2.直接点击nginx目录下的nginx.exe

// 停止服务
nginx -s stop // 快速停止nginx
nginx -s quit // quit是完整有序的停止nginx

//重新加载配置文件
nginx -s reload // 热加载
2.2.2 默认配置
nginx-1.21.0\conf下的nginx.conf
# 工作进程的数量
worker_processes  1; # 与worker_connections乘积表示实际处理事件的总数
events {
    worker_connections  1024; # 每个工作进程连接数
}

http {
    include       mime.types;  # 文件扩展名与文件类型映射表
    include       self/ *.conf; # 独立出不同网站不同配置文件,引入其他的配置文件
    default_type  application/octet-stream; # 默认文件类型

    # 日志格式
    log_format  access  '$remote_addr - $remote_user [$time_local] $host "$request" '
                  '$status $body_bytes_sent "$http_referer" '
                  '"$http_user_agent" "$http_x_forwarded_for" "$clientip"';
    access_log  /srv/log/nginx/access.log  access; # 日志输出目录
    gzip  on; # gzip模块设置,设置是否开启gzip压缩输出
    sendfile  on; # 开启文件传输模式
    #tcp_nopush  on; # 减少网络报文数量

    #keepalive_timeout  0; # 连接不超时,单位 s
    # 链接超时时间,自动断开
    keepalive_timeout  60;

    # 虚拟主机
    server {
        listen       80; # 监听地址以及端口
        server_name  localhost; # 浏览器访问域名

        charset utf-8; # 默认字符集
        access_log  logs/localhost.access.log  access;

        # 路由
        location / {
            root   html; # 访问根目录 nginx-1.21.0\html
            index  index.html index.htm; # 入口文件,可以接收index、index.html、index.htm文件
        }
    }
}
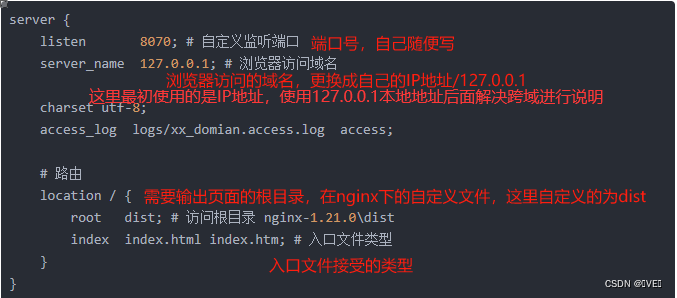
2.2.3 搭建不同网站的站点
在其他配置文件'self'目录下,添加新建站点的配置文件'xxx.conf'

server {
    listen       8070; # 自定义监听端口
    server_name  127.0.0.1; # 浏览器访问域名

    charset utf-8;
    access_log  logs/xx_domian.access.log  access;

    # 路由
    location / {
        root   dist; # 访问根目录 nginx-1.21.0\dist
        index  index.html index.htm; # 入口文件类型
    }
}


2.2.4 禁止访问的目录以及一键申请SSL证书验证目录相关设置
    #禁止访问的文件或目录
    location ~ ^/(\.user.ini|\.htaccess|\.git|\.svn|\.project|LICENSE|README.md)
    {
        return 404;
    }

    #一键申请SSL证书验证目录相关设置
    location ~ \.well-known{
        allow all;
    }
2.2.5 根据文件类型设置过期时间
    # location ~ .*\.(gif|jpg|jpeg|png|bmp|swf)$
    # {
    #     expires      30d; // 30天过期
    #     access_log off;
    # }

    # location ~ .*\.(js|css)?$
    # {
    #     expires      12h;
    #     access_log off;
    # }
2.2.6 禁止文件缓存
location ~* \.(js|css|png|jpg|gif)$ {
    add_header Cache-Control no-store;
}
2.2.7 跨域问题
场景:
-- 我们前端使用的路径配置为:http://127.0.0.1:8070/(nginx配置)

-- 需要向后端请求的路径为: http://192.168.1.19:8087/(项目打包配置)

此时前端向后端发送请求一定会出现跨域!!
解决方法:启动nginx服务器,将server_name设置为127.0.0.1****,然后设置响应的拦截前端需要跨域的请求置相应的location以拦截前端需要跨域的请求,最后将请求代理回自己需要请求的后端路径,以我的为例:
server
{
    listen 8001;
    server_name 127.0.0.1;

    location /api/ {
         proxy_pass  http://192.168.1.19:8087/;
         proxy_http_version 1.1; # http版本
         proxy_set_header Upgrade $http_upgrade; # 继承地址,这里的$http_upgrade为上面的proxy_pass
         proxy_set_header Connection "upgrade";
         proxy_set_header  X-Real-IP $remote_addr; # 传递的ip
         proxy_connect_timeout 60;
         proxy_send_timeout  60;
         proxy_read_timeout 3000;
    }
}
第三章 配置参考
小编基本配置提供参考——
server
{
    listen 8070;
    server_name 127.0.0.1;
    index index.php index.html index.htm default.php default.htm default.html;
    root dist;

    #REWRITE-END

    #禁止访问的文件或目录
    location ~ ^/(\.user.ini|\.htaccess|\.git|\.svn|\.project|LICENSE|README.md)
    {
        return 404;
    }

    #一键申请SSL证书验证目录相关设置
    location ~ \.well-known{
        allow all;
    }

    # location ~ .*\.(gif|jpg|jpeg|png|bmp|swf)$
    # {
    #     expires      30d;
    #     access_log off;
    # }

    # location ~ .*\.(js|css)?$
    # {
    #     expires      12h;
    #     access_log off;
    # }
    location /api/ {
        proxy_pass  http://192.168.1.19:8087/;
        proxy_http_version 1.1; # http版本
        proxy_set_header Upgrade $http_upgrade; # 继承地址,这里的$http_upgrade为上面的proxy_pass
        proxy_set_header Connection "upgrade";
        proxy_set_header  X-Real-IP $remote_addr; # 传递的ip
        proxy_connect_timeout 60;
        proxy_send_timeout  60;
        proxy_read_timeout 3000;
    }

    location / {
      try_files $uri $uri/ /index.html;
      index  index.html index.htm;
    }

}
版权归原作者 ❆VE❆ 所有, 如有侵权,请联系我们删除。