
搭建深度学习虚拟环境(Anaconda)
创建新的虚拟环境
1.以管理员的身份打开Anaconda Prompt窗口: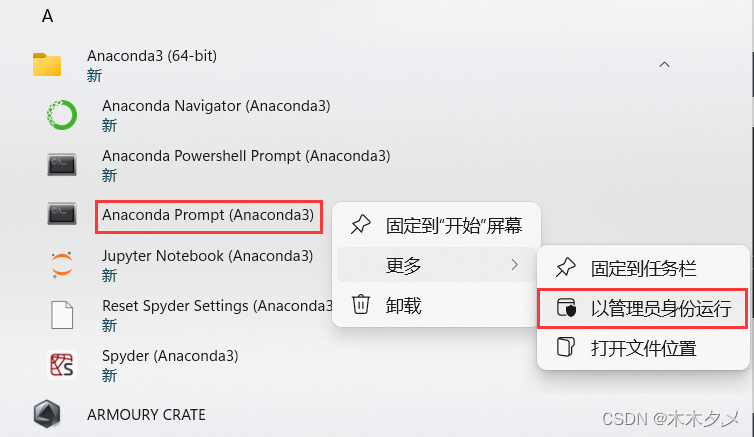
2.创建新的虚拟环境:
conda create -n 环境名称 python=x.x

3.激活刚刚创建好的虚拟环境:
conda activate 环境名称

安装CUDA(11.6)
1.右击鼠标打开NVIDIA控制面板,查看显卡支持的最高CUDA版本: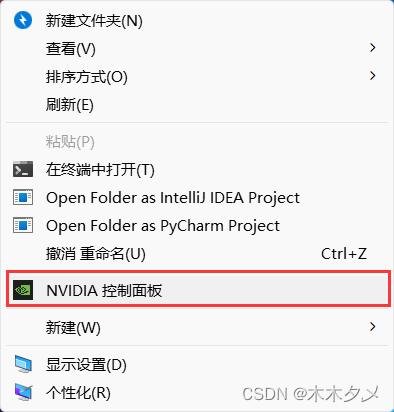

2.Anaconda 换清华镜像源,提高下载速度:
conda config --add channels https://mirrors.tuna.tsinghua.edu.cn/anaconda/pkgs/free/
conda config --add channels https://mirrors.tuna.tsinghua.edu.cn/anaconda/pkgs/main/
conda config --add channels https://mirrors.tuna.tsinghua.edu.cn/anaconda/cloud/pytorch/
conda config --add channels https://mirrors.tuna.tsinghua.edu.cn/anaconda/cloud/conda-forge
conda config --add channels https://mirrors.tuna.tsinghua.edu.cn/anaconda/cloud/msys2/
conda config --add channels https://mirrors.tuna.tsinghua.edu.cn/anaconda/cloud/bioconda/
conda config --add channels https://mirrors.tuna.tsinghua.edu.cn/anaconda/cloud/menpo/
# 设置搜索时显示通道地址
conda config --set show_channel_urls yes
3.我电脑的CUDA最高支持12.0,但注意在环境中安装比电脑CUDA版本低的,因为pytorch的版本更新比CUDA更新速度慢,例如目前pytorch官网发布的最高版本是11.7,还兼容不到12.0的版本,我在安装时选择了11.6版本。
conda install cudatoolkit=x.x

安装cudnn(8.4.0.27)
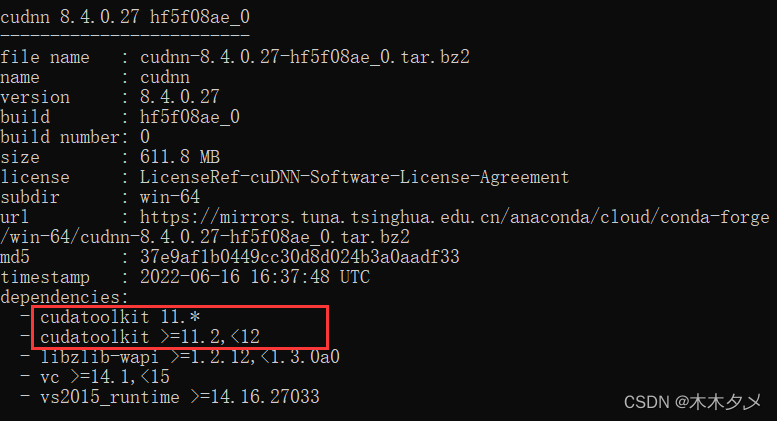
1.查看CUDA对应的cudnn版本信息,根据依赖选择相对应的cudnn:
conda search cudnn --info
2.执行安装cudnn的命令:
conda install cudnn=x.x.x.x

安装pytorch(1.13.1)
在线安装
1.进入 pytorch官网:
2.选择对应的版本,并复制命令安装即可(但官网命令我使用的时候会很慢,建议使用下面的离线安装):
conda install pytorch torchvision torchaudio pytorch-cuda=11.6-c pytorch -c nvidia
离线安装
1.进入 pytorch离线包下载网址,根据下面的规则选择对应的包:
torch版本+CUDA版本/包名-cp39-cp39-win_amd64.whl
cp39就是python3.9版本
我的下载如下:
2.先使用 [cd 目录名] 切换到离线包所在位置,输入安装命令:
pip install torch-1.13.1+cu116-cp39-cp39-win_amd64.whl

安装torchvision(0.14.1)
1.同pytorch的离线安装,先进入相同的离线包下载网址,根据下面的规则选择对应的包:
torchvision版本+CUDA版本/包名-cp39-cp39-win_amd64.whl
cp39就是python3.9版本

2.输入安装命令:
pip install torchvision-0.14.1+cu116-cp39-cp39-win_amd64.whl
验证安装是否成功
1.验证pytorch是否安装成功,依旧是在Anaconda Prompt的窗口,进入需要验证的虚拟环境,依次输入下列命令,import后不报错则表示安装成功啦:
python
import torch

2.验证CUDA是否安装成功,依次输入下列命令,输出为True则表示安装成功啦:
torch.cuda.is_available()
torch.version.cuda

3.验证cudnn是否安装成功,依次输入下列命令,输出为True则表示安装成功啦:
torch.backends.cudnn.is_available()
torch.backends.cudnn.version()

版权归原作者 木木夕乄 所有, 如有侵权,请联系我们删除。