文章目录
Element-UI概述
Element
:是饿了么公司前端开发团队提供的一套基于 Vue 的网站组件库,用于快速构建网页。
Element 提供了很多组件(组成网页的部件)供我们使用。例如 超链接、按钮、图片、表格等等~
如下图左边的是我们编写页面看到的按钮,上图右边的是 Element 提供的页面效果,效果一目了然。

我们学习 Element 其实就是学习怎么从官网拷贝组件到我们自己的页面并进行修改,官网网址是
https://element.eleme.cn/#/zh-CN
进入官网能看到如下页面

接下来直接点击
组件
,页面如下

Element-UI快速入门
我们使用Element-UI的时候先把官方下载的的资源包拷贝到当前项目之下,然后再进行引入。
我们尝试着去使用它:
- 创建页面,并在页面引入Element 的css、js文件 和 Vue.js
<scriptsrc="vue.js"></script><scriptsrc="element-ui/lib/index.js"></script><linkrel="stylesheet"href="element-ui/lib/theme-chalk/index.css"> - .创建Vue核心对象Element 是基于 Vue 的,所以使用Element时必须要创建 Vue 对象
<script>newVue({el:"#app"})</script> - 官网复制Element组件代码
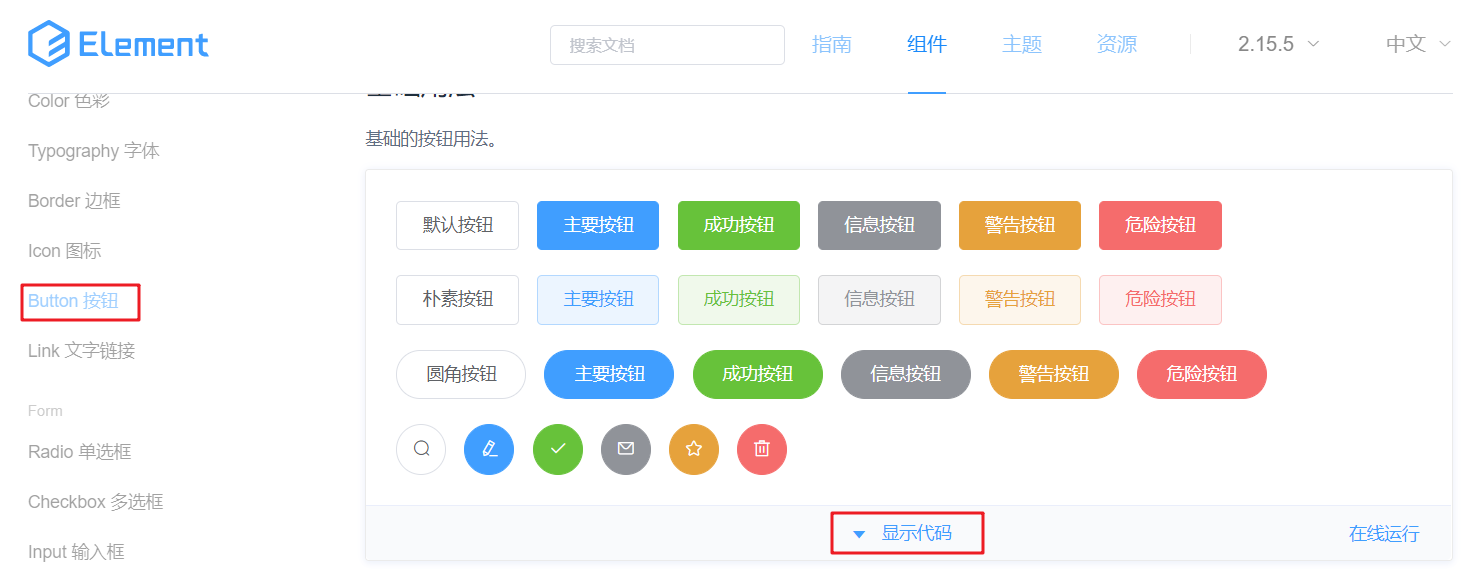 在左菜单栏找到
 Button 按钮,然后找到自己喜欢的按钮样式,点击显示代码,在下面就会展示出对应的代码,将这些代码拷贝到我们自己的页面即可。
整体页面代码如下:
<!DOCTYPEhtml><htmllang="en"><head><metacharset="UTF-8"><title>Title</title></head><body><divid="app"><el-row><el-button>默认按钮</el-button><el-buttontype="primary">主要按钮</el-button><el-buttontype="success">成功按钮</el-button><el-buttontype="info">信息按钮</el-button><el-buttontype="warning">警告按钮</el-button><el-buttontype="danger">删除</el-button></el-row><el-row><el-buttonplain>朴素按钮</el-button><el-buttontype="primary"plain>主要按钮</el-button><el-buttontype="success"plain>成功按钮</el-button><el-buttontype="info"plain>信息按钮</el-button><el-buttontype="warning"plain>警告按钮</el-button><el-buttontype="danger"plain>危险按钮</el-button></el-row><el-row><el-buttonround>圆角按钮</el-button><el-buttontype="primary"round>主要按钮</el-button><el-buttontype="success"round>成功按钮</el-button><el-buttontype="info"round>信息按钮</el-button><el-buttontype="warning"round>警告按钮</el-button><el-buttontype="danger"round>危险按钮</el-button></el-row><el-row><el-buttonicon="el-icon-search"circle></el-button><el-buttontype="primary"icon="el-icon-edit"circle></el-button><el-buttontype="success"icon="el-icon-check"circle></el-button><el-buttontype="info"icon="el-icon-message"circle></el-button><el-buttontype="warning"icon="el-icon-star-off"circle></el-button><el-buttontype="danger"icon="el-icon-delete"circle></el-button></el-row></div><scriptsrc="js/vue.js"></script><scriptsrc="element-ui/lib/index.js"></script><linkrel="stylesheet"href="element-ui/lib/theme-chalk/index.css"><script>newVue({el:"#app"})</script></body></html>
Element 布局
Element 提供了两种布局方式,分别是:
- Layout 布局
- Container 布局容器
Layout 局部
通过基础的 24 分栏,迅速简便地创建布局。也就是默认将一行分为 24 栏,根据页面要求给每一列设置所占的栏数。
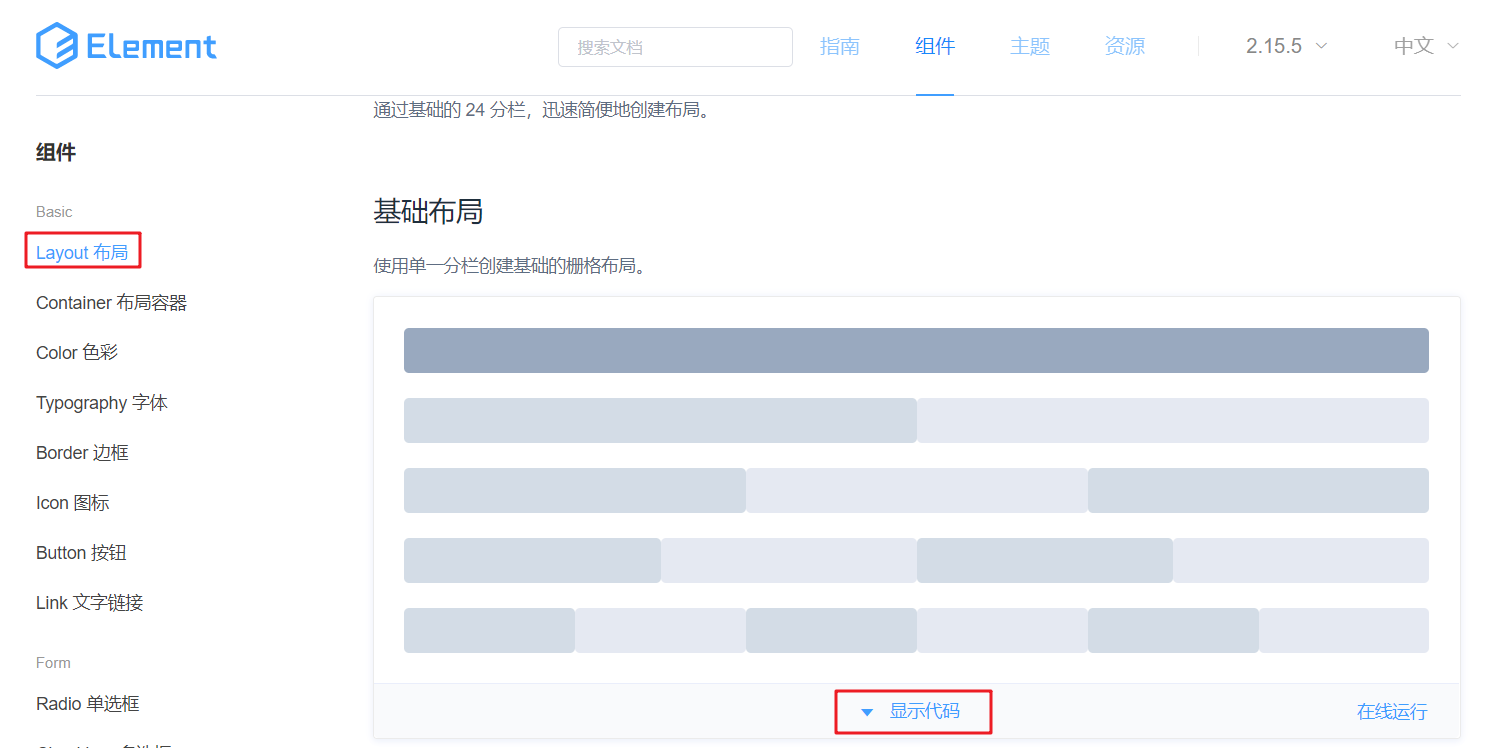
在左菜单栏找到
Layout 布局
,然后找到自己喜欢的按钮样式,点击
显示代码
,在下面就会展示出对应的代码,显示出的代码中有样式,有html标签。将样式拷贝我们自己页面的
head
标签内,将html标签拷贝到
<div id="app"></div>
标签内。
整体页面代码如下:
<!DOCTYPEhtml><htmllang="en"><head><metacharset="UTF-8"><title>Title</title><style>.el-row{margin-bottom: 20px;}.el-col{border-radius: 4px;}.bg-purple-dark{background: #99a9bf;}.bg-purple{background: #d3dce6;}.bg-purple-light{background: #e5e9f2;}.grid-content{border-radius: 4px;min-height: 36px;}.row-bg{padding: 10px 0;background-color: #f9fafc;}</style></head><body><divid="app"><el-row><el-col:span="24"><divclass="grid-content bg-purple-dark"></div></el-col></el-row><el-row><el-col:span="12"><divclass="grid-content bg-purple"></div></el-col><el-col:span="12"><divclass="grid-content bg-purple-light"></div></el-col></el-row><el-row><el-col:span="8"><divclass="grid-content bg-purple"></div></el-col><el-col:span="8"><divclass="grid-content bg-purple-light"></div></el-col><el-col:span="8"><divclass="grid-content bg-purple"></div></el-col></el-row><el-row><el-col:span="6"><divclass="grid-content bg-purple"></div></el-col><el-col:span="6"><divclass="grid-content bg-purple-light"></div></el-col><el-col:span="6"><divclass="grid-content bg-purple"></div></el-col><el-col:span="6"><divclass="grid-content bg-purple-light"></div></el-col></el-row><el-row><el-col:span="4"><divclass="grid-content bg-purple"></div></el-col><el-col:span="4"><divclass="grid-content bg-purple-light"></div></el-col><el-col:span="4"><divclass="grid-content bg-purple"></div></el-col><el-col:span="4"><divclass="grid-content bg-purple-light"></div></el-col><el-col:span="4"><divclass="grid-content bg-purple"></div></el-col><el-col:span="4"><divclass="grid-content bg-purple-light"></div></el-col></el-row></div><scriptsrc="js/vue.js"></script><scriptsrc="element-ui/lib/index.js"></script><linkrel="stylesheet"href="element-ui/lib/theme-chalk/index.css"><script>newVue({el:"#app"})</script></body></html>
现在需要添加一行,要求该行显示8个格子,通过计算每个格子占 3 栏,具体的html 代码如下
<!--
添加一行,8个格子  24/8 = 3
--><el-row><el-col:span="3"><divclass="grid-content bg-purple"></div></el-col><el-col:span="3"><divclass="grid-content bg-purple-light"></div></el-col><el-col:span="3"><divclass="grid-content bg-purple"></div></el-col><el-col:span="3"><divclass="grid-content bg-purple-light"></div></el-col><el-col:span="3"><divclass="grid-content bg-purple"></div></el-col><el-col:span="3"><divclass="grid-content bg-purple-light"></div></el-col><el-col:span="3"><divclass="grid-content bg-purple"></div></el-col><el-col:span="3"><divclass="grid-content bg-purple-light"></div></el-col></el-row>
Container 布局容器
用于布局的容器组件,方便快速搭建页面的基本结构。如下图就是布局容器效果。
如下图是官网提供的 Container 布局容器实例:
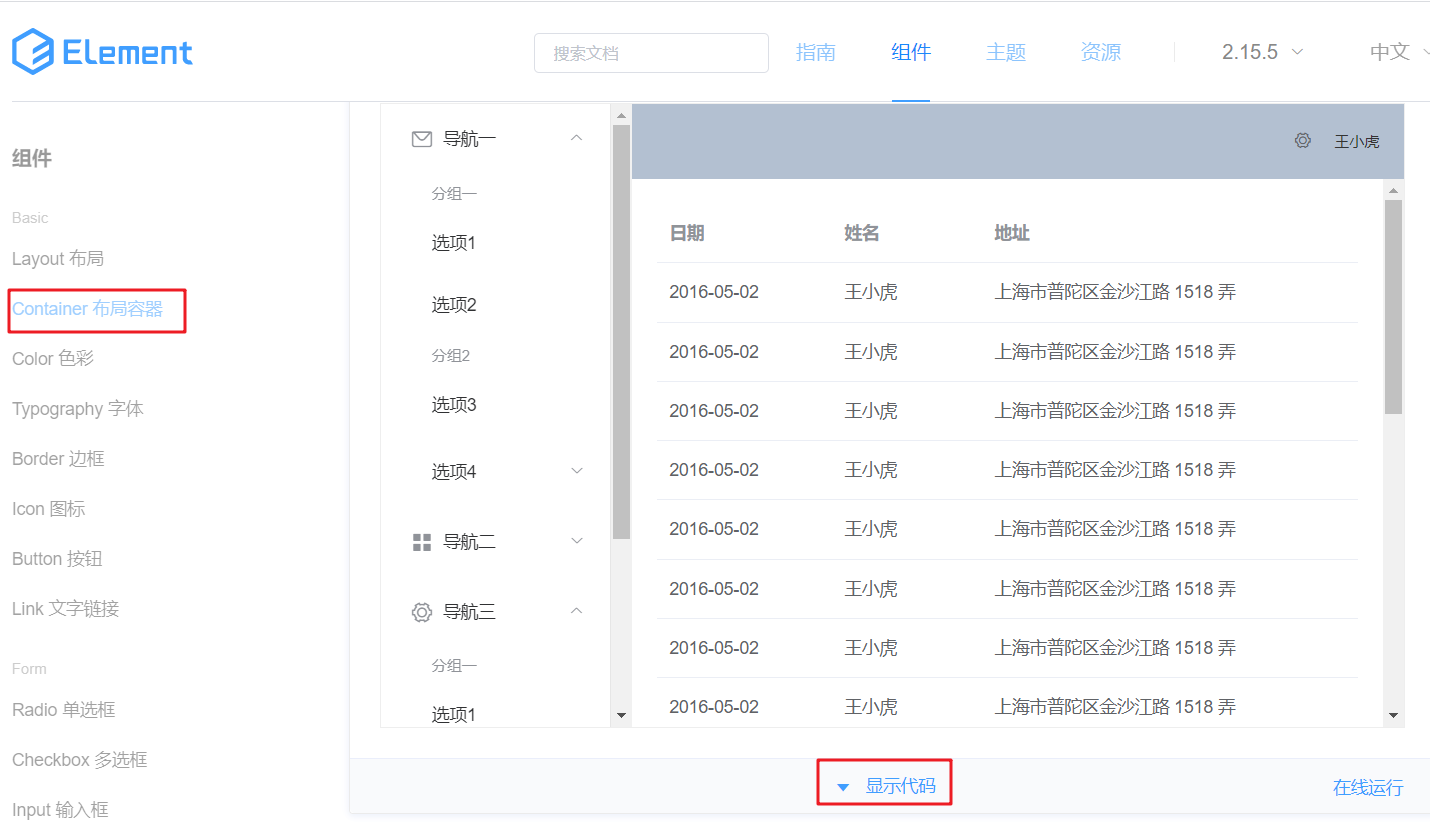
该效果代码中包含了样式、页面标签、模型数据。将里面的样式
<style>
拷贝到我们自己页面的
head
标签中;将html标签拷贝到
<div id="app"></div>
标签中,再将数据模型拷贝到
vue
对象的
data()
中。
整体页面代码如下:
<!DOCTYPEhtml><htmllang="en"><head><metacharset="UTF-8"><title>Title</title><style>.el-header{background-color: #B3C0D1;color: #333;line-height: 60px;}.el-aside{color: #333;}</style></head><body><divid="app"><el-containerstyle="height: 500px;border: 1px solid #eee"><el-asidewidth="200px"style="background-color:rgb(238, 241, 246)"><el-menu:default-openeds="['1', '3']"><el-submenuindex="1"><templateslot="title"><iclass="el-icon-message"></i>导航一</template><el-menu-item-group><templateslot="title">分组一</template><el-menu-itemindex="1-1">选项1</el-menu-item><el-menu-itemindex="1-2">选项2</el-menu-item></el-menu-item-group><el-menu-item-grouptitle="分组2"><el-menu-itemindex="1-3">选项3</el-menu-item></el-menu-item-group><el-submenuindex="1-4"><templateslot="title">选项4</template><el-menu-itemindex="1-4-1">选项4-1</el-menu-item></el-submenu></el-submenu><el-submenuindex="2"><templateslot="title"><iclass="el-icon-menu"></i>导航二</template><el-submenuindex="2-1"><templateslot="title">选项1</template><el-menu-itemindex="2-1-1">选项1-1</el-menu-item></el-submenu></el-submenu><el-submenuindex="3"><templateslot="title"><iclass="el-icon-setting"></i>导航三</template><el-menu-item-group><templateslot="title">分组一</template><el-menu-itemindex="3-1">选项1</el-menu-item><el-menu-itemindex="3-2">选项2</el-menu-item></el-menu-item-group><el-menu-item-grouptitle="分组2"><el-menu-itemindex="3-3">选项3</el-menu-item></el-menu-item-group><el-submenuindex="3-4"><templateslot="title">选项4</template><el-menu-itemindex="3-4-1">选项4-1</el-menu-item></el-submenu></el-submenu></el-menu></el-aside><el-container><el-headerstyle="text-align: right;font-size: 12px"><el-dropdown><iclass="el-icon-setting"style="margin-right: 15px"></i><el-dropdown-menuslot="dropdown"><el-dropdown-item>查看</el-dropdown-item><el-dropdown-item>新增</el-dropdown-item><el-dropdown-item>删除</el-dropdown-item></el-dropdown-menu></el-dropdown><span>王小虎</span></el-header><el-main><el-table:data="tableData"><el-table-columnprop="date"label="日期"width="140"></el-table-column><el-table-columnprop="name"label="姓名"width="120"></el-table-column><el-table-columnprop="address"label="地址"></el-table-column></el-table></el-main></el-container></el-container></div><scriptsrc="js/vue.js"></script><scriptsrc="element-ui/lib/index.js"></script><linkrel="stylesheet"href="element-ui/lib/theme-chalk/index.css"><script>newVue({el:"#app",data(){const item ={date:'2016-05-02',name:'王小虎',address:'上海市普陀区金沙江路 1518 弄'};return{tableData:Array(20).fill(item)}}})</script></body></html>
Element-UI组件使用
有关组件的使用我们通过一个案例来练习
案例介绍
我们要完成如下页面效果
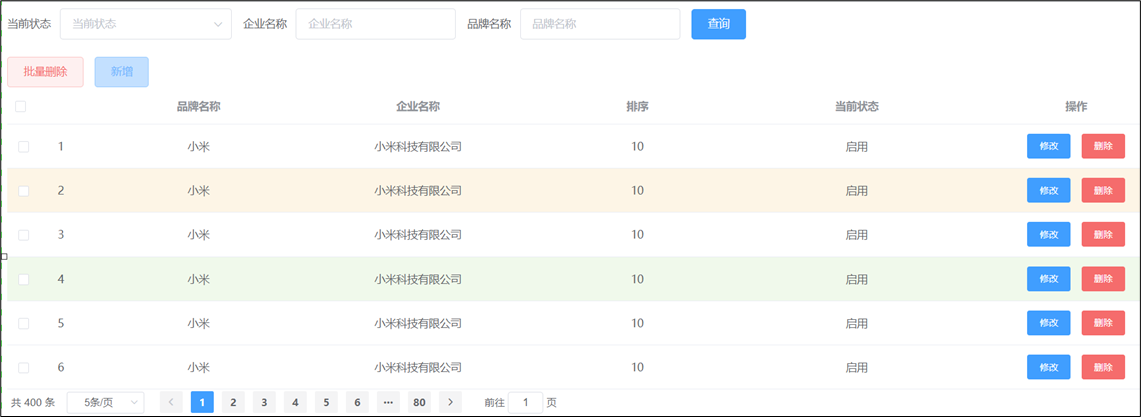
要完成该页面,我们需要先对这个页面进行分析,看页面由哪儿几部分组成,然后到官网进行拷贝并修改。页面总共有如下组成部分
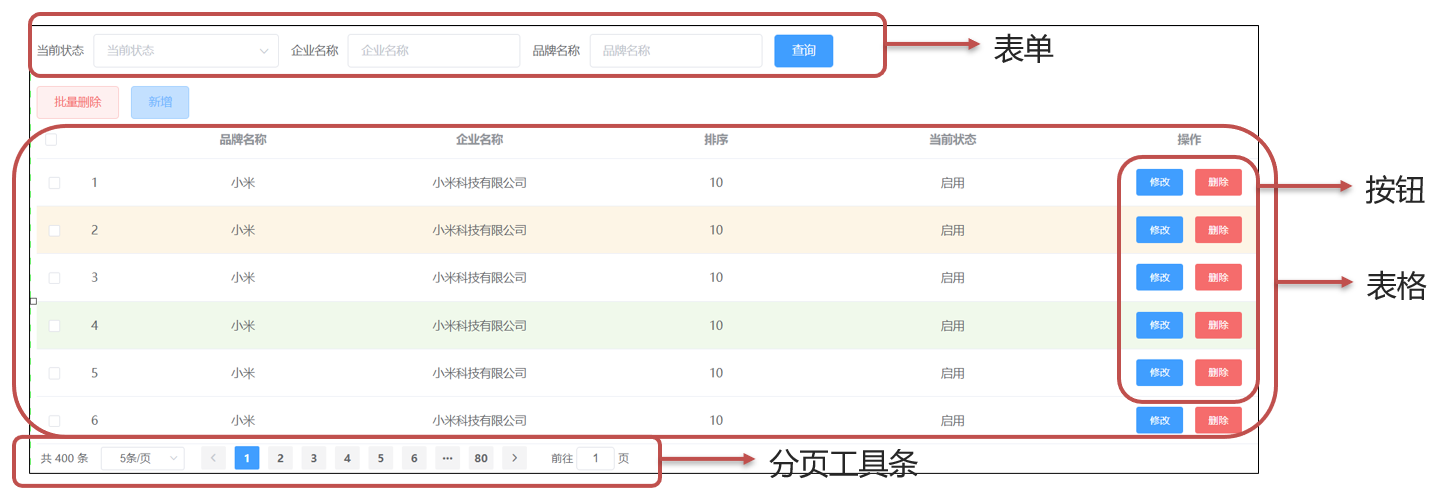
还有一个是当我们点击
新增
按钮,会在页面正中间弹出一个对话框,如下

准备基本页面
<!DOCTYPEhtml><htmllang="en"><head><metacharset="UTF-8"><title>Title</title></head><body><divid="app"></div><scriptsrc="js/vue.js"></script><scriptsrc="element-ui/lib/index.js"></script><linkrel="stylesheet"href="element-ui/lib/theme-chalk/index.css"><script>newVue({el:"#app"})</script></body></html>
完成表格展示
使用 Element 整体的思路就是 拷贝 + 修改。
拷贝
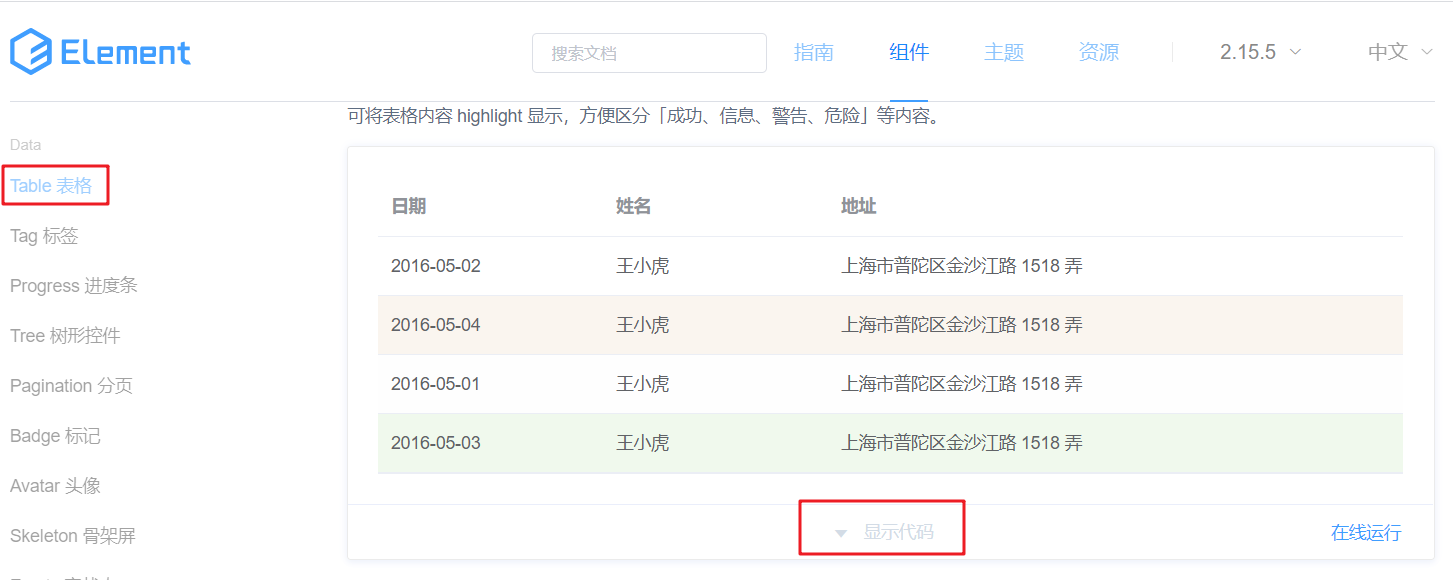
在左菜单栏找到
Table 表格
并点击,右边主体就会定位到表格这一块,找到我们需要的表格效果(如上图),点击
显示代码
就可以看到这个表格的代码了。
将html标签拷贝到
<div id="app"></div>
中,如下:

将css样式拷贝到我们页面的
head
标签中,如下

将方法和模型数据拷贝到 Vue 对象指定的位置

拷贝完成后通过浏览器打开可以看到表格的效果

表格效果出来了,但是显示的表头和数据并不是我们想要的,所以接下来就需要对页面代码进行修改了。
修改
- 修改表头和数据下面是对表格代码进行分析的图解。根据下图说明修改自己的列数和列名
 修改完页面后,还需要对绑定的模型数据进行修改,下图是对模型数据进行分析的图解
- 给表格添加操作列从之前的表格拷贝一列出来并对其进行修改。按钮是从官网的
Button 按钮组件中拷贝并修改的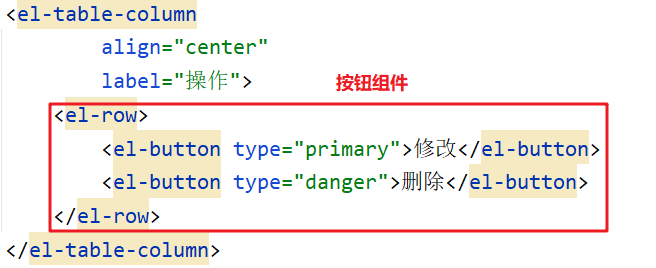
- 给表格添加复选框列和标号列给表格添加复选框和标号列,效果如下
 此效果也是从 Element 官网进行拷贝,先找到对应的表格效果,然后将其对应代码拷贝到我们的代码中,如下是复选框列官网效果图和代码
 这里需要注意在
 <el-table>标签上有一个事件@selection-change="handleSelectionChange",这里绑定的函数也需要从官网拷贝到我们自己的页面代码中,函数代码如下: 从该函数中又发现还需要一个模型数据
 multipleSelection,所以还需要定义出该模型数据
标号列也用同样的方式进行拷贝并修改。
完成搜索表单展示
在 Element 官网找到横排的表单效果,然后拷贝代码并进行修改

点击上面的
显示代码
后,就会展示出对应的代码,下面是对这部分代码进行分析的图解

然后根据我们要的效果修改代码。
完成批量删除和新增按钮展示
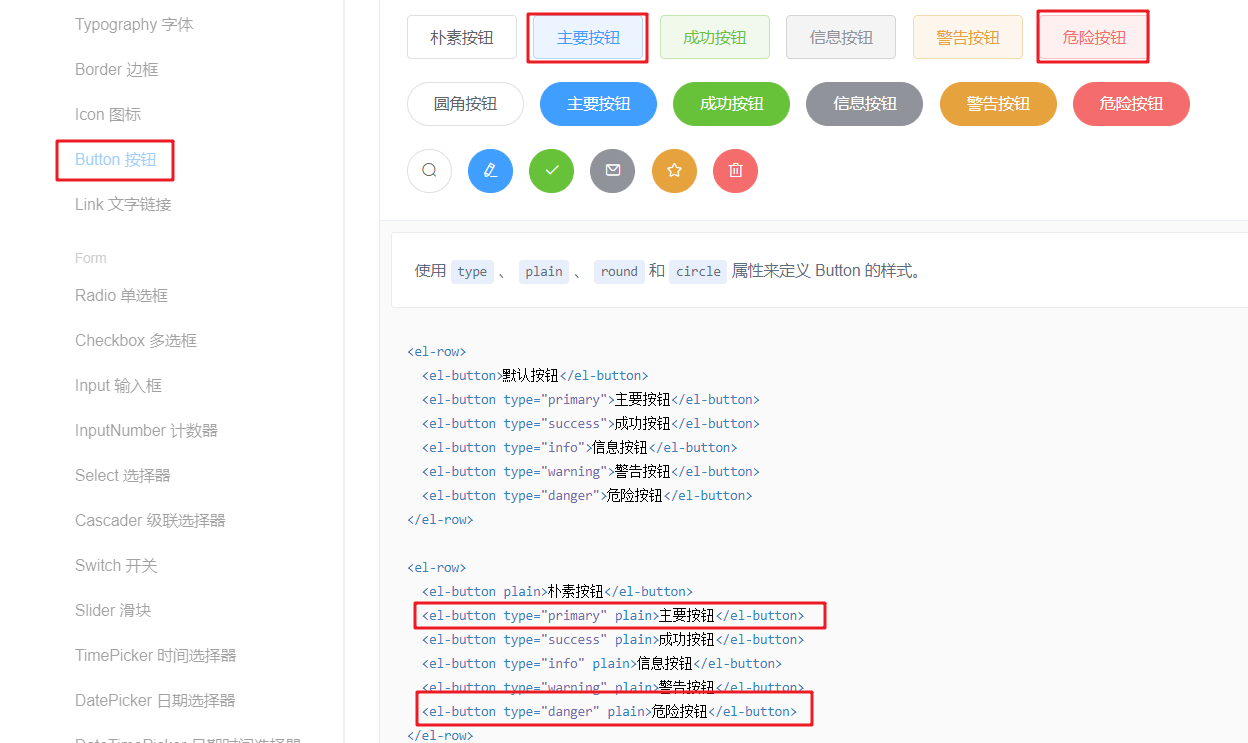
从 Element 官网找具有着色效果的按钮,并将代码拷贝到我们自己的页面上
完成对话框展示
在 Element 官网找对话框,如下:
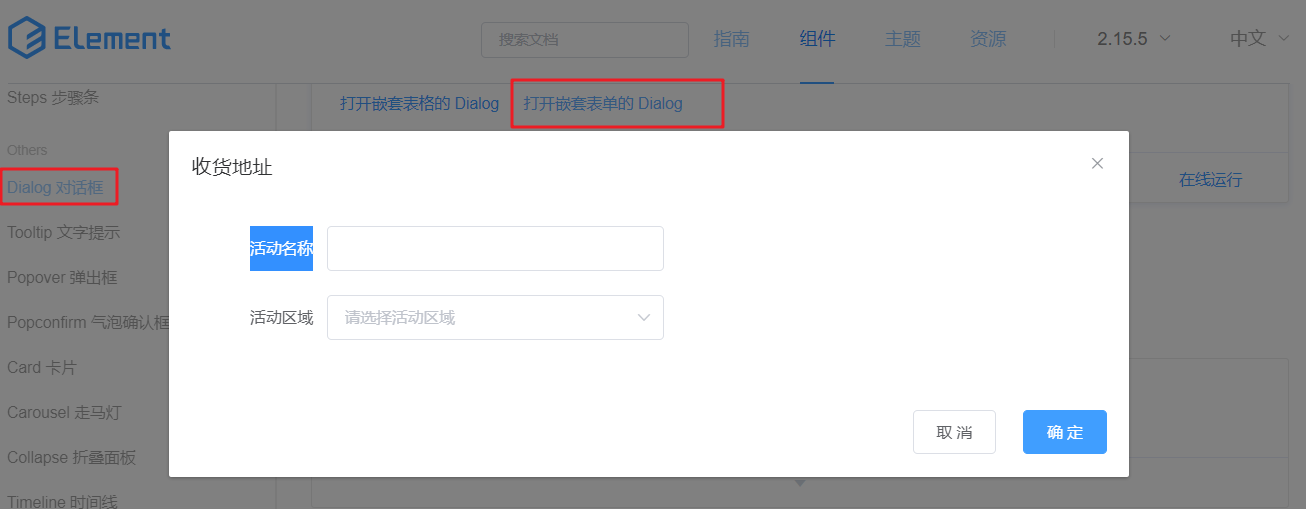
下面对官网提供的代码进行分析
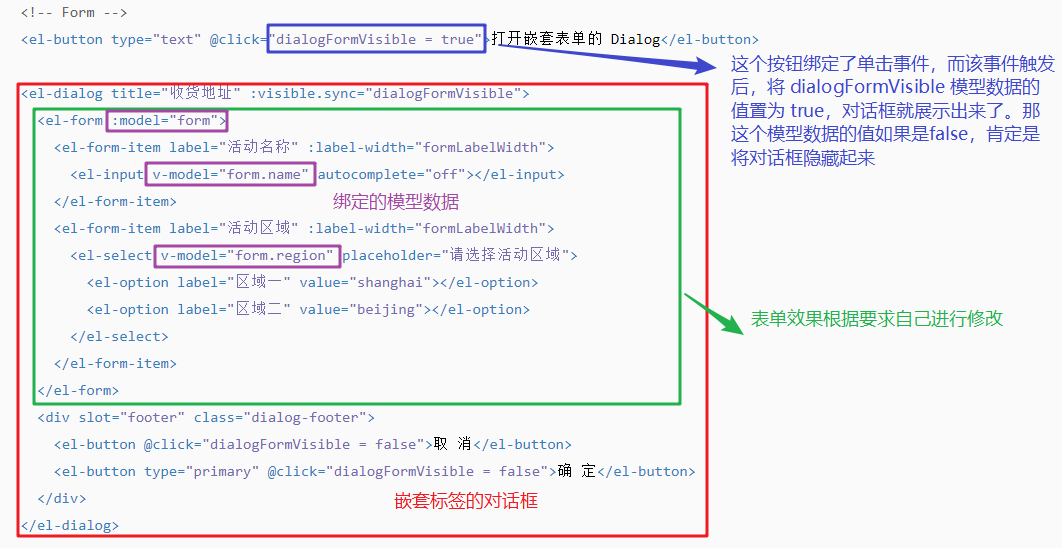
上图分析出来的模型数据需要在 Vue 对象中进行定义。
完成分页条展示
在 Element 官网找到
Pagination 分页
,在页面主体部分找到我们需要的效果,如下

点击
显示代码
,找到
完整功能
对应的代码,接下来对该代码进行分析

上面代码属性说明:
page-size:每页显示的条目数page-sizes: 每页显示个数选择器的选项设置。:page-sizes="[100,200,300,400]"对应的页面效果如下: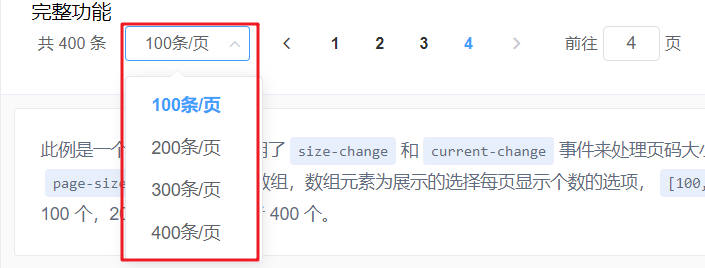
currentPage:当前页码。我们点击那个页码,此属性值就是几。total:总记录数。用来设置总的数据条目数,该属性设置后, Element 会自动计算出需分多少页并给我们展示对应的页码。
事件说明:
size-change:pageSize 改变时会触发。也就是当我们改变了每页显示的条目数后,该事件会触发。current-change:currentPage 改变时会触发。也就是当我们点击了其他的页码后,该事件会触发。
完整页面代码
<!DOCTYPEhtml><htmllang="en"><head><metacharset="UTF-8"><title>Title</title><style>.el-table .warning-row{background: oldlace;}.el-table .success-row{background: #f0f9eb;}</style></head><body><divid="app"><!--搜索表单--><el-form:inline="true":model="brand"class="demo-form-inline"><el-form-itemlabel="当前状态"><el-selectv-model="brand.status"placeholder="当前状态"><el-optionlabel="启用"value="1"></el-option><el-optionlabel="禁用"value="0"></el-option></el-select></el-form-item><el-form-itemlabel="企业名称"><el-inputv-model="brand.companyName"placeholder="企业名称"></el-input></el-form-item><el-form-itemlabel="品牌名称"><el-inputv-model="brand.brandName"placeholder="品牌名称"></el-input></el-form-item><el-form-item><el-buttontype="primary"@click="onSubmit">查询</el-button></el-form-item></el-form><!--按钮--><el-row><el-buttontype="danger"plain>批量删除</el-button><el-buttontype="primary"plain@click="dialogVisible = true">新增</el-button></el-row><!--添加数据对话框表单--><el-dialogtitle="编辑品牌":visible.sync="dialogVisible"width="30%"><el-formref="form":model="brand"label-width="80px"><el-form-itemlabel="品牌名称"><el-inputv-model="brand.brandName"></el-input></el-form-item><el-form-itemlabel="企业名称"><el-inputv-model="brand.companyName"></el-input></el-form-item><el-form-itemlabel="排序"><el-inputv-model="brand.ordered"></el-input></el-form-item><el-form-itemlabel="备注"><el-inputtype="textarea"v-model="brand.description"></el-input></el-form-item><el-form-itemlabel="状态"><el-switchv-model="brand.status"active-value="1"inactive-value="0"></el-switch></el-form-item><el-form-item><el-buttontype="primary"@click="addBrand">提交</el-button><el-button@click="dialogVisible = false">取消</el-button></el-form-item></el-form></el-dialog><!--表格--><template><el-table:data="tableData"style="width: 100%":row-class-name="tableRowClassName"@selection-change="handleSelectionChange"><el-table-columntype="selection"width="55"></el-table-column><el-table-columntype="index"width="50"></el-table-column><el-table-columnprop="brandName"label="品牌名称"align="center"></el-table-column><el-table-columnprop="companyName"label="企业名称"align="center"></el-table-column><el-table-columnprop="ordered"align="center"label="排序"></el-table-column><el-table-columnprop="status"align="center"label="当前状态"></el-table-column><el-table-columnalign="center"label="操作"><el-row><el-buttontype="primary">修改</el-button><el-buttontype="danger">删除</el-button></el-row></el-table-column></el-table></template><!--分页工具条--><el-pagination@size-change="handleSizeChange"@current-change="handleCurrentChange":current-page="currentPage":page-sizes="[5, 10, 15, 20]":page-size="5"layout="total, sizes, prev, pager, next, jumper":total="400"></el-pagination></div><scriptsrc="js/vue.js"></script><scriptsrc="element-ui/lib/index.js"></script><linkrel="stylesheet"href="element-ui/lib/theme-chalk/index.css"><script>newVue({el:"#app",methods:{tableRowClassName({row, rowIndex}){if(rowIndex ===1){return'warning-row';}elseif(rowIndex ===3){return'success-row';}return'';},// 复选框选中后执行的方法handleSelectionChange(val){this.multipleSelection = val;

                console.log(this.multipleSelection)},// 查询方法onSubmit(){
                console.log(this.brand);},// 添加数据addBrand(){
                console.log(this.brand);},//分页handleSizeChange(val){
                console.log(`每页 ${val} 条`);},handleCurrentChange(val){
                console.log(`当前页: ${val}`);}},data(){return{// 当前页码currentPage:4,// 添加数据对话框是否展示的标记dialogVisible:false,// 品牌模型数据brand:{status:'',brandName:'',companyName:'',id:"",ordered:"",description:""},// 复选框选中数据集合multipleSelection:[],// 表格数据tableData:[{brandName:'华为',companyName:'华为科技有限公司',ordered:'100',status:"1"},{brandName:'华为',companyName:'华为科技有限公司',ordered:'100',status:"1"},{brandName:'华为',companyName:'华为科技有限公司',ordered:'100',status:"1"},{brandName:'华为',companyName:'华为科技有限公司',ordered:'100',status:"1"}]}}})</script></body></html>
版权归原作者 十八岁讨厌编程 所有, 如有侵权,请联系我们删除。