一、MHA概述
1、简介
MHA(Master High Availability)目前在MySQL高可用方面是一个相对成熟的解决方案,MHA是由
日本人开发,是一套优秀的MySQL故障切换和主从复制的高可用软件。
在MySQL故障切换的过程中,MHA能做到0~30秒之内自动完成数据库的故障切换操作,并且在进行故障切换的过程中,MHA能够最大程度上保证数据库的一致性,以达到真正意义上的高可用。
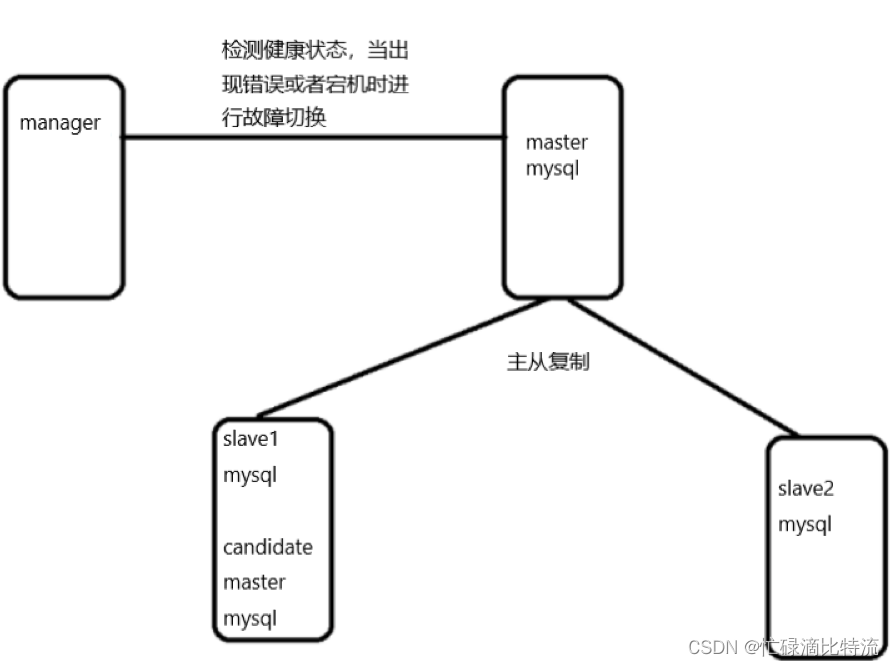
MHA里有 两个角色一个是MHA Node(数据节点)另一个是MHA Manager(管理节点)。MHA Manager可以单独部署 在一台独立的机器上管理多个master-slave集群,也可以部署在一台slave节点上。MHA Node运行在每台 MySQL服务器上,MHA Manager会定时探测集群中的master节点,当master出现故障时,它可以自动将最新 数据的slave提升为新的master,然后将所有其他的slave重新指向新的master。整个故障转移过程对应用程序完全透明。
2、MHA特点
自动故障切换过程中,MHA总会试图从宕机的主服务器上保存二进制日志,最大程度的保证数据不丢失。
但这并不总是可行,例如如果主服务器硬件故障或者无法通过ssh访问,MHA则无法保存二进制日志,只能进行故障转移而丢失了最新的数据。此时,使用MySQL5.5的半同步复制,可以大大降低数据丢失的风险。MHA可以与半同步复制结合起来,如果只有一个slave已经收到了最新的二进制日志,MHA可以将最新的二进制日志应用于其他所有的slave服务器上,因此可以保证所有节点的数据一致性,有时候可故意设置从节点慢于主节点,当发生意外删除数据库倒是数据丢失时可从从节点二进制日志中恢复。
3、何为高可用
高可用就是可用性强,在一定条件下(某个服务器出错或宕机)可以保证服务器可以正常运行,在一定程度上不会影响业务的运行。
4、故障切换过程
当主服务器出现错误时,被manager服务器监控到主库mysqld服务停止后,首先对主库进行SSH登录检查(save_binary_logs -command=test),然后对mysqld服务进行健康检查(PING(SELECT)每个3秒检查一次,持续3次),最后作出Master is down!的判断,master failover开始进行对应的处理
二、MHA高可用架构部署
安装包下载:
https://download.csdn.net/download/m0_62948770/86724795
1、架构图

2、 实验环境:需要四台Centos7服务器
①一台作为mha服务器(manager)来监控管理下面的MySQL服务器
②三台:一主两从MySQL服务器
主机IPmanager192.168.159.13master192.168.159.68slave1192.168.159.11slave2192.168.159.10
实验流程:
安装编译环境——> 安装MySQL5.6.36数据库——>配置时间同步——>配置主从复制与储备MySQL服务器——>安装node工具——>配置mha服务器——>测试验证
3、实验部署
3.1、master、slave1、slave2安装mysql服务,之前博客有编译安装教程
3.2、master、slave1、slave2上配置my.cnf
修改master的配置文件my.cnf
[root@master ~]# vim /etc/my.cnf

[client]
port = 3306
#default-character-set=utf8                    ## 注销字符集
socket = /usr/local/mysql/mysql.sock

[mysql]
port = 3306
#default-character-set=utf8                   ## 注销字符集
socket = /usr/local/mysql/mysql.sock

[mysqld]
user = mysql
basedir = /usr/local/mysql
datadir = /usr/local/mysql/data
port = 3306
#character_set_server=utf8                    ## 注销字符集
pid-file = /usr/local/mysql/mysqld.pid
socket = /usr/local/mysql/mysql.sock
server-id = 1

##增加内容
log_bin = master-bin
log-slave-update = true
修改slave1的配置文件my.cnf
[root@slave1 ~]# vim /etc/my.cnf
[client]
port = 3306
#default-character-set=utf8
socket = /usr/local/mysql/mysql.sock

[mysql]
port = 3306
#default-character-set=utf8
socket = /usr/local/mysql/mysql.sock

[mysqld]
user = mysql
basedir = /usr/local/mysql
datadir = /usr/local/mysql/data
port = 3306
#character_set_server=utf8
pid-file = /usr/local/mysql/mysqld.pid
socket = /usr/local/mysql/mysql.sock

server-id =2                               ## 修改为2
log_bin = master-bin                       ## 开启二进制日志
relay-log = relay-log-bin                  ## 使用中继日志进行同步
relay-log-index = slave-relay-bin.index    ## 索引
修改slave2的配置文件my.cnf
[root@zew_slave2 ~]# vim /etc/my.cnf

[client]
[mysql]
port = 3306
#default-character-set=utf8
socket = /usr/local/mysql/mysql.sock

[mysqld]
user = mysql
basedir = /usr/local/mysql
datadir = /usr/local/mysql/data
port = 3306
#character_set_server=utf8
pid-file = /usr/local/mysql/mysqld.pid
socket = /usr/local/mysql/mysql.sock
server-id = 3
log_bin = master-bin
relay-log = relay-log-bin
relay-log-index = slave-relay-bin.index
3.3、在master、slave1、slave2上分别做两个软链接
############ 只做master上的配置演示了 ###########################

[root@master ~]# ln -s /usr/local/mysql/bin/mysql /usr/sbin
[root@master ~]# ln -s /usr/local/mysql/bin/mysqlbinlog /usr/sbin
3.4、重启3台MySQL服务,再查看端口,是否启动成功
[root@master ~]# systemctl restart mysqld.service ## 只演示master节点了
[root@master ~]# netstat -natp | grep 3306
tcp6 0 0 :::3306 :::* LISTEN 10503/mysqld
3.5、配置主从复制
在所有数据库节点上授权两个用户,一个是从数据库同步使用用户myslave,另一个是manager 使用用户mha
grant replication slave on . to 'myslave'@'192.168.159.%' identified by '123456';
grant all privileges on . to 'mha'@'192.168.159.%' identified by 'manager';
下面三条授权理论上不用添加,但是实验环境通过MHA检查MySQL主从报错,报两个从库通过主机名连接不上主库,所以所有数据库都需要添加以下授权,通过mha检查的时候,是通过主机名的形式进行监控,这种情况会容易报错。
grant all privileges on . to 'mha'@'master' identified by 'manager';
grant all privileges on . to 'mha'@'slave1' identified by 'manager';
grant all privileges on . to 'mha'@'slave2' identified by 'manager';
把从库均设为只读功能:set global read_only=1;
master
[root@master ~]# mysql -uroot -pabc123

mysql> grant replication slave on *.* to 'myslave'@'192.168.159.%' identified by '123456';
Query OK, 0 rows affected, 1 warning (0.01 sec)

mysql> grant all privileges on *.* to 'mha'@'192.168.159.%' identified by 'manager';
Query OK, 0 rows affected, 1 warning (0.00 sec)

mysql> grant all privileges on *.* to 'mha'@'master' identified by 'manager';
Query OK, 0 rows affected, 1 warning (0.00 sec)

mysql> grant all privileges on *.* to 'mha'@'slave1' identified by 'manager';
Query OK, 0 rows affected, 1 warning (0.00 sec)

mysql> grant all privileges on *.* to 'mha'@'slave2' identified by 'manager';
Query OK, 0 rows affected, 1 warning (0.00 sec)
slave1
[root@master ~]# mysql -uroot -pabc123

mysql> grant replication slave on *.* to 'myslave'@'192.168.159.%' identified by '123456';
Query OK, 0 rows affected, 1 warning (0.00 sec)

mysql> grant all privileges on *.* to 'mha'@'192.168.159.%' identified by 'manager';
Query OK, 0 rows affected, 1 warning (0.00 sec)

mysql> grant all privileges on *.* to 'mha'@'master' identified by 'manager';
Query OK, 0 rows affected, 1 warning (0.00 sec)

mysql> grant all privileges on *.* to 'mha'@'slave1' identified by 'manager';
Query OK, 0 rows affected, 1 warning (0.00 sec)

mysql> grant all privileges on *.* to 'mha'@'slave2' identified by 'manager';
Query OK, 0 rows affected, 1 warning (0.00 sec)

#### 所有从库开启只读功能(不会对超级管理员super生效,普通用户)
mysql> set global read_only=1;
Query OK, 0 rows affected (0.00 sec)

mysql> flush privileges;
Query OK, 0 rows affected (0.00 sec)
slave2
[root@slave2 ~]# mysql -uroot -pabc123

mysql> grant replication slave on *.* to 'myslave'@'192.168.159.%' identified by '123456';
Query OK, 0 rows affected, 1 warning (0.00 sec)

mysql> grant all privileges on *.* to 'mha'@'192.168.159.%' identified by 'manager';
Query OK, 0 rows affected, 1 warning (0.00 sec)

mysql> grant all privileges on *.* to 'mha'@'master' identified by 'manager';
Query OK, 0 rows affected, 1 warning (0.00 sec)

mysql> grant all privileges on *.* to 'mha'@'slave1' identified by 'manager';
Query OK, 0 rows affected, 1 warning (0.00 sec)

mysql> grant all privileges on *.* to 'mha'@'slave2' identified by 'manager';
Query OK, 0 rows affected, 1 warning (0.00 sec)

### 所有从库开启只读功能(不会对超级管理员super生效,普通用户)
mysql> set global read_only=1;
Query OK, 0 rows affected (0.00 sec)

mysql> flush privileges;
Query OK, 0 rows affected (0.00 sec)
同步
在master上查看二进制文件和同步点
mysql> show master status;
+-------------------+----------+--------------+------------------+-------------------+
| File              | Position | Binlog_Do_DB | Binlog_Ignore_DB | Executed_Gtid_Set |
+-------------------+----------+--------------+------------------+-------------------+
| master-bin.000001 |     1595 |              |                  |                   |
+-------------------+----------+--------------+------------------+-------------------+
1 row in set (0.00 sec)
在slave1数据库中配置
mysql> change master to master_host='192.168.159.68',master_user='myslave',master_password='123456',master_log_file='master-bin.000001',master_log_pos=1595;
Query OK, 0 rows affected, 2 warnings (0.01 sec)

mysql> start slave;
Query OK, 0 rows affected (0.01 sec)

mysql> show slave status\G;
*************************** 1. row ***************************
               Slave_IO_State: Waiting for master to send event
                  Master_Host: 192.168.159.68
                  Master_User: myslave
                  Master_Port: 3306
                Connect_Retry: 60
              Master_Log_File: master-bin.000001
          Read_Master_Log_Pos: 1595
               Relay_Log_File: relay-log-bin.000002
                Relay_Log_Pos: 321
        Relay_Master_Log_File: master-bin.000001
             Slave_IO_Running: Yes
            Slave_SQL_Running: Yes
              Replicate_Do_DB:
          Replicate_Ignore_DB:
           Replicate_Do_Table:
       Replicate_Ignore_Table:
      Replicate_Wild_Do_Table:
  Replicate_Wild_Ignore_Table:
                   Last_Errno: 0
                   Last_Error:
                 Skip_Counter: 0
          Exec_Master_Log_Pos: 1595
              Relay_Log_Space: 526
              Until_Condition: None
               Until_Log_File:
                Until_Log_Pos: 0
           Master_SSL_Allowed: No
           Master_SSL_CA_File:
           Master_SSL_CA_Path:
              Master_SSL_Cert:
            Master_SSL_Cipher:
               Master_SSL_Key:
        Seconds_Behind_Master: 0
Master_SSL_Verify_Server_Cert: No
                Last_IO_Errno: 0
                Last_IO_Error:
               Last_SQL_Errno: 0
               Last_SQL_Error:
  Replicate_Ignore_Server_Ids:
............................................
在slave2上数据库中配置
mysql> change master to master_host='192.168.159.68',master_user='myslave',master_password='123456',master_log_file='master-bin.000001',master_log_pos=1595;
Query OK, 0 rows affected, 2 warnings (0.01 sec)

mysql> start slave;
Query OK, 0 rows affected (0.00 sec)

mysql> show slave status\G;
*************************** 1. row ***************************
               Slave_IO_State: Connecting to master
                  Master_Host: 192.168.159.68
                  Master_User: myslave
                  Master_Port: 3306
                Connect_Retry: 60
              Master_Log_File: master-bin.000001
          Read_Master_Log_Pos: 1595
               Relay_Log_File: relay-log-bin.000001
                Relay_Log_Pos: 4
        Relay_Master_Log_File: master-bin.000001
             Slave_IO_Running: Connecting
            Slave_SQL_Running: Yes
              Replicate_Do_DB:
          Replicate_Ignore_DB:
           Replicate_Do_Table:
       Replicate_Ignore_Table:
      Replicate_Wild_Do_Table:
  Replicate_Wild_Ignore_Table:
                   Last_Errno: 0
                   Last_Error:
                 Skip_Counter: 0
          Exec_Master_Log_Pos: 1595
              Relay_Log_Space: 154
              Until_Condition: None
               Until_Log_File:
                Until_Log_Pos: 0
           Master_SSL_Allowed: No
           Master_SSL_CA_File:
           Master_SSL_CA_Path:
              Master_SSL_Cert:
            Master_SSL_Cipher:
               Master_SSL_Key:
        Seconds_Behind_Master: NULL
Master_SSL_Verify_Server_Cert: No
                Last_IO_Errno: 0
.............................................
3.6、在manager主机上配置mha
安装MHA依赖的环境及安装epel源(每台节点都需要安装这依赖环境,因为每台都要安装node)
yum install epel-release --nogpgcheck -y
yum install -y perl-DBD-MySQL \
perl-Config-Tiny
perl-Log-Dispatch
perl-Parallel-ForkManager
perl-ExtUtils-CBuilder
perl-ExtUtils-MakeMaker
perl-CPAN
安装node(四台节点都需要安装,方法一样)
[root@manager ~]# cd /opt

[root@manager opt]# rz -E             ## 上传安装包到opt下
rz waiting to receive.
[root@manager opt]# ls
mha4mysql-manager-0.57.tar.gz  rh
mha4mysql-node-0.57.tar.gz

[root@manager opt]# tar zxf mha4mysql-node-0.57.tar.gz
[root@manager opt]# cd mha4mysql-node-0.57/
[root@manager mha4mysql-node-0.57]# perl Makefile.PL

[root@manager mha4mysql-node-0.57]# make && make install
安装manager组件
[root@manager mha4mysql-node-0.57]# cd /opt/
[root@manager opt]# tar -zxvf mha4mysql-manager-0.57.tar.gz

[root@manager opt]# cd mha4mysql-manager-0.57
[root@manager mha4mysql-manager-0.57]# perl Makefile.PL

[root@manager mha4mysql-manager-0.57]# make && make install
manager 安装后在/usr/local/bin 下面会生成几个工具,主要包括以下几个:
masterha_check_ssh ## 检查MHA的SSH的配置状况
masterha_check_repl ## 检查MySQL复制状况
masterha_manager ## 启动manager脚本
masterha_check_status ## 检查当前MHA运行状态
masterha_master_monitor ## 检测master是否宕机
masterha_master_switch ## 控制故障转移(自动或者手动)
masterha_conf_host ## 添加或删除配置的server信息
masterha_stop ## 关闭manager
[root@manager mha4mysql-manager-0.57]# cd /usr/local/bin/
[root@manager bin]# ls
apply_diff_relay_logs  masterha_master_monitor
filter_mysqlbinlog     masterha_master_switch
masterha_check_repl    masterha_secondary_check
masterha_check_ssh     masterha_stop
masterha_check_status  purge_relay_logs
masterha_conf_host     save_binary_logs
masterha_manager
四台节点在node安装后都会在/usr/local/bin 下面会生成一下几个脚本(这些工具通常由MHA manager的脚本触发,无需人为操作)主要如下:
save_binary_logs ### 保存和复制master的二进制日志
apply_diff_relay_logs ### 识别差异的中继日志事件并将其差异的事件应用于其他的slave
filter_mysqlbinlog ### 去除不必要的ROLLBACK事件(MHA已不再使用这个工具)
purge_relay_logs ### 清除中继日志(不会阻塞SQL线程)
[root@master mha4mysql-node-0.57]# cd /usr/local/bin/
[root@master bin]# ls
apply_diff_relay_logs  filter_mysqlbinlog  purge_relay_logs  save_binary_logs
3.7、配置无密码认证
①在 master 上配置到所有数据库节点的无密码认证
[root@master ~]# ssh-keygen -t rsa
Generating public/private rsa key pair.
Enter file in which to save the key (/root/.ssh/id_rsa):    ## 回车
Created directory '/root/.ssh'.
Enter passphrase (empty for no passphrase):                 ## 回车
Enter same passphrase again:                                ## 回车
Your identification has been saved in /root/.ssh/id_rsa.
Your public key has been saved in /root/.ssh/id_rsa.pub.
The key fingerprint is:                                     ## 回车
SHA256:TS1zC5lCuQRj/ILwKh8MGqSmcC1jubyE+rnWVg5k8bA root@master
The key's randomart image is:                               ## 回车
+---[RSA 2048]----+
|     .+...       |
| .. o..oo  +     |
|o  = * o..B o    |
|=.* E o o+ = .   |
|=O B   .S . .    |
|= B . .          |
|.+ + +           |
|. +.o .          |
| o+o             |
+----[SHA256]-----+

[root@master ~]# ssh-copy-id 192.168.159.11         ## 到slave1的免密登录
/usr/bin/ssh-copy-id: INFO: Source of key(s) to be installed: "/root/.ssh/id_rsa.pub"
The authenticity of host '192.168.159.11 (192.168.159.11)' can't be established.
ECDSA key fingerprint is SHA256:/foExVQ7yWnkh6o06Me2Naf74YXIhWUC7cZf5cC030k.
ECDSA key fingerprint is MD5:83:dd:28:fc:10:70:e3:9c:bf:f0:26:0a:30:78:10:c2.
Are you sure you want to continue connecting (yes/no)? yes
/usr/bin/ssh-copy-id: INFO: attempting to log in with the new key(s), to filter out any that are already installed
/usr/bin/ssh-copy-id: INFO: 1 key(s) remain to be installed -- if you are prompted now it is to install the new keys
[email protected]'s password:     ## 虚拟机登录密码

Number of key(s) added: 1

Now try logging into the machine, with:   "ssh '192.168.159.11'"
and check to make sure that only the key(s) you wanted were added.

[root@master ~]# ssh-copy-id 192.168.159.10
...............................................

[root@master ~]# ssh-copy-id 192.168.159.13
...............................................

[root@master ~]# ssh-copy-id 192.168.159.68
...............................................
②在 slave1 上配置到所有数据库节点的无密码认证
ssh-keygen -t rsa
ssh-copy-id 192.168.159.11
ssh-copy-id 192.168.159.68
ssh-copy-id 192.168.159.10
ssh-copy-id 192.168.226.13
③在 slave2上配置到所有数据库节点的无密码认证
ssh-keygen -t rsa
ssh-copy-id 192.168.159.10
ssh-copy-id 192.168.159.68
ssh-copy-id 192.168.159.11
ssh-copy-id 192.168.226.13
④在 manager上配置到所有数据库节点的无密码认证
ssh-keygen -t rsa
ssh-copy-id 192.168.226.13
ssh-copy-id 192.168.159.68
ssh-copy-id 192.168.159.11
ssh-copy-id 192.168.226.10
3.8、在manager节点上配置MHA脚本
在 manager 节点上复制相关脚本到/usr/local/bin 目录
[root@manager scripts]# cp -ra /opt/mha4mysql-manager-0.57/samples/scripts/ /usr/local/bin
#-a:此选项通常在复制目录时使用,它保留链接、文件属性,并复制目录下的所有内容
#-r: 递归
[root@manager scripts]# ll /usr/local/bin/scripts/
总用量 32
-rwxr-xr-x 1 wangwu wangwu  3648 5月  31 2015 master_ip_failover  #自动切换时 VIP管理
                                                                      的脚本
-rwxr-xr-x 1 wangwu wangwu  9870 5月  31 2015 master_ip_online_change #在线切换时 VIP
                                                                        的管理
-rwxr-xr-x 1 wangwu wangwu 11867 5月  31 2015 power_manager #故障发生后关闭主机的脚本
-rwxr-xr-x 1 wangwu wangwu  1360 5月  31 2015 send_report  #因故障切换后发送报警的脚本
复制上述的自动切换时 VIP 管理的脚本到/usr/local/bin 目录,这里使用脚本管理 VIP
[root@manager scripts]# cd /usr/local/bin/scripts/
[root@manager scripts]# ls
master_ip_failover       power_manager
master_ip_online_change  send_report
[root@manager scripts]# cp master_ip_failover /usr/local/bin/[root@manager scripts]#
修改配置文件master_ip_failover(删除原有内容,直接复制)
[root@manager scripts]# pwd
/usr/local/bin/scripts
[root@manager scripts]# vim /usr/local/bin/master_ip_failover

#!/usr/bin/env perl
use strict;
use warnings FATAL => 'all';

use Getopt::Long;

my (
$command, $ssh_user, $orig_master_host, $orig_master_ip,
$orig_master_port, $new_master_host, $new_master_ip, $new_master_port
);
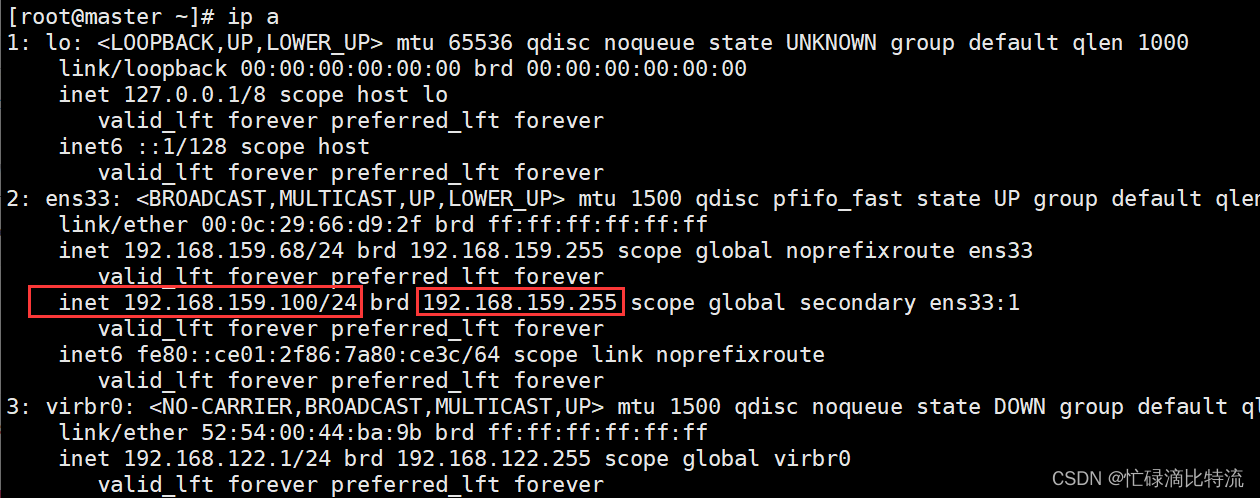
my $vip = '192.168.159.100';                 ## 设置vip
my $brdc = '192.168.159.255';                  ## 设置广播地址
my $ifdev = 'ens33';
my $key = '1';
my $ssh_start_vip = "/sbin/ifconfig ens33:$key $vip";
my $ssh_stop_vip = "/sbin/ifconfig ens33:$key down";
my $exit_code = 0;
#my $ssh_start_vip = "/usr/sbin/ip addr add $vip/24 brd $brdc dev $ifdev label $ifdev:$key;/usr/sbin/arping -q -A -c 1 -I $ifdev $vip;iptables -F;";
#my $ssh_stop_vip = "/usr/sbin/ip addr del $vip/24 dev $ifdev label $ifdev:$key";
GetOptions(
'command=s' => \$command,
'ssh_user=s' => \$ssh_user,
'orig_master_host=s' => \$orig_master_host,
'orig_master_ip=s' => \$orig_master_ip,
'orig_master_port=i' => \$orig_master_port,
'new_master_host=s' => \$new_master_host,
'new_master_ip=s' => \$new_master_ip,
'new_master_port=i' => \$new_master_port,
);

exit &main();

sub main {

print "\n\nIN SCRIPT TEST====$ssh_stop_vip==$ssh_start_vip===\n\n";

if ( $command eq "stop" || $command eq "stopssh" ) {

my $exit_code = 1;
eval {
print "Disabling the VIP on old master: $orig_master_host \n";
&stop_vip();
$exit_code = 0;
};
if ($@) {
warn "Got Error: $@\n";
exit $exit_code;
}
exit $exit_code;
}
elsif ( $command eq "start" ) {

my $exit_code = 10;
eval {
print "Enabling the VIP - $vip on the new master - $new_master_host \n";
&start_vip();
$exit_code = 0;
};
if ($@) {
warn $@;
exit $exit_code;
}
exit $exit_code;
}
elsif ( $command eq "status" ) {
print "Checking the Status of the script.. OK \n";
exit 0;
}
else {
&usage();
exit 1;
}
}
sub start_vip() {
`ssh $ssh_user\@$new_master_host \" $ssh_start_vip \"`;
}
# A simple system call that disable the VIP on the old_master
sub stop_vip() {
`ssh $ssh_user\@$orig_master_host \" $ssh_stop_vip \"`;
}

sub usage {
print
"Usage: master_ip_failover --command=start|stop|stopssh|status --orig_master_host=host --orig_master_ip=ip --orig_master_port=port --new_master_host=host --new_master_ip=ip --new_master_port=port\n";
}
3.9、创建 MHA 软件目录并拷贝配置文件
[root@manager scripts]# pwd
/usr/local/bin/scripts
[root@manager scripts]# mkdir /etc/masterha

[root@manager scripts]# cp /opt/mha4mysql-manager-0.57/samples/conf/app1.cnf /etc/masterha/

[root@manager scripts]# vim /etc/masterha/app1.cnf

[server default]
manager_workdir=/var/log/masterha/app1
manager_log=/var/log/masterha/app1/manager.log

master_binlog_dir=/usr/local/mysql/data/            ## 修改下二进制日志的位置
password=manager
ping_interval=1
remote_workdir=/tmp
repl_password=123456
repl_user=myslave
secondary_check_script=/usr/local/bin/masterha_secondary_check -s 192.168.159.11 -s 192.168.159.10shutdown_script=""
ssh_user=root
user=mha

[server1]
hostname=192.168.159.68
port=3306

[server2]
candidate_master=1
hostname=192.168.226.11
check_repl_delay=0
port=3306

[server3]
hostname=192.168.226.10
port=3306
三、测试
1、在manager端测试无密码认证
[root@manager conf]# masterha_check_ssh -conf=/etc/masterha/app1.cnf
Tue Sep 27 22:58:26 2022 - [warning] Global configuration file /etc/masterha_default.cnf not found. Skipping.
Tue Sep 27 22:58:26 2022 - [info] Reading application default configuration from /etc/masterha/app1.cnf..
Tue Sep 27 22:58:26 2022 - [info] Reading server configuration from /etc/masterha/app1.cnf..
Tue Sep 27 22:58:26 2022 - [info] Starting SSH connection tests..
Tue Sep 27 22:58:28 2022 - [debug]
Tue Sep 27 22:58:27 2022 - [debug]  Connecting via SSH from [email protected](192.168.159.10:22) to [email protected](192.168.159.68:22)..
Tue Sep 27 22:58:27 2022 - [debug]   ok.
Tue Sep 27 22:58:27 2022 - [debug]  Connecting via SSH from [email protected](192.168.159.10:22) to [email protected](192.168.159.11:22)..
Tue Sep 27 22:58:28 2022 - [debug]   ok.
Tue Sep 27 22:58:47 2022 - [debug]
Tue Sep 27 22:58:26 2022 - [debug]  Connecting via SSH from [email protected](192.168.159.68:22) to [email protected](192.168.159.11:22)..
Tue Sep 27 22:58:36 2022 - [debug]   ok.
Tue Sep 27 22:58:36 2022 - [debug]  Connecting via SSH from [email protected](192.168.159.68:22) to [email protected](192.168.159.10:22)..
Tue Sep 27 22:58:47 2022 - [debug]   ok.
Tue Sep 27 22:58:47 2022 - [debug]
Tue Sep 27 22:58:26 2022 - [debug]  Connecting via SSH from [email protected](192.168.159.11:22) to [email protected](192.168.159.68:22)..
Tue Sep 27 22:58:37 2022 - [debug]   ok.
Tue Sep 27 22:58:37 2022 - [debug]  Connecting via SSH from [email protected](192.168.159.11:22) to [email protected](192.168.159.10:22)..
Tue Sep 27 22:58:47 2022 - [debug]   ok.
Tue Sep 27 22:58:47 2022 - [info] All SSH connection tests passed successfully.
最后结果为tests passed successfully,表示测试正常
2、测试主从复制
[root@manager conf]# masterha_check_repl -conf=/etc/masterha/app1.cnf
Tue Sep 27 23:00:45 2022 - [warning] Global configuration file /etc/masterha_default.cnf not found. Skipping.
Tue Sep 27 23:00:45 2022 - [info] Reading application default configuration from /etc/masterha/app1.cnf..
Tue Sep 27 23:00:45 2022 - [info] Reading server configuration from
...............................................................................
Tue Sep 27 23:01:09 2022 - [warning] shutdown_script is not defined.
Tue Sep 27 23:01:09 2022 - [info] Got exit code 0 (Not master dead).

MySQL Replication Health is OK.
最后测试结果为;MySQL Replication Health is OK 。 表示测试正常
3、启动mha
在master节点上配置ens33:1的虚拟子接口,给与VIP:192.168.159.100/24
[root@manager conf]# nohup masterha_manager --conf=/etc/masterha/app1.cnf --remove_dead_master_conf --ignore_last_failover < /dev/null > /var/log/masterha/app1/manager.log 2>&1 &
[1] 8982

## 查询当前的master角色
[root@manager conf]# masterha_check_status --conf=/etc/masterha/app1.cnf
app1 (pid:8982) is running(0:PING_OK), master:192.168.159.68   ## 当前master
解释:
ohup //选项
masterha_manager //开启
--conf=/etc/masterha/app1.cnf //指定配置文件
--remove_dead_master_conf //当master服务器失效时,发生主从切换后,会把旧的master的ip从主配置文件删
--ignore_last_failover//忽略故障转移,忽略掉总是宕机不够可靠的服务器
4、查看到当前的master节点
[root@manager conf]# masterha_check_status --conf=/etc/masterha/app1.cnf
app1 (pid:8982) is running(0:PING_OK), master:192.168.159.68

### 当前master为192.168.159.68
5、查看当前日志信息
[root@manager conf]# tail -f /var/log/masterha/app1/manager.log

IN SCRIPT TEST====/sbin/ifconfig ens33:1 down==/sbin/ifconfig ens33:1 192.168.159.100===

Checking the Status of the script.. OK
Tue Sep 27 23:12:10 2022 - [info]  OK.
Tue Sep 27 23:12:10 2022 - [warning] shutdown_script is not defined.
Tue Sep 27 23:12:10 2022 - [info] Set master ping interval 1 seconds.
Tue Sep 27 23:12:10 2022 - [info] Set secondary check script: /usr/local/bin/masterha_secondary_check -s 192.168.159.11 -s 192.168.159.10
Tue Sep 27 23:12:10 2022 - [info] Starting ping health check on 192.168.159.68(192.168.159.68:3306)..
Tue Sep 27 23:12:10 2022 - [info] Ping(SELECT) succeeded, waiting until MySQL doesn't respond..
6、模拟master宕机,slave1是否能顶上
①vip在master主机上
②关闭master上的MySQL服务
[root@master ~]# systemctl stop mysqld.service

#####  查看发现虚拟VIP没有了

[root@master ~]# ifconfig
ens33: flags=4163<UP,BROADCAST,RUNNING,MULTICAST>  mtu 1500
        inet 192.168.159.68  netmask 255.255.255.0  broadcast 192.168.159.255
        inet6 fe80::ce01:2f86:7a80:ce3c  prefixlen 64  scopeid 0x20<link>
        ether 00:0c:29:66:d9:2f  txqueuelen 1000  (Ethernet)
        RX packets 12157  bytes 5819674 (5.5 MiB)
        RX errors 0  dropped 0  overruns 0  frame 0
        TX packets 6723  bytes 922189 (900.5 KiB)
        TX errors 0  dropped 0 overruns 0  carrier 0  collisions 0

lo: flags=73<UP,LOOPBACK,RUNNING>  mtu 65536
        inet 127.0.0.1  netmask 255.0.0.0
        inet6 ::1  prefixlen 128  scopeid 0x10<host>
        loop  txqueuelen 1000  (Local Loopback)
        RX packets 12239  bytes 986082 (962.9 KiB)
        RX errors 0  dropped 0  overruns 0  frame 0
        TX packets 12239  bytes 986082 (962.9 KiB)
        TX errors 0  dropped 0 overruns 0  carrier 0  collisions 0

virbr0: flags=4099<UP,BROADCAST,MULTICAST>  mtu 1500
        inet 192.168.122.1  netmask 255.255.255.0  broadcast 192.168.122.255
        ether 52:54:00:44:ba:9b  txqueuelen 1000  (Ethernet)
        RX packets 0  bytes 0 (0.0 B)
        RX errors 0  dropped 0  overruns 0  frame 0
        TX packets 0  bytes 0 (0.0 B)
        TX errors 0  dropped 0 overruns 0  carrier 0  collisions 0
③在原先slave1上查看ifconfig,发现VIP 漂移过来了。slave1成为了新的master
[root@slave1 ~]# ifconfig
ens33: flags=4163<UP,BROADCAST,RUNNING,MULTICAST>  mtu 1500
        inet 192.168.159.11  netmask 255.255.255.0  broadcast 192.168.159.255
        inet6 fe80::8d62:30c7:5d56:1dbb  prefixlen 64  scopeid 0x20<link>
        ether 00:0c:29:13:31:5e  txqueuelen 1000  (Ethernet)
        RX packets 4734  bytes 600130 (586.0 KiB)
        RX errors 0  dropped 0  overruns 0  frame 0
        TX packets 4093  bytes 742333 (724.9 KiB)
        TX errors 0  dropped 0 overruns 0  carrier 0  collisions 0

ens33:1: flags=4163<UP,BROADCAST,RUNNING,MULTICAST>  mtu 1500
        inet 192.168.159.100  netmask 255.255.255.0  broadcast 192.168.159.255
        ether 00:0c:29:13:31:5e  txqueuelen 1000  (Ethernet)

lo: flags=73<UP,LOOPBACK,RUNNING>  mtu 65536
        inet 127.0.0.1  netmask 255.0.0.0
        inet6 ::1  prefixlen 128  scopeid 0x10<host>
        loop  txqueuelen 1000  (Local Loopback)
        RX packets 375  bytes 41807 (40.8 KiB)
        RX errors 0  dropped 0  overruns 0  frame 0
        TX packets 375  bytes 41807 (40.8 KiB)
        TX errors 0  dropped 0 overruns 0  carrier 0  collisions 0

virbr0: flags=4099<UP,BROADCAST,MULTICAST>  mtu 1500
        inet 192.168.122.1  netmask 255.255.255.0  broadcast 192.168.122.255
        ether 52:54:00:bd:1f:d5  txqueuelen 1000  (Ethernet)
        RX packets 0  bytes 0 (0.0 B)
        RX errors 0  dropped 0  overruns 0  frame 0
        TX packets 0  bytes 0 (0.0 B)
        TX errors 0  dropped 0 overruns 0  carrier 0  collisions 0
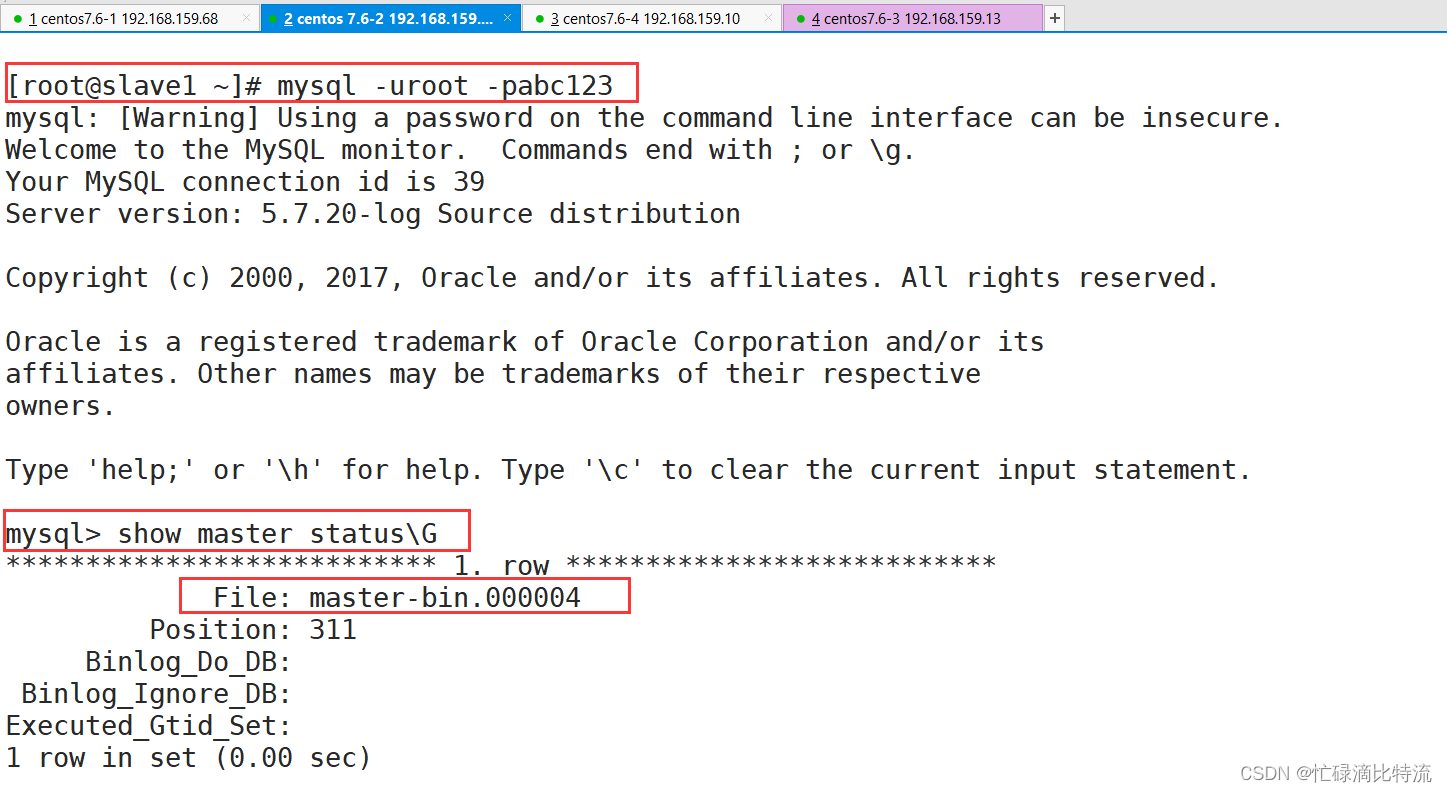
进入slave1的数据库中查看状态

版权归原作者 忙碌滴比特流 所有, 如有侵权,请联系我们删除。
