
一、获取服务器授权码
简单来说,就是你需要使用什么邮箱来发送邮件,需要获取到这个发送邮箱的授权码才能有这个权限,这里使用 QQ 邮箱为例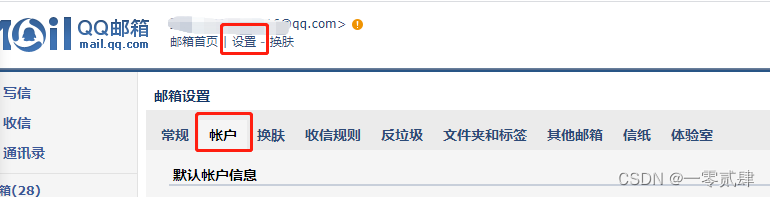
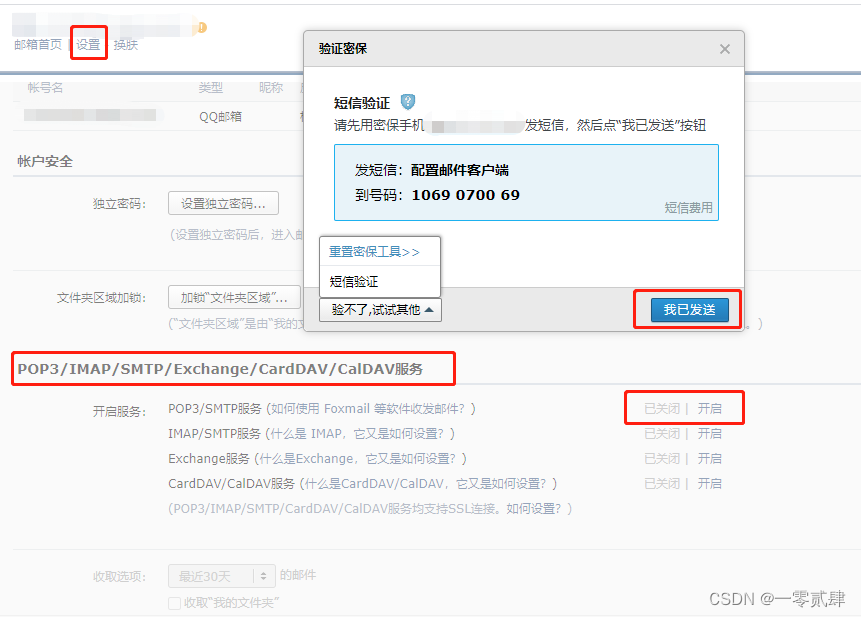
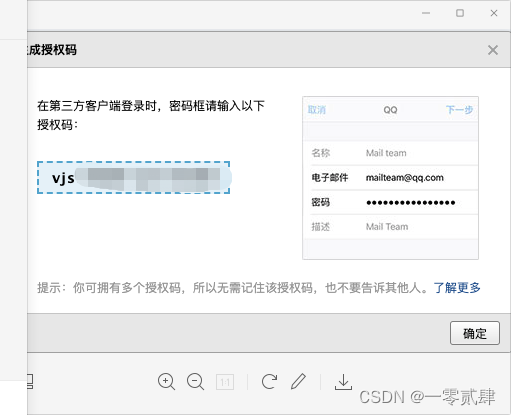
这个就是 QQ 邮箱的授权码,请妥善保管
二、基本配置
1. 添加相关的 POM 文件
<dependency><groupId>org.springframework.boot</groupId><artifactId>spring-boot-starter-mail</artifactId></dependency>
2. 配置 yml 文件
spring:mail:# 配置 SMTP 服务器地址host: smtp.qq.com
    # 发送者邮箱username: [email protected]
    # 配置密码,注意不是真正的密码,而是刚刚申请到的授权码password: xxxxxx
    # 端口号465或587port:587# 默认的邮件编码为UTF-8default-encoding: UTF-8# 配置SSL 加密工厂properties:# 设置邮件超时时间防止服务器阻塞timeout:5000connection-timeout:5000write-timeout:5000mail:smtp:socketFactoryClass: javax.net.ssl.SSLSocketFactory
        #表示开启 DEBUG 模式,这样,邮件发送过程的日志会在控制台打印出来,方便排查错误debug:true
126 邮箱 SMTP 服务器地址:smtp.126.com,端口号:465 或者 994
2163 邮箱 SMTP 服务器地址:smtp.163.com,端口号:465 或者 994
yeah 邮箱 SMTP 服务器地址:smtp.yeah.net,端口号:465 或者 994
qq 邮箱 SMTP 服务器地址:smtp.qq.com,端口号 465 或 587
三、邮件服务
1. 定义邮件接口
publicinterfaceIEmailService{/**
     * 普通邮件发送
     *
     * @param form    发送人
     * @param to      发送对象
     * @param subject 主题
     * @param content 内容
     */voidsendText(String form,Stringto,String subject,String content);/**
     * Html邮件发送
     *
     * @param form    发送人
     * @param to      发送对象
     * @param subject 主题
     * @param content 内容
     */voidsendHtml(String form,Stringto,String subject,String content);/**
     * 邮件发送
     *
     * @param name    发送人名称
     * @param form    发送人
     * @param to      发送对象
     * @param subject 主题
     * @param content 内容
     * @param isHtml  是否为html
     * @param cc      抄送,多人用逗号隔开
     * @param bcc     密送,多人用逗号隔开
     * @param files   文件
     */voidsend(String name,String form,Stringto,String subject,String content,Boolean isHtml,String cc,String bcc,List<File> files);}
这里我定义了三个邮件发送的接口,一个是普通文本,一个是 HTML 的,最后一个是综合类型的,可以根据参数自己配置内容
2. 邮件实现类
@Slf4j@ServicepublicclassEmailServiceImplimplementsIEmailService{@AutowiredprivateJavaMailSender javaMailSender;//注入邮件工具类@Overridepublicvoidsend(String name,String form,Stringto,String subject,String content,Boolean isHtml,String cc,String bcc,List<File> files){if(StringUtils.isAnyBlank(form,to, subject, content)){thrownewServiceException("发送人,接收人,主题,内容均不可为空");}try{//true表示支持复杂类型MimeMessageHelper messageHelper =newMimeMessageHelper(javaMailSender.createMimeMessage(),true);//邮件发信人
            messageHelper.setFrom(newInternetAddress(name +"<"+ form +">"));//邮件收信人
            messageHelper.setTo(to.split(","));//邮件主题
            messageHelper.setSubject(subject);//邮件内容
            messageHelper.setText(content, isHtml);//抄送if(!StringUtils.isEmpty(cc)){
                messageHelper.setCc(cc.split(","));}//密送if(!StringUtils.isEmpty(bcc)){
                messageHelper.setCc(bcc.split(","));}//添加邮件附件if(CollectionUtil.isNotEmpty(files)){for(File file : files){
                    messageHelper.addAttachment(file.getName(), file);}}// 邮件发送时间
            messageHelper.setSentDate(newDate());//正式发送邮件
            javaMailSender.send(messageHelper.getMimeMessage());}catch(Exception e){thrownewServiceException("邮件发送失败", e);}}@OverridepublicvoidsendText(String form,Stringto,String subject,String content){this.send("评论提醒", form,to, subject, content,false,null,null,null);}@OverridepublicvoidsendHtml(String form,Stringto,String subject,String content){this.send("评论提醒", form,to, subject, content,true,null,null,null);}}
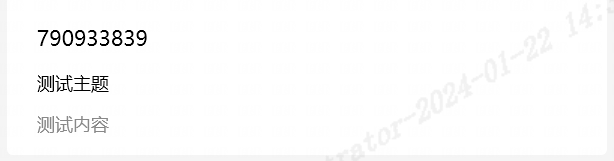
测试发送
每一行代码的注释我也都注释了,不难解释,这里我提出一点的是
//邮件发信人
messageHelper.setFrom(newInternetAddress(name +"<"+ form +">"));
这里是为了发送邮件的时候的发送者名称可以自定义,而不是上述中的邮箱名称
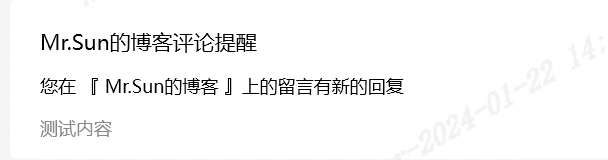
这样是不是好看多了
3.HTML 邮件
有时候,我们需要展示好看的邮件格式用 HTML 编写,然后使用占位符填充 HTML 的内容,所以这里使用
TemplateEngine
来做
- 新增 POM
<!--thymeleaf--><dependency><groupId>org.springframework.boot</groupId><artifactId>spring-boot-starter-thymeleaf</artifactId></dependency>
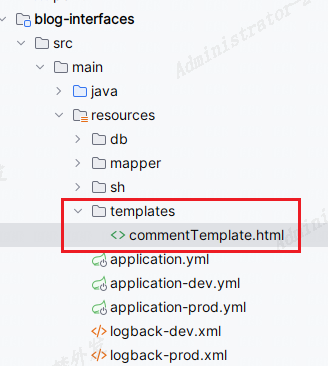
- 创建 HTML 模板 在 resoureces 文件夹下创建 template.html 文件
这里还是以我博主评论回复发送的邮件为例
<!DOCTYPEhtml><htmllang="en"xmlns:th="http://www.thymeleaf.org"><head><metacharset="UTF-8"><title>评论提醒</title><style>.button{background-color:rgb(14 165 233);border-radius: 10px;border: #181818;color: white;padding: 6px 10px;}.avatar{width: 60px;height: 60px;border-radius: 9px;}</style></head><body><div><divstyle="display: flex;align-items: center"><imgclass="avatar"src="https://q1.qlogo.cn/headimg_dl?dst_uin=1032065316&spec=100"alt="头像"><divstyle="display: block;margin-left: 10px"><pth:text="'您好,'+${oldNickname}"></p><p>您在本站的留言收到了回复:</p></div></div><p><strong>您的评论内容:</strong></p><pth:text="${oldContent}"></p><p><strongth:text="${nickname}+'回复内容:'"></strong></p><pth:text="${newContent}"><strong></strong></p><buttonclass="button"><ath:href="${url}">查看详细内容</a></button><p>此邮件由系统自动发出,请勿直接回复</p></div></body></html>
这里的${}就是占位符,在发送的时候填充数据即可,具体的
thymeleaf
相关语法写法可以去百度找找
- 发送 HTML 邮件
@SpringBootTestpublicclassEmailTestimplementsSerializable{@AutowiredprivateIEmailService emailService;@AutowiredprivateTemplateEngine templateEngine;@Testpublicvoidtest_email_text(){Context context =newContext();
        context.setVariable("avatar","https://q1.qlogo.cn/headimg_dl?dst_uin=1032065316&spec=100");
        context.setVariable("nickname","Mr.Sun");
        context.setVariable("newContent","测试新的评论");
        context.setVariable("oldContent","这是旧的评论");
        context.setVariable("oldNickname","腾讯视频");
        context.setVariable("url","https://www.xiaoquanya.com");String content = templateEngine.process("commentTemplate.html", context);
        emailService.sendHtml("[email protected]","[email protected]","您在 『 Mr.Sun的博客 』上的留言有新的回复", content);}}
这里使用
Context context = new Context();
来填充刚刚的 html 中的数据,然后发送就可以了
本文转载自: https://blog.csdn.net/m0_56287495/article/details/136587403
版权归原作者 一零贰肆 所有, 如有侵权,请联系我们删除。
版权归原作者 一零贰肆 所有, 如有侵权,请联系我们删除。