Vue + ElementUI 后台管理项目实战
内容参考链接一Vue + Element-UI —— 项目实战(零)(项目概述【附源码】)二Vue + Element-UI —— 项目实战(一)三Vue + Element-UI —— 项目实战(二)四Vue + Element-UI —— 项目实战(三)五Vue + Element-UI —— 项目实战(四)六Vue + Element-UI —— 项目实战(五)七Vue + Element-UI —— 项目实战(六)八Vue + Element-UI —— 项目实战(七)九Vue + Element-UI —— 项目实战(八)(完结)
文章目录
项目演示
项目教学视频链接
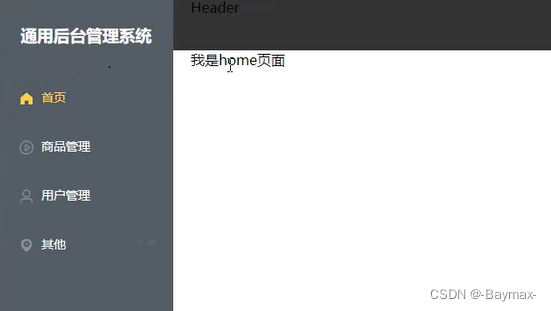
vue + element-ui 项目演示
一、项目实战一
Ⅰ、配置相关插件
1. 配置使用 Element
Element参考文档
- 安装 Element:在项目路径下终端键入以下命令:
npm i element-ui -S
- (全局引入)引入并使用 Element:在
main.js中通过 import 导入,通过 Vue.use(xxx) 全局使用。
import ElementUI from'element-ui';import'element-ui/lib/theme-chalk/index.css';
    Vue.use(ElementUI)
- (按需引入)引入并使用 Element:在
main.js中通过 import 导入指定组件,通过 Vue.use(xxx) 使用该组件。
import{Button}from'element-ui';import'element-ui/lib/theme-chalk/index.css';
    Vue.use(Button)
- 安装 babel-plugin-component 插件,已达到减小项目体积的目的。
npm install babel-plugin-component -D
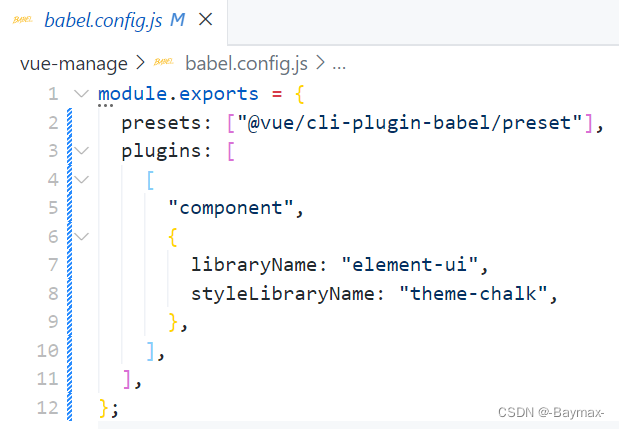
- 如果使用了按需引入,则需要在
babel.config.js中添加以下代码

- 通过终端键入
npm run build,可以发现全局引入和按需引入,生成的打包文件 dist 的大小差距很大。使用按需引入,会减少项目的体积。
2. 配置使用路由
- 安装路由插件,终端键入如下代码。【注意 vue.js 对应 vue-router 的 3版本,要 vue-router@3,安装指定版本,否则会安装最新版本,导致错误】
npm i vue-router@3
- 创建 router 文件夹,并在该文件夹创建 index.js 文件进行路由相关配置

import Vue from"vue";import VueRouter from"vue-router";import Home from'../views/Home.vue'import User from'../views/User.vue'//全局引入VueRouter
    Vue.use(VueRouter);const routes =[{path:"/",name:"Home",component: Home,},{path:'/user',name:'User',component: User
      }];// router用于接收VueRouter实例const router =newVueRouter({mode:"history",
      routes,});//默认暴露exportdefault router;
- 创建 views 文件夹,在该文件夹下,创建 home 和 User 文件夹,在这两个文件夹下分别创建 index.vue


- 在 main.js 导入并使用路由
import Vue from"vue";import App from"./App.vue";import router from'../router'newVue({render:h=>h(App),
      router
    }).$mount('#app')
- 在 App 组件相应位置显示内容
<template><div id="app"><router-view></router-view></div></template>
Ⅱ、搭建首页(头部 && 侧边栏)
1. 头部 header 搭建
- 安装 less 插件(本项目的样式为 less)
npm i less
- 安装插件 less 的解析器
npm i [email protected]
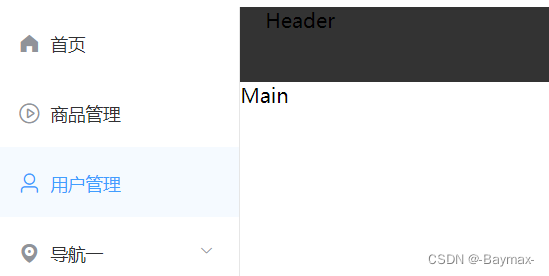
- 对 Main.vue 写入布局(el-xxx 是 Elementui 的书写格式)
<el-container style="hight: 100%"><el-aside width="auto">Aside</el-aside><el-container><el-header>Header</el-header><el-main>Main</el-main></el-container></el-container>
- 对 Main.vue 的 header 设置样式
<style lang="less" scoped>.el-header{
      background-color: #333;}.el-main{padding:0;}</style>
- 记得在 main.js 中按需引入
import{Button, Radio, Container, Main, Header, Aside}from'element-ui';
    Vue.use(Button)
    Vue.use(Radio)
    Vue.use(Container)
    Vue.use(Main)
    Vue.use(Header)
    Vue.use(Aside)

2. 左侧 aside 菜单栏搭建
- component(里面是公共文件) 文件夹下创建 CommonAside.vue,写入布局及样式。

<template><el-menu
        default-active="1-4-1"class="el-menu-vertical-demo"
        @open="handleOpen"
        @close="handleClose":collapse="isCollapse"><el-submenu index="1"><template slot="title"><i class="el-icon-location"></i><span slot="title">导航一</span></template><el-menu-item-group><span slot="title">分组一</span><el-menu-item index="1-1">选项1</el-menu-item><el-menu-item index="1-2">选项2</el-menu-item></el-menu-item-group><el-menu-item-group title="分组2"><el-menu-item index="1-3">选项3</el-menu-item></el-menu-item-group><el-submenu index="1-4"><span slot="title">选项4</span><el-menu-item index="1-4-1">选项1</el-menu-item></el-submenu></el-submenu><el-menu-item index="2"><i class="el-icon-menu"></i><span slot="title">导航二</span></el-menu-item><el-menu-item index="3" disabled><i class="el-icon-document"></i><span slot="title">导航三</span></el-menu-item><el-menu-item index="4"><i class="el-icon-setting"></i><span slot="title">导航四</span></el-menu-item></el-menu></template><script>exportdefault{data(){return{isCollapse:true};},methods:{handleOpen(key, keyPath){
            console.log(key, keyPath);},handleClose(key, keyPath){
            console.log(key, keyPath);}}}</script><style lang="less" scoped>.el-menu-vertical-demo:not(.el-menu--collapse){width: 200px;
        min-height: 400px;}</style>
- 记得在 main.js 中按需引入

3. 一级菜单实现
【添加数据】
- 在 CommonAside.vue 的 data 中添加数据(用来做动态组件)
menu:[{path:"/",name:"home",label:"首页",icon:"s-home",url:"Home/Home",},{path:"/mall",name:"mall",label:"商品管理",icon:"video-play",url:"MallManage/MallManage",},{path:"/user",name:"user",label:"用户管理",icon:"user",url:"UserManage/UserManage",},{label:"其他",icon:"location",children:[{path:"/page1",name:"page1",label:"页面1",icon:"setting",url:"Other/PageOne",},{path:"/page2",name:"page2",label:"页面2",icon:"setting",url:"Other/PageTwo",},],},]
【渲染组件(分为一级菜单和二级菜单)】
- 在计算属性 computed 中定义函数
noChildren(),过滤出没有子级的一级菜单
noChildren(){//过滤出来没有子项目的数据returnthis.menu.filter((item)=>!item.children);}
- v-for 遍历过滤出来的一级菜单,并在相应位置做出呈现
<el-menu-item v-for="item in noChildren":index="item.path":key="item.path"><i :class="'el-icon-' + item.icon"></i><span slot="title">{{item.label}}</span></el-menu-item>

4. 二级菜单实现
- 在计算属性 computed 中定义函数
hasChildren(),过滤出有子级的菜单
hasChildren(){//过滤出来有子项目的数据returnthis.menu.filter((item)=> item.children);}
- v-for 遍历过滤出来的二级菜单,并在相应位置做出呈现
<el-submenu v-for="item in hasChildren":index="item.path":key="item.path"><template slot="title"><i :class="'el-icon-' + item.icon"></i><span slot="title">{{item.label}}</span></template><!-- 二级菜单 --><el-menu-item-group v-for="(subItem, subIndex) in item.children":index="subIndex":key="subItem.path"><el-menu-item >{{subItem.label}}</el-menu-item></el-menu-item-group></el-submenu>
5. menu 样式和路由跳转
- CommonAside.vue 中设置样式:对侧边栏进行样式设置
    background-color="#545c64"
    text-color="#fff"
    active-text-color="#ffd04b".......el-menu {height: 100vh;border: #fff;
      h3 {color: white;
        text-align: center;
        line-height: 48px;}}
- 路由配置:添加点击事件,进行路由的跳转
<el-menu-item @click='clickMenu(item)'></el-menu-item>.......clickMenu(item){this.$router.push({name: item.name
        })}

不积跬步无以至千里 不积小流无以成江海
点个关注不迷路(持续更新中…)
版权归原作者 前端杂货铺 所有, 如有侵权,请联系我们删除。