一、实验目的与要求
1.1 Eclipse(或IDEA)环境下用Junit环境配置
1.2 Junit测试脚本的设计
1.3测试结果
二、实验环境
window 10
IntelliJ IDEA 2023.1 x64
Java
Junit
三、实验内容
- 配置IDEA工具中Junit环境
- 设计关于三角形问题的Junit测试实例脚本
- 通过运行测试观看输出结果
四、测试用例描述及实验步骤
1.配置Junit环境
(1)打开 Eclipse(或 IDEA)并打开你的 Java 项目。
(2)右键单击项目,选择 "Properties"(或 "Build Path")菜单。
(3)在弹出的窗口中,选择 "Java Build Path"(或 "Libraries")选项卡。
(4)点击 "Add Library"(或 "Add JARs")按钮。
(5)在选择 JUnit 库的对话框中,浏览并选择 JUnit 库的位置,然后点击 (6)"Finish" 完成库的添加。
****import ****org.junit.Test;
@Test
测试方法public void test(){}
2.编写测试脚本
三角形问题Test类
package com.company;
import static org.junit.Assert.assertEquals;
import java.util.Arrays;
import java.util.Collection;
import org.junit.Assert;
import org.junit.Test;
import org.junit.runner.RunWith;
import org.junit.runners.Parameterized;
import org.junit.runners.Parameterized.Parameters;
@RunWith(Parameterized.class)
public class test {

    private int p1;
    private int p2;
    private int p3;
    private String expected_triangle="";
    @Parameters
    public static Collection<Object[]> date(){
        //将所有测试数据放在object数组对象中
        //object数组对象可使用任意数据类型
        Object[][] object= {
                //语句覆盖
        /*
//#非法 (3 2 0 "illegal input")
//#线段 (2 3 5 "a line")
//#等腰 (3 3 5 "isosceles triangle")
//#等边 (3 3 3 "equilateral triangle")
//#直角 (3 4 5 "right triangle")
//#锐角 (5 6 7 "acute triangle")
//#顿角 (3 6 5 "obtuse triangle")*/
                {3 ,2,0,"this is illegal input"},
                {2 ,3, 5, "this only construct a line"},
                {3 ,3 ,5 ,"this only constuct a isosceles triangle"},
                {3 ,3 ,3 ,"this only constuct a equilateral triangle"},
                {3 ,4 ,5 ,"this only constuct a right triangle"},
                {5 ,6 ,7 ,"this only constuct a acute triangle"},
                {3 ,6 ,5 ,"this only constuct a obtuse triangle"},

        };
        return Arrays.asList(object);
    }
    public test(int p1,int p2,int p3,String expect_triangle){
        this.p1=p1;
        this.p2=p2;
        this.p3=p3;
        this.expected_triangle=expect_triangle;
    }
    @Test
    public void test_istriangle(){
        Triangle triangle=new Triangle(p1,p2,p3);
        triangle.JudgeTriangle(triangle);
        String result_triangle=triangle.str;
     assertEquals(expected_triangle,result_triangle);
    }

}
次日问题test
@RunWith(Parameterized.class)
public class DateTests {
    private String input1;
    private String input2;
    private String input3;
    private String expected;

    @Parameters
    public static Collection<?> prepareData(){
        String [][] object = {
                // 有效等价类
                {"2016","2","29","下一天是2016年3月1日!"},
                {"2017","1","28","下一天是2017年1月29日!"},
                {"2017","1","31","下一天是2017年2月1日!"},
                {"2017","4","30","下一天是2017年5月1日!"},
                // 无效等价类
                {"1899","3","1","年的值不在指定范围之内"},
                {"2051","3","1","年的值不在指定范围之内"},
                {"205%","3","1","无效的输入日期!"},
                {"1901","-1","1","月的值不在指定范围之内"},
                {"1901","13","1","月的值不在指定范围之内"},
                {"1901","1%","1","无效的输入日期!"},
                {"1901","1","-1","日的值不在指定范围之内"},
                {"2016","2","30","日的值不在指定范围之内"},
                {"2017","2","29","日的值不在指定范围之内"},
                {"2017","3","32","日的值不在指定范围之内"},
                {"2017","4","31","日的值不在指定范围之内"},
                {"2017","4","32","日的值不在指定范围之内"},
                {"2017","4","3%","无效的输入日期!"}
        };
        return Arrays.asList(object);
    }
    public DateTests(String input1,String input2,String input3,String expected){
        this.input1 = input1;
        this.input2 = input2;
        this.input3 = input3;
        this.expected = expected;

    }
    @Test
    public void testDate(){
        String result = Date.nextDate(input1,input2,input3);
        Assert.assertEquals(expected,result);
    }
}
3.执行测试
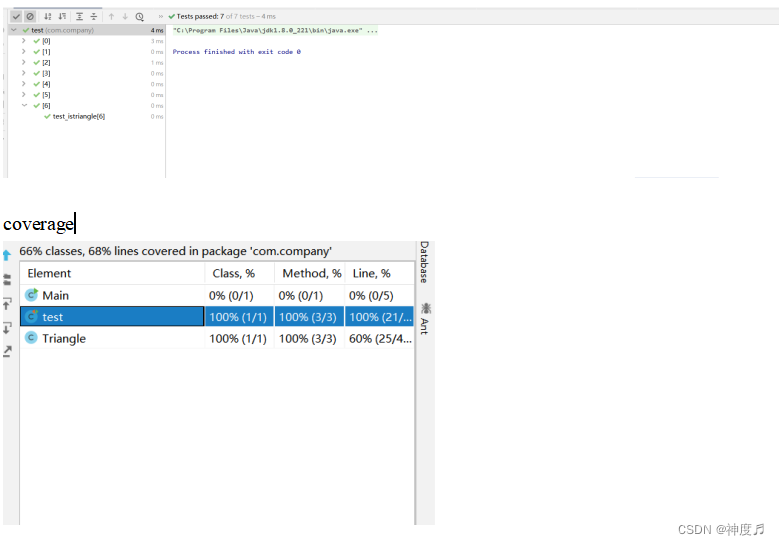
三角形问题测试通过

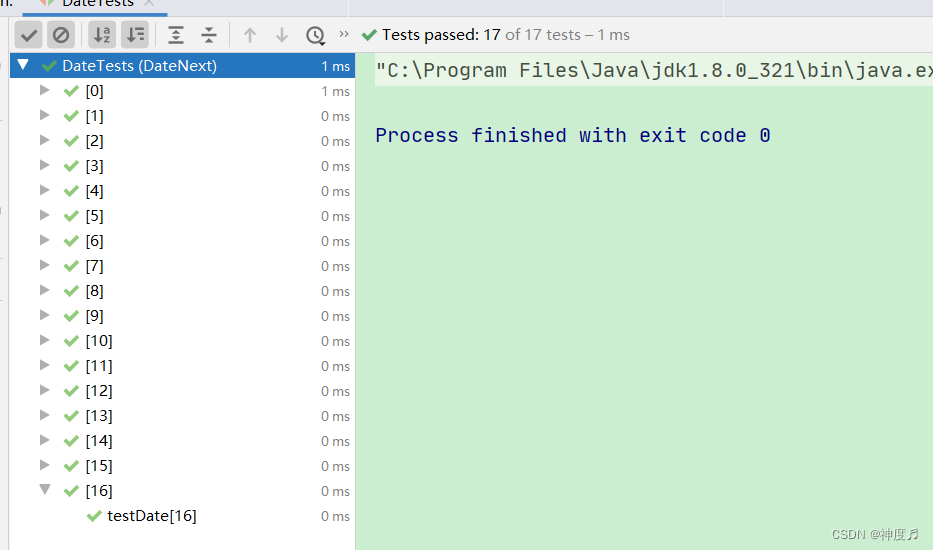
次日问题测试

五、调试过程及实验结果
六、总结
当我开始使用 Eclipse(或 IDEA)进行 JUnit 单元测试时,我遇到了一些问题。首先,我不知道如何在 IDE 中配置 JUnit 环境。我遇到了困惑,因为我没有在项目中找到 JUnit 库。为了解决这个问题,我进行了一些研究,并找到了解决方案。我学会了在 Eclipse(或 IDEA)的项目构建路径中添加 JUnit 库。我右键单击项目,选择 "Properties"(或 "Build Path")菜单,然后在 "Java Build Path"(或 "Libraries")选项卡中添加了 JUnit 库。这样,我成功地配置了 JUnit 环境。
我面临了另一个问题,即如何设计 JUnit 测试脚本。我并不确定应该如何开始编写测试代码。我开始阅读 JUnit 的文档和教程,以了解如何编写有效的测试脚本。明白了编写测试脚本的基本原则。我创建了一个与要测试的类相对应的测试类,并使用 @Test 注解标记了要执行的测试方法。我使用了 JUnit 提供的断言方法来验证预期结果与实际结果的一致性。
我还学会了如何设置前置条件和清理操作。我使用 @Before 注解标记了一个方法,在测试方法执行之前初始化了测试环境。同样地,我使用 @After 注解标记了一个方法,在测试方法执行之后执行了清理操作。
我还需要找到一种方法来查看我的测试结果。我发现,Eclipse(或 IDEA)提供了 JUnit 视图来显示测试结果。通过在 IDE 中运行我的单元测试,我可以在 JUnit 视图中查看每个测试方法的执行状态和详细结果。通过解决这些问题,我成功地进行了 JUnit 单元测试,并获得了准确的测试结果。我对在 Eclipse(或 IDEA)环境下使用 JUnit 进行单元测试的整个过程有了更好的了解和掌握。
版权归原作者 神度♬ 所有, 如有侵权,请联系我们删除。