
文章目录
一、前言
更多内容见Seata专栏:https://blog.csdn.net/saintmm/category_11953405.html
至此,seata系列的内容包括:
- can not get cluster name in registry config ‘service.vgroupMapping.xx‘, please make sure registry问题解决;
- Seata Failed to get available servers: endpoint format should like ip:port 报错原因/解决方案汇总版(看完本文必解决问题)
- Seata json decode exception, Cannot construct instance of java.time.LocalDateTime报错原因/解决方案最全汇总版
- 【微服务 31】超细的Spring Cloud 整合Seata实现分布式事务(排坑版)
- 【微服务 32】Spring Cloud整合Seata、Nacos实现分布式事务案例(巨细排坑版)【云原生】
- 【微服务33】分布式事务Seata源码解析一:在IDEA中启动Seata Server
- 【微服务34】分布式事务Seata源码解析二:Seata Server启动时都做了什么
- 【微服务35】分布式事务Seata源码解析三:从Spring Boot特性来看Seata Client 启动时都做了什么
- 【微服务36】分布式事务Seata源码解析四:图解Seata Client 如何与Seata Server建立连接、通信
- 【微服务37】分布式事务Seata源码解析五:@GlobalTransactional如何开启全局事务
- 【微服务38】分布式事务Seata源码解析六:全局/分支事务分布式ID如何生成?序列号超了怎么办?时钟回拨问题如何处理?
- 【微服务39】分布式事务Seata源码解析七:图解Seata事务执行流程之开启全局事务
- 分布式事务Seata源码解析八:本地事务执行流程(AT模式下)
- 分布式事务Seata源码解析九:分支事务如何注册到全局事务
Seata最核心的全局事务执行流程,上文我们聊了本地事务是如何执行的?在本地事务执行的过程中涉及到分支事务如何注册到全局事务、undo log的构建,本文我们接着聊undo log的构建。
二、准备undo log
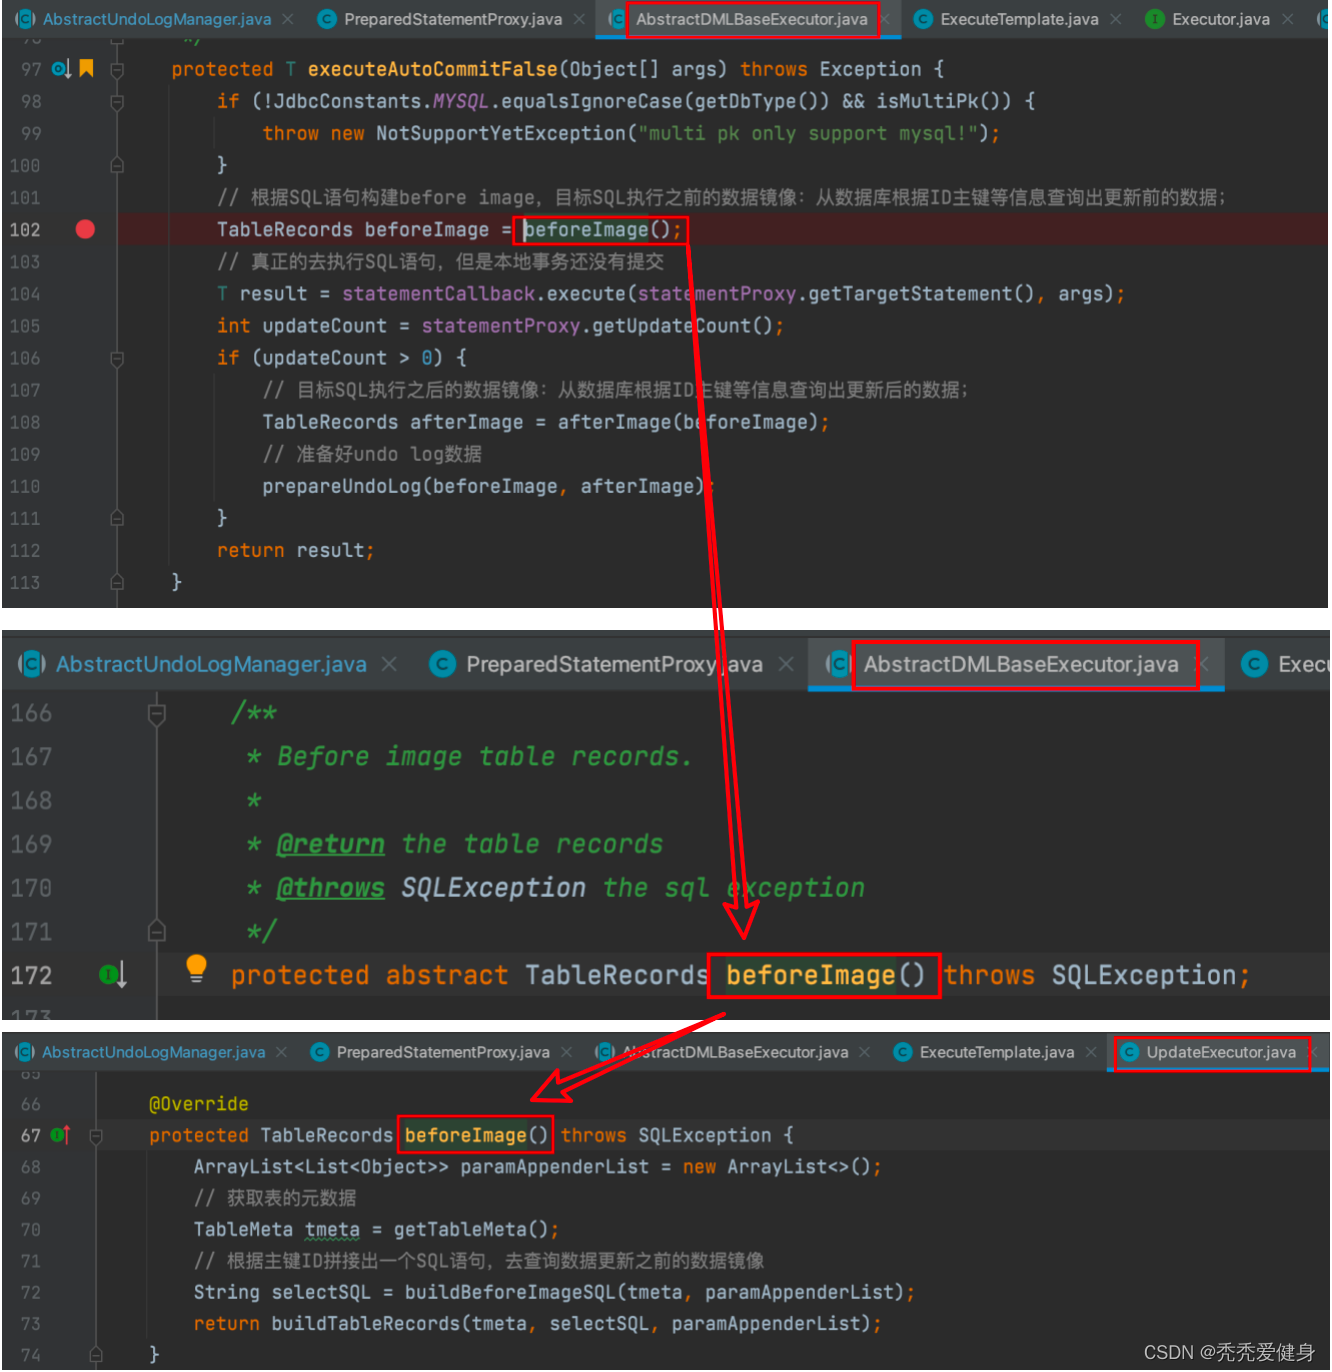
在分布式事务Seata源码解析八:本地事务执行流程一文,我们聊到了在本地事务执行的时候,执行目标SQL前后会分别构建相应数据的before image、after image,然后将before image 和 after image合并作为回滚日志undo log,保存到当前数据库连接上下文ConnectionContext中。
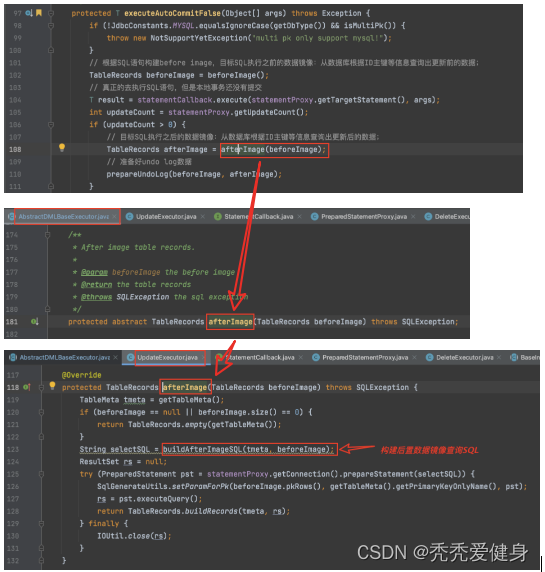
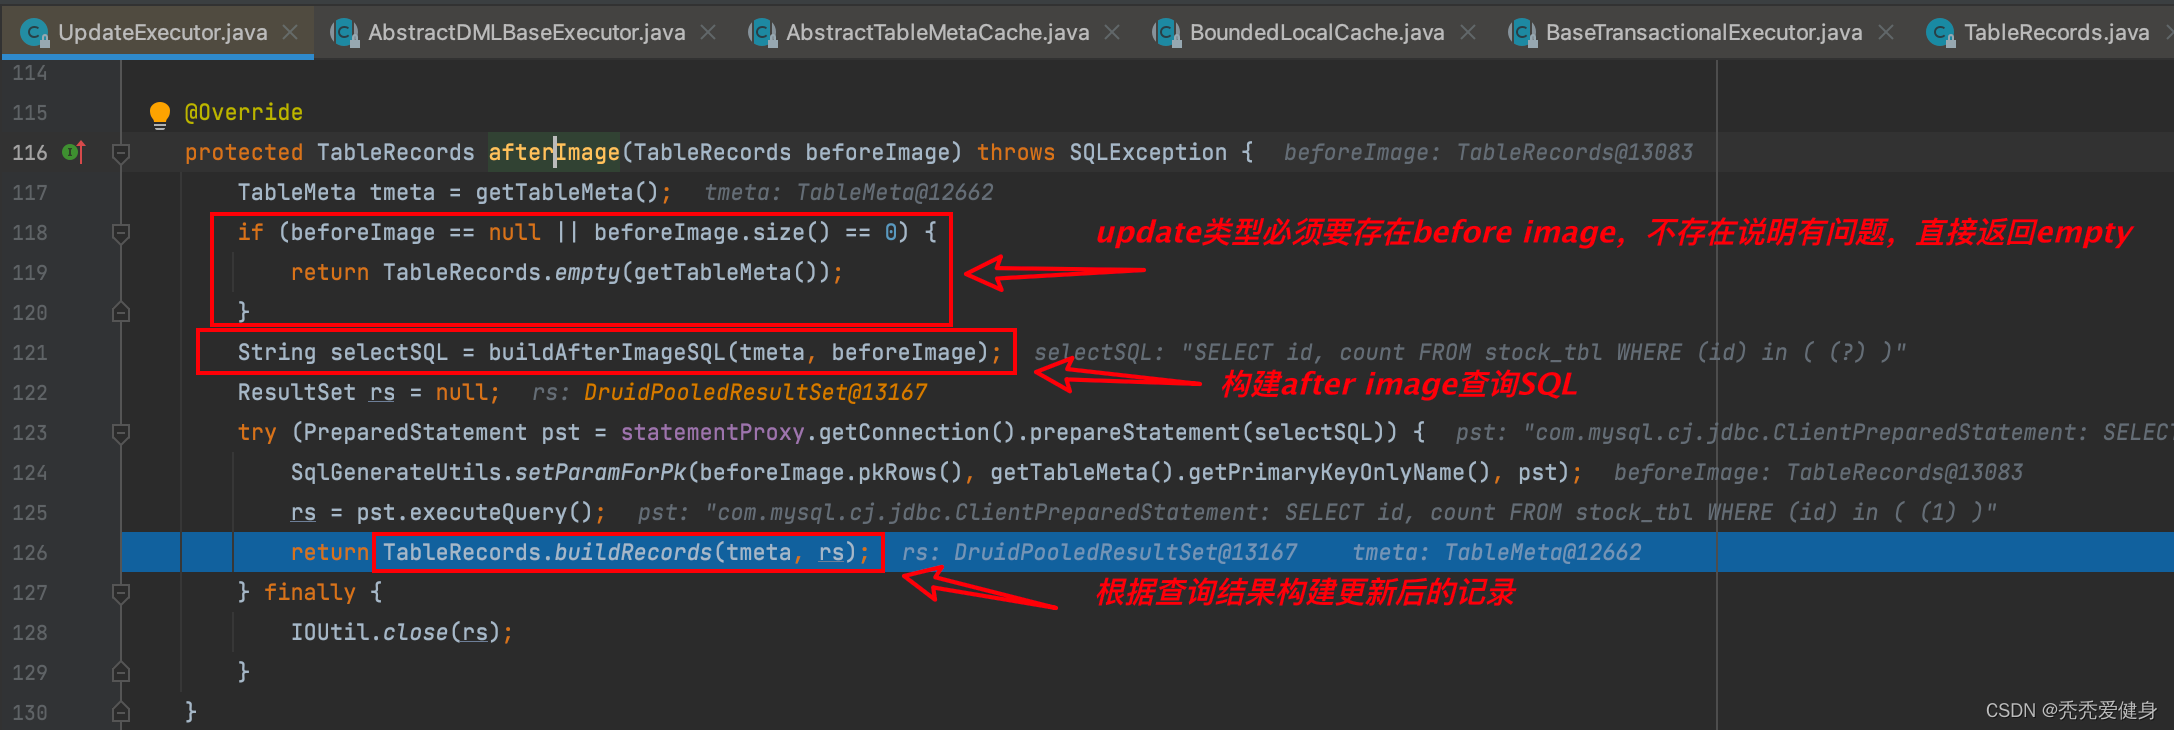
protectedTexecuteAutoCommitFalse(Object[] args)throwsException{if(!JdbcConstants.MYSQL.equalsIgnoreCase(getDbType())&&isMultiPk()){thrownewNotSupportYetException("multi pk only support mysql!");}// 根据SQL语句构建before image,目标SQL执行之前的数据镜像:从数据库根据ID主键等信息查询出更新前的数据;TableRecords beforeImage =beforeImage();// 真正的去执行SQL语句,但是本地事务还没有提交T result = statementCallback.execute(statementProxy.getTargetStatement(), args);int updateCount = statementProxy.getUpdateCount();if(updateCount >0){// 目标SQL执行之后的数据镜像:从数据库根据ID主键等信息查询出更新后的数据;TableRecords afterImage =afterImage(beforeImage);// 准备好undo log数据prepareUndoLog(beforeImage, afterImage);}return result;}
执行SQL的流程如下:
beforeImage()– 根据SQL语句构建before image,查询目标sql执行前的数据快照; - Update、Delete操作从数据库根据ID主键等信息查询出更新前的数据;- Insert操作直接返回空的TableRecords,其中只包含TableMeta,没有数据记录;- 执行SQL语句,但是本地事务还没有提交;
afterImage()– 构建after image,查询目标SQL执行之后的数据快照; - Insert、Update操作从数据库根据ID主键等信息查询出更新后的数据;- Delete操作直接返回空的TableRecords,其中只包含TableMeta,没有数据记录;prepareUndoLog(beforeImage, afterImage)--> 将before image 和 after image合并作为回滚日志undo log,保存到当前数据库连接上下文ConnectionContext中。其中还包括构建当前本地事务要占用所有全局锁key信息,然后将其保存到当前数据库连接上下文ConnectionContext中。
以update类型SQL为例,下面具体看一下before image 和 after image是如何构建的?
0、undo log 样例
1)undo log表结构
CREATETABLE`undo_log`(`id`bigint(20)NOTNULLAUTO_INCREMENT,`branch_id`bigint(20)NOTNULL,`xid`varchar(100)NOTNULL,`context`varchar(128)NOTNULL,`rollback_info`longblobNOTNULL,`log_status`int(11)NOTNULL,`log_created`datetimeNOTNULL,`log_modified`datetimeNOTNULL,PRIMARYKEY(`id`),UNIQUEKEY`ux_undo_log`(`xid`,`branch_id`))ENGINE=InnoDBAUTO_INCREMENT=1DEFAULTCHARSET=utf8;
2)rollback_info(回滚日志数据)
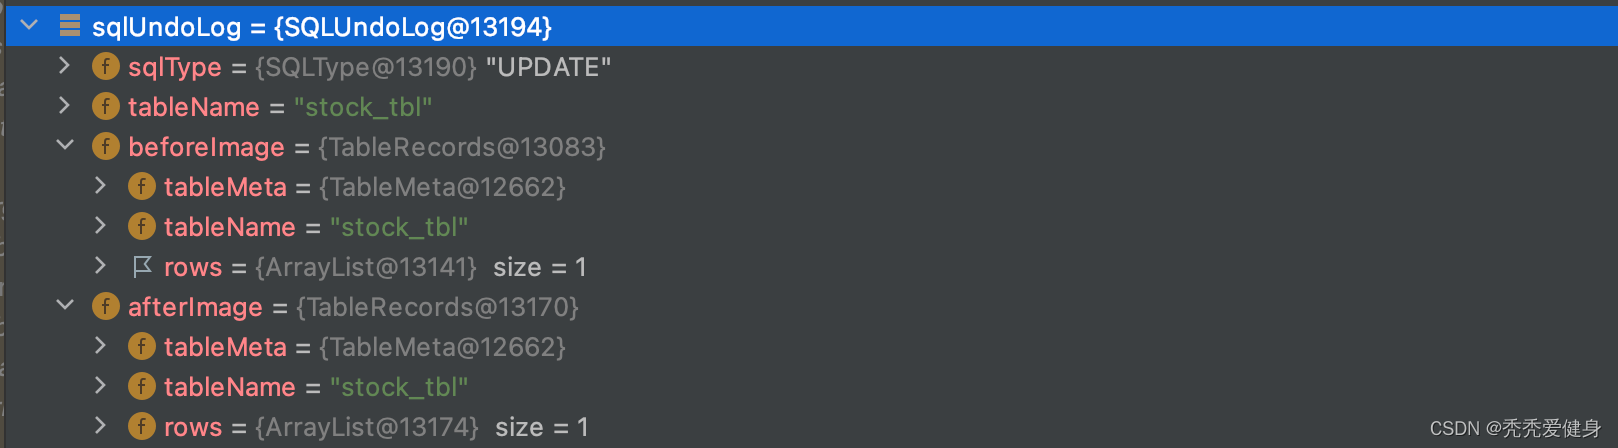
{"@class":"io.seata.rm.datasource.undo.BranchUndoLog","xid":"192.168.5.148:8091:7629417955717185671","branchId":7629417955717185681,"sqlUndoLogs":["java.util.ArrayList",[{"@class":"io.seata.rm.datasource.undo.SQLUndoLog","sqlType":"UPDATE","tableName":"stock_tbl","beforeImage":{"@class":"io.seata.rm.datasource.sql.struct.TableRecords","tableName":"stock_tbl","rows":["java.util.ArrayList",[{"@class":"io.seata.rm.datasource.sql.struct.Row","fields":["java.util.ArrayList",[{"@class":"io.seata.rm.datasource.sql.struct.Field","name":"id","keyType":"PRIMARY_KEY","type":4,"value":1},{"@class":"io.seata.rm.datasource.sql.struct.Field","name":"count","keyType":"NULL","type":4,"value":100}]]}]]},"afterImage":{"@class":"io.seata.rm.datasource.sql.struct.TableRecords","tableName":"stock_tbl","rows":["java.util.ArrayList",[{"@class":"io.seata.rm.datasource.sql.struct.Row","fields":["java.util.ArrayList",[{"@class":"io.seata.rm.datasource.sql.struct.Field","name":"id","keyType":"PRIMARY_KEY","type":4,"value":1},{"@class":"io.seata.rm.datasource.sql.struct.Field","name":"count","keyType":"NULL","type":4,"value":99}]]}]]}}]]}
里面有一个beforeImage和一个afterImage,beforeImage就是写操作之前的数据备份,而afterImage就是写操作之后的数据。
1、before image的构建
针对更新的SQL语句,UpdateExecutor#beforeImage()中首先需要获取到目标SQL要更新的表的元数据,然后拼接出一个SQL语句查询出更新之前的记录,根据查询到的记录构建镜像对象
TableRecords
。
1)业务表元数据信息TableMeta
业务表元数据的获取体现在UpdateExecutor#getTableMeta()方法:
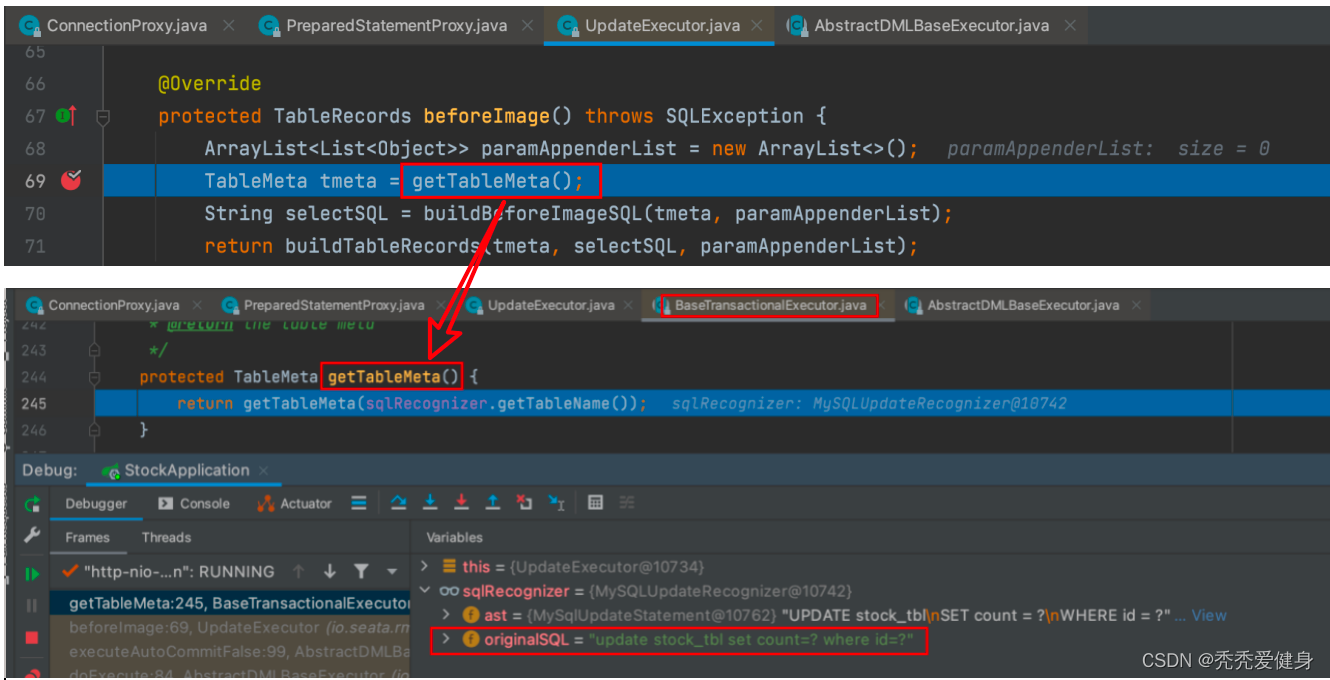
获取业务表元数据时,首先需要根据要执行的业务SQL获取到数据库表名,比如上图的stock_tbl;
一共有三种TableMetaCache:

当我们采用MYSQL数据时,使用的就是MysqlTableMetaCache:
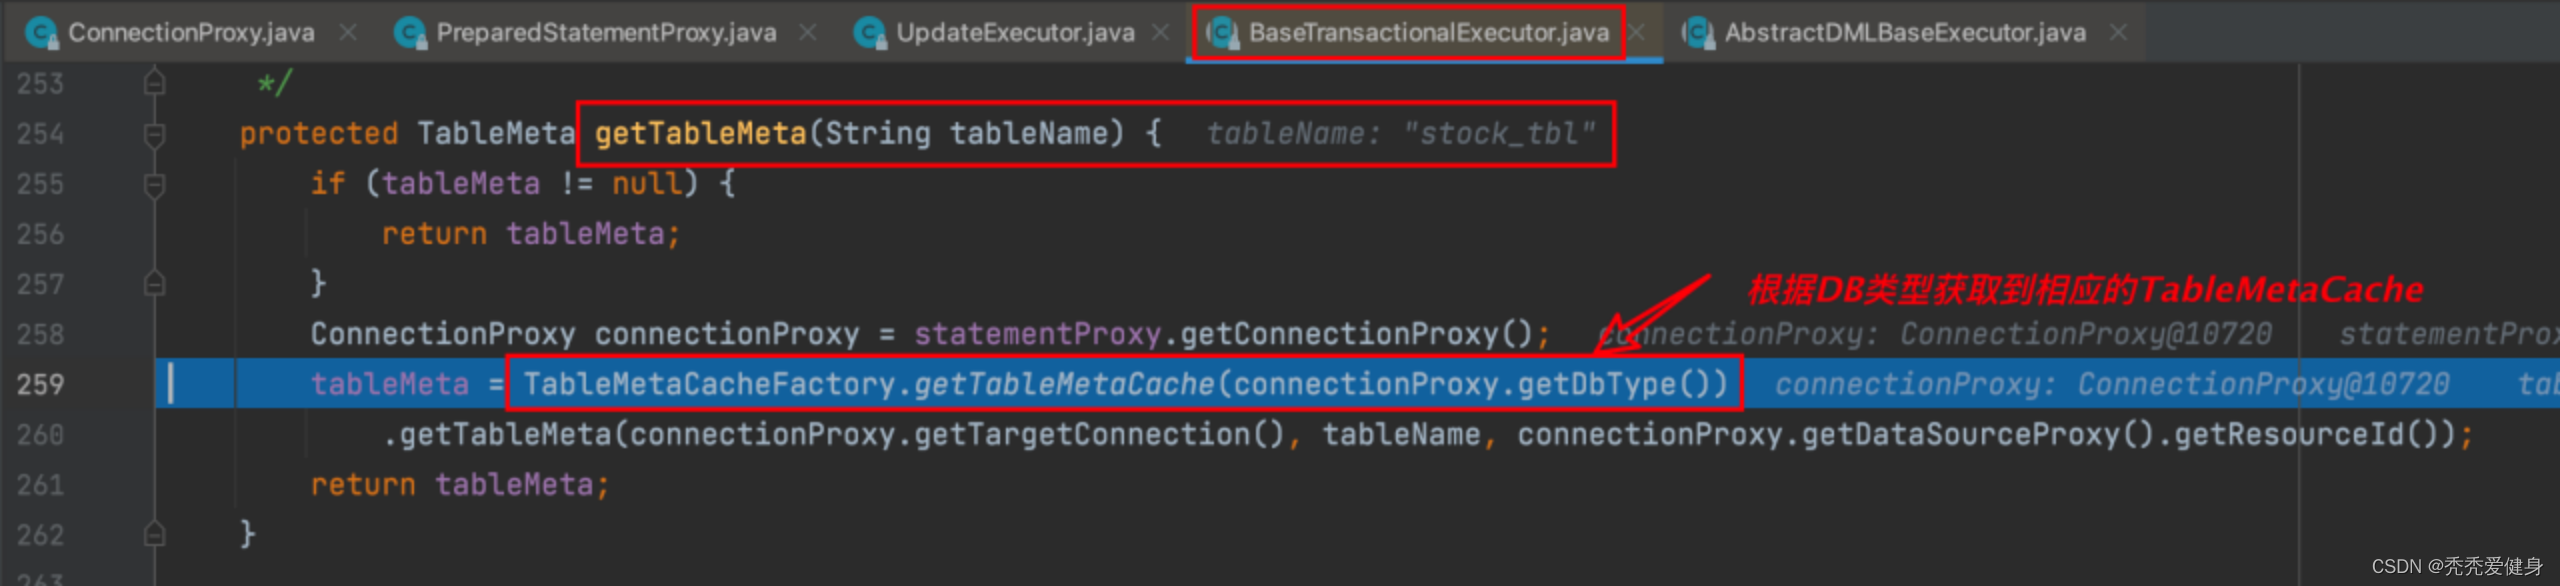
但无论是Oracle、PgSQL、还是MYSQL,它们的TableMetaCache实现类都没有重写getTableMeta()方法,所以获取业务表元数据的都体现在它们的父类
AbstractTableMetaCache
中:
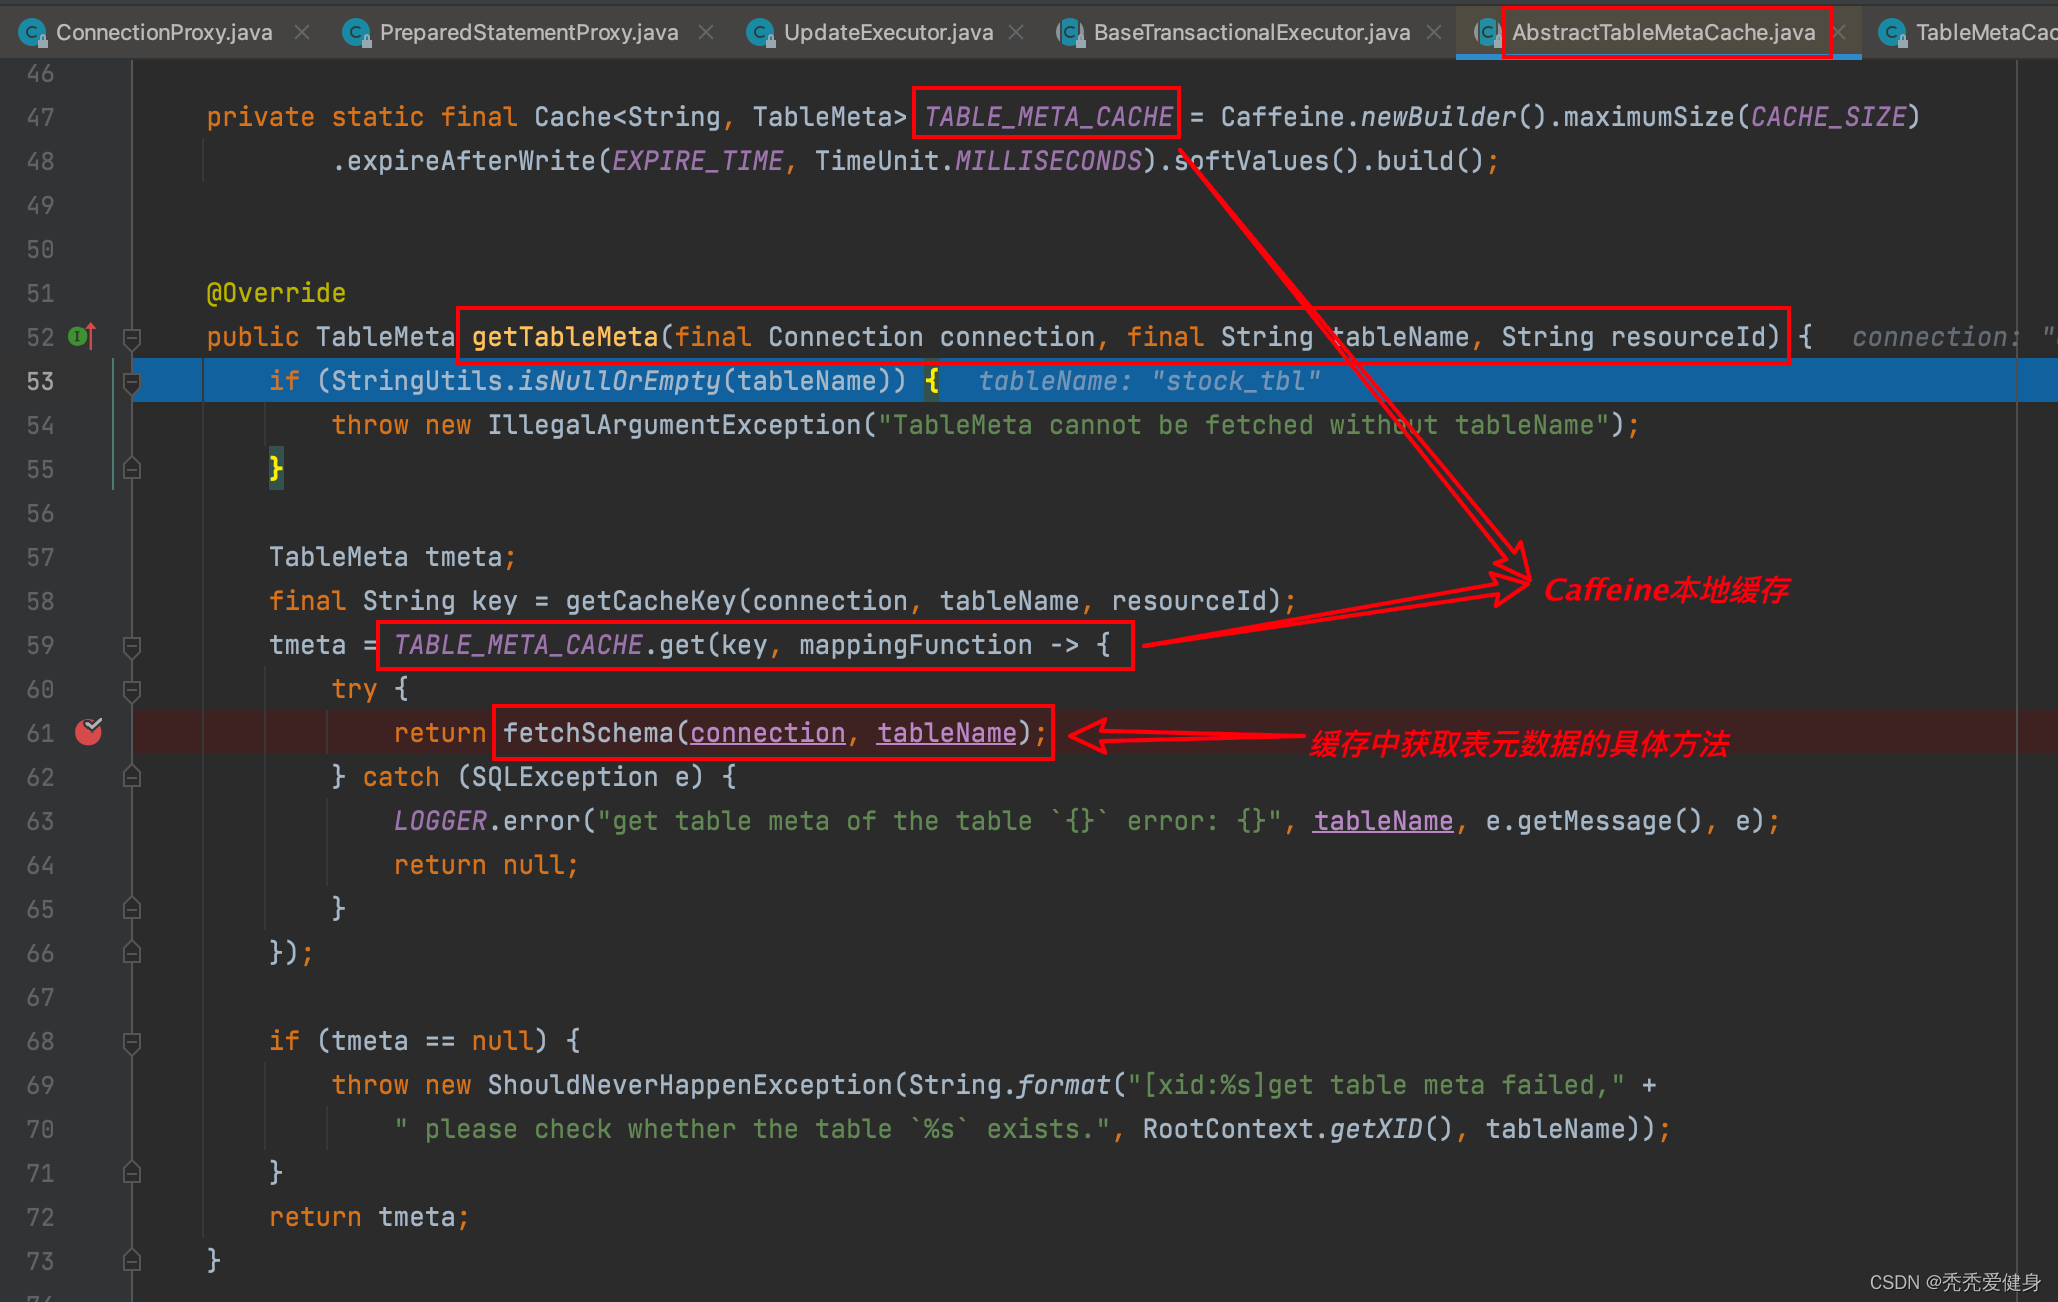
Seata使用Caffeine本地缓存,缓存业务表元数据;
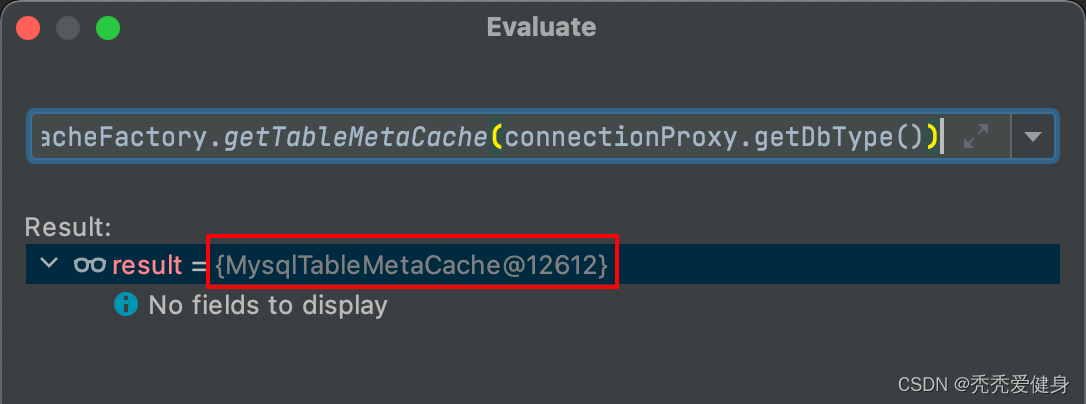
1> Caffeine缓存数据获取
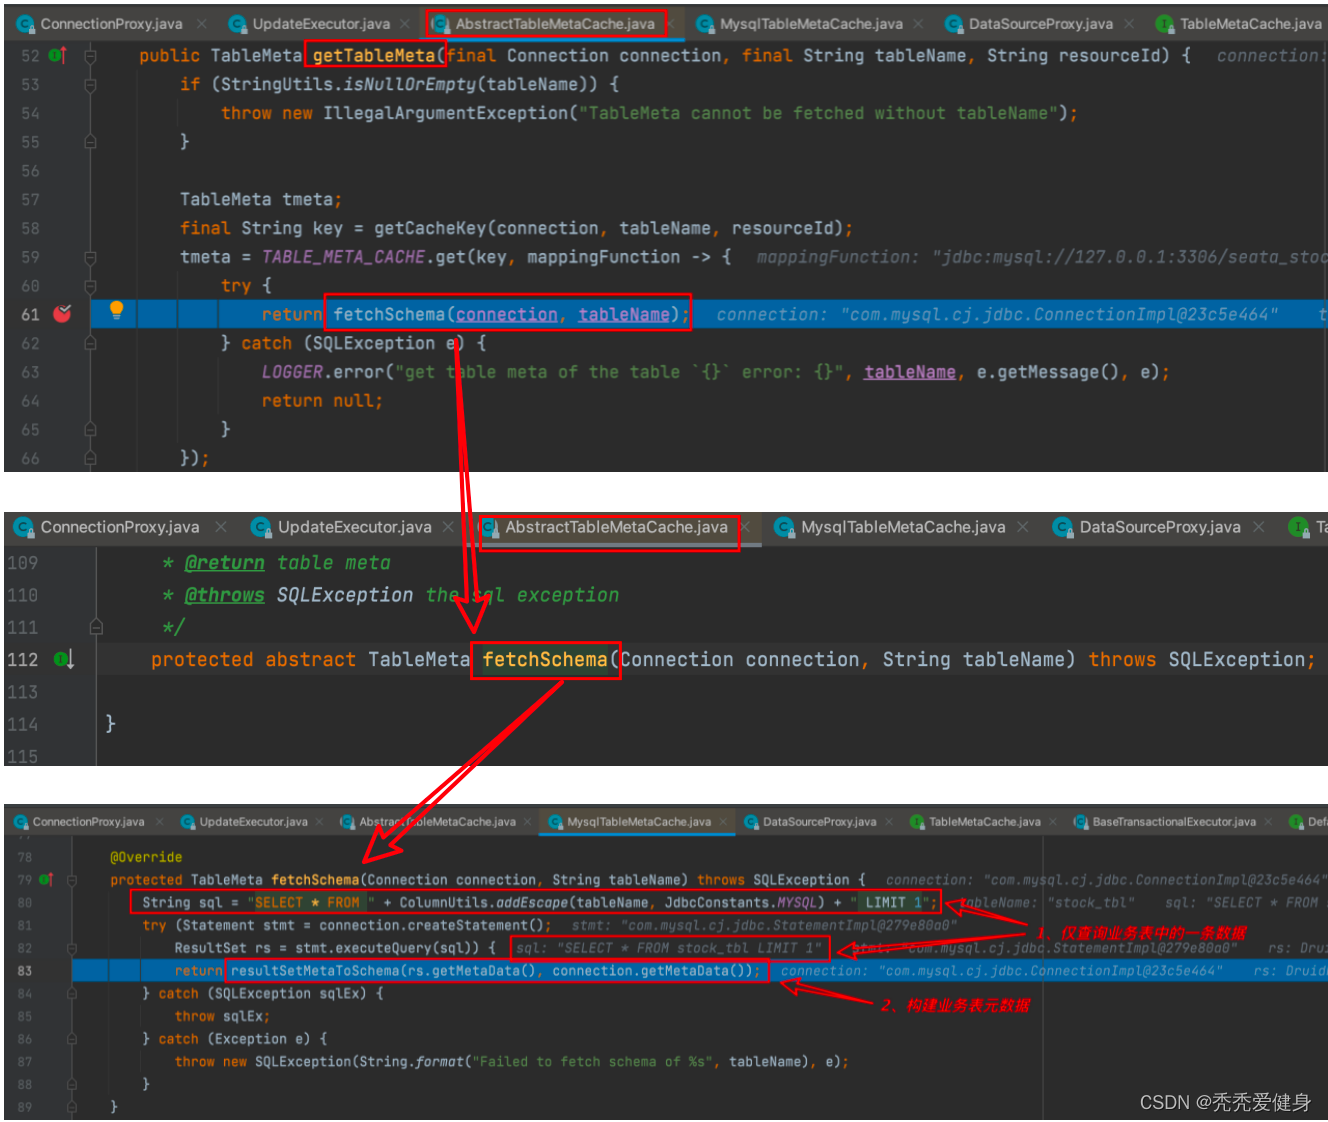
获取业务表的元数据逻辑如下:
- 构建一条SQL语句,仅从业务表中查询出一条记录;
- 根据从业务表中查询出的记录构建业务表元数据;
构建业务表元数据源码如下:
privateTableMetaresultSetMetaToSchema(ResultSetMetaData rsmd,DatabaseMetaData dbmd)throwsSQLException{//always "" for mysqlString schemaName = rsmd.getSchemaName(1);String catalogName = rsmd.getCatalogName(1);/*
         * use ResultSetMetaData to get the pure table name
         * can avoid the problem below
         *
         * select * from account_tbl
         * select * from account_TBL
         * select * from `account_tbl`
         * select * from account.account_tbl
         */String tableName = rsmd.getTableName(1);TableMeta tm =newTableMeta();
        tm.setTableName(tableName);/*
         * here has two different type to get the data
         * make sure the table name was right
         * 1. show full columns from xxx from xxx(normal)
         * 2. select xxx from xxx where catalog_name like ? and table_name like ?(informationSchema=true)
         */try(ResultSet rsColumns = dbmd.getColumns(catalogName, schemaName, tableName,"%");ResultSet rsIndex = dbmd.getIndexInfo(catalogName, schemaName, tableName,false,true);ResultSet onUpdateColumns = dbmd.getVersionColumns(catalogName, schemaName, tableName)){while(rsColumns.next()){ColumnMeta col =newColumnMeta();
                col.setTableCat(rsColumns.getString("TABLE_CAT"));
                col.setTableSchemaName(rsColumns.getString("TABLE_SCHEM"));
                col.setTableName(rsColumns.getString("TABLE_NAME"));
                col.setColumnName(rsColumns.getString("COLUMN_NAME"));
                col.setDataType(rsColumns.getInt("DATA_TYPE"));
                col.setDataTypeName(rsColumns.getString("TYPE_NAME"));
                col.setColumnSize(rsColumns.getInt("COLUMN_SIZE"));
                col.setDecimalDigits(rsColumns.getInt("DECIMAL_DIGITS"));
                col.setNumPrecRadix(rsColumns.getInt("NUM_PREC_RADIX"));
                col.setNullAble(rsColumns.getInt("NULLABLE"));
                col.setRemarks(rsColumns.getString("REMARKS"));
                col.setColumnDef(rsColumns.getString("COLUMN_DEF"));
                col.setSqlDataType(rsColumns.getInt("SQL_DATA_TYPE"));
                col.setSqlDatetimeSub(rsColumns.getInt("SQL_DATETIME_SUB"));
                col.setCharOctetLength(rsColumns.getInt("CHAR_OCTET_LENGTH"));
                col.setOrdinalPosition(rsColumns.getInt("ORDINAL_POSITION"));
                col.setIsNullAble(rsColumns.getString("IS_NULLABLE"));
                col.setIsAutoincrement(rsColumns.getString("IS_AUTOINCREMENT"));if(tm.getAllColumns().containsKey(col.getColumnName())){thrownewNotSupportYetException("Not support the table has the same column name with different case yet");}
                tm.getAllColumns().put(col.getColumnName(), col);}while(onUpdateColumns.next()){
                tm.getAllColumns().get(onUpdateColumns.getString("COLUMN_NAME")).setOnUpdate(true);}while(rsIndex.next()){String indexName = rsIndex.getString("INDEX_NAME");String colName = rsIndex.getString("COLUMN_NAME");ColumnMeta col = tm.getAllColumns().get(colName);if(tm.getAllIndexes().containsKey(indexName)){IndexMeta index = tm.getAllIndexes().get(indexName);
                    index.getValues().add(col);}else{IndexMeta index =newIndexMeta();
                    index.setIndexName(indexName);
                    index.setNonUnique(rsIndex.getBoolean("NON_UNIQUE"));
                    index.setIndexQualifier(rsIndex.getString("INDEX_QUALIFIER"));
                    index.setIndexName(rsIndex.getString("INDEX_NAME"));
                    index.setType(rsIndex.getShort("TYPE"));
                    index.setOrdinalPosition(rsIndex.getShort("ORDINAL_POSITION"));
                    index.setAscOrDesc(rsIndex.getString("ASC_OR_DESC"));
                    index.setCardinality(rsIndex.getInt("CARDINALITY"));
                    index.getValues().add(col);if("PRIMARY".equalsIgnoreCase(indexName)){
                        index.setIndextype(IndexType.PRIMARY);}elseif(!index.isNonUnique()){
                        index.setIndextype(IndexType.UNIQUE);}else{
                        index.setIndextype(IndexType.NORMAL);}
                    tm.getAllIndexes().put(indexName, index);}}if(tm.getAllIndexes().isEmpty()){thrownewShouldNeverHappenException("Could not found any index in the table: "+ tableName);}}return tm;}
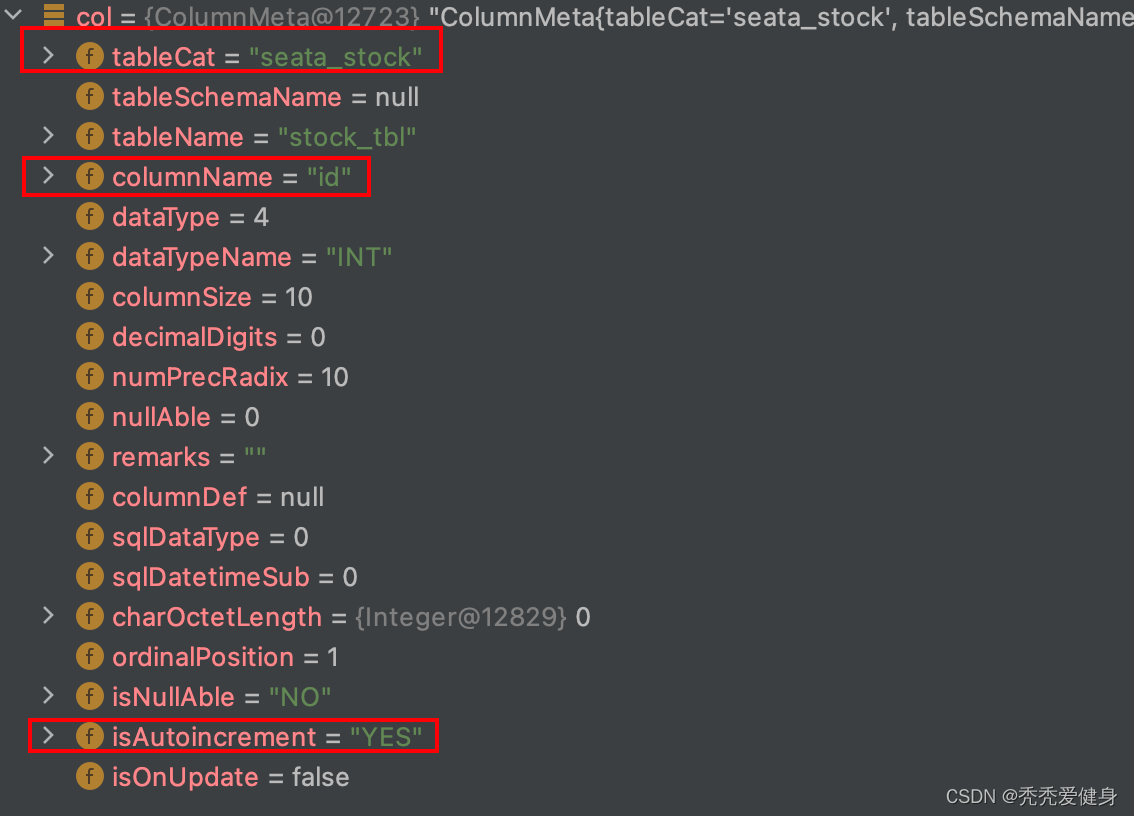
针对业务表的每一列采用
ColumnMeta
对象表示,其中包括:列名、列数据类型、列size、列是否允许为空、列是否自动自增…
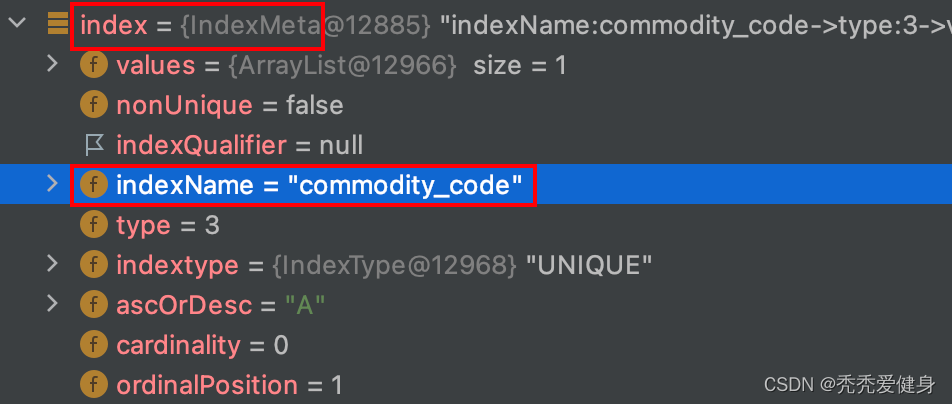
如果业务表中含有索引Index,Seata采用
IndexMeta
对象表示;其中包括:索引名、索引类型、索引是否为唯一索引…
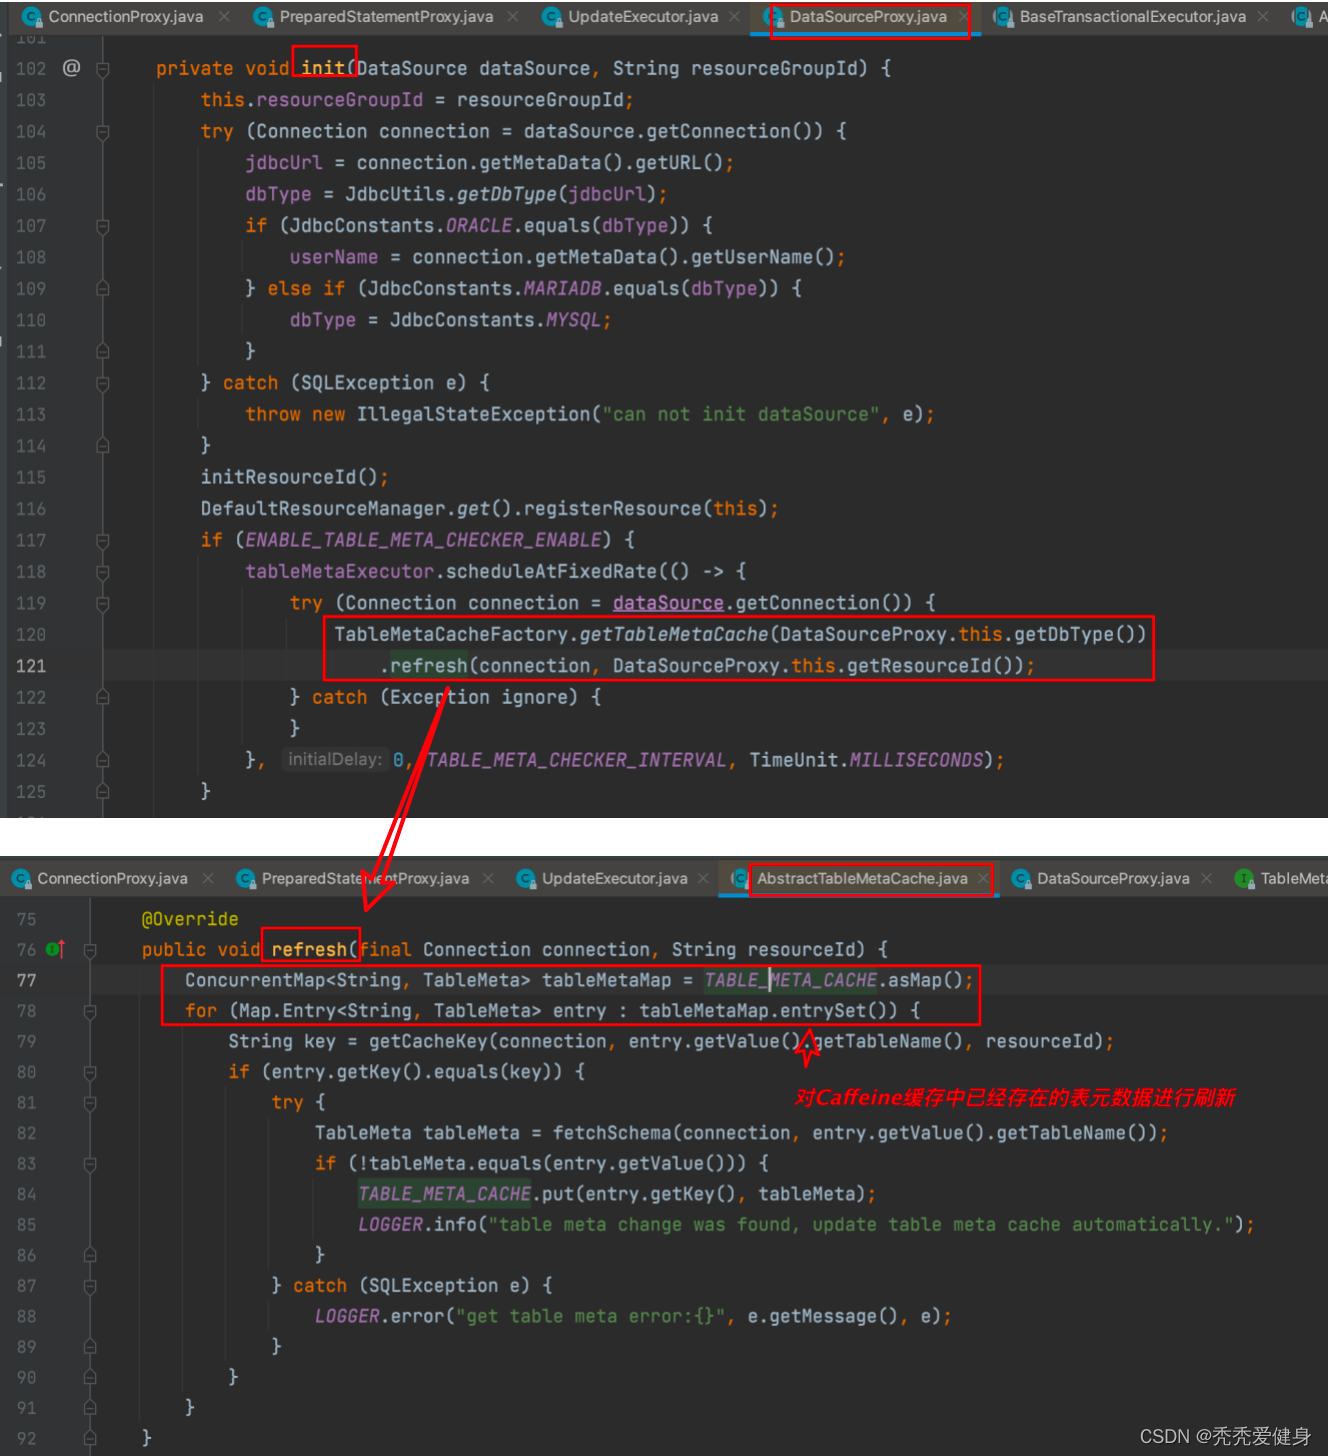
2> Caffeine缓存自动刷新
另外在初始化
DataSourceProxy
时默认会开启TableMetaCache刷新机制、并且每分钟刷新一次:
2)before image查询SQL
就MYSQL中的更新语句而言,构建before image的查询SQL体现在UpdateExecutor#buildBeforeImageSQL()中:
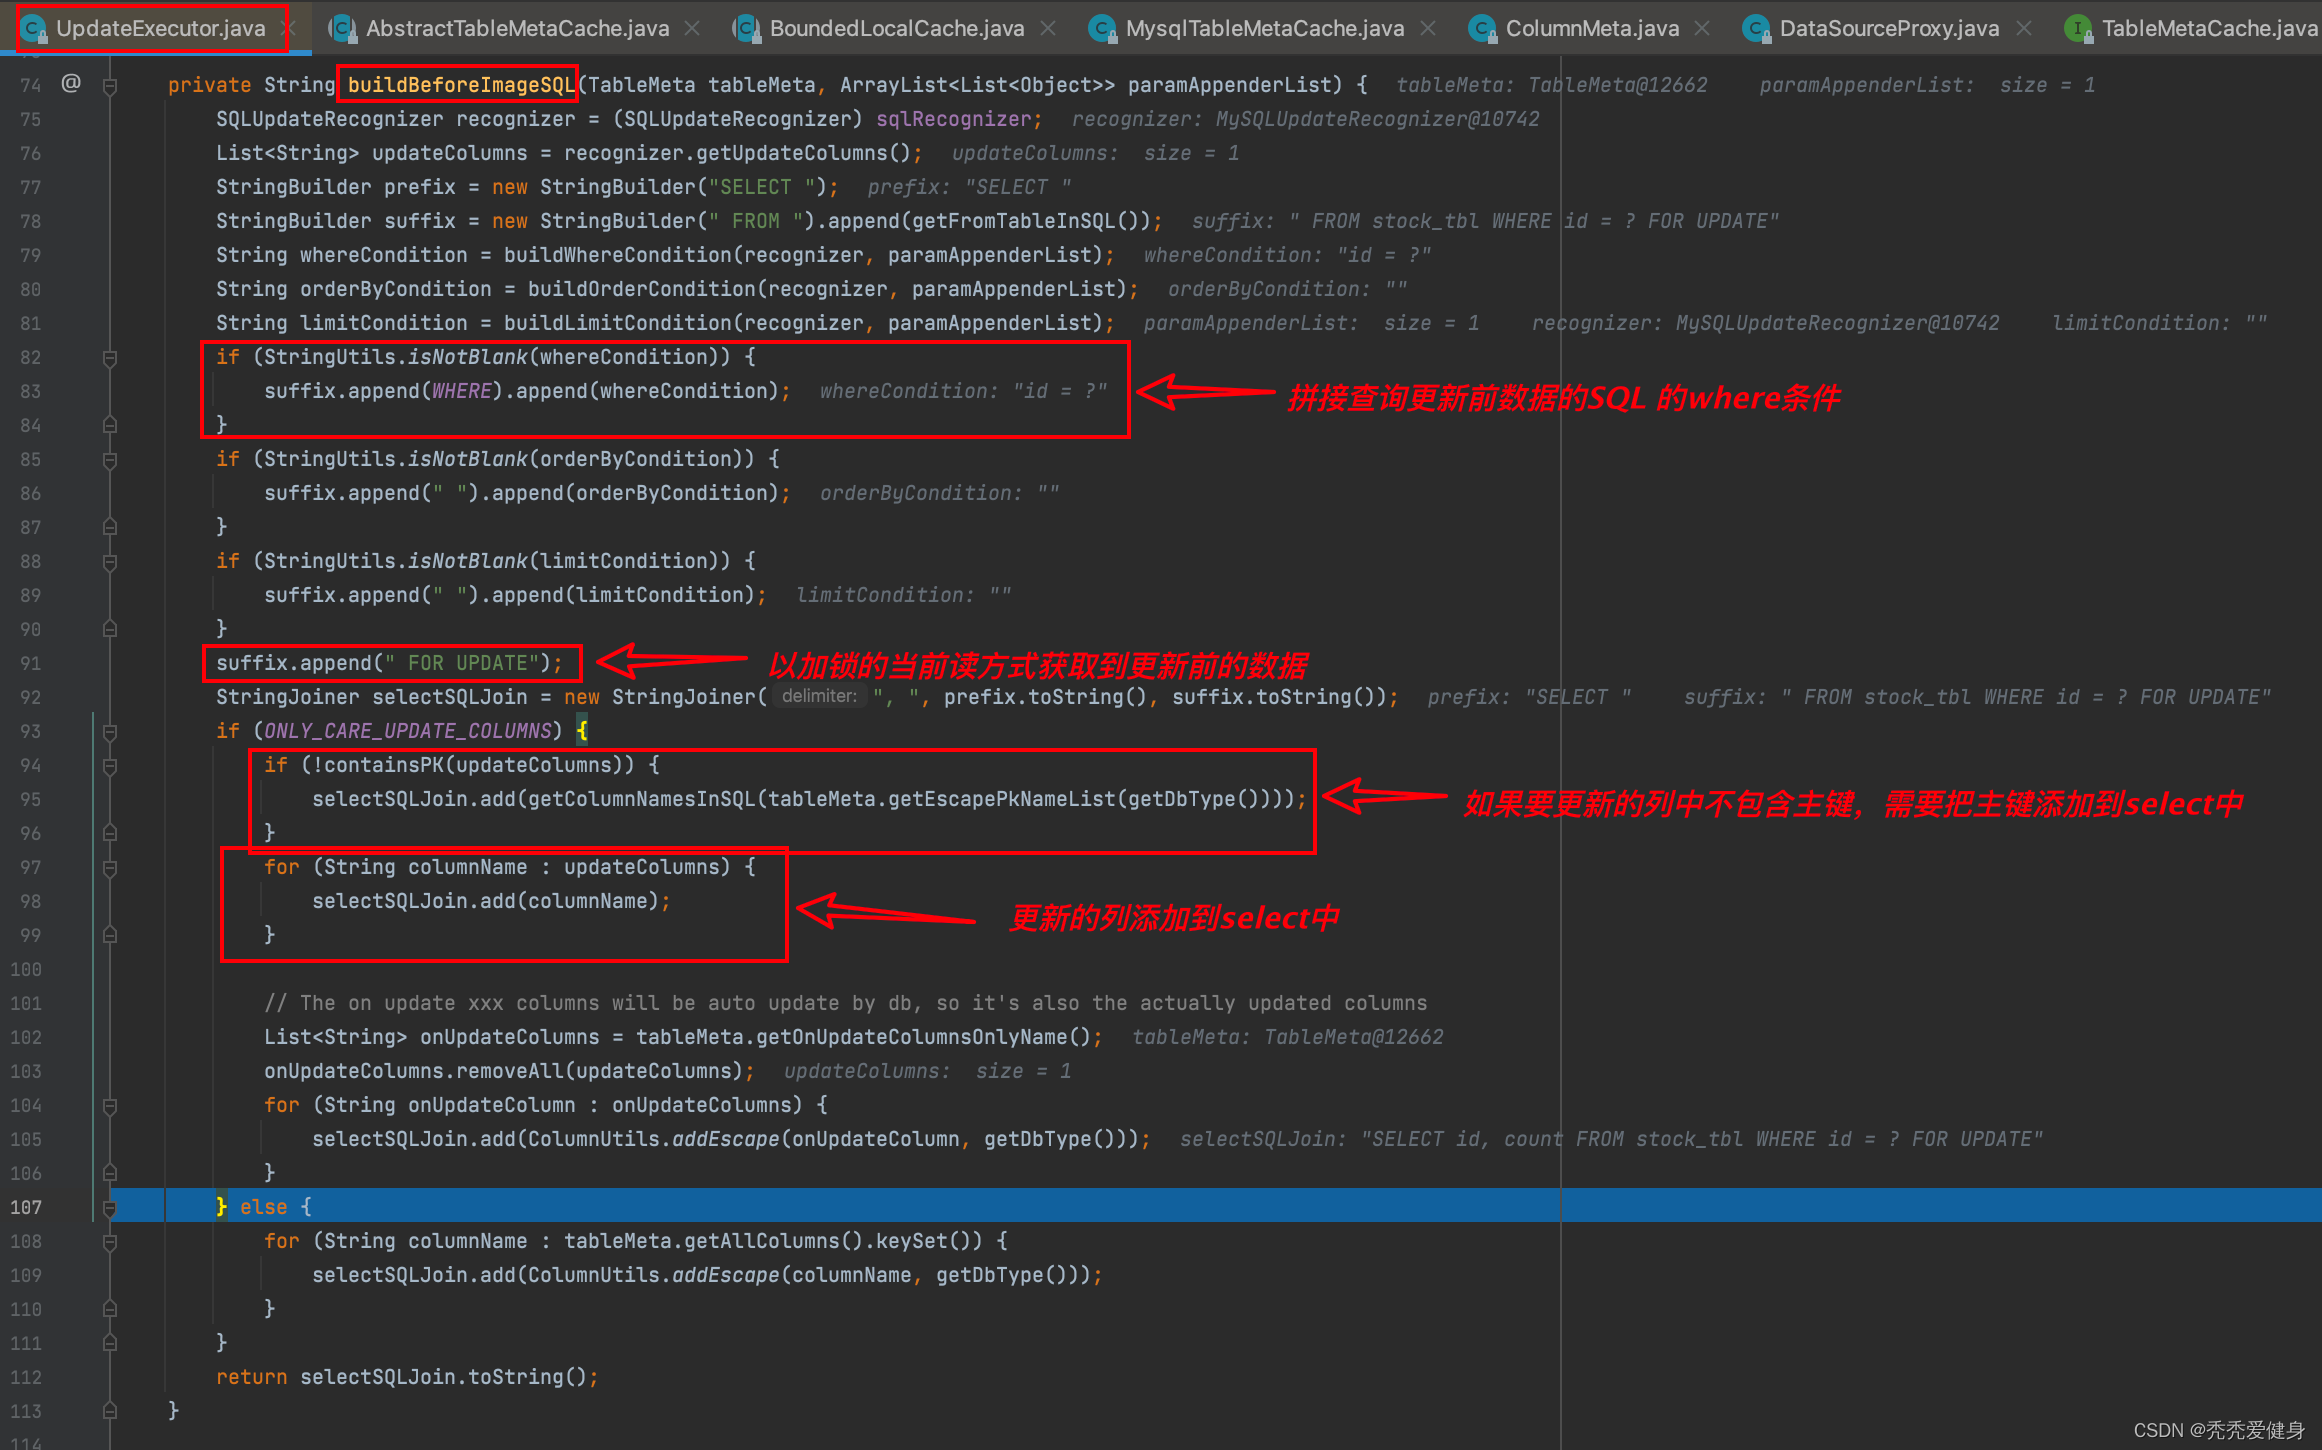
以
update stock_tbl set count=? where id=?
为例:
- 首先查询的SQL的前缀prefix为
SELECT;查询SQL的后缀suffix为FROM stock_tbl;- 如果业务SQL存在where条件,则将查询的where条件拼接到查询SQL的后缀;此时后缀为
FROM stock_tbl where id = ?;- 如果业务SQL存在order by 条件,则将查询的order by 条件拼接到查询SQL的后缀;
- 如果业务SQL存在limit 条件,则将查询的limit 条件拼接到查询SQL的后缀;
- 查询更新前的表记录采用加锁的当前读方式,即在查询SQL的后缀suffix中拼接
FOR UPDATE;此时后缀为:FROM stock_tbl where id = ? FOR UPDATE;- 如果要更新的字段中不含有主键,则将主键列添加到select中,此时查询SQL为:
SELECT id FROM stock_tbl where id = ? FOR UPDATE;- 最后再将所有要更新的字段,添加到select中,次数查询SQL为:
SELECT id, count FROM stock_tbl where id = ? FOR UPDATE;
3)构建before表记录TableRecords
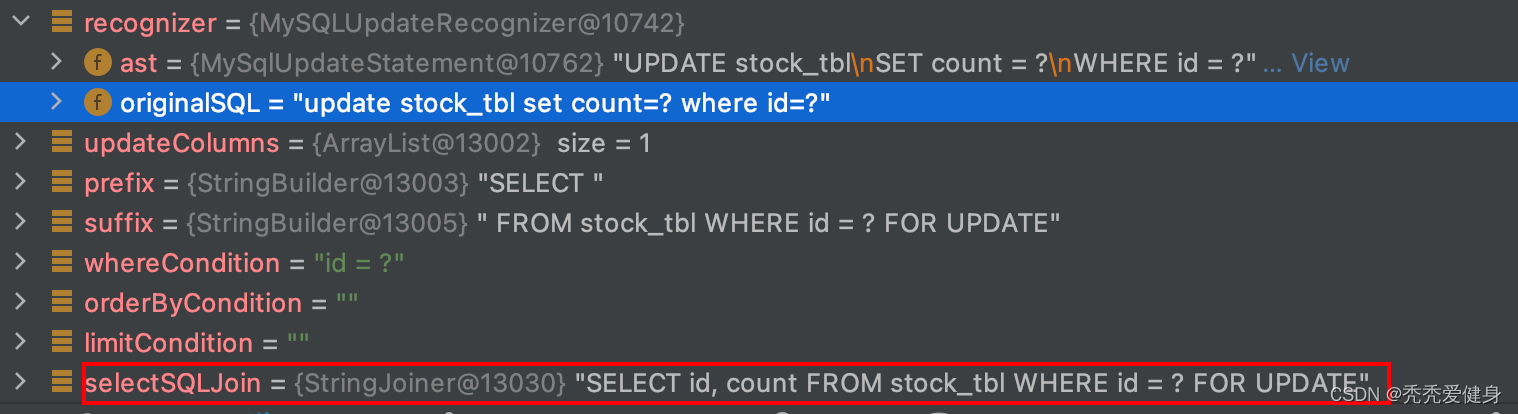
根据构建出来的before image查询SQL:
SELECT id, count FROM stock_tbl where id = ? FOR UPDATE
,和占位符的参数值列表
paramAppenderList
构建出真正的查询SQL(
SELECT id, count FROM stock_tbl where id = 1 FOR UPDATE
):
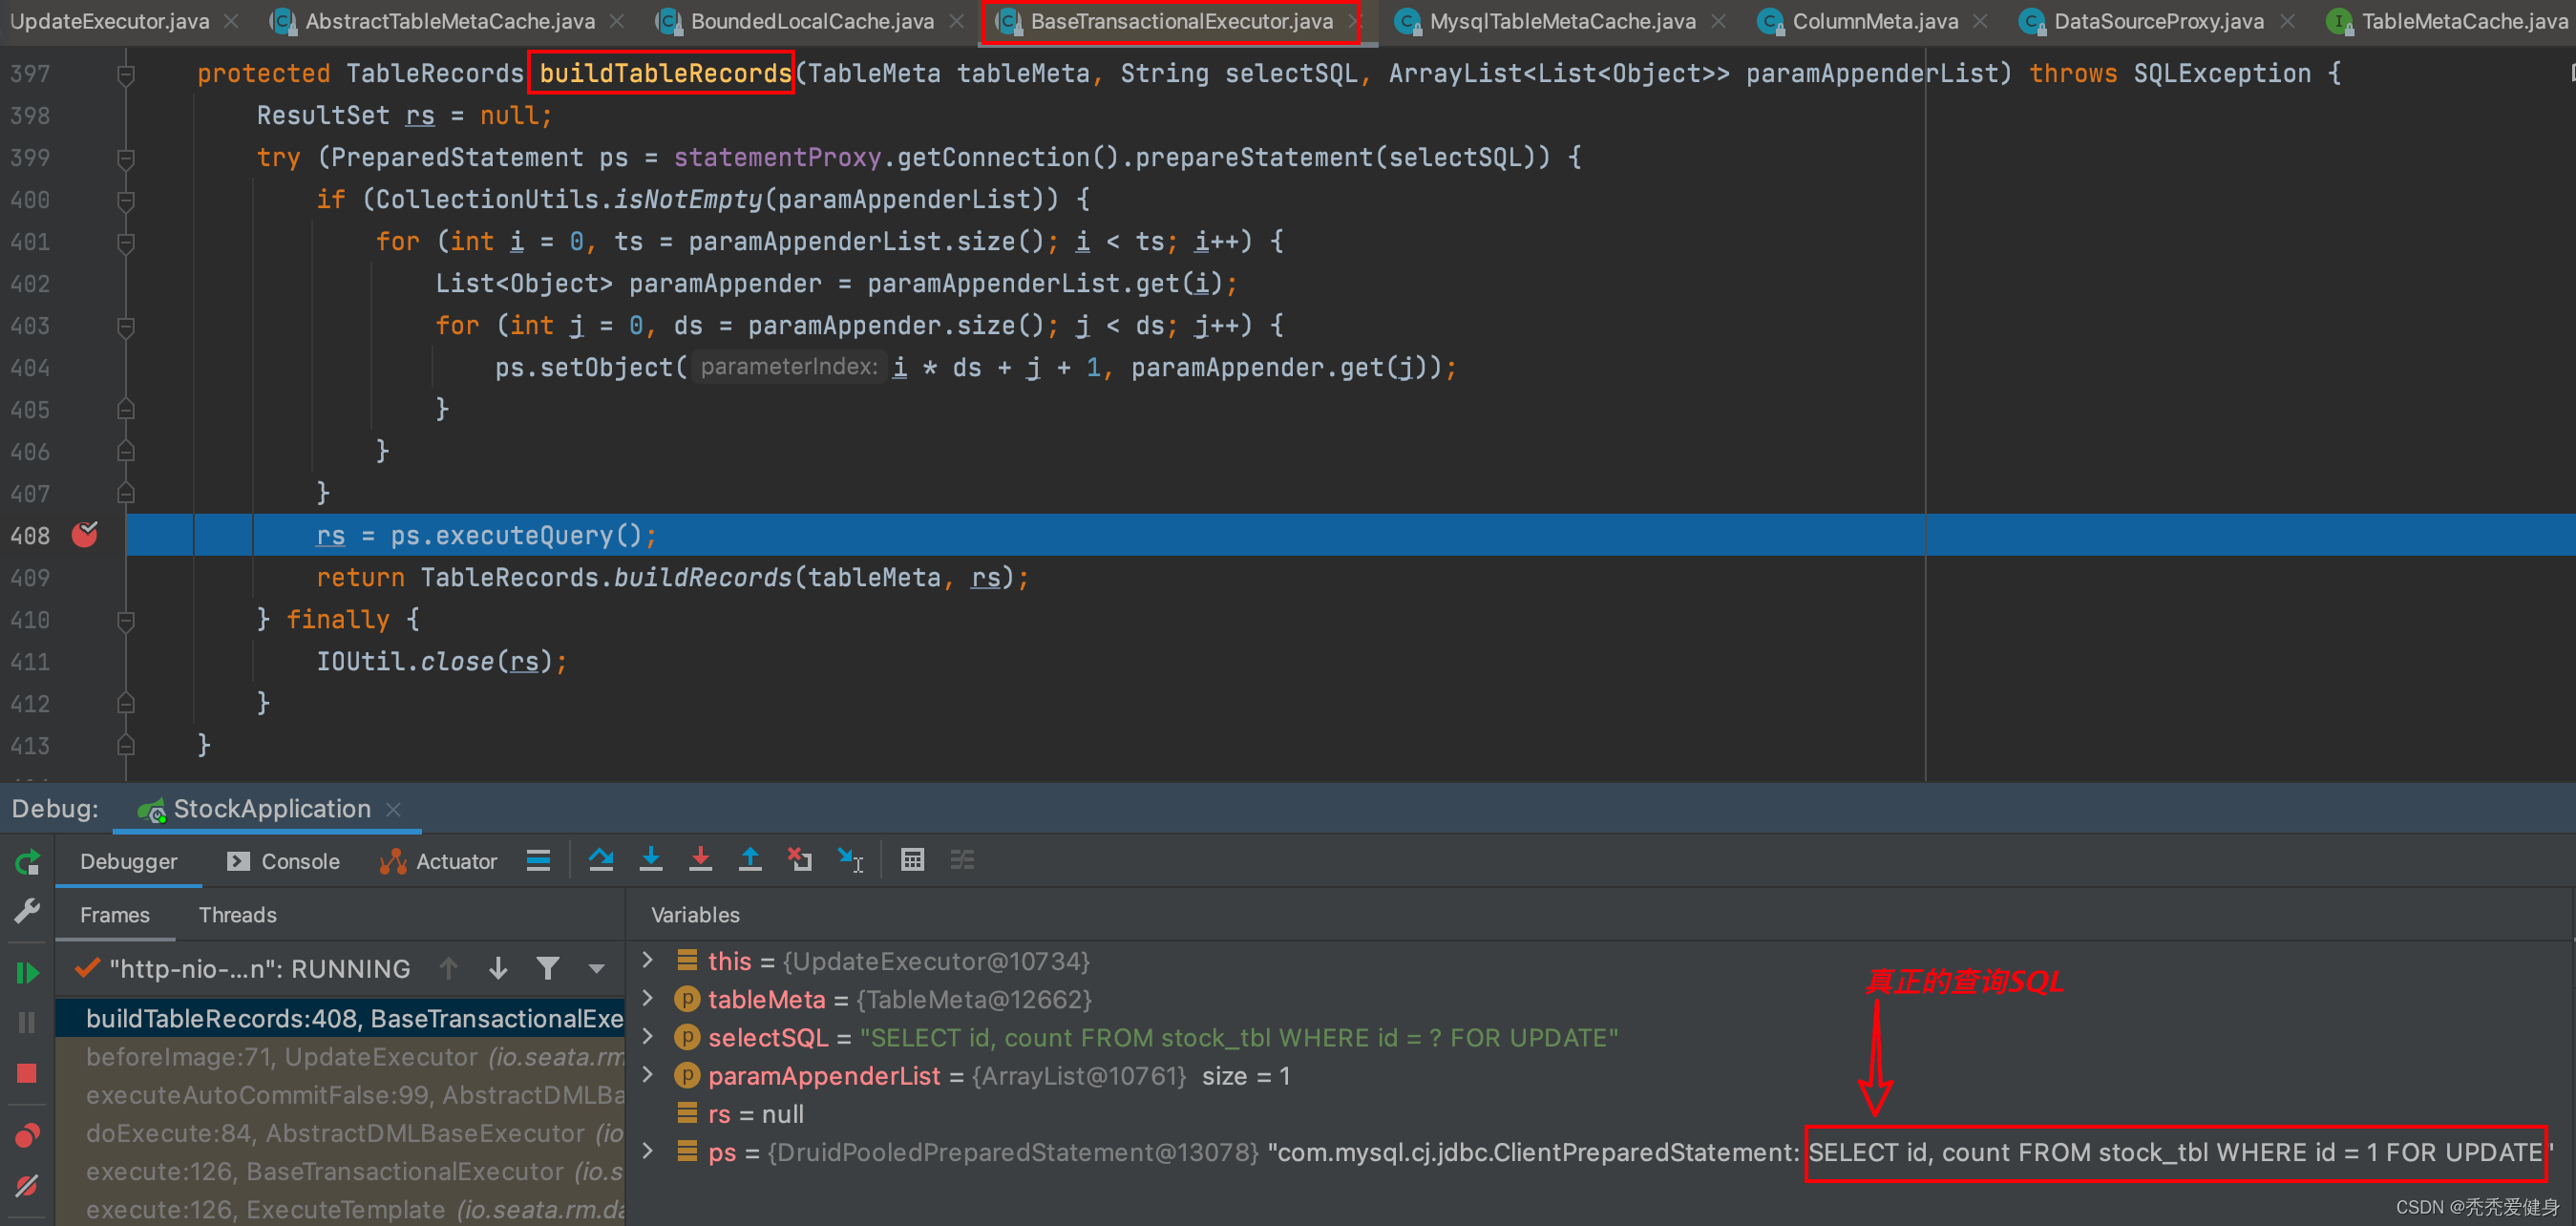
再然后before image查询SQL查询出的结果构建行记录:

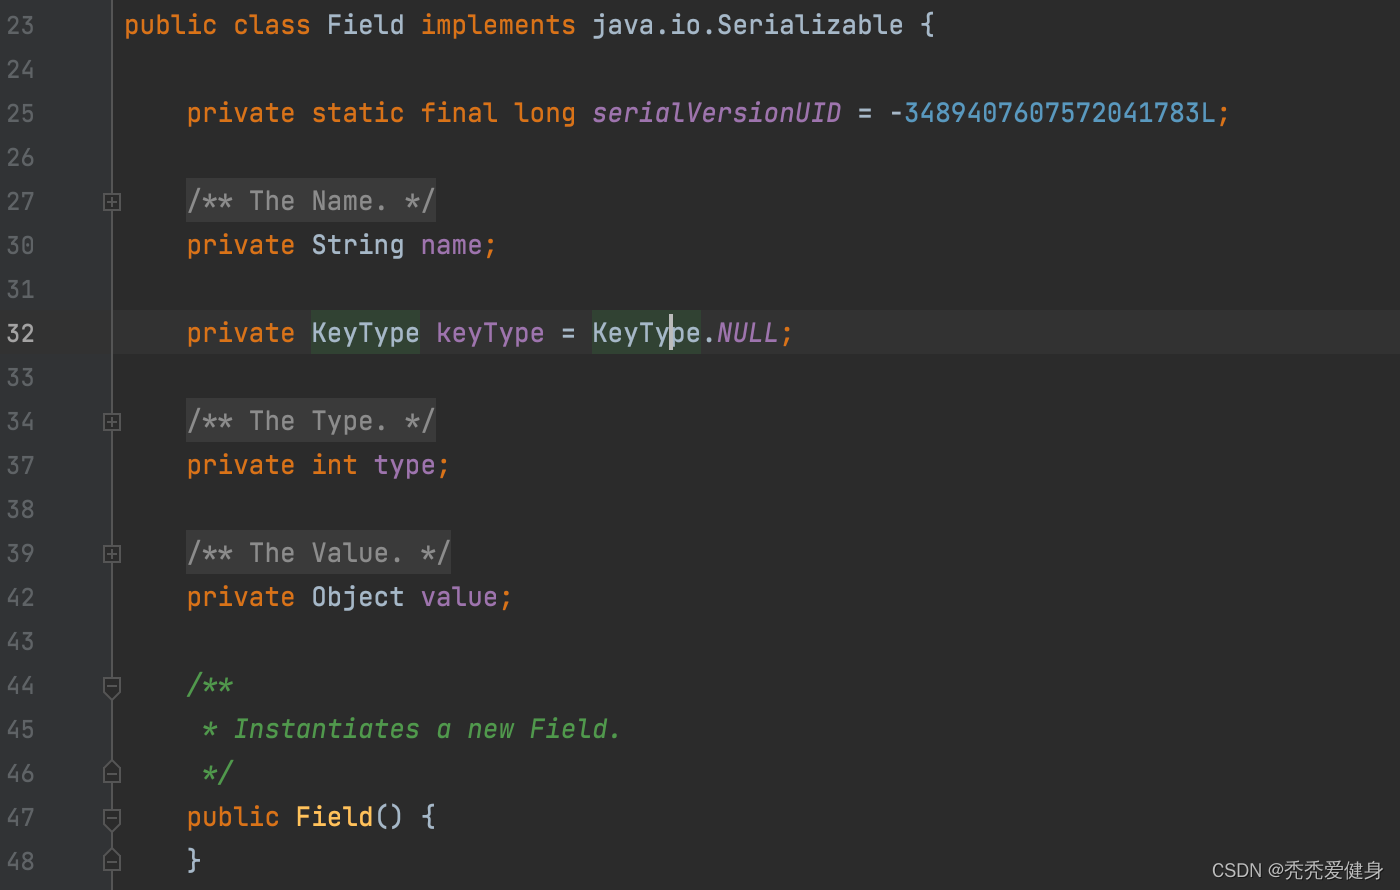
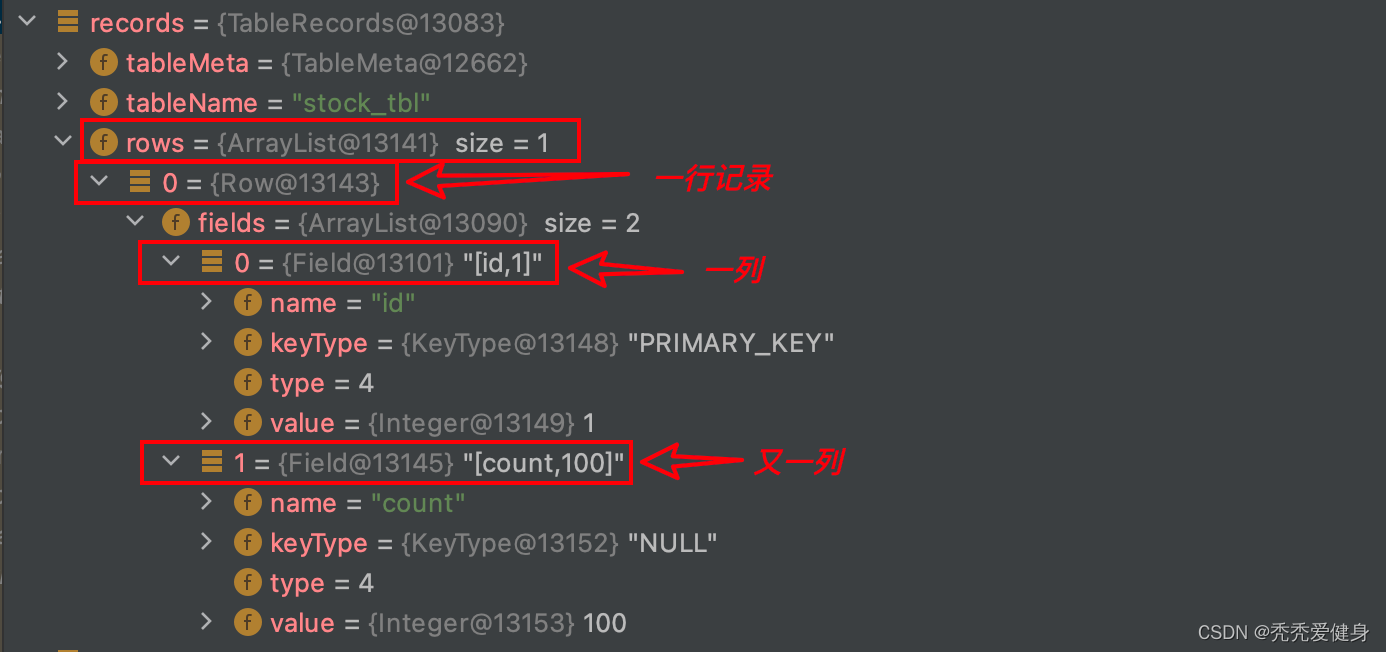
针对Before Image中的每一行记录采用Row对象保存,每一列采用Field对象保存,Row和Field是一对多的关系,即一行中可以有很多列。
- Row由Field集合组合;

- Field中包含四个信息:列名、列是否为主键(默认是NULL)、数据类型、数据值;
样例数据如下:
至此,before image就构建完了。
2、after image的构建
after image 的构建和before image的构建几乎一样,此处不做过多冗余介绍,感兴趣可以自行跟一下源码。
3、before image 和 after image封装到SqlUndoLog
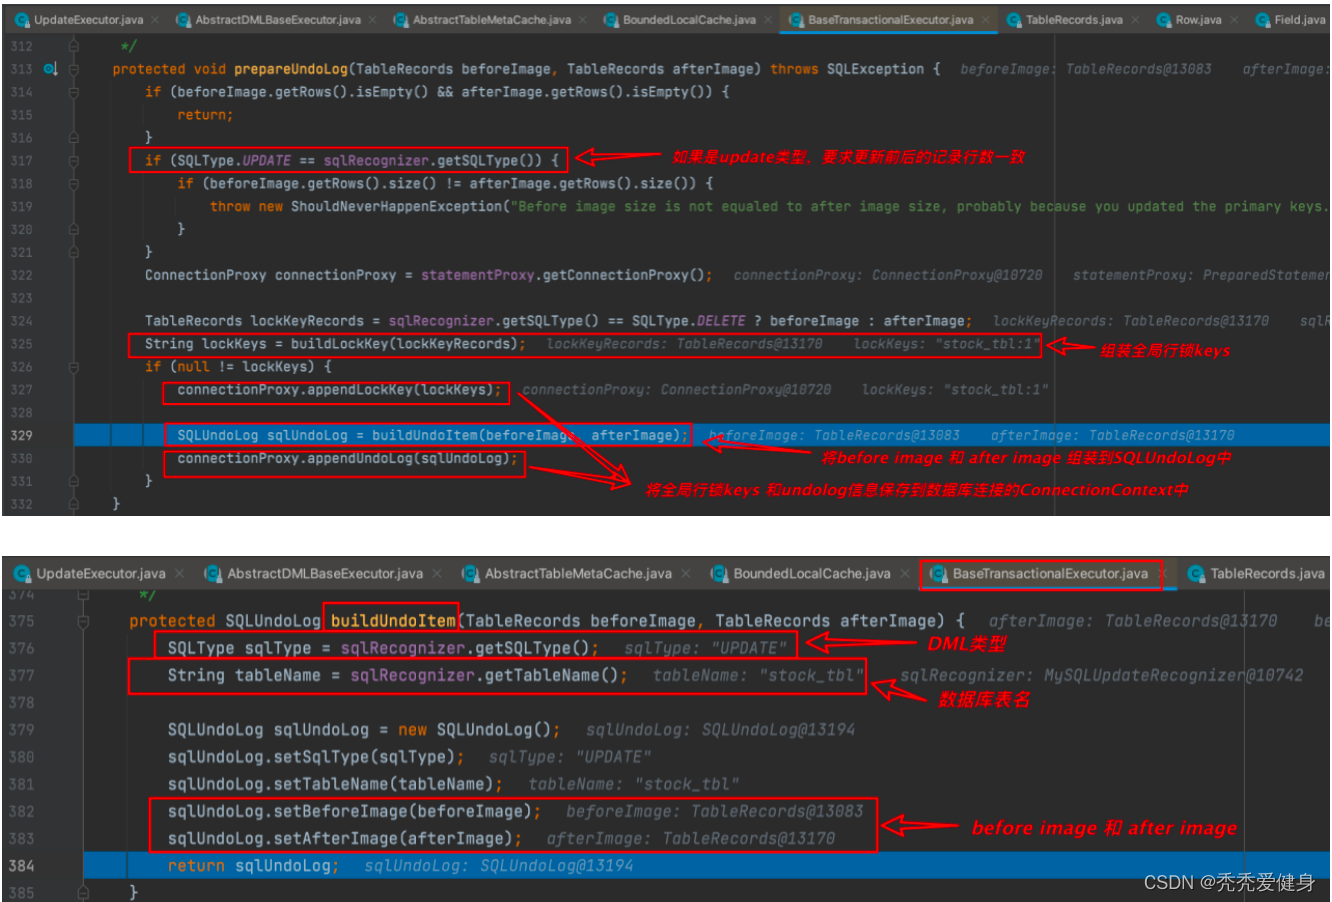
最终before image 、after image会和DML类型、数据表名一起封装到SQLUndoLog对象中,
然后保存到当前数据库连接的上下文ConnectionContext中;于此同时也会将需要占用的全局行锁keys保存到当前数据库连接的上下文ConnectionContext中。
三、持久化undo log
在本地事务提交的过程中:将分支事务注册到全局事务之后,会将SQL执行阶段准备好的undo log进行持久化、最后在提交本地事务。
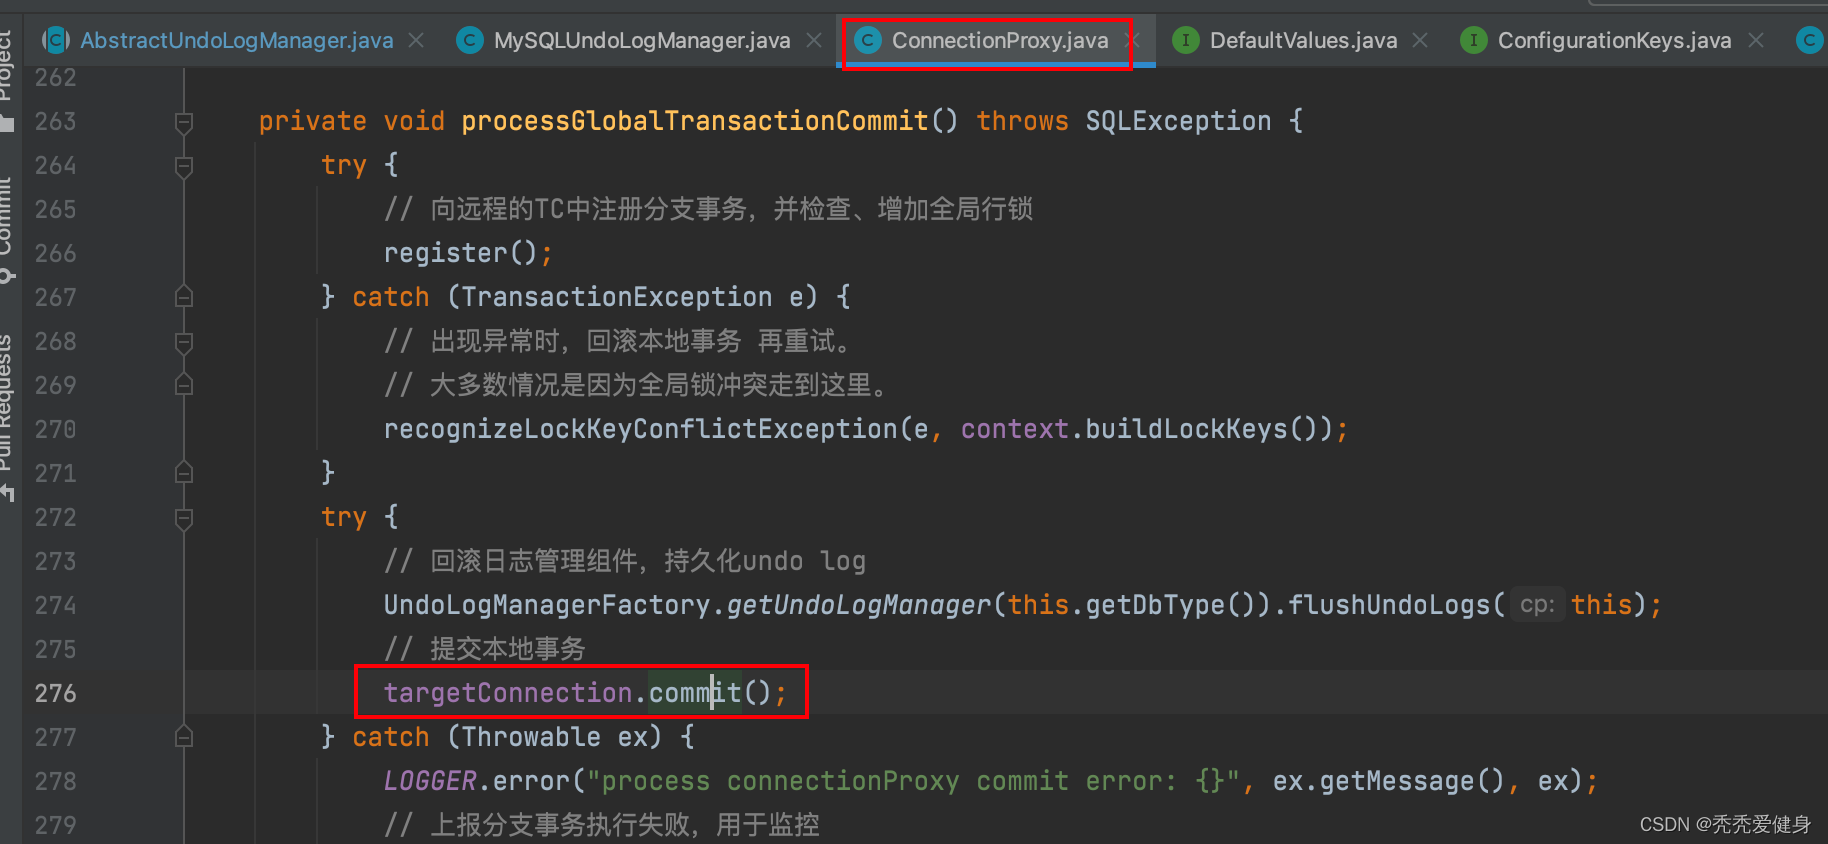
以全局事务的方式的提交本地事务的逻辑体现在:ConnectionProxy#processGlobalTransactionCommit()方法:
privatevoidprocessGlobalTransactionCommit()throwsSQLException{try{// 向远程的TC中注册分支事务,并检查、增加全局行锁register();}catch(TransactionException e){// 出现异常时,回滚本地事务 再重试。// 大多数情况是因为全局锁冲突走到这里。recognizeLockKeyConflictException(e, context.buildLockKeys());}try{// 回滚日志管理组件,持久化undo logUndoLogManagerFactory.getUndoLogManager(this.getDbType()).flushUndoLogs(this);// 提交本地事务
        targetConnection.commit();}catch(Throwable ex){
        LOGGER.error("process connectionProxy commit error: {}", ex.getMessage(), ex);// 上报分支事务执行失败,用于监控report(false);thrownewSQLException(ex);}// 上报分支事务执行成功,默认不会上报if(IS_REPORT_SUCCESS_ENABLE){report(true);}// 重置连接的ConnectionContext
    context.reset();}
以全局事务的方式提交本地事务会做四件事:
- 通过netty请求TC,注册分支事务,并检查、增加全局行锁; - 如果出现异常,则回滚本地事务。若异常类型为全局锁冲突
LockConflictException,则进入重试策略;其他异常类型则直接抛出SQLException;- 将执行SQL时保存到ConnectionContext中的undo log 回滚日志 保存到DB;
- 提交本地事务,真正将业务数据和回滚日志 持久化到DB;
- 向TC上报本地事务提交结果; - 如果持久化undo log 或 提交本地事务出现异常,则上报分支事务执行失败;- 如果本地事务提交成功,上报分支事务执行成功;默认并不会上报。
最后,清空当前数据库连接的ConnectionContext。
1、UndoLogManagerFactory
UndoLogManagerFactory是undoLog管理器的工厂,其中采用策略模式,根据数据库类型选择不同的UndoLogManager;
publicclassUndoLogManagerFactory{privatestaticfinalMap<String,UndoLogManager> UNDO_LOG_MANAGER_MAP =newConcurrentHashMap<>();/**
     * get undo log manager.
     *
     * @param dbType the db type
     * @return undo log manager.
     */publicstaticUndoLogManagergetUndoLogManager(String dbType){returnCollectionUtils.computeIfAbsent(UNDO_LOG_MANAGER_MAP, dbType,
            key ->EnhancedServiceLoader.load(UndoLogManager.class, dbType));}}
2、UndoLogManager
UndoLogManager有三个主要实现:
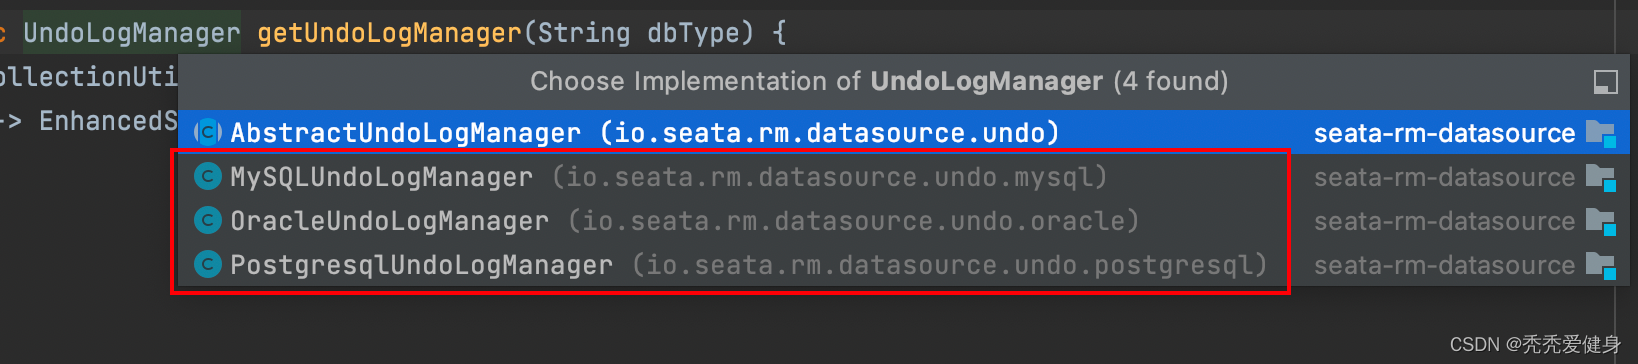
其分别对应数据库:MYSQL、Oracle、PGSQL。
博主seata系列中采用的数据库类型为MYSQL,我们业务上也是用的MySQL,所以此处针对MySQLUndoLogManager展开讨论;
UndoLogManager的三个具体实现中都没有重写
flushUndoLogs()
方法,因此先来看一下
AbstractUndoLogManager
flushUndoLogs()
方法:
@OverridepublicvoidflushUndoLogs(ConnectionProxy cp)throwsSQLException{ConnectionContext connectionContext = cp.getContext();if(!connectionContext.hasUndoLog()){return;}String xid = connectionContext.getXid();long branchId = connectionContext.getBranchId();BranchUndoLog branchUndoLog =newBranchUndoLog();
branchUndoLog.setXid(xid);
branchUndoLog.setBranchId(branchId);
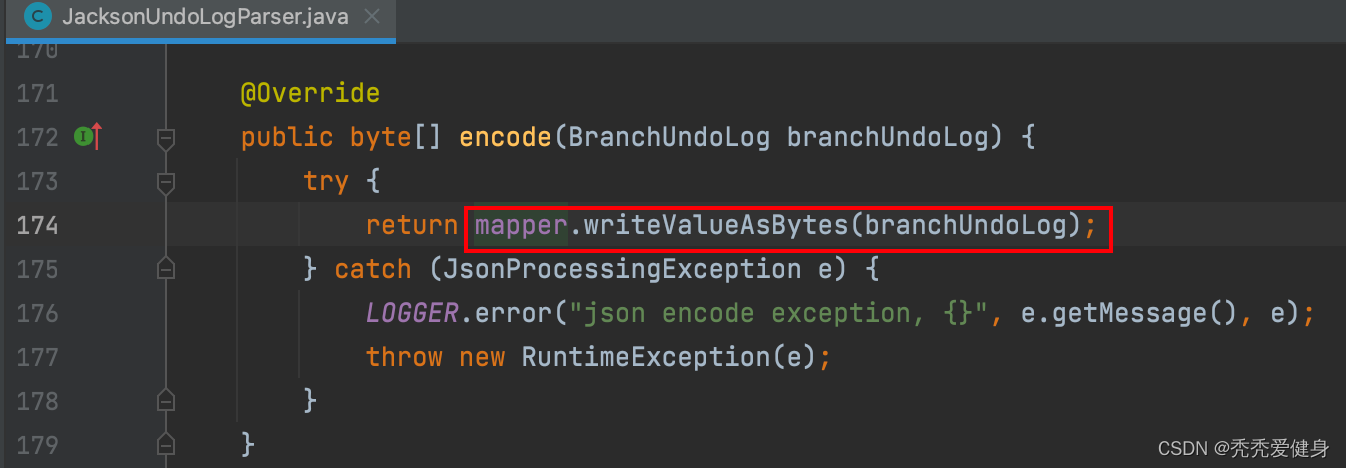
branchUndoLog.setSqlUndoLogs(connectionContext.getUndoItems());// 根据不同的序列化工具(jackson、fastjson、protostuff....),对BranchUndoLog进行编码UndoLogParser parser =UndoLogParserFactory.getInstance();byte[] undoLogContent = parser.encode(branchUndoLog);if(LOGGER.isDebugEnabled()){
LOGGER.debug("Flushing UNDO LOG: {}",newString(undoLogContent,Constants.DEFAULT_CHARSET));}CompressorType compressorType =CompressorType.NONE;// 是否对数据进行压缩if(needCompress(undoLogContent)){
compressorType = ROLLBACK_INFO_COMPRESS_TYPE;
undoLogContent =CompressorFactory.getCompressor(compressorType.getCode()).compress(undoLogContent);}// undo_log持久化insertUndoLogWithNormal(xid, branchId,buildContext(parser.getName(), compressorType), undoLogContent, cp.getTargetConnection());}
方法中会做三件事:
- 根据
seata.client.undo.log-serialization指定的序列化协议对undo log进行编码;- 如果数据需要压缩,则对undo log数据进行压缩;
- 最后,根据DB类型,对undo log进行落表;
1)undo log数据编码
目前最新版本:1.5.2,Seata提供了5种undo log序列化方式:

默认采用的JacksonUndoLogParser,可以通过
seata.client.undo.log-serialization=jackson
参数指定,但需要在seeata client端引入相应序列化协议的maven依赖。
2)undo log数据压缩
如果开启了undo log数据压缩配置(
seata.client.undo.compress.enable=true
),并且undo log数据大小大约开启压缩的阈值(
seata.client.undo.compress.threshold=64K
),则会对undo log进行压缩(默认开启数据压缩,数据压缩的阈值为64K);seata1.5.2目前支持的压缩策略包括:
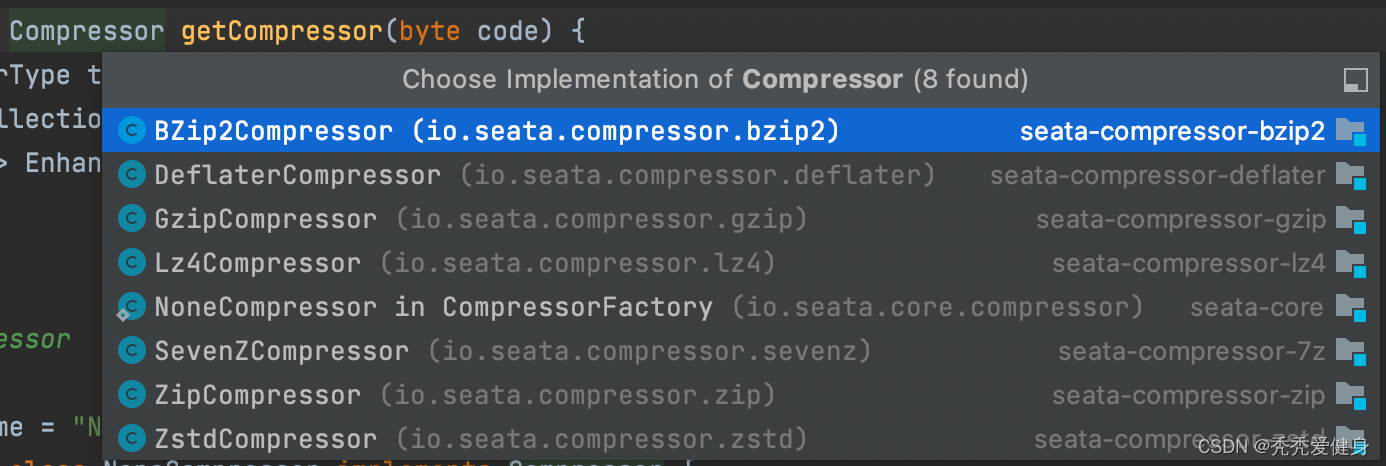
默认采用的
ZipCompressor
,可以通过
seata.client.undo.compress.type=zip
参数指定,但需要在seeata client端引入相应序列化协议的maven依赖。
3)undo log数据落表
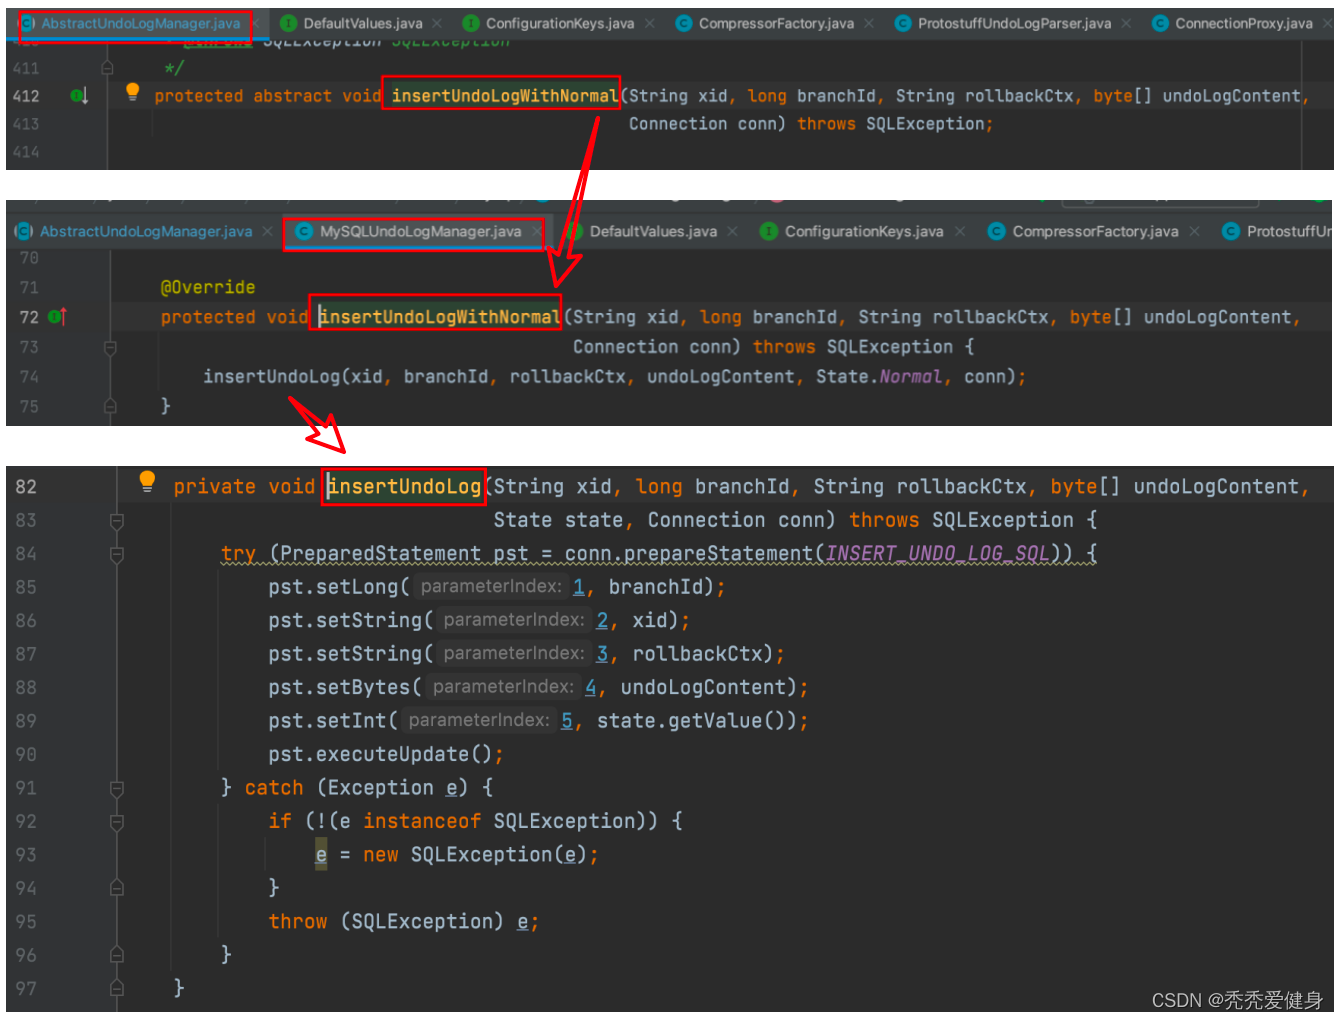
这里直接使用JDBC将分支事务ID、全局事务xid、编码后的undoLogContent…插入到
undo_log
表中。
最后:数据真正落到表中,还需要提交事务,写undolog的本地事务和执行目标SQL的本地事务是同一个,所以最终提交写undolog的本地事务也是如下位置:
四、总结和后续
AT模式下undo log的构建 和 持久化是分两阶段进行的:
- 一阶段:- 在执行业务SQL的同时,会根据业务SQL构建出before image 和 after image镜像数据的查询SQL;- 基于查询SQL的结果,每一列的数据采用
Field对象存储、每一行数据采用Row对象存储,Row和Field对象的关系为一对多;- 由于业务SQL可能设计到多行,所以最终数据镜像采用TableRecords对象存储,TableRecords和Row对象的关系为一对多; - 二阶段:
- 在提交本地业务SQL流程中:将分支事务注册到全局事务之后,会持久化 undo log;最后将本地事务提交。
后续文章我们接着聊全局事务的提交、回滚。
版权归原作者 秃秃爱健身 所有, 如有侵权,请联系我们删除。