Java图形化界面编程(使用AWT)
文章目录
内容概述
先谈谈个人对图形化界面编程的认识,图形化界面编程可以直接的看到每一步操作带来的效果,相对于传统编程盯着黑框框学起来是非常非常有意思的。
再谈谈最后的效果,界面是由
窗口
和
组件
构成的。而组件在窗口内的排列并不是没有章法可言,依赖于
布局管理器
使组件以合适的位置以及合理的排布呈现。排布于窗口内的组件又可以通过
事件监听器
与用户进行交互…
容器Container
什么是容器?容器是特殊的组件。容器是用来装东西的,不仅可以存放组件,也可以用来存放容器,而存放的容器又可以存放容器或组件。听起来有点反复套娃,但学起来还是很容易的!
importjava.awt.*;publicclassWindowDemo{publicstaticvoidmain(String[] args){//创建一个窗口对象Frame frame =newFrame("测试Window窗口");//指定窗口的位置和大小
        frame.setLocation(500,300);
        frame.setSize(500,300);//设置窗口可见
        frame.setVisible(true);}}
importjava.awt.*;publicclassPanelDemo{publicstaticvoidmain(String[] args){//1.创建一个Window对象,因为panel以及其它容器不能独立存在必须依附于WindowFrame frame =newFrame("这里演示panel");//2.创建一个panel对象Panel p =newPanel();//3.创建一个文本框和按钮,并把它们放到Panel中
        p.add(newTextField("测试文本"));
        p.add(newButton("测试按钮"));//4.把panel放入到Window中
        frame.add(p);//5.设置Window得位置及大小
        frame.setBounds(100,100,500,300);//6.设置Window可见
        frame.setVisible(true);}}
importjava.awt.*;publicclassScrollPaneDemo{publicstaticvoidmain(String[] args){Frame frame =newFrame("这是测试ScrollPane");//创建一个ScrollPaneScrollPane sp =newScrollPane(ScrollPane.SCROLLBARS_ALWAYS);//往ScrollPane中添加内容
        sp.add(newTextField("测试文本"));//将ScrollPane加入Frame
        frame.add(sp);
        frame.setBounds(100,100,500,300);
        frame.setVisible(true);}}
Box
Box容器,可以将容纳的组件或容器水平或垂直排列非常有利于模块化构建窗口框架。
frame.pack()
pack()方法可根据窗口内组件的数量以及尺寸自动设置窗口的最佳大小。
使用
Box.createHorizontalBox()
方法创建一个水平Box容器,其存放内容只能水平排列。
使用
Box.createVerticalBox()
方法创建一个垂直Box容器,其存放内容只能垂直排列。
存放内容的间隔使用
Box.createHorizontalGlue()
或
Box.createVerticalGlue()
方法,注意此类间隔的大小会随着窗口拖动而改变。使用
Box.createHorizontalStrut(width)
(
Box.createVerticalStrut(height)
)可以创建在水平(垂直)方向上尺寸不变的间隔。
运行效果: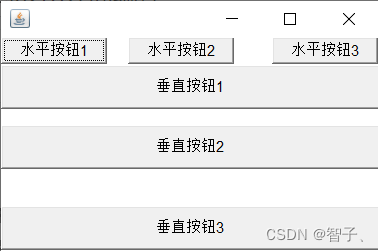
代码:
importjavax.swing.*;importjava.awt.*;publicclassBoxDemo{publicstaticvoidmain(String[] args){Frame frame =newFrame();//创建一个水平BoxBox hbox =Box.createHorizontalBox();
        hbox.add(newButton("水平按钮1"));
        hbox.add(Box.createHorizontalGlue());//尺寸不固定间隔
        hbox.add(newButton("水平按钮2"));
        hbox.add(Box.createHorizontalStrut(30));;//水平方向尺寸不变间隔
        hbox.add(newButton("水平按钮3"));//创建一个垂直BoxBox vbox =Box.createVerticalBox();
        vbox.add(newButton("垂直按钮1"));
        vbox.add(Box.createVerticalGlue());//尺寸不固定间隔
        vbox.add(newButton("垂直按钮2"));
        vbox.add(Box.createVerticalStrut(30));//垂直方向尺寸不变间隔
        vbox.add(newButton("垂直按钮3"));
        frame.add(hbox,BorderLayout.NORTH);
        frame.add(vbox);
        frame.pack();
        frame.setVisible(true);}}
布局管理器
FlowLayout
FlowLayout流式布局管理器,按从左往右从上往下的顺序添加内容。可以自定义间距以及排列方式。
setLayout();
方法可以为指定容器设置布局管理器。
如:frame.setLayout(new FlowLayout(FlowLayout.CENTER,40,20));就是将frame的布局管理器(frame默认为BorderLayout)更改为FlowLayout。
构造方法中
FlowLayout(FlowLayout.CENTER,40,20)
第一个参数为指定排列方式,后两个参数为行间距以及列间距。
FlowLayout.CENTER
表示居中对齐;
FlowLayout.LEFT
表示左对齐;
FlowLayout.RIGHT
表示右对齐。
运行效果(使用流式布局管理器加入9个按钮):
代码:
importjava.awt.*;publicclassFlowLayoutDemo{publicstaticvoidmain(String[] args){Frame frame =newFrame();//1.通过setLayout
        frame.setLayout(newFlowLayout(FlowLayout.CENTER,40,20));for(int i=1;i<=9;i++){
            frame.add(newButton(""+i));}
        frame.pack();
        frame.setVisible(true);}}
BorderLayout
边界布局管理器,Frame和ScrollPane默认使用BorderLayout布局管理器。BorderLayout将区域划分为
中部
(CENTER)、
北部
(NORTH)、
南部
(SOUTH)、
西部
(WEST)和
东部
(EAST)。注意每个区域只能容纳一个组件或容器,在同一区域多次放入组件会造成覆盖。但可以向区域中加入容器,比如向中部加入Panel,再向Panel中加入很多按钮或文本是可以的。
运行效果(区域分布):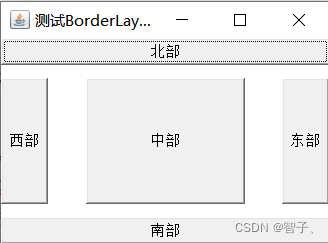
当某一区域不存在时,会由中部区域填充。
代码:
importjava.awt.*;publicclassBorderLayoutDemo{publicstaticvoidmain(String[] args){Frame frame =newFrame("测试BorderLayout");//1.通过setLayout
        frame.setLayout(newBorderLayout(30,10));

        frame.add(newButton("北部"),BorderLayout.NORTH);
        frame.add(newButton("南部"),BorderLayout.SOUTH);
        frame.add(newButton("东部"),BorderLayout.EAST);
        frame.add(newButton("西部"),BorderLayout.WEST);
        frame.add(newButton("中部"));//不添加区域指定,默认中部

        frame.pack();
        frame.setVisible(true);}}
尝试向中部区域加入装有9个按钮的Panel。
运行效果: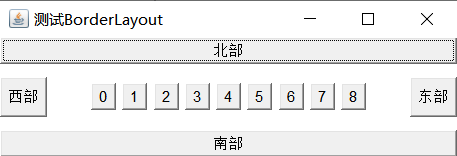
代码:
packageAwt;importjava.awt.*;publicclassBorderLayoutDemo{publicstaticvoidmain(String[] args){Frame frame =newFrame("测试BorderLayout");//1.通过setLayout
        frame.setLayout(newBorderLayout(30,10));

        frame.add(newButton("北部"),BorderLayout.NORTH);
        frame.add(newButton("南部"),BorderLayout.SOUTH);
        frame.add(newButton("东部"),BorderLayout.EAST);
        frame.add(newButton("西部"),BorderLayout.WEST);Panel panel =newPanel();for(int i=0;i<9;i++){
            panel.add(newButton(i+""));}
        frame.add(panel);

        frame.pack();
        frame.setVisible(true);}}
GridLayout
GridLayout网式布局管理器,可以将区域划分为r*c个小区域,GridLayout构造方法
GridLayout(rows,cols,hgap,vgap)
四个参数分别指定了要划分的行、列、水平间距和垂直间距。
在Frame的北部区域放置一个文本框,中部区域存放一个指定布局管理器为网式布局管理器的Panel,并加入按钮组件,会发生什么?
运行效果: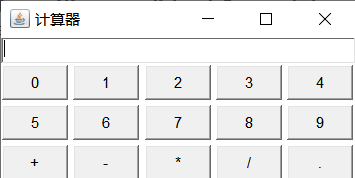
注意:此时的窗口还未加入事件监听,计算器还不能使用。但也快了。
代码:
importjava.awt.*;publicclassGridLayOutDemo{publicstaticvoidmain(String[] args){Frame frame =newFrame("计算器");

        frame.add(newTextField(30),BorderLayout.NORTH);Panel p =newPanel();
        p.setLayout(newGridLayout(3,5,4,4));for(int i =0; i <10; i++){
            p.add(newButton(i+""));}String s ="+-*/.";for(int i=0;i<5;i++){
            p.add(newButton(s.charAt(i)+""));}
        frame.add(p);

        frame.pack();
        frame.setVisible(true);}}
Cardlayout
CardLayout卡片式布局管理器,相当于一叠扑克牌,叠放式分布。
初识事件监听机制,对按钮注册监听,可以达到点击按钮有对应响应的效果。简单了解事件监听后续有详细讲解,其中代码27行
e.getActionCommand()
得到的信息就是按钮上的字符。
运行效果: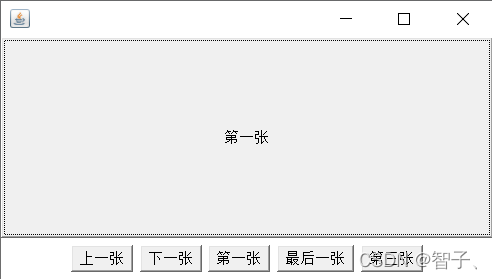
代码:
importjava.awt.*;importjava.awt.event.ActionEvent;importjava.awt.event.ActionListener;publicclassCardLayoutDemo{publicstaticvoidmain(String[] args){Frame frame =newFrame();Panel p =newPanel();CardLayout cardLayout =newCardLayout();
        p.setLayout(cardLayout);String[] names ={"第一张","第二张","第三张","第四张","第五张"};for(int i=0;i<5;i++){
            p.add(names[i],newButton(names[i]));}
        frame.add(p);String[] operat ={"上一张","下一张","第一张","最后一张","第三张"};Panel p2 =newPanel();Button b1 =newButton(operat[0]);Button b2 =newButton(operat[1]);Button b3 =newButton(operat[2]);Button b4 =newButton(operat[3]);Button b5 =newButton(operat[4]);ActionListener listener =newActionListener(){@OverridepublicvoidactionPerformed(ActionEvent e){String actionCommand = e.getActionCommand();switch(actionCommand){case"上一张":
                        cardLayout.previous(p);break;case"下一张":
                        cardLayout.next(p);break;case"第一张":
                        cardLayout.first(p);break;case"最后一张":
                        cardLayout.last(p);break;case"第三张":
                        cardLayout.show(p,"第三张");break;}}};

        b1.addActionListener(listener);
        b2.addActionListener(listener);
        b3.addActionListener(listener);
        b4.addActionListener(listener);
        b5.addActionListener(listener);
        p2.add(b1);
        p2.add(b2);
        p2.add(b3);
        p2.add(b4);
        p2.add(b5);
        frame.add(p2,BorderLayout.SOUTH);
        frame.pack();
        frame.setVisible(true);}}
AWT基本组件
Button
Button:按钮组件,可以单击并作出响应。
TextField
TextField:单行文本框。可以用
set()
和
get()
方法设置和获取文本内容。
TextArea
TextArea:多行文本域。
Choice
Choice:下拉选择框。
Checkbox
复选框组件,也可以单独使用作为单选框组件。
CheckboxGroup
CheckboxGroup:将多个Checkbox组装为一组,每组中只有一个选项可以被选中。
List
List:列表框组件可以添加多项条目。
运行效果: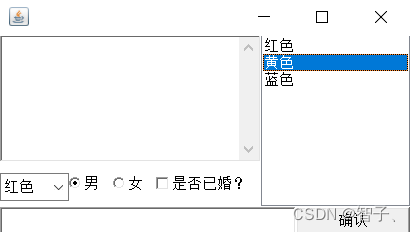
代码:
importjavax.swing.*;importjava.awt.*;publicclassBasicComponentDemo{Frame frame =newFrame();//文本框TextArea ta =newTextArea(5,20);//下拉选择框Choice colorChooser =newChoice();//复选框CheckboxGroup cbg =newCheckboxGroup();Checkbox male =newCheckbox("男",cbg,true);Checkbox famale =newCheckbox("女",cbg,false);Checkbox isMarred =newCheckbox("是否已婚?");//单行文本框TextField tf =newTextField(20);//按钮Button ok =newButton("确认");//列表框List colorList =newList(6,true);publicvoidinit(){Box bBox =Box.createHorizontalBox();//底部
        bBox.add(tf);
        bBox.add(ok);
        frame.add(bBox,BorderLayout.SOUTH);//topLeft
        colorChooser.add("红色");
        colorChooser.add("蓝色");
        colorChooser.add("黄色");Box cBox =Box.createHorizontalBox();
        cBox.add(colorChooser);
        cBox.add(male);
        cBox.add(famale);
        cBox.add(isMarred);Box topLeft =Box.createVerticalBox();
        topLeft.add(ta);
        topLeft.add(cBox);Box top =Box.createHorizontalBox();
        top.add(topLeft);//topRight
        colorList.add("红色");
        colorList.add("黄色");
        colorList.add("蓝色");
        top.add(colorList);//组装
        frame.add(top);

        frame.pack();
        frame.setVisible(true);}publicstaticvoidmain(String[] args){newBasicComponentDemo().init();}}
事件处理
当组件上发生某些操作时会自动触发一段代码的执行。
一个事件的发生是由
事件源
产生事件,
事件监听器
捕获事件最后做出相应的响应(自动执行一段代码)。将事件监听器加入到事件源上的过程称为
注册监听
。
例如:当按钮为
事件源
,添加
myListener
监听器注册监听,事件发生时会自动向单行文本框中添加“Hello world!”。
执行效果: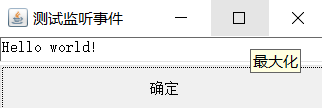
代码:
importjava.awt.*;importjava.awt.event.ActionEvent;importjava.awt.event.ActionListener;publicclassHello{Frame frame =newFrame("测试监听事件");//事件源Button b =newButton("确定");TextField tf =newTextField(30);publicvoidinit(){//监听器MyListener myListener =newMyListener();//注册监听//匿名内部类 事件监听器只与一个事件有关
        b.addActionListener(newActionListener(){@OverridepublicvoidactionPerformed(ActionEvent e){
                tf.setText("Hello world!");}});
        frame.add(tf,BorderLayout.NORTH);
        frame.add(b);
        frame.pack();
        frame.setVisible(true);}//内部类 共同一类事件使用privateclassMyListenerimplementsActionListener{@OverridepublicvoidactionPerformed(ActionEvent e){
            tf.setText("Hello world!");}}publicstaticvoidmain(String[] args){newHello().init();}}
常见的事件监听器
ComponentEvent
:组件事件,当组件尺寸、位置、显示/隐藏状态发生改变时触发事件。
ContainerEvent
:容器事件,当容器里添加删除组件时触发该事件。
WindonEvent
:窗口事件,当窗口状态改变时触发该事件。
FoucusEvent
:焦点事件,当组件得到焦点或失去焦点时触发该事件。
KeyEvent
:键盘事件,当按、松开下键盘时触发该事件。
MouseEvent
:鼠标事件,当单击、松开或移动鼠标时触发该事件。
利用窗口事件写一个可以点击’X’关闭的窗口。
代码:
importjava.awt.*;importjava.awt.event.WindowAdapter;importjava.awt.event.WindowEvent;publicclassWindowDemo{publicstaticvoidmain(String[] args){//创建一个窗口对象Frame frame =newFrame("测试Window窗口");//指定窗口的位置和大小
        frame.setLocation(500,300);
        frame.setSize(500,300);
        frame.addWindowListener(newWindowAdapter(){@OverridepublicvoidwindowClosing(WindowEvent e){System.exit(0);}});//设置窗口可见
        frame.setVisible(true);}}
常见监听器测试:
代码:
importjava.awt.*;importjava.awt.event.*;publicclassListenerDemo{publicstaticvoidmain(String[] args){Frame frame =newFrame();Choice nameChooser =newChoice();
        nameChooser.add("Red");
        nameChooser.add("Yellow");
        nameChooser.add("Blue");//下拉选择框添加ItemListener 监听条目变化
        nameChooser.addItemListener(newItemListener(){@OverridepublicvoiditemStateChanged(ItemEvent e){Object item = e.getItem();System.out.println("当前所选条目为:"+item);}});TextField tf =newTextField(30);
        tf.addTextListener(newTextListener(){@OverridepublicvoidtextValueChanged(TextEvent e){String s = tf.getText();System.out.println("文本框内容为:"+s);}});

        frame.add(nameChooser,BorderLayout.WEST);
        frame.add(tf);

        frame.addWindowListener(newWindowAdapter(){@OverridepublicvoidwindowClosing(WindowEvent e){System.exit(0);}});

        frame.pack();
        frame.setVisible(true);}}
开发一个简单计算器
Frame
NORTH
区域放置
TextField
组件,将指定为4行5列
GridLayout布局管理器
的Panel放置于Frame
中部区域
,其中填充操作符和操作数
按钮
。
按钮
触发事件源,对按钮添加
ActionListener
注册监听。自定义NumListener(操作数监听类)、OperatListener(操作符监听类)、EqualListener(’=‘符监听类)和匿名内部类(如b[11]’-'符监听类)分情况对按钮事件进行监听并响应。
注意:整数、浮点、负数以及连续运算均可以。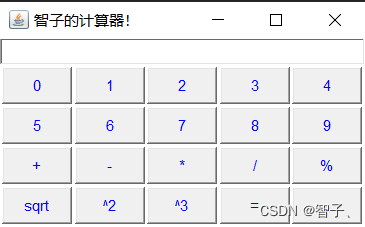
代码:
importjava.awt.*;importjava.awt.event.ActionEvent;importjava.awt.event.ActionListener;importjava.awt.event.WindowAdapter;importjava.awt.event.WindowEvent;importstaticjava.awt.Color.blue;publicclassCalculation{//操作数double x,y;String op;boolean flag;Frame frame =newFrame("智子的计算器!");TextField tf =newTextField(30);Button[] b =newButton[20];publicvoidinit(){//北部区域放置文本框
        frame.add(tf,BorderLayout.NORTH);Panel panel =newPanel();
        panel.setLayout(newGridLayout(4,5,2,2));//设置按钮String s ="+-*/%";for(int i=0;i<10;i++){//运算数
            b[i]=newButton(i +"");
            b[i].setForeground(blue);}for(int i=0;i<5;i++){//运算符
            b[i+10]=newButton(s.charAt(i)+"");
            b[i+10].setForeground(blue);}String[] t ={"sqrt","^2","^3","=","."};for(int i=0;i<5;i++){
            b[i+15]=newButton(t[i]);
            b[i+15].setForeground(blue);}//按钮注册监听for(int i =0; i <10; i++){//操作数注册监听
            b[i].addActionListener(newNumListener());}for(int i =10; i <18; i++){//操作符注册监听if(i==11)continue;
            b[i].addActionListener(newOperatListener());}
        b[11].addActionListener(newActionListener(){@OverridepublicvoidactionPerformed(ActionEvent e){if(!flag){
                    tf.setText("-");
                    flag =true;}else{
                    x =Double.parseDouble(tf.getText());
                    op = e.getActionCommand();
                    flag =false;}}});//“=”注册监听
        b[18].addActionListener(newEqualListener());//“back”注册监听
        b[19].addActionListener(newNumListener());//将按钮加入panelfor(int i =0; i <20; i++){
            panel.add(b[i]);}//设置中部按钮
        frame.add(panel);//窗口监听器 注册监听
        frame.addWindowListener(newWindowAdapter(){@OverridepublicvoidwindowClosing(WindowEvent e){System.exit(0);}});//设置窗口最优并可见
        frame.pack();
        frame.setVisible(true);}//数字按钮监听器类publicclassNumListenerimplementsActionListener{@OverridepublicvoidactionPerformed(ActionEvent e){String t = e.getActionCommand();String s = tf.getText();if(flag==false)
                tf.setText(t);else
                tf.setText(s+t);
            flag =true;}}//操作符按钮监听器类publicclassOperatListenerimplementsActionListener{@OverridepublicvoidactionPerformed(ActionEvent e){
            x =Double.parseDouble(tf.getText());
            op = e.getActionCommand();
            flag =false;}}//等号按钮监听器类publicclassEqualListenerimplementsActionListener{@OverridepublicvoidactionPerformed(ActionEvent e){
            y =Double.parseDouble(tf.getText());
            flag =true;switch(op){case"+":tf.setText(x+y+"");break;case"-":tf.setText(x-y+"");break;case"*":tf.setText(x*y+"");break;case"/":if(y!=0)
                        tf.setText(x/y+"");else
                        tf.setText("inf");break;case"%":tf.setText(x%y+"");break;case"sqrt":tf.setText((int)Math.sqrt(x)+"");break;case"^2":tf.setText(y*y+"");break;case"^3":tf.setText(y*y*y+"");break;}}}publicstaticvoidmain(String[] args){newCalculation().init();}}
版权归原作者 智子、 所有, 如有侵权,请联系我们删除。